


XRM47BT
INSTALLATION/OWNER'S MANUAL
AM/FM Receiver with Bluetooth / Fixed Face
XRM47BT INSTALLATION
Preparation
Please read entire manual before installation.
Before You Start
•Disconnect negative battery terminal. Consult a qualified technician for instructions.
•Avoid installing the unit where it would be subject to high temperatures, such as from direct sunlight, or where it would be subject to dust, dirt or excessive vibration.
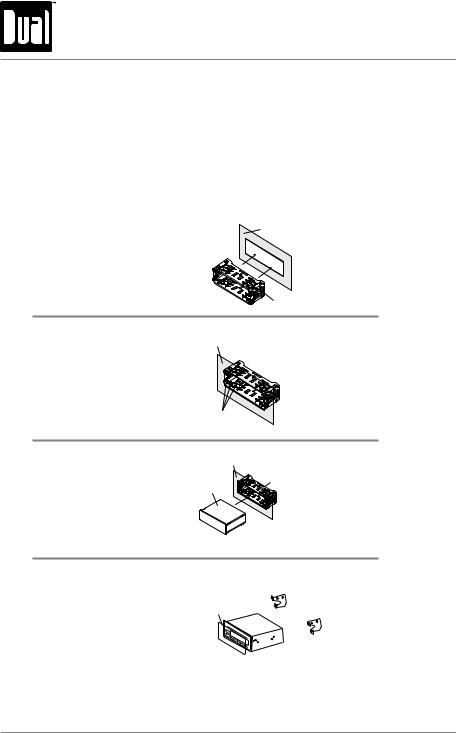
Mounting the Head Unit:
Typical DIN mounting
Step 1:
Insert the mounting sleeve into the installation kit or dashboard.
Single DIN
Dashboard or
Installation Kit
Mounting Sleeve
Step 2:
Bend multiple mounting tabs around the mounting sleeve until the mounting sleeve is secure.
Single DIN
Dashboard or Installation Kit
Mounting Sleeve
Mounting Tabs
Step 3:
Connect all wiring harnesses and slide the head unit into the mounting sleeve until it clicks into place.
Single DIN
Dashboard or Installation Kit
Mounting Sleeve
Head Unit
Mounting the Head Unit: ISO mounting
Using the existing brackets or the brackets supplied with the installation kit, mount the brackets to the sides of the head unit with the screws supplied with the head unit.
Single DIN
Decorative |
Existing |
|
Bezel |
||
Brackets |
||
|
||
|
New |
|
|
Radio |
2
XRM47BT INSTALLATION
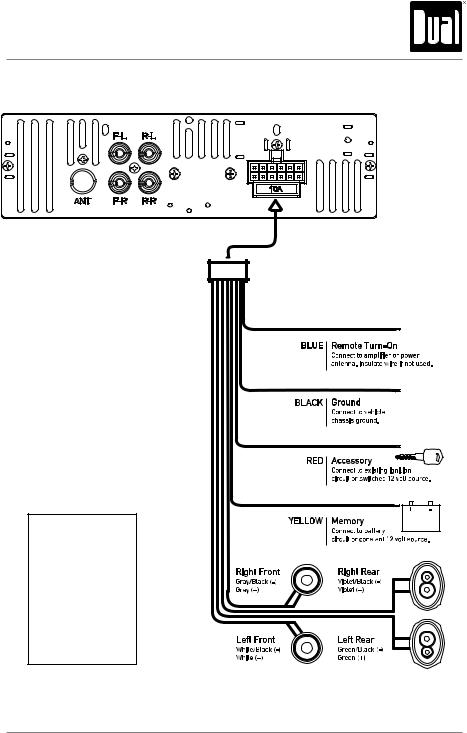
Wiring Diagram
FUSE
When replacing the fuse, make sure new fuse is the correct type and amperage. Using an incorrect fuse could
damage the radio. The unit uses
one 10 amp ATM fuse located beside the Heat Sink
3

XRM47BT OPERATION
Control Locations
1 |
2 |
3 |
4 |
5 |
6 |
18 |
17 |
16 |
15 |
14 |
13 |
12 |
11 |
10 |
9 |
8 |
7 |
1 |
Power |
7 Auxiliary Input |
|
13 |
Preset 1 / Play/Pause |
||
2 |
Band |
8 Preset 6 / Folder Up |
14 |
Display |
|||
3 |
Mute |
9 Preset 5 / Folder Down |
15 |
Mode |
|||
4 |
Volume Knob |
10 Preset 4 / Random |
16 |
Reset |
|||
5 |
AS/PS |
11 Preset 3 / Repeat |
17 |
Tune Up |
|||
6 |
USB Port |
12 Preset 2 / Intro |
|
18 |
Tune Down |
||
|
1 |
2 |
|
|
|
|
|
|
|
3 |
1 |
Mode |
|
10 |
Preset 6 / Folder Up |
17 |
|
4 |
2 |
Volume Up |
11 |
Mute |
|
|
5 |
3 |
Power |
|
12 |
AS/PS |
|
|
|
|
|||||
|
|
4 |
Audio |
|
|
|
|
16 |
|
6 |
|
13 |
Preset 5 / Folder Down |
||
|
|
5 |
Tune Up |
|
14 |
Preset 4 / Random |
|
15 |
|
7 |
|
||||
|
|
6 |
Volume Down |
15 |
Preset 1 / Play / Pause |
||
14 |
|
|
|||||
|
8 |
7 |
Band |
|
16 |
|
|
|
|
|
Bluetooth Talk |
||||
13 |
|
|
|
||||
|
9 |
8 |
Preset 3 / Repeat |
17 |
Tune Down |
||
|
|
||||||
12 |
|
10 |
9 |
Preset 2 / |
Intro |
|
|
|
|
|
|
|
|
|
|
|
|
11 |
|
|
|
|
|
4 |
|
|
|
|
|
|
|

XRM47BT OPERATION
General Operation
Power On/Off Press the  button to turn the unit on. Press
  again to turn the unit off.
Changing Modes Press MODE to select between Radio, USB, Auxiliary Input and Bluetooth. Modes of operation are shown in the display.
Volume Adjust volume using the volume knob (00-43).
Mute Press to silence the audio. Press again to resume listening at the previously selected volume.
Auxiliary Inputs Insert a 3.5mm cable in the unit's front AUX port.
Reset Press the RESET button to reset the unit back to the factory settings if abnormal operation occurs. The reset button is located on the front panel.
Setting the Clock With the unit on, press DISP to display clock time. Press and hold DISP until the hours begins to flash, then release.
Press the TUNE nnand TUNE llto adjust the hours, then press the DISP, the minutes begins to flash, press the TUNE nnand TUNE llbutton to adjust the minutes.
Press DISP momentarily to save the selected time.
Display Press DISP to toggle display between various displayed information.
Audio / Menu Press the volume knob momentarily to select between audio functions.
Press and hold the volume knob for more than two seconds to select between the menu functions.
Rotate the volume knob left/right to adjust or activate the desired function/audio.
5
 Loading...