


D26960K

INSTRUCTIVO DE OPERACIÓN, CENTROS DE SERVICIO Y PÓLIZA
DE GARANTÍA. ADVERTENCIA: LÉASE ESTE INSTRUCTIVO ANTES
DE USAR EL PRODUCTO.
Si tiene dudas o comentarios, contáctenos.
If you have questions or comments, contact us.
Pour toute question ou tout commentaire, nous contacter.
1-800-4-DEWALT • www.dewalt.com
INSTRUCTION MANUAL
GUIDE D'UTILISATION
MANUAL DE INSTRUCCIONES
DEWALT Industrial Tool Co., 701 Joppa Road, Baltimore, MD 21286
(AUG09) Part No. N042236 D26950, D26960 Copyright © 2009 D
The following are trademarks for one or more D
color scheme; the “D” shaped air intake grill; the array of pyramids on the handgrip; the kit box
configuration; and the array of lozenge-shaped humps on the surface of the tool.
Definitions: Safety Guidelines
The definitions below describe the level of severity for each signal word. Please read the
manual and pay attention to these symbols.
DANGER: Indicates an imminently hazardous situation which, if not avoided, will result
in death or serious injury.
WARNING: Indicates a potentially hazardous situation which, if not avoided, could
result in death or serious injury.
CAUTION: Indicates a potentially hazardous situation which, if not avoided, may result
in minor or moderate injury.
NOTICE: Indicates a practice not related to personal injury which, if not avoided, may
result in property damage.
IF YOU HAVE ANY QUESTIONS OR COMMENTS ABOUT THIS OR ANY DEWALT TOOL,
CALL US TOLL FREE AT: 1-800-4-D
DANGER: To reduce the risk of injury, read the instruction manual. Failure to follow all
instructions listed below may result in electric shock, fi re and/or serious injury.
EWALT (1-800-433-9258)
IMPORTANT SAFETY INSTRUCTIONS
READ THESE INSTRUCTIONS
Safety Instructions for Heat Guns
• To reduce the risk of explosion, DO NOT use in paint spray booths or within 10' (3.0 m) of
paint spraying operations.
• This appliance has a polarized plug (one blade is wider than the other). To reduce the risk of
electric shock, this plug is intended to fit in a polarized outlet only one way. If the plug does
not fit fully in the outlet, reverse the plug. If it still does not fit, contact a qualified electrician.
Do not modify the plug in any way.
• DO NOT use this tool to remove paint containing lead. The peelings, residue and vapors
of paint may contain lead which is poisonous
• Hidden areas such as behind walls, ceilings, floors, soffit boards and other panels may
contain flammable materials that could be ignited by the heat gun when working in these
locations. The ignition of these materials may not be readily apparent and could result in
property damage and injury to persons. When working in these locations, keep the heat gun
moving in a back-and-forth motion. Lingering or pausing in one spot could ignite the panel or
the material behind it.
NOTE: These heat guns are capable of producing temperatures in excess of 1000˚ F
• DO NOT use this tool as a hair dryer.
• DO NOT use this tool to heat food.
• DO NOT lay the heat gun on flammable surfaces when operating the gun or immediately after
shutting it off. Allow the tool to cool before storing. Always set the gun on a flat level surface
so that the nozzle tip is pointed upward.
• DO NOT use in the presence of explosive materials.
• Keep moveable items secured and steady while scraping.
• NEVER obstruct the air intake or nozzle outlet. This may cause excessive heat build up
resulting in damage to the tool.
• Be sure to direct the hot air blast in a safe direction; away from other people or flammable
objects.
• DO NOT remove the heat barrel cover during use.
• KEEP FINGERS AWAY FROM METAL NOZZLE; it becomes very hot during use and
remains hot for 30 minutes after use. Wear gloves to protect hands.
• ALWAYS keep nozzle away from cord.
• DO NOT touch the nozzle to any surface while running or shortly after running.
• DO NOT place anything inside the nozzle as it could cause an electric shock. Do not look
down the nozzle while the unit is turned on due to the high temperatures being produced.
• Splinters and small particles of stripped paint can be ignited and blown through holes and
cracks in the surface being stripped.
• DO NOT apply heat to the same area for a long period of time.
EWALT power tools: the yellow and black
D26950, D26960
Heavy-Duty Heat Gun
Pistolets thermiques industriels
Pistolas de aire caliente para trabajos pesados
EWALT
• DO NOT burn the paint. Use the scraper provided and keep the nozzle at least 1" (25 mm)
away from the painted surface. When working in a vertical direction, work downwards to
prevent paint from falling into the tool and burning.
• DO NOT allow paint to adhere to the nozzle or scraper. It could ignite.
• ALWAYS use good quality scrapers and stripping knives.
• DO NOT use the heat gun in combination with chemical strippers.
• DO NOT use accessory nozzles as scrapers.
• DO NOT direct heatgun airflow directly on glass. The glass may crack and could result in
property damage or personal injury.
• Maintain labels and nameplates. These carry important information.
• Place the heat gun on a stable, level surface when not hand held. Place the cord in a position
that won't cause the heat gun to tip over.
• Be constantly aware that this tool can ignite flammable materials, soften or melt others.
Regardless of the task you are performing, shield or keep the heat gun away from these
materials.
• You may occasionally notice some slight smoking of the tool after it is turned off. This is
the result of heating the residual oil that was deposited on the heating element during the
manufacturing process.
• Use eye protection and other safety equipment.
• Do not abuse the cord. Never use the cord for carrying, pulling or unplugging the tool.
Keep cord away from heat, oil, sharp edges or moving parts. Damaged or entangled
cords increase the risk of electric shock.
• When operating a tool outdoors, use an extension cord suitable for outdoor use. Use
of a cord suitable for outdoor use reduces the risk of electric shock.
• Do not expose tools to rain or wet conditions. Water entering a tool will increase the risk
of electric shock.
• Do not overreach. Keep proper footing and balance at all times. This enables better
control of the tool in unexpected situations.
• Store idle tools out of the reach of children and do not allow persons unfamiliar with
the tool or these instructions to operate the tool. Tools are dangerous in the hands of
untrained users.
• Have your tool serviced by a qualified repair person using only identical replacement
parts. This will ensure that the safety of the tool is maintained.
• Air vents often cover moving parts and should be avoided. Loose clothes, jewelry or long
hair can be caught in moving parts.
• An extension cord must have adequate wire size (AWG or American Wire Gauge) for
safety. The smaller the gauge number of the wire, the greater the capacity of the cable, that
is 16 gauge has more capacity than 18 gauge. An undersized cord will cause a drop in line
voltage resulting in loss of power and overheating. When using more than one extension to
make up the total length, be sure each individual extension contains at least the minimum
wire size. The following table shows the correct size to use depending on cord length and
nameplate ampere rating. If in doubt, use the next heavier gauge. The smaller the gauge
number, the heavier the cord.
Minimum Gauge for Cord Sets
Volts Total Length of Cord in Feet (meters)
Ampere Rating
More
Than
0 6 18 16 16 14
610 18161412
10 12 16 16 14 12
12 16 14 12 Not Recommended
WARNING: Always use eye protection. All users and bystanders must wear eye protection
that conforms to ANSI Z87.1.
WARNING: Always wear proper personal hearing protection that conforms to ANSI
S12.6 (S3.19) during use. Under some conditions and duration of use, noise from this product
may contribute to hearing loss.
WARNING: Some dust created by power sanding, sawing, grinding, drilling, and other
construction activities contains chemicals known to cause cancer, birth defects or other
reproductive harm. Some examples of these chemicals are:
• lead from lead-based paints,
• crystalline silica from bricks and cement and other masonry products, and
• arsenic and chromium from chemically-treated lumber (CCA).
Your risk from these exposures varies, depending on how often you do this type of work. To
reduce your exposure to these chemicals: work in a well ventilated area, and work with approved
safety equipment, such as those dust masks that are specially designed to filter out microscopic
particles.
WARNING: ALWAYS USE SAFETY GLASSES. Everyday eyeglasses are NOT safety glasses.
Also use face or dust mask if cutting operation is dusty. All users and bystanders MUST ALWAYS
wear certified safety equipment:
• ANSI Z87.1 eye protection (CAN/CSA Z94.3),
• ANSI S12.6 (S3.19) hearing protection,
• NIOSH/OSHA/MSHA respiratory protection.
• The label on your tool may include the following symbols. The symbols and their definitions
are as follows:
V .....................volts A .................. amperes
Hz ...................hertz W ................. watts
min ..................minutes
................direct current
....................Class I Construction .................earthing terminal
........................(grounded) ................ safety alert symbol
.....................Class II Construction BPM ............ beats per minute
........................(double insulated) …/min ......... revolutions or
sfpm .............. surface feet
...................... per minute (sfpm) ...................per minute
PERSONS REMOVING PAINT SHOULD ALWAYS FOLLOW THESE GUIDELINES:
WARNING: Extreme care should be taken when stripping paint. The peelings, residue and
vapors of paint may contain lead, which is poisonous. Any pre-1977 paint may contain lead and
paint applied to homes prior to 1950 is likely to contain lead. Once deposited on surfaces, hand
to mouth contact can result in the ingestion of lead. Exposure to even low levels of lead can
cause irreversible brain and nervous system damage; young and unborn children are particularly
vulnerable.
Before beginning any paint removal process you should determine whether the paint you are
removing contains lead. This can be done by your local health department or by a professional
who uses a paint analyzer to check the lead content of the paint to be removed. LEAD-BASED
PAINT SHOULD ONLY BE REMOVED BY A PROFESSIONAL AND SHOULD NOT BE
REMOVED USING A HEAT GUN. Persons removing paint should follow these guidelines:
1. Move the workpiece outdoors. If this is not possible, keep the work area well ventilated. Open
the windows and put an exhaust fan in one of them. Be sure the fan is moving the air from
inside to outside.
2. Remove or cover any carpets, rugs, furniture, clothing, cooking utensils and air ducts.
3. Place drop cloths in the work area to catch any paint chips or peelings. Wear protective
clothing such as extra work shirts, overalls and hats.
4. Work in one room at a time. Furnishings should be removed or placed in the center of the
room and covered. Work areas should be sealed off from the rest of the dwelling by sealing
doorways with drop cloths.
5. Children, pregnant or potentially pregnant women and nursing mothers should not be
present in the work area until the work is done and all clean up is complete.
6. Wear a dust respirator mask or a dual filter (dust and fume) respirator mask which has
been approved by the Occupational Safety and Health Administration (OSHA), the National
Institute of Safety and Health (NIOSH), or the United States Bureau of Mines. These masks
and replaceable filters are readily available at major hardware stores. Be sure the mask
fits. Beards and facial hair may keep masks from sealing properly. Change filters often.
DISPOSABLE PAPER MASKS ARE NOT ADEQUATE.
Not More
Than
120V
240V
25 (7.6) 50 (15.2) 100 (30.5) 150 (45.7)
50 (15.2) 100 (30.5) 200 (61.0) 300 (91.4)
AWG
............... alternating current
n
o ................ no load speed
.................... reciprocation
7. Use caution when operating the heat gun. Keep the heat gun moving as excessive heat will
generate fumes which can be inhaled by the operator.
8. Keep food and drink out of the work area. Wash hands, arms and face and rinse mouth
before eating or drinking. Do not smoke or chew gum or tobacco in the work area.
9. Clean up all removed paint and dust by wet mopping the floors. Use a wet cloth to clean
all walls, sills and any other surface where paint or dust is clinging. DO NOT SWEEP, DRY
DUST OR VACUUM. Use a high phosphate detergent or trisodium phosphate (TSP) to wash
and mop areas.
10. At the end of each work session put the paint chips and debris in a double plastic bag, close
it with tape or twist ties and dispose of properly.
11. Remove protective clothing and work shoes in the work area to avoid carrying dust into the
rest of the dwelling. Wash work clothes separately. Wipe shoes off with a wet rag that is then
washed with the work clothes. Wash hair and body thoroughly with soap and water.
IMPORTANT NOTICE
In order for this tool to be an effective paint stripper, it must produce extremely high temperatures.
As a consequence, the stripper is capable of igniting paper, wood, paint and varnish residue and
similar materials.
As you become more familiar with the tool and develop the proper technique, the danger of
accidental ignition will be greatly reduced. In establishing the proper technique, the best thing to
do is PRACTICE! Work on simple stripping projects, preferably outdoors, until you get a “feel” for
how to use your stripper safely and effectively.
AS YOU PRACTICE, OBSERVE THE FOLLOWING PROCEDURES FOR SAFETY
• Always be sure the tool is turned off and disconnected from power supply when unattended.
• Clean the scraper blade often during use. Built up residue on the blade is highly flammable.
• Experiment to find the optimum distance from the tool’s nozzle to the surface being stripped.
This distance [1"–2" (25.4 mm–50.8 mm)] will vary depending on the material being
removed.
• Keep the heat gun moving ahead of the scraper blade at all times.
• As you work, clean up loose pieces of paint as they accumulate around the work area.
• When working indoors, keep away from curtains, papers, upholstery and similar flammable
materials.
• Above all, remember that this is a serious tool that is capable of producing excellent results
when used properly. Practice on simple projects until you feel comfortable with your stripper.
Only then will you have mastered the proper technique.
SAVE THESE INSTRUCTIONS FOR FUTURE USE
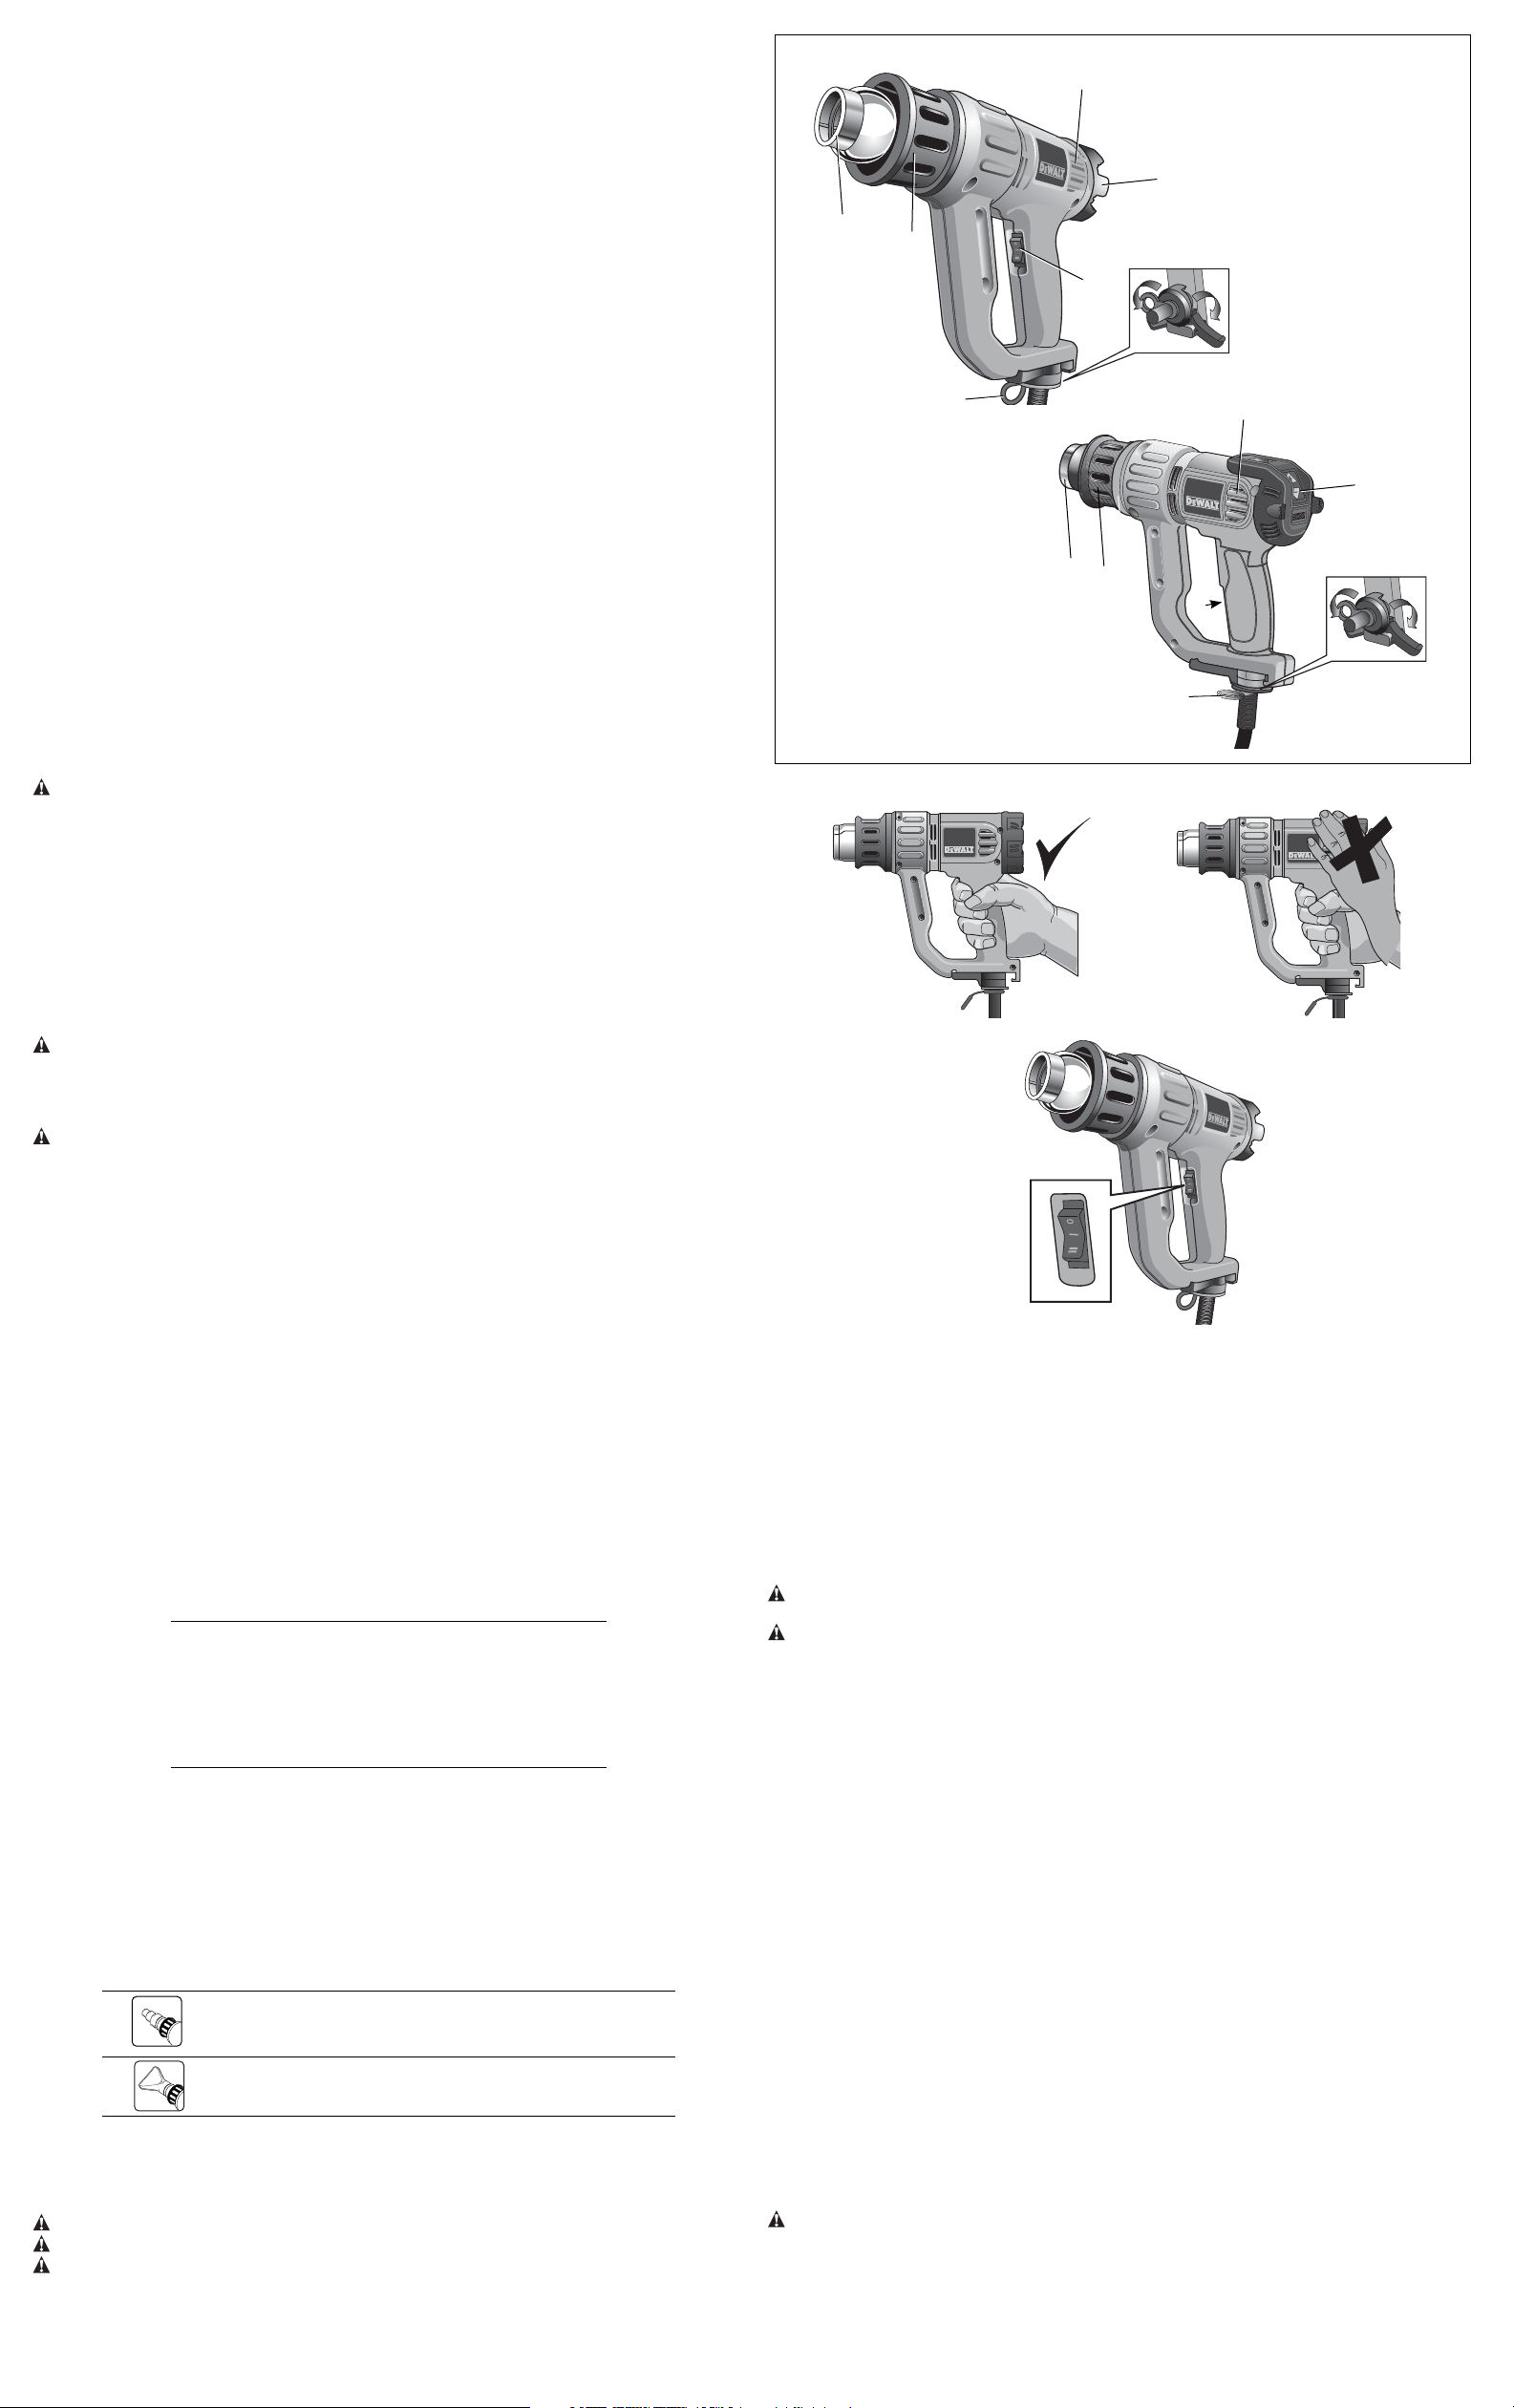
FIG.1
E
D26950
B
D
G
A
C
F
E
G
D26960
F
B
D
A
C
Description (Fig. 1)
WARNING: Never modify the tool or any part of it. Damage or personal injury could result.
A. On/off switch
B. Air vents
C. Kick-off stand
D. Air temperature adjustment knob (D26950)
LCD air temperature indicator and adjuster (D26960)
E. Nozzle
F. Tool hanging ring
G. Heat barrel cover
INTENDED USE
Your D
EWALT heat gun has been designed for stripping paint, soldering pipes, shrinking PVC,
welding and bending plastics as well as general drying and thawing purposes.
WARNING: DO NOT use under wet conditions or in presence of flammable liquids or gases.
The heat gun is a professional power tool. DO NOT let children come into contact with the tool.
Supervision is required when inexperienced operators use this tool.
ASSEMBLY AND ADJUSTMENTS
WARNING: To reduce the risk of injury, turn off tool, disconnect from power source and
allow to cool before installing and removing accessories, before making any adjustments or
removing/installing attachments or accessories.
Air Temperature (Fig. 1)
D26950
The air temperature can be adjusted to suit a wide range of applications. Turn the air temperature
adjustment knob (D) clockwise or counterclockwise for higher or lower heat.
D26960
Press and release the LCD air temperature indicator and adjuster (D) to set the desired
temperature in 50˚F (10˚C) increments. To continously increase or decrease the temperature
press and hold the LCD air temperature indicator and adjuster (D). Release the indicator when
desired temperature or minimum/maximum temperature is reached.
The display shows the actual rising/falling temperature until the desired temperature is
reached.
SET AND FORGET TEMPERATURE CONTROL SYSTEM
D26960
The desired temperature is stored in the memory of the tool. Each time the heat gun is turned
on, the heat gun heats to the last temperature setting, with respect to air flow. If unsure about
the setting, always start with a low temperature setting and gradually increase the temperature
until the desired setting is reached.
Applications
The table below suggests settings for different applications.
Setting Applications
Low • Drying paint and varnish
• Removing stickers
• Waxing and dewaxing
• Drying wet timber prior to filling
• Shrinking PVC wrapping and
• Thawing frozen pipes
High • Welding plastics
• Bending plastic pipes and sheets
• Loosening rusted or tightly
• Removing paint and lacquer
• Soldering plumbing joints
• Removing linoleum or vinyl floor tiles
insulation tubes
fastened nuts and bolts
To Attach the Correct Accessory
This tool is supplied with a set of accessories for different applications.
Icon Description Purpose
shrink sleeving (heat over
concentrated small area)
Fish tail removing vinyl or linoleum,
surface nozzle thawing (heat spread over wide area)
1. Make sure the on/off switch (A) is in position O and the tool is disconnected from the power
source. Ensure the nozzle has cooled down.
2. Place the desired accessory onto the nozzle.
Cone nozzle Welding, soldering,
2" (50 mm) Drying, removing paint,
OPERATION
WARNING: Make sure the nozzle ALWAYS points away from you and any bystanders.
WARNING: DO NOT drop anything into the nozzle.
WARNING: Use only one hand to hold the tool as shown in Figure 2. Do not place your other
hand over the air vents (Fig. 3).
PRIOR TO OPERATION
1. Attach the correct accessory recommended for the application.
2. Turn the air temperature adjustment knob (D) to desired air temperature.
FIG. 2 FIG. 3
FIG. 4
A
Switching On and Off (Fig. 4)
1. Push the on/off switch (A) to the desired air flow settings:
A low air flow to heat up the workpiece slowly.
I: 8.5 CFM [120–750˚F (50˚–400˚C)]
8.8 CFM [150–750˚F (65˚–400˚C)] (D26960)
A high air flow to heat up the workpiece quickly.
II: 16 CFM [120–1100˚F (50˚–600˚C)]
17.7 CFM [(150–1100˚F) (65˚–600˚C)] (D26960)
2. To turn the tool off, push the on/off switch (A) to position O. Disconnect the tool from the
power source and let the tool cool down before moving or storing it.
Removing Paint
WARNING: Refer to Important Notice under Additional Safety Instructions for Heat Guns
before using the tool to remove paint.
WARNING: Do not strip metal window frames as the heat may crack the glass.
• When striping other window frames, use a glass protection nozzle.
• To prevent igniting the surface, do not keep the tool directed at one spot too long.
• Avoid collecting paint on the scraper accessory, as it may ignite. If necessary, carefully
remove paint debris from the scraper accessory using a knife.
1. Attach the appropriate accessory.
2. Turn the air temperature adjustment knob (D) to high.
3. Turn the tool on by selecting the desired air flow.
4. Direct the hot air onto the paint to be removed.
Best results will be achieved if the heat gun is moved slowly, but CONSTANTLY, from side to
side to evenly distribute heat. DO NOT LINGER OR PAUSE IN ONE SPOT.
5. When the paint softens, scrape the paint away using a hand scraper.
REMEMBER: Splinters and small particles of stripped paint can be ignited and blown through
holes and cracks in the surface being stripped.
Stationary Use (Fig. 1)
This tool can also be used in stationary mode.
1. Fold down the kickstand (C) as shown in Figure 1.
2. Set the tool onto a level, stable workbench. Ensure the tool will not tip over.
3. Secure the power cord to prevent entanglement or pulling the tool off the workbench.
4. Turn the tool on by selecting the desired air flow.
Constant Heat Control (Overload Protection)
When the tool is overloaded, this feature protects the heating element from damage without
stopping the tool and/or without a cool down period.
1. When the temperature gets too hot, the heating element switches itself off. The motor will
continue to run and produce cold air.
2. When the temperature has cooled sufficiently (taking only a few seconds) the heating
element will switch on automatically.
Tool Ring (Fig. 1)
WARNING: ALWAYS turn heat gun off, disconnect from the power source and let the tool cool
down for at least 30 minutes before moving or storing it.
For easy storage, the tool can hang from the tool ring (F). The heat gun should be stored
indoors.
Cool Down Period
The nozzle and accessory becomes very hot during use. Turn heat gun off, disconnect from the
power source and let the tool cool down for at least 30 minutes before moving or storing it.

NOTE: To reduce the cooling time, switch the tool on at the lowest air temperature setting and
let it run for a few minutes before turning the heat gun off.
MAINTENANCE
WARNING: To reduce the risk of injury, turn off tool, disconnect from power source and
allow to cool before installing and removing accessories, before making any adjustments or
removing/installing attachments or accessories.
EWALT power tool has been designed to operate over a long period of time with a
Your D
minimum of maintenance. Continuous satisfactory operation depends upon proper tool care and
regular cleaning.
Cleaning
WARNING: Blow dirt and dust out of all air vents with dry air at least once a week. Wear
proper ANSI Z87.1 (CAN/CSA Z94.3) eye protection and proper NIOSH/OSHA/MSHA
respiratory protection when performing this.
WARNING: Never use solvents or other harsh chemicals for cleaning the non-metallic parts
of the tool. These chemicals may weaken the plastic materials used in these parts. Use a cloth
dampened only with water and mild soap. Never let any liquid get inside the tool; never immerse
any part of the tool into a liquid.
Lubrication
Your power tool requires no additional lubrication.
Accessories
WARNING: Since accessories, other than those offered by DEWALT, have not been tested
with this product, use of such accessories with this tool could be hazardous. To reduce the risk
of injury, only D
Recommended accessories for use with your tool are available at extra cost from your local
dealer or authorized service center. If you need assistance in locating any accessory, please
contact D
D
EWALT (1-800-433-9258) or visit our website www.dewalt.com.
EWALT, recommended accessories should be used with this product.
EWALT Industrial Tool Co., 701 East Joppa Road, Baltimore, MD 21286, call 1-800-4-
Repairs
To assure product SAFETY and RELIABILITY, repairs, maintenance and adjustments (including
brush inspection and replacement) should be performed by a D
EWALT authorized service center or other qualified service personnel. Always use identical
a D
replacement parts.
EWALT factory service center,
Three Year Limited Warranty
DEWALT will repair, without charge, any defects due to faulty materials or workmanship for
three years from the date of purchase. This warranty does not cover part failure due to normal
wear or tool abuse. For further detail of warranty coverage and warranty repair information, visit
www.dewalt.com or call 1-800-4-D
accessories or damage caused where repairs have been made or attempted by others. This
warranty gives you specific legal rights and you may have other rights which vary in certain
states or provinces.
In addition to the warranty, D
EWALT will maintain the tool and replace worn parts caused by normal use, for free, any time
D
during the first year after purchase.
If you are not completely satisfied with the performance of your D
Nailer for any reason, you can return it within 90 days from the date of purchase with a receipt
for a full refund – no questions asked.
LATIN AMERICA: This warranty does not apply to products sold in Latin America. For products
sold in Latin America, see country specific warranty information contained either in the
packaging, call the local company or see website for warranty information.
FREE WARNING LABEL REPLACEMENT: If your warning labels become illegible or are
missing, call 1-800-4-D
EWALT (1-800-433-9258) for a free replacement.
EWALT (1-800-433-9258). This warranty does not apply to
EWALT tools are covered by our:
1 YEAR FREE SERVICE
90 DAY MONEY BACK GUARANTEE
EWALT Power Tool, Laser, or
Définitions : lignes directrices
en matière de sécurité
Les définitions ci-dessous décrivent le niveau de danger pour chaque mot-indicateur
employé. Veuillez lire le mode d’emploi et porter une attention particulière à ces
symboles.
DANGER : Indique une situation dangereuse imminente qui, si elle n’est pas
évitée, causera la mort ou des blessures graves.
AVERTISSEMENT : Indique une situation potentiellement dangereuse qui, si elle n’est
pas évitée, pourrait se solder par un décès ou des blessures graves.
ATTENTION : Indique une situation potentiellement dangereuse qui, si elle n’est pas
évitée pourrait se solder par des blessures mineures ou modérées.
AVIS : Indique une pratique ne posant aucun risque de dommages corporels mais
qui par contre, si rien n’est fait pour l’éviter, pourrait poser des risques de dommages
matériels.
POUR TOUT COMMENTAIRE, OU QUESTION, RELATIF À CET OUTIL OU TOUT AUTRE
OUTIL D
EWALT, COMPOSEZ GRATUITEMENT LE : 1-800-4-DEWALT (1-800-433-9258)
DANGER : Pour réduire tout risque de dommages corporels, lire le manuel de
l’utilisateur. Tout manquement aux directives suivantes pose des risques de chocs
électriques, d’incendie et/ou de blessures graves.
CONSIGNES DE SÉCURITÉ IMPORTANTES
LIRE CES DIRECTIVES
Consignes de sécurité propres aux pistolets thermiques
• Pour réduire tout risque d’explosion, NE PAS utiliser au sein de cabines de pulvérisation ou
à proximité (moins de 3 m [10 pi]) d’applications de peinture au pistolet.
• Cet appareil est muni d’une fiche polarisée (l’une des lames est plus large que l’autre). Pour
réduire tout risque de chocs électriques, cette fiche a été conçue pour rentrer dans une prise
polarisée uniquement dans un seul sens. Inverser la fiche si elle ne rentre pas correctement
dans la prise. Si ce n’est toujours pas le cas, consulter un électricien qualifié. Ne modifier la
fiche en aucune façon.
• NE PAS utiliser cet outil pour décaper de la peinture au plomb. La peinture écaillée, ses
résidus ou émanations peuvent contenir du plomb qui est toxique pour l’individu.
• Certains lieux, comme derrière des murs, plafonds, sols, panneaux de coffrage ou autres,
peuvent dissimuler des matériaux inflammables qui pourraient s’enflammer lorsque le
pistolet thermique est utilisé à proximité. L’ignition de ces matériaux pourrait ne pas être
immédiatement apparente, et causer des dommages corporels et matériels sérieux. Au sein
de ce genre d’emplacements, effectuer des va-et-vient continuels avec le pistolet thermique.
Le fait de s’arrêter ou s’attarder sur un point pourrait enflammer le panneau ou le matériau
dissimulé derrière.
REMARQUE : Ces pistolets thermiques peuvent produire des températures supérieures à
1000 ˚F.
• NE PAS utiliser cet outil pour sécher les cheveux.
• NE PAS utiliser cet outil pour réchauffer la nourriture.
• NE PAS poser le pistolet thermique sur une surface inflammable pendant ou immédiatement
après son utilisation. Laisser l’outil refroidir avant de l’entreposer. Poser systématiquement le
pistolet sur une surface plane, l’embout pointant vers le haut.
• NE PAS utiliser l’appareil en présence de matériaux explosifs.
• Arrimer soigneusement tout élément mobile lors du raclage.
• NE JAMAIS obstruer les prises d’air ou l’embout. Cela pourrait causer une accumulation
excessive de chaleur et endommager l’outil.
• S’assurer de diriger systématiquement le jet d’air chaud dans une direction sûre, opposée à
tout individu présent ou tout objet inflammable.
• NE PAS retirer le barillet anti-brûlures pendant l’utilisation.
• PROTÉGER LES DOIGTS DE L’EMBOUT MÉTALLIQUE, car il chauffera énormément
au cours de l’utilisation et restera ainsi pendant une trentaine de minutes après utilisation.
Protéger les mains avec des gants.
• Maintenir SYSTÉMATIQUEMENT l’embout à l’écart du cordon électrique.
• NE mettre l’embout en contact avec AUCUNE surface pendant et juste après utilisation.
• NE RIEN insérer dans l’embout pour prévenir tout risque de chocs électriques. En raison des
températures élevées produites lors de l’utilisation, ne pas regarder à l’intérieur de l’embout
pendant le fonctionnement de l’outil.
• Des éclats ou de petites particules de peintures pourraient s’enflammer et être éjectés dans
les trous ou fentes de la surface à décaper.
• NE PAS appliquer la chaleur au même endroit pendant une période prolongée.
• NE PAS brûler la peinture. Utiliser le grattoir fourni à cet effet et maintenir l’embout à un
minimum de 25 mm (1 po) de la surface peinte. Pour décaper une surface verticale, travailler
de haut en bas pour empêcher que la peinture ne tombe sur l’outil et ne brûle.
• NE PAS laisser la peinture adhérer sur l’embout ou le grattoir, car elle pourrait s’enflammer.
• Utiliser SYSTÉMATIQUEMENT des grattoirs et des couteaux à décaper de bonne qualité.
• NE PAS utiliser le pistolet thermique en même temps qu’un décapant chimique.
• NE PAS utiliser d’embout accessoire en tant que grattoir.
• NE PAS diriger le flot d’air du pistolet thermique sur du verre. Ce dernier pourrait se briser et
poser des risques de dommages corporels ou matériels sérieux.
• Maintenir en place, étiquettes et plaques signalétiques, car ils comportent des informations
importantes.
• Placer le pistolet thermique sur une surface plane et stable après toute utilisation. Disposer
son cordon de façon à ce que le pistolet thermique ne puisse être renversé.
• Se rappeler systématiquement que cet outil pourrait enflammer des matériaux, les ramollir ou
les faire fondre. Peu importe la tâche en cours, protéger ou éloigner ces matériaux du pistolet
thermique.
• Il se pourra occasionnellement que l’outil fume légèrement après utilisation. Cela provient de
l’huile résiduelle déposée sur les éléments chauffant de l’outil lors de sa fabrication.
• Utiliser une protection oculaire et tout autre matériel de sécurité approprié.
• Ne pas utiliser le cordon de façon abusive. Ne jamais utiliser le cordon électrique
pour transporter, tirer ou débrancher l’outil. Protéger le cordon de la chaleur, de
l’huile, d’arêtes coupantes ou de pièces mobiles. Les cordons endommagés ou emmêlés
augmentent les risques de chocs électriques.
• Pour utiliser un outil à l’extérieur, utiliser une rallonge conçue à cet effet. L’utilisation
d’une rallonge conçue pour l’extérieur réduit les risques de chocs électriques.
• Ne pas exposer les outils électriques à la pluie ou à l’humidité. Tout contact d’un liquide
avec un outil électrique augmente les risques de chocs électriques.
• Ne pas effectuer de travaux hors de portée. Les pieds doivent rester bien ancrés au
sol afin de maintenir son équilibre en permanence. Cela permet de conserver la maîtrise
de l’outil dans les situations imprévues.
• Après usage, ranger les outils hors de portée des enfants, et ne permettre à aucune
personne non familière avec un outil (ou son manuel d’instruction) d’utiliser ce dernier.
Les outils peuvent être dangereux entre des mains inexpérimentées.
•
Faire entretenir cet outil par un réparateur qualifié qui n’utilisera que des pièces
de rechange identiques. Cela permettra d’assurer l’intégrité de l’outil et la sécurité de
l’utilisateur.
• Prendre des précautions à proximité des évents car ils cachent des pièces mobiles.
Les vêtements amples, bijoux ou cheveux longs pourraient s’y faire prendre.
• Pour la sécurité de l’utilisateur, utiliser une rallonge de calibre adéquat (AWG, American
Wire Gauge [calibrage américain normalisé des fils électriques]). Plus son calibre est
petit, plus sa capacité est grande. Une rallonge de calibre 16, par exemple, a plus de capacité
qu’une rallonge de calibre 18. L’usage d’une rallonge de calibre insuffisant causera une chute
de tension qui entraînera perte de puissance et surchauffe. Si plus d’une rallonge est utilisée
pour obtenir une certaine longueur, s’assurer que chaque rallonge présente au moins le
calibre de fil minimum. Le tableau ci-dessous illustre les calibres à utiliser selon la longueur
de rallonge et l’intensité nominale indiquée sur la plaque signalétique. En cas de doute,
utiliser le calibre suivant. Plus le calibre est petit, plus la rallonge peut supporter de courant.
Calibres minimaux des rallonges
Intensité
(en ampères)
Supérieur à Inférieur à AWG
0 6 18 16 16 14
610
10 12
12 16
AVERTISSEMENT : Porter systématiquement une protection oculaire. Tout utilisateur ou
individu présent doit porter une protection oculaire homologuée ANSI Z87.1.
AVERTISSEMENT : Pendant l’utilisation, porter systématiquement une protection
auditive individuelle adéquate homologuée ANSI S12.6 (S3.19). Sous certaines conditions
et suivant la longueur d’utilisation, le bruit émanant de ce produit pourrait contribuer à une
perte de l’acuité auditive.
AVERTISSEMENT : Les scies, meules, ponceuses, perceuses ou autres outils de construction,
peuvent produire des poussières contenant des produits chimiques reconnus pour causer
cancers, malformations congénitales ou être nocifs pour le système reproducteur. Parmi ces
produits chimiques, on retrouve :
• le plomb dans les peintures à base de plomb;
• la silice cristallisée dans les briques et le ciment ou autres articles de maçonnerie; et
• l’arsenic et le chrome dans le bois ayant subi un traitement chimique (ACC).
Le risque associé à de telles expositions varie selon la fréquence à laquelle on effectue ces
travaux. Pour réduire toute exposition à ces produits : travailler dans un endroit bien aéré, en
utilisant du matériel de sécurité homologué tel un masque antipoussières spécialement conçu
pour filtrer les particules microscopiques.
AVERTISSEMENT : PORTER SYSTÉMATIQUEMENT DES LUNETTES DE PROTECTION.
Les lunettes courantes NE sont PAS des lunettes de protection. Utiliser aussi un masque
antipoussières si la découpe doit en produire beaucoup. Tout utilisateur ou individu présent DOIT
porter SYSTÉMATIQUEMENT un équipement de sécurité homologué :
• Protection oculaire ANSI Z87.1 (CAN/CSA Z94.3);
• Protection auditive ANSI S12.6 (S3.19);
• Protection des voies respiratoires NIOSH/OSHA/MSHA.
• L’étiquette apposée sur votre outil peut inclure les symboles suivants. Les symboles et leur
définition sont indiqués ci-après :
V .................... volts A ..................ampères
Hz .................. hertz W ................. watts
min ................. minutes
............... courant continu
Volts Longueur totale de cordon en mètres (pieds)
120V
240V
7,6 (25) 15,2 (50) 30,5 (100) 45,7 (150)
15,2 (50) 30,5 (100) 61,0 (200) 91,4 (300)
18 16 14 12
16 16 14 12
14 12 Non recommandé
............... courant alternatif
n
o ................vitesse à vide
 Loading...