


 Loading...
User Guide
Guía del usuario
Guide d’utilisation
Guida per l’uso
Benutzerhandbuch
Appendix
English ( 3 – 6 )
Español ( 7 – 10 )
Français ( 11 – 14 )
Italiano ( 15 – 18 )
Deutsch ( 19 – 22 )
English ( 23 )

2

User Guide (English)
Introduction
The Lectern Active is a portable lectern for multi-media presentations—perfect for hotels, places of worship, conference rooms and convention centers. This all-in-one solution is designed with professional features, such as a powerful 2-way speaker system, inputs for a microphone and playback device, a USB-powered lamp and a separate output to feed an external sound system or remote zone. It also features a rigid laptop tray and AC convenience outlets.
Please see this guide’s Setup chapter to learn how to integrate Lectern Active with your audio system, and then refer to the Operation chapter to start using Lectern Active.
Box Contents
Lectern Active
Gooseneck XLR Microphone & Windscreen
Power Cable
User Guide
Safety & Warranty Manual
Support
For the latest information about this product (documentation, technical specifications, system requirements, compatibility information, etc.) and product registration, visit denonpro.com.
For additional product support, visit denonpro.com/support.
3
Features
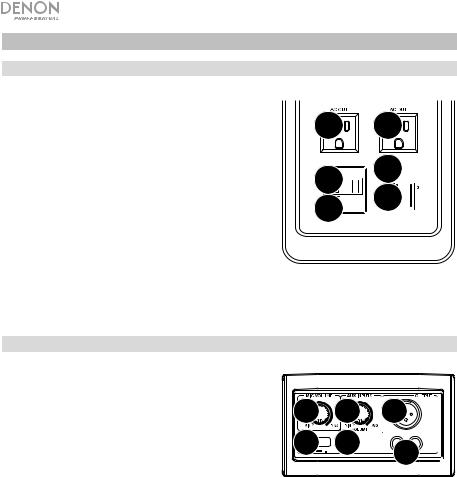
Rear Panel
1.Power Input: Insert the included power cable here to power the unit.
2.Fuse: If the fuse is broken, disconnect the power cord from the power outlet, and then unscrew this holder to replace the fuse. Replace it with a fuse with an appropriate rating (printed under on the rear panel). Using a fuse with an incorrect rating can damage the product and/or fuse.
3.Power Switch: Use this switch to power Lectern Active on or off.
4.Power Light: This light will illuminate when Lectern Active is powered on.
5.AC Outlet: Connect other devices here. The AC outlets work when wall power is connected.
5 |
5 |
1


 4
4


 2
2


 3
3


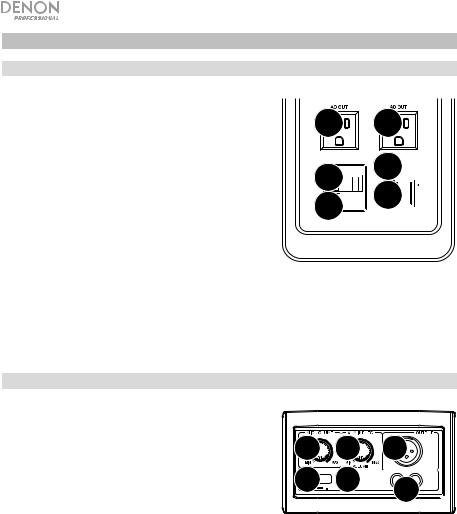
Top Panel
1.Mic Volume: Turn this knob to adjust the volume of the microphone.
2.Aux Input (1/8” / 3.5 mm): Connect a CD player, digital media player, or other audio source to this 1/8” (3.5 mm) stereo auxiliary input. Control the volume using the Aux Volume knob.
3.Aux Input (RCA): Connect a CD player, digital media player, or other audio source to these RCA auxiliary inputs. Control the volume using the Aux Volume knob.
4.Aux Volume: Turn this knob to adjust the input volume of the aux inputs.
5.Output (XLR): Connect this XLR output to another active (powered) speaker. The level of the output is controlled by the Mic Volume and Aux Volume knobs.
6.USB Charging Port: Connect your device’s charge cable here to charge it. USB charging only functions when the unit’s power is turned on.
1


 4
4


 5 6
5 6

 2
2 

 3
3


4

Setup
Items not listed under Introduction > Box Contents are sold separately.
Tablet (charging only) or USB Lamp XLR Microphone
Smartphone
(charging or audio playback)
Loudspeaker
Power Outlet
5

Operation
To power Lectern Active on or off, use the power switch.
To use Lectern Active’s microphone:
1.Make sure the microphone is connected properly to the XLR input above the lectern tray.
2.Speak into the microphone and adjust its position, if necessary.
To adjust the microphone volume, turn the Mic Volume knob.
To mute the microphone, press and hold the Mute button next to the XLR input.
To unmute the microphone, release the Mute button.
To power or charge additional devices:
•AC Power: Connect each device to an AC outlet at its base.
•USB: Connect each device to the USB port on the rear panel or the USB port above the lectern tray.
Important: Lectern Active must be powered on to power or charge any connected devices.
To play audio:
1.Connect an audio device to one of the aux inputs—the 1/8” (3.5mm) input using a stereo 1/8” (3.5mm) cable or the RCA inputs using a stereo RCA cable.
2.Play audio on your device.
3.Turn the Aux Volume knob to adjust the output volume level. Also, adjust the input volume level on your device.
6

Guía del usuario (Español)
Introducción
El Lectern Active es un atril portátil para presentaciones multimedia—perfecto para hoteles, templos, salas de conferencia y centros de convenciones. Esta solución todo en uno está diseñada con características profesionales, tales como un poderoso sistema de altavoces bidireccional, entradas para micrófono y dispositivo de reproducción, una lámpara alimentada por USB y una salida separada para alimentar un sistema de sonido externo o zona remota. También cuenta con una bandeja rígida para ordenadores portátiles y convenientes tomas de corriente alterna.
Consulte el capítulo Ajustes de esta guía para aprender a integrar el Lectern Active con su sistema de audio y luego consulte el capítulo Operación para comenzar a utilizar el Lectern Active.
Contenido de la caja
Lectern Active
Micrófono XLR y paraviento de brazo articulado
Cable de corriente
Guía del usuario
Manual sobre la seguridad y garantía
Soporte
Para obtener la información más reciente acerca de este producto (documentación, especificaciones técnicas, requisitos de sistema, información de compatibilidad, etc.) y registrarlo, visite denonpro.com.
Para obtener soporte adicional del producto, visite denonpro.com/support.
7
Características
Panel trasero
1.Entrada del cable de corriente: Inserte aquí el cable de corriente incluido para alimentar la unidad.
2.Fusible: Si el fusible está roto, desconecte el cable de alimentación de la toma de corriente y desatornille este soporte para reemplazar el fusible. Reemplácelo por un fusible de la especificación apropiada (impresa en o debajo del portafusibles). Si utiliza un fusible de especificación incorrecta, puede dañarse la unidad y/o el fusible.
3.Interruptor de encendido: Utilice este interruptor para encender y apagar el Lectern Active.
4.Luz de encendido: Esta luz se encenderá cuando el Lectern Active se encuentre encendido.
5.Tomacorriente de CA: Conecte aquí otros dispositivos. Los tomacorrientes de CA funcionan cuando el suministro eléctrico de la pared está conectado.
5 |
5 |
1


 4
4


 2
2


 3
3


Panel superior
1.Volumen del micrófono: Gire esta perilla para ajustar el volumen del micrófono.
2.Entrada auxiliar (3,5 mm / 1/8 pulg.): Conecte a esta entrada auxiliar estéreo de 3,5 mm (1/8 pulg.) un reproductor de CD, un reproductor de medios digitales u otra fuente de audio. Controle el volumen de salida mediante la perilla de volumen auxiliar.
3.Entradas auxiliares (RCA): Conecte a estas entradas auxiliares de RCA un reproductor de CD, un reproductor de medios digitales u otra fuente de audio. Controle el volumen de salida mediante la perilla de volumen auxiliar.
4.Volumen auxiliar: Gire esta perilla para ajustar el volumen de las entradas auxiliares.
5.Salida (XLR): Conecte esta salida XLR a otro altavoz activo (alimentado). El nivel de esta salida se controla mediante el ajuste de volumen del micrófono y volumen auxiliar.
6.Puerto de carga USB: Conecte aquí el cable de carga de su dispositivo para cargarlo. La carga por USB funciona solamente cuando la unidad está encendida.
1


 4
4


 5 6
5 6

 2
2 

 3
3


8
Loading...