

Denon DN-306S User Manual

DN-306S
User Guide
English ( 2 – 5 )
Guía del usuario
Español ( 6 – 9 )
Guide d'utilisation
Français ( 10 – 13 )
Guida per l'uso
Italiano ( 14 – 17 )
Benutzerhandbuch
Deutsch ( 18 – 21 )
Appendix
English ( 22 )

2
User Guide (English)
Introduction
The DN-306S is a self-powered (active) speaker designed to meet your needs in multiple environments such
as boardrooms, classrooms, presentation facilities, and other installed applications. It is focused on
delivering pure sound reproduction, excellent for both speech and music.
The DN-306S delivers a wide-range frequency response by employing two extraordinary drivers and unique
crossover technology. It boasts a balanced low-mid frequency response along with a defined mid and high
frequency response.
Box Contents
• DN-306S (1)
• Power Cable
• User Guide
• Safety & Warranty Manual
Support
For complete system requirements, compatibility information, and product registration, visit the Denon
Professional website: denonpro.com.
3
Features
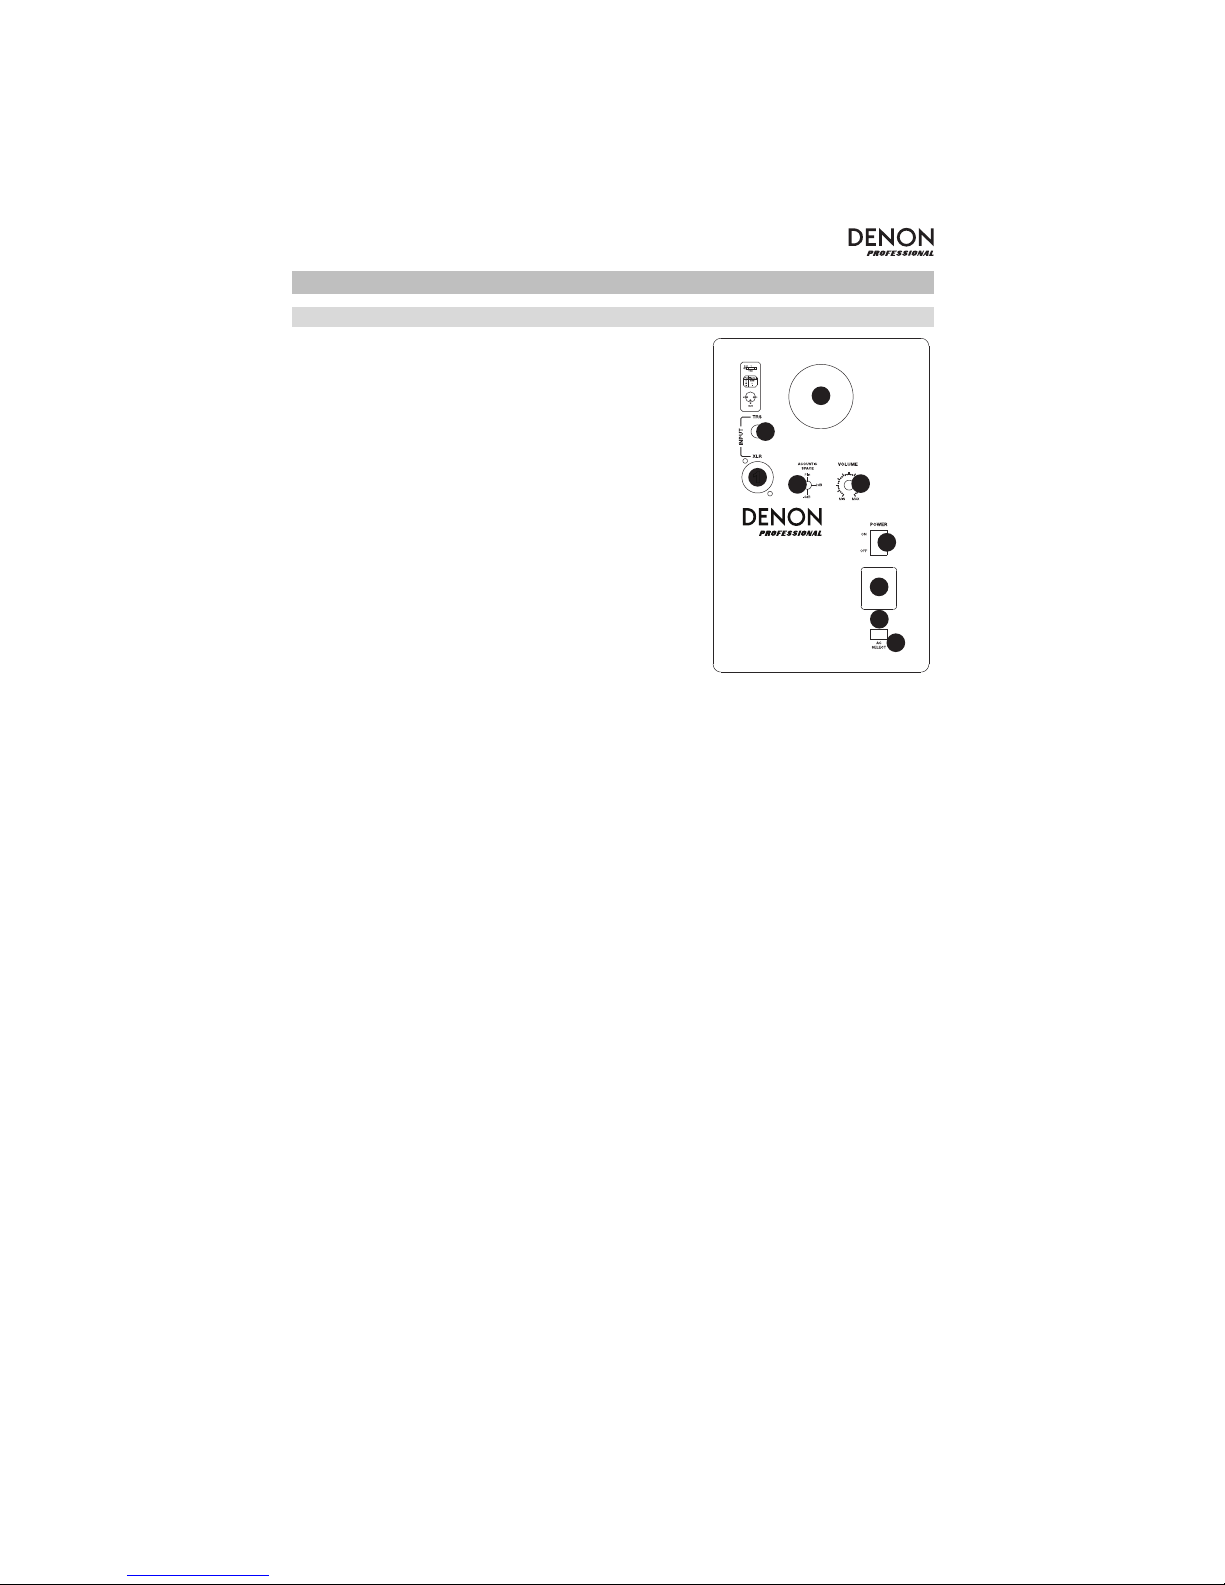
Rear Panel
1. XLR Input: This jack accepts XLR input connections with
either balanced or unbalanced wiring. The input wiring of an
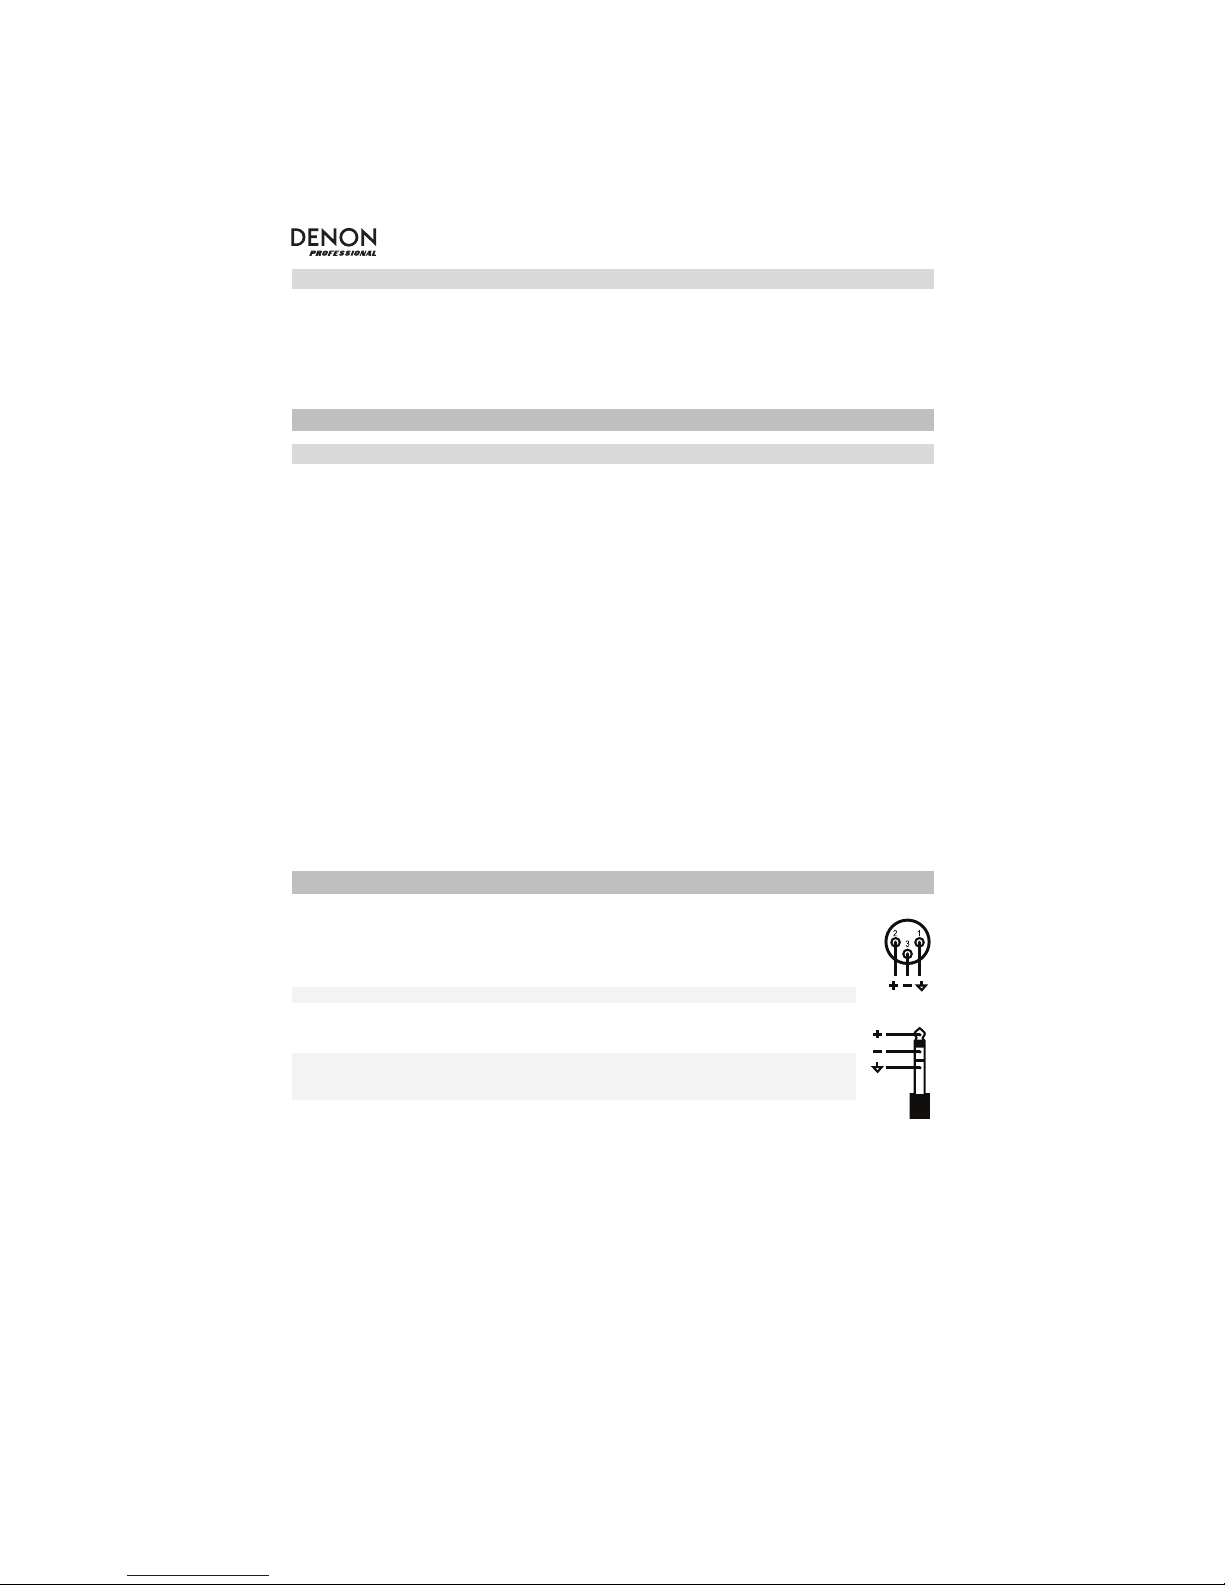
XLR connector should be as follows:
• XLR Pin 1: signal ground (shield)
• XLR Pin 2: signal positive (+)
• XLR Pin 3: signal negative (–)
2. TRS Input: This jack accepts 1/4" connections with either
balanced or unbalanced wiring. For balanced wiring, a threeconductor TRS plug is necessary. The input wiring of a TRS
connector should be as follows:
• TRS Tip: signal positive (+)
• TRS Ring: signal negative (–)
• TRS Sleeve: signal ground (shield)
Unbalanced 1/4" wiring can be done with either a two- or
three-conductor (TS or TRS) plug. A two-conductor (TS) plug
automatically grounds the signal negative input, whereas a
three-conductor (TRS) plug, wired unbalanced, provides the
option of leaving the negative input open or grounded. We
recommend that you ground the unused negative input (this
can be done by wiring the ring and sleeve of the TRS plug together). The TRS input is summed
through a balanced input amplifier with the XLR input, allowing both inputs to be used simultaneously.
Input specifications apply to both.
3. Sub-Frequency Vent Port: This port aids in reproduction of very low frequencies by discharging
frequencies below 60 Hz and to act as a cooling mechanism to prevent overheating. This port should
not be blocked.
4. Acoustic Space Switch: Your DN-306S loudspeakers should ideally be placed at least one foot away
from the nearest wall, ceiling, or other large, flat surface. In the real world, this may be impractical due
to space limitations. For that reason, DN-306S loudspeakers feature an acoustic space switch. This
switch compensates for placement near walls where bass response is affected by its proximity to
other objects.
Tip: Be sure to leave at least 3" of space between the rear of the loudspeaker and a wall to allow the
rear-firing port to "breathe" properly. Placing the loudspeaker any closer than 3" may adversely affect
low-frequency response.
5. Volume Control: Use the volume control to set the output sound pressure from the
DN-306S to proper levels as required.
6. Power Switch: This switch turns the loudspeaker on and off. The “auto-power” feature will go into
low-power “eco” mode if there is no signal present for about 12 minutes. To “wake” from low-power
mode, send an audio signal to the speakers.
7. Power Receptacle: Accepts a detachable 3-circuit line cord in order to power the loudspeaker.
8. Fuse Holder: Holds the external main fuse.
9. Voltage-Select Switch: Provides two selections, 115V AC and 230V AC, and should be set to match
the "house supply" (receptacle) voltage of the country or location in which the loudspeaker is used.
The 115V setting is correct for the USA, while the 230V setting is correct for most of the UK and
Europe.
DN-306S
Precision Acoustic Monitor
5
1
2
3
7
9
8
4
6
4
Front Panel
1. Power LED (front panel; not pictured): The power indicator illuminates when the loudspeaker is
receiving power and the rear panel Power Switch is in the "ON" position.
2. HF Driver (tweeter) (front panel; not pictured): The high-frequency driver outputs the top range of the
audio spectrum.
3. LF Driver (woofer) (front panel; not pictured): The low-frequency driver outputs the bottom range of
the audio spectrum.
Setup
Precautions
Use the following guidelines to get the best performance out of your loudspeakers.
• Handling: The DN-306S set is packaged in the box tightly, so your attention is required when taking
the loudspeakers out of the box.
To avoid possible damage to the loudspeaker units, hold both sides of the loudspeaker in order to pull
it out of the box.
• Correct Power Operation: Since the DN-306S contains its own amplifier, it must be connected to a
power outlet using the detachable AC cable provided. Before connecting power, please make sure
that the Voltage-Select Switch located on the loudspeaker's rear panel is set to the appropriate
position, as described in the rear-panel features list appearing earlier in this manual.
WARNING! Use of improper Voltage-Select Switch combinations may result in hazardous conditions
and/or damage to loudspeaker components not covered by loudspeaker warranty.
• Connections: You can connect either an XLR balanced cable or TRS balanced/unbalanced cable
from the input of each DN-306S to your corresponding preamp, computer, mixer, or audio interface.
We recommend that you use high-quality balanced or unbalanced cables for input connections. Also,
ALWAYS turn off the power of the DN-306S and turn the volume of the DN-306S down to a minimum
before making the necessary connections.
Remarks: DO NOT place any obstacles that may block the flow of air in front or between the loudspeakers.
Also remove reflective materials such as glass, mirrors or metal from the loudspeaker environment. PLACE
THOSE MATERIALS AWAY FROM THE PATH OF THE SOUND FROM THE DN-306S.
If your loudspeakers must be oriented horizontally due to space or line-of-sight considerations, place them
so that their tweeters are on the "inside" to improve imaging.
Connection
To connect your loudspeaker to your mixer or audio interface, follow the steps below for your
connector type. Make sure your audio source is line-level.
XLR Cable: Connect a channel of your audio source's main output to the loudspeaker's XLR
input.
Important: Pin 2 is positive/hot, Pin 3 is negative/cold, and Pin 1 (the shield pin) is the ground.
1/4" (6.35 mm) TRS or TS Cable: Connect a channel of your audio source's main output to
the loudspeaker's 1/4" (6.35 mm) input.
Important: For balanced cables (TRS, shown here), the tip of the plug is positive/hot, the ring
is negative/cold, and the sleeve is the ground. For unbalanced cables (TS), the tip of the plug
is the signal, and the sleeve is the ground.

5
Mounting Points
Using the threaded inserts on the bottom face of
the enclosure, you may optionally attach the
loudspeaker to VESA-standard mounts (sold
separately) for installation on walls or ceilings. Use
standard M4 machine screws (0.7 mm pitch) which
can be found from a local hardware store or home
improvement store.
Important: We recommend using screws that are
10–14mm longer than the thickness of your
mounting bracket. Do not drive the screws more
than 14mm into the threaded inserts. Follow the
specifications and instructions provided by the
mount manufacturer for proper installation.

6
Guía del usuario (Español)
Introducción
El DN-306S está monitor activos diseñado para satisfacer sus necesidades en diversos
ambientes tales como salas de juntas, aulas, salas para presentaciones y otras aplicaciones
instaladas. Está pensado para brindar una reproducción de sonido pura, excelente tanto para
discursos como para música.
El DN-306S brinda una respuesta en frecuencia de gama amplia gracias a sus dos drivers
extraordinarios y su tecnología de crossover sin igual. Ofrece una respuesta en frecuencia
baja-media balanceada junto con una respuesta en frecuencia media y alta definida.
Contenido de la caja
• DN-306S (1)
• Cable de alimentación
• Guía del usuario
• Manual sobre la seguridad y garantía
Soporte
Para obtener la información más completa acerca de este product (los requisitos del sistema,
compatibilidad, etc) y registro del producto, visite denonpro.com.
7
Características
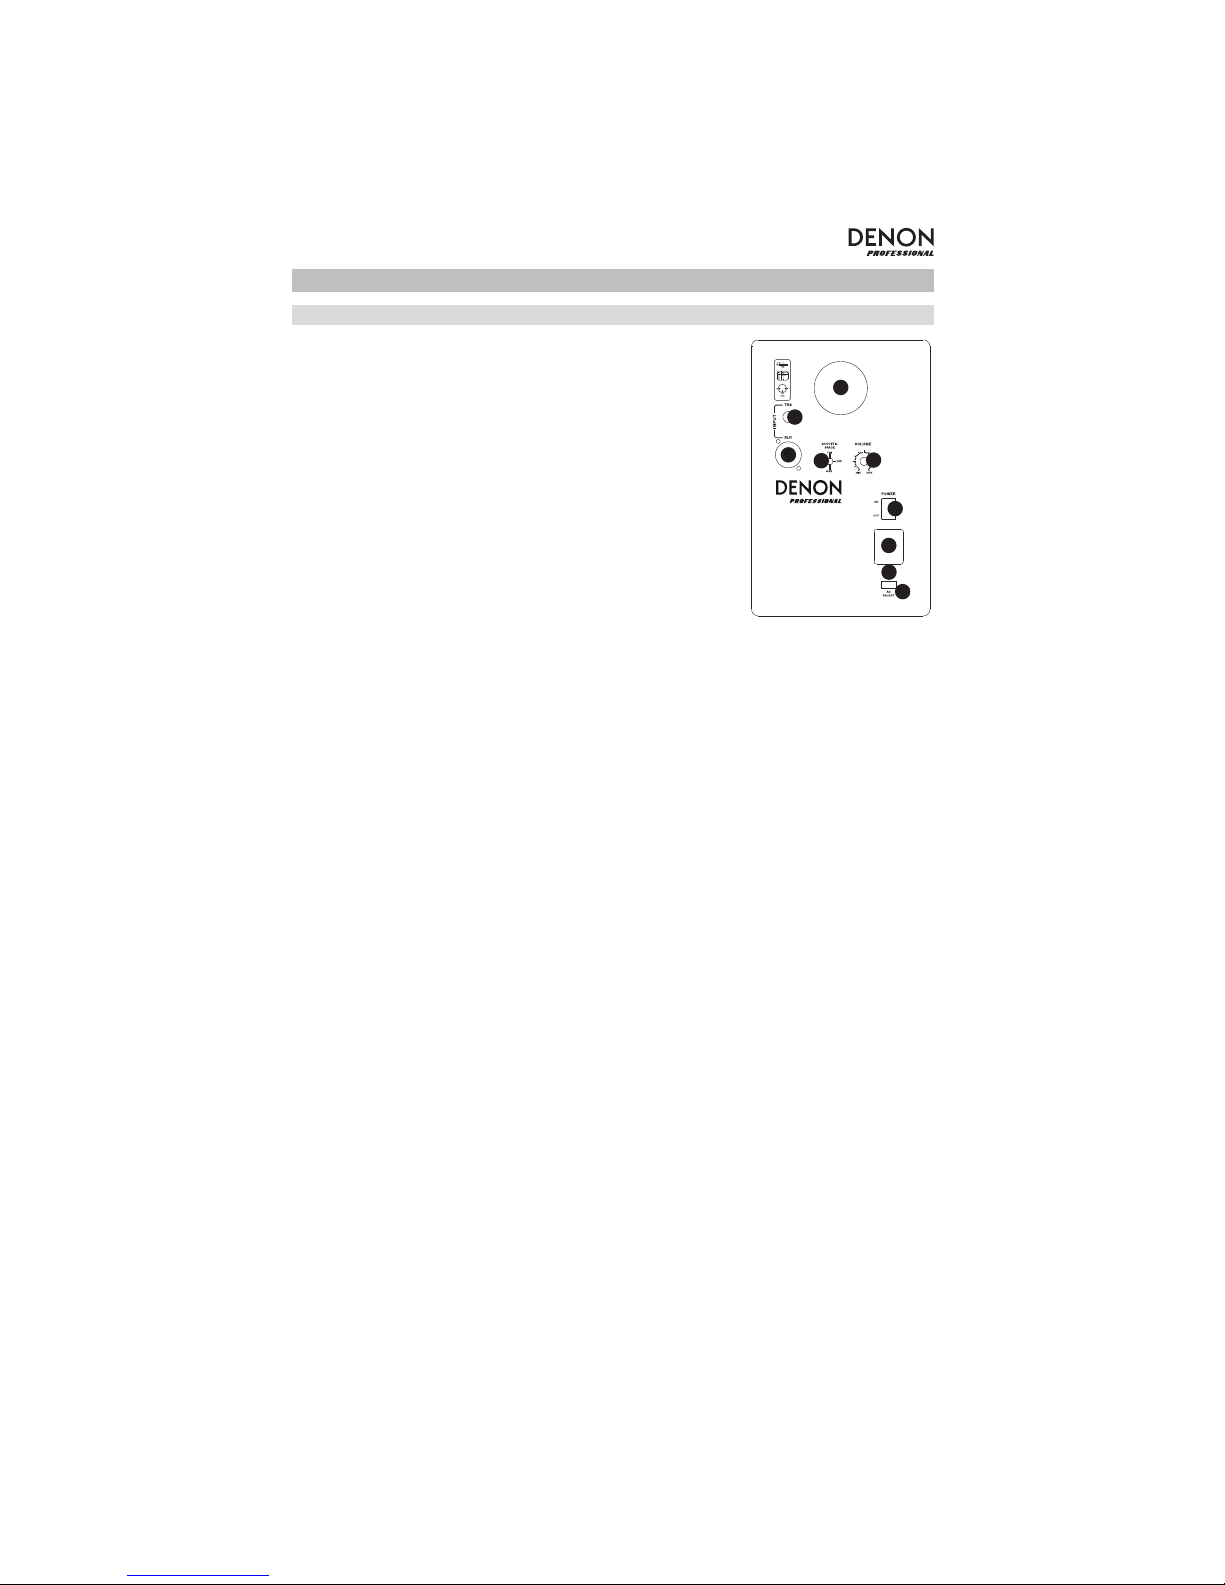
Panel trasero
1. Entrada XLR: Este conector XLR admite señales de entrada
balanceadas y no balanceadas. El cableado de la entrada XLR
se realiza de acuerdo con el siguiente esquema:
• Patilla 1: Tierra (Masa)
• Patilla 2: Positivo (+)
• Patilla 3: Negativo (–)
2. Entrada TRS: Este conector 1/4" (6,35 mm) admite señales de
entrada balanceadas y no balanceadas. Si desea establecer
una línea balanceada deberá utilizar conectores TRS (tip-ringsleeve) balanceados, con cables de tres conductores. El
cableado de la entrada TRS se realiza de acuerdo con el
siguiente esquema:
• Punta: Positivo(+)
• Anillo: Negativo (–)
• Pantalla: Tierra (Masa)
El cableado no balanceado puede realizarse con dos o con tres conductores (TS y TRS,
respectivamente). Si utiliza un conector TS de dos conductores, la señal de entrada negativa se
conecta automáticamente a la masa, mientras que si emplea un conector TRS de tres
conductors soldado en modo no balanceado tendrá la opción de dejar el polo negativo abierto
o conectarlo a la masa. Es aconsejable conectar a la masa la entrada negativa no utilizada.
Para ello basta con unir el anillo y la pantalla del conector TRS. La señal presente en la entrada
TRS se suma a la de la entrada XLR a través de un amplificador de entrada balanceada, por lo
que ambas entradas pueden ser utilizadas de manera simultánea. Las especificaciones de
entrada son aplicables a ambas entradas.
3. Puerto de subfrecuencias: Este puerto ayuda en la reproducción de frecuencias muy bajas al
descargar las frecuencias inferiores a 60 Hz y actuar como mecanismo de enfriamiento para
evitar el recalentamiento. Este puerto no debe bloquearse.
4. Interruptor de acústica de espacio: los monitores DN-306S deben colocarse idealmente
como mínimo a 30 cm (1 pie) de distancia de la pared más cercana, el cielo raso u otra
superficie grande y plana. En el mundo real, esto puede no ser factible debido a las
limitaciones de espacio. Por esta razón, los monitores DN-306S incluyen un interruptor de
interruptor de acústica de espacio. Este interruptor compensa la ubicación de las paredes.
Este interruptor compensa la cercanía a las paredes en donde la respuesta de los graves se ve
afectada por la proximidad a otros objetos.
Consejo: Asegúrese de dejar como mínimo 7,5 cm (3 pulg.) de espacio entre la parte trasera
del altavoz y la pared, para permitir que el puerto trasero "respire" apropiadamente. Si se
coloca el altavoz a menos de 7,5 cm, puede afectarse perjudicialmente la respuesta en
frecuencias bajas.
5. Control de volumen: Este control de volumen permite establecer el nivel de presión sonora
emitido por el DN-306S.
6. Switch de encendido: Prende y apaga el monitor. La característica de "apagado-automático"
entrará en modo de ahorro de energía "eco" si no hay señales presentes en aproximadamente 12
minutos. Para "salir" del modo de ahorro de energía, envíe una señal de audio a los altavoces.
7. Toma de alimentación: Esta toma admite un cable de alimentación de tres polos, a través del
cual el monitor recibe la alimentación necesaria.
8. Portafusible: Acoge el fusible externo principal.
9. Conmutador de selección de tensión: Dispone de dos opciones (115V CA y 230V CA).
Coloque este interruptor de manera que el valor de tensión corresponda con el tipo de
corriente eléctrica disponible en el país o región donde desee utilizar los monitores. El ajuste
"115V" es el adecuado para los Estados Unidos de América, mientras que en la mayoría de los
países europeos se emplea una tensión de 230V.
DN-306S
Precision Acoustic Monitor
5
1
2
3
7
9
8
4
6

8
Panel frontal
1. LED de alimentación: el indicador de alimentación se ilumina cuando el monitor recibe
electricidad y el interruptor de encendido del panel posterior está en la posición "ON".
2. Driver de frecuencia agudos (tweeter): el altavoz de altas frecuencias emite la gama
superior del espectro de audio.
3. Driver de frecuencia graves (woofer): el altavoz de bajas frecuencias se encarga de la
gama inferior del espectro de audio.
Configuración
Precauciones
Cumpla las siguientes directrices para obtener el mejor rendimiento de sus monitores.
• Manipulación de los monitores: Los DN-306S están apretados dentro del embalaje.
Retírelos de la caja con precaución.
• Alimentación: Los monitores DN-306S contienen su propio amplificador y por
consiguiente, necesitan recibir alimentación eléctrica a través del cable de alimentación
CA suministrado. Antes de conectar los monitores a la red eléctrica, asegúrese de que el
interruptor de selección de tensión (situado en la parte trasera de los monitores) se
encuentra en la posición adecuada (Consulte la sección anterior).
¡ATENCIÓN!: El uso de un valor de tensión inapropiado podría provocar situaciones
peligrosas y/o daños en los componentes del monitor que no están cubiertos por la
garantía.
• Conexiones: Puede conectar tanto un cable XLR balanceado como un cable TRS
balanceado/no balanceado desde la entrada de cada DN-306S a su preamplificador,
ordenador, mezclador o interfaz de audio correspondiente. Recomendamos utilizar
cables balanceados o no balanceados de alta calidad para las conexiones de entrada.
Además, SIEMPRE apague el DN-306S y baje el volumen del mismo al mínimo antes de
realizar las conexiones necesarias.
Nota: EVITE la presencia de objetos que puedan obstaculizar la circulación de aire delante de
los monitores o alrededor de los mismos. Evite asimismo la presencia de materiales
reflectantes como cristales, espejos o superficies metálicas en el entorno de escucha.
MANTENGA DICHOS MATERIALES ALEJADOS DE LA TRAYECTORIA DEL SONIDO DE LOS
DN-306S.
 Loading...