

Denon DN-300UI User Manual

A
DN
User Guide
Guía del usuario
Guide d’utilisation
Guida per l’uso
Benutzerhandbuch
ppendix
-
300
UI
English ( 2 – 12 )
Español ( 13 – 23 )
Français ( 24 – 34 )
Italiano ( 35 – 45 )
Deutsch ( 46 – 57 )
English ( 58 – 59 )

k
User Guide (English)
Introduction
Box Contents Support
DN-300UI Wireless LAN Antenna For the latest information about
Rack Ears with Screws FM Indoor Antenna Cable
Power Cable User Guide
Remote Control Safety & Warranty Manual
Safety Instructions
Please also see the included Safety and Warranty Manual for more information.
this product (system requirements,
compatibility information, etc.)
and product registration, visit
denonpro.com.
Before turning the power on:
Proper ventilation:
About condensation:
Cautions on using mobile
phones:
Moving the unit:
About care:
Rackmount warnings:
(required rack specifications for
mounting the unit in a rack)
Rack installation:
Make sure all connections are secure and correct and that there
are no problems with the connection cables.
Power is supplied to some of the circuitry even when the unit is
powered off. When the unit will not be used for long periods of
time, disconnect the power cable from the power outlet.
If the unit is left in a room which is not properly ventilated or is full
of smoke from cigarettes, dust, etc. for long periods of time, the
surface of the optical pickup may get dirty, causing incorrect
operation.
If there is a major difference in temperature between the inside of
the unit and the surroundings, condensation may form inside the
unit, causing the unit not to operate properly. If this happens, let
the unit sit for an hour or two while powered off, and wait until there
is little difference in temperature before using the unit.
Using a mobile phone near this unit may cause noise. If this occurs,
move the mobile phone away from this unit when it is in use.
Before moving the unit, turn off its power and disconnect the power
cable from the power outlet. Next, disconnect its connection cables
from other devices before moving it.
Wipe the cabinet and control panel clean with a soft cloth.
Follow the instructions when using a chemical cleaner.
Do not use benzene, paint thinner, insecticide, or other organic
solvents to clean the unit. These materials can cause material
changes and discoloration.
EIA standard 19-inch (48.3cm) rac
1U-size installation compatible rack
Rack that has a guide rail or shelf board that can support this
device.
This product will work normally when the
player unit is mounted within 10° off the
vertical plane at the front panel. (See image.)
10°
Maximum
2
Unit
Features
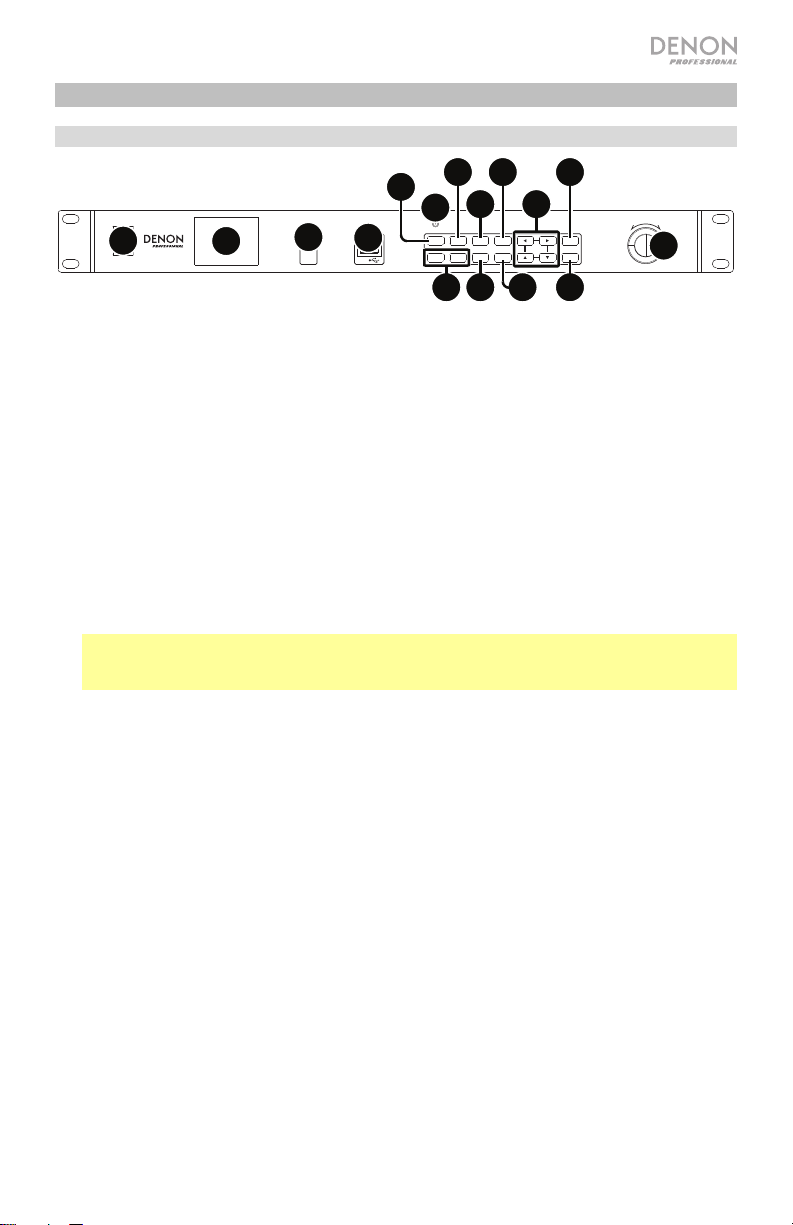
Front Panel
7
ON
1
OFF
POWER
2
5V1
A
4
3
AUX IN
USB
9
6
IR
POWER MUTE SLEEP MENU MODE
-
VOL+VOL
FAVORITE
DIMMER
10
8
14
12
11
ENTER
1513
16
VOLUME/ SELECT
PUSH
ENTER
5
-
DN
300
UI
1. Power Switch: Press this button to turn the unit on or off. Make sure the AC In is properly
connected to a power outlet. Do not turn the unit off during media playback—doing so
could damage your media.
2. Display: This screen indicates the unit’s current operation.
3. Aux In: Connect an optional device to this input using a 1/8” (3.5mm) TRS cable. See
Menu Operation > Aux for more information.
4. USB Port: Connect a mass-storage-class USB device to this port. See Menu Operation >
Media Center for more information.
5. Jog Dial: Turn this dial to increase or decrease the volume of the audio source. When
navigating menus, turn this dial to browse the options shown in the display (e.g., media
types in the Media Selection screen, files/folders USB Mode, etc.). Press this dial to
confirm a selection.
6. Remote Sensor: Point the remote control at this sensor when operating it.
Note: If the remote sensor is exposed to direct sunlight, strong artificial light (like from an
interverter-type fluorescent lamp), or infrared light, the unit or remote control may not
function properly.
7. Power Button: Press this button to put the unit into standby mode.
8. Mute Button: Press this button to silence the audio output.
9. Sleep Button: Press this button to set the unit to enter standby mode after a period of
time.
10. Menu Button: Press this button to access the main menu. See Menu Operation for more
information.
11. Navigation Buttons: Use these buttons to navigate the menus on the Display.
12. Mode Button: Press this button to change media playback modes.
13. Vol-/Vol+ Buttons: Press these buttons to decrease or increase the volume.
14. Dimmer Button: Press this button to dim the Display.
15. Favorite Button: In Internet Radio or FM modes, press this button briefly to access the list
of favorite stations. Press and hold this button to save a station as a favorite.
16. Enter Button: Press this button to confirm a selection.
3
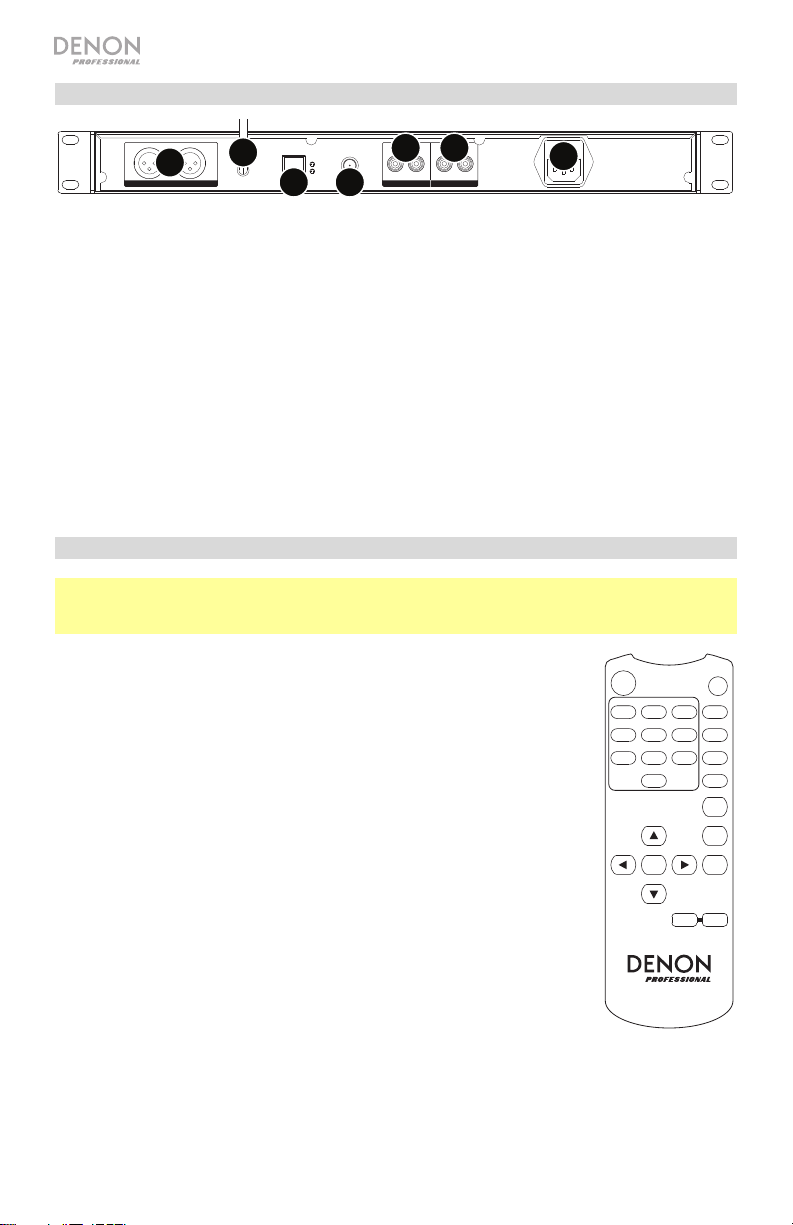
Rear Panel
RL
2
OUTPUT OUTPUT AUX IN
RJ45 FM ANTENNA R L R L
5
WLAN
TX/RX
LINK
6
7
3
4
1
1. AC In: Use the included power cable to connect this input to a power outlet.
2. Outputs (balanced XLR): Use XLR cables to connect these outputs to external speakers,
a sound system, etc.
3. Outputs (unbalanced): Use RCA cables to connect these outputs to external speakers, a
sound system, etc.
4. Aux In (RCA): Use a standard stereo RCA cable to connect an optional audio source to
this stereo input. When a cable is connected to the Aux In on the front panel, these inputs
will be disabled.
5. WLAN Antenna Terminal: Connect the included Wireless LAN Antenna here to improve
wireless reception.
6. RJ45 Port: This port lets you connect DN-300UI to a network. Use a standard Ethernet
cable to connect this port to a network switch or router.
7. FM Antenna Terminal: Connect the included FM antenna to this terminal.
Remote
Note: Point the remote control at the remote sensor when operating it. If the remote sensor is
exposed to direct sunlight, strong artificial light (like from an interverter-type fluorescent lamp),
or infrared light, the unit or remote control may not function properly.
• Power Button: Press this button to power on the unit or to put it in
standby mode.
• Number Buttons (0–9): Use these buttons to input values for
selections on the Display, such as FM frequency or Preset number.
• Navigation Buttons: Use these buttons (Left, Right, Up, and Down)
to navigate the menus on the Display.
• Enter Button: Press this button to confirm a selection.
• Vol-/Vol+ Buttons: Press these buttons to decrease or increase the
volume.
• Mute Button: Press this button to silence the audio output.
• Menu Button: Press this button to access the main Menu.
• Dimmer Button: Press this button to dim the Display.
• Sleep Button: Press this button to set the unit to enter standby mode
after a period of time.
• Alarm Button: Press this button to activate or deactivate an alarm.
• Memory Button: Press this button to add the current station as a
favorite.
• Favorite Button: In Internet Radio or FM modes, press this button briefly to access the list
of favorite stations. Press and hold this button to save a station as a favorite.
• Mode Button: Press this button to change media playback modes.
POWER
LEFT
MUTE
MENU
321
DIMMER654
SLEEP9
8
7
ALARM
0
MEMORY
FAVORIT EUP
RIGHT
MODEENTER
DOWN
+
VOL-VOL
DN-300UI
4

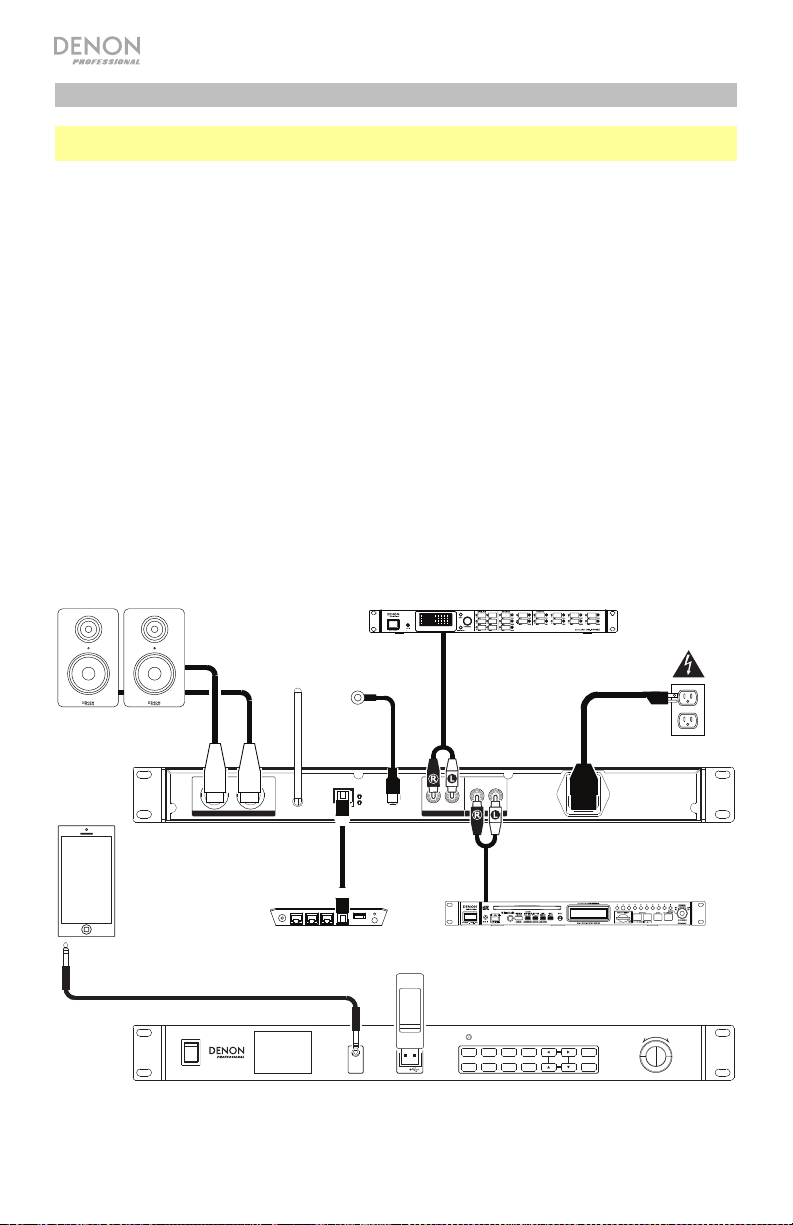
Setup
Important: Connect all cables securely and properly (with stereo cables: left with left, right
with right), and do not bundle them with the power cable.
1. Use XLR cables or a stereo RCA cable to connect the Outputs (balanced or unbalanced)
to the analog inputs of your external receiver, amp, powered monitors, etc.
2. Use stereo RCA or 1/8” (3.5 mm) cables to connect any optional external devices to the
Aux In on the front or back of the unit.
3. Connect the WLAN Antenna and FM Antenna on the back of the unit, if needed.
4. After completing all the connections, use the included power cable to connect the AC In to
a power outlet.
5. Power on all of your audio sources.
6. Power on DN-300UI.
7. To connect DN-300UI to a network, press the Menu button, select Configuration and
choose Network. To have DN-300UI automatically configure network settings, select your
desired connection type: Wired Network Configuration, Wireless Network
Configuration, or Wireless Network (WPS PBC). To manually configure network settings,
select Manual Configuration. For wired network connections, make sure DN-300UI is
connected to your network switch or router by Ethernet cable from the RJ45 Port.
Powered Speakers
FM Antenna
Zone Mixer
Power
RL
OUTPUT OUTPUT AUX IN
RJ45 FM ANTENNA R L R L
TX/RX
WLAN
LINK
CD Player
Smartphone,
tablet, etc.
Router
USB Flash Drive
ON
OFF
POWER
5V1
AUX IN
USB
IR
A
POWER MUTE SLEEP MENU MODE
-
FAVORITE
DIMMER
VOL+VOL
Items not listed under Introduction > Box Contents are sold separately.
VOLUME/SELECT
PUSH
ENTER
ENTER
-
DN
300
UI
5

Menu Operation
To access the main Menu, press Menu.
To move through the options in the Display, use the Navigation Buttons or the Jog Dial.
• Press Right to move forward in the menus.
• Press Left to move backward in the menus.
• Press Up or Down or use the Jog Dial to change selection.
To confirm a selection, press the Jog Dial or the Enter button.
You can also use the Remote Control to navigate the Display and make selections.
See the following sections for information on each Menu item:
Configuration Media Center
Local Radio FM Radio
My mediaU Information Center
Internet Radio Aux
Configuration
Select the Configuration icon to access the following sub-menu options.
Mode
Select this option to choose Internet Radio or Clock Radio modes. When Internet Radio
mode is selected, the Display will default to the currently selected media type when the Mode
button is pressed. When Clock Radio mode is selected, the Display will default to a standby
screen featuring the time, date, and weather (if added) when the Mode button is pressed.
Manage my mediaU
Select this option to Enable or Disable the mediaU management system, which allows you to
save and organize favorite stations and share them between devices. See Menu Operation >
My mediaU for more information.
Note: To use the mediaU management system, an account is required. Visit mediayou.net for
more information.
Network
Select this option to configure your Network settings.
• Wired Network Configuration: Select this to Enable or Disable a wired network
connection. When enabled, you will automatically join the connected network. Make sure
the RJ45 Port is connected to a network switch or router before doing so.
• Wireless Network Configuration: Select this to Enable or Disable a wireless network
connection. When enabled, you can select which wireless network you want to join. If the
network is password protected, you will be prompted to enter it using the Jog Dial and
Navigation Buttons.
• Wireless Network (WPS PBC): Select this to Enable or Disable a connection to a Wi-Fi
Protected Setup (Push-button configuration).
• Manual Configuration:
o Wired: Choose DHCP On or DHCP Off.
o Wireless: Choose DHCP (On or Off), Enter SSID, or Manage.
• Check Network when Power On: Select this to Enable or Disable automatic network
reconnection when powered on. When enabled, DN-300UI will connect to the last used
network.
6

Date & Time
Select this option to configure the Date & Time settings.
• Set Date and Time: Select this to edit the Date and Time settings. Choose Manual Setup
to enter the date and time manually, or select Auto Detect to have DN-300UI detect the
date and time based on your network connection.
• Set Time Format: Select this to set the time format to 12 Hour or 24 Hour.
• Set Date Format: Select this to set the date format to YYYY/MM/DD, DD/MM/YYYY, or
MM/DD/YYYY.
Alarm
Select this option to set or edit an alarm.
• Alarm 1 and Alarm 2: Select these options to Turn On or Turn Off the two alarms.
o Repeat: Sets when the alarm is active. Choose Everyday, Once, or the Day of Week.
o Time: Sets what time the alarm will ring. Choose HH, MM, and AM/PM.
o Sound: Sets what sound will be used for the alarm. Choose Beep, Melody, Internet
Radio, FM, or USB.
• NAP Alarm: Select this to choose the default snooze time for when the alarm rings.
Choose Turn Off, 5 Minutes, 10 Minutes, 20 Minutes, 30 Minutes, 60 Minutes, 90
Minutes, or 120 Minutes.
• Alarm Volume: Sets the volume of the alarm.
Timer
Select this option to set a timer. Use the Navigation buttons to set the desired time.
Language
Select this option to set the operating language.
Dimmer
Select this option to set the brightness levels of the display. Select Power Saving to set the
brightness level when the Dimmer is enabled or the unit is in standby mode. Select Turn On
to set the brightness level when the Dimmer is disabled and the unit is on.
Display
Select this option to set the Display appearance to Color or Monochrome.
Power Management
Select this option to set an amount of time after which the unit will go into standby mode if
there is no activity. Choose Turn Off, 5 Minutes, 15 Minutes, or 30 Minutes.
Sleep Timer
Select this option to set a Sleep Timer to put the unit in standby mode. Choose 15 Minutes,
30 Minutes, 45 Minutes, 60 Minutes, 90 Minutes, 120 Minutes, 150 Minutes, or 180
Minutes.
Buffer
Select this option to set the preferred amount of buffer time. Choose 2 Seconds, 4 Seconds,
or 8 Seconds.
7

Weather
Select this option to set the preferences for displaying weather information.
• Set Location: Select this to set the preferred location for weather information. Choose
region, country, state, and city.
• Temperature Unit: Choose Celsius (°C) or Fahrenheit (°F).
• Show on Standby: Choose Off or On.
FM Setup
Select this option to adjust the FM radio settings.
• Mode: Choose Set Mono or Set Stereo to change the FM mode.
• Threshold: Select this to change the Seek Threshold and Stereo Threshold for the FM
radio. For each, choose Strong, Default, or Weak.
o Seek Threshold: If the station’s signal strength exceeds the set threshold when
scanning, then scanning will stop at that station. If the station’s signal strength does
not pass the set threshold, then scanning will continue until the next station whose
signal does pass the threshold and stop.
o Stereo Threshold: If the station’s signal strength exceeds the set threshold, then it will
become stereo. If the station’s signal strength does not pass the threshold, then it will
stay in mono.
Local Radio Setup
Select this option to set the local radio stations that will appear under the Local Radio option
in the Menu. You can choose to Manual Setup (Country), Manual Setup (City), or Auto
Select.
Playback Setup
Select this option to set the playback mode for USB playback. Choose Off, Repeat All,
Repeat One, or Shuffle.
DLNA
Select this option to set the name that DN-300UI will appear as to other devices when using
UPnP. See Menu Operation > Media Center > UPnP for more information.
Equaliser
Select this option to change the EQ setting for the audio output. Choose Normal, Flat, Jazz,
Rock, Soundtracks, Classical, Pop, or News.
Resume When Powered On
Select this option to set DN-300UI to automatically resume audio playback when powered on.
Choose On or Off.
Software Update
Select this option to check for software updates.
Reset to Default
Select this option to reset DN-300UI to its default settings.
8

Local Radio
Select this option to connect to local radio stations. To set what stations appear here go to
Configuration > Local Radio Setup.
My mediaU
Select this option to access stations saved using the mediaU management system. To use the
mediaU management system, an account is required. Visit mediayou.net for more
information. Once you have created a mediaU account, follow these steps to access your
saved stations:
1. Enable mediaU by going to Configuration > Manage my mediaU.
2. Add DN-300UI as a radio player to your mediaU account on your external device using the
MAC address for your network (Wired or Wireless) in Information Center > System
Information.
3. When DN-300UI and your device are both connected to the same network, use My
mediaU to access the stations saved to your mediaU account. These are stored in folders
for Favorite Station, Favorite Location/Genre, My Local Station, and Manually Add.
Internet Radio
Select the Internet Radio icon to access the following sub-menu options.
Note: When in Clock Radio mode, this option is called Global Radio.
My Favorite
Select this option to access the saved favorite stations.
Radio Station/Music
Select this option to find an Internet radio station. You can search by Global Top 20, Genre,
Country/Location, or Highlight (a selection of recommended stations).
Local Radio
Select this option to connect to local radio stations. To set what stations appear here go to
Configuration > Local Radio Setup.
History
Select this option to view stations that have been recently played.
Service
Select Search Radio Station to search for a station by name. Select Add New Radio Station
to add a new station by web address.
In Internet Radio mode, you can also perform any of the following operations:
• Press the Right Navigation Button to view more information about the current station.
• Press the Up or Down Navigation Buttons to change to another station.
• Press and hold the Fav button to save a station as a preset. Use the Jog Wheel to select
which preset slot you want to save the station to, and press it to save the station.
• Briefly press the Fav button to access the list of saved presets. Use the Jog Wheel to
scroll through the list, and press it to select a preset.
9

Media Center
Select the Media Center icon to access the following sub-menu options.
USB
Select this option to enter USB Mode. When a compatible USB device is inserted into the
USB Port, the contents of the device will be available here.
Note: Only mp3 and wma files are supported for USB playback.
UPnP
Select this option to stream media between DN-300UI and a PC (or other device) on the same
network using the UPnP (Universal Plug and Play) protocol.
1. Make sure the PC and DN-300UI are powered on and connected to the same network.
2. On your PC, open a UPnP compatible media server. Windows Media Player is
recommended for most users, but other software can be used.
Note: For Windows Media Player users, make sure your audio files have been added to
the Windows Media Player Library.
3. On DN-300UI, select UPnP in the Media Center menu and select your PC from the list of
available devices on the network.
4. Use the Jog Wheel to scroll through the connected device’s library. Press it to begin
streaming the selected media.
Alternatively, you can set up your PC to stream directly to DN-300UI. Consult your media
server’s documentation to find out how to set up media streaming.
Note: Go to Configuration > DLNA to change the name that DN-300UI will appear as to other
devices.
My Playlist
Select this option to access a playlist shared through UPnP.
Clear My Playlist
Select this option to delete the current UPnP playlist.
10

FM Radio
In FM mode, you can perform any of the following operations:
• Use the Up and Down Navigation Buttons to increase or decrease the frequency.
• Use the Left or Right Navigation Buttons to seek backward or forward through the
frequencies. Press the button again to stop seeking.
• Press the Jog Dial or the Enter button to automatically scan and save multiple stations to
preset numbers.
• Press and hold the Fav button to save a station as a preset. Use the Jog Wheel to select
which preset slot you want to save the station to, and press it to save the station.
• Briefly press the Fav button to access the list of saved presets. Use the Jog Wheel to
scroll through the list, and press it to select a preset.
Important:
The preset memory can hold up to 20 FM stations.
If the preset memory reaches its 20-station limit during the Auto Preset process, the process
will stop.
If you cannot receive a good broadcast signal, we recommend installing an outdoor antenna.
For details, inquire at the retail store where you purchased the unit.
When you receive a clear a broadcast signal, fix the antenna with tape in a position where the
noise level is minimal.
Information Center
Select the Information Center icon to access the following sub-menu options.
Weather Information
Select this option to view current and forecasted weather from cities around the world. After
selecting a city, you can also add it to the standby display by pressing the Right Navigation
Button, Enter Button, or Jog Wheel.
Financial Information
Select this option to view current stock index information from exchanges around the world.
System Information
Select this option to view the system software Version, Wireless Info, and Wired Info.
Aux
To play audio on an external device (e.g., smartphone, computer, portable music player, etc.)
connected to the Aux In:
1. Connect the output of your external device to the Aux In (1/8” [3.5 mm] TRS) on the front
panel or to the Aux In (RCA stereo) on the back panel.
2. To start playback, press the Play button on your external device.
11

Troubleshooting
If you encounter a problem, try doing these things first:
• Make sure all cables and other connected devices are properly and securely connected.
• Make sure you are using DN-300UI as described in this User Guide.
• Make sure your other devices or media are working properly.
• If you believe DN-300UI is not working properly, check the following table for your problem and
solution.
Problem: Solution:
Power does not turn on.
DN-300UI does not produce any
sound, or the sound is distorted.
Using the radio produces noise. Make sure the antenna is properly connected.
No Device appears even when a
USB device is inserted.
Files on a USB device do not
appear.
Files on a USB device cannot
play.
File names do not appear
properly.
Make sure DN-300UI’s power input is properly connected to a
power outlet using the included power cable.
Make sure all cable and device connections are secure and
correct.
Make sure none of the cables are damaged.
Make sure the settings on your device, loudspeaker, mixer, etc.
are correct.
Change the position or orientation of the antenna.
Use an outdoor FM antenna.
Move the antenna away from other cables.
Disconnect and reconnect the USB device to make sure it is
securely inserted.
Make sure the USB device is of a mass storage class or
compatible with MTP.
Make sure the USB device is formatted using a FAT16 or
FAT32 file system.
Do not use a USB hub, USB extension cable.
Not all USB devices are guaranteed to work; some may not be
recognized.
Make sure the files are of a supported file format. Files that are
not supported by this unit will not appear.
Make sure the USB device uses a folder structure that the unit
supports: up to 999 folders (up to 8 folder levels, including the
root) and up to 999 files.
If your USB device is partitioned, make sure the files are in the
first partition. The unit will not show other partitions.
Make sure the files are of a supported file format. Files that are
not supported by this unit will not appear.
Make sure the files are not copyright-protected. The unit cannot
play copyright-protected files.
Make sure the files are using only supported characters.
Characters that are not supported will be replaced with a “.”
12

Guía del usuario (Español)
Introducción
Contenido de la caja Soporte
DN-300UI Antena para LAN inalámbrica Para obtener la información más
Orejas de rack con tornillos Antena de FM para interiores
Cable de corriente Guía del usuario
Control remoto Manual sobre la seguridad
y garantía
Instrucciones de seguridad
Para más información, consulte también el Manual de seguridad y garantía incluido.
Antes de encender la unidad:
Ventilación apropiada:
Acerca de la condensación:
Precauciones sobre el uso de
teléfonos móviles:
Cómo mover la unidad:
Cómo cuidar la unidad:
Advertencias para el montaje
en rack:
(especificaciones para rack
requeridas para montar la unidad
en un rack)
Instalación del rack:
Asegúrese de que todas las conexiones estén aseguradas y
correctas y que no haya problemas con los cables de conexión.
Algunos circuitos permanecen alimentados aun cuando la unidad
está apagada. Cuando la unidad no se utilizará durante largos
períodos de tiempo, desconecte el cable de corriente de la toma
de corriente.
Si la unidad se deja en una sala que no está ventilada
apropiadamente o está llena de humo de cigarrillos, polvo, etc.,
durante largos períodos de tiempo, la superficie óptica puede
ensuciarse, causando un funcionamiento incorrecto.
Si existe una gran diferencia de temperatura entre el interior de la
unidad y los alrededores, puede acumularse condensación en el
interior, haciendo que la unidad no funcione correctamente. Si
esto ocurriera, deje la unidad apagada durante una o dos horas y
espere hasta que haya una menor diferencia de temperatura
antes de utilizar la unidad.
Utilizar un teléfono móvil cerca de esta unidad puede ocasionar
ruido. Si esto ocurriera, aleje el teléfono móvil de la unidad
cuando lo esté utilizando.
Antes de mover la unidad, apáguela y desconecte el cable de
corriente de la toma de corriente. A continuación, desconecte sus
cables de conexión con otros dispositivos antes de moverlo.
Limpie el gabinete y el panel de control con un paño suave.
Siga las instrucciones cuando utilice un limpiador químico.
No utilice benceno, diluyente de pintura, insecticidas u otros
solventes orgánicos para limpiar la unidad. Estas sustancias
pueden causar cambios y decoloración en los materiales.
Rack EIA estándar de 19 pulg. (48,3 cm)
Rack compatible con instalación de tamaño 1U
Rack que posee un riel guía o estante capaz de
acomodar este dispositivo
Este producto funcionará normalmente cuando
la unidad de reproducción se monte a menos de
10° respecto del plano vertical del panel frontal.
completa acerca de este product
(los requisitos del sistema,
compatibilidad, etc) y registro del
producto, visite denonpro.com.
Máximo
de 10°
Unidad
13
Características
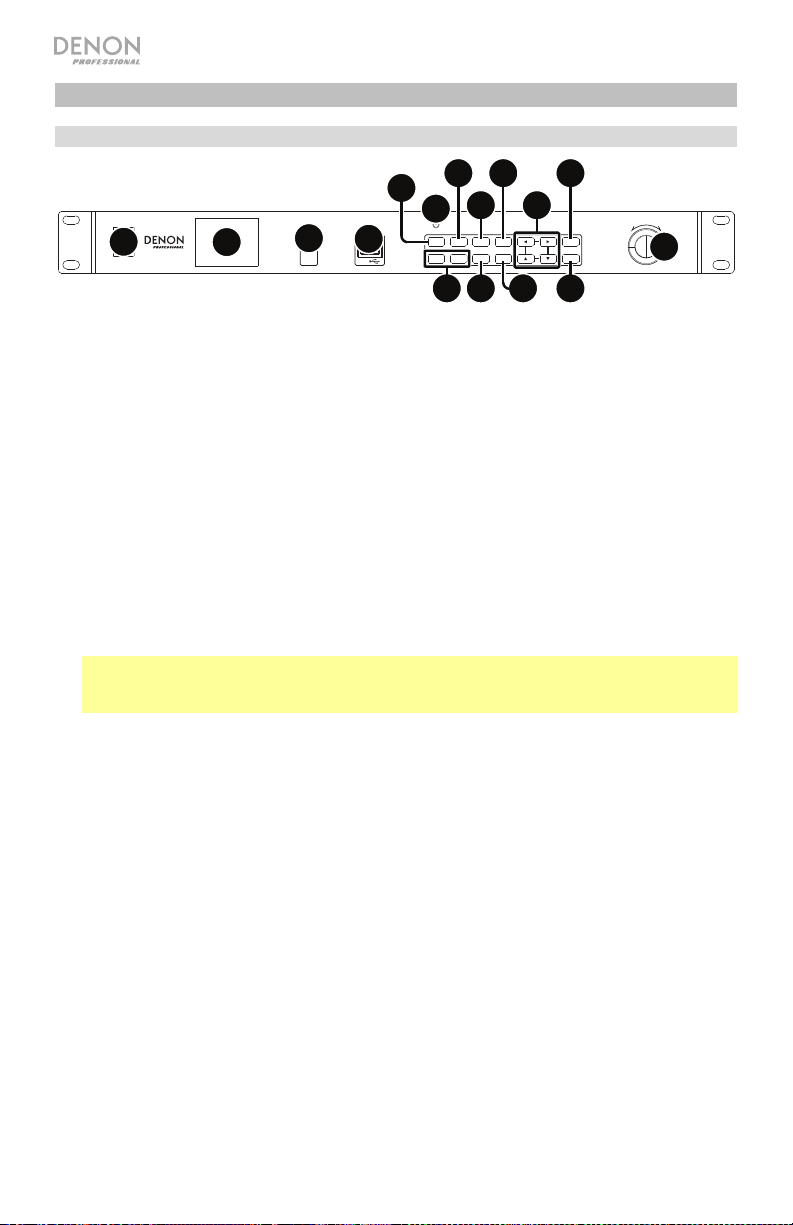
Panel frontal
7
ON
1
OFF
POWER
2
5V1
A
4
3
AUX IN
USB
9
6
IR
POWER MUTE SLEEP MENU MODE
-
VOL+VOL
FAVORITE
DIMMER
10
8
14
12
11
ENTER
1513
16
VOLUME/ SELECT
PUSH
ENTER
5
-
DN
300
UI
1. Interruptor de encendido: Pulse este interruptor para encender o apagar la unidad.
Asegúrese de que la entrada AC In esté conectada firmemente a la toma de corriente. No
apague la unidad mientras esté reproduciendo medios—esto podría dañarlos.
2. Pantalla: Esta pantalla indica el funcionamiento actual de la unidad.
3. Entrada auxiliar: Conecte un dispositivo opcional a esta entrada utilizando un cable TRS
de 3,5 mm (1/8 pulg.). Consulte Operación de los menús > Aux para mayor información.
4. Puerto USB: Conecte un dispositivo USB de almacenamiento masivo a este puerto.
Consulte Operación de los menús > Media Center para mayor información.
5. Tecla giratoria: Gire esta tecla giratoria para aumentar o disminuir el volumen de la fuente
de audio. Cuando navegue por los menús, gire esta tecla para examinar las opciones que
se muestran en la pantalla (por ej., los tipos de medio en la pantalla Media Selection
(Selección de medios), archivos/carpetas en modo USB, etc.). Pulse esta tecla giratoria
para confirmar una selección.
6. Sensor remoto: Apunte el control remoto hacia este sensor al utilizarlo.
Nota: Si el sensor del control remoto se expone a luz solar directa, luz artificial intensa
(como una lámpara fluorescente de tipo invertido) o luz infrarroja, puede que la unidad o el
control remoto no funcionen correctamente.
7. Botón de encendido: Pulse este botón para poner la unidad en modo de espera.
8. Botón de silenciamiento: Pulse este botón para silenciar la salida de audio.
9. Botón de hibernación Pulse este botón para colocar la unidad en modo de espera
después de un período de tiempo.
10. Botón de menú: Pulse este botón para abrir el menú principal. Consulte Operación de
los menús para mayor información.
11. Botones de navegación: Utilice estos botones para navegar por los menús de la
pantalla.
12. Botón de modo: Pulse este botón para cambiar los modos de reproducción de medios:
13. Botones Vol-/Vol+: Pulse estos botones para reducir o aumentar el volumen.
14. Botón del atenuador de luz: Pulse este botón para atenuar el brillo de la pantalla.
15. Botón de favoritas: En modos Internet Radio o FM. pulse brevemente este botón para
acceder a la lista de estaciones favoritas. Mantenga pulsado este botón para guardar una
estación como favorita.
16. Botón Intro: Pulse este botón para confirmar una selección.
14
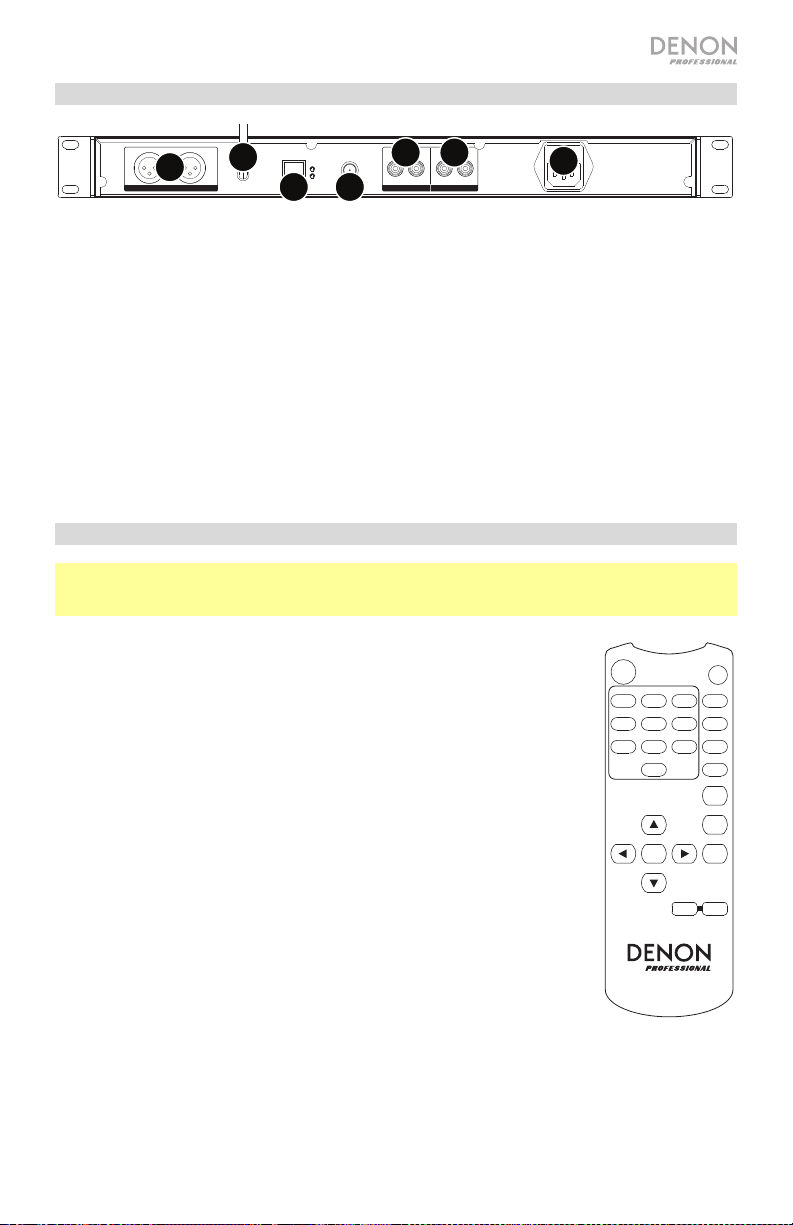
Panel trasero
RL
2
OUTPUT OUTPUT AUX IN
RJ45 FM ANTENNA R L R L
5
WLAN
TX/RX
LINK
6
7
3
4
1
1. Entrada AC In (Corriente alterna): Utilice el cable de corriente incluido para conectar esta
entrada a una toma de corriente.
2. Salidas (XLR balanceadas): Utilice cables XLR para conectar a estas salidas altavoces
externos, un sistema de sonido, etc.
3. Salidas (RCA desbalanceadas): Utilice cables RCA para conectar a estas salidas altavoces
externos, un sistema de sonido, etc.
4. Entrada auxiliar (RCA): Utilice un cable RCA estéreo estándar para conectar una fuente de
sonido opcional a esta entrada estéreo. Cuando se conecta un cable a la entrada auxiliar del
panel frontal, estas entradas quedarán desactivadas.
5. Terminal de la antena para WLAN: Conecte la antena para LAN inalámbrica incluida para
mejorar la recepción inalámbrica.
6. Puerto RJ45: Este puerto le permite conectar el DN-300UI a una red. Utilice un cable Ethernet
estándar para conectar este puerto a un conmutador o enrutador de red.
7. Terminal de la antena FM Conecte a este terminal la antena FM incluida.
Control remoto
Nota: Apunte el control remoto hacia el sensor remoto al utilizarlo. Si el sensor del control remoto
se expone a luz solar directa, luz artificial intensa (como una lámpara fluorescente de tipo invertido) o
luz infrarroja, puede que la unidad o el control remoto no funcionen correctamente.
• Botón POWER (Encendido): Pulse este botón para encender la unidad o
colocarla en modo de espera.
• Botones numéricos (0–9): Use estos botones para introducir valores en
las selecciones de la pantalla, tales como frecuencia de FM o número de
preset,
• Botones de navegación: Utilice estos botones (Left, Right, Up y Down)
[izquierda, derecha, arriba y abajo] para navegar por los menús de la
pantalla.
• Botón ENTER (Intro): Pulse este botón para confirmar una selección.
• Botones Vol-/Vol+: Pulse estos botones para reducir o aumentar el
volumen.
• Botón MUTE (Silenciamiento): Pulse este botón para silenciar la salida de
audio.
• Botón MENU (Menú): Pulse este botón para abrir el menú principal.
• Botón DIMMER (Atenuador de luz): Pulse este botón para atenuar el brillo
de la pantalla.
• Botón SLEEP (Hibernación) Pulse este botón para colocar la unidad en
modo de espera después de un período de tiempo.
• Botón ALARM (Alarma): Pulse este botón para activar o desactivar una
alarma.
• Botón MEMORY (Memoria): Pulse este botón para agregar la estación actual como favorita.
• Botón FAVORITE (Favoritas): En modos Internet Radio o FM. pulse brevemente este botón para
acceder a la lista de estaciones favoritas. Mantenga pulsado este botón para guardar una
estación como favorita.
• Botón MODE (Modo): Pulse este botón para cambiar los modos de reproducción de medios.
POWER
LEFT
MUTE
MENU
321
DIMMER654
SLEEP9
8
7
ALARM
0
MEMORY
FAVORIT EUP
RIGHT
MODEENTER
DOWN
+
VOL-VOL
DN-300UI
15
U
Ajustes
Importante: Conecte todos los cables firme y correctamente (los cables estéreo: izquierdo con
izquierdo, derecho con derecho) y no los agrupe junto con el cable de corriente.
1. Utilice cables XLR o un cable RCA estéreo para conectar las salidas (balanceadas o
desbalanceadas) a las entradas analógicas de su receptor externo, amplificador, monitores
alimentados, etc.
2. Utilice cables RCA estéreo o de de 3,5 mm (1/8 pulg.) para conectar dispositivos externos
opcionales a la entrada Aux In del frente o la parte trasera de la unidad.
3. Conecte la antena para WLAN y la antena de FM a la parte trasera de la unidad, si fuera
necesario.
4. Una vez completadas todas las conexiones, utilice el cable de corriente incluido para conectar la
entrada AC In a una toma de corriente.
5. Encienda todas sus fuentes de audio.
6. Encienda el DN-300UI.
7. Para conectar el DN-300UI a una red, pulse el botón Menu, seleccione Configuration
(Configuración) y escoja Network (Red). Para que el DN-300UI configure automáticamente los
parámetros de la red, seleccione su tipo de conexión deseada: Wired Network Configuration,
(Configuración de red cableada) Wireless Network Configuration (Configuración de red
inalámbrica o Wireless Network (WPS PBC) (Red inalámbrica). Para configurar manualmente
los parámetros de la red, seleccione Manual Configuration (Configuración manual). Para las
conexiones de red cableada, asegúrese de que el DN-300UI esté conectado a su conmutador
o enrutador de red por un cable Ethernet desde el puerto RJ45.
Monitores alimentados
Mezclador de zona
Corriente
Antena de FM
RL
OUTPUT OUTPUT AUX IN
Teléfono
RJ45 FM ANTENNA R L R L
TX/RX
WLAN
LINK
Reproductor de CD
inteligente,
tablet, etc.
Enrutador
nidad flash USB
ON
OFF
POWER
5V1
AUX IN
USB
IR
A
POWER MUTE SLEEP MENU MODE
-
FAVORITE
DIMMER
VOL+VOL
Los elementos que no se enumeran en Introducción > Contenido de la caja se venden por separado.
16
VOLUME/SELECT
PUSH
ENTER
ENTER
-
DN
300
UI

Operación de los menús
Para acceder al menú principal, pulse Menu.
Para desplazarse por las opciones de la pantalla, use los botones de navegación o la tecla giratoria.
• Pulse Right (Derecha) para avanzar en los menús.
• Pulse Left (Izquierda) para retroceder en los menús.
• Pulse Up (Arriba) o Down (Abajo) o utilice la tecla giratoria para cambiar la selección.
Para confirmar una selección, pulse la tecla giratoria o el botón Enter.
Puede utilizar también el control remoto para navegar por la pantalla y realizar selecciones.
Para información sobre cada elemento del menú, consulte las siguientes secciones:
Configuration Media Center
Local Radio FM Radio
My mediaU Information Center
Internet Radio Aux
Configuration (Configuración)
Seleccione el icono Configuration para acceder a las siguientes opciones de submenús.
Mode (Modo)
Seleccione esta opción para escoger Internet Radio (Radio por Internet) o Clock Radio (Radio reloj).
Cuando se seleccione el modo de radio por Internet, la pantalla pasa por defecto al tipo de medio
seleccionado en ese momento cuando se pulsa el botón Mode. Cuando se seleccione el modo de radio
reloj , la pantalla pasa por defecto a una pantalla de espera que muestra la hora, la fecha y el tiempo (si se
agregó) cuando se pulsa el botón Mode.
Manage my mediaU (Administrar mi mediaU)
Seleccione esta opción para habilitar o deshabilitar el sistema de administración mediaU, que le permite
guardar y organizar las estaciones favoritas y compartirlas entre dispositivos. Para más información,
consulte Menu Operation > My mediaU (Operación de menús - My mediaU).
Nota: Para utilizar el sistema de administración mediaU, se requiere una cuenta. Para más información,
visite mediayou.net.
Network (Red)
Seleccione esta opción para configurar los parámetros de su red.
• Wired Network Configuration (Configuración de red cableada): Seleccione esta opción como Enable
(Habilitar) o Disable (Deshabilitar) una conexión de red cableada. Cuando está habilitada, usted se
incorporará automáticamente a la red conectada. Antes de hacerlo, asegúrese de que el puerto RJ45
esté conectado a un conmutador o enrutador de red.
• Wireless Network Configuration (Configuración de red inalámbrica): Seleccione esta opción como
Enable (Habilitar) o Disable (Deshabilitar) una conexión de red inalámbrica. Cuando está habilitada,
puede seleccionar a qué red inalámbrica desea incorporarse. Si la red está protegida por contraseña, el
sistema le solicitará que entre a la misma usando la tecla giratoria y los botones de navegación.
• Wireless Network (WPS PBC) (Red inalámbrica [WPS PBC]): Seleccione esta opción como Enable
(Habilitar) o Disable (Deshabilitar) una conexión a una configuración protegida de Wi-Fi (configuración
por pulsadores).
• Manual Configuration:
o Wired (Cableada): Escoja DHCP On (Activada) o DHCP Off (Desactivada).
o Wireless (Inalámbrica): Escoja DHCP (On u Off), Enter SSID (Introducir SSID) o Manage
(Administrar).
• Check Network when Power On (Comprobar la red en el encendido): Seleccione esta opción como
Enable (Habilitar) o Disable (Deshabilitar) la reconexión automática a la red en el encendido. Cuando se
habilita, el DN-300UI se conecta a la última red utilizada.
17

Date & Time (Fecha y hora)
Seleccione esta opción para configurar los ajustes de fecha y hora.
• Set Date and Time (Ajustar fecha y hora): Seleccione esta opción para editar los ajustes de
fecha y hora. Escoja Manual Setup (Configuración manual) para introducir manualmente la
fecha y la hora o seleccione Auto Detect (Detección automática) para que el DN-300UI detecte
la fecha y la hora en función de su conexión de red.
• Set Time Format (Ajustar formato de hora): Seleccione esta opción para ajustar el formato de
hora a 12 Hour (12 horas) o 24 Hour (24 horas).
• Set Date Format (Ajustar formato de fecha): Seleccione esta opción para ajustar el formato de
fecha a YYYY/MM/DD (año/mes/día), DD/MM/YYYY (día/mes/año) o MM/DD/YYYY
(mes/día/año).
Alarm (Alarma)
Seleccione esta opción para ajustar o editar una alarma.
• Alarm 1 y Alarm 2: Seleccione estas opcionmes para activar o desactivar las dos alarmas.
o Repeat (Repetir): Ajusta cuándo está activa la alarma. Escoja Everyday, (Todos los días),
Once (Una vez) o el Day of Week (Día de la semana).
o Time (Hora): Ajusta la hora a la que sonará la alarma. Escoja HH, MM y AM/PM.
o Sound (Sonido): Configura el sonido que se utilizará para la alarma. Escoja Beep (Pitido),
Melody (Melodía), Internet Radio, FM o USB.
• NAP Alarm (Despertador): Seleccione esta opción para escoger el tiempo de repetición de
alarma predeterminado para que suene la alarma. Escoja Turn Off (Apagada), 5 Minutes (5
minutos), 10 Minutes, 20 Minutes, 30 Minutes, 60 Minutes, 90 Minutes o 120 Minutes.
• Alarm Volume (Volumen de la alarma): Ajusta el volumen de la alarma.
Timer (Temporizador)
Seleccione esta opción para configurar un temporizador. Utilice los botones de navegación para
ajustar la hora deseada.
Language (Idioma)
Seleccione esta opción para configurar el idioma de operación.
Dimmer (Atenuador)
Seleccione esta opción para ajustar los niveles de brillo de la pantalla. Seleccione Power Saving
(Ahorro de energía) para ajustar el nivel de brillo cuando está activado el atenuador o la unidad está
en modo de espera. Seleccione Turn On (Encendido) para ajustar el nivel de brillo cuando está
desactivado el atenuador o la unidad está encendida.
Display (Pantalla)
Seleccione esta opción para ajustar el aspecto de la pantalla como Color o Monochrome
(Monocromática).
Power Management (Gestión de energía)
Seleccione esta opción para ajustar el tiempo después del cual la unidad pasa al modo de espera si
no hay actividad. Escoja Turn Off, 5 Minutes, 15 Minutes o 30 Minutes.
Sleep Timer (Temporizador de hibernación)
Seleccione esta opción para configurar un temporizador de hibernación a fin de poner la unidad en
modo de espera. Escoja 15 Minutes, 30 Minutes, 45 Minutes, 60 Minutes, 90 Minutes, 120
Minutes, 150 Minutes o 180 Minutes.
Buffer (Búfer)
Seleccione esta opción para ajustar el valor de tiempo de búfer preferido. Escoja 2 Seconds, 4
Seconds, u 8 Seconds.
18
 Loading...