

Denon DN-300H User Manual
User Guide
English ( 3 – 10 )
Guía del usuario
Español ( 11 – 18 )
Guide d’utilisation
Français ( 19 – 26 )
Guida per l’uso
Italiano ( 27 – 34 )
Benutzerhandbuch
Deutsch ( 35 – 42 )
A
ppendix
English ( 43 )

2

3
User Guide (English)
Introduction
Box Contents
DN-300H
(2) Rack Ears
(6) Rackmount Screws
FM Antenna
AM Loop Antenna
RCA Cable
Remote Control
Power Cable
User Guide
Safety & Warranty Manual
Support
For the latest information about this product (documentation, technical specifications, system
requirements, compatibility information, etc.) and product registration, visit denonpro.com.
For additional product support, visit denonpro.com/support.
4
Features
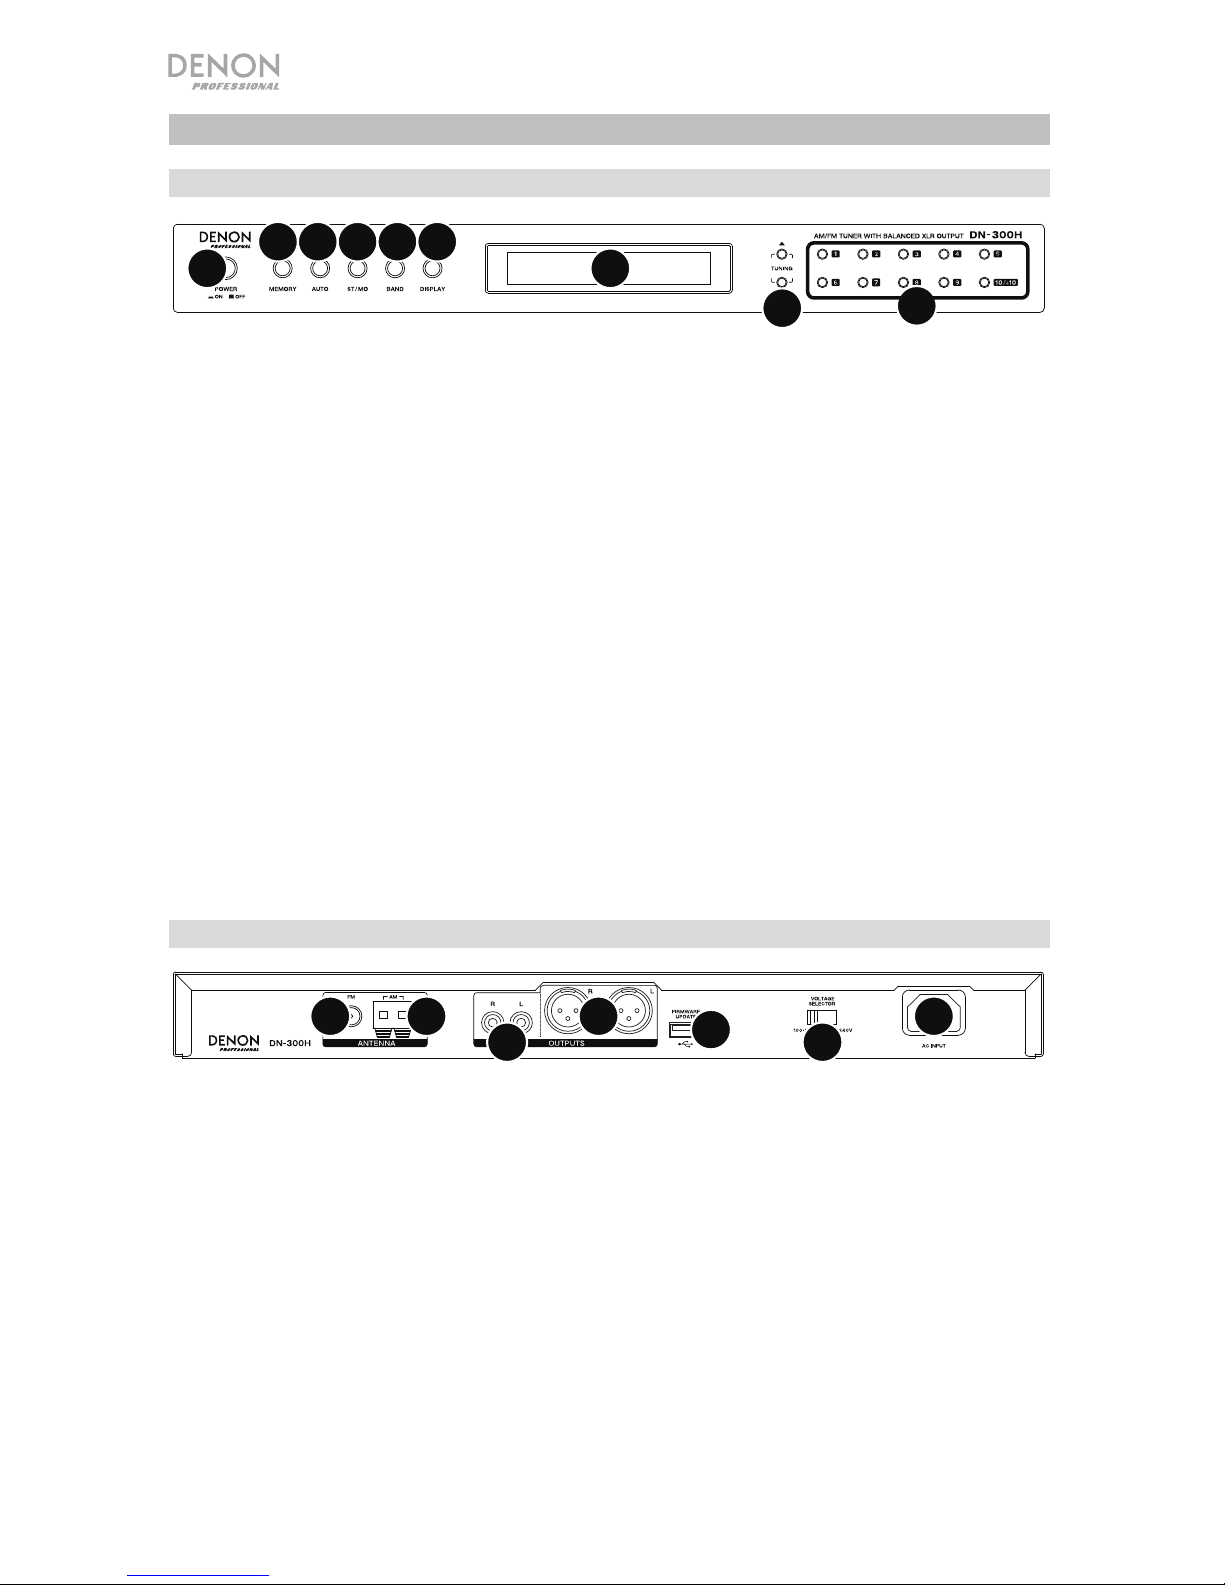
Front Panel
1
2
3
4
5
6
7
89
1. Power Button: Press this button to turn the unit on or off.
2. Display: This screen indicates the unit’s current operation.
3. Tuning Buttons: Press one of these buttons to increase or decrease the frequency one step at
a time. Press and hold the button for more than 1 second to jump to the previous or next
station with clear reception.
4. Number Buttons (1–10/10+): Press buttons 1-10/10+ on the unit or the remote control to recall a
saved preset from 1-10. To recall presets higher than 10, press the 10/10+ button on the unit or
remote control followed by the additional number button to get to the desired preset (e.g. to get to
preset 12, select 10/10+ followed by 2). To get to preset 20, press the 10/10+ button twice.
5. Memory Button: To save a preset, press the Memory button, then press a Number button (1–
10/10+) to select location, and press the Memory button again to save the current station to
that preset number.
6. Auto Button: Press this button to select Auto or Manual tuning for AM and FM stations. Press
once to set to Auto and the unit will search for the next clear station when using the Tuning
Up/Down buttons. Press to set to Manual and you can manually search for stations with the
Tuning Up/Down buttons.
7. ST/MO: Press this button to alternate between Stereo mode and Mono mode
Stereo: FM stereo broadcasts are received in stereo and the "ST." indicator lights on the display.
Mono: To compensate for weak FM stereo reception, select this mode. Reception will now be
monaural, reducing unwanted noise.
8. Band: Press this button switches between FM and AM radio.
9. Display Button: When in FM mode, press this button to show different operation information
on the screen.
Rear Panel
1
2
3
4
5
6
7
1. AC In: Use the included power cable to connect this input to a power outlet.
2. Voltage Selector: The voltage selector setting should only be changed when necessary (e.g.,
when traveling to a country or region with a different voltage). Selecting an improper voltage
setting can damage the unit. To change its setting, only remove *one* screw of the cover and
slide it aside to expose the selector.
3. FM Antenna Terminal: Connect the included FM antenna to this terminal.
4. AM Antenna Terminals: Connect the included AM loop antenna to this terminal. See
Connection Diagram for more information.
5. Audio Outputs (unbalanced RCA): These outputs send the audio signals from the radio
station. Use RCA cables to connect these outputs to external speakers, sound system, etc. See
Connection Diagram for more information.
6. Audio Outputs (balanced XLR): These outputs send the audio signals from the radio station.
Use XLR cables to connect these outputs to external speakers, sound system, etc. See
Connection Diagram for more information.
7. Firmware Update: This USB port is used to upgrade the unit’s firmware. The “Update/Normal”
switch is used to set the mode for the USB connection for the firmware upgrade. For normal
operation, this switch should be left in the Normal position.
5
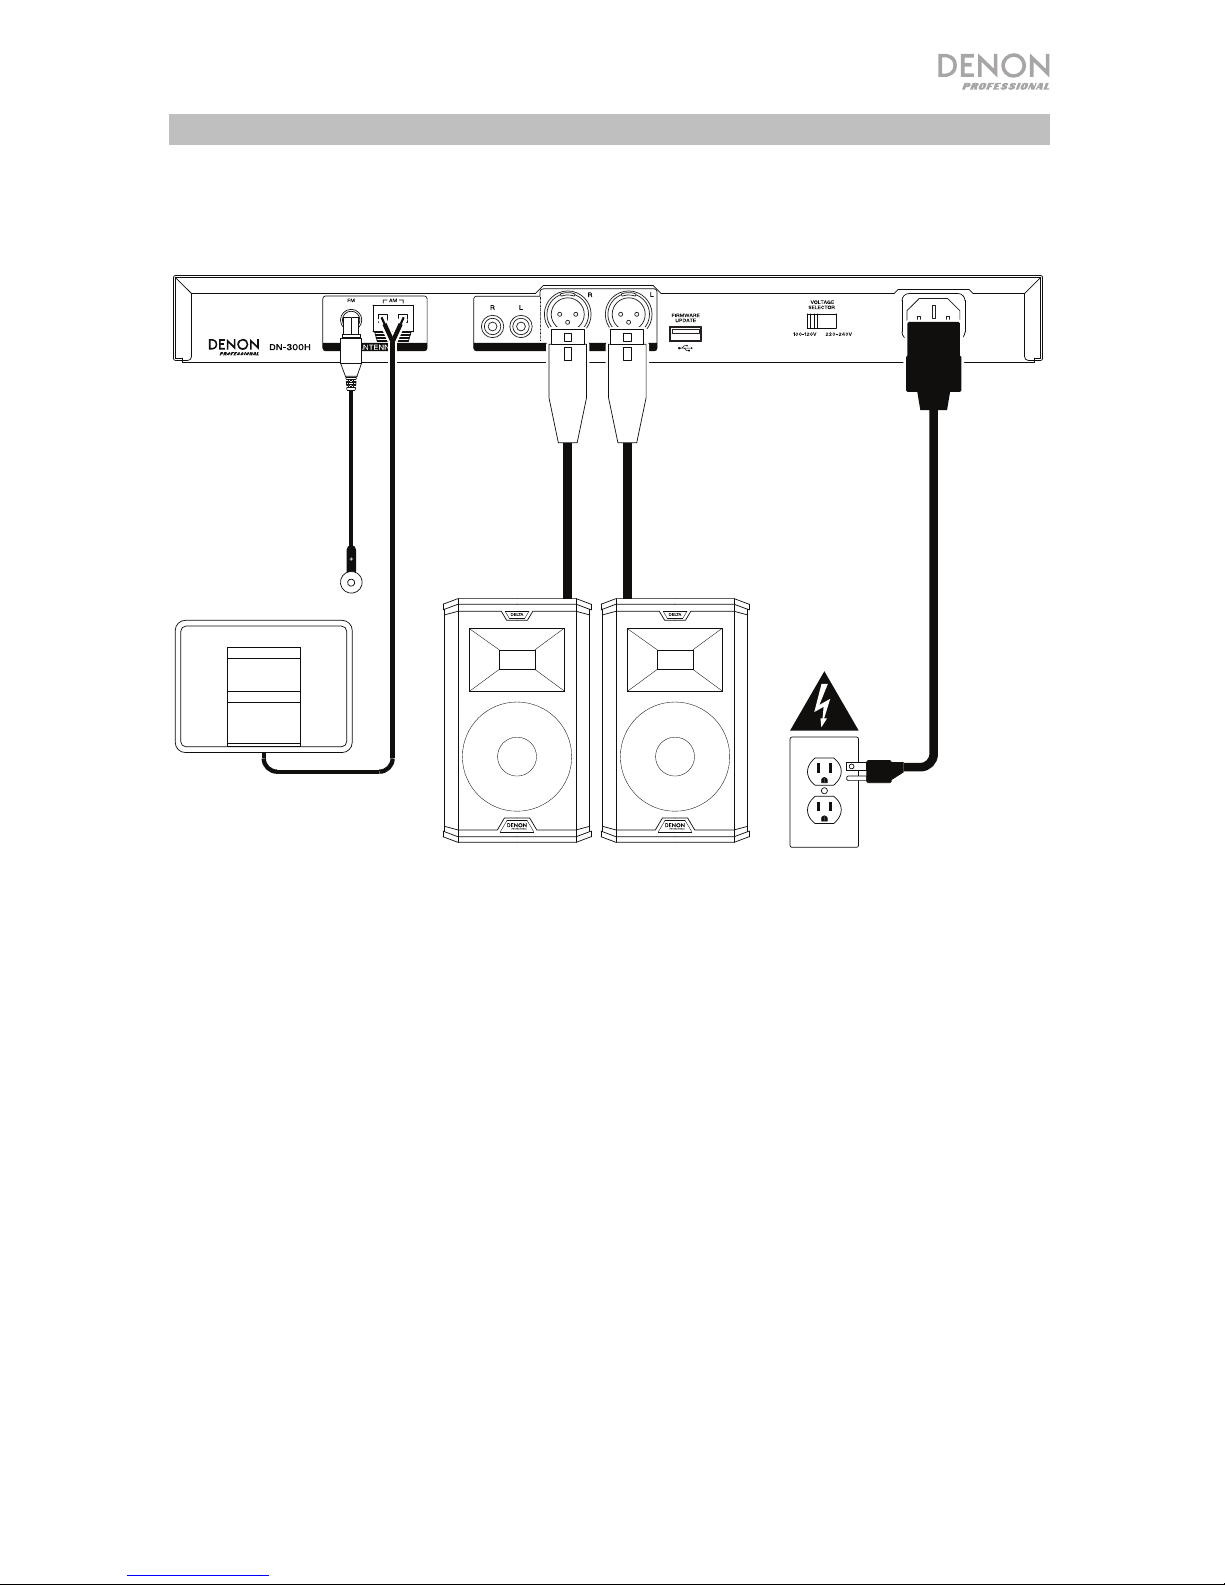
Connection Diagram
Items not listed under Introduction > Box Contents are sold separately.
FM Antenna
AM Antenna Loop
Powered Monitors
Power

6
Setup
Important: Connect all cables securely and properly (with stereo cables: left with left, right
with right), and do not bundle them with the power cable.
1. Use a stereo RCA cable or XLR cable to connect the Outputs to the analog inputs of your
external receiver, amp, powered monitors, etc. Make sure the tuner Region is set for your
location (America/Europe/Japan). See Operation > Remote Control for more information.
Note: If the unit is powered on, turn its power off and on again after changing this setting.
When the unit powers on again, it will be set for the selected area.
2. Connect the included FM antenna to the FM Antenna Terminal.
3. Connect the included AM antenna
loop to the AM Antenna Terminals.
Make sure the AM loop antenna lead
terminals do not touch metal parts of
the panel. (Even if you use an
external AM antenna, do not
disconnect the AM loop antenna.)
If you want to hang the AM antenna loop on a wall, use a nail or tack to attach it
(unassembled) to the wall.
If you want to stand the AM antenna loop on a flat surface, assemble it (see images below):
i. Put the stand section through the bottom of the loop antenna from the rear and
bend it forward.
ii. Insert the projecting part into the square hole in the stand.
4. After completing all the connections, use the included power cable to connect the AC In
to a power outlet.
i.
AM
Loop
Antenna
Projecting part
Square hole
Stand
ii.

7
Operation
Remote Control
1. Mute Button: Press this button to silence the audio output.
Press this button again to turn the sound on. See Operation
> Using the Radio for more information.
2. ST/MO: Press this button to alternate between Stereo mode
and Mono mode.
Stereo: FM stereo broadcasts are received in stereo and the
"ST." indicator lights on the display.
Mono: To compensate for weak FM stereo reception, select
this mode. Reception will now be monaural, reducing
unwanted noise.
3. PTY (Program Type) Search: Press this button to search for a
certain style of radio programming and save these as presets.
Note: This only applies to FM mode.
a. Press the PTY button. “PTY SEL” will flash on the display.
b. Press the Tuning Up/Down buttons to select the
program type. The chosen program type (e.g. “Talk”) will flash on the display.
c. Press PTY to confirm the program selection. “PTY SRH” will appear on the screen
as the unit searches for radio stations in that style.
Note: RDS is a method for the transmission of additional information via VHF stations.
For example, the name of the station broadcasting, the name of the program, or the type
of program will be shown on the multifunction display. It can only function if the local
broadcasting stations have the RDS transmission and the signal is strong enough.
News
News station
Inform
Talk or news
Sports
Sports station
Talk
Information, interviews, consumer advice
Rock
Rock music
Cls Rock
Classic rock music
A
dlt Hit
Current/oldie adult hits, acoustic, solo vocalists
Soft Rck
Light melodic rock music
Top 40
Current popular music
Country
Contemporary and traditional country music
Oldies
Popular non-current music
Soft
Light music
Nostalga
Music and radio shows from decades past, usually 1940’s and prior
Jazz
Mostly instrumental jazz and blues music
Classicl
Classical music
A
lert
Disaster report
Bluetooth Antenna
1
2
3
4
5
6
7
8
9
10
11
8
4. Tuning Buttons: In Auto mode, press one of these buttons to go to the next clear station.
If in Manual mode, press one of the buttons for the stations to go up or down in one step
increments.
5. Auto Button: Press this button to select Auto or Manual tuning for AM and FM stations.
Press the button to set to Auto and the unit will search for the next clear station to go to
when using the Tuning Up/Down buttons. Press the button again to set to Manual and
you can manually search for stations with the Tuning Up/Down buttons.
6. Band: Press this button to switch between FM and AM modes.
7. APS: Press this button to search and store available radio stations automatically. It will
search for stations with RDS (Radio Data System) broadcasts first and then search for
others.
Note: This function will overwrite any previously stored radio station presets.
8. Display Button: When in FM mode, press this button to show different operation
information on the screen when RDS data has been received. Press the Display button
once for PS (program name), again for PTY (program type), then CT (current time), and
lastly RT (information). NO PS, NO PTY, NO CT or NO RT will appear if the required
function cannot be carried out. (e.g. due to a weak signal.)
• PS (Station Name): Press the Display button until “PS” appears. The current
station name will be shown.
• PTY (Program Type): Press the Display button until “PTY” appears. The program
type will be shown.
• CT (Current Time): Press the Display button until “CT” appears on the display. The
current time will be shown (e.g. 15:30). If the display shows “WAIT CT”, then it is
attempting to get the time from the station.
Note: Unless the clock is synchronized to an accurate source, the time may be
inconsistent from station to station.
• RT (Information): Press the Display button until “RT” appears. The relevant
information transmitted from the local radio station will be shown.
9. Number Buttons (1–10/10+): Press buttons 1-10/10+ on the remote control to recall a
saved preset from 1-10. To recall presets higher than 10, press the 10/10+ button on the
remote control followed by the additional number button to get to the desired preset (e.g.
to get to preset 12, select 10/10+ followed by 2). To get to preset 20, press the 10/10+
button twice.
10. Memory Button: To save a preset, press the Memory button, then press a Number button
(1–10/10+) to select location, and press the Memory button again to save the current
station to that preset number. See Operation > Using the Radio for more information.
11. Region: Press this button, then select the region (America/Europe/Japan) with the
Tuning Up/Down buttons, then press the Region button again to confirm the region. The
unit will then automatically power off. Press the Mute button to power on the unit or
double press the power button on the front of the unit to be set to your selected region.
Note: Changing from one Region to another will overwrite all previously stored radio
station presets.
9
Battery Usage
Important: Before using the remote control for the first time, pull the insulation sheet out from
the battery compartment.
To replace the battery:
1. On the back of the remote control, put a pin into the door release hole and then slide the
door release open.
2. Pull out the old lithium battery from the battery case and insert a new one. Place the
battery so that the positive (+) side faces upward.
3. Place the battery case carefully into the compartment so the edges are in the grooves
and then slide the battery case to its original position.
Important: Misuse of the lithium battery can result in heat build-up, ignition, or rupture. Bear in
mind the following points when using or replacing batteries:
• The supplied battery is for testing the functionality of the remote controller.
• Use a 3V CR2032 lithium battery.
• Never recharge the battery. Do not handle the battery roughly or disassemble the battery.
• When replacing the battery, place it with its polarities (+ and -) facing the correct directions.
• Do not leave the battery in a place subject to high temperature or direct sunlight.
• Keep the battery in a place beyond the reach of infants or children. If a battery is
swallowed, consult a physician immediately.
• If electrolyte has leaked, discard the battery immediately. Be careful when handling it as
the electrolyte can burn your skin or clothes. If the electrolyte touches your skin or
clothes, immediately wash with tap water and consult a physician.
• Before discarding a battery, insulate it with tape, etc. and dispose of it in a place without
fire, by following the directions or regulations laid down by the local authorities in the area
of its disposal.
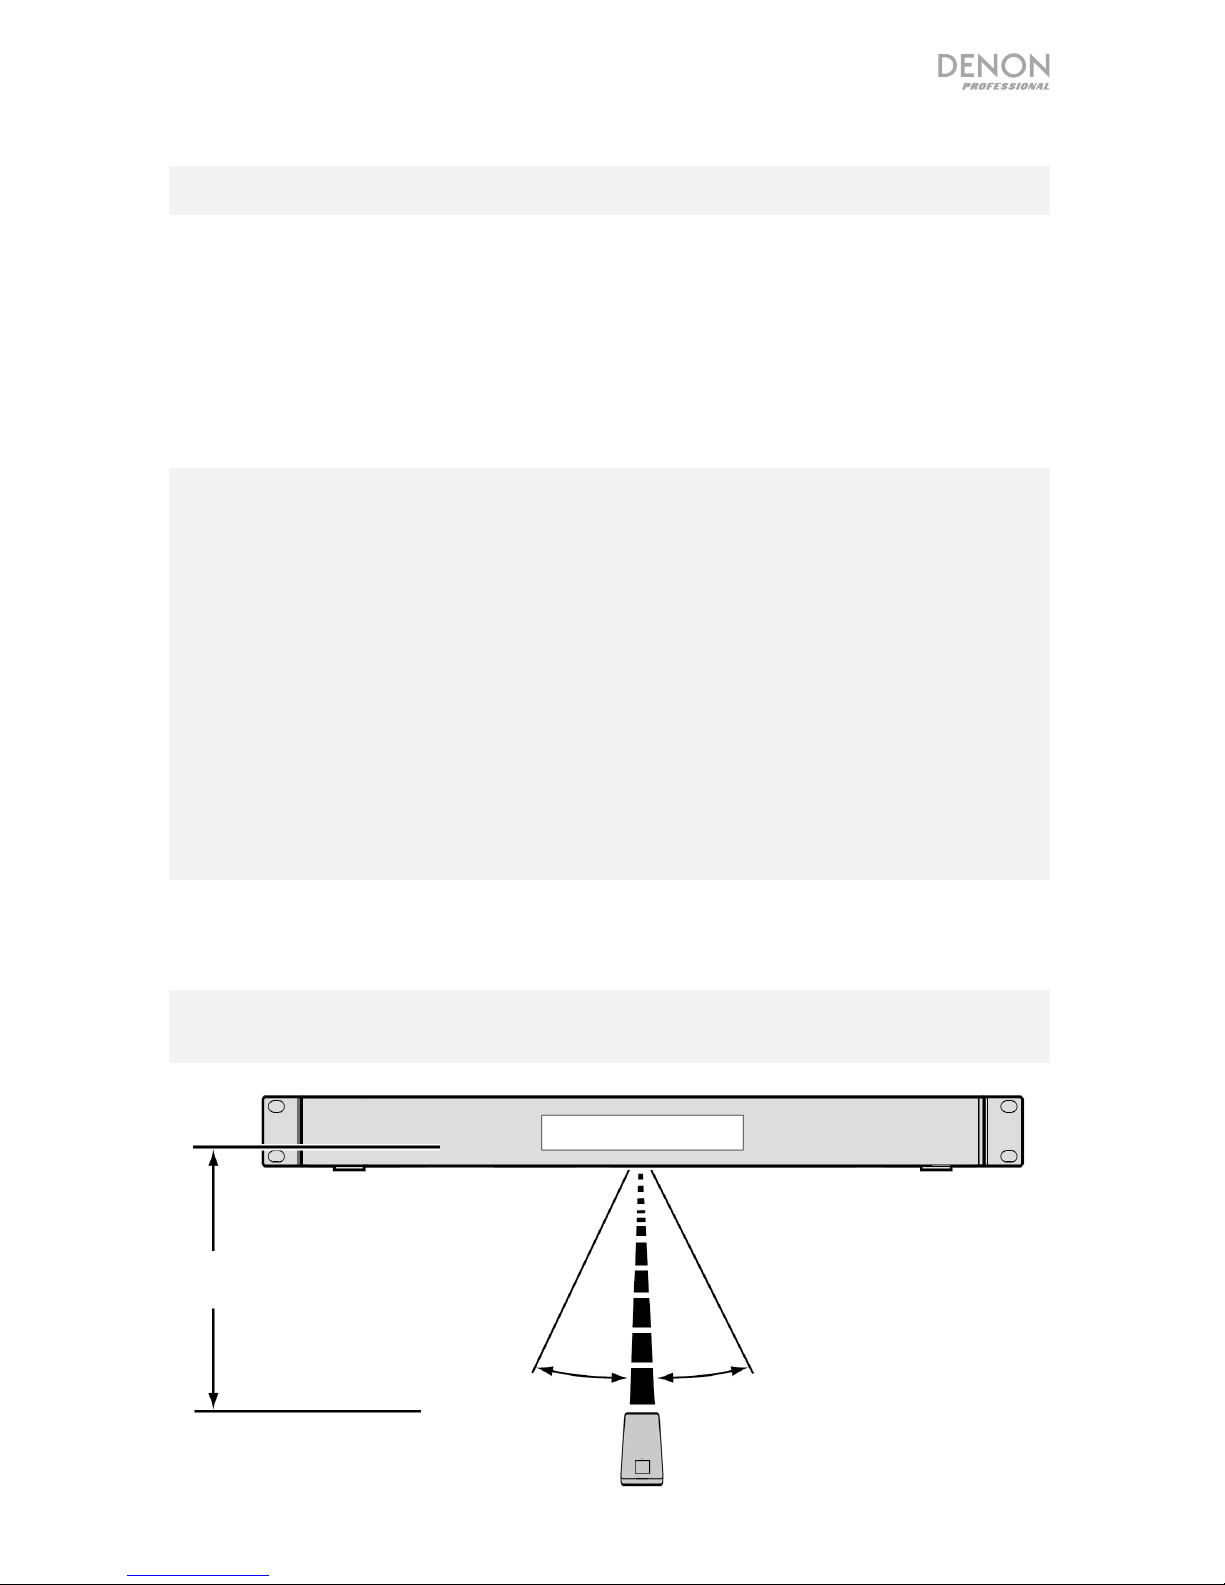
Operating Range
Point the remote control unit at the display when operating it.
Note: If the remote control sensor is exposed to direct sunlight, strong artificial light (like from
an interverter-type fluorescent lamp), or infrared light, the unit or remote control may not
function properly.
Approximately
16.4 feet / 5 meters
30° 30°

10
Using the Radio
To use the radio:
1. If the unit is off, press the Power button to power it on.
2. Press the Band button to select FM or AM. The audio from the broadcast will start
automatically.
Important: Make sure you have properly connected the FM and AM antennae and set
the Region to the correct setting.
3. To select a radio station, use the Tuning Up/Down buttons on the unit or the remote
control. To jump to the previous or next station with clear reception, press and hold the
Tuning Up or Down button for more than 1 second.
To save a station to a preset number:
1. Select the desired station.
2. Press the Memory button on the unit or remote control.
3. Use the Number buttons (1–10/10+) on the unit or the remote control to enter the desired
preset number.
4. Press the Memory button to save the station to the preset.
To recall a saved radio station’s preset number, use the Number buttons (1–10/10+) on the
unit or the remote control to enter the desired preset number. To recall presets higher than 10,
press the 10/10+ button on the unit followed by the additional number button to get to the
desired preset (e.g. to get to preset 12, select 10/10+ followed by 2).
Important:
The preset memory can hold up to 20 FM stations and 20 AM stations.
If you cannot receive a good broadcast signal, we recommend installing an outdoor antenna.
For details, inquire at the retail store where you purchased the unit.
When you receive a clear broadcast signal, affix the antenna in a position with tape where the
noise level is minimal.

11
Guía del usuario (Español)
Introducción
Contenido de la caja
DN-300H
(2) Orejetas para rack
(6) Tornillos para montaje en rack
Antena de FM
Antena de cuadro de AM
Cable RCA
Control remoto
Cable de corriente
Guía del usuario
Manual sobre la seguridad y garantía
Soporte
Para obtener la información más reciente acerca de este producto (documentación,
especificaciones técnicas, requisitos de sistema, información de compatibilidad, etc.) y
registrarlo, visite denonpro.com.
Para soporte adicional del producto, visite denonpro.com/support.

12
Características
Panel frontal
1
2
3
4
5
6
7
89
1. Botón de encendido: Pulse este botón para encender o apagar la unidad.
2. Pantalla: Esta pantalla indica el funcionamiento actual de la unidad.
3. Botones de sintonización: Pulse alguno de estos botones para aumentar o reducir la frecuencia de a
un paso a la vez. Mantenga pulsado el botón durante más de 1 segundo para saltar a la próxima o
anterior estación de radio con buena señal.
4. Botones numéricos (1
–10/10+): Pulse los botones 1-10/10+ de la unidad o el control remoto para
recuperar un preset guardado en 1-10. Para recuperar presets mayores a 10, pulse el botón 10/10+
de la unidad o el control remoto seguido por el botón del número adicional para obtener el preset
deseado (por ejemplo, para obtener el preset 12, seleccione 10/10+ seguido por 2). Para obtener el
preset 20 pulse dos veces el botón 10/10+.
5. Botón de memoria: Para guardar un preset, pulse el botón Memory (memoria), luego puse un botón
numérico (1
–10/10+) para seleccionar la ubicación y pulse el botón Memory nuevamente para guardar
la estación actual en ese número de preset.
6. Botón de sintonización automática: Pulse este botón para seleccionar la sintonización automática o
manual para las estaciones AM y FM. Púlselo una vez para ajustarla en automática y la unidad
buscará la siguiente estación con buena señal cuando se usen los botones de sintonización (Tuning)
hacia arriba/abajo. Púlselo para ajustarla en manual y podrá buscar estaciones de radio
manualmente con los botones de sintonización (Tuning) hacia arriba/abajo.
7. ST/MO: Pulse este botón para alternar entre el modo estéreo y el modo monoaural.
Estéreo: Las transmisiones de FM en estéreo se reciben en estéreo y se enciende el indicador "ST."
en la pantalla.
Mono: Para compensar una recepción de FM en estéreo débil, seleccione este modo. La recepción
ahora será monoaural, disminuyendo el ruido no deseado.
8. Banda: Pulse este botón para alternar entre los radios AM y FM.
9. Botón de visualización: Estando en modo de FM, pulse este botón para mostrar información de
funcionamiento diferente en la pantalla.
Panel trasero
1
2
3
4
5
6
7
1. Entrada de corriente alterna: Utilice el cable de corriente incluido para conectar esta entrada a una
toma de corriente.
2. Selector de voltaje: Cambie el ajuste del selector de voltaje sólo cuando sea necesario (por ej.,
cuando viaje a un país o región con un voltaje diferente). Si selecciona un ajuste de voltaje incorrecto,
se puede dañar la unidad. Para cambiar este ajuste, sólo retire *un* tornillo de la cubierta y deslícela a
un lado para exponer el selector.
3. Terminal de la antena FM Conecte a este terminal la antena FM incluida.
4. Terminal de la antena AM Conecte a este terminal la antena de cuadro de AM. Consulte Diagrama
de conexión para mayor información.
5. Salidas de audio (RCA no balanceadas): Estas salidas envían las señales de audio provenientes de
la estación de radio. Utilice cables RCA para conectar a estas salidas altavoces externos, un sistema
de sonido, etc. Consulte Diagrama de conexión para mayor información.
6. Salidas de audio (XLR balanceadas): Estas salidas envían las señales de audio provenientes de la
estación de radio. Utilice cables XLR para conectar a estas salidas altavoces externos, un sistema de
sonido, etc. Consulte Diagrama de conexión para mayor información.
7. Actualización de firmware: Este puerto USB se utiliza para actualizar el firmware de la unidad. El
interruptor "Actualizar/Normal" se utiliza para ajustar el modo de la conexión USB para la
actualización de firmware. Para que la unidad funcione de modo normal, este interruptor debe dejarse
en la posición Normal.

13
Diagrama de conexión
Los elementos que no se enumeran en Introducción > Contenido de la caja se venden por
separado.
Antena de FM
Antena de cuadro de AM
Monitores alimentados Suministro eléctrico

14
Instalación
Importante: Conecte todos los cables firme y correctamente (los cables estéreo: izquierdo
con izquierdo, derecho con derecho) y no los agrupe junto con el cable de corriente.
1. Utilice un cable RCA o XLR para conectar las salidas a las entradas analógicas de su
receptor externo, amplificador, monitores alimentados, etc. Asegúrese de que la región
del sintonizador esté ajustada según su ubicación (América/Europa/Japón). Consulte
Funcionamiento > Control Remoto para más información.
Nota: Si la unidad está encendida, apáguela y vuelva a encenderla una vez realizado este
ajuste. Cuanto la unidad se encienda nuevamente, estará configurada para el área
seleccionada.
2. Conecte la antena de FM incluida en el terminal de antena FM.
3. Conecte la antena de AM incluida en
el terminal de antena AM. Asegúrese
de que los terminales del cable de la
antena de cuadro de AM no toquen
las partes metálicas del panel. (Aun
cuando utilice una antena de AM externa, no desconecte la antena de cuadro de AM).
Si desea colgar la antena de cuadro de AM en una pared, utilice un clavo o tachuela para
colgarla (desensamblada) de la pared.
Si desea colocar la antena de cuadro de AM sobre una superficie plana, ensámblela
(consulte las imágenes a continuación):
i. Coloque la sección del soporte a través de la parte inferior de la antena de cuadro
desde la parte trasera y dóblela hacia adelante.
ii. Inserte la parte sobresaliente en el orificio cuadrado del soporte.
4. Una vez completadas todas las conexiones, utilice el cable de corriente incluido para
conectar la entrada AC In a una toma de corriente.
i.
Antena de AM
Parte que se
proyecta
Orificio cuadrado
Soporte
ii.
 Loading...