

Page 1
NESPRESSO LATTISSIMA TOUCH COFFEE MACHINE, USER MANUAL
* Ma machine
My
*
Machine
UM_LATTISSIMA_TOUCH_FACELIFT_Z2A_TER.indb 1 06.12.17 15:00
Page 2

EN - FR 4-31
DE - IT 32-59
UM_LATTISSIMA_TOUCH_FACELIFT_Z2A_TER.indb 2 06.12.17 15:00
Page 3
4
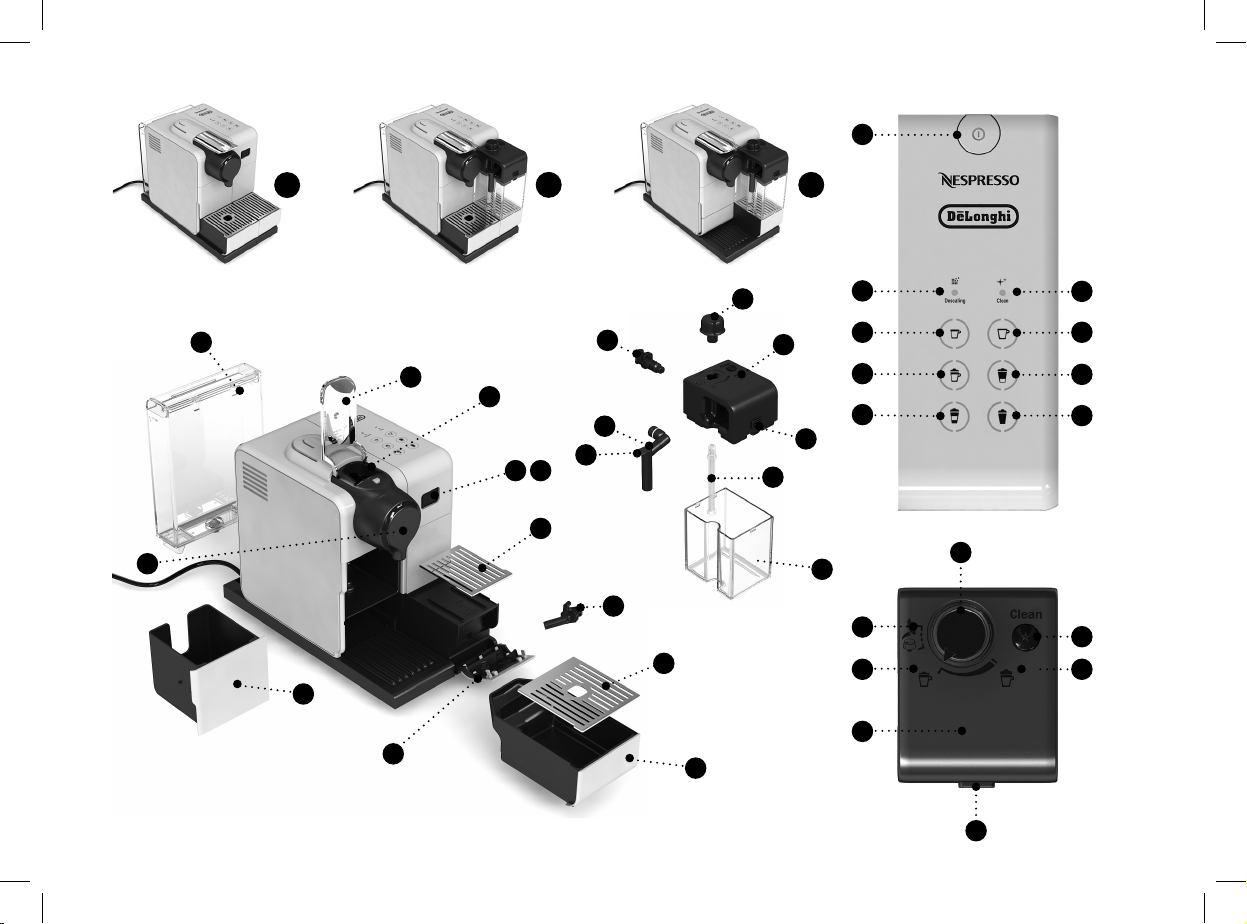
OVERVIEW
13
A
3
1
4
5
9
B C
29
2
30
11 12
31
8
10
7
26
23
32
6
14
15 19
16
17
22
26
33
25
24
23
18
20
21
27
28
22
3
UM_LATTISSIMA_TOUCH_FACELIFT_Z2A_TER.indb 3 06.12.17 17:09
Page 4
OVERVIEW
EN
EN
FR
FR
Overview of machine
/VUE D’ENSEMBLE
/
Vue d’ensemble de la machine
A
Machine without Rapid Capp uccino System
Machine sans le Rapid Cappuccino System
B
Machine with Rapid Cappuccino Sys tem (for Cappuccino)
Machine avec le Rapid Cappuccino System
(pour les Cappuccinos)
C
Mac hine with Rapid Cappuccino System
(for Latte Macchiato and Creamy L atte)
Machine avec le Rapid Cappuccino System
(pour les Lat te Macchiato et Creamy Lat te)
1
Lever
/Levier
2
Capsule compartment
3
Water tank (0.9 L)
4
Coee out let
5
Used capsule container
6
Drip tray (pu sh inside for Latte M acchiato glass)
Bac d’égout tage (pousser vers l ’intérieur pour
les verres à Latte Macchiato)
7
Left grid
/Grille gauche
8
Right grid
9
Descaling p ipe storage door (p ull to open)
Compartiment pour l’embout de détartrage (tirer pour ouvrir)
10
Descaling pipe
11
Steam connector door
12
Steam connector
/Compartiment à capsule
/Réser voir d’eau (0.9 L)
/Sortie Café
/Bac à capsule s usagées
/Grille droite
/Embout de détartrage
/Volet du connecteur vapeur
/Connecteur vapeur
Tactile beverage buttons
Touches tactiles de sélection boisson
/
/
/
/
13 22
ON/OFF button
15 23
Espress o 40 ml
16 24
Cappuccino
17 25
Latte Macchiato
19
Lungo 110 ml
20
Creamy Latt e
21
Warm milk froth
Alert/Alerte
Alert
14
“Descaling” : descaling alert refer to sect ion “Descaling”
“Descaling”
/Interrupteur général (ON/OFF) /Bouton de re trait du couvercle
/Espress o 40 ml /Couvercle du réser voir à lait
/Cappuccino /Indicateur de mousse min.
/Latte Macchiato /
/Lungo 110 ml
/
Creamy Latt e
/Mousse de lait c haude
: alerte détart rage
(se réferer au paragraphe “détartrage”)
18
: milk system cleaning alert ref er to section
“Clean”
“Preparing Cappuccino”
“Clean”
/
: nettoyage d u système Cappuccino
(se référer au paragraphe “préparer un Cappuccino”)
/
Rapid Cappuccino System (R.C.S.)
Rapid Cappuccino System (R.C.S.)
Lid detach button
Milk container Lid
Milk froth den sity: MIN
Position for m ilk froth regulator kno b (insertion/removal)
Position du bo uton de réglage de la mousse d e lait
(insérer/sortir)
26
Milk froth regulator knob
Bouton de réglage de la mousse de lait
27
CLEAN
: Rinsing button
CLEAN
: Bouton de rinçage
28
Milk froth den sity: MAX
/
29
Rapid Cappuccino System connec tor
Connecteur du Rapid Capuccino Sys tem
30
Milk spout
/Buse à lait
31
Milk Spout Lever
32
Milk aspiration tube
33
Milk container (0.35 L)
/
/
/Indicateur de mousse max.
/
/Levier de la buse à lai t
/Tube d’aspiration du lait
/Réser voir à lait (0.35 L)
/
/
4
UM_LATTISSIMA_TOUCH_FACELIFT_Z2A_TER.indb 4 06.12.17 17:09
Page 5
EN
FR
Nespresso is an exclusive syste m creating the ultimate Es presso, time after t ime. Our Nespresso machines are equipped wi th an extract ion system that guarante es up to 19 bar pressure. Each par ameter has been calculate d with
great precisi on to ensure that all the aromas f rom each capsule can be ex tracted, to give t he coee body and create an e xceptionally thick and smoot h crema.
Nespresso est un système inc omparable orant un Es presso parfait , tasse après tasse. Toutes le s machines Nespresso sont équipées d’un sy stème d’extracti on unique à très haute pressi on (jusqu’à 19bars). Chaque
paramètre e st calculé avec précisi on pour exprimer la totali té des arômes de chaque caps ule, donner du corps au café et lui o rir une crema* d’une densité et d’une onc tuosité exceptionne lles.
* crema: mousse d e café
CONTENT
/CONTENT
CAUTION: when you see this sign, please refer to the safety precautions to avoid possible harm and damage.
INFORMATION: when you see this sign, please take note of the advice for the correct and safe usage of your coee machine.
AVERTISSEMENT: lorsque ce symbole apparait, veuillez consulter les consignes de sécurité pour éviter d'éventuels dangers et dommages.
INFORMATION: lorsque ce symbole apparait, veuillez prendre connaissance du conseil pour une utilisation sûre et conforme de votre appareil.
OVERVIEW 3
SAFETY PRECAUTIONS 6
PACKAGING CONTENT 12
FIRST USE OR AFTER A LONG PERIOD OF NONUSE
13
OU APRÈS UNE LONGUE PÉRIODE DE NONUTILISATION
COFFEE PREPAR ATION 15
ASSEMBLING DISASSEMBLING OF RAPID CAPPUCCINO SYSTEM R.C.S.
15
MONTAGE/DÉMONTAGE DU RAPID CAPPUCCINO SYSTEM R.C.S.
PREPARING C APPUCCINOLATTE MACCHIATOCREAMY LATTEWARM MILK FROTH
PRÉPARATION DU CAPPUCCINOLATTE MACCHIATO CREAMY LATTEMOUSSE DE
16
LAIT CHAUDE
PROGRAMMING COFFEE QUANTITY
19
PROGRAMMER L A QUANTITÉ DE CAFÉ
PROGRAMMING QUANTIT Y FOR CAPPUCCINO LATTE MACCHIATO CREAMY LATTE
WARM MILK FROTH
20
MACCHIATOCREAMY LATTEMOUSSE DE LAIT CHAUDE
DAILY CARE 21
/ VUE D'ENSEMBLE
/ CONSIGNES DE SÉCURITÉ
/ CONTENU DE L‘EMBALLAGE
/ PREMIÈRE UTILISATION
/ PRÉPARATION CAFÉ
/
/
/ PROGR AMMER LA QUANTITÉ DE CAPPUCCINOLATTE
/ ENTRETIEN QUOTIDIEN
HAND WASHING OF RAPID CAPPUCCINO SYSTEM R.C.S.
21
LAVAGE À LA MAIN DU RAPID CAPPUCCINO SYSTEM R.C.S.
RESTORING QUANTITY TO FACTORY SETTINGS 22
FACTORY SETTINGS 23
DESCALING 24
WATER HARDNESS SETTING 26
EMPT YING THE SYSTEM BEFORE A PERIOD OF NONUSE, FOR FROST PROTECTION
OR BEFORE A REPAIR
UTILISATION, POUR LA PROTECTION CONTRE LE GEL OU AVANT UNE
/
27
RÉPA RATIO N
AUTOMATIC POWER OFF 28
TROUBLESHOOTING 29
SPECIFICATIONS 30
DISPOSAL AND ECOLOGICAL CONCERNS
31
L'ENVIRONNEMENT
CONTACT THE NESPRESSO CL UB 31
WARRANTY 31
/ RÉGLAGES USINE
/ DÉTART RAGE
/ RÉGLAGE DE LA DURETÉ D'EAU
/ VIDANGE DE LA MACHINE AVANT UN TEMPS SANS
/ ARRÊT AUTOMATIQUE
/ DÉPANNAGE
/ SPÉCIFICATIONS
/ CONTACTEZ LE CLUB NESPRESSO
/ GARANTIE
/ RÉTABLIR LES RÉGLAGES USINE
/ MISE AU REBUT ET PROTECTION DE
/
5
UM_LATTISSIMA_TOUCH_FACELIFT_Z2A_TER.indb 5 06.12.17 17:09
Page 6
EN
SAFETY
PRECAUTIONS
CAUTION / WARNING
ELECTRICAL DANGER
DISCONNECT DAMAGED
SUPPLY CORD
CAUTION HOT SURFACE
CAUTION: the safety
precautions are part of
the appliance. Read them
carefully before using your
new appliance for the rst
time. Keep them in a place
where you can nd and
refer to them later on.
CAUTION: when you see
this sign, please refer to the
safety precautions to avoid
possible harm and damage.
INFORMATION: when you
see this sign, please take
note of the advice for the
correct and safe usage of
6
your appliance.
• The appliance is intended to
prepare beverages according to
these instructions.
• Do not use the appliance for other
than its intended use.
• This appliance has been designed
for indoor and non-extreme
temperature conditions use only.
• Protect the appliance from direct
sunlight eect, prolonged water
splash and humidity.
• This is a household appliance
only. It is not intended to be
used in: sta kitchen areas in
shops, oces and other working
environments; farm houses; by
clients in hotels, motels and other
residential type environments;
bed and breakfast type
environments.
• This appliance may be used by
children of at least 8 years of age,
as long as they are supervised
and have been given instructions
about using the appliance safely
and are fully aware of the dangers
involved. Cleaning and user
maintenance shall not be made
by children unless they are older
than 8 and they are supervised by
an adult.
• Keep the appliance and its cord
out of reach of children under
8 years of age.
• This appliance may be used by
persons with reduced physical,
sensory or mental capabilities, or
whose experience or knowledge
is not sucient, provided they
are supervised or have received
instruction to use the device
safely and understand the
dangers.
• Children shall not use the device
as a toy.
• The manufacturer accepts no
responsibility and the warranty
will not apply for any commercial
use, inappropriate handling or
use of the appliance, any damage
resulting from use for other
purposes, faulty operation, nonprofessionals’ repair or failure to
comply with the instructions.
Avoid risk of fatal
electric shock and re
• In case of an emergency:
immediately remove the plug
from the power socket.
• Only plug the appliance into
suitable, easily accessible, earthed
mains connections. Make sure
that the voltage of the power
source is the same as that
specied on the rating plate. The
use of an incorrect connection
voids the warranty.
The appliance must only be
connected after installation
• Do not pull the cord over sharp
edges, clamp it or allow it to
hang down.
• Keep the cord away from heat
and damp.
• If the supply cord or the plug are
damaged, they must be replaced
by the manufacturer, its service
agent or similarly qualied
persons, in order to avoid all risks.
• If the supply cord or the plug
are damaged, do not operate
the appliance. Return the
appliance to the Nespresso Club
or to a Nespresso authorized
representative.
• To avoid hazardous damage,
UM_LATTISSIMA_TOUCH_FACELIFT_Z2A_TER.indb 6 06.12.17 17:09
Page 7
EN
never place the appliance on
or beside hot surfaces such as
radiators, stoves, ovens, gas
burners, open ame, or similar.
• Always place it on a horizontal,
stable and even surface.
The surface must be resistant to
heat and uids, like water, coee,
descaler or similar.
• Disconnect the appliance from
the mains when not in use for
a long period. Disconnect by
turning the machine o, pulling
out the plug and not by pulling
the cord itself or the cord may
become damaged.
• Before cleaning and servicing,
remove the plug from the mains
socket and let the appliance cool
down.
• Never touch the cord with wet
hands.
• Never immerse the appliance or
part of it in water or other liquid.
• Never put the appliance or part
of it in a dishwasher, except the
Rapid Cappuccino System (R.C.S.).
• Electricity and water together is
dangerous and can lead to fatal
electrical shocks.
• Do not open the appliance.
Hazardous voltage inside!
• Do not put anything into any
openings. Doing so may cause
re or electrical shock!
• The use of accessory attachments
not recommended by the
manufacture may result in re,
electric shock or injury to persons.
Avoid possible harm when
operating the appliance
• Never leave the appliance
unattended during operation.
• Do not use the appliance if it
is damaged or not operating
perfectly. Immediately remove
the plug from the power
socket. Contact the Nespresso
Club or Nespresso authorized
representative for examination,
repair or adjustment.
A damaged appliance can
•
cause electrical shocks,
burns and re.
• Always completely close the lever
and never lift it during operation.
Scalding may occur.
• Do not put ngers under coee
outlet, risk of scalding.
• Do not put ngers into capsule
compartment or the capsule
shaft. Danger of injury!
Do not touch surfaces that
•
become hot during and
after operation and descaling:
descaling pipe and milk spout.
Use handles or knobs.
• If coee volumes higher than
150 ml are programmed: let the
machine cool down for 5 minutes
before making the next coee.
Risk of overheating!
• Water could ow around a
capsule when not perforated
by the blades and damage the
appliance.
• Never use an already used, a
damaged or deformed capsule.
• If a capsule is blocked in the
capsule compartment, turn the
machine o and unplug it before
any operation. Call the Nespresso
Club or Nespresso authorized
representative.
• Coee-maker shall not be placed
in a cabinet when in use.
Heating element surface is
•
subject to residual heat
after use.
• Fill the water tank only with fresh
and potable water.
• Empty water tank if the appliance
will not be used for an extended
time (holidays, etc.).
• Replace water in water tank when
the appliance is not operated for
a weekend or a similar period of
time.
• Do not use the appliance without
the drip tray and drip grid to
avoid spilling any liquid on
surrounding surfaces.
• Do not use any strong cleaning
agent or solvent cleaner. Use a
damp cloth and mild cleaning
agent to clean the surface of the
appliance.
• To clean machine, use only clean
cleaning tools.
• When unpacking the machine,
remove the plastic lm and
dispose.
• This appliance is designed
for Nespresso coee capsules
available exclusively through the
Nespresso Club or your Nespresso
authorized representative.
• All Nespresso appliances pass
stringent controls. Reliability tests
7
UM_LATTISSIMA_TOUCH_FACELIFT_Z2A_TER.indb 7 06.12.17 17:09
Page 8
EN
FR
under practical conditions are
performed randomly on selected
units. This can show traces of any
previous use.
• Nespresso reserves the right to
change instructions without prior
notice.
Descaling
• Nespresso descaling agent, when
used correctly, helps ensure
the proper functioning of your
machine over its lifetime and
that your coee experience is as
perfect as the rst day.
CAUTION: the descaling
solution can be harmful. Avoid
contact with eyes, skin and
surfaces. Nespresso descaling agent
has been specically developed for
Nespresso machines; the use of any
other unsuitable descaling agent
may lead to machine component
damage or an insucient descaling
process. For any additional
questions you may have regarding
descaling, please contact your
Nespresso Club.
8
SAVE THESE
INSTRUCTIONS
Pass them on to any
subsequent user.
This instruction manual is
also available as a PDF at
nespresso.com
CONSIGNES DE
SÉCURITÉ
ATTENTION /
AVERTISSEMENT
DANGER
ÉLECTRIQUE
DÉBRANCHER
LE CORDON
D'ALIMENTATION
ENDOMMAGÉ
ATTENTION!
SURFACE CHAUDE
AVERTISSEMENT: les
consignes de sécurité font
partie de l’appareil. Veuillez
les lire attentivement avant
d’utiliser votre nouvel
appareil. Gardez-les dans un
endroit où vous pourrez les
retrouver et vous y référer
utlérieurement.
AVERTISSEMENT: lorsque
ce symbole apparaît,
veuillez consulter les
mesures de sécurité pour
éviter d’éventuels dangers
et dommages.
INFORMATION: lorsque ce
symbole apparaît, veuillez
prendre connaissance du
conseil pour une utilisation
sûre et conforme de votre
appareil.
• Cet appareil est destiné à préparer
des boissons conformément à ces
instructions.
• N’utilisez pas l’appareil pour
d’autres usages que ceux prévus.
• Cet appareil a été conçu
seulement pour un usage
intérieur, pour un usage dans des
conditions de températures non
extrêmes.
• Protégez votre appareil des eets
directs des rayons du soleil,
des éclaboussures d’eau et de
l’humidité.
• Cet appareil est uniquement
destiné à un usage domestique.
Il n’est pas conçu pour être utilisé
dans: les espaces cuisines des
magasins, bureaux et d’autres
environnement de travail; les
fermes; par les clients dans
UM_LATTISSIMA_TOUCH_FACELIFT_Z2A_TER.indb 8 06.12.17 17:09
Page 9
les hôtels, motels ou d’autres
environnements résidentiels;
des environnements type bed &
breakfast.
• Cet appareil peut être utilisé
par des enfants âgés d’au
moins 8 ans, à condition qu’ils
bénécient d’une surveillance
ou qu’ils aient reçu des
instructions quant à l’utilisation
de l’appareil en toute sécurité
et qu’ils comprennent bien les
dangers encourus. Le nettoyage
et l’entretien par l’utilisateur ne
doivent pas être eectués par des
enfants, à moins qu’ils ne soient
âgés de plus de 8 ans et qu’ils
soient sous la surveillance d’un
adulte.
• Conservez l’appareil et son câble
hors de portée des enfants âgés
de moins de 8 ans.
• Cet appareil peut être utilisé par
des personnes dont les capacités
physiques, sensorielles ou
mentales sont réduites ou dont
l’expérience ou les connaissances
ne sont pas susantes, à
condition qu’ils bénécient
d’une surveillance ou qu’ils aient
reçu des instructions quant à
l’utilisation de l’appareil en toute
sécurité et qu’ils comprennent
bien les dangers encourus.
• Les enfants ne doivent pas utiliser
l’appareil comme un jouet.
• Le fabricant décline toute
responsabilité et la garantie ne
s’appliquera pas en cas d’usage
commercial, d’utilisations ou de
manipulations inappropriées, de
dommages résultant d’un usage
incorrect, d’un fonctionnement
erroné, d’une réparation par un
non professionnel ou du non
respect des instructions.
Evitez les risques
d’incendie et de choc
électrique fatal
• En cas d’urgence: débranchez
immédiatement l’appareil de la
prise électrique.
• Branchez l’appareil uniquement
à des prises adaptées, facilement
accessibles et reliées à la terre.
Assurez-vous que la tension de
la source d’énergie soit la même
que celle indiquée sur la plaque
signalétique. L’utilisation d’un
branchement inadapté annule la
garantie.
L’appareil doit être
connecté uniquement après
l’installation
• Ne tirez pas le cordon
d’alimentation sur des bords
tranchants, attachez-le ou
laissez-le pendre.
• Gardez le cordon d’alimentation
loin de la chaleur et de l’humidité.
• Si le cordon d’alimentation ou
la prise sont endommagés, ils
doivent être remplacés par le
fabricant, son service après-vente
ou des personnes de même
qualication, an d’éviter tous
risques.
• Si le cordon d’alimentation ou la
prise sont endommagés, ne faites
pas fonctionner l’appareil, an
d’éviter tout danger. Retournez
votre appareil au Club Nespresso
ou à un revendeur Nespresso
agréé.
• An d’éviter de dangereux
dommages, ne placez jamais
l’appareil sur ou à côté de surfaces
chaudes telles que les radiateurs,
les cuisinières, les fours, les
brûleurs à gaz, les feux nus, ou
des sources de chaleur similaires.
• Placez-le toujours sur une surface
horizontale, stable et régulière.
La surface doit être résistante à
la chaleur et aux uides comme:
l’eau, le café, le détartrant ou
autres.
• Débranchez l’appareil de la
prise électrique lorsqu’il n’est
pas utilisé pendant une période
prolongée. Débranchez la
machine en l'éteignant et en
tirant sur la che et non sur le
cordon d’alimentation an de ne
pas l’endommager.
• Avant le nettoyage et l’entretien
de votre appareil, débranchez-le
de la prise électrique et laissez-le
refroidir.
• Ne touchez jamais le l électrique
avec des mains mouillées.
• Ne plongez jamais l’appareil, en
entier ou en partie, dans l’eau ou
dans d’autres liquides.
• Ne mettez jamais l’appareil ou
une partie de celui-ci dans un
lave-vaisselle, excepté le Rapid
Cappuccino System (R.C.S.)..
FR
9
UM_LATTISSIMA_TOUCH_FACELIFT_Z2A_TER.indb 9 06.12.17 17:09
Page 10
• L’électricité et l’eau ensemble sont
FR
dangereux et peuvent conduire à
des chocs électriques mortels.
• N’ouvrez pas l’appareil. Voltage
dangereux à l’intérieur.
• Ne mettez rien dans les
ouvertures. Cela pourrait
provoquer un incendie ou un choc
électrique!
• L’utilisation d’accessoires non
recommandés par le fabricant
peut entraîner un incendie, un
choc électrique ou des blessures.
Évitez les dommages
possibles lors de l’utilisation
de l’appareil
• Ne laissez jamais l’appareil
sans surveillance pendant son
fonctionnement.
• N’utilisez pas l’appareil s’il est
endommagé ou ne fonctionne
pas parfaitement. Débranchezle immédiatement de la prise
électrique. Contactez le Club
Nespresso ou un revendeur
Nespresso agréé, pour la
réparation ou le réglage de votre
appareil.
10
Un appareil endommagé
•
peut provoquer des chocs
électriques, brûlures et incendies.
• Refermez toujours bien
complètement le levier et ne
le soulevez jamais pendant le
fonctionnement, des brûlures
peuvent se produire.
• Ne mettez pas vos doigts sous
la sortie café, il y a un risque de
brûlure.
• Ne mettez pas vos doigts dans
le compartiment à capsules ou
dans le bac de récupération des
capsules. Risque de blessure!
Ne touchez pas les surfaces
•
rendues chaudes durant ou
après une préparation ou un
détartrage: l'embout de
détartrage et la buse à lait.
Utilisez les poignées ou boutons.
• Si la quantité de café
programmée excède 150 ml;
laissez la machine refroidir
pendant 5 minutes avant de
préparer un autre café. Risque de
surchaue!
• L’eau peut s’écouler autour d’une
capsule, quand celle-ci n’a pas
été perforée par les lames, et
endommager l’appareil.
• N'utilisez jamais une capsule
usagée, endommagée ou
déformée.
• Si une capsule est bloquée dans
le compartiment à capsules,
éteignez l’appareil et débranchezle avant toute opération. Appelez
le Club Nespresso ou un revendeur
Nespresso agréé.
• La machine à café ne doit pas
être placée dans un endroit clos
pendant son utilisation.
Après utilisation, les
•
surfaces chaudes peuvent
être soumises à une chaleur
résiduelle.
• Remplissez
toujours le réservoir avec de l'eau
potable et fraîche.
• Videz le réservoir d’eau si
l’appareil n’est pas utilisé pendant
une durée prolongée (vacances
etc...).
• Remplacez l’eau du réservoir
d’eau quand l’appareil n’est pas
utilisé pendant un week-end ou
une période de temps similaire.
• N’utilisez pas l’appareil sans le
bac d’égouttage et sa grille an
d’éviter de renverser du liquide
sur les surfaces environnantes.
• Ne nettoyez jamais votre appareil
avec un produit d’entretien ou
un solvant. Utilisez un chion
humide et un détergent doux
pour nettoyer la surface de
l’appareil.
• Pour nettoyer la machine, utilisez
seulement des chions propres.
• Lors du déballage de l'appareil,
retirez le lm plastique et jetez le.
• Cet appareil est conçu pour
des capsules de café Nespresso
disponibles exclusivement via le
Club Nespresso ou votre revendeur
Nespresso agréé.
• Tous les appareils Nespresso sont
soumis à des contrôles sévères.
Des tests de abilité, dans des
conditions réelles d’utilisation, sont
eectués au hasard sur des unités
sélectionnées. Certains appareils
peuvent donc montrer des traces
d’une utilisation antérieure.
• Nespresso se réserve le droit de
modier sans préavis la notice
d’utilisation.
UM_LATTISSIMA_TOUCH_FACELIFT_Z2A_TER.indb 10 06.12.17 17:09
Page 11

Détartrage
• Lorsqu’il est utilisé correctement,
le détartrant Nespresso, permet
d’assurer le bon fonctionnement
de votre appareil tout au long
de sa vie et vous permet de
maintenir une expérience café
aussi parfaite qu’au premier jour.
AVERTISSEMENT: la
solution de détartrage peut être
nocive. Évitez le contact avec les
yeux, la peau et les surfaces. Le
produit de détartrage Nespresso
est spécialement conçu pour les
machines Nespresso; l’utilisation
de tout autre produit risquerait
d’endommager les composants
de la machine ou de ne pas la
détartrer susamment. Pour
toute autre question relative au
détartrage, veuillez contacter le
Nespresso Club.
CONSERVEZ LES
INSTRUCTIONS
SUIVANTES
Transmettez-les aux
utilisateurs ultérieurs.
Ce manuel d’instruction
est également disponible
en version PDF sur
nespresso.com
FR
11
UM_LATTISSIMA_TOUCH_FACELIFT_Z2A_TER.indb 11 06.12.17 17:09
Page 12
4
EN
CZESDE
Special care for your rapid
Special care for your rapid
Special care for your rapid
Special care for your rapid
Machine starts rinsing, stops automatically
Machine starts rinsing, stops automatically
EN
FR
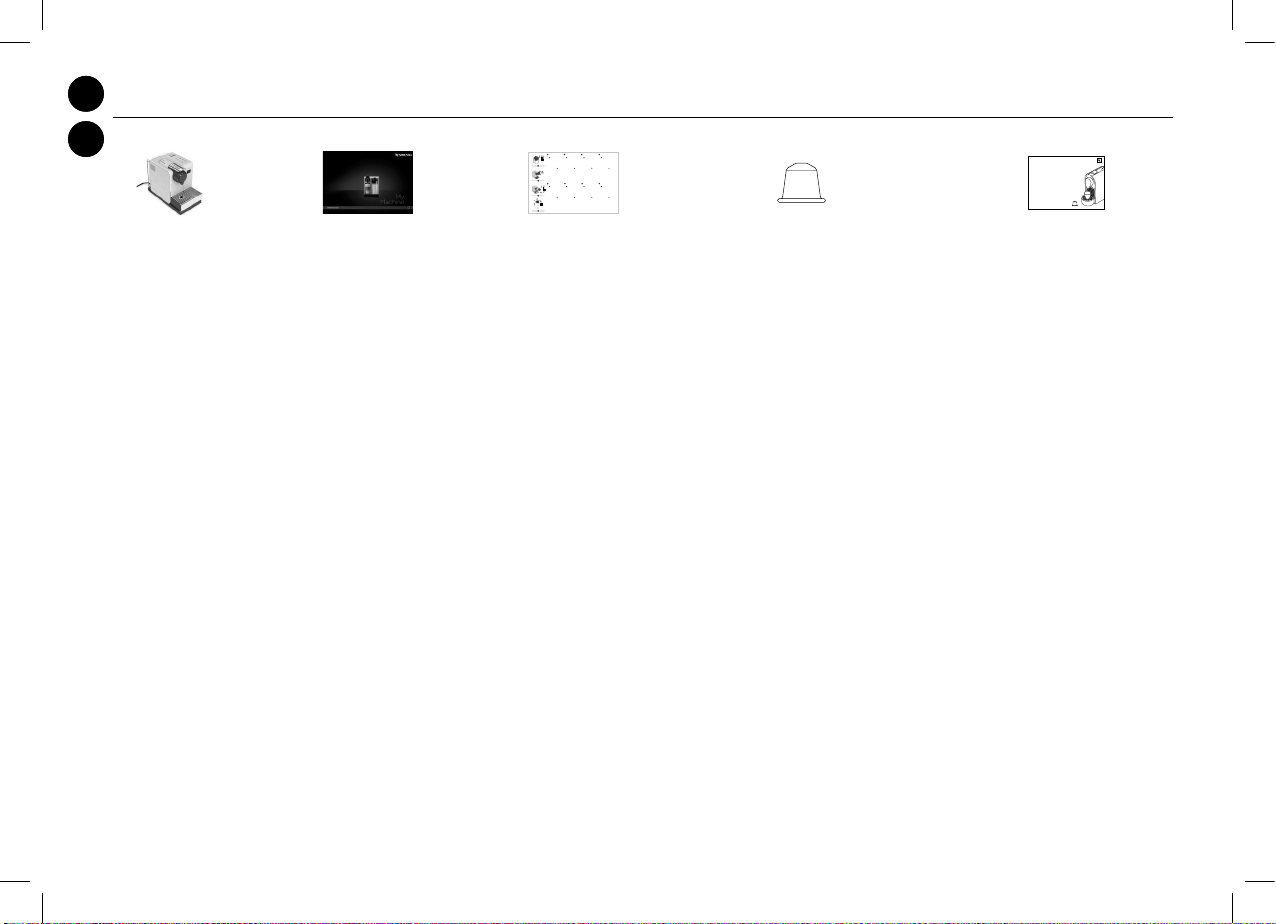
PACKAGING CONTENT
EN
FR
Coee machine User manual Care of Rapid Cappuccino System leaet Nespresso capsule tasting gi ft "Welcome to Nespresso folder"
Machine à café Pochett e de bienvenue NespressoMode d’emploi
/CONTENU DE L‘EMBALLAGE
cappuccino SyStem (r.c.S.)
cappuccino SyStem (r.c.S.)
cappuccino SyStem (r.c.S.)
cappuccino SyStem (r.c.S.)
4°
important: refer
important: refer
important: refer
important: refer
to User manual for
to User manual for
to User manual for
to User manual for
complete instructions.
complete instructions.
complete instructions.
complete instructions.
1- For a perfect milk froth, use skimmed
or semi-skimmed milk at refrigerator
temperature (about 4° C).
2- Rinse after each milk based preparation.
1
Place a recipient under milk outlet, press
and hold the «CLEAN»
machine stops pumping automatically
(approx. 15 sec.).
Machine starts rinsing, stops automatically
( ~15sec.).
3- Place the milk container in the fridge
immediately.
4- Every two days, disassemble the
Rapid Cappuccino System and clean
all components in the upper level of a
2
dishwasher.
Special care for your rapid
FR
cappuccino SyStem (r.c.S.)
4°
important: refer
to User manual for
complete instructions.
1- For a perfect milk froth, use skimmed
or semi-skimmed milk at refrigerator
temperature (about 4° C).
2- Rinse after each milk based preparation.
3
Place a recipient under milk outlet, press
and hold the «CLEAN»
machine stops pumping automatically
(approx. 15 sec.).
Machine starts rinsing, stops automatically
( ~15sec.).
3- Place the milk container in the fridge
immediately.
4- Every two days, disassemble the
Rapid Cappuccino System and clean
all components in the upper level of a
dishwasher.
Instruc tion pour l'entretien du
Rapid Cappuccino System
1- For a perfect milk froth, use skimmed
1- For a perfect milk froth, use skimmed
1- For a perfect milk froth, use skimmed
or semi-skimmed milk at refrigerator
or semi-skimmed milk at refrigerator
or semi-skimmed milk at refrigerator
temperature (about 4° C).
temperature (about 4° C).
temperature (about 4° C).
2- Rinse after each milk based preparation.
2- Rinse after each milk based preparation.
2- Rinse after each milk based preparation.
Place a recipient under milk outlet, press
Place a recipient under milk outlet, press
Place a recipient under milk outlet, press
and hold the «CLEAN»
and hold the «CLEAN»
and hold the «CLEAN»
button until
button until
button until
button until
machine stops pumping automatically
machine stops pumping automatically
machine stops pumping automatically
(approx. 15 sec.).
(approx. 15 sec.).
(approx. 15 sec.).
Machine starts rinsing, stops automatically
Machine starts rinsing, stops automatically
( ~15sec.).
( ~15sec.).
( ~15sec.).
3- Place the milk container in the fridge
3- Place the milk container in the fridge
3- Place the milk container in the fridge
immediately.
immediately.
immediately.
4- Every two days, disassemble the
4- Every two days, disassemble the
4- Every two days, disassemble the
Rapid Cappuccino System and clean
Rapid Cappuccino System and clean
Rapid Cappuccino System and clean
all components in the upper level of a
all components in the upper level of a
all components in the upper level of a
dishwasher.
dishwasher.
dishwasher.
PTIT HU
Special care for your rapid
Special care for your rapid
Special care for your rapid
cappuccino SyStem (r.c.S.)
cappuccino SyStem (r.c.S.)
cappuccino SyStem (r.c.S.)
important: refer
important: refer
important: refer
to User manual for
to User manual for
to User manual for
complete instructions.
complete instructions.
complete instructions.
1- For a perfect milk froth, use skimmed
1- For a perfect milk froth, use skimmed
1- For a perfect milk froth, use skimmed
or semi-skimmed milk at refrigerator
or semi-skimmed milk at refrigerator
or semi-skimmed milk at refrigerator
temperature (about 4° C).
temperature (about 4° C).
temperature (about 4° C).
2- Rinse after each milk based preparation.
2- Rinse after each milk based preparation.
2- Rinse after each milk based preparation.
Place a recipient under milk outlet, press
Place a recipient under milk outlet, press
Place a recipient under milk outlet, press
and hold the «CLEAN»
and hold the «CLEAN»
and hold the «CLEAN»
button until
button until
button until
button until
machine stops pumping automatically
machine stops pumping automatically
machine stops pumping automatically
(approx. 15 sec.).
(approx. 15 sec.).
(approx. 15 sec.).
Machine starts rinsing, stops automatically
Machine starts rinsing, stops automatically
( ~15sec.).
( ~15sec.).
( ~15sec.).
3- Place the milk container in the fridge
3- Place the milk container in the fridge
3- Place the milk container in the fridge
immediately.
immediately.
immediately.
4- Every two days, disassemble the
4- Every two days, disassemble the
4- Every two days, disassemble the
Rapid Cappuccino System and clean
Rapid Cappuccino System and clean
Rapid Cappuccino System and clean
all components in the upper level of a
all components in the upper level of a
all components in the upper level of a
dishwasher.
dishwasher.
dishwasher.
Welcome
Coret de dé gustation
de capsules Nespresso
12
UM_LATTISSIMA_TOUCH_FACELIFT_Z2A_TER.indb 12 06.12.17 17:09
Page 13
EN
FR
FIRST USE OR AFTER A LONG PERIOD OF NONUSE
EN
FR
PREMIÈRE UTILISATION OU APRÈS UNE LONGUE PÉRIODE DE NONUTILISATION
CAUTION: rst read the safety
precautions to avoid risks of fatal
electrical shock and re.
AVERTISSEMENT: commencez
par lire les consignes de sécurité
pour éviter les risques de décharges
électriques mortelles et d‘incendie.
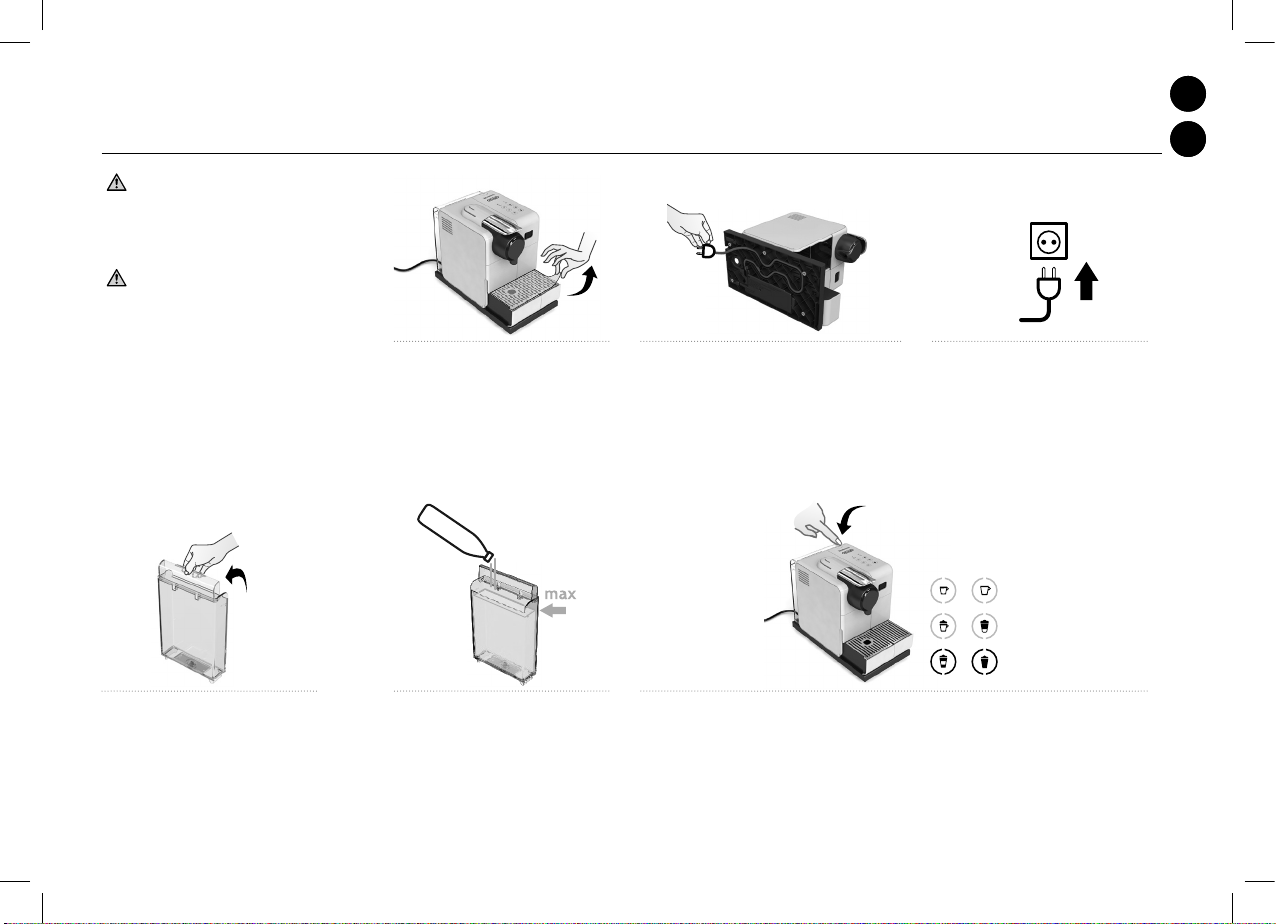
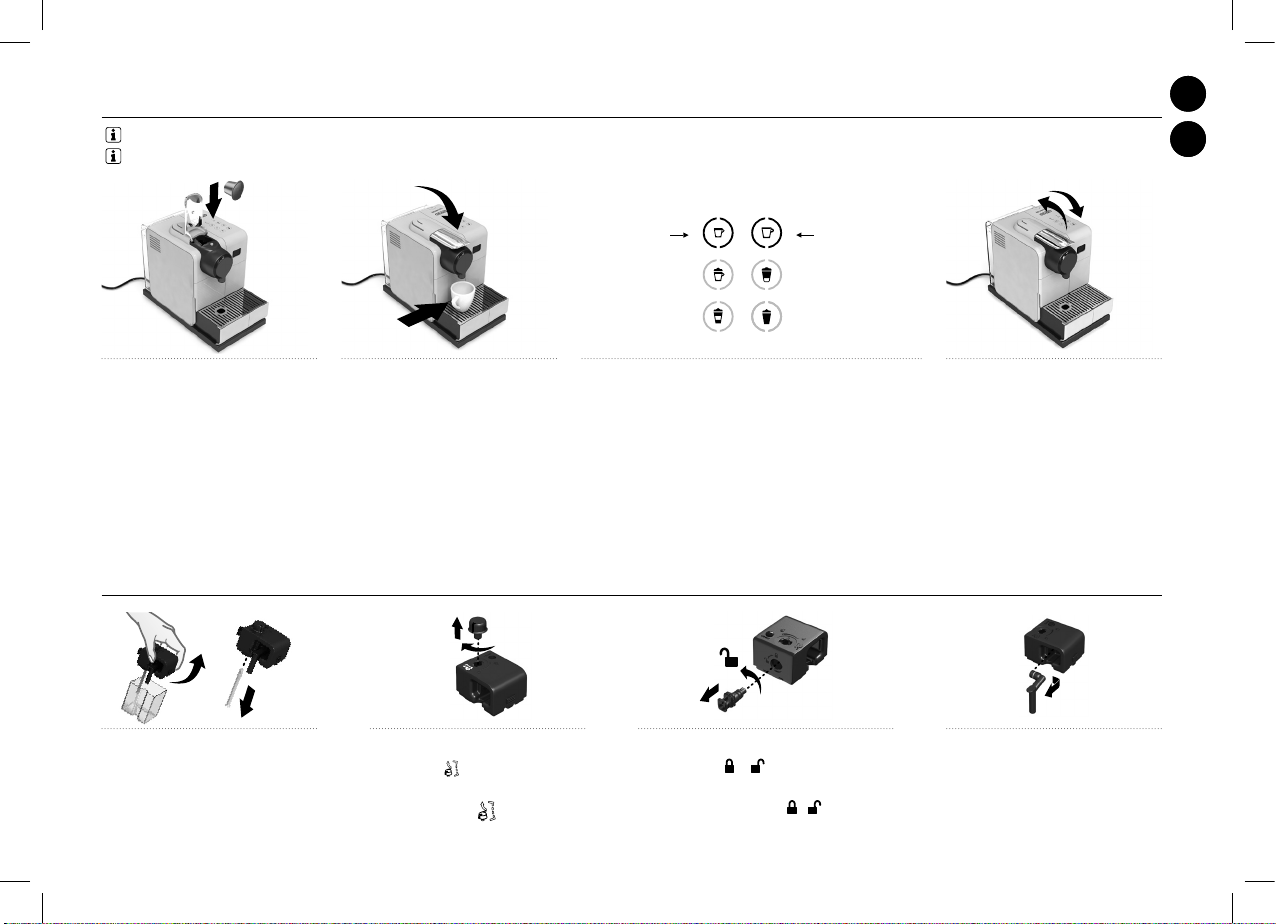
1. W hen unpacking the machine, rem ove
the plastic lm and dispose from both le ft
grid and right g rid, and machine panels.
1. Quand vous d éballez la machine, retirer
le lm plastiqu e des grilles d'égouttag e
gauche et droi te et des panneaux de la
machine.
2. Remove the w ater tank, drip tray, and capsule
container. Adjust th e cable length and store th e
excess in the c able guide under the machine.
2. Retirez le r eservoir d'eau, le bac d'égoutt age et
le bac à capsule s usagées. Réglez la lo ngueur du
câble en utilis ant le logement prévu à cet e et sous
la machine.
3. Put t he machine in upright posit ion,
plug machine into mains.
3. Placez la machine e n position vertica le,
branchez- la à la prise électriqu e.
4. The water t ank can be carried by
its cover.
4. Le réser voir d'eau peut êt re porté par son
couvercle.
5. Rins e the water tank before lling w ith
potable water up to maximum level.
5. Rincez le ré servoir d'eau avant de le
remplir d'eau potable jusqu'au niveau
maximum.
6. Switch the mac hine on. For the rst 2 se conds, the automatic power o an d water hardness sett ing
are indicated w ith steady light.
6. Allumez la machine. Pen dant les 2 premières second es les touches lumineuse s indiquent les règlages
enregist rés pour l'arrêt automatique e t la dureté d'eau.
13
UM_LATTISSIMA_TOUCH_FACELIFT_Z2A_TER.indb 13 06.12.17 17:09
Page 14
EN
FR
FIRST USE OR AFTER A LONG PERIOD OF NONUSE
EN
FR
PREMIÈRE UTILISATION OU APRÈS UNE LONGUE PÉRIODE DE NONUTILISATION
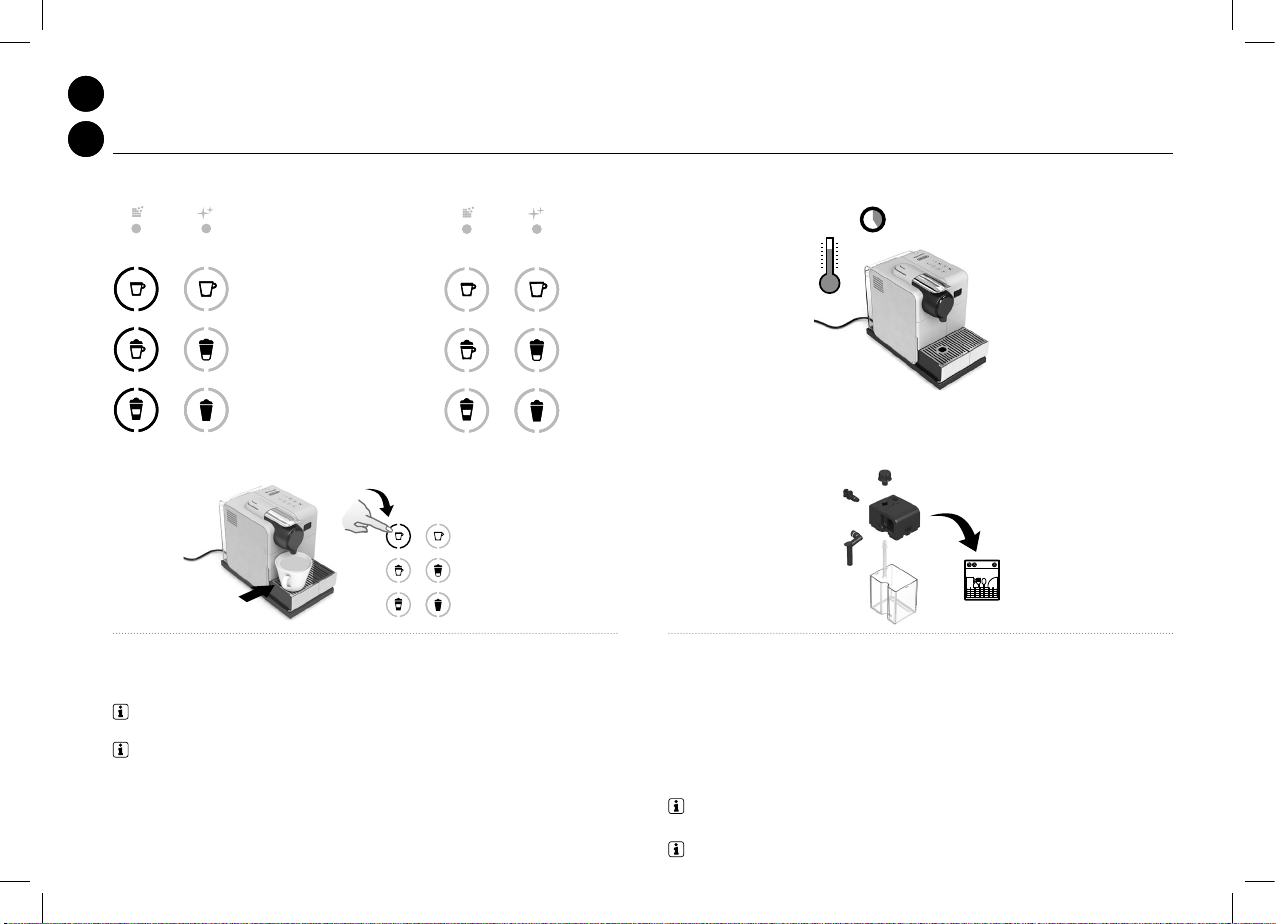
How to read au tomatic power o and water hard ness settings: /
Comment connaître les réglages enregistés pour l'arrêt automatique et la dureté d'eau:
Descaling
Descaling
Clean
Clean
to page 28
Réglage d e l'arrêt
automatique, voir page 28
– Espresso for 8 h
– Cappuccino for 30 min
Cappuccino p our 30 min
– Latte Macchiato 9 min
/Espress o pour 8 h
/
/
Descaling
Descaling
Latte Macchiato pour 9 min
x3
Automati c power o, refer
7. Rinsing: place a container under co ee outlet and press th e lungo button. Repeat thr ee times.
7. Rinç age: placez un récip ient sous la sortie caf é et appuyez sur la touche Lung o. Répétez trois fois
cette opé ration.
INFORMATION: machines are full y tested after bein g produced. Some trac es of coee
powder could be found in rinsing water.
INFORMATION:toutes nos machines so nt entièrement testées a près avoir été fabriqué es. Des
traces de po udre de café peuvent être v isibles dans l'eau de rinçage.
14
Water hardness set tings,
refer to p age 26
Clean
Clean
Réglage d e la dureté de l'eau,
voir page 26
– Lungo: level 0
Lungo: niveau 0
– Creamy Latt e: level 1
– Warm milk froth: leve l 2
Lait chaud: nivea u 2
– Warm milk froth + Lun go: level 3
Lait chaud + Lung o: niveau 3
– Warm milk froth + Cr eamy Latte: level 4
Lait chaud + Cre amy Latte: niveau 4
8. Disass emble the Rapid Cappuccino Sy stem (R.C.S.) and clean all 6 component s in the upper level of
your dishwasher. In cas e a dishwater is not available, refer to t he "Hand Washing of Rapid Cappuccino
System (R.C.S.)" sec tion. After reassemb le and re-attach the R .C.S. to the mac hine, use the "Clean"
button before preparing milk beverage.
8. Démonter les 6 pi èces du Rapid Cappuccino Sys tem (R.C.S.) et placer tous les élément s dans le tiroir
supérieur du lave -vaisselle. Si vous ne dispos ez pas d'un lave-vaisselle, se réf érer à la section lavage à
la main du Rapid Capp uccino System (R.C.S.). Après avoir remonté le R .C.S. et l'avoir reconnecté à la
machine, utilis ez le bouton "Clean" avant toute prépar ation à base de lait.
(refer to page 15).
After the rst 2 seconds,
25 sec.
the machine heat s up for
approximately 2 5 seconds
(blinking light s). Machine ready is
indicated by steady lights.
Après les 2 pre mières secondes, la
/ Creamy Latte: niveau 1
/
machine chaue pendant environ
25 secondes (touches clignotantes).
La machine es t prête lorsque la
/
lumière des touc hes est xe.
/
INFORMATION: refer to "Assembling/Disassembling of Rapid Cappuccino System" section
INFORMATION:voir section Montage/Démontage du Rapid Cappuccino System, à la page 15.
UM_LATTISSIMA_TOUCH_FACELIFT_Z2A_TER.indb 14 06.12.17 17:09
Page 15
EN
FR
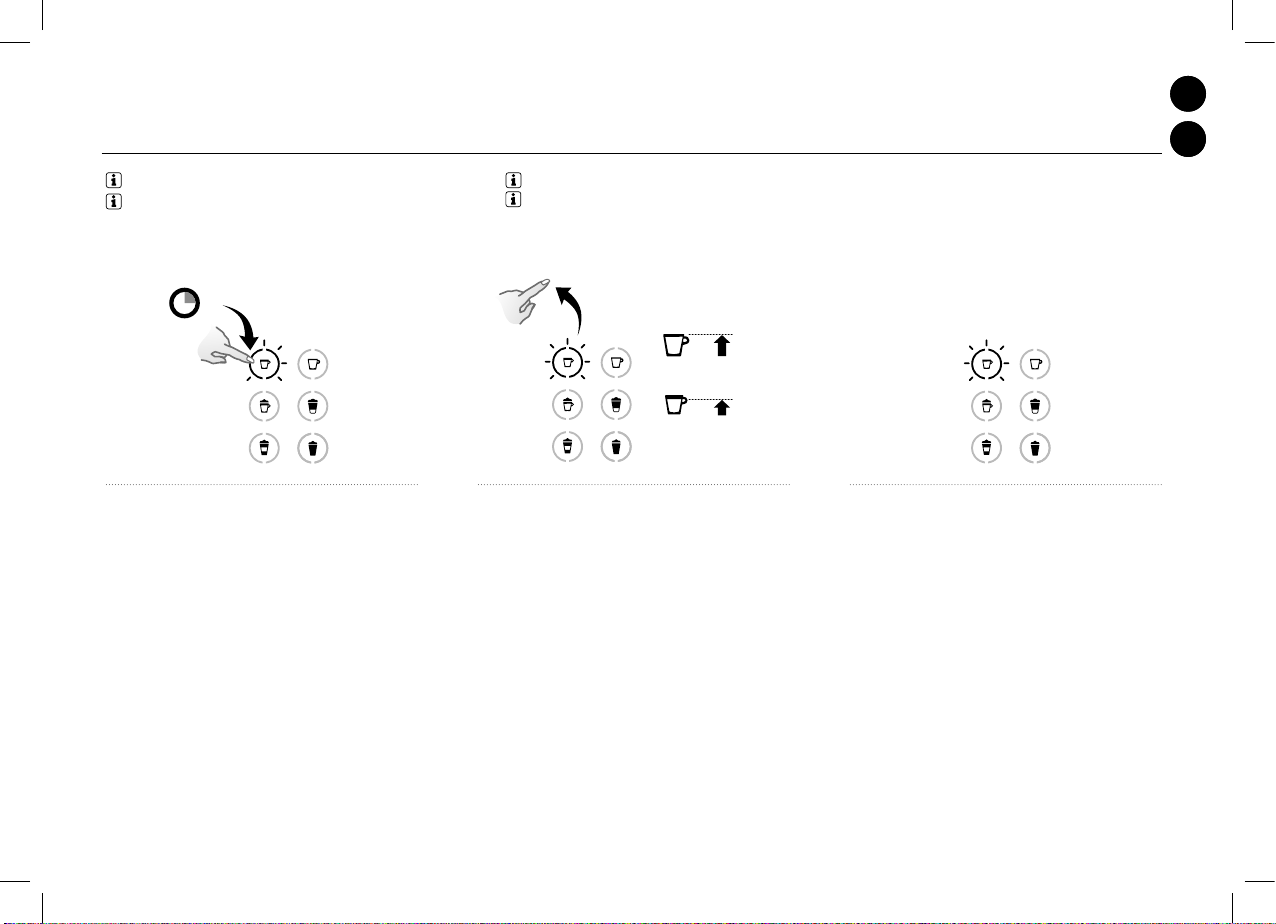
COFFEE PREPARATION
EN
FR
NOTE: during heat u p, you can press any coee bu ttons. The coee wi ll then ow automaticall y when the machine is read y.
NOTE: dur ant le chauage de la mach ine, vous pouvez appuyer s ur n'impor te quelle touche café. Le c afé s'écoulera automatiq uement dès que la machine s era prête.
/PRÉPARATION CAFÉ
110 ml40 ml
1. L ift the lever complete ly and insert the
capsule.
1. Levez le lev ier complètement et insére z
la capsule.
2. Close th e lever and place a cup under the
coee outlet.
2. Fermez le lev ier et placez une tasse sou s
la sortie c afé.
3. Press the Espresso (4 0 ml) or the Lungo (110 ml) button. Preparatio n
will stop autom atically. To stop the coee ow or top up yo ur coee, press
again.
3. Appuyez la to uche Espresso (40 m l) ou Lungo (110 ml). La préparatio n
s'arrêtera automatiquement. Pour arrêter l'écoulement de votre café ou pour
rallonger votr e café, appuyez à nouvea u.
4. Take the cup. Lif t and close the lever
to eject th e capsule into the used cap sule
con taine r.
4. Prenez la tass e. Levez et fermez le
levier pour éje cter la capsule dans le bac à
capsules usagées.
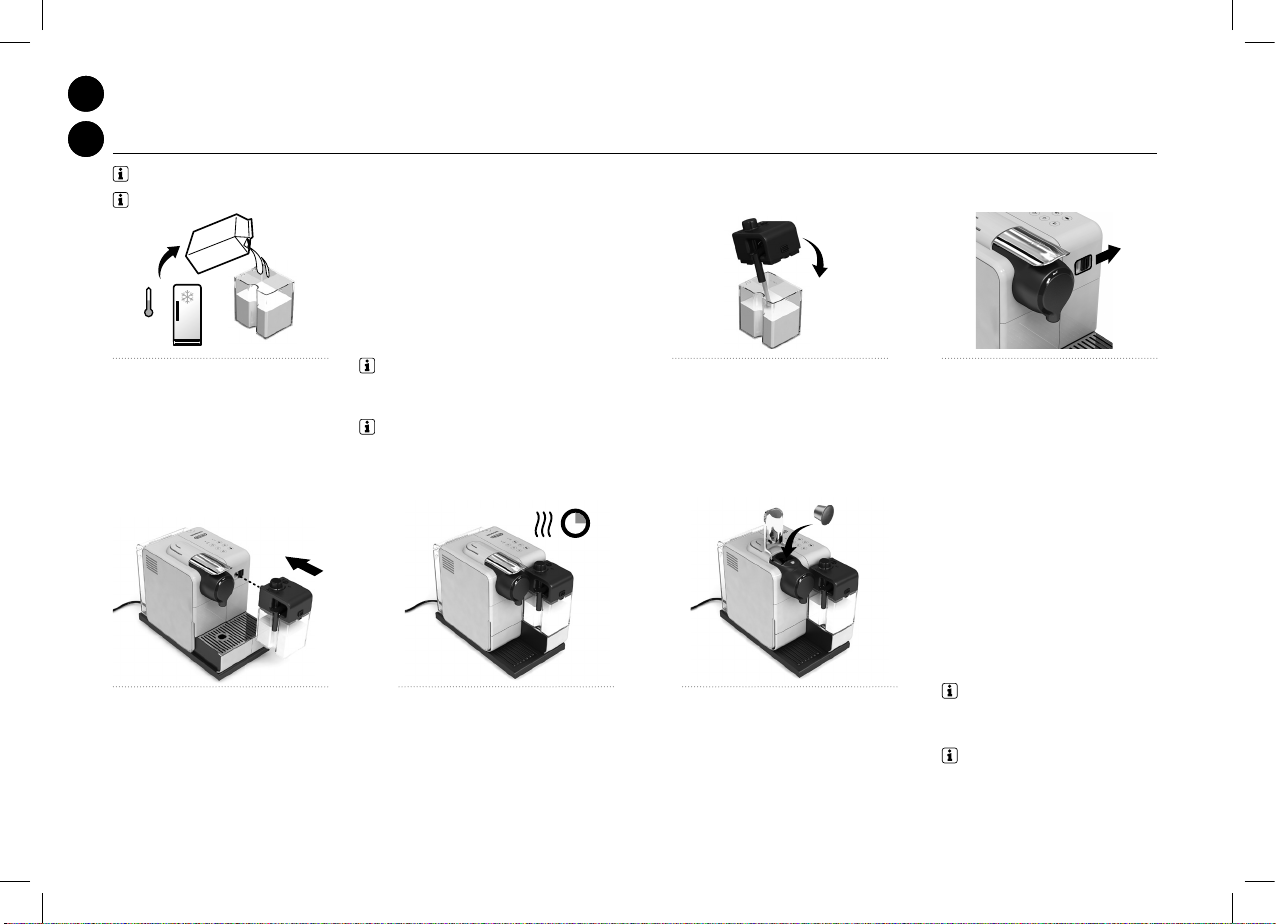
ASSEMBLING DISASSEMBLING OF RAPID CAPPUCCINO SYSTEM R.C.S.
MONTAGE/DÉMONTAGE DU RAPID CAPPUCCINO SYSTEM R.C.S.
1. R emove the milk container lid and
unplug milk aspiration tube.
1. Retire z le couvercle du réservoir à la it et
retirez le tu yau d'aspiration de lait.
UM_LATTISSIMA_TOUCH_FACELIFT_Z2A_TER.indb 15 06.12.17 17:09
2. Remove the mi lk froth regulator knob by
turning it unt il
2. Retirez le bo uton de réglage de mousse
en le tournant jusqu'à
and pulling it up.
et tirez-le.
3. Remove R apid Cappuccino System conne ctor by
unlocking i t from
3. Retirez l e connecteur du Rapid Capp uccino
System en le déver rouillant de
ensuite.
to and pulling it o.
à et le t irant
4. Remove the mi lk spout by pulling it o.
4. Retirez la bus e à lait en la tirant.
15
Page 16
EN
FR
PREPARING CAPPUCCINOLATTE MACCHIATOCREAMY LATTEWARM MILK FROTH
EN
FR
PRÉPARATION DU CAPPUCCINOLATTE MACCHIATOCREAMY LATTEMOUSSE DE LAIT CHAUDE
INFORMATION: for a perfect milk froth, use skimmed or semi-skimmed milk at refrigerator temperature (about 4° C).
INFORMATION: pour une mousse parfaite, utilisez du lait écrémé ou demi-écrémé à température du réfrigérateur (environ 4° C).
4 ° C
1. F ill the milk container with desi red
quantity of milk.
1. Rempliss ez le réservoir à lait avec la
quantité de lait souhaité.
4. Connec t the Rapid Cappuccino Sys tem
to the machine.
4. Connectez le Rapid Capp uccino System
à la machine.
INFORMATION: when the milk container is
empty, befo re relling, thoroug hly rinse it and the
milk aspirat ion tube with potab le water.
INFORMATION: lorsque le réser voir de lait est vide,
avant de le remp lir, rincez le abondamment ave c de
l'eau potable ain si que le tuyau d'aspirati on de lait.
15 sec.
5. Mach ine heats up for approximatel y
15 seconds (blinking lights).
5. La machine chaue pendant
approximati vement 15 sec. (les touches
lumineuses c lignotent).
2. Close th e milk container. 3. Ope n the steam connector do or by
2. Fermez le ré servoir à lait.
6. Lif t the lever completely and inse rt the
capsule.
6. Levez le levier co mplètement et insérez
la capsule.
sliding it to the r ight.
3. Ouvrez le v olet du connecteur vapeu r en
le faisant cou lisser vers la droite.
INFORMATION: only for Cappuccin o,
Latte Macchiato and Creamy Latte. Skip t his
step when preparing Warm milk froth only.
INFORMATION: seulement en cas de
préparation de Cappuccino, Latte Macchiato
et Creamy Latte. Ignore z cette étape en c as
de préparation de mousse de lait chaude.
16
UM_LATTISSIMA_TOUCH_FACELIFT_Z2A_TER.indb 16 06.12.17 17:09
Page 17
EN
FR
PREPARING CAPPUCCINOLATTE MACCHIATOCREAMY LATTEWARM MILK FROTH
EN
FR
PRÉPARATION DU CAPPUCCINOLATTE MACCHIATOCREAMY LATTEMOUSSE DE LAIT CHAUDE
INFORMATION: recommended settings:
Cappuccino min/Macchiato max/Creamy Latte min.
INFORMATION: Réglages recommandés:
Cappuccino min./Macchiato max/Creamy Latte min.
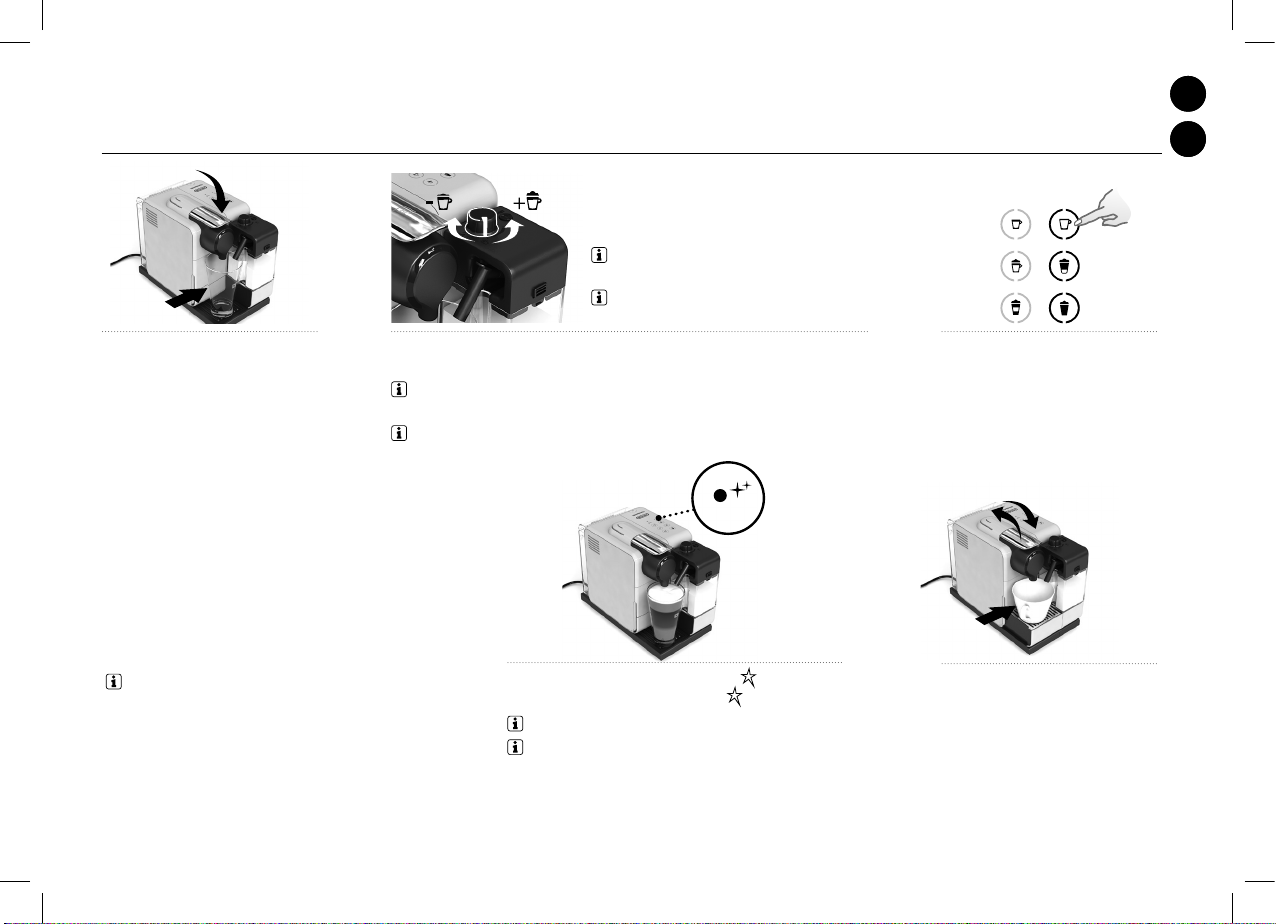
7. Close the leve r, place a Cappuccino c up
or a Latte Ma cchiato glass under the coee
outlet and adj ust milk spout position by
liftin g it up to the right level.
7. F ermez le levier et placez une t asse
Cappuccino ou u n verre à Latte Macchiato
sous la sor tie café et ajuster la posi tion de
la buse de lait.
8. Adjust th e milk froth regulator knob acco rding to the volume of froth you wan t.
8. Ajustez le bo uton de réglage de la mousse de lai t au volume de mousse souhaité.
NOTE: do not overt urn the milk froth regulato r. Overtu rned position is for in serting/
removing dial for cleaning.
NOTE: ne tournez pas com plètement le bouto n de réglage. Cette po sition sert à re tirer le
bouton pour le nettoyage.
Clean
9. Press the Cappuccino, Macchiato,
Creamy Latt e or Warm milk froth button.
9. Presser la touche Cap puccino, Macchiato,
Creamy Latt e ou mousse de lait chaude.
INFORMATION: pour le Cappuccino, le L atte Macchiato
et Creamy Latte, l'écoulement commence après quelques
secondes et s'arrêtera automatiquement. Pour la mousse de
lait chaude, s eulement de la mousse de lai t coulera.
10. At the end of the prepar ation, the "CLEAN" shines orange.
10. A la n de la prép aration la touche Clean
INFORMATION: rinse the milk sys tem after each use.
INFORMATION: rincez le sy stème à lait après ch aque
utilisation.
s'illumine en orang e.
11. Lif t and close the lever to eje ct the
capsule into the used capsule cont ainer.
Place a container und er milk spout.
11. Leve z et fermez le levier pour éj ecter
la capsule dans le b ac à capsules usagées .
Placez un récip ient sous la buse à lait.
17
UM_LATTISSIMA_TOUCH_FACELIFT_Z2A_TER.indb 17 06.12.17 17:09
Page 18
EN
FR
PREPARING CAPPUCCINOLATTE MACCHIATOCREAMY LATTEWARM MILK FROTH
EN
FR
PRÉPARATION DU CAPPUCCINOLATTE MACCHIATOCREAMY LATTEMOUSSE DE LAIT CHAUDE
16 sec.
Clean Clean
4° C
12. Press and h old the "CLEAN" button until machine stops pumping auto matically. Rinsing process
lasts appr oximately 16 seconds. "CLEAN"
combined wit h steam ows through the milk sp out.
12. Pr essez et maintenez la touc he «CLEAN» jusqu'à ce que la machine s'arrête automatiquement. Le
rinçage dure e nviron 16 secondes. «CLE AN»
chaude et de la vap eur s'écoulent par la b use à lait.
blinks. Milk s ystem rinsing process s tarts and hot water
clignote. Le rinç age du système lait commence, de l'eau
15. Afte r each use, disassemble the R apid Cappuccino System, and
clean all componen ts in the upper side of your dishw asher. In case a
dishwasher is not av ailable, refer to sectio n Hand washing of Rapid
Cappuccino System (R.C.S.).
15. Aprè s chaque utilisation, démo ntez le Rapid Capuccino Syste m,
et lavez tous les co mposants dans le panier sup érieur de votre lavevaisselle. Si vous n e disposez pas d'un lave-vaiss elle, référez-vous à la
secti on Lavage à la main du Rapid Capuccin o System (R.C. S.).
INFORMATION: refer to section "Assembling/
Disassembling of Rapid Cappuccino system (R.C.S.)".
INFORMATION: référez-vous à la section «Montage/
Démontage du Rapid Cappuccino System (R.C.S.)».
13. When the r insing process is nished,
the "CLEAN"
13. Lors que le rinçage est terminé, l'alerte
«CLEAN»
alert is re sumed.
s'éteint.
14. Disconnec t the R.C.S. from machine a nd place it
immediately in the refriger ator. Close the machine steam
connector door.
14. Dé connectez le R.C.S. de la mac hine et placez-le
immédiatement d ans le réfrigérateur. Ferme z la porte
d'accès au connecte ur vapeur.
CAUTION: this milk should not be kept for more than 2 days
in the refrigerator. In the case the milk container is kept outside
refrigerator for longer than 2 hours, disassemble the R.C.S. and
clean all components (refer to dishwashing or hand washing
recommendations).
AVERTISSEMENT: le lait ne doit pas être conservé plus de 2
jours dans le réfrigérateur. Si le réservoir à lait est conservé en dehors
du réfrigérateur pendant plus de 2 heures, démontez le R.C.S. et
nettoyez tous les composants (voir les recommandations de lavage au
lave-vaisselle et lavage à la main).
18
UM_LATTISSIMA_TOUCH_FACELIFT_Z2A_TER.indb 18 06.12.17 17:09
Page 19
EN
FR
PROGRAMMING COFFEE QUANTITY
EN
FR
PROGRAMMER LA QUANTITÉ DE CAFÉ
INFORMATION: follow the step 1-2 of section "coe e preparation". NOTE: please ref er to factory se ttings secti on for min/max program mable quantities.
INFORMATION: suivre les instruc tions 1-2 du paragra phe
«Préparer un café».
3 sec.
NOTE: référez-vous au p aragraphe «Régla ges usine» pour conna ître les quantité s programmables m in. et max.
1. Touch an d hold Espresso or Lungo b utton button fo r at least
3 sec to enter the p rogramming mode. Brewing s tarts. But ton
blinks fast: programming mode.
1. Appuye z et maintenez appuyée la touch e Espresso ou
Lungo pendant au m oins 3 sec. pour entrer dans le m ode
programmation. L'écoulement commence. En mode
programmation les touches clignotent rapidement .
2. Release bu tton when desired volu me is reached.
2. Relâchez la tou che lorsque la quantité dés irée est obtenue.
3. Water volum e is now stored for the nex t coee preparation s.
Button b links 3 times to conrm the ne w water volume.
3. Le volume d'eau est main tenant programmé pour les
prochaines p réparations de café. La t ouche programmée
clignote 3 fois p our conrmer la nouvelle progr ammation.
19
UM_LATTISSIMA_TOUCH_FACELIFT_Z2A_TER.indb 19 06.12.17 17:09
Page 20

EN
FR
PROGRAMMING QUANTITY FOR CAPPUCCINOLATTE MACCHIATOCREAMY LATTEWARM MILK FROTH
EN
FR
PROGRAMMER LA QUANTITÉ DE CAPPUCCINOLATTE MACCHIATOCREAMY LATTEMOUSSE DE LAIT
INFORMATION: follow the steps 1-8 of section "Preparing Cappucc ino, Latte Macchiato or Crea my Latte".
INFORMATION: suivez les instruc tions 1 à 8 du paragraphe «Prép arer un Cappuccino, un Latte M acchiato ou Creamy Latte».
CHAUDE
3 sec.
1. Touch and hold Cappu ccino/Latte Macchiato/Creamy Lat te/
Warm milk froth bu tton for at least 3 sec . Milk frothing star ts.
Button blinks fast: programming mode.
1. Appuye z et maintenez appuyée la touch e Cappuccino/Latte
Macchiato/Creamy Latte/Mousse de lait c haude pendant au
moins 3 sec. L a préparation de mouss e de lait commence. En
mode programmation les touches clignotent rapid ement.
NOTE: please ref er to "Factory settings" sectio n for
min/max programmable quantities.
NOTE: référez-vous au paragraphe «Réglages usine» pour
connaître les quantités programmables min. et max.
NOTE: sequence betw een coee and milk depe nds on
the chosen recipe.
NOTE: pour le Creamy Lat te, il faut d'abord met tre le
café puis la m ousse de lait.
2. Release bu tton when desired milk f roth volume is reached.
Button still blink s fast: programming mode. (Cappuccino/Latte
Macchiato/Creamy Latte). When programming the Warm mi lk
froth beve rage, the programming ends h ere.
2. Relâchez la touc he lorsque la quantité de mous se de lait
désirée est obtenue, les touc hes clignotent (Cappuccino/
Latte Macc hiato/Creamy Latte). Si vous programmez la touc he
Mousse de L ait le réglage est terminé.
3. Touch and ho ld the same button. Bre wing starts. Rele ase
button w hen desired coee volume is rea ched. Recipe volume
is now stored f or the next prepar ations. Button blink s 3 times to
conrm the new w ater volume.
3. Appuyez et maintenez appuyée la même touche. L'écoulement
café commence. R elâcher le bouton lorsqu e la quantité de café est
atteinte. La quantité de la recette es t maintenant programmée
pour les pro chaines préparations . La touche programmée c lignote
3 fois pour con rmer la nouvelle programmat ion.
NOTE: the milk fro th volume depends on the k ind of
milk that is use d, its temperature a nd the position of the
milk regulator knob.
NOTE: le volume de mousse d e lait dépend de la qualité
de lait chois ie, de sa température e t de la position du sél ecteur
de mousse.
3 sec.
20
UM_LATTISSIMA_TOUCH_FACELIFT_Z2A_TER.indb 20 06.12.17 17:09
Page 21

EN
FR
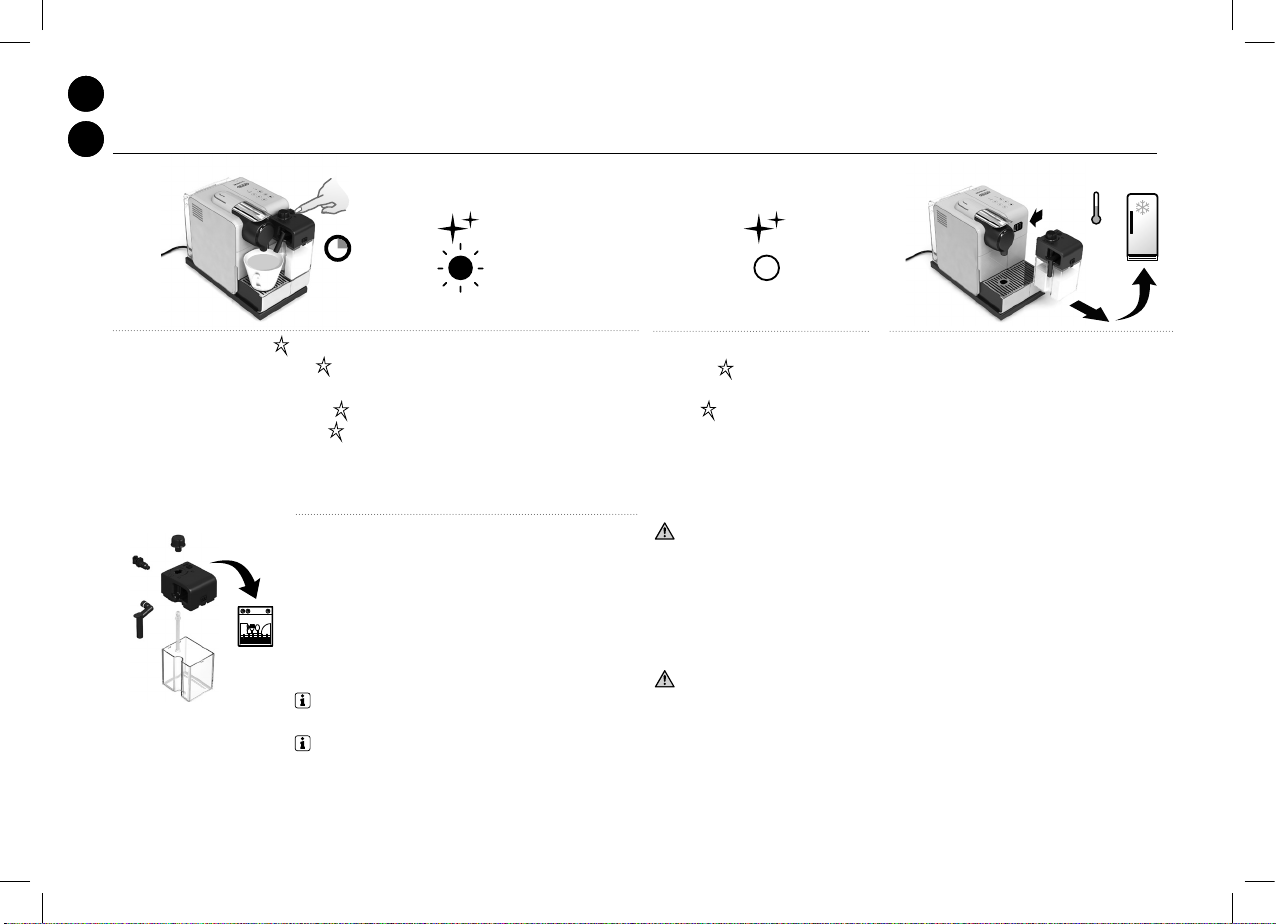
DAILY CARE
EN
FR
ENTRETIEN QUOTIDIEN
INFORMATION: do not use any strong c leaning agent or solvent c leaner. Use a clean damp cloth and m ild cleaning agent to clea n
the surface of the machine. Do not put any machine components in dishwasher, except the Rapid Cappuccino System components.
INFORMATION: n’utilisez pas d es produits de ne ttoyage agress ifs ou à base de sol vants. Utilisez u n chion humide et un a gent nettoyant
doux pour ne ttoyer la surf ace de la machine. Ne lavez auc un composant de la mac hine au lave-vaissell e, excepté les composa nts du Rapid
Cappuccino System.
1. R emove drip tray, capsule container. Empt y and rinse.
Remove water tank . Empty, rinse it before llin g with
fresh pot able water.
1. Retire z la grille d'égouttage et le ba c à capsules.
Videz-le et r incez-le. Retirez le rés ervoir d'eau. Videz-le,
rincez-le avant d e le remplir avec de l'eau potable fraic he.
2. Lif t and close the lever to ejec t the capsule into the use d capsule container.
Place a container und er coee outlet and pres s the Lungo button to rins e.
2. Levez et ferm ez le levier pour éjecte r la capsule dans le bac à capsules u sagées.
Placez un récip ient sous la sortie caf é, appuyez sur la touche Lungo po ur rincer.
3. Clean t he coee outlet with a cl ean damp cloth. Clean
the machine sur face using a clean damp cloth.
3. Nettoy er la sortie café à l'aide d'un chio n propre et
humide. Net toyez la machine à l'aide d'un chion propr e
et humide.
HAND WASHING OF RAPID CAPPUCCINO SYSTEM R.C.S.
LAVAGE À LA MAIN DU RAPID CAPPUCCINO SYSTEM R.C.S.
INFORMATION: when a dishwasher is not ava ilable, the R.C.S.
component s can be washed by hand. In t hat case, the procedur e must be
performed daily for a maximum eciency.
INFORMATION: en l'absence de l ave-vaisselle, les comp osants du
R.C.S. peuven t être lavés à la main. Dans ce cas , le nettoyage doit êt re
réalisé quotidiennement pour une meilleure ecacité.
UM_LATTISSIMA_TOUCH_FACELIFT_Z2A_TER.indb 21 06.12.17 17:09
1. D isassemble the Rapid Ca ppuccino System. Refer to
"Assembling/Disassembling of Rapid Cappu ccino section
system (R.C.S.)", rinse all parts with warm/hot potable water.
1. Démonte z le Rapid Capuccino System. Ré férez-vous à la
section "Montage/Démontage du Rapid Capuccino System
(R.C.S.)", rincez toutes les pièce s avec de l'eau potable chaude.
21
Page 22

EN
FR
HAND WASHING OF RAPID CAPPUCCINO SYSTEM R.C.S.
EN
FR
LAVAGE À LA MAIN DU RAPID CAPPUCCINO SYSTEM R.C.S.
30 minutes
30 minutes
2. Soak all components in war m/hot potable water
together wi th mild/soft detergent f or at least 30 minutes
and rinse tho roughly with warm/hot po table water. Do not
use stron g odor mild/soft deterge nts.
2. Laissez tr emper tous les composant s dans de l'eau potable
chaude mélangée à un détergent doux pendant minimum
30 minutes puis r incez abondamment avec de l'eau pota ble
chaude. N'utilisez pas de détergent fortement o dorant.
RESTORING QUANTITY TO FACTORY SETTINGS
1. Switch the machine ON.
1. Allumez la ma chine.
NOTE: remove milk jug .
NOTE: enlevez le pot à lai t.
3. Clean t he interior of the Milk tank with m ild/soft
detergent and r inse with warm/ hot potab le water.
Do not use abrasive material that might damage the
surface of the equipment.
3. Nettoy ez l'intérieur du réserv oir à lait avec du
détergent dou x puis rincez avec de l'eau potable
chaude. N'utilis ez pas d'abrasif qui pourr ait
endommager la sur face de la pièce.
4. Dry all p arts with a fre sh and clean
towel, cloth or paper and reassemble.
4. Séchez tou tes les pièces avec une
servie tte propre, un chion ou du p apier
et remontez l'ensemble.
/RÉTABLIR LES RÉGLAGES USINE
3 sec.
Descaling
Clean
2. Press th e Lungo and Warm milk froth but tons simultaneously for 3 s econds to enter Menu
mode: descaling and clean aler ts start blinking.
2. Appuyez simult anément les touches Lungo e t Mousse de lait pendant 3 sec . pour entrer
dans le mode Menu: les touches d'alerte détar trage et nettoyage clignotent.
5. Af ter reassemble and re-at tach the RCS to the
machine, use th e “Clean” but ton before preparing
milk beverag e.
5. Après avoir re monté le R.C.S. et l'avoir reconnec té
à la machine, utilis ez le bouton "Clean" avant toute
préparatio n à base de lait.
NOTE: the Menu mod e exits automatica lly after
30 sec if no ac tions are perfo rmed or can be exite d
manually by pre ssing the Lungo and Milk f roth
buttons simultaneously for 3 seconds.
NOTE: le mode Menu se dés active après 30 se c
sans act ion, il est possibl e d'en sortir manuelle ment
en appuyant simultanément sur les touches Lungo et
Mousse de lait pendant 3 secondes.
22
UM_LATTISSIMA_TOUCH_FACELIFT_Z2A_TER.indb 22 06.12.17 17:09
Page 23

EN
FR
RESTORING QUANTITY TO FACTORY SETTINGS
EN
FR
3. Touch in a singl e continuous movement the follow ing
buttons : Warm milk frot h->Cr eamy Latte->Lungo->
Espresso ->Cappuccino->Latte Macchiato.
3. Appuyer successivement dans un mouvement continu
sur les touche s: Mousse de lait chaude->Creamy Latte ->
Lungo->Espresso ->Cappuccino->Latte Macchiato.
CAUTION: if coee volumes higher than 150 ml are programmed: let the machine cool down for
FACTORY SETTINGS
RÉGLAGES USINE
5 minutes before making the next coee. Risk of overheating!
AVERTISSEMENT: si la quantité de café programmée excède 150 ml; laissez la machine refroidir
pendant 5 minutes avant de préparer un autre café. Risque de surchaue!
/RÉTABLIR LES RÉGLAGES USINE
4. The Warm milk f roth button blinks to in dicate reset
mode. Press i t to conrm. All buttons blink 3 t imes:
all volumes are re set.
4. La touche Mou sse de lait chaude clignote pou r indiquer
que les quantit és sont rétablies. Pres ser cette touche pour
conrmer, toutes le s touches clignotent 3 fois: to us les
volumes d'origine s ont rétablis.
5. The m enu exits automatica lly and
machine retur ns to ready mode.
5. La sor tie du mode Menu se fait
automatiquement et la machine est
prête.
Espress o: 40 ml
Espress o: 40 ml
Cappuccino: Milk *: 50 ml/Coee: 40 ml
Cappuccino: La it*: 50 ml/Café: 40 ml
Latte Macchiato:
Milk* 150 ml/Coee: 40 ml
Latte Macchiato:
Lait*: 150 ml/Café: 4 0 ml
NOTE: *the milk f roth volume depends on t he kind of milk that is use d, its temperature and t he
position of the milk regulator knob.
NOTE: *le volume de la mouss e de lait dépend de la natu re de lait utilisé, de sa te mpérature et de la
position du bouton de réglage de mousse à lait.
Lungo: 110 ml
Lungo: 110 ml
Creamy Latt e: Milk*: 150 ml/Coee: 40 ml
Creamy Latt e: Lait*: 150 ml/Café: 40 ml
Warm milk froth*: 120 ml
Mousse de lait c haude*: 120 ml
Automatic power o 9 min
Arrêt complet automatique 9 min
NOTE: we recommen d you to keep factor y settings for Esp resso and Lungo to ensur e the
best in cu p results for each of ou r coee varieties.
NOTE: nous vous recomma ndons de conserve r les réglages usine p our Espresso et L ungo an
d'assurer le mei lleur résultat dans la t asse pour toutes no s variétés de caf és.
Milk volume c an be programmed fr om 30 to 200 ml.
Coee volum e can be progammed fr om 25 to 200 ml.
La volume de la it peut être program mé de 30 à 200 ml.
Le volume de ca fé peut être progra mmé de 25 à 200 ml.
23
UM_LATTISSIMA_TOUCH_FACELIFT_Z2A_TER.indb 23 06.12.17 17:09
Page 24

Clean
EN
FR
DESCALING
www.nespresso.com/descaling
INFORMATION: descaling time is ap proximately 25 minute s.
NOTE: le processus d e détartrage dur e environ 25 minutes.
NOTE: to ensure a per fect coee ex perience time af ter time and a good func tioning of
the machine this is important to descale your machine when needed. When the descaling
alert s tarts to blink, it i s time to descale your mac hine. The machine can st ill prepare
several milk b everages before it i s blocked preventivel y. The blocka ge prevents any
damages to th e machine and ensure its p roper function ing over its lifetime. In c ase the
machine is bl ocked, please desca le your machine or contac t the Nespresso club.
NOTE: an d'assurer une expérience café aussi parfaite qu'au premier jour, nous vous
recommand ons de détartr er votre machine lors que c'est nécessai re. Lorsque l'alerte
détar trage commence à clig noter, votre machine doit êt re détartré e. La machine peut
encore fai re quelques prépar ations à base de lait avan t de se bloquer de manièr e préventive.
Ce blocage p ermet d'éviter des domm ages à votre machine et a insi assurer son bon
fonct ionnement tout au long d e sa vie. En cas de bloca ge de votre machine, veuil lez la
détar trer ou contacte r le Club Nespresso.
IMPORTANT: when the machine need s to be descaled, there a re 2 dierent speeds f or the
blinking of the descaling LED alert: fast blinking indicates only few preparations can be
made befo re the machine is blocked .
IMPORTANT: please make sure to comple te the entire descali ng procedure. If it is not
completed, the machine will remain blocked.
IMPORTANT: lorsque la machine do it être détartr ée, il y a 2 diérentes vite sses de
clignotement du LED Détartrage: un clignotement rapide indique que seules quelques
préparat ions peuvent être fai tes avant que la machine se bl oque.
IMPORTANT: veuillez vous assurer qu e la procédure de détar trage soit faite a u complet.
Si le détar trage n’est pas complété, la m achine restera bloq uée.
/DÉTARTRAGE
CAUTION: refer to safety precautions.
AVERTISSEMENT: référez-vous aux consignes de sécurité.
Descaling
1. D escale the machine when descaling alert
shines orang e in ready mode.
1. Détar trez la machine lorsque l'alerte détartrage
est allumée en o range en mode marche.
100 ml
• 1
3. Empt y the drip tray and the us ed capsules
container. Fill the wate r tank with 100 ml of
Nespresso descaling agent and 50 0 ml water.
3. Videz le ba c d'égoutt age et le bac à capsules
usagées .Remplissez le réser voir d'eau avec 100 ml
de produit dé tartrant Nespresso et 500 ml d'eau.
500 ml
• 2
2. Lif t and close the lever to ejec t any capsules in
the used ca psule container.
2. Levez et ferm ez le levier an d'éjecter la
capsule dans le b ac à capsules usagées .
4. Open the d escaling pipe storag e door. Plug
the descaling pipe into steam connec tor of
machine.
4. Ouvrir l'espace de r angement de l'emboût de
détart rage. Connecter l'embout dé tartrage sur le
connecteur vapeur de la machine.
24
UM_LATTISSIMA_TOUCH_FACELIFT_Z2A_TER.indb 24 06.12.17 17:09
Page 25

EN
FR
DESCALING
/DÉTARTRAGE
Descaling
5. The ma chine enters the descalin g mode. The
descaling ale rt blinks orange dur ing the entire
descaling p rocess. The Warm milk froth bu tton
shines white.
5. La machine en tre en mode détar trage. Le voyant
d'alerte détartr age clignote en orange pendant tout
le processus d e détartrage. L a touche lumineuse de
mousse de lait c haude s'allume en blanc.
9. Empty t he used capsules cont ainer, drip
tray, rinse out and ll the water tank with
fresh pot able water up to level MAX.
9. Videz le b ac à capsules usagée s, le
bac d'égoutt age, rincez le réservo ir et
le remplir complètement d'eau fraîche
potable.
6. Place a containe r with a minimum 1 litre
capacit y under both the coee ou tlet and
under the des caling pipe nozzle.
6. Positionner un récipient d'une contenance
minimum d'un litre sou s la sortie café et
l'embout de détartrage.
Descaling
10. Press the Warm milk f roth button again.
The rinsing c ycle continues through th e coee
outlet, de scaling pipe and drip tray u ntil the
water tank turns empty.
10. Appuye z la touche Mousse de lait chaud e à
nouveau. Le rinç age continue par la sorti e café,
l'embout détartrage et le bac d'égouttage.
Descaling
1L
7. Press the Warm milk f roth button. Des caling
product ows alternately through the co ee outlet,
descaling pi pe and drip tray.
7. Pr esser la touche Mousse de lai t chaude. Le produit
détart rant coule alternativement d e la sortie café, de
l'embout détar trage et du bac d'égout tage.
11. Once t he rinsing process is nishe d, the machine switches
o. Remove and store d escaling pipe. Empty dr ip tray and used
capsules cont ainer. Fill water tank with fres h potable water.
11. Lor sque le rinçage est ter miné, la machine s'éteint. Retirez
et rangez l'embou t détartrage dans s on logement. Vider le bac
égout toir et le bac de capsules us agées. Remplissez le ré servoir
d'eau fraîche potable.
Descaling
ok
8. When the de scaling cycle is nishe d (water
tank runs empt y), the Warm milk frot h button
shines.
8. Lorsque le c ycle de détartrag e est terminé
(le réser voir d'eau est vide), la touche Mousse
de lait chaude s'allume .
12. Clean the mac hine using a damp cloth.
You have now nished desc aling the machine.
12. N ettoyez la machine à l'aide d'un chion
humide. Vous avez term iné le détartrage de
la machine.
25
UM_LATTISSIMA_TOUCH_FACELIFT_Z2A_TER.indb 25 06.12.17 17:09
Page 26

EN
FR
WATER HARDNESS SETTING
EN
FR
RÉGLAGE DE LA DURETÉ D'EAU
1 sec.
1. P lace the water hardness
sticker under water for 1 second.
1. Placez la band e test sous
l'eau pendant 1 seconde.
2. The number o f red squares
indicates th e water hardness
level.
2. Le nombre de carr és rouges
indique le niveau de d ureté
de l'e au.
0
1
2
3
4
3. Switch the machine ON.
3. Allumez la mac hine.
NOTE: remove milk jug .
NOTE: enlevez le pot à lait.
3 sec.
Descaling
Clean
4. Press th e Lungo and Warm milk froth but tons
simultaneou sly for 3 seconds to enter Menu mo de:
descaling and clean alert s start blinking.
4. Appuyez simul tanément sur les touches Lun go
et Mousse de lai t chaude pendant 3 seconde s pour
entrer dans le mo de Menu: les voyants d'alerte
détartra ge et nettoyage clignotent.
NOTE: the Menu mod e exits
automatic ally after 30 sec. if n o actions
are perf ormed. It can be exi t manually
by pressing t he Lungo and Milk froth
buttons simultaneously for 3 seconds.
NOTE: le mode Menu se dés active
après 30 sec s ans action. Il es t possible
d'en sortir manuellement en appuyant
simultanément sur les touches Lungo et
Mousse de lait pendant 3 secondes.
Water hardness tab le/
Tableau de dureté d'eau
5. Touch in a singl e continuous movement the follo wing buttons:
Lungo->Creamy Latte->Milk froth. The cur rent water hardness set ting is
Lungo
Level/ dH fH mg/L CaCo3
Niveau
0 <3 <5 <50
indicated by t he corresponding but tons (steady light).
5. Appuyer successivement dans un mouvement continu les touches:
Lungo->Creamy Latte->Mousse de lait. Le ré glage de la dureté de l'eau
est indiqué p ar les touches lumineuse s correspondantes (lumièr e xe).
Creamy Latte
Warm milk froth
+
+
* Mousse d e lait chaude
/*
Warm milk froth
+ Lungo
Warm milk froth
+ Creamy Lat te
1 >4 >7 >70
2 >7 >13 >13 0
/*
3 >1 4 >25 >25 0
/*
4 >21 >3 8 >38 0
6. Now, within 15 sec, yo u can set the desired value
by pressing th e corresponding but ton. They blink 3
times rapidl y to conrm new value.
6. Vous disposez ma intenant de 15 secondes pour
programmer la du reté souhaitée en appuyant su r les
touches cor respondantes. Elles clig notent 3 fois pour
conrmer la nou velle valeur choisie.
7. The menu exi ts automatically and machin e
returns to rea dy mode.
7. L a sortie du mode Menu se f ait
automatiquement et la machine est prête.
26
UM_LATTISSIMA_TOUCH_FACELIFT_Z2A_TER.indb 26 06.12.17 17:09
Page 27

EN
FR
EMPTYING THE SYSTEM BEFORE A PERIOD OF NONUSE, FOR FROST PROTECTION OR BEFORE A REPAIR
EN
FR
VIDANGE DE LA MACHINE AVANT UN TEMPS SANS UTILISATION, POUR LA PROTECTION CONTRE
LE GEL OU AVANT UNE RÉPARATION
3 sec.
Descaling
Clean
1. Switch the machine ON.
1. Allumez la ma chine.
NOTE: remove milk jug .
NOTE: enlevez le pot à lait.
4. Touch in a sing le continuous movement
the following button s:
Creamy Latt e ->C appuccino.
4. Appuyez successivement dans un
mouvement cont inu sur les touches:
Creamy Latte->Cappuccino.
2. Remove the w ater tank. Lift and clo se the lever
to eject any rem aining capsule. Place a container
under the coe e outlet.
2. Retirez le ré servoir à eau. Levez et fer mez le
levier pour eje cter la capsule. Placez un ré cipient
sous la sor tie café.
5. The War m milk froth button blink s for conrmation. Once pr essed, the emptying
start s. The coee butto ns blink alternately: empty ing mode in progress.
5. La touche M ousse de lait chaude clignote p our conrmation. Presse z la touche et
la vidange commence. L es touches café clignoten t alternativement, la vidange e st en
cours.
3. Pre ss the Lungo and Warm milk froth bu ttons simultaneousl y for 3 seconds to enter Menu mod e: the
descaling and clean alert s start blinking.
3. Appuyez si multanément sur les touches L ungo et Mousse de lait chaude p endant 3 secondes pour ent rer
dans le Menu: les voyants d'alerte détar trage et nettoyage clignotent.
NOTE: the Menu mode e xits automatica lly after 30 sec if no ac tions are perf ormed or can be ex ited
manually by pressing the Lungo and Milk froth buttons simultaneously for 3 seconds.
NOTE: le mode Menu se dés active après 30 se c sans action. Il e st possible d'en sor tir manuellement en
appuyant si multanément sur les t ouches Lungo et Mou sse de lait pendant 3 se condes.
6. When the pr ocess is nished, the machine s witches o automatica lly.
6. Lorsque la vidange est terminée, la machine s'éteint automatiquement.
NOTE: applian ce will be blocked for app roximately
10 minutes after emptying.
NOTE: L'appareil ne peut être u tilisé après la vidan ge pendant
10 min. environ.
27
UM_LATTISSIMA_TOUCH_FACELIFT_Z2A_TER.indb 27 06.12.17 17:09
Page 28

EN
FR
AUTOMATIC POWER OFF
EN
FR
INFORMATION: this machine is equip ped with an excellent ene rgy consumption pro le as well as an automatic powe r o function (0W) whic h enables you to save
energy. The app liance switches o af ter 9 minutes after la st use. (factory s ettings).
INFORMATION: cette machine est dotée d'un excellent prol de consommation d'énergie, ainsi que d'une fonction d'arrêt automatique qui permet d'économiser
l'énergie. L'appareil s'éteint après 9 min. de non utilisation (réglage usine).
1. Switch the machine ON.
1. Allumez la ma chine.
NOTE: remove mi lk jug.
NOTE: enlevez le pot à l ait.
Automati c power o/
Arrêt Automatique
Espresso
Cappuccino
Latte Macchiato
8h
30 min.
9 min.
/ARRÊT AUTOMATIQUE
2. Press th e Lungo and Warm milk froth but tons
simultaneou sly for 3 seconds to enter Menu mo de:
the descaling and clean aler ts start blinking.
2. Appuyez simult anément sur les touches Lung o
et Mousse de lai t chaude pendant 3 seconde s pour
entrer dans le Menu: le s voyants d'alerte détar trage
et nettoyage clignotent.
4. Now, within 15 sec, yo u can set the desired value
by pressing th e corresponding but ton. They blinks 3
times rapidl y to conrm new value.
4. Vous disposez de 15 secondes pour programmer
la valeur souhait ée en appuyant la touche
correspon dante. Elle clignote 3 fois pour con rmer
la nouvelle valeur choisie.
3 sec.
Descaling
Clean
NOTE: the Menu mod e exits
automatic ally after 30 sec if no ac tions are
perfo rmed or can be exite d manually by
pressing t he Lungo and Milk froth bu ttons
simultaneously for 3 seconds.
NOTE: le mode Menu se dés active après
30 sec sans ac tion. Il est pos sible d'en sortir
manuellement en appuyant simultanément
sur les touch es Lungo et Mousse de l ait
pendant 3 secondes.
5. The m enu exits automatica lly and
machine retur ns to ready mode.
5. La sor tie du mode Menu se fait
automatiquement et la machine est prête.
3. Touch in a si ngle continuous movement the
following buttons: L atte Macchiato->Cappuccino
-> Espresso. The curren t automatic power o set ting is
indicated by t he corresponding but tons (steady light).
3. Appuyez successivement dans un mouvement
continu s ur les touche s: Latte Macchiato->Cappuccino
-> Espresso. Le réglage de l'arrêt auto matique est
indiqué par la touc he lumineuse correspon dante
(lumière xe).
28
UM_LATTISSIMA_TOUCH_FACELIFT_Z2A_TER.indb 28 06.12.17 17:09
Page 29

EN
TROUBLESHOOTING
No light indicator. Check t he mains, plug, voltage, and fu se. In case of problems, call t he Nespresso Club.
No coee, no wate r.
Coee comes o ut very slowly.
No coee, jus t water runs out (despite inser ted capsule). I n case of problems, send app liance to repair or call the Nespresso Club.
Coee is not hot en ough.
Capsule area is leaking (water in capsule container). Position capsule corre ctly. If leakages occur, call the Nespresso Club.
Irregular blinking. Send applian ce to repair or call the Nespresso Club.
All button s blink simultaneously for 10 se conds and then machine
switches o automatically.
All 6 button s blinking fast 3 times an d then machine goes back in
ready mode.
Descaling and cleaning alert b link.
Descaling al ert blinks orange an d beverage buttons av ailable
(descaling alert level 1).
Descaling al ert blinks orange an d Warm milk froth steady light. M achine is in Descaling mo de. Press Warm milk froth but ton to start de scaling process.
Descaling alert shine s orange, milk beverage buttons are unavailable
(descaling alert level 2).
Clean alert shine orange. R inse Milk system.
All coee but tons and all milk recipe but tons ash alternative ly.
Lever cannot be closed completely. E mpty capsule containe r. Make sure that no c apsule is blocked inside th e capsule container.
Quality of Milk f roth is not up to standard .
I cannot enter Menu m ode.
Water tank is empt y. Fill water tank.
Desc ale if necessary; s ee Descaling sec tion.
F low speed depends on th e coee variety.
D escale if necess ary; see Descalin g section.
Preheat cup.
Desc ale if necessary; s ee Descaling sec tion.
E rror alarm, machine need s repair. Send appliance to repair or ca ll the Nespresso Club.
Water tank is empt y.
M achine is in menu mode, press si multaneously Lungo and milk f roth button for 3 s econds to exit
menu mode or wai t 30 seconds to exit autom atically .
Descale machine.
Machine is b locked to prevent any damages.
Please desc ale your machine or contac t the Nespresso Club.
M achine overheat, wait until machine cools down.
Appliance will be blocked for approx imately 10 minutes after empt ying.
Use skimme d or semi-skimmed milk at re frigerator temper ature (about 4° C/39.2° F ).
Rinse af ter each milk preparatio ns (see p.Hand Washing R.C.S.).
D escale the machine (se e. p.24).
Do not use f rozen milk.
B e sure to remove the milk jug.
B e sure to press Lungo and Milk f roth button for 3 se conds.
Remove descaling pipe.
29
UM_LATTISSIMA_TOUCH_FACELIFT_Z2A_TER.indb 29 06.12.17 17:09
Page 30

EN
FR
EN
FR
DÉPANNAGE
Pas de lumière su r les touches et voyant s.
Pas de café, p as d'eau.
Le café s'écoule très lentement.
Pas de café, s eulement de l'eau coule (malgré l'inser tion d'une
capsule).
Le café n'est pas a ssez chaud.
Fuite au niveau de l a capsule (eau dans le bac à capsu les).
Clignotements irréguliers.
Toutes les touc hes clignotent simult anément pendant 10 secon des et
la machine s'éteint.
Les 6 touche s clignotent rapideme nt et la machine est prêt e.
Les alertes détar trage et nettoyage clignotent.
L'alerte détart rage clignote en orang e et les touches caf é fonctionnent
(Alerte dé tartrage niveau 1).
L'alerte détart rage clignote en orang e et la touche Mousse de la it est
éclairée en permanence.
L'alerte détart rage est allumée en o range et les touches d e préparation
à base de lait s ont indisponibles (Al erte détart rage niveau 2).
L'alerte net toyage est orange xe.
Toutes les touc hes café et recet tes clignotent alter nativement.
Le levier ne se f erme pas complètem ent.
La mousse d e lait est insusan te.
Je ne peux pa s entrer dans le Mode Menu .
Véri ez la prise, la che, la tensi on, le fusible. En cas de p roblème, appelez le C lub Nespresso.
Le réser voir d'eau est vide: remplis sez le.
Détartrez si nécessaire, voir le paragraphe Détartrage.
La v itesse d'écoulement dép end de la variété de caf é.
Détartrez si nécessaire, voir le paragraphe Détartrage.
En cas de pro blème, conez l'appareil en ré paration ou appele z le Club Nespresso.
Préchauez les tasses.
Détartrez si nécessaire, voir le paragraphe Détartrage.
Si la ca psule est correc tement mise en place, app elez le Club Nespresso.
Con ez l'appareil en réparati on ou appelez le Club Nespresso.
Alar me Panne : Conez l'appareil en r éparation ou appele z le Club Nespresso.
Le ré servoir est vid e.
La m achine est en mode Men u, appuyez simultaném ent sur les touches Lun go et Mousse de lait pen dant
3 seconde s, ou attendez 30 se condes pour qu'elle sor te automatiquement du m ode Menu.
Dé tartrez la machin e.
La m achine est en mode dé tartrage. Appu yez sur la touche Mous se de lait chaude pour comm encer le
détartrage.
La machine e st bloquée an d'évite r des dommages. Veuillez la d étartrer ou cont acter le Club Nespresso.
Rin cez le système de lait .
La machine surchau e, attendez qu'elle refroidisse.
L'appareil est bloqué p our 10 minutes environ sui te à une vidange.
Vid ez le bac à capsules. A ssurez-vous qu'aucune c apsule n'est bloquée dans le b ac à capsules.
Ut ilisez du lait écrémé o u demi-écrémé à temp érature du réfrig érateur ( 4° C environ).
Rin cez le système aprè s chaque préparatio n (voir le paragraphe net toyage à la main du R.C.S.).
Détartrez la machine (voir le paragraphe Détartrage).
N'utilisez p as de lait gelé.
Enle vez le pot à lait.
As surez-vous d'appuyer simu ltanément pendant 3 se condes sur les touc hes Lungo et Mousse d e Lait.
Enlevez l'embout de détartrage.
SPECIFICATIONS
SPÉCIFICATIONS
LATTISSIMA TOUCH
EUR, AUS, NZ: 220-240 V,
50-60 Hz , 1400 W
/Max.
Max 19 bar
~ 4.5 kg
/litre
0.9 L
/litre
0.35 L
17. 3 c m
32 cm
25.8 cm
30
UM_LATTISSIMA_TOUCH_FACELIFT_Z2A_TER.indb 30 06.12.17 17:09
Page 31

EN
FR
DISPOSAL AND ECOLOGICAL CONCERNS
Disposal and Environmental Protection
Your appliance contains valua ble materials that can be recover ed or recycled. Sepa ration of the remaining waste m aterials into dierent ty pes facilitates the re cycling of valuable raw materi al.
You can obtain inform ation on disposal from y our local authoritie s.
Mise au rebut et protection de l'environnement
Votre appareil conti ent des matériaux précieu x qui peuvent être récup érés ou recyclés. La s éparation des déche ts restants, en di érentes catégories, f acilite le recyclage de s matières premières pré cieuses.
Vous pouvez obten ir des renseignements sur l ’évacuation de s déchets auprès de vo s autorités locales.
/MISE AU REBUT ET PROTECTION DE L'ENVIRONNEMENT
CONTACT THE NESPRESSO CLUB
For any additio nal information, in case of p roblems or simply to seek advi se, call the Nespresso Club.
Contact de tails of the Nespresso Club can be found in the "Welcome to Nespresso" folder in y our machine box or at nespres so.com
Pour de plus amples informations, en cas de problème ou simplement pour demander des conseils, appelez le Club Nespresso.
Les coordonné es du Club Nespresso sont indiquées dans la poc hette de Bienvenue chez Nespresso dans le car ton de votre machine ou sur w ww.nespresso.com
WARRANTY
De’Longhi war rants this product a gainst defect s in materials and workmanship fo r a period of two years f rom the date of purchase. during t his period, De’Longhi will ei ther repair or replace, at its di scretion, any
defec tive product at no charge t o the owner. Replacement product s or repaired part s will be guaranteed for onl y the unexpired por tion of the original warr anty or six months, whiche ver is greater. This limited warrant y
does not appl y to any defect resultin g from accident, misuse, imp roper maintenance, or normal wear and te ar. Except to the e xtent allowed by applicabl e law, the terms of this lim ited warranty do not e xclude, restrict or
modif y, and are in additio n to, the mandatory statu tory rights applica ble to the sale of the produc t to you. If you believe your produc t is defective, co ntact Nespresso for instructi ons on where to send or bring it f or repair.
De’Longhi gara ntit ce produit contre tous le s défauts matériels e t de fabrication pour un e période de deux ans à compter d e la date d’achat. Pendant cette péri ode, De’Longhi réparera ou rem placera, à sa discrétion,
tout produit d éfectueux san s frais supplémentaire s pour son propriétaire. Le s produits de remplacemen t ou les pièces réparées s eront exclusivement garanti s pour la part non expir ée de la garantie initiale ou pen dant
six mois, la durée r etenue étant la plus longue. Cet te garantie limitée ne s’applique p as à un quelconque défaut ré sultant d’un accident, d’un usage inap proprié de la machine, d’un mauvais ent retien ou d’une usure
normale. Sau f si cela est prévu par la législat ion en vigueur, les conditions de cet te garantie limitée n’excluent, ni n e restreignent, ni ne mod ient les droits légaux o bligatoires relatifs à vot re achat, voire y sont
complémentair es. Si vous estimez que vot re produit est défe ctueux, contac tez Nespresso pour obtenir de s précisions sur l’adresse à laqu elle il convient de l’envoyer ou de l’apporter p our réparation. Veuillez consulte r
notre site web w ww.nespresso.com pour en s avoir plus sur Nespresso.
/GARANTIE
/CONTACTEZ LE CLUB NESPRESSO
31
UM_LATTISSIMA_TOUCH_FACELIFT_Z2A_TER.indb 31 06.12.17 17:09
Page 32

DE
IT
ÜBERSICHT/INDICAZIONI GENERALI
Übersicht/
Indicazioni generali
A
Maschine ohne Rapid Cappuccino Sys tem/
Macchina senza Sistema Rapid Cappu ccino
B
Maschine mit Rapid Cappuccino Sys tem (für Cappuccino)/
Macchina con Sistema Rapid Cappuccino (per Capp uccino)
C
Maschine mit Rapid Cappuccino Sys tem (für Latte Macchia to
und Creamy Lat te)/Macchina con Sistema Rapid Cappuccino
(per Latte Macchiato e Lat te Macchiato Chiaro)
1
Hebel/Leva
2
Kapselfach/Alloggiamento per la capsula
3
Wasse rtank (0.9 L)/Serbatoio acqua (0.9 L)
4
Kaeeauslauf/Ero gatore caè
5
Kapselbehälter für gebrau chte Kapseln/
Contenitore capsule usate
6
Abtropf schale (Zur Nutzung eine s Latte Macchiato Glas es nach
innen schieben)/Vassoio raccogligocce (far scorrere all’interno
per l’utilizzo d el bicchiere da ricett a)
7
Linkes Gitter/Griglia sinistra
8
Rechtes Gitter/Griglia destra
9
Aufbewahrungsfach der Entkalkungsdüse (aufklappbar)/
Sportello d el vano per beccuccio di de calcicazione
(tirare e aprire)
10
Entkalkungsdüse/Beccuccio di decalcicazione
11
Dampfansc hlussklappe/Sportello del conne ttore di vapore
12
Dampfanschluss/Connet tore di vapore
Sensorische Zubereitungstasten/
Pulsanti per la preparazione delle
bevande
13
EIN/AUS Schalter/Pulsante ON/OFF
15
Espress o 40 ml/Espresso 4 0 ml
16
Cappuccino/Cappuccino
17
Latte Macchiato/Lat te Macchiato
19
Lungo 110 ml/Lungo 110 ml
20
Creamy Latt e/Latte Macchiato Chiaro
21
Warmer Milchschaum/Schiuma di lat te calda
Alarm/Avviso
14
«Entkalkung» : Entkalkungsalarm, siehe
Abschnitt «Entk alkung»
«Decalcicazione»
vedere la sezione «Decalcicazione»
18
«Reinigung»
siehe Abschnitt «Cappuccino Zubereitung»
«Pulizia»
sistema lat te, vedere la sezione «Prep arazione
Cappuccino»
: avviso de calcicazione,
: Reinigung des Milchsystem s,
: avviso puliz ia
Rapid Cappuccino System (R.C.S.)/
Rapid Cappuccino System (R.C.S.)
22
Taste zum Entf ernen des Deckels/Puls ante per rimozione
coperchio
23
Milchbehälterdeckel/Coperchio contenitore del latte
24
Milchschaumdichte: MIN/Densità schiuma di latte: MIN
25
Position des Milchschaumregulierers (Einse tzen/ Entfernen)/
Posizione pe r manopola di regolazione d ella schiuma di latte
(inserimento / rimozione)
26
Milchschaumregulierer/
Manopola di re golazione della schiuma di lat te
27
REINIGUNG
PULIZIA
28
Milchschaumdichte: MAX/Densit à schiuma di latte: MAX
29
Rapid Cappuccino System Anschluss/
Connettore del Sistema Rap id Cappuccino
30
Milchdüse/Be ccuccio del latte
31
Gri der Milchdüse/Leva del beccuccio d el latte
32
Milchansaugrohr/Tubo di aspir azione del latte
33
Milchbehälter
Spülknopf/
: Pulsante risciacquo
(0.3 5 L)/Contenitore latte (0.35 L)
32
UM_LATTISSIMA_TOUCH_FACELIFT_Z2A_TER.indb 32 06.12.17 17:09
Page 33

DE
IT
Nespresso ist ein exklusives Sy stem, das zu jeder Zeit den pe rfekten Espre sso zubereitet. Alle Nespresso Maschin en sind mit einem patentier ten Extrak tionssystem ausg estattet, das ei nen Druck von bis zu 19 bar garantier t. Jeder
einzelne Parame ter wurde strengen Kontr ollen unterzogen, um die Arome nvielfalt, den Körper s owie die unvergleichliche Crema j eder einzelnen Varietät zum Au sdruck zu bringen.
Nespresso è un sistema esclusivo p er la preparazione di un E spresso eccezionale, t azzina dopo taz zina. Tutte le macchine Nespresso sono dotate di un sis tema unico che garantisce l’est razione a 19 bar di pressione. O gni
parametro è s tato calcolato con la massima pr ecisione anché siano es tratti tut ti gli aromi di ogni capsula, per da re corpo al caè e ot tenere una crema part icolarmente densa e morbi da.
INHALT/CONTENUTO
VORSICHT: Wenn Sie dieses Zeichen sehen, halten Sie sich bitte an die Sicherheitshinweise, um mögliche Gefahren und Schäden zu vermeiden.
INFORMATION: Wenn Sie dieses Zeichen sehen, befolgen Sie den Rat für einen sicheren und einwandfreien Betrieb Ihrer Kaeemaschine.
ATTENZIONE: in presenza di questo simbolo, leggere le precauzioni di sicurezza per evitare eventuali danni.
INFORMAZIONI: in presenza di questo simbolo, leggere le indicazioni per un uso sicuro e adeguato dell’apparecchio.
ÜBERSICHT/INDICAZIONI GENERALI ..................................................................
SICHERHEITSVORKEHRUNGEN/PRECAUZIONI DI SICUREZ ZA ...............................
VERPACKUNGSINHALT/CONTENUTO DELLA CONFEZIONE .....................................
INBETRIEBNAHME NACH LÄNGERER NICHTBENUTZUNG/
IN CASO DI PRIMO UTILIZZO O DOPO UN LUNGO PERIODO DI NON UTILIZZO .........
KAFFEEZUBEREITUNG/PREPARAZIONE DEL CAFFÈ ..............................................
MONTIEREN/DEMONTIEREN DES RAPID CAPPUCCINO SYSTEMS R.C.S./
ASSEMBLAGGIO/SMONTAGGIO DEL SISTEMA RAPID CAPPUCCINO R.C.S. ............
ZUBEREITUNG VON CAPPUCCINOLATTE MACCHIATOCREAMY LATTEWARMEN
MILCHSCHAUM/PREPARAZIONE CAPPUCCINOL ATTE MACCHIATOLATTE
MACCHIATO CHIAROSCHIUMA DI LATTE CALDA ..................................................
FÜLLMENGE FÜR KAFFEE UND ESPRESSO PROGRAMMIEREN/
PROGRAMMA ZIONE DELLA QUANTITÀ DI CAFFÈ ..................................................
FÜLLMENGE FÜR CAPPUCCINOLATTE MACCHIATO CREAMY LATTEWARMEN
MILCHSCHAUM PROGRAMMIEREN/PROGRAMMA ZIONE DELLA QUANTITÀ PER
CAPPUCCINOLATTE MACCHIATOLATTE MACCHIATO CHIAROSCHIUMA DI LATTE
CALDA ..............................................................................................................
TÄGLICHE PFLEGE/CURA QUOTIDIANA ................................................................
MANUELLE REINIGUNG DES RAPID CAPPUCCINO SYSTEMS R.C.S./
32
LAVAGGIO A MANO DEL SISTEMA R APID CAPPUCCINO R.C. S.........................
34
WIEDERHERSTELLEN DER WERKSEINSTELLUNGEN/
40
RIPRISTINO DELLE IMPOSTAZIONI DI FABBRICA .............................................
WERKSEINSTELLUNG/IMPOSTAZIONI DI FABBRICA ........................................
41
ENTKALKUNG/DECALCIFICAZIONE .................................................................
43
WASSERHÄRTE EINSTELLEN/IMPOSTAZIONI DELLA DUREZZA DELL'ACQUA .......
ENTLEERUNG VOR LÄNGERER NICHTBENUTZUNG, ZUM SCHUTZ VOR
43
FROST ODER VOR EINER REPARATUR/SVUOTARE IL SISTEMA PRIMA DI UN
PERIODO DI NON UTILIZZO PER LA PROTEZIONE ANTIGELO O PRIMA DI UNA
RIPARAZIONE ...............................................................................................
44
AUTOMATISCHE POWER OFF FUNKTION/SPEGNIMENTO AUTOMATICO .............
FEHLERBEHEBUNG/RICERCA GUASTI .............................................................
47
SPEZIFIKATIONEN/SPECIFICHE TECNICHE.......................................................
ENTSORGUNG UND UMWELTSCHUTZ/
SMALTIMENTO E PROTEZIONE AMBIENTALE ...................................................
KONTAKTIEREN SIE DEN NESPRESSO CLUB/CON TATTARE NESPRESSO ................
48
GEWÄHRLEISTUNG/GARANZIA ......................................................................
49
49
50
51
52
54
55
56
57
58
59
59
59
33
UM_LATTISSIMA_TOUCH_FACELIFT_Z2A_TER.indb 33 06.12.17 17:09
Page 34

DE
SICHERHEITS
VORKEHRUNGEN
VORSICHT / WARNUNG
GEFAHR DURCH STROM
ZIEHEN SIE DAS KABEL
BEI BESCHÄDIGUNG AB
VORSICHT BEI HEISSEN
OBERFLÄCHEN
VORSICHT: Die
Sicherheitsvorkehrungen
sind Bestandteil des
Gerätes. Bitte lesen Sie
die Anweisungen und
Sicherheitshinweise vor
der Inbetriebnahme des
Gerätes. Bewahren Sie die
Sicherheitshinweise auf,
um diese bei Bedarf schnell
einsehen zu können.
VORSICHT: Wenn Sie
dieses Zeichen sehen,
halten Sie sich bitte an die
Sicherheitshinweise, um
34
mögliche Gefahren und
Schäden zu vermeiden.
INFORMATION: Wenn
Sie dieses Zeichen sehen,
befolgen Sie den Rat
für einen sicheren und
einwandfreien Betrieb Ihrer
Kaeemaschine
• Das Gerät ist dazu bestimmt,
Getränke nach diesen Anweisungen
zuzubereiten.
• Benutzen Sie das Gerät
ausschließlich für den
bestimmungsgemäßen Gebrauch.
• Dieses Gerät wurde ausschließlich
für die Nutzung innerhalb von
Gebäuden und unter normalen
Temperaturbedingungen entwickelt.
• Schützen Sie das Gerät vor direktem
Sonnenlicht, Spritzwasser und
Feuchtigkeit.
• Dieses Gerät dient dem Einsatz
in Haushalten. Es ist nicht für die
folgenden Umgebungen geeignet:
Aufenthaltsräume von Geschäften,
Büros oder sonstigen Einrichtungen
des Arbeitslebens; in Bauernhöfen;
für Gäste in Hotels, Pensionen; Bed
& Breakfast-Einrichtungen und
anderen Unterkünften.
• Dieses Gerät kann von Kindern ab
mindestens 8 Jahren verwendet
werden, wenn sie bei der
Verwendung beaufsichtigt werden
sowie die Anweisung zum sicheren
Gebrauch des Gerätes erhalten und
die damit verbundenen Gefahren
verstanden haben. Reinigung
und Wartung der Maschine sollte
nicht von Kindern durchgeführt
werden, es sei denn, sie sind älter
als 8 Jahre und werden von einem
Erwachsenen beaufsichtigt.
• Halten Sie das Gerät und das Kabel
außerhalb der Reichweite von
Kindern unter 8 Jahren.
• Dieses Gerät kann von Personen
mit eingeschränkten physischen,
sensorischen oder psychischen
Fähigkeiten oder Mangel an
Erfahrung und Kenntnis verwendet
werden, wenn sie bei der
Verwendung beaufsichtigt werden
sowie die Anweisung zum sicheren
Gebrauch des Gerätes erhalten und
die damit verbundenen Gefahren
verstanden haben.
• Kinder sollten das Gerät nicht als
Spielzeug verwenden.
• Bei kommerziellem Gebrauch,
bei Zweckentfremdung, falscher
Bedienung, unsachgemäßem
Gebrauch, nicht fachgerechter
Reparatur oder bei Nichtbeachtung
der Anweisungen übernimmt
der Hersteller keine Haf tung für
eventuelle Schäden. Ebenso sind
Gewährleistungen in solchen Fällen
ausgeschlossen.
Vermeiden Sie Risiken
wie tödlichen
Stromschlag und Feuer
• Im Notfall: ziehen Sie sofort den
Stecker aus der Steckdose.
• Schließen Sie das Gerät nur an eine
geeignete, geerdete Netzsteckdose
an. Bei falschem Anschluss
verfällt die Gewährleistung.
Vergewissern Sie sich, dass die
Netzspannung dieselbe ist wie
auf dem Typenschild angegeben.
Bei falschem Anschluss verfällt die
UM_LATTISSIMA_TOUCH_FACELIFT_Z2A_TER.indb 34 06.12.17 17:09
Page 35

DE
Gewährleistung.
Das Gerät darf erst nach
dem korrekten Aufbau
angeschlossen werden
• Ziehen Sie das Kabel nicht über
scharfe Kanten. Befestigen Sie es
oder lassen Sie es hängen.
• Halten Sie das Kabel von Hitze und
Feuchtigkeit fern.
• Wenn das Netzkabel oder der
Stecker beschädigt ist, müssen
sie vom Hersteller, seinem
Kundendienst oder einer ähnlich
qualizierten Person ersetzt
werden, um Risiken zu verhindern.
• Das Gerät nicht in Betrieb nehmen,
wenn das Netzkabel oder der
Stecker beschädigt ist. Sollte Ihr
Gerät einen Defekt aufweisen,
wenden Sie sich an den Nespresso
Club oder einen von Nespresso
bevollmächtigten Vertreter.
• Um gefährliche Schäden zu
vermeiden, stellen Sie das Gerät
nie auf oder neben eine heiße
Oberäche wie Heizkörper,
Kochplatten, Gaskocher, oene
Flammen oder ähnliches.
• Stellen Sie das Gerät immer auf eine
stabile und ebene Oberäche. Die
Oberäche muss gegen Hitze und
Flüssigkeiten wie Wasser, Kaee,
Entkalkerlösung o.ä. resistent sein.
• Ziehen Sie den Netzstecker, falls
Sie das Gerät für längere Zeit nicht
benutzen. Schalten Sie dazu die
Maschine zunächst aus. Ziehen
Sie den Netzstecker dann heraus.
Ziehen Sie nur am Stecker selbst
und niemals am Kabel, da dieses
beschädigt werden kann.
• Ziehen Sie vor der Reinigung den
Netzstecker und lassen Sie das
Gerät abkühlen.
• Berühren Sie das Kabel nie mit
feuchten Händen.
• Tauchen Sie das Gerät oder Teile
davon niemals in Wasser oder
andere Flüssigkeiten.
• Stellen Sie das Gerät oder Teile
davon niemals in die Spülmaschine,
außer dem Rapid Cappuccino
System (R.C.S.).
• Die Verbindung von Elektrizität und
Wasser ist gefährlich und kann zu
tödlichen Stromschlägen führen.
• Önen Sie das Gerät nicht. Die im
Inneren vorhandene Spannung ist
gefährlich!
• Stecken Sie nichts in die Önungen.
Dies kann zu einem Brand oder
einem Stromschlag führen.
• Die Verwendung von
Zubehörteilen, die vom Hersteller
nicht empfohlen werden, kann zu
Brand, elektrischem Schock oder
Verletzungen führen.
Vermeiden Sie mögliche
Schäden bei der Bedienung
des Gerätes
• Lassen Sie das Gerät während der
Anwendung nicht unbeaufsichtigt.
• Nehmen Sie das Gerät nicht in
Betrieb, wenn es beschädigt ist oder
nicht ordnungsgemäß funktioniert.
Ziehen Sie sofort den Stecker aus
der Steckdose. Wenden Sie sich zur
Prüfung, Reparatur oder Einstellung
des Gerätes an den Nespresso Club.
Ein beschädigtes Gerät kann
•
zu Stromschlag,
Verbrennungen und Brand führen.
• Schließen Sie den Hebel immer
komplett und önen Sie ihn
niemals während der Zubereitung.
Dies könnte zu Verbrühungen
führen.
• Halten Sie den Finger nicht
unter den Kaeeauslauf.
Verbrühungsgefahr!
• Stecken Sie den Finger nicht in das
Kapselfach oder den Kapselgang.
Verletzungsgefahr!
Berühren Sie nicht die
•
Oberächen von
Heißwasserdüse und
Milchschaumdüse während bzw.
unmittelbar nach dem Gebrauch
oder der Entkalkung, da sich diese
stark erhitzen. Verwenden Sie
hierfür die vorgesehenen Grie.
• Sollte die Tassenfüllmenge größer
als 150 ml programmiert sein,
lassen Sie das Gerät 5 Minuten
lang abkühlen bevor Sie den
nächsten Kaee zubereiten.
Überhitzungsgefahr!
• Wasser könnte um die Kapsel
ießen, falls sie nicht von den
Klingen durchstochen wurde, und
35
UM_LATTISSIMA_TOUCH_FACELIFT_Z2A_TER.indb 35 06.12.17 17:09
Page 36

DE
das Gerät beschädigen.
• Benutzen Sie keine bereits
verwendete, beschädigte oder
verformte Kapsel.
• Sollte eine Kapsel im System
feststecken, schalten Sie die
Maschine aus und ziehen Sie
den Netzstecker. Kontaktieren
Sie den Nespresso Club oder eine
autorisierte Vertretung.
• Die Maschine darf nicht in einem
Schrank oder ähnlichem betrieben
werden.
Das Gerät strahlt nach
•
Benutzung Restwärme ab.
• Füllen Sie den Wassertank lediglich
mit frischem Leitungswasser.
• Leeren Sie den Wassertank, wenn
Sie das Gerät für einen längeren
Zeitraum nicht benutzen (Urlaub,
usw.).
• Ersetzen Sie das Wasser im
Wassertank, wenn Sie das Gerät
während des Wochenendes oder
einen längeren Zeitraum nicht
benutzt haben.
• Verwenden Sie das Gerät nicht
ohne Tropfschale und Tropfgitter
36
um jeglichen Flüssigkeitsaustritt
auf umliegenden Flächen zu
vermeiden.
• Verwenden Sie keine starken
Reinigungs- oder Lösungsmittel.
Benutzen Sie ein weiches,
feuchtes Tuch zur Reinigung der
Geräteoberäche.
• Zur Reinigung Ihrer Maschine
verwenden Sie bitte lediglich
saubere Reinigungsmaterialien.
• Wenn Sie die Maschine auspacken,
entfernen Sie die Kunststofolie
und entsorgen Sie diese.
• Diese Maschine wurde speziell
für die Verwendung mit Nespresso
Kapseln entwickelt, die nur über
den Nespresso Club erhältlich sind.
• Alle Nespresso Maschinen
durchlaufen strenge
Qualitätskontrollen. Belastungstests
unter realen Bedingungen werden
im Zufallsbetrieb mit ausgewählten
Produktionseinheiten durchgeführt.
Einige Geräte können daher Spuren
eines vorherigen Gebrauchs
aufweisen.
• Nespresso behält sich das Recht
vor, Anweisungen ohne vorherige
Ankündigung zu ändern.
Entkalkung
• Das Nespresso Entkalkerset hilft
bei korrekter Anwendung, die
einwandfreie Funktion Ihrer
Maschine und ein perfektes
Kaee-Erlebnis wie am ersten
Tag während ihrer gesamten
Lebensdauer zu erhalten.Die
korrekte Anwendung entnehmen
Sie der im Nespresso Entkalkerset
enthaltenen Anleitung.
VORSICHT: Die Entkalkerlösung
kann schädlich sein. Kontakt mit
Augen, Haut und Oberächen
vermeiden. Das Nespresso
Entkalkerset wurde speziell für die
Nutzung mit Nespresso Maschinen
entwickelt. Die Nutzung von
ungeeigneten Entkalkerüssigkeiten
kann zur Beschädigung der
Maschine oder unzureichender
Entkalkungsleistung führen. Für
weitere Fragen zur Entkalkung
kontaktieren Sie den Nespresso Club.
BEWAHREN SIE
DIESE GEBRAUCHSANWEISUNG AUF
Geben Sie sie an alle
weiteren Benutzer weiter.
Diese Bedienungsanleitung
ist ebenfalls als PDF-Datei
auf www.nespresso.com
verfügbar.
UM_LATTISSIMA_TOUCH_FACELIFT_Z2A_TER.indb 36 06.12.17 17:09
Page 37

PRECAUZIONI DI
SICUREZZA
ATTENZIONE
PERICOLO ELETTRICO
SCOLLEGARE IL CAVO
DI ALIMENTAZIONE
DANNEGGIATO
ATTENZIONE:
SUPERFICIE CALDA
ATTENZIONE:
le precauzioni di
sicurezza sono parte
dell’apparecchio.
Leggere attentamente
le precauzioni di
sicurezza prima di usare
l’apparecchio per la prima
volta. Conservarle in un
posto dove possono essere
trovate facilmente per
consultarle in seguito.
ATTENZIONE: in presenza
di questo simbolo, leggere
le precauzioni di sicurezza
per evitare eventuali danni.
INFORMAZIONI: in
presenza di questo simbolo,
leggere le indicazioni per
un uso sicuro e adeguato
dell’apparecchio
• L’apparecchio è destinato a
preparare bevande conformi a
queste istruzioni.
• Non usare l’apparecchio per un
uso diverso da quello previsto.
• Questo apparecchio è stato
progettato per uso interno e
solo per condizioni termiche non
estreme.
• Proteggere l’apparecchio dalla
luce diretta del sole, da schizzi
d’acqua e dall’umidità.
• L’apparecchio è inteso per l’uso
esclusivamente domestico,
pertanto non è destinato a: aree
adibite a cucina all’interno di
negozi, uci e altri ambienti
lavorativi; agriturismi; clienti di
alberghi, motel, B&B e altri tipi di
strutture d’accoglienza.
• Questo apparecchio può essere
utilizzato da bambini di almeno
8 anni, purché siano controllati
e abbiano ricevuto istruzioni
sull'utilizzo sicuro dell'apparecchio
e siano pienamente consapevoli
dei pericoli inerenti. La pulizia e
la manutenzione non dovranno
essere fatte da bambini a meno
che non abbiano un'età superiore
agli 8 anni e non siano controllati
da un adulto.
• Tenere l'apparecchio e il cavo fuori
dalla portata dei bambini sotto gli
8 anni di età.
• Questo apparecchio può essere
utilizzato da persone con ridotte
capacità siche, sensoriali o
mentali o da coloro privi di
una suciente conoscenza
o esperienza, purché siano
controllati o abbiano ricevuto
istruzioni sull'utilizzo sicuro
dell'apparecchio e abbiano
compreso i pericoli inerenti.
• I bambini non dovrebbero
utilizzare questo apparecchio
come un giocattolo.
• In caso di uso commerciale,
di uso non conforme alle
istruzioni, di eventuali danni
derivanti dall’uso per altri scopi,
di cattivo funzionamento, di
riparazione non professionale o
di inosservanza delle istruzioni,
il produttore declina qualsiasi
responsabilità ed è autorizzato
a non applicare i termini di
garanzia.
Evitare rischi di scosse
elettriche letali e
incendi
• In caso di emergenza: scollegare
l’apparecchio dalla presa di
alimentazione.
• Collegare l'apparecchio solo
alle prese con la messa a terra
adeguate e facilmente accessibili.
Vericare che la tensione
riportata sull’apparecchio
corrisponda alla tensione
di alimentazione. L’uso di
collegamenti errati rende nulla la
garanzia.
IT
37
UM_LATTISSIMA_TOUCH_FACELIFT_Z2A_TER.indb 37 06.12.17 17:09
Page 38

L’apparecchio deve essere
IT
collegato solo dopo
l’installazione
• Non accostare il cavo a bordi
taglienti, non ssarlo o lasciarlo
pendere.
• Tenere il cavo lontano da fonti di
calore e umidità.
• Se il cavo di alimentazione o
la presa risultano danneggiati,
devono essere sostituiti dal
produttore o da personale
qualicato, in modo da evitare
qualunque rischio.
• Se il cavo o la presa sono
danneggiati, non utilizzare
l’apparecchio. Portare
l'apparecchio al Nespresso Club
oppure a un rappresentante
autorizzato di Nespresso.
• Per evitare eventuali danni, non
posizionare mai l’apparecchio
accanto o su ripiani caldi come
caloriferi, piano cottura, amme
o simili.
• Posizionare l’apparecchio su una
supercie orizzontale, piana e
stabile. La supercie deve essere
38
resistente al calore e ai liquidi
come acqua, caè, decalcicanti
e simili.
• Durante lunghi periodi di non
utilizzo, scollegare l’apparecchio
dalla presa di alimentazione.
Scollegare l'spparecchio
spegnendo la macchina,
estraendo la spina e non tirando
il cavo in quanto lo stesso
potrebbe danneggiarsi.
• Prima della pulizia e della
manutenzione, togliere la spina
dalla presa di corrente e lasciare
rareddare l’apparecchio.
• Non toccare mai la spina con le
mani bagnate.
• Non immergere mai l’apparecchio
o parti di esso in acqua o altro
liquido.
• Non mettere mai l’apparecchio o
parti di esso in lavastoviglie, fatta
eccezione per il sistema Rapid
Cappuccino (R.C.S.).
• L’acqua in presenza di elettricità
genera pericolo e può essere
causa di scariche elettriche.
• Non aprire l’apparecchio. Pericolo
di scariche elettriche!
• Non inserire alcun oggetto nelle
aperture dell’apparecchio. Pericolo
d’incendio o di scariche elettriche!
• L‘uso di accessori non consigliati
dal produttore può provocare
incendi, scosse elettriche o danni
alle persone.
Evitare eventuali danni
durante il funzionamento
dell’apparecchio
• Non lasciare mai l’apparecchio
incustodito durante il
funzionamento.
• Non usare l’apparecchio in caso
di danni o di funzionamento
anomalo. Staccare subito la spina
dalla presa di corrente. Contattare
Nespresso o un rappresentante
autorizzato Nespresso, anchè
l’apparecchio sia esaminato,
riparato o regolato.
Un apparecchio
•
danneggiato può causare
scariche elettriche, ustioni e
incendi.
• Richiudere sempre la leva
completamente e non aprirla
quando l’apparecchio è in
funzione. Rischio di scottature.
• Non inserire le dita sotto
l’erogatore di caè, rischio di
scottature.
• Non inserire le dita nello spazio
destinato al contenitore di
capsule. Rischio di lesioni!
Non toccare le superci che
•
diventano calde durante e
dopo il funzionamento e la
decalcicazione: l'erogatore
telescopico di acqua calda e
l'erogatore di latte. Utilizzare le
maniglie o le manopole.
• Se si programma il volume del
caè in quantità superiore a
150 ml, lasciar rareddare la
macchina per 5 minuti prima di
preparare un altro caè. Rischio di
surriscaldamento!
• Qualora la capsula non sia
correttamente perforata l’acqua
potrebbe scorrere attorno
alla capsula e causare danni
all’apparecchio.
• Non utilizzare capsule usate,
UM_LATTISSIMA_TOUCH_FACELIFT_Z2A_TER.indb 38 06.12.17 17:09
Page 39

danneggiate o deformate.
• Se una capsula fosse bloccata
nel vano capsula, spegnere la
macchina e staccare la spina prima
di qualsiasi operazione. Contattare
Nespresso o un rappresentante
autorizzato Nespresso.
• La macchina da caè non deve
essere riposta in un armadietto
quando è in uso.
La supercie dell'elemento di
•
riscaldamento è soggetta a
calore residuo dopo l'uso.
• Riempire il serbatoio dell'acqua con
acqua fresca e potabile.
• Svuotare il serbatoio dell’acqua se
l’apparecchio non verrà utilizzato
per un periodo prolungato
(vacanze, ecc).
• Cambiare l’acqua del serbatoio se
la macchina non viene utilizzata da
più di due giorni.
• Non utilizzare l’apparecchio senza
il vassoio raccogligocce e la griglia,
per evitare fuoriuscite di liquidi
sulle superci circostanti.
• Non utilizzare detersivi abrasivi o
solventi. Usare un panno umido e
un detergente delicato per pulire la
supercie della macchina.
• Per la pulizia della macchina, usare
solo strumenti di pulizia adeguati.
• Quando si apre l’imballo della
macchina, rimuovere la pellicola di
plastica presente sulla griglia.
• Questo apparecchio è progettato
per capsule Nespresso, disponibili
esclusivamente presso i canali
di vendita diretta Nespresso o
rappresentanti autorizzati Nespresso.
L’unione delle capsule Nespresso e
delle macchine a sistema Nespresso
ore il piacere di un caè corposo,
ricco di aromi e con una crema
densa, tazzina dopo tazzina.
• Tutti gli apparecchi Nespresso
passano attraverso controlli
severi. Devono superare test
rigorosi in condizioni reali che
vengono eseguiti, su selezionate
unità, in modo casuale. Per
questo motivo, possono essere
presenti tracce di utilizzo.
• Nespresso si riserva il diritto di
cambiare le istruzioni senza
avviso.
Decalcicazione
• La soluzione decalcicante
Nespresso, se usata correttamente,
contribuisce a garantire il
corretto funzionamento della
macchina durante la sua vita e
un’esperienza di degustazione
sempre eccezionale, come il
primo giorno. Per la corretta
quantità e la procedura da
seguire, consultare il manuale
incluso nel kit di decalcicazione
Nespresso.
ATTENZIONE: la soluzione
decalcicante può essere nociva.
Evitare il contatto con gli occhi, la
pelle e altre superci. La soluzione
decalcicante Nespresso è stata
sviluppata appositamente per
macchine a sistema Nespresso;
L'uso di soluzioni decalcicanti non
idonee potrebbe causare
danni ai componenti della
macchina o un'insuciente
decalcicazione. Per ulteriori
informazioni sulla decalcicazione
contattare Nespresso.
CONSERVARE
LE PRESENTI
ISTRUZIONI
Consegnarle agli utilizzatori
successivi.
Le presenti istruzioni
per l’uso sono disponibili
in formato PDF su
www.nespresso.com
IT
39
UM_LATTISSIMA_TOUCH_FACELIFT_Z2A_TER.indb 39 06.12.17 17:09
Page 40

4
EN
CZESDE
Special care for your rapid
Special care for your rapid
Special care for your rapid
Special care for your rapid
Machine starts rinsing, stops automatically
Machine starts rinsing, stops automatically
DE
IT
VERPACKUNGSINHALT/CONTENUTO DELLA CONFEZIONE
cappuccino SyStem (r.c.S.)
cappuccino SyStem (r.c.S.)
cappuccino SyStem (r.c.S.)
4°
important: refer
important: refer
important: refer
to User manual for
to User manual for
to User manual for
complete instructions.
complete instructions.
complete instructions.
1- For a perfect milk froth, use skimmed
1- For a perfect milk froth, use skimmed
1- For a perfect milk froth, use skimmed
or semi-skimmed milk at refrigerator
or semi-skimmed milk at refrigerator
or semi-skimmed milk at refrigerator
temperature (about 4° C).
temperature (about 4° C).
temperature (about 4° C).
2- Rinse after each milk based preparation.
2- Rinse after each milk based preparation.
2- Rinse after each milk based preparation.
1
Place a recipient under milk outlet, press
Place a recipient under milk outlet, press
Place a recipient under milk outlet, press
and hold the «CLEAN»
and hold the «CLEAN»
and hold the «CLEAN»
button until
button until
machine stops pumping automatically
machine stops pumping automatically
Kaeemaschine
Macchina da caè
Bedienungsanleitun g
Istruz ioni per l'uso
Pegeanleitung de s Rapid Cappuccino Systems
Leaet Sistema Rapid Cappuccino
machine stops pumping automatically
(approx. 15 sec.).
(approx. 15 sec.).
(approx. 15 sec.).
Machine starts rinsing, stops automatically
Machine starts rinsing, stops automatically
Machine starts rinsing, stops automatically
( ~15sec.).
( ~15sec.).
( ~15sec.).
3- Place the milk container in the fridge
3- Place the milk container in the fridge
3- Place the milk container in the fridge
immediately.
immediately.
immediately.
4- Every two days, disassemble the
4- Every two days, disassemble the
4- Every two days, disassemble the
Rapid Cappuccino System and clean
Rapid Cappuccino System and clean
Rapid Cappuccino System and clean
all components in the upper level of a
all components in the upper level of a
all components in the upper level of a
2
dishwasher.
dishwasher.
dishwasher.
PTIT HU
Special care for your rapid
Special care for your rapid
Special care for your rapid
FR
cappuccino SyStem (r.c.S.)
cappuccino SyStem (r.c.S.)
cappuccino SyStem (r.c.S.)
4°
important: refer
important: refer
important: refer
to User manual for
to User manual for
to User manual for
complete instructions.
complete instructions.
complete instructions.
1- For a perfect milk froth, use skimmed
1- For a perfect milk froth, use skimmed
1- For a perfect milk froth, use skimmed
or semi-skimmed milk at refrigerator
or semi-skimmed milk at refrigerator
or semi-skimmed milk at refrigerator
temperature (about 4° C).
temperature (about 4° C).
temperature (about 4° C).
2- Rinse after each milk based preparation.
2- Rinse after each milk based preparation.
2- Rinse after each milk based preparation.
3
Place a recipient under milk outlet, press
Place a recipient under milk outlet, press
Place a recipient under milk outlet, press
and hold the «CLEAN»
and hold the «CLEAN»
and hold the «CLEAN»
button until
button until
machine stops pumping automatically
machine stops pumping automatically
machine stops pumping automatically
(approx. 15 sec.).
(approx. 15 sec.).
(approx. 15 sec.).
Machine starts rinsing, stops automatically
Machine starts rinsing, stops automatically
Machine starts rinsing, stops automatically
( ~15sec.).
( ~15sec.).
( ~15sec.).
3- Place the milk container in the fridge
3- Place the milk container in the fridge
3- Place the milk container in the fridge
immediately.
immediately.
immediately.
4- Every two days, disassemble the
4- Every two days, disassemble the
4- Every two days, disassemble the
Rapid Cappuccino System and clean
Rapid Cappuccino System and clean
Rapid Cappuccino System and clean
all components in the upper level of a
all components in the upper level of a
all components in the upper level of a
dishwasher.
dishwasher.
dishwasher.
cappuccino SyStem (r.c.S.)
important: refer
to User manual for
complete instructions.
1- For a perfect milk froth, use skimmed
or semi-skimmed milk at refrigerator
temperature (about 4° C).
2- Rinse after each milk based preparation.
Place a recipient under milk outlet, press
and hold the «CLEAN»
button until
button until
machine stops pumping automatically
(approx. 15 sec.).
( ~15sec.).
3- Place the milk container in the fridge
immediately.
4- Every two days, disassemble the
Rapid Cappuccino System and clean
all components in the upper level of a
dishwasher.
Special care for your rapid
cappuccino SyStem (r.c.S.)
important: refer
to User manual for
complete instructions.
1- For a perfect milk froth, use skimmed
or semi-skimmed milk at refrigerator
temperature (about 4° C).
2- Rinse after each milk based preparation.
Place a recipient under milk outlet, press
and hold the «CLEAN»
button until
button until
machine stops pumping automatically
(approx. 15 sec.).
( ~15sec.).
3- Place the milk container in the fridge
immediately.
4- Every two days, disassemble the
Rapid Cappuccino System and clean
all components in the upper level of a
dishwasher.
Nespresso Kapselset
Set degustazione
Welcome
Broschüre “Welcome”
Folder «Benve nuto in Nespresso»
di capsule Nespresso
40
UM_LATTISSIMA_TOUCH_FACELIFT_Z2A_TER.indb 40 06.12.17 17:09
Page 41

DE
IT
ERSTE INBETRIEBNAHME ODER NACH LÄNGERER NICHTBENUTZUNG/
IN CASO DI PRIMO UTILIZZO O DOPO UN LUNGO PERIODO DI NON UTILIZZO
ACHTUNG: Lesen Sie zunächst
die Sicherheitshinweise, um Risiken
wie Stromschlag oder Feuer zu
vermeiden.
ATTENZIONE: leggere le
precauzioni di sicurezza per evitare
rischi di scariche elettriche e incendi.
1. Wenn Sie die Masc hine auspacken,
entfer nen Sie die Kunststo folie von beiden
Tropfgittern sowie den Seitenteilen.
1. Rimuover e le pellicole di plastica d alla
griglia racco gligocce, dalla leva e dai pannelli
della macchina.
2. Entfer nen Sie den Wassertank, d ie Abtropfschale und
den Kapselbe hälter. Passen Sie die Kabellänge an und
verstaue n Sie die Überlänge in der Kabelau fwicklung unter
der Maschine.
2. Rimuovere il serbatoio dell'acqua, il vassoio raccogligocce
e il contenitore dell e capsule. Regolare la lunghe zza del cavo e
ssare quello in eccesso nell'apposito vano sot to la macchina.
3. Stellen Sie die Mas chine in die richtige
Position und s chließen Sie das Gerät an das
Stromnetz an.
3. Posizionare la macchina in posizione
vertica le e inserire la spina nella pres a.
4. Der Wasser tank kann mit Hilfe seines
Deckels getragen werden.
4. Il serbatoio dell'acqua può essere sollevato
e spostato prendendolo dal coperchio.
5. Spülen Sie den Wass ertank, bevor Sie ihn
mit Trinkwasser bis zum maximalen Füllstand
füllen.
5. Sciacquare il serbatoio dell'acqua prima
di riempirlo co n acqua fresca potabil e no al
livello massimo.
6. Schalten Sie die Ma schine ein. In den ersten 2 S ekunden werden die automati sche Power O Einstellung
sowie die Wasser härte Einstellung durc h ein konstantes Licht ange zeigt.
6. Accendere la macchina. Per i p rimi due secondi, le impos tazioni di spegnimento au tomatico e durezza
dell'acqua sono indic ate con luce ssa.
41
UM_LATTISSIMA_TOUCH_FACELIFT_Z2A_TER.indb 41 06.12.17 17:09
Page 42

DE
IT
ERSTE INBETRIEBNAHME ODER NACH LÄNGERER NICHTBENUTZUNG/
IN CASO DI PRIMO UTILIZZO O DOPO UN LUNGO PERIODO DI NON UTILIZZO
Wie Sie die automatische Power O Funktion und die Wasserhärte Einstellung ablesen können:/ Come leggere le impostazioni di spegnimento automatico e di durezza dell'acqua:
Descaling
Automatische
Clean
Abschaltautomatik, siehe
Seite 56
Spegnimento automatico,
consultare pagina 56
- E spresso für 8 Stunden/
Espress o per 8 h
- Cappuccin o für 30 Minuten/
Cappuccino p er 30 min
- Lat te Macchiato 9 Minuten/
Latte Macchiato 9 min
x3
7. Spülen: Platzieren Sie einen Behälter unter dem Kae eauslauf und drücken Sie die
Lungotaste. Vorgang dreimal wiederholen.
7. Risciacqu o: sistemare un cont enitore sotto l'erogatore del c aè e premere il pulsan te
Lungo. Ripeter e 3 volte.
INFORMATION: Die Maschine wurde nach der Produktion getestet. Evtl.
können Kaeerückstände beim Spülen austreten.
INFORMAZIONI: le macchine vengono sottoposte a una serie di test
completi. È p ossibile rilevare t racce di caè in polv ere nell'acqua del risciac quo.
42
Descaling
Wasserhärte Einstellungen, siehe
Seite 54
Clean
Impostazioni di durezza dell'acqua,
consultare pagina 54
- Lungo: Level 0/Lungo: li vello 0
- Creamy Latt e: Level 1/
Latte Macchiato Chiaro: livello 1
- Warmer Milchsc haum: Level 2/ schiuma di latte
caldo: livello 2
- Warmer Milchsc haum + Lungo: Level 3/
schiuma di lat te caldo + Lungo: livello 3
-
Warmer Milchsc haum + Creamy Latte: Level 4/
schiuma di lat te caldo +
Latte Macchiato Chiaro: livello 4
8. Zerlegen Sie das R apid Cappuccino System (R.C. S.) und reinigen Sie alle 6 Teile im oberen Fach Ihrer Gesc hirrspülmaschine.
Sollte keine Ges chirrspülmaschine vo rhanden sein, reinigen Sie das R apid Cappuccino System (R .C.S.) mit der Hand. N ach dem
Zusammense tzen und dem erneuten Ans chließen des R.C.S. an die Ma schine nutzen Sie die "Clean"-Taste vor der Zubereit ung
eines Milchgetränk s.
8. Smontare il Sist ema Rapid Cappuccino (R.C.S.) e lavare t utti i 6 componenti ne llo scomparto superi ore della lavastoviglie. Nel
caso non si disp onga di una lavastoviglie, cons ultare la sezione Lavagg io a mano del Sistema Rapid Cap puccino (R.C. S.). Dopo aver
riassemblat o e ssato l'R.C.S. alla macchina, premer e il pulsante "Clean" prima di preparar e una bevanda a base di latt e.
25 sec.
Nach den ers ten 2 Sekunden heizt
die Maschine f ür 25 Sekunden auf
(blinkende Leuchten). Die Maschine
ist bereit , wenn die Leuchten
konstant leuchten.
Dopo i primi 2 s econdi, la macchina
si riscalda p er 25 secondi (luci
lampeggianti). Le luci s se indicano
macchina pronta.
INFORMATION: Siehe Abschnitt «Montieren/Demontieren des Rapid Cappuccino Systems (R.C.S.)» (Seite 43)
INFORMAZIONE: consultare la sezione Assemblaggio / Smontaggio del sistema Rapid Cappuccino, a pagina 43)
UM_LATTISSIMA_TOUCH_FACELIFT_Z2A_TER.indb 42 06.12.17 17:09
Page 43

DE
IT
KAFFEEZUBEREITUNG/PREPARAZIONE DEL CAFFÈ
HINWEIS: Während der Auf heizphase kann be reits eine Taste gedrüc kt werden. Nach der Au fheizphase st artet automatis ch der Brühvorgang.
IMPORTANTE: durante il risca ldamento, è possibile pr emere qualunque puls ante del caè. Il ca è verrà erogato autom aticamente non appe na la macchina sarà pron ta per l'uso.
110 ml40 ml
1. Ön en Sie den Hebel vollständig , um die
Kapsel einzulegen.
1. Alzare comp letamente la leva e inserire
una capsula.
2. Schließen Sie den H ebel und stellen Sie
eine Tasse unter den Kaeeauslauf.
2. Abbassare la le va e posizionare una
tazzina s otto l'erogatore del ca è.
3. Drücken Sie di e Espresso/ (40 ml) oder Lun gotaste (110 ml). Die
Zubereitung s toppt automatisch. U m den Kaeeuss fr ühzeitig zu stopp en
oder um den Ka ee zu verlängern, drüc ken Sie erneut die Taste.
3. Premere i puls anti Espresso (40 m l) o Lungo (110 ml). L'erogazione
terminerà aut omaticamente. Per blocc are l'erogazione di ca è o per
aggiungere ancora caè, premere nuovamente.
4. Nehmen Sie die Tasse. Ö nen und
schließen Sie de n Hebel, um die Kapsel in den
Kapselbehälter auszuwer fen.
4. Prendere la taz zina. Sollevare e abbas sare
la leva per espellere la capsula direttamente
nel contenitore delle capsule usate.
MONTIEREN/DEMONTIEREN DES RAPID CAPPUCCINO SYSTEMS R.C.S./
ASSEMBLAGGIO/SMONTAGGIO DEL SISTEMA RAPID CAPPUCCINO R.C.S.
1. Entfer nen Sie den Deckel des Milchbehälters
und lösen Sie das M ilchansaugrohr.
1. Rimuovere il coperchio del contenitore del
latte e sta ccare il tubicino di aspira zione del latte.
UM_LATTISSIMA_TOUCH_FACELIFT_Z2A_TER.indb 43 06.12.17 17:09
2. Entfernen Sie den Schaumregulierer, indem Sie
diesen bis zur Markierung drehen und hochziehen.
2. Rimuovere la mano pola di regolazione de lla
schiuma di lat te facendola ruotare no a
sollevandola.
e
3. Entfe rnen Sie die Rapid Cappucci no System
Verbindung, indem Si e diese von
und herausziehen.
3. Rimuovere il connettore del Sis tema Rapid Cappuccino
sbloccandolo da
alla posizione ed estraendolo.
nach entr iegeln
4. Entfer nen Sie die Milchdüse, indem Sie
diese herausziehen.
4. Rimuovere il tub o di erogazione del latte
estraendolo.
43
Page 44

DE
IT
ZUBEREITUNG VON CAPPUCCINOLATTE MACCHIATOCREAMY LATTEWARMEN MILCHSCHAUM/
PREPARAZIONE CAPPUCCINOLATTE MACCHIATOLATTE MACCHIATO CHIAROSCHIUMA DI LATTE CALDA
INFORMATION: Für ein ideales Milchschaumergebnis nutzen Sie bitte gekühlte H-Milch (ca. 4° C).
INFORMAZIONE: per una schiuma di lat te eccezionale, us are latte scremat o o parzialmente sc remato a temperatur a di frigorifer o (circa 4° C).
4 ° C
1. Befüllen Sie den Milchbehälter mit der
gewünschte n Menge an Milch.
1. Versare nel co ntenitore del latte la quanti tà
di latte desiderata.
4. Verbinden Sie das Rapid Cappuccino
System mit der Ma schine.
4. Collegare il Sistema Rapid Cappuccino alla
macchina.
44
INFORMATION: Wenn der Milchbehälter leer
ist, spülen Sie diesen und das Milchansaugrohr mit
Leitungswasser, bevor sie den Milchbehälter erneut
befüllen.
INFORMAZIONE: quando il contenitor e del latte è
vuoto, prima di riempirlo, risciacquarlo accuratamente
con acqua potabile insieme al tubicino di aspirazione
del lat te.
15 sec.
5. Maschine h eizt für ca. 15 Sekunden au f.
5. La macchina si r iscalderà per circa
15 secondi.
2. Schließen Sie den Milchbehälter.
2. Chiudere il contenitore del latte.
6. Önen Sie d en Hebel vollständig und
legen Sie eine Kapsel ein.
6. Alzare complet amente la leva e inserire
una capsula.
3. Önen S ie die Klappe des
Dampfansch lusses, indem Sie diese nac h
rechts schieben.
3. Aprire il connettore del vapore facendolo
scorrere verso destra.
INFORMATION: Nur für Cappuccino,
Latte Macchiato und Creamy Latte.
Überspringen Sie den Punkt, wenn warme
Milch zubereitet wird.
INFORMAZIONE: solo per Cappuccino,
Latte Macc hiato e Latte M acchiato C hiaro.
Saltare qu esto passaggi o se si vuole prepara re
solo schiuma di latte calda.
UM_LATTISSIMA_TOUCH_FACELIFT_Z2A_TER.indb 44 06.12.17 17:09
Page 45

DE
IT
ZUBEREITUNG VON CAPPUCCINOLATTE MACCHIATOCREAMY LATTEWARMEN MILCHSCHAUM/
PREPARAZIONE CAPPUCCINOLATTE MACCHIATOLATTE MACCHIATO CHIAROSCHIUMA DI LATTE CALDA
7. S chließen Sie den Hebel und st ellen Sie
eine Cappuccino- oder Lat te Macchiato Tasse
unter den Kae eauslauf und passen Sie die
Position der Mi lchdüse an.
7. Ab bassare la leva, sistemar e una tazza
per Cappuccin o o un bicchiere per Latte
Macchiato sotto l'erogatore del caè e
regolare la posizione dell'erogatore del latte
sollevando la alla giusta posizio ne.
INFORMATION: Die Zubereitung für Cappuccino, Latte
Macchiato un d Creamy Latte star tet nach ein paar Sek unden
und stoppt a utomatisch. Für warm en Milchschaum wir d nur
Milchschaum zubereitet.
INFORMAZIONE: per Cappuccin o, Latte Macchiato e
Latte Ma cchiato Chiaro, la prepar azione inizia dopo po chi
secondi e si f erma automaticame nte. Per la schiuma di latte
calda, sarà erogata solo schiuma di latte.
8. Verstellen Sie den Schaumregulierer, je nach der gewünschten Schaumkonsistenz.
8. Regolare la manop ola per la schiuma di latte a se conda del volume di schiuma de siderato.
beim Einsetzen und Entfernen zur Reinigung verwendet.
l'inserimento - la rimozione della manopola per la pulizia.
INFORMATION:
Cappuccino min/Latte Macchiato max/Creamy Latte min.
INFORMAZIONI: impostazioni consigliate:
Cappuccino min/Macchiato max/ Latte Macchiato
Chiaro min.
HINWEIS: Überdrehen Sie den Milchschaumregler nicht. Diese Position wird lediglich
NOTA: non capovolgere il re golatore della schi uma di latte. La posiz ione capovolta è pe r
10. Nach der Zubereitung leuchtet REINIGUNG orange.
10. Alla ne della pre parazione, CLEAN
INFORMATION: Reinigen Sie das Milchsystem nach jedem
Gebrauch.
INFORMAZIONE: pulire il contenitor e del latte dopo ogni
utilizzo.
Empfohlene Einstellung:
Clean
lampeggia in arancione.
9. Drücken Si e die Cappuccino-, Lat te
Macchiato-, Creamy L atte- oder Warmer
Milchschaum Taste.
9. Premere il pulsante Cappuccino,
Macchiato, Latte Macchiato Chiaro o schiuma
di latte calda.
11. Ö nen und schließen Sie nach d er
Zubereitung d en Hebel, um die Kapsel in den
Kapselbehälter auszuwer fen. Platzieren Sie
einen Behälter unter dem Milchauslauf.
11. Soll evare e abbassare la leva per e spellere
la capsula direttamente nel contenitor e delle
capsule usate. Posizionare un contenitore
sotto l'erogatore del latte.
45
UM_LATTISSIMA_TOUCH_FACELIFT_Z2A_TER.indb 45 06.12.17 17:09
Page 46

DE
IT
ZUBEREITUNG VON CAPPUCCINOLATTE MACCHIATOCREAMY LATTEWARMEN MILCHSCHAUM/
PREPARAZIONE CAPPUCCINOLATTE MACCHIATOLATTE MACCHIATO CHIAROSCHIUMA DI LATTE CALDA
16 sec.
Clean Clean
4° C
12. D rücken Sie die REINIGUNG Taste u nd halten Sie diese gedrüc kt, bis die Maschine au tomatisch
stoppt. De r Reinigungsprozess dauer t ca. 16 Sekunden. «REINIGUNG »
Milchsys tems startet und ein e Mischung aus heißem Wasser un d Dampf ießt durch die Milchdüs e.
12. Premere e tenere premuto il pulsante «CLEAN»
automaticam ente. Questo process o dura circa 16 secondi. Il pulsan te «CLEAN»
di risciacquo d el sistema per l'erogazione de l latte inizia e acqua calda e vap ore passano attr averso il tubo
erogazione del latte.
15. Demontieren Sie nach jedem Gebrauch das Rapid-CappuccinoSystem und reinig en Sie alle Komponenten im oberen Fach Ihrer
Spülmaschine. Sofern keine Spülmaschine ver fügbar ist, beachten Sie
den Abschnitt "Manuelle Reinigung de s Rapid Cappuccino Systems
(R .C .S. )".
15. Dop o ogni utilizzo, smontare i l Sistema Rapid Cappuccino e lav are
tutti i co mponenti nello scompar to superiore della lavasto viglie. Nel caso
non si disponga d i una lavastoviglie, consultare la s ezione Lavaggio a
mano del Sistema R apid Cappuccino (R.C.S.).
des Rapid Cappuccino Systems (R.C.S.)».
Smontaggio del Sistema Rapid Cappuccino (R.C.S.)»
nché il proces so di risciacquo si arres ta
INFORMATION: Siehe Abschnitt «Montieren/Demontieren
INFORMAZIONE: consultare la sezione «Assemblaggio /
blinkt. Der Reinigungsprozess des
lampeggia. Processo
13. Sobald der Reini gungsprozess
abgeschlossen wurde, erlischt der
«REINIGUNGS»
13. Una volt a terminato il risciacquo, l'avvi so
di pulizia
Alarm.
smette di lampeggiare.
ACHTUNG: Die Milch sollte nicht länger als 2 Tage im Kühlschrank
aufbewahrt werden. Wenn der Milchbehälter länger als 2 Stunden
nicht im Kühlschrank gelagert wurde, zerlegen Sie das R.C.S. und
reinigen Sie alle Einzelteile (siehe"Tägliche Pege" und "Manuelle
Reinigung des Rapid Cappuccino Systems (R.C.S.)").
ATTENZIONE: il latte non dovrebbe essere tenuto in frigo
per più di 2 giorni. Nel caso il contenitore del latte rimanga fuori
dal frigorifero per più di 2 ore, smontare l'R.C.S. e lavare tutti i
componenti (consultare i consigli per il lavaggio manuale o in
lavastoviglie).
14. Ent fernen Sie den Milchbeh älter und stellen Sie ihn
umgehend in den Küh lschrank. Schließen Sie di e Klappe des
Dampfanschlusse s.
14. Rimuovere l'R.C.S. dalla macchina e riporlo
immediatamente nel frigorifero. Chiudere la porta del
connettore di vapore.
46
UM_LATTISSIMA_TOUCH_FACELIFT_Z2A_TER.indb 46 06.12.17 17:09
Page 47

DE
IT
FÜLLMENGE FÜR KAFFEE UND ESPRESSO PROGRAMMIEREN/
PROGRAMMAZIONE DELLA QUANTITÀ DI CAFFÈ
INFORMATION: Folgen Sie den Schrit ten 1 und 2 des Abschnit ts
«Kaeezubereitun g».
INFORMAZIONE: seguire i passi 1 e 2 ripor tati nella sezion e
«Preparazione del caè».
3 sec.
1. Berühr en und halten Sie die Espress o- oder Lungotaste f ür
mind. 3 Sek., um den P rogrammiermodus aus zuwählen. Tasten
blinken schnell: Programmiermodus.
1. Toccare e tenere pre muto il pulsante Espres so o Lungo per
almeno 3 sec. p er accedere alla modalità di pro grammazione.
Inizia l'erogazione. Il pulsante lampeggia velocemente: indica la
modalità di programmazione.
HINWEIS: Siehe Abschnitt Werkseinstellung für die min/max programmierbare Menge.
NOTA: fare riferimento alla sezione «Impostazioni di fabbrica» per conoscere i quantitativi programmabili min/max.
2. Lassen Sie di e Taste los, wenn die g ewünschte Füllmenge
erreicht ist.
2. Rilasciare il puls ante quando viene raggiunto i l volume
desiderato.
3. Die Tassenfüllmenge ist nun für folgende Zubereitungen
gespeichert. Taste blinkt dreimal, um die neue Tassenfüllmenge
zu bestätigen.
3. Il volume di acqua è s tato memorizzato. Il p ulsante lampeggia
3 volte per confe rmare la nuova impostaz ione relativa alla
quantità di acqua.
47
UM_LATTISSIMA_TOUCH_FACELIFT_Z2A_TER.indb 47 06.12.17 17:09
Page 48

DE
IT
FÜLLMENGE FÜR CAPPUCCINOLATTE MACCHIATOCREAMY LATTEWARMEN MILCHSCHAUM
PROGRAMMIEREN/PROGRAMMAZIONE DELLA QUANTITÀ PER CAPPUCCINOLATTE MACCHIATO
LATTE MACCHIATO CHIAROSCHIUMA DI LATTE CALDA
INFORMATION: Folgen Sie den Schrit ten 1-8 des Abschnitt es «Zubereitung von Cap puccino, Latte Macchiato or C reamy Latte».
INFORMAZIONE: seguire i passi 1-8 ripor tati nella sezion e «Preparazione Capp uccino, Latte Macchiato o L atte Macchiato Chiaro».
3 sec.
1. Berühren und halten Sie die Cappu ccino-, Latte Macchiato-,
Creamy Latt e- oder Warme Milch-Taste für mind. 3 S ekunden.
Milchaufschäumung s tartet. Tasten blinken schnell.
1. Toccare e tenere premuto il pulsante Cappuccino / Lat te
Macchiato / Latte Macchiato Chiaro / Latte c aldo per almeno 3
sec. Inizi a l'erogazion e di schiuma di latte. Il pulsan te lampeggia
velocemente: indi ca la modalità di programma zione.
HINWEIS: Siehe Abschnitt «Werkseinstellung für die
min/max programmierbare Menge».
NOTA: fare riferimento alla sezione «Impostazioni di
fabbrica» per i quantitativi programmabili min/max.
HINWEIS: Beim Creamy Lat te wird zuerst d er Kaee
bezogen und dann die Milch aufgeschäumt.
NOTA: pe r la preparazione La tte Macchiato Chiaro, la
macchina ero gherà prima il ca è e poi la schiuma di lat te.
2. Lassen Sie die Taste lo s, wenn die gewünschte Füllmeng e
erreicht ist. Tasten blinken weiterhin schnell: Programmiermodus.
(Cappuccino/Latte Macchiato/Creamy Latte). Bei der
Programmierung des warmen Milchschaums endet die
Programmierung hier.
2. Rilasciare il puls ante una volta raggiunto il volum e di schiuma
di latte desi derata. Il pulsante lampeg gia ancora velocemente:
modalità di programmazion e. (Cappuccino/Latte Macchiato/L atte
Macchiato Chiaro). Quando si pr ogramma la quantità di schiu ma di
latte calda per Cappuccino/L atte Macchiato, la programmazione è
terminata.
3. Berühren und halten Sie die identische Taste. Die Zubereitung
beginnt. L assen Sie die Taste los, wenn die gewün schte
Kaeemeng e erreicht ist. Die Re zepteinstellung ist nun fü r
folgende Zubereitungen gespeich ert. Taste blinkt dreimal, um die
neue Rezepteinstellung zu bes tätigen.
3. Toccare e tenere premuto lo stesso pulsante. Inizia l'erogazione.
Rilasciare il pu lsante una volta raggiunto il vo lume di caè
desiderato. Il vo lume relativo alla ricett a è stato memorizz ato per
le prossime vol te. Il pulsante lampeggia tre vo lte per confermare il
nuovo volume programmato.
HINWEIS: Das Milchschaumvolumen hängt von der Art
der Milch, der Milchtemperatur sowie der Einstellung des
Milchschaumreglers ab.
NOTA: il volume della schiuma di la tte dipende dal tip o
di latte ut ilizzato, dalla tempe ratura e dalla posizi one della
manopola di regolazione del latte.
3 sec.
48
UM_LATTISSIMA_TOUCH_FACELIFT_Z2A_TER.indb 48 06.12.17 17:09
Page 49

DE
IT
TÄGLICHE PFLEGE/
CURA QUOTIDIANA
INFORMATION: Verwenden Sie keine aggressiven Reinigungs- oder Lösungsmittel. Um die Oberäche Ihrer Maschine zu reinigen,
verwenden Sie ein feuchtes Tuch und milde Reinigungsmittel. Stellen Sie das Gerät oder Zubehörteile davon niemals in die Spülmaschine,
außer die Komponenten des Rapid Cappuccino Systems.
INFORMAZIONE: non utilizzare detersivi abrasivi o solventi. Utilizzare un panno umido e un detergente delicato per pulire la supercie della
macchina. Non mettere alcun componente della macchina nella lavastoviglie, ad eccezione dei componenti del Sistema Rapid Cappuccino.
1. Entf ernen Sie die Abtropf schale und den Kapselbehä lter.
Entleeren und spülen Sie sie. Entfernen Sie den Wasser tank.
Entleeren un d spülen Sie den Wassertank , bevor er erneut
mit frischem Leitungs wasser befüllt wird.
1. Rimuovere il v assoio raccogligocce e il conten itore delle
capsule. Svuotare e sciacquare. Rimuovere il serbatoio
dell'acqua. Svuotare, risciacquare prima di riempirlo con
acqua fresca potabile.
2. Önen und s chließen Sie nach der Zuberei tung den Hebel, um die Kapsel in d en
Kapselbehälter auszuwer fen. Stellen Sie einen Behälter unter den Kaeeauslauf und
drücken Sie die Lun gotaste, um zu spülen.
2. Sollevare e abba ssare la leva per espellere la c apsula direttamente n el contenitore
delle capsule usate. Sistemare un contenitore sot to l'erogatore del ca è e premere il
pulsante Lungo per risciacquare.
MANUELLE REINIGUNG DES RAPID CAPPUCCINO SYSTEMS R.C.S./
LAVAGGIO A MANO DEL SISTEMA RAPID CAPPUCCINO R.C.S.
INFORMATION:
die R.C.S. Einzelteile manuell gereinigt werden. In diesem Falle muss die
Reinigung täglich erfolgen, damit die maximale Leistung gewährleistet ist.
INFORMAZIONE: se non si dispone di una lava stoviglie, lavare i
componenti dell'R.C. S. a mano. In tal caso, eseguire questo procedimento
ogni giorno per la massima ecienza.
Falls keine Spülmaschine vorhanden ist, können
3. Reinigen Sie die Maschine mit einem weichen,
feuchten Tuch.
3. Pulire con un pann o umido pulito.
1. Demontieren Sie das Rapid-C appuccino-System gemäß dem
Abschnitt "Montage/Demontage des Rapid-Cappuccino-Systems
(R.C.S.)". Spülen Sie alle Teile mit warmem/heißem Trinkwasser.
1. Smontare il S istema Rapid Cappuccino (R .C.S.). Consultare la s ezione
"Assemblaggio / Smont aggio del sistema Rapid C appuccino (R.C.S.)" e
sciacquare tutte le par ti con acqua potabile tiepida o calda.
49
UM_LATTISSIMA_TOUCH_FACELIFT_Z2A_TER.indb 49 06.12.17 17:09
Page 50

3 sec.
DE
IT
MANUELLE REINIGUNG DES RAPID CAPPUCCINO SYSTEMS R.C.S./
LAVAGGIO A MANO DEL SISTEMA RAPID CAPPUCCINO R.C.S.
30 minutes
2. Lassen Sie alle Komponenten in warmem/heißem
Trinkwasser mit mildem Reinigungsmittel für minde stens
30 Min. einwirken. Danach gründlich mit warmem/heißem
Wasser abspülen. Vermeiden Sie aggressive Reinigungsmittel.
2. Immergere tut ti i componenti in acqua pot abile tiepida
o calda con un deter gente delicato/neutro per almen o 30
minuti, quindi sciacquare accuratamente con acqua potabile
tiepida o calda. N on utilizzare deter genti delicati/neutri co n
odori molto persistenti.
3. Reinigen Sie den Milchtank mit mildem Reinigungsmittel
und spülen diesen mit warmem/heißem Trinkwasser aus.
Verwenden Sie keine Scheuermilch oder andere schleifende
Mittel, da andernfalls die Oberäche des Milchtank s
beschädigt werden kann.
3. Pulire l'interno de l serbatoio del latte con u n detergente
delicato/neutro e sciacquare con acqua potabile tiepida o
calda. Non usare materiale abrasivo: potr ebbe danneggiare
la super cie dell'apparecchio.
4. Trocknen Sie alle Teile mit einem
sauberen Tuch, einem Stü ck Sto oder
Papier und set zen Sie die MilchtankKomponenten wieder zusammen.
4. Asciugare t utti i componenti con u n
panno, o un asciuga mano, asciutto e
pulito, o con car ta assorbente, quindi
riassemblare.
5. Nach dem Zusa mmensetzen und dem
erneuten Ans chließen des R.C.S. an die
Maschine nut zen Sie die "Clean"-Taste vor der
Zubereitung eines Milchgetränk s.
5. Dopo aver ria ssemblato e ssato l'R.C.S. alla
macchina, premere il p ulsante "Clean" prima di
preparare una b evanda a base di latte.
WIEDERHERSTELLEN DER WERKSEINSTELLUNGEN/RIPRISTINO DELLE IMPOSTAZIONI DI FABBRICA
BEMERKUNG: Der Menümodus wird nach
30 Sekunden beendet, wenn keine Aktion
Descaling
Clean
1. Schalten Sie die Maschine ein.
1. Accendere la ma cchina.
BEMERKUNG: Entfernen Sie den Milchbehälter.
NOTA: rimuovere il contenitor e del latte.
2. Halten Sie die Lungo Taste un d die Taste für warmen Milchsc haum gleichzeitig 3 Sekun den lang gedrückt,
um in den Menümodu s zu gelangen: der Entkalkung s- und Reinigungsalarm f angen an zu blinken.
2. Premere contempo raneamente il pulsante per Lun go e Schiuma di latte per 3 se condi per accedere alla
modalità Menu: le s pie per la decalcica zione e la pulizia iniziano a lampe ggiare.
50
UM_LATTISSIMA_TOUCH_FACELIFT_Z2A_TER.indb 50 06.12.17 17:09
durchgeführt wird. Manuell beendet wird
der Modus durch das gleichzeitige Drücken
der Lungo- und der Milchschaumtaste für 3
Sekunden.
NOTA: se non viene eseguita alcuna azione,
la macchina esce automaticamente dalla
modalità M enu dopo 30 secondi; è pos sibile
anche uscire dalla modalità manualmente,
premendo contemporaneamente per 3 secondi i
pulsanti Lu ngo e Schiuma di lat te.
Page 51

DE
IT
WIEDERHERSTELLEN DER WERKSEINSTELLUNGEN/RIPRISTINO DELLE IMPOSTAZIONI DI FABBRICA
3. Berühren Sie in einzelnen kontinuierlichen Bewegung en
die folgende n Tasten: Milchsc haum->Creamy Latte ->Lung o
->Espresso ->Cappuccino->Latte Macchiato.
3. Toccare di segui to in un unico movimento i pulsanti:
Schiuma di latte->Latte Macchiato Chiaro->Lungo>Espresso ->Cappuccino->Latte Macchiato .
ACHTUNG: Wenn die Kaeemenge größer als 150 ml eingestellt ist: lassen Sie die Maschine
5 Minuten lang abkühlen, bevor Sie den nächsten Kaee zubereiten. Risiko der Überhitzung.
WERKSEINSTELLUNG/
IMPOSTAZIONI DI FABBRICA
Espress o: 40 ml
Espress o: 40 ml
Cappuccino: Milc h*: 50 ml/Kae e: 40 ml
Cappuccino: La tte*: 50 ml/Caè: 40 ml
Latte Macc hiato: Milch*: 150 ml/Kae e: 40 ml
Latte Macc hiato: Latte*: 150 ml/Caè: 40 ml
BEMERKUNG: *Die Milchschaummenge ist abhängig von der Milch, die Sie verwenden, der
Temperatur und der Position des Milch-Reglerknopfes.
NOTA: *il volume della schiuma d i latte dipende dal t ipo di latte utiliz zato, dalla sua temper atura e
dalla posizione della manopola di regolazione del latte.
ATTENZIONE: Se si programma il volume del caè in quantità superiore a 150 ml,
lasciar rareddare la macchina per 5 minuti prima di preparare un altro caè. Rischio di
surriscaldamento!
Lungo: 110 ml
Lungo: 110 ml
Creamy Latt e: Milch*: 150 ml/Kaee: 4 0 ml
Latte Macchiato Chiaro: Lat te*:
150 ml/Caè: 40 ml
Warmer Milchsc haum*: 120 ml
Schiuma di Lat te calda*: 120 ml
Automatische Power-O-Funk tion 9 Minuten
Spegnimento automatico 9 min
4. Die Taste für war men Milchschaum blinkt , um den
Wiederher stellungsmodus anzu zeigen. Drücken Sie die Taste
nochmal, um den Mo dus zu bestätigen. Alle Taste n blinken 3
Mal: Alle Mengen wurd en zurückgesetz t.
4. Il pulsante per la s chiuma di latte caldo lampe ggia per indicare
la modalità di ri pristino. Premerlo pe r confermare. Tutti i pulsant i
lampeggiano 3 vo lte: tutti i volumi sono s tati ripristina ti.
BEMERKUNG: Wir empfehlen Ihnen die Werkseinstellungen für Espresso und Lungo
beizubehalten, um die beste Tassenmenge für jede Kaeevariation zu gewährleisten.
NOTA: consigliamo di attenersi alle impostazioni di fabbrica per Espresso e Lungo, per
ottenere i migliori risultati in tazza per ciascuna delle nostre varietà di caè.
Die Milchme nge kann von 30 ml auf bis zu 20 0 ml programmiert w erden.
Die Kaee menge kann von 25 ml auf bis z u 200 ml programmier t werden.
Il volume del lat te può essere pro grammato da 30 a 200 ml.
Il volume del c aè può essere pro grammato da 25 a 150 ml.
5. Das Menü endet automatisch und
die Maschine we chselt wieder in den
Bereitmodus.
5. La macchina esce automaticamente
dal Menu e ritor na alla modalità
macchina pronta.
51
UM_LATTISSIMA_TOUCH_FACELIFT_Z2A_TER.indb 51 06.12.17 17:09
Page 52

Clean
DE
IT
ENTKALKUNG/DECALCIFICAZIONE
www.nespresso.com/descaling
ACHTUNG: Siehe auch Sicherheitshinweis
ATTENZIONE: consultare le precauzioni di sicurezza.
HINWEIS: Der Entkalkungsprozess dauert ca. 25 Minuten.
INFORMAZIONE: il processo di decalcicazione durerà circa 25 minuti.
HINWEIS: Um ein perfektes Kaeegenusserlebnis wie am ersten Tag zu gewährleisten,
empfehlen wir Ihnen, Ihre Kaeemaschine, sobald verlangt, zu entkalken. Wenn der
Entkalkungsalarm blinkt, ist es an der Zeit, Ihr Gerät zu entkalken. Die Maschine kann noch
mehrere Milchgetränke zubereiten, bevor sie vorbeugend blockiert wird. Diese Blockierung
verhindert Schäden an Ihrer Maschine und sorgt so für eine gut funktionierende Maschine
über die gesamte Lebensdauer. Wenn Ihr Gerät blockiert ist, entkalken Sie die Maschine oder
kontaktieren Sie den Nespresso Club.
NOTA: per assic urare un'esperienza de l caè perfe tta come il primo g iorno, si raccomanda
di decalcicare la macchina quando richiesto.Dal momento in cui l’allerta di decalcicazione
inizia a lampe ggiare, bisogna pro cedere a decalci care la macchina. La ma cchina potrà
erogare anc ora diverse prepa razioni a base di lat te, prima che si blocch i del tutto. Ques ta
precauz ione serve ad evit are che la macchina si dann eggi, assicurando ne il corretto
funziona mento nel corso di tu tta la sua vita. Nel c aso in cui la macchina si b locchi, si prega
perta nto di eettuare u na decalcicaz ione o di contatta re il Club Nespresso.
WICHTIG: Wenn die Maschine entkalkt werden muss, gibt es 2 verschiedene
Blinkgeschwindigkeiten der Entkalkungs-LED: Ein schnelles Blinken zeigt an, dass nur noch
wenige Zubereitungen gemacht werden können, bevor die Maschine blockiert wird.
WICHTIG: Bitte vergewissern Sie sich, dass der gesamte Entkalkungsvorgang abgeschlossen
ist. Wenn die Entkalkung nicht abgeschlossen wurde, bleibt die Maschine blockiert.
IMPORTANTE: quando la macchina necessita di essere decalcicata, il LED Decalcicazione
può lampeg giare a due diverse vel ocità: un lampeggio v eloce indica che sol o poche erogazion i
potranno e sser fatte prim a che la macchina si blocc hi.
IMPORTANTE: è bene assicurarsi che la procedura di decalcicazione venga eseguita no alla
ne in quanto qualora non venisse completata, la macchina resterà bloccata.
52
Descaling
1. Entkalken Sie die Maschine, wenn im
Bereitschaf tsmodus der Entkalkungsalarm - ein
oranges Licht - erscheint.
1. Decalc icare la macchina quando la spia
per la decalc icazione è arancion e in modalità
macchina pronta.
100 ml
• 1
3. Leeren Sie die Abtropfschale und den
Kapselbehälter. Füllen Sie den Wassertank mit
100 ml Nespresso Entkalkermit tel und 500 ml
Leitungswasser.
3. Svuotare il vas soio raccogligocce e il conteni tore
delle capsule usate.Riempire il serbatoio dell'acqua
con 100 ml di soluzi one decalcicante Nespresso e
con 500 ml di acqua p otabile.
500 ml
• 2
2. Önen und s chließen Sie den Hebel, um Kaps eln
in den Kapselbehälter auszuwer fen.
2. Sollevare e abba ssare la leva per espellere le
capsule direttamente ne l contenitore delle capsule
usate.
4. Önen Sie di e Klappe des Dampfansc hlusses.
Stecken Sie die Entk alkungsdüse in den Stecker d er
Maschine.
4. Aprire il vano di allo ggiamento del beccuccio
di decalci cazione. Inserire il b eccuccio di
decalcicazione nel connettore a vapore della
macchina.
UM_LATTISSIMA_TOUCH_FACELIFT_Z2A_TER.indb 52 06.12.17 17:09
Page 53

DE
IT
ENTKALKUNG/DECALCIFICAZIONE
Descaling
5. Setzen S ie die Maschine in den Entk alkungsmodus.
Der Entkalkungsalarm blink t während des gesamten
Entkalkungs prozesses orange auf. Di e Taste für w armen
Milchschaum leuchtet weiß.
5. La macchina ent ra in modalità di deca lcicazione. La spi a
per la decalc icazione lampegg ia in arancione durante l'intero
processo di d ecalcicazion e. Il pulsante per la schiuma di lat te
caldo è bianco.
9. Leeren Sie d en Kapselbehälter und die
Abtropfschale, spülen Sie den Wassertank
und füllen Sie die sen bis zur max.
Markierung mit Leitungswasser.
9. Svuotare il contenitore delle capsule
usate, il vass oio raccogli- gocce, sciacquare
e riempire il serbatoio dell'acqua con acqua
fresca p otabile no al livello MAX.
10. Drücke n Sie die Taste fü r warmen
Milchschaum no chmal. Der Spülzyklus läu ft
abwechselnd ü ber den Kaeeauslauf, die
Heißwasserdüse und zur Abtropfschale, bis der
Wassertank leer gelaufen ist.
10. Premere di nu ovo il pulsante di Latte cal do.
Il ciclo di risc iacquo continua, il liquido esce
dall'erogatore e dal tubo p er la decalcicazi one
nché il serb atoio è vuoto.
6. Platzieren Si e ein Gefäß (min. 1 Liter) unter
dem Kaeeauslauf und der Entkalkungsdüse.
6. Posizionare un contenitore con capacità
minima di 1 litro sot to l'erogatore del caè e
sotto il be ccuccio di decalcic azione.
Descaling
Descaling
1L
7. D rücken Sie die Taste für warmen
Milchschaum. Die Entkalkerüssigkeit ießt
abwechselnd ü ber den Kaeeauslauf und d ie
Entkalkungsdüse.
7. Pr emere il pulsante per la schiuma d i latte
caldo. La soluzione decalcicante scorre
alternativamente attraver so l'erogatore del caè
e il tubo per la de calcicazione.
11. Nach d em Spülvorgang schaltet sich d ie Maschine aus.
Entfernen Sie die Entkalkungsdüse. Leeren Sie die Abtropfs chale
und den Kapselb ehälter. Befüllen Sie den Wasser tank mit
Leitungswasser.
11. Una vol ta che il processo di ris ciacquo è terminato, la
macchina si speg ne. Rimuovere il tubo per la dec alcicazione.
Vuotare la vasche tta raccogligocce e il conte nitore delle capsule
usate. Riempir e il serbatoio con acqua fre sca potabile.
Descaling
ok
8. Wenn der Entkalkungsprozess abgeschlossen
ist (Wasser tank leer), leuchtet die Taste für
warmen Milchschaum.
8. Quando il ciclo di d ecalcicazione è co mpleto
(il serbatoio d ell'acqua è vuoto), il pulsante pe r la
schiuma di latte calda lampeggia.
12. Re inigen Sie die Maschine mit eine m
sauberen, feuchten Tuch.
12. Pu lire la macchina con un panno umido. La
decalcicazi one della macchina è terminata.
53
UM_LATTISSIMA_TOUCH_FACELIFT_Z2A_TER.indb 53 06.12.17 17:09
Page 54

DE
IT
WASSERHÄRTE EINSTELLEN/
IMPOSTAZIONI DELLA DUREZZA DELL'ACQUA
1. Halten Sie den Wasserhärte
Teststre ifen für 1 Sekunde unter
Was ser.
1. Met tere l'etichetta per la
durezza dell'acqua sotto l'acqua
corrente per 1 secondo.
Wasserhärte Tabelle/Tabella della durezza dell'acqua
Creamy Lat te/Latte
Warme Milch/Latte caldo
* Schiuma di l atte
54
Lungo
Macchiato Chiaro
Warme Milch/* +
+
Lungo
Warme Milch/* +
+
Creamy Latte/Lat te
Macchiato Chiaro
0
1
2
3
1 sec.
2. Die Anzahl der roten Quadrate
zeigt die ör tliche Wasserhärte an.
2. Il numero di quadratini
rossi indica il li vello di durezza
dell'acqua.
4
3. Schalten Sie die Maschine an.
3. Accendere la macc hina.
BEMERKUNG: Entfernen
Sie den Milchbehälter.
NOTA: rimuovere il
contenitore del latte.
Stufe/Livello dH fH mg/L CaCo3
0 <3 <5 <50
1 >4 >7 >7 0
2 >7 >1 3 >13 0
3 >14 >2 5 >2 50
4 >21 >3 8 >3 80
3 sec.
Descaling
Clean
4. Halten Sie die Lung o Taste und die Taste f ür warmen
Milchschaum gl eichzeitig 3 Sekunden lang g edrückt, um
in den Menümodu s zu gelangen: der Entkalkungs- u nd
Reinigungsalarm fangen an zu blinken.
4. Premere i pulsan ti Schiuma di latte e Lungo
contemporaneamente per 3 secondi per entrare in modalità
Menu: decalcicazio ne e pulizia iniziano a lampeggiare.
5. Berühren Sie in einzelnen kontinuierlichen Bewegung en die folgenden
Tasten: Lungo->Creamy Latte->Milchschaum. Die aktuelle Einstellung der
Wasserhärte wird durch die entsprech enden Tasten (Dauerlicht) angezeigt.
5. Toccare in un unico movim ento continuo i seguenti pu lsanti: Lungo->
Latte Macchiato Chiaro->Schiuma di latte. L'impostazione della durezz a
dell'acqua corrente è indicata dai pulsanti corrispondenti (luce ssa).
6. Nun können Sie inner halb von 15 Sekunden den
gewünschten Härtegra d durch Drücken der entsprechenden
Taste einstellen. Die Tasten b linken 3 Mal schnell, um den
neuen Wert zu b estätigen.
6.
Ora, entro 15 secon di, è possibile impost are il valore desiderato
premendo il pulsante corrispondente. I pulsanti lampeggiano
3 volte rapidamente per confermare il nuovo valore.
BEMERKUNG: Der Menümodus
wird nach 30 Sekunden beendet,
wenn keine Aktion durchgeführt
wird. Manuell beendet wird der
Modus durch das gleichzeitige
Drücken der Lungo Taste und der
Milchschaum Taste für
3 Sekunden.
NOTA: se non viene eseguita
alcuna azione, la macchina esce
automaticamente dalla modalità
Menu dopo 30 se condi; è possibile
anche uscire dalla modalità
manualmente, premendo
contemporaneamente per 3 secondi
i pulsanti Lu ngo e Schiuma di lat te.
7. Das Menü schließt sich automatisch
und die Maschin e wechselt in den
Bereitschaf tsmodus.
7. L a macchina esce automaticamente
dal Menu e ritor na alla modalità
macchina pronta.
UM_LATTISSIMA_TOUCH_FACELIFT_Z2A_TER.indb 54 06.12.17 17:09
Page 55

DE
IT
ENTLEERUNG VOR LÄNGERER NICHTBENUTZUNG, ZUM SCHUTZ VOR FROST ODER VOR EINER
REPARATUR/SVUOTARE IL SISTEMA PRIMA DI UN PERIODO DI NON UTILIZZO PER LA PROTEZIONE
ANTIGELO O PRIMA DI UNA RIPARAZIONE
1. Schalten Sie die Maschine an.
1. Accendere la ma cchina.
BEMERKUNG: Entfernen Sie den
Milchbehälter.
NOTA: rimuovere il contenitore del
latte.
4. Berühren Sie in einzelnen, kontinuierlichen
Bewegunge n die folgenden Tasten: Creamy
Latte->Cappuccino.
4. Toccare in un unico movimento continuo i
seguenti pulsanti: Lat te Macchiato Chiaro
->Cappuccino.
2. Entfernen Sie den Wassert ank. Önen und schließen
Sie den Hebel, um Kap seln in den Kapselbehälter
auszuwerfen. Plat zieren Sie ein Gefäß unter dem
Kaeeauslauf.
2. Rimuovere il serbatoio dell'acqua. Sollevare e
chiudere la leva p er espellere la capsula. Posiz ionare un
contenitore sotto L'erogatore del caè.
5. Die Taste für war men Milchschaum blinkt al s Bestätigung. Einma l gedrückt, begi nnt die
Entleerung. Die Kaee Tasten blinken abwechselnd: Entleerungsmo dus läuft.
5. Il pulsante p er la schiuma di latte caldo lamp eggia per conferma. Una vol ta premuto,
inizia lo svuo tamento. I pulsanti per la prep arazione di caè la mpeggiano alternativ amente:
lo svuotame nto è in corso.
3 sec.
Descaling
Clean
3. Halten Sie die Lung o Taste und die Taste f ür warmen Milchschaum glei chzeitig 3 Sekunden lang ge drückt, um
in den Menümodu s zu gelangen: der Entkalkungs- u nd Reinigungsalarm fang en an zu blinken .
3. Premere i contemp oraneamente i pulsanti Sc hiuma di latte caldo e Lungo e pe r 3 secondi per entrare in
modalità Menu: le s pie di decalcicazi one e di pulizia iniziano a lampe ggiare.
BEMERKUNG: Der Menümodus wird nach 30 Sekunden beendet, wenn keine Aktion
durchgeführt wird. Manuell beendet wird der Modus durch das gleichzeitige Drücken der Lungo Taste
und der Milchschaum Taste für 3 Sekunden.
NOTA: se non viene eseguita alcuna azione, la macchina esce automaticamente dalla modalità Menu
dopo 30 secondi; è possibile anche uscire dalla modalità manualmente, premendo contemporaneamente
per 3 second i i pulsanti Lungo e Sc hiuma di latte.
6.
Wenn der Prozess be endet ist, schaltet s ich die Maschine automati sch aus.
6.
Quando il processo è terminato, la macchina si spegne automaticamente.
BEMERKUNG: Die Maschine ist für 10 Minuten nach der
Entleerung gesperrt.
NOTA: la macchina si bl occa per circa 10 minuti d opo lo
svuotamento.
55
UM_LATTISSIMA_TOUCH_FACELIFT_Z2A_TER.indb 55 06.12.17 17:09
Page 56

DE
IT
AUTOMATISCHE POWER OFF FUNKTION/SPEGNIMENTO AUTOMATICO
INFORMATION: Diese Maschine ist mit einem ausgezeichneten Energieverbrauchsprol sowie einer automatischen Abschaltfunktion (0W) ausgestattet, die Ihnen das
Energiesparen ermöglicht. Das Gerät schaltet sich 9 Minuten nach dem letzten Gebrauch automatisch aus. (Werkseinstellung).
INFORMAZIONE: questa macchina è dotata di un eccellente prolo di consumo energetico oltre che di una funzione di spegnimento automatico (0W), che consente di
risparmiare energia. La macchina si spegne dopo 9 minuti di inutilizzo (impostazioni di fabbrica).
3 sec.
Descaling
Clean
1. Schalten Sie die Maschine an.
1. Accendere la ma cchina.
BEMERKUNG: Entfernen Sie den
Milchbehälter.
NOTA: rimuovere il co ntenitore del latte.
Power O-Automatik/
Spegnimento automatico
Espresso
Cappuccino
Latte Macchiato
8h
30 min.
9 min.
2. Halten Sie die Lungo Taste u nd die Taste für warmen
Milchschaum gl eichzeitig 3 Sekunden lang g edrückt, um
in den Menümodu s zu gelangen: der Entkalkungs- u nd
Reinigungsalarm fangen an zu blinken.
2. Premere contemporaneamente i pulsanti Schiuma di latte
caldo e Lungo e pe r 3 secondi per entrare in mo dalità Menu:
le spie di decalc icazione e di pulizia in iziano a lampeggiare.
4. Nun können Sie inner halb von 15 Sekunden den
gewünschten Wert durch das Drücken der entspre chenden
Taste einstellen. Die Tasten b linken 3 Mal schnell, um den
neuen Wert zu b estätigen.
4. Entro 15 secondi sarà possibile impos tare il valore
desiderato premendo il pulsante corrispondente. Il pulsante
lampeggia velo cemente 3 volte per confermare i l nuovo
valore.
BEMERKUNG: Der Menümodus
wird nach 30 Sekunden beendet,
wenn keine Aktion durchgeführt
wird. Manuell beendet wird der
Modus durch das gleichzeitige
Drücken der Lungo Taste und der
Milchschaum Taste für 3 Sekunden.
NOTA: se non viene eseguita
alcuna azione, la macchina esce
automaticamente dalla modalità Menu
dopo 30 seco ndi; è possibile anche
uscire dalla modalità manualmente,
premendo contemporaneamente per
3 secondi i pu lsanti Lungo e Schiu ma
di latte.
5. Das Menü schließt sich automatisch
und die Maschin e wechselt in den
Bereitschaf tsmodus.
5. La macchina esce automaticamente
dal Menu e ritor na alla modalità
macchina pronta.
3. Berühren Sie in einzelnen, kontinuierlichen
Bewegungen die folgenden Tasten: Lat te Macchiato->
Cappuccino -> Espresso. D ie aktuelle Einstellung d er
automatischen Power-O-Funkt ion wird durch die
entsprechenden Tasten (Dauerlicht) angezeigt.
3. Toccare in un unico movim ento continuo i seguenti
pulsant i: Latte Macchiato ->Cappuccin o-> E spresso.
L'impostazione di spe gnimento automatico è indicata
con la luce ssa di que sti pulsanti.
56
UM_LATTISSIMA_TOUCH_FACELIFT_Z2A_TER.indb 56 06.12.17 17:09
Page 57

DE
FEHLERBEHEBUNG
Keine Taste leucht et.
Kein Kaee, kei n Wasser.
Kaee ie ßt sehr langsam.
Es wird kein K aee ausgegeb en, sondern nur Wasser (t rotz
eingesetzter Kapsel).
Kaee is t nicht heiß genug.
Kapselbereich ist undicht (Wasser im Kapselbehälter).
Unregelmäßiges Blinken.
Alle Tasten blinken 10 Sek unden gleichzeiti g und die Maschine sch altet
sich automatisch aus.
Alle 6 Tasten blinken 3 Mal s chnell und die Masch ine wechselt zurü ck in
den Bereitschaf tsmodus.
Entkalkungs- und Reinigungsalarm blinken.
Entkalkungsalarm leuchtet or ange und Bezugstasten sind verf ügbar.
(Entkalkungs alarm Stufe 1).
Entkalkun gsalarm leuchtet o range und die Taste für war men
Milchschaum leuchtet dauerhaft .
Der Entkalk ungsalarm leuchte t orange und die Zuber eitungstast en für
Rezepte sind n icht verfügb ar. (Entkalkungsalarm St ufe 2).
Reinigungsalarm scheint orange
Alle Kaee -Tasten und alle M ilch Rezept Tasten blinken abw echselnd.
Hebel lässt sich nicht richtg schließen.
Die Qualität des Milchschaums ist nicht einheitlich.
Ich kann nich t in den Menümodus wech seln.
Ne tzstromver sorgung, Stecker, Spannun g und Sicherung kontr ollieren. Bei Problem en den Nespresso Club
kontaktieren.
Wassertank ist leer. Wasserank mit Trinkwasser füllen.
Entkalken, falls notwendig. Siehe Kapitel «Entk alkung».
Die Fließgesc hwindigkeit ist abhängig von der gewählten Kaeesorte.
Entkalken, falls not wendig. Siehe Kapitel «Entkalkung».
Den Nespresso Club kontaktieren.
Tasse vorwärmen.
Entkalken, falls notwendig. Siehe Kapitel «Entk alkung».
Kapsel korrek t einsetzen. Bei Undichtigkeit den Nespresso Club kontaktieren.
Den Nespresso Club kontaktieren.
Feh lermeldung, die Mas chine muss reparier t werden. Geben Sie d as Gerät in Reparat ur oder rufen Sie im
Nespresso Club an.
Wass ertank ist lee r.
Die M aschine ist im Menüm odus, halten Sie die Lung o Taste und di e Milchschaum Taste für 3 S ekunden
gedrück t, um den Menümodu s zu verlassen oder wa rten Sie 30 Sekunde n für die automatis che Beendigung
des Modus.
Maschine entk alken.
Die M aschine ist im Entk alkungsmodus. Dr ücken Sie die Taste für war me Milch, um den Entkalku ngsprozess zu
starten.
Die M aschine ist bloc kiert um Schäde n zu vermeiden. Entk alken Sie die Maschine od er kontaktieren Si e den
Nespresso Club.
Milchs ystem spülen.
Mas chine ist überhi tzt,warten S ie, bis die Maschine ab gekühlt ist.
Gerät ist f ür ca. 10 Minuten nach dem En tleeren blockie rt.
Leerer Kapselbehälter. Prüfen Sie, dass keine Kapsel den Kapselbehälter blockier t.
Ver wenden Sie Mager- oder f ettarme Milch i n Kühlschranktemp eratur (etwa 4° C).
Spülen Sie die Milchdüse nach jeder Verwendung. (beachten «manuelle Reinigung des R.C.S.»).
Ent kalken Sie die Maschine (si ehe Seite 52).
Verwenden Sie keine gefrorene Milch.
Pr üfen Sie, ob der Milchbe hälter entfern t ist.
Stelle n Sie sicher, dass Sie die Lungo Taste u nd Milchschaum Taste fü r 3 Sekunden gedrüc kt haben.
Entfernen Sie die Entkalkungsdüse.
57
UM_LATTISSIMA_TOUCH_FACELIFT_Z2A_TER.indb 57 06.12.17 17:09
Page 58

DE
IT
RICERCA GUASTI
EUR,AUS,NZ: 220240 V, 50/60 Hz, 1300 W
US/CA: 120 V, 60 Hz, 1200 W
Specifications
EUR,AUS,NZ: 220240 V, 50/60 Hz, 1300 W
US/CA: 120 V, 60 Hz, 1200 W
19 bar
Specifications
P
EUR,AUS,NZ: 220240 V, 50/60 Hz, 1300 W
US/CA: 120 V, 60 Hz, 1200 W
19 bar
6.5 kg
Specifications
P
max
Assenza di luce sul display.
Non eroga caè, ne acqua.
Il caè e sce molto lentamente.
Fuoriusc ita di acqua ma non di ca è (a capsula inseri ta).
Il caè n on è abbastanza c aldo.
Il vano delle ca psule perde acqua (acqua nel co ntenitore delle caps ule).
Lampeggio irregolare.
Tutti i pulsa nti lampeggiano conte mporaneamente per 10 se condi e la
macchina si spegne automaticamente.
Tutti i 6 pulsa nti lampeggiano velo cemente 3 volte e poi la macchi na
torna in modalità macchina pronta.
Le spie per la de calcicazion e e la pulizia lampeggian o.
La spia per la de calcicazio ne lampeggia con luce ara ncione,
i pulsanti p er la preparazione d elle bevande sono dis ponibili
Cont rollare l’alimentazion e: presa, tensione e f usibile. In caso di pro blemi, contatta re Nespresso.
Il serbatoi o dell'acqua è vuoto. Riempire il s erbatoio dell'acqua.
Decalcicare se nece ssario; vedere il paragrafo Decalcicaz ione.
La ve locità di erogaz ione dipende dalla var ietà di caè.
Se nece ssario, eettuare la decalcica zione. Fare riferimento al paragrafo Decalcicaz ione.
In ca so di problemi, contat tare Nespresso.
Prerisc aldare la tazzina.
Se necessario, eet tuare la decalcicazione. Fare riferimento al paragraf o Decalcicazione.
Posizionare la c apsula corret tamente. Se si veric ano perdite, contat tare Nespresso.
Far ripa rare la macchina o contat tare il Nespresso Club.
Se gnalazione di guas to. La macchina deve ess ere riparata. Invia re la macchina in ripara zione o contatta re
Nespresso.
Il se rbatoio dell'acqua è vuoto.
La m acchina è in modalità Men u, premere il pulsante Lun go e il pulsante schium a di latte per 3 second i per
uscire dalla m odalità Menu o atten dere 30 secondi per u scire automatica mente da questa mo dalità.
Dec alcicare la macchina.
SPEZIFIKATIONEN/
SPECIFICHE TECNICHE
LATTISSIMA TOUCH
EUR, AUS, NZ: 220-240 V,
50-60 Hz , 1400 W
max
Max/Max. 19 bar
Kg
~ 4.5 kg
0.9 Liter/Litri
0.35 Li ter/Litri
17.3 cm 25.8 cm
32 cm
(avviso de calcicazion e livello 1).
La spia per la de calcicazio ne lampeggia con luce ara ncione, il pulsante
per la schiuma d i latte calda è dispo nibile.
L'avviso di decalci cazione è aranc ione e i tasti delle ri cette a base di
latte non s ono disponibili (Avvi so di decalcica zione, livello 2).
La spia per la pu lizia è arancione.
Tutti i pulsa nti per la preparazi one di caè e tut ti i pulsanti per la
preparazione di ricet te a base di latte lampeggiano alternativamente.
La leva non si abbassa completamente.
La m acchina è in modalità di de calcicazio ne. Premere il pulsante p er il latte caldo per i niziare il process o di
decalcicazio ne.
La macchin a è bloccata per evit are che si danneggi. Si pr ega di decalcic are la macchina o di contat tare il Club
Nespresso.
Sc iacquare il sistema per la p reparazione del la tte.
La macchina è surriscaldat a, attendere il rareddamento.
La macchina si bl occherà per circa 10 minu ti dopo lo svuota mento.
Svuotare il contenitore delle capsule. Assic urarsi che non vi siano capsule bloccate all’interno del contenitore
delle capsule.
Us are latte scremato o p arzialmente scre mato a temperatura di f rigorifero (circ a 4° C).
La qualità d ella schiuma di latte no n è all'altezza dello st andard.
Ri sciacquare dopo og ni preparazione a b ase di latte (vedere la se zione Lavaggio a ma no R.C.S.).
De calcicare la macch ina (vedere pag. 52).
Non usare lat te congelato.
As sicurarsi di aver ri mosso il contenitore d el latte.
Non è possib ile accedere alla modalit à Menu.
58
UM_LATTISSIMA_TOUCH_FACELIFT_Z2A_TER.indb 58 06.12.17 17:09
As sicurarsi di preme re i pulsanti Lungo e Sc hiuma di latte per 3 se condi.
Rimuovere il tub o di decalcicazione.
Page 59

DE
IT
ENTSORGUNG UND UMWELTSCHUTZ/SMALTIMENTO E PROTEZIONE AMBIENTALE
Entsorgung und Umweltschutz
Ihr Gerät enthält wert volle Materialien, die wiedergewonnen und recycelt werden können. Die Trennung der Abfallmaterialien in verschied ene Sorten erleichtert das Rec ycling des wiederverwert baren Materials.
Bringen Sie das G erät zu einem Recycling - bzw. Wertsto hof. Mehr Informationen üb er die Wiederverw ertung erhalten Sie be i Ihren örtlichen Behö rden.
Smaltimento e protezione ambientale
La macchina conti ene materiali di valore che pos sono essere recup erati e riciclati. La sep arazione dei materiali cons ente il recupero di prez iose materie prime. Ai sens i della normativa vigente, il sim bolo del
cassone tto barrato avver te che la macchina deve esse re raccolta separatamen te da altri riuti. Si dovr à pertanto conferi re la macchina presso i centri di r accolta dierenziata, o ppure consegnandola al ri venditore
al momento dell’acquis to di una nuova macchina di tipo equ ivalente, in ragione “di uno a uno”. L’adeguata raccolt a dierenziata della macchin a contribuisce ad evitar e possibili eett i negativi sull’ambiente e sulla salut e e
favorisce il r eimpiego e/o riciclo dei materi ali utilizzati per reali zzarla.
KONTAKTIEREN SIE DEN NESPRESSO CLUB/CONTATTARE NESPRESSO
Für jegliche weiterführende Inf ormation, bei auftretenden Problemen oder wenn Sie weitere Fragen haben, kontaktieren Sie den Nespresso Club.
Kontaktmöglichkeiten zum Nespresso Club nden Sie im Ord ner Broschüre “Welcome”, im Maschinenka rton oder auf ww w.nespres so.com
Per ulteriori in formazioni, in caso di p roblemi o per avere assisten za, rivolgersi a Nespresso.
Le informaz ioni per contattare Nespresso sono disp onibili nel cofanetto «B envenuto in Nespresso» oppure su www.nespresso.com
GEWÄHRLEISTUNG/GARANZIA
De’Longhi gew ährt eine Garantie von 2 Jah ren ab dem Kauf des Gerät s gegen Materialdefek te und Fehler in der handwer klichen Ausführung. Wä hrend dieser Zeitspann e wird De’Longhi jedes de fekte Produkt nac h eigenem
Ermesse n reparieren oder aust auschen, ohne Kosten für d en Besitzer. Die Austaus chprodukte oder rep arierten Einzelteile u nterstehen der noch ver bleibenden Original- Garantiedauer oder ei ner Garantiedauer von se chs
Monaten, je nachdem, was länger ist. Diese beschränk te Garantie kommt nicht zur Anwendung bei Beschädigungen, die durch einen Unfall, Missbrauch, unsachgemäße Pege od er normalen Verschleiß verurs acht wurden.
Ausgenommen im durch das anwendbare Recht zulässigen Umfang nehmen die Bes timmungen dieser eingeschränkten Garantie keine Ausschließungen, Einschränkungen, Änderu ngen oder Ergänzungen bezüglich des auf
Ihren Maschine nkauf zwingend anwendb aren Rechts vor. Wenn Sie der Meinung sin d, dass Ihr Produkt fehler haft ist, kontak tieren Sie den Nespresso Club, um Anweisungen zu erhal ten, wohin Sie es senden oder zur R eparatur
bringen können.
De’Longhi gara ntisce questo prodo tto contro eventuali di fetti di fabbr icazione o dei materiali p er un periodo di due anni dalla da ta d’acquisto. Durante tale per iodo De’Longhi ripar erà o sostituirà g ratuitamente, a sua disc rezione,
qualunque prod otto difetto so. I prodotti sos tituiti o i componen ti riparati saranno ga rantiti solamente per la p arte di garanzia ori ginale non scaduta o per i su ccessivi sei mesi, a seco nda di quale sia il periodo più lun go. Nei limiti e termini
previsti d alla legge vigente, quest a garanzia limitata non v ale per difetti d ovuti a incidenti, uso no n corretto, manutenz ione inadeguata o norm ale usura. Le condizioni di qu esta garanzia non e scludono, riducono o modi cano quanto
previsto dalla l egge vigente applicabil e alla vendita del prodot to al consumatore. In caso si r itenga che il prodot to sia difettoso, si pr ega di contattare Nespresso che Le indich erà come procedere per la r iparazione.
59
UM_LATTISSIMA_TOUCH_FACELIFT_Z2A_TER.indb 59 06.12.17 17:09
Page 60

+++
A
++
A
+
A
A
B
C
D
ENERG
IE
IA
Lattissima
Touch
EN560
51
kWh /annum
A
+
08/2016
60
UM_LATTISSIMA_TOUCH_FACELIFT_Z2A_TER_DE-IT.indd 60 06.12.17 17:58
Page 61

61
UM_LATTISSIMA_TOUCH_FACELIFT_Z2A_TER.indb 61 06.12.17 17:09
Page 62

5
Z2A_TER_2017_12_06
7 1 3 2 3 7 1 5 1 _ 0 0 _ 1 2 1 7
UM_LATTISSIMA_TOUCH_FACELIFT_Z2A_TER.indb 62 06.12.17 15:01
 Loading...