

De’Longhi Appliances
via Seitz, 47
31100 Treviso Italia
5711411181/03.12_00
10
TERMOVENTILATORE
FAN HEATER
RADIATEUR SOUFFLANT
HEIZLÜFTER
VENTILATORKACHEL
TERMOVENTILADOR
TERMOVENTILADOR
ΑΕΡΟΘΕΡΜΟ
ТЕПЛОВЕНТИЛЯТОР
TERMOVENTILÁTOR
TEPELNÝ VENTILÁTOR
TEPELNÝ VENTILÁTOR
TERMOWENTYLATOR
VIFTEOVN
VÄRMEFLÄKT
VARMTLUFTBLÆSER
TUULETINLÄMMITIN
TERMOVENTILATOR
TERMOVENTILATOR
ТЕРМОВЕНТИЛАТОР
TERMOVENTILATOR
FANLI ISITICI
Istruzioni per l’uso
Instructions for use
Mode d'emploi
Bedienungsanleitung
Gebruiksaanwijzingen
Instrucciones para el uso
Instruções de utilização
Οδηγίες χρήσης
Инструкции по эксплуатации
Használati utasítás
Návod k použití
Návod na použitie
Instrukcje użytkowania
Bruksanvisning
Bruksanvisning
Brugsvejledning
Käyttöohjeet
Upute za uporabu
Navodila za uporabo
Указания за употреба
Instrucţiuni de utilizare
Kullanım talimatları
ةحورم عم ةئفدم
2
Voltage
Wattage
See rating plate
Tensione
potenza
vedi targa caratteristica
Τάση Ισχύς βλέπε πινακίδα χαρακτηριστικών
Напряжение
и мощность
см. табличку с характеристиками
Feszültség
teljesítmény
lásd adattábla
Napětí,
výkon
viz štítek s údaji
Napájacie
napätie
pozri štítok s technickými údajmi
Napięcie
moc
zobacz tabliczkę znamionową
Voltspen-
ning
se merkeskiltet
Spänning,
effekt
se märkplåt
Strømstyrke se typeskilt
Jännite katso arvokylttiä
Napon
snaga
vidi pločicu s tehničkim podacima
Napetost,
moč
glejte tablico lastnosti
Напрежение
мощност
вж. табелката с характеристиките
Tensiune
putere
vezi plăcuţa cu caracteristici
Kuvvet
gerilimi
özellikler plakasına bakın
Tension
puissance
voir plaque signalétique
Voltagem de
potência
Leistun-
gsspannung
siehe Typenschild
Spanning
vermogen
zie typeplaatje
Tension
Potencia
Véase la placa de las características
Ver chapa de características
A) If your appliance comes fitted with a plug, it will incorporate a 13 Amp fuse. If it does not fit your socket, the plug should
be cut off from the mains lead, and an appropriate plug fitted, as below.
WARNING: Very carefully dispose of the cut off plug after removing the fuse: do not insert in a 13 Amp socket elsewhere
in the house as this could cause a shock hazard.
With alternative plugs not incorporating a fuse, the circuit must be re-fitted when changing the fuse using a 13 Amp Asta
approved fuse to BS 1362. In the event of losing the fuse cover, the plug must NOT be used until a replacement fuse cover
can be obtained from your nearest electrical dealer. The colour of the correct replacement fuse cover is that as marked on
the base of the plug.
B) If your appliance is not fitted with a plug, please follow the instructions provided below:
IMPORTANT
The wires in the mains lead are coloured in accordance with the following code:
Blue: Neutral
Brown: Live
As the colours of the wires in the mains lead of this appliance may not correspond with the coloured markings identifying the
terminals in your plug, proceed as follows:
The wire which is coloured blue must be connected to the terminal which is marked with the letter N or coloured black.
The wire which is coloured brown must be connected to the terminal which si marked with the letter L or coloured red.
ELECTRICAL CONNECTION (U.K. ONLY)
3
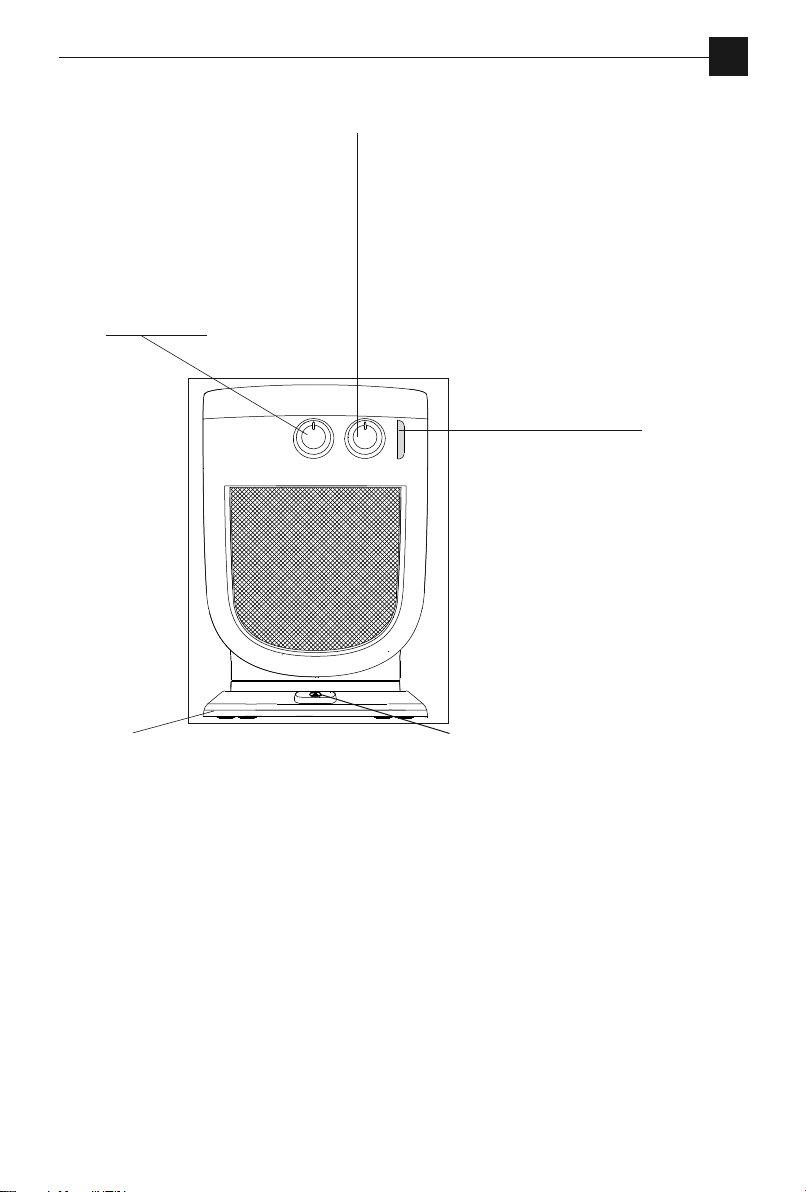
Termostato
Thermostat
Thermostaat
Termóstato
Θεροστάτη
Терморегулятор
Termosztát
Termostat
Lämmönsäädin
Термостат
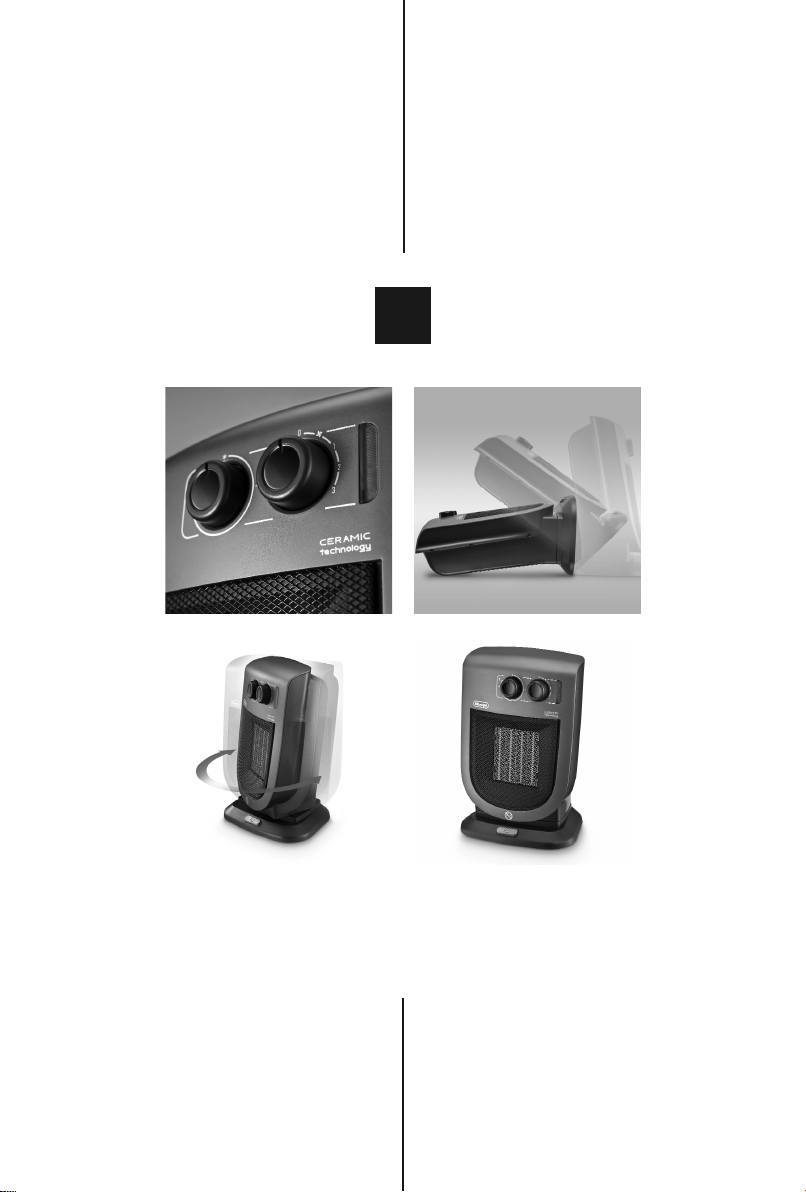
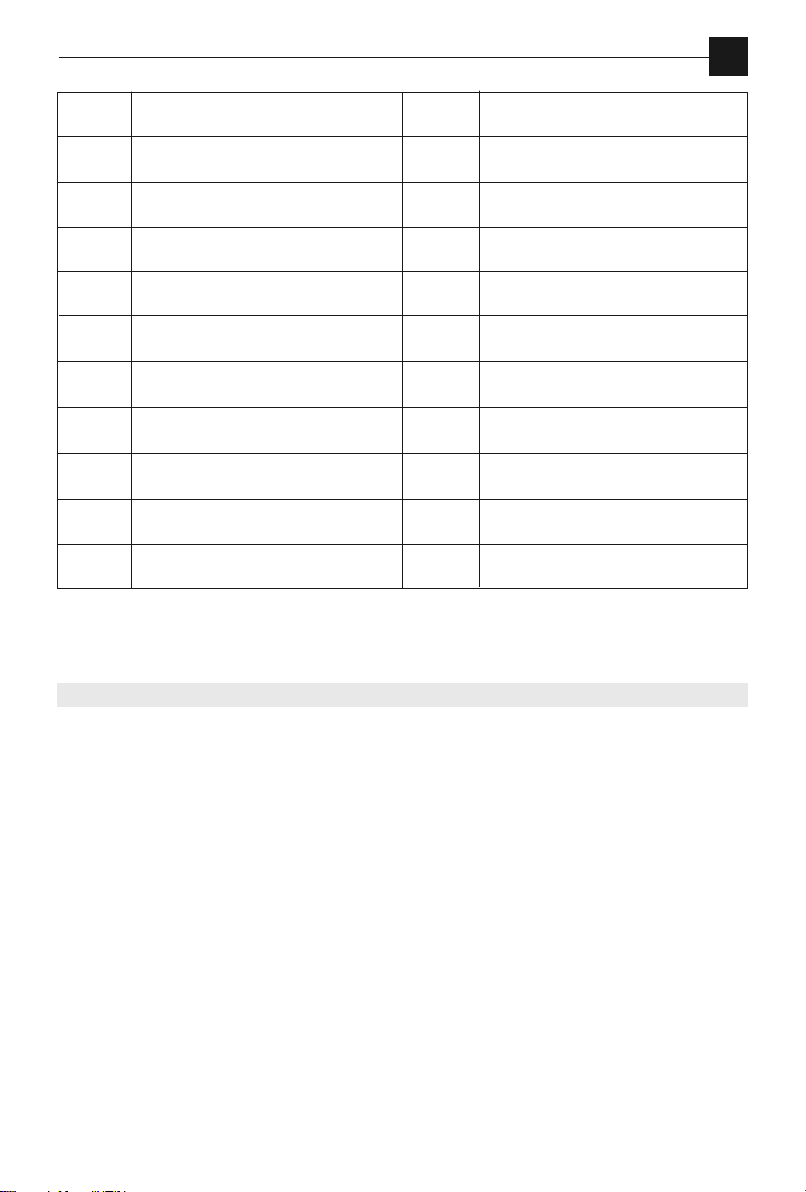
Base orientabile (solo in alcuni modelli)
Swivelling base (certain models only)
Base orientable (seulement sur certains modèles)
Schwenkbarer Sockel (nur bei einigen Modellen)
Richtbare basis (alleen bij sommige modellen)
Base orientable (solamente en algunos modelos).
Base orientável (apenas em alguns modelos)
Περιστρεφόενη βάση (όνο σε ορισένα οντέλα)
Поворотная подставка (только для определенных моделей)
Irányítható talprész (csak néhány modellnél)
Otočná základna (pouze u některých modelů)
Otočný podstavec (iba na niektorých modeloch)
Regulowana podstawa (tylko w niektórych modelach)
Dreibar sokkel (kun enkelte modeller)
Vridbart underrede (endast på vissa modeller)
Retningsindstillelig sokkel (kun på visse modeller)
Käännettävä alusta (vain joissakin malleissa)
Podesivo postolje (samo kod nekih modela)
Vrtljiv podstavek (samo pri nekaterih modelih)
Въртяща се основа (само при някои модели)
Bază orientabilă (doar la anumite modele)
Yönlendirilebilir kaide (yalnızca bazı modellerde)
Interruttore di rotazione (solo in alcuni modelli)
Rotation switch (certain models only)
Interrupteur de rotation (seulement sur certains modèles)
Drehschalter (nur bei einigen Modellen)
Draaischakelaar (alleen bij sommige modellen)
Interruptor de rotación (solamente en algunos modelos)
Interruptor de rotação (apenas em alguns modelos)
ιακόπτη περιστροφή (όνο σε ορισένα οντέλα)
Переключатель поворота (только для определенных моделей)
Forgás kapcsológomb (csak néhány modellnél)
Spínač otáčení (jen u některých modelů)
Vypínač otáčania (iba na niektorých modeloch)
Wyłącznik obrotowy (tylko w niektórych modelach)
Roteringsbryter (kun enkelte modeller)
Rotationsomkopplare (endast på vissa modeller)
Drejeafbryder (kun på visse modeller)
Kiertokatkaisin (vain joissakin malleissa)
Prekidač za okretanje (samo kod nekih modela)
Stikalo vrtenja (samo pri nekaterih modelih)
Прекъсвач за въртене (само при някои модели)
Întrerupător de rotaţie (doar la anumite modele)
Döndürme düğmesi (sadece bazı modellerde)
Lampada spia
Indicator light
Lampe témoin
Kontrolllampe
Controlelampje
Indicador luminoso
Luz piloto
Ενδεικτική λυχνία
Индикаторная лампа
Jelzőlámpa
Světelná kontrolka
Svetelná kontrolka
Lampka kontrolna
Varsellampe
Kontrollampa
Kontrollampe
Merkkivalo
Kontrolna lampica
Kontrolna lučka
Светлинен индикатор
Indicator luminos
Gösterge lambası
Selettore di funzioni
Function selector
Sélecteur de fonctions
Funktionswählschalter
Functieschakelaar
Selector de funciones
Selector de funções
Επιλογέα λειτουργιών
Переключатель функций
Funkcióválasztó
Volič funkcí
Volič funkcií
Przełącznik funkcji
Funksjonsvelger
Funktionsväljare
Funktionsvælger
Toiminnon valitsin
Dugme za odabir funkcija
Stikalo za izbiro načina
Превключвател за избор на работна
функция
Selector de funcţiuni
Fonksiyon selektörü
4
ALLACCIAMENTO ELETTRICO
- Prima di inserire la spina nella presa di corrente verificare attentamente che il voltaggio della Vostra rete domestica corrisponda al
valore in Volt (V) indicato sull’apparecchio e che la presa di corrente e la linea di alimentazione siano dimensionate al carico richiesto.
- QUESTO APPARECCHIO É CONFORME ALLA DIRETTIVA 2004/108/CE
SULLA COMPATIBILITÁ ELETTROMAGNETICA.
FUNZIONAMENTO E USO
Verificare che l’apparecchio sia spento prima di inserire la spina
nella presa di corrente.
1. Inserire la spina nella presa di corrente.
2. Ruotare la manopola del termostato fino a raggiungere la massima posizione.
3. Funzione estiva (solo ventilazione): ruotare il selettore fun-
zioni in posizione .
4. Funzionamento a potenza min.: ruotare il selettore funzioni in
posizione 1 (nei modelli dotati di 2 velocità di ventilazione la velocità del ventilatore è la minima).
5. Funzionamento a potenza med.: ruotare il selettore funzioni
in posizione 2 (nei modelli dotati di 2 velocità di ventilazione la
velocità del ventilatore è massima).
6. Funzionamento a potenza max.: ruotare il selettore funzioni
in posizione 3 (velocità di ventilazione massima).
7. Spegnimento: ruotare il selettore funzioni in posizione “0”.
Nota: Nei modelli dotati di soli 2 livelli di potenza, la posizione 2
corrisponde alla massima potenza.
Regolazione termostato
Posizionare il termostato alla massima posizione, quando l’ambiente
avrà raggiunto il livello di temperatura desiderato, ruotare lentamente la
manopola del termostato in senso antiorario fino ad udire un click (il ventilatore si spegne). La temperatura così fissata verrà automaticamente
regolata e mantenuta costante dal termostato.
Funzione antigelo
Con il selettore funzioni in posizione 3 e la manopola del termostato in
posizione , l’apparecchio mantiene l’ambiente ad una temperatura
di circa 5°C impedendo il congelamento con un minimo dispendio di
energia.
Modelli con solo termostato
Per accendere l’apparecchio ruotare la manopola del termostato in senso
orario fino a raggiungere la massima posizione. Per spegnere completamente il termostato ruotare la manopola in senso antiorario fino alla
posizione minima e successivamente staccare la spina dalla presa di corrente.
Modelli con base rotante motorizzata
Alcuni modelli sono dotati di base rotante motorizzata. Per diffondere il
flusso d’aria in un’area più vasta premere l’interruttore sulla base. L’apparecchio così attivato oscillerà a destra e sinistra. Per fermare l’oscillazione nella posizione desiderata è sufficiente ripremere il tasto.
MANUTENZIONE
- Prima di qualsiasi pulizia togliere sempre la spina dalla presa di
corrente.
- Pulire regolarmente le griglie di entrata ed uscita dell’aria.
- Non usare mai polveri abrasive o solventi per pulire l’apparecchio.
AVVERTENZE
- Questo apparecchio è destinato esclusivamente all’uso domestico.
- Non usare l’apparecchio nelle immediate vicinanze di docce, vasche da bagno, piscine, ecc.
- Usare l’apparecchio sempre e soltanto in posizione verticale.
- L’apparecchio non deve essere posto immediatamente sotto una
presa di corrente fissa.
- Non coprire l’apparecchio durante il funzionamento, onde evitare
rischi d’incendio.
- Non usare l’apparecchio per asciugare la biancheria. Non ostruire
le griglie di entrata e uscita dell’aria (pericolo di surriscaldamento).
- Non consentire l’uso dell’apparecchio a persone (anche bambini)
con ridotte capacità psico-fisico-sensoriali, o con esperienza e conoscenze insufficienti, a meno che non siano attentamente sorvegliate e istruite da un responsabile della loro incolumità.
Sorvegliare i bambini, assicurandosi che non giochino con l’apparecchio.
- Per una distanza di 50 cm davanti all’apparecchio non devono esserci mobili, muri, tende o altri oggetti.
- Quando l’apparecchio è usato in configurazione portatile, non va
posizionato a ridosso di pareti, mobili, tende ecc.
- É sconsigliato l’uso di prolunghe. Qualora il loro uso si rendesse necessario, seguire attentamente le istruzioni accluse alla prolunga,
facendo attenzione a non superare il limite di potenza marcato
sulla prolunga.
- Se il cavo di alimentazione è danneggiato, esso deve essere sostituito dal costruttore o dal suo servizio assistenza tecnica o comunque da una persona qualificata, in modo da prevenire ogni
rischio.
- Non usare questo apparecchio in una stanza la cui superficie è inferiore a 4 m
2
.
Alcuni modelli sono dotati di un dispositivo anti-ribaltamento che
spegne l’apparecchio in caso di caduta. Per avviare nuovamente
l’apparecchio è sufficiente rimetterlo in posizione verticale. Un di-
spositivo termico di sicurezza interrompe il funzionamento
del termoventilatore in caso di surriscaldamento accidentale (es.
ostruzione delle griglie di entrata e uscita dell’aria, motore che non
gira o gira lento). Per ripristinare il funzionamento, è necessario
staccare la spina dalla presa per alcuni minuti, eliminare la causa
del surriscaldamento, quindi reinserire la spina.
AVVERTENZA: per evitare i rischi connessi al ripristino accidentale del dispositivo termico di sicurezza, questo apparecchio non deve essere alimentato tramite un dispositivo di accensione/spegnimento esterno,
come un timer, né collegato ad un circuito che venga acceso e spento regolarmente dal fornitore di energia.
IMPORTANTE: Al fine di evitare surriscaldamenti, non coprire in nessun caso l'apparecchio durante il funzionamento,
poiché ciò provocherebbe un pericoloso aumento di temperatura.
Smaltimento dell’apparecchio
Ai sensi della direttiva Europea 2002/96/EC, non smaltire
l’apparecchio insieme ai riuti domestici ma consegnatelo ad
un centro di raccolta dierenziata uciale.
IT
5
ELECTRICAL CONNECTION
- Before plugging into the mains, make sure the voltage of your
mains supply corresponds to the value in Volts (V) indicated on
the appliance and that the socket and power line are appropriate for the load required.
- THIS APPLIANCE COMPLIES WITH DIRECTIVE 2004/108/EC ON
ELECTROMAGNETIC COMPATIBILITY.
FUNCTIONING AND USE
Make sure the appliance is off before plugging into the
mains.
1. Plug the appliance into the mains.
2. Turn the thermostat dial to maximum.
3. Summer mode (fan only): turn the function selector to
the position.
4. Low power operation: turn the function selector to position 1 (in models with two fan speeds, the fan operates at
minimum).
5. Medium power operation: turn the function selector to
position 2(in models with two fan speeds, the fan operates at
maximum).
6. High power operation: turn the function selector to position 3 (the fan operates at maximum).
7. Switching off: turn the function selector to the "0" position.
Note: In models with two power levels, position 2 corresponds
to maximum power.
Setting the thermostat:
Position the thermostat on maximum. When the room has reached
the required temperature, turn the thermostat dial slowly anticlockwise until you hear a click and the fan goes off. The thermostat
will then keep room temperature at the selected level automatically.
FROST PREVENTION MODE
With the function selector in position 3 and the thermostat dial in
position , the appliance maintains room temperature at about
5°C, preventing freezing with minimal energy consumption.
Models with thermostat only
To switch the appliance on turn the thermostat dial as far as it will
go to maximum position. To switch the appliance off completely,
turn the knob to the minimum position, then unplug from the
mains.
MODELS WITH MOTORISED ROTATING BASE
A number of models have a motorised rotating base
To distribute the air flow over a larger area, press the pedal on the
base. The appliance swings from right to left. To stop the appliance
in the desired position, simply press the button again.
MAINTENANCE
- Always unplug from the mains socket before cleaning.
- Clean the air intake and outlet grilles regularly.
- Do not use abrasive products or solvents to clean the appliance.
IMPORTANT
- The appliance is designed and produced for domestic use only.
- Do not use this appliance near showers, baths, swimming
pools, etc.
- Always use the heater in an upright position.
- The appliance must not be placed immediately under a fixed
power socket.
- Do not cover the appliance when in operation to avoid the risk
of fire.
- Do not use the heater to dry laundry. Never obstruct the intake and outlet grilles (danger of overheating).
- The appliance is not intended for use by persons (including
children) with reduced physical, sensory or mental capabilities,
or lack of experience and knowledge, unless they have been
given supervision or instruction concerning use of the appliance by a person responsible for their safety. Children must be
supervised to ensure they do not play with the appliance.
- The heater must be positioned at least 50 cm from furniture,
walls, curtains, or other objects.
- When the appliance is used in the portable configuration, do
not place it near walls, furniture, curtains etc.
- The use of extension leads is not recommended. However if
they cannot be avoided, follow the instructions accompanying the extension lead and never exceed the power limit
marked on the extension.
- If the power cable is damaged, it must be replaced by the
manufacturer, an authorised service centre or a qualified electrician in order to eliminate all risk.
- Do not use the appliance in rooms measuring less than 4 m.
Certain models are fitted with a tip-over switch which turns
the appliance off if it falls over. To restart the appliance, simply place it upright again.
The heater is fitted with a thermal cutout device which
switches the heater off in case of accidental overheating (eg.
obstruction of air intake and outlet grilles, motor turning
slowly or not at all). To reset, unplug the appliance from the
mains socket for a few minutes, remove the cause of overheating then plug in again.
CAUTION: In order to avoid a hazard due to inadvertent resetting of
the thermal cutout, this appliance must not be powered through
an external switching device such as a timer, or connected to a circuit that is regularly switched on and off by the power provider.
Important: Never under any circumstances cover the
appliance during operation as this would lead to dangerous overheating of the appliance.
Disposing of the appliance
In compliance with European directive 2002/96/EC, the
appliance must not be disposed of with household
waste, but taken to an authorised waste separation and
recycling centre.
EN
6
RACCORDEMENT ÉLECTRIQUE
- Avant de brancher l’appareil, vérifiez attentivement si la tension de secteur correspond à la valeur en Volts (V) indiquée sur
l’appareil et si la prise de courant et la ligne d'alimentation peuvent supporter l’intensité requise.
- CET APPAREIL EST CONFORME À LA DIRECTIVE 2004/108/CE SUR
LA COMPATIBILITÉ ÉLECTROMAGNÉTIQUE
FONCTIONNEMENT ET UTILISATION
Avant de brancher l’appareil, vérifiez s’il est éteint.
1. Branchez l’appareil, la lampe témoin s’allume.
2. Tournez le bouton du thermostat jusqu’à la position max.
3. Utilisation d’été (seulement ventilation) : tournez le sé-
lecteur de fonctions sur .
4. Fonctionnement à puissance min : tournez le sélecteur de
fonctions sur 1 (dans les modèles dotés de 2 vitesses de ventilation, la vitesse du ventilateur est minimum)
5. Fonctionnement à puissance moy. : mettez le sélecteur de
fonctions sur 2 (sur les modèles dotés de 2 vitesses de ventilation, la vitesse du ventilateur est maximum).
6. Fonctionnement à la puissance max. : mettez le sélecteur
de fonctions sur 3 (vitesse de ventilation maximum).
7. Arrêt: mettez le sélecteur de fonctions sur “0”.
Remarque : Sur les modèles dotés de 2 niveaux de puissance
seulement, la position 2 correspond à la puissance maximum.
Réglage du thermostat
Mettez le thermostat sur la position maximum. Une fois que la pièce
aura atteint la température désirée, tournez lentement le bouton du
thermostat en sens inverse des aiguilles d’une montre jusqu’au déclic(le ventilateur s’éteint). La température ainsi fixée sera automatiquement réglée et maintenue constante par le thermostat.
FONCTION HORS GEL
Le sélecteur de fonctions étant sur 3 et le thermostat sur , l’appareil maintient la température de la pièce à environ 5 °C, évitant le
gel et consommant un minimum d’énergie.
Modèles avec seulement le thermostat
L’appareil se met en marche en tournant le bouton dans le sens des
aiguilles d’une montre jusqu’à l’arrêt sur le maximum. Pour arrêter
complètement l’appareil, tournez le bouton en sens inverse jusqu’au
minimum et débranchez l’appareil.
MODÈLES DOTÉS DE BASE TOURNANTE MOTORISÉE
Certains modèles sont doté d’une base pivotante motorisée.
Pour diffuser le flux d’air sur une zone plus vaste, appuyez sur l’interrupteur de la base. L’appareil ainsi activé oscillera à droite et à gauche.Pour arrêter l’oscillation dans la direction désirée, il suffit de
rappuyer sur la touche.
ENTRETIEN
- Avant toute opération de nettoyage, débranchez toujours l’appareil.
- Nettoyez régulièrement les grilles d’entrée et de sortie de l’air
- N’utilisez jamais de poudres abrasives ni de solvants pour nettoyer l’appareil.
MISES EN GARDE
- Cet appareil est destiné exclusivement à un usage domestique.
- Évitez d’utiliser l’appareil à proximité de douches, baignoires,
piscines, etc.
- Utilisez l’appareil exclusivement en position verticale.
Cet appareil ne doit pas être placé juste au-dessous d’une prise
de courant fixe.
- Ne couvrez pas l’appareil en marche, cela pourrait provoquer
un incendie.
- Évitez d’utiliser l’appareil pour sécher le linge. Évitez d’obstruer
les grilles d’entrée et de sor tie de l’air (risque de surchauffe).
- L’appareil ne doit pas être utilisé par des personnes (y compris
les enfants) ayant des capacités psychophysiques sensorielles
réduites, une expérience ou des connaissances insuffisantes,
sans la surveillance vigilante et les instructions d'un responsable de leur sécurité. Surveillez les enfants et assurez-vous qu’ils
ne jouent pas avec l’appareil.
- Évitez de placer l’appareil à moins de 50 cm du mur, des meubles, des rideaux et autres objets.
- Lorsque vous utilisez l’appareil dans sa configuration portable,
évitez de l’installer contre un mur, un meuble, un rideau, etc.
- Les rallonges sont déconseillées, mais si vous en avez vraiment
besoin, suivez attentivement les instructions qui les accompagnent, sans jamais dépasser la puissance maximale indiquée
sur la rallonge.
- Afin de prévenir tous les risques, si le câble d’alimentation est
détérioré, faites-le remplacer par le constructeur ou dans un
centre de service, mais toujours par une personne qualifiée.
- N’utilisez pas cet appareil dans une pièce de moins de 4 m.
Certains modèles sont doté d’un dispositif anti-renversement
qui éteint l’appareil en cas de chute. Pour le faire repartir, il suffit de le relever.
Un dispositif thermique de sécurité arrête l’appareil en
cas de surchauffe accidentelle (obstruction des grilles d’entrée
et de sortie de l’air, moteur qui ne tourne pas ou qui tourne lentement). Pour remettre l’appareil en marche, débranchez-le
quelques minutes, supprimez la cause de la surchauffe et rebranchez-le.
ATTENTION: afin d’éviter tout danger dû au réarmement intempestif du coupe-circuit thermique, cet appareil ne doit pas être alimenté
par l’intermédiaire d’un interrupteur externe, comme une minuterie, ou être connecté à un circuit qui est régulièrement mis sous tension par le fournisseur d’élec tricité.
Important : Afin d’éviter les surchauffes, ne couvrez en
aucun cas l’appareil quand il est en marche, cela pourrait
provoquer une hausse de la température.
Mise au rebut de l’appareil
Conformément à la directive européenne 2002/96/CE, ne
jetez pas l’appareil avec les déchets domestiques, mais
portez-le à un centre de collecte sélective agréé.
FR
7
ELEKTRISCHER ANSCHLUSS
- Bevor Sie den Stecker in die Steckdose stecken, überprüfen Sie bitte sorgfältig, dass die Netzspannung Ihrer Wohnung mit dem am Gerät in Volt (V)
angegebenen Wert übereinstimmt, und dass die Steckdose und die Versorgungsleitung über die für dieses Gerät erforderliche Leistung verfügen.
- DIESES GERÄT ENTSPRICHT DER RICHTLINIE EU 2004/108 ÜBER DIE ELEKTROMAGNETISCHE VERTRÄGLICHKEIT VON BETRIEBSMITTELN.
FUNKTIONSWEISE UND GEBRAUCH
Stellen Sie sicher, dass das Gerät ausgeschaltet ist, bevor S ie den Stecker in die Steckdose stecken.
1. Stecken Sie den Stecker in die Steckdose.
2. Den Drehknopf des Thermostats bis auf die Höchststufe drehen.
3. Sommerbetrieb (nur Belüftung): Den Funktionswählschalter auf
Position drehen
4. Heizbetrieb bei verminderter Leistungsstufe: Den Funktionswä-
hlschalter auf Position 1 drehen (bei Modellen mit zwei Ventilationsgeschwindigkeiten ist die Geschwindigkeit des Ventilators minimal).
5. Heizbetrieb bei mittlerer Leistungsstufe: Den Funktionswä-
hlschalter auf Position 2 drehen (bei Modellen mit zwei Ventilationsgeschwindigkeiten ist die Geschwindigkeit des Ventilators maximal).
6. Heizbetrieb bei max. Leistungsstufe: Den Funktionswählschalter
auf Position 3 drehen (maximale Ventilationsgeschwindigkeit).
7. Ausschalten: Den Funktionswählschalter auf Position “0“ drehen.
Merke: Bei Modellen mit nur zwei Leistungsstufen entspricht Position
2 der maximalen Leistung.
Thermostatregelung
Den Thermostat auf die höchste Stufe stellen, sobald die gewünschte Raumtemperatur erreicht worden ist, den D rehknopf des Thermostats langsam gegen
den Uhrzeigersinn drehen, bis ein Klicken zu vernehmen ist (der Ventilator schaltet sich aus). Die auf diese Weise eingestellte Temperatur wird dann durch den
Thermostat automatisch geregelt und konstant gehalten.
FROSTSCHUTZFUNKTION
Wenn der Funktionswählschalter auf Position 3 und der Raumthermostat auf
Position gestellt sind, hält das Gerät die Raumtemperatur konstant auf
etwa 5°C und verhindert so bei minimalem Energieverbrauch die Frostgefahr.
Modelle nur mit Thermostat
Das Gerät wird durch Drehen des Drehknopfs nach rechts bis zur Position Max.
eingeschaltet. Zum vollständigen Ausschalten des Gerätes, drehen Sie zuerst
den Drehknopf nach links auf die Position Min. und ziehen dann den Netzstecker aus der Steckdose.
MODELLE MIT MOTORISIERTEM, SCHWENKBAREM SOCKEL
Einige Modelle verfügen über einen motorisierten Drehsockel. Für eine großflächigere Ausbreitung des Luftflusses den Schalter auf dem Sockel betätigen.
Das Gerät wird sich mit dieser Einstellung nach rechts und links drehen. Um die
Schwenkung in der gewünschten Position zum Stillstand zu bringen, Taste erneut drücken.
MANUTENZIONE
- Prima di qualsiasi pulizia togliere sempre la spina dalla presa di corrente.
- Pulire regolarmente le griglie di entrata ed uscita dell’aria.
- Non usare mai polveri abrasive o solventi per pulire l’apparecchio.
HINWEISE
- Dieses Gerät ist ausschließlich für den Gebrauch im Haushalt bestimmt.
- Das Gerät nicht in nächster Nähe von Duschen, Badewannen, Swimming
Pools, usw. aufstellen.
- Das Geräts ausschließlich in senkrechter Position verwenden.
- Das Gerät darf nicht unmittelbar unter einer ortsfesten Steckdose aufgestellt werden.
- Das Gerät während seines Betriebs nicht abdecken, da es sich entzünden
könnte.
- Das Gerät nicht zum Trocknen von Wäsche ver wenden, und niemals die Lufteintritts- und Luftaustrittsgitter zudecken bzw. verstopfen (Überhitzungsgefahr).
- Das Gerät darf nicht von Personen (ebenfalls Kindern) mit körperlichen,
geistigen oder sensorischen Behinderungen oder von Personen, die nicht
mit dem Betrieb des Gerätes vertraut sind, gebraucht werden, es sei denn,
dass sie von einer für sie und ihre Sicherheit verantwortlichen Person beaufsichtigt und in den Gebrauch des Gerätes eingewiesen wurden. Kinder
sind zu beaufsichtigen und von dem Gerät fernzuhalten.
- Das Gerät muss mit einem Mindestabstand von 50 cm zu Möbeln, Wänden, Vorhängen oder anderen Gegenständen entfernt aufgestellt werden.
- Wenn das Gerät in tragbarer Konfiguration benutzt wird, dieses nicht in der
Nähe von Wänden, Möbel, Vorhängen, usw. aufstellen.
- Wir raten von dem Gebrauch von Verlängerungskabeln ab. Sollten diese jedoch unbedingt benutzt werden müssen, befolgen Sie bitte genauestens die
den Verlängerungskabeln beigelegten Anleitungen und achten Sie darauf,
nicht die auf dem Verlängerungskabel angegebene Leistungsgrenze zu
überschreiten.
- Bei Beschädigung des Netzkabels, dieses nur durch den Hersteller selbst,
durch einen autorisierten Kundendienst oder durch qualifiziertes Fachpersonal auswechseln lassen, damit jedes Risiko ausgeschlossen werden kann.
- Das Gerät nicht in einem Raum mit einer Bodenfläche unter 4 m
2
einsetzen.
Einige Modelle sind mit einer Kippschutzvorrichtung ausgerüstet, die das
Gerät bei Umfallen ausschaltet. Zur Wiederinbetriebsetzung des Gerätes,
dieses einfach wieder senkrecht aufstellen. Das Gerät ist mit einer
Thermo-Sicherheitsvorrichtung ausgerüstet, welche den Betrieb des
Heizlüfters bei unbeabsichtigter Überhitzung (z.B. wenn die Lufteintrittsund Luftaustrittsgitter abgedeckt bzw. verstopft sind oder der Motor sich nur
langsam oder gar nicht dreht) unterbricht. Zur Wiederinbetriebsetzung des
Gerätes, einige Minuten den Netzstecker aus der Steckdose ziehen, die Ursache der Überhitzung beseitigen und dann den Netzstecker wieder einstecken.
VORSICHT: Zum Vermeiden von Risiken, die durch ein unbeabsichtigtes Rücksetzen der Thermo-Sicherheitsvorrichtung entstehen können, dar f dieses Gerät
auf keinen Fall mit einer externen Ein-/Ausschaltvorrichtung, wie zum Beispiel
einem Timer, verbunden sein, noch an einen Kreis angeschlossen werden, der
vom Energiezulieferer regelmäßig ein- und ausgeschaltet wird.
Wichtig: Um Überhitzung zu vermeiden, darf das Gerät während
des Betriebs niemals abgedeckt werden, da dadurch eine gefährliche Temperaturerhöhung hervorgerufen werden könnte.
Entsorgung des Gerätes
Gemäß Europarichtlinie 2002/96/EC das Gerät nicht zusammen
mit anderen Hausabfällen entsorgen, sondern einem Zentrum für
ozielle Mülltrennung übergeben.
DE

8
ELEKTRISCHE AANSLUITING
- Controleer, alvorens de stekker in het stopcontact te steken, of de
netspanning overeenkomt met de op uw toestel aangeduide spanning in Volt (V) en of het stopcontact en de voedingsleiding qua afmetingen op de vereiste belasting zijn afgestemd.
- DIT APPARAAT IS CONFORM DE EG-RICHTLIJN 2004/108 INZAKE DE
ELEKTROMAGNETISCHE COMPATIBILITEIT.
WERKING EN GEBRUIK
Controleer of het apparaat uitgeschakeld is alvorens de stekker
in het stopcontact te steken.
1. Steek de stekker in het stopcontact;
2. Draai de thermostaatknop naar de maximumstand.
3. Zomerstand (alleen ventilatie): draai de functieschakelaar in de
stand .
4. Werking met min. vermogen: draai de functieschakelaar in de
stand 1(bij de modellen met 2 ventilatiesnelheden, is de ventilatorsnelheid minimaal).
5. Werking met gemiddeld vermogen: draai de functieschakelaar
in de stand 2 (bij de modellen met 2 ventilatiesnelheden, is de ventilatorsnelheid maximaal).
6. Werking met max. vermogen: draai de functieschakelaar in de
stand 3 (maximum ventilatiesnelheid).
7. Uitschakelen: draai de functieschakelaar in de stand “0”. Opmer-
king: Bij modellen met slechts 2 vermogensniveaus, komt de stand
2 overeen met het maximumvermogen.
Regeling thermostaat
Plaats de temperatuur in de maximumstand; draai, wanneer de temperatuur in de ruimte het gewenste niveau heeft bereikt, de thermostaatknop
langzaam linksom tot een klik wordt gehoord (de ventilator gaat uit). De op
deze manier ingestelde temperatuur wordt automatisch door de thermostaat geregeld en constant gehouden.
ANTIVRIESFUNCTIE
Met de functieschakelaar in de stand 3 en de thermostaatknop in de stand
, behoudt het apparaat een temperatuur van ongeveer 5°C in het vertrek. Zo worden vriestemperaturen vermeden, met een minimaal energieverbruik.
Modellen met alleen thermostaat
Het apparaat wordt ingeschakeld door de knop rechtsom te draaien tot de
aanslag in de maximumstand. Om het apparaat volledig uit te schakelen,
draait u de knop linksom naar de minimumstand en haalt u vervolgens de
stekker uit het stopcontact.
MODELLEN MET GEMOTORISEERDE DRAAIBARE BASIS
Sommige modellen zijn uitgerust met een gemotoriseerde draaibare basis.
Om de luchtstroom over een groter gebied te verspreiden, drukt u op de
schakelaar op de basis. Op die manier draait het apparaat naar rechts en
naar links. Om deze beweging stil te zetten in de gewenste positie, drukt u
opnieuw op de toets.
ONDERHOUD
- Voordat u het apparaat gaat schoonmaken, dient u altijd de stekker
uit het stopcontact te verwijderen.
- Maak regelmatig de roosters voor de ingang en uitgang van de lucht
schoon.
- Gebruik nooit oplosmiddelen of schuurmiddelen voor de reiniging
van het apparaat.
WAARSCHUWINGEN
- Dit apparaat is uitsluitend voor huishoudelijk gebruik bedoeld.
- Gebruik het apparaat niet in de onmiddellijke nabijheid van douches, badkuipen, zwembaden, enz.
- Gebruik het apparaat uitsluitend in verticale positie.
- Het apparaat mag niet recht onder een vast stopcontact geplaatst
worden.
- Dek het apparaat tijdens de werking niet af, om brandgevaar te voorkomen.
- Gebruik het apparaat niet om wasgoed te drogen. Laat de roosters
voor de ingang en uitgang van de lucht vrij (gevaar voor oververhitting).
- Sta het gebruik van dit apparaat niet toe aan personen (ook kinderen) met beperkte mentale, fysieke of sensoriële capaciteiten, of met
onvoldoende ervaring of kennis, tenzij ze aandachtig worden gevolgd of geïnstrueerd door iemand die verantwoordelijk is voor hun
veiligheid. Houd toezicht op kinderen en zorg er voor dat ze niet met
het apparaat spelen.
- Het apparaat moet op een afstand van 50 cm van meubels, muren,
gordijnen of andere voorwerpen worden geplaatst.
- Wanneer het apparaat in de draagbare uitvoering wordt gebruikt,
dient het niet tegen muren, meubels, gordijnen, enz. te worden geplaatst.
- Het gebruik van een verlengsnoer wordt afgeraden. Mocht het gebruik ervan toch nodig zijn, volg dan zorgvuldig de gebruiksaanwijzingen van het verlengsnoer op en overschrijd niet het
maximumvermogen dat op het verlengsnoer is aangegeven.
- Wanneer het netsnoer beschadigd is, mag het uitsluitend door de fabrikant of door zijn technische servicedienst of in elk geval door iemand
met vakkennis vervangen worden, om elk risico te voorkomen.
- Gebruik het apparaat niet in een ruimte met een oppervlakte kleiner
dan 4 m2.
Sommige modellen zijn voorzien van een kantelbeveiliging die het
apparaat uitschakelt wanneer het omvalt. Om het apparaat weer
aan te zetten, zet u het eenvoudigweg weer overeind. Een thermi-
sche beveiliging onderbreekt de werking van de ventilatorkachel in geval van onbedoelde oververhitting (bv. verstopping van de
roosters voor de luchtinlaat en -uitlaat, niet of langzaam draaiende
motor). Om het apparaat weer in werking te stellen, is het noodzakelijk de stekker enkele minuten uit het stopcontact te halen, de oorzaak van de oververhitting te elimineren en vervolgens de stekker
weer in het stopcontact te steken.
WAARSCHUWING: om risico’s te vermijden die veroorzaakt worden doordat de thermische beveiliging per ongeluk gereset wordt, mag dit apparaat niet gevoed worden via een externe inschakel-/uitschakelinrichting,
zoals een timer, noch aangesloten zijn op een circuit dat regelmatig aan- en
uitgeschakeld wordt door de energieleverancier.
Belangrijk: Dek, om oververhitting te voorkomen, in geen
geval het apparaat tijdens de werking af, omdat dit een gevaarlijke stijging van de temperatuur kan veroorzaken.
Verwerking van het apparaat
Krachtens de Europese richtlijn 2002/96/EG mag het apparaat
niet samen met het huishoudelijke afval worden verwerkt,
maar moet het naar een ocieel inzamelcentrum gebracht
worden.
NL

9
CONEXIÓN ELÉCTRICA
- Antes de enchufar el aparato a la corriente, compruebe meticulosamente que el voltaje de su red doméstica corresponda al valor en
Volt (V) indicado en el aparato y que el enchufe de corriente y la
línea de alimentación estén dimensionados para la carga necesaria.
- ESTE APARATO ES CONFORME A LA DIRECTIVA 2004/108/CE SOBRE
LA COMPATIBILIDAD ELEC TROMAGNÉTICA.
FUNCIONAMIENTO Y USO
Compruebe que el aparato esté apagado antes de enchufarlo a
la corriente.
1. Enchufe el aparato a la corriente.
2. Gire el mando del termostato para situarlo en la posición máxima.
3. Uso veraniego (solamente ventilación) gire el selector de fun-
ciones hasta la posición .
4. Funcionamiento con potencia mín: gire el selector de funcio-
nes hasta la posición 1 (en los modelos con 2 velocidades de ventilación, la velocidad del ventilador es mínima).
5. Funcionamiento con potencia med.: gire el selector de funciones hasta la posición 2 (en los modelos con 2 velocidades de
ventilación, la velocidad del ventilador es máxima).
6. Funcionamiento con potencia máx.: gire el selector de fun-
ciones hasta la posición 3 (velocidad de ventilación máxima).
7. Apagado: gire el selector de funciones hasta la posición 0. Nota:
en los modelos con solamente 2 niveles de potencia, la posición 2
corresponde a la máxima potencia.
Regulación del termostato
Ponga el termostato en la posición máxima, cuando el ambiente haya
alcanzado la temperatura elegida, gire lentamente el mando del termostato en el sentido contrario de las agujas del reloj hasta oír un clic (el
ventilador se apaga). El termostato mantendrá automáticamente la temperatura elegida regulada y constante.
FUNCIÓN ANTIHIELO
Con el selector de funciones en la posición 3, y el mando del termostato
en la posición , el aparato mantiene la temperatura ambiente a 5°C
aproximadamente, impidiendo fenómenos de hielo y con un consumo
mínimo energético.
Modelos con termostato solamente
El aparato se enciende girando el mando en el sentido de las agujas del
reloj hasta el tope en la posición máxima; para apagar completamente
el aparato, gire el mando en el sentido contrario de las agujas del reloj
hasta la posición mínima y posteriormente desenchufe el aparato de la
corriente.
MODELOS CON BASE GIRATORIA MOTORIZADA
Algunos modelos tienen una base giratoria motorizada.
Para difundir el flujo del aire en un área más amplia, presione el interruptor en la base. El aparato oscilará a derechas y a izquierdas.
Para detener la oscilación en la posición elegida, pulse de nuevo el botón.
MANTENIMIENTO
- Antes de efectuar cualquier operación de mantenimiento, desenchufe siempre el aparato de la corriente.
- Limpie regularmente las rejillas de entrada y salida del aire.
- No use nunca polvos abrasivos o disolventes para limpiar el aparato.
ADVERTENCIAS
- Este aparato está destinado exclusivamente al uso doméstico.
- No use el aparato en las inmediaciones de duchas, bañeras, piscinas, etc.
- Use el aparato siempre y exclusivamente en posición vertical.
- No sitúe el aparato directamente debajo de un enchufe de corriente fijo.
- No cubra el aparato durante el funcionamiento para evitar riesgos
de incendio.
- No use el aparato para secar la lencería. No obstruya las rejillas de
entrada y salida del aire (peligro de recalentamiento).
- No permita que personas (incluidos niños) con capacidades psicofísicas sensoriales disminuidas o con experiencia y conocimientos
insuficientes usen el aparato, a no ser que estén vigilados atentamente e instruidos por un responsable en relación a su seguridad.
Vigile a los niños para asegurarse de que no jueguen con el aparato.
- Deje una distancia de 50 cm delante del aparato sin muebles, paredes, cortinas u otros objetos.
- Cuando use el aparato en la configuración portátil, no lo sitúe cerca
de paredes, muebles, cortinas, etc.
- Le desaconsejamos usar alargadores. Si su uso fuese necesario, siga
meticulosamente las instrucciones adjuntas con el alargador y
tenga cuidado de no superar el límite de potencia indicado en el
alargador.
- Si el cable de alimentación se estropea, deberá ser sustituido por
el fabricante o por su servicio de asistencia técnica, o en todo caso,
por una persona cualificada para evitar cualquier riesgo.
- No use este aparato en habitaciones con superficies inferiores a los
4 m
2
.
Algunos modelos incorporan un dispositivo anti-vuelco que apaga
el aparato en caso de caída. Para encender de nuevo el aparato,
sólo debe colocarlo otra vez en posición vertical. Un dispositivo
térmico de seguridad interrumpe el funcionamiento del termoventilador en caso de recalentamiento accidental (ej: por obstrucción de las rejillas de entrada y salida del aire, motor que no
gira o que gira lentamente). Para restablecer el funcionamiento,
desenchufe el aparato de la corriente durante unos minutos, elimine la causa que ha provocado el recalentamiento y enchufe de
nuevo el aparato a la corriente.
ADVERTENCIA: para evitar los riesgos relacionados con la reposición accidental del dispositivo térmico de seguridad, no alimente este aparato
con un dispositivo de encendido/apagado exterior, tal como un timer, ni
lo conecte a un circuito que el proveedor de energía enciende y apaga
regularmente.
Importante: Para evitar recalentamientos, no cubra nunca el
aparato mientras que permanece encendido. Ello podría causar un peligroso aumento de la temperatura.
Eliminación del aparato
En cumplimiento de la Directiva Europea 2002/96/CE, no elimine el aparato con los residuos domésticos, ha de entre garlo a un centro de recogida selectiva ocial.
ES

10
LIGAÇÃO ELÉCTRICA
- Antes de inserir a ficha na tomada de alimentação, certifiquese atentamente de que a voltagem da sua rede doméstica corresponde ao valor indicado em Volts (V) no aparelho e de que
a tomada e a linha de alimentação suportam a carga requerida.
- ESTE APARELHO ESTÁ EM CONFORMIDADE COM A DIRECTIVA
2004/108/CE RELATIVA À COMPATIBILIDADE ELECTROMAGNÉTICA.
FUNCIONAMENTO E UTILIZAÇÃO
Certifique-se de que o aparelho está desligado antes de introduzir a ficha na tomada de alimentação.
1. Introduza a ficha na tomada de alimentação.
2. Rode o botão do termóstato até alcançar a posição máxima.
3. Serviço de verão (apenas ventilação): rode o selector de
funções para a posição .
4. Funcionamento à potência mín.: rode o selector de funções
para a posição 1 (nos modelos dotados de 2 velocidades de ventilação, a velocidade do ventilador é mínima).
5. Funcionamento à potência méd.: rode o selector de fun-
ções para a posição 2 (nos modelos dotados de 2 velocidades de
ventilação, a velocidade do ventilador é máxima).
6. Funcionamento à potência máx.: rode o selector de fun-
ções para a posição 3 (velocidade de ventilação máxima).
7. Desligar: rode o selector de funções para a posição “0”. Nota:
Nos modelos dotados de apenas 2 níveis de potência, a posição 2 corresponde à potência máxima.
Regulação do termóstato
Coloque o termóstato na posição máxima, quando a divisão alcançar
a temperatura desejada, rode lentamente o botão do termóstato no
sentido contrário ao dos ponteiros do relógio até ouvir um clique (o
ventilador desliga-se). A temperatura assim definida será automaticamente regulada e mantida constante pelo termóstato.
FUNÇÃO ANTI-GELO
Com o selector de funções na posição 3 e o botão do termóstato na posição , o aparelho mantém a divisão a uma temperatura de cerca
de 5°C, impedindo a congelação com um consumo mínimo de energia.
Modelos apenas com termóstato
O aparelho é ligado rodando o botão no sentido dos ponteiros do relógio até à sua paragem na posição máxima. Para desligar completamente o aparelho, rode o botão no sentido contrário ao dos
ponteiros do relógio para a posição mínima e, de seguida, retire a
ficha da tomada de alimentação.
MODELOS COM BASE ROTATIVA MOTORIZADA
Alguns modelos estão equipados com uma base rotativa motorizada.
Para distribuir o fluxo de ar por uma área mais alargada, carregue no
interruptor da base. O aparelho assim activado oscilará para a direita
e para a esquerda. Para bloquear a oscilação na posição desejada,
basta carregar novamente no botão.
MANUTENÇÃO
- Retire sempre a ficha da tomada antes de efectuar qualquer
operação de limpeza.
- Limpe regularmente as grelhas de entrada e saída de ar.
- Nunca utilize pós abrasivos nem solventes para limpar o aparelho.
ADVERTÊNCIAS
- Este aparelho destina-se apenas a um uso doméstico.
- Não utilize o aparelho junto a duches, banheiras, piscinas, etc.
- Utilize o aparelho única e exclusivamente na posição vertical.
- O aparelho não deve ser colocado imediatamente por baixo de
uma tomada de alimentação fixa.
- Não cubra o aparelho durante o funcionamento para evitar riscos de incêndio.
- Não utilize o aparelho para secar roupa. Não obstrua as grelhas
de entrada e saída de ar (perigo de sobreaquecimento).
- Não permita o uso do aparelho a pessoas (incluindo crianças)
com capacidades psicofísicas e sensoriais reduzidas, ou com
uma experiência e conhecimentos insuficientes, a menos que
sejam atentamente vigiadas e ensinadas por um responsável
pela sua segurança. Vigie as crianças, certificando-se de que
elas não brincam com o aparelho.
- O aparelho deve estar posicionado a uma distância de pelo
menos 50 cm de móveis, paredes, cortinas ou outros objectos.
- Quando o aparelho for utilizado na configuração portátil, não
deve ser colocado junto a paredes, móveis, cortinas, etc.
- O uso de extensões não é aconselhável. Se tal se tornar, no entanto, necessário, siga atentamente as instruções fornecidas
com a extensão. Certifique-se de que não ultrapassa o limite
de potência assinalado na mesma.
- Se o cabo de alimentação estiver danificado, deverá ser substituído pelo fabricante ou pelo respectivo serviço de assistência
técnica ou, em todo o caso, por pessoal qualificado, de modo a
prevenir quaisquer riscos.
- Não utilize o aparelho numa divisão cuja superfície seja inferior a 4 m
2
.
Alguns modelos estão equipados com um dispositivo anti-viragem que desliga o aparelho em caso de queda do mesmo.
Para ligar novamente o aparelho, basta colocá-lo novamente
na posição vertical. Um dispositivo térmico de segurança
interrompe o funcionamento do termoventilador em caso de
sobreaquecimento acidental (por ex.: obstrução das grelhas de
entrada e saída de ar, motor que não roda ou roda lentamente).
Para restabelecer o funcionamento, retire a ficha da tomada por
alguns minutos, elimine a causa do sobreaquecimento e, de seguida, insira novamente a ficha.
ADVERTÊNCIA: para evitar os riscos associados ao reset acidental do
dispositivo térmico de segurança, este aparelho não deve ser alimentado através de um dispositivo de activação/desactivação externo, como um temporizador, nem ligado a um circuito que seja
regularmente ligado e desligado pelo fornecedor de energia
Importante: para evitar sobreaquecimentos, nunca cubra
o aparelho durante o funcionamento, pois tal poderá originar um perigoso aumento da temperatura.
Eliminação do aparelho
Nos termos da directiva Europeia 2002/96/EC, não elimine
o aparelho juntamente com os resíduos domésticos; deposite-o num centro de recolha selectiva ocial.
PT

11
ΗΛΕΚΤΡΙΚΗ ΣΥΝΔΕΣΗ
- Πριν συνδέσετε το φι στην πρίζα του ρεύατο, ελέγξτε προσεκτικά
αν η τάση του οικιακού σα δικτύου αντιστοιχεί στην τιή Volt (V)
που αναγράφεται στη συσκευή και αν η πρίζα του ρεύατο και η
γραή τροφοδοσία είναι κατάλληλε για το απαιτούενο φορτίο.
- Η ΣΥΣΚΕΥΗ ΣΥΜΜΟΡΦΟΥΤΑΙ ΜΕ ΤΗΝ ΟΗΓΙΑ 2004/108/ΕΚ ΣΧΕΤΙΚΑ ΜΕ ΤΗΝ ΗΛΕΚΤΡΟΜΑΓΝΗΤΙΚΗ ΣΥΜΒΑΤΟΤΗΤΑ
ΛΕΙΤΟΥΡΓΙΑ ΚΑΙ ΧΡΗΣΗ
Πριν συνδέστε το φις την πρίζα, βεβαιωθείτε ότι η συσκευή είναι
σβηστή.
1. Συνδέστε το φι στην πρίζα του ρεύατο.
2. Γυρίστε το διακόπτη του θεροστάτη στο έγιστο.
3. Θερινή λειτουργία (μόνο αερισμός): γυρίστε τον επιλογέα λειτουργιών στη θέση .
4. Λειτουργία με την ελάχιστη ισχύ: γυρίστε τον επιλογέα λει-
τουργιών στη θέση 1 (στα οντέλα ε 2 ταχύτητε αερισού, η ταχύτητα του ανειστήρα είναι η ικρότερη).
5. Λειτουργία με τη μέση ισχύ: γυρίστε τον επιλογέα λειτουργιών
στη θέση 2 (στα οντέλα ε 2 ταχύτητε αερισού, η ταχύτητα του
ανειστήρα είναι η έγιστη).
6. Λειτουργία με τη μέγιστη ισχύ: γυρίστε τον επιλογέα λειτουρ-
γιών στη θέση 3 (έγιστη ταχύτητα αερισού).
7. Σβήσιμο: γυρίστε τον επιλογέα λειτουργιών στη θέση "0". Σηείωση: Στα οντέλα ε όνο 2 επίπεδα ισχύο, η θέση 2 αντιστοιχεί
στη έγιστη ισχύ.
Ρύθμιση θερμοστάτη
Τοποθετήστε το θεροστάτη στο έγιστο και όταν το περιβάλλον φτάσει
στην επιθυητή θεροκρασία, γυρίστε αργά το διακόπτη του θεροστάτη
αριστερόστροφα έω ότου ακουστεί ένα "κλικ" (ο ανειστήρα σβήνει). Η
θεροκρασία ρυθίζεται αυτόατα και διατηρείται σταθερή από το θεροστάτη.
ΛΕΙΤΟΥΡΓΙΑ ΑΠΟΨΥΞΗΣ
Με τον επιλογέα λειτουργιών στη θέση 3 και το διακόπτη του θεροστάτη
στη θέση , η συσκευή διατηρεί το χώρο σε θεροκρασία 5°C περίπου ώστε να αποφεύγεται η συνθήκη παγετού ε ελάχιστη κατανάλωση
ενέργεια.
Μοντέλα μόνο με θερμοστάτη
Η συσκευή ανάβει γυρνώντα το διακόπτη δεξιόστροφα έω τη θέση έγιστη ισχύο. Για να σβήσετε τη συσκευή γυρίστε το διακόπτη αριστερόστροφα στη θέση ελάχιστη ισχύο και στη συνέχεια αποσυνδέστε το φι
από την πρίζα.
ΜΟΝΤΕΛΑ ΜΕ ΜΗΧΑΝΟΚΙΝΗΤΗ ΠΕΡΙΣΤΡΕΦΟΜΕΝΗ ΒΑΣΗ
Ορισένα οντέλα διαθέτουν ηχανοκίνητη περιστρεφόενη βάση.
Για την κατανοή τη ροή του αέρα σε εγαλύτερη περιοχή πιέστε το διακόπτη στη βάση. Με αυτόν τον τρόπο η συσκευή περιστρέφεται δεξιά-αριστερά. Για να διακόψετε την κίνηση στην επιθυητή θέση αρκεί να πιέσετε
πάλι το πλήκτρο.
ΣΥΝΤΗΡΗΣΗ
- Πριν από οποιοδήποτε καθαρισό, αποσυνδέετε πάντα το φι από
την πρίζα του ρεύατο.
- Καθαρίζετε τακτικά τι γρίλιε εισόδου και εξόδου του αέρα.
- Μη χρησιοποιείτε ποτέ απορρυπαντικά σε σκόνη ή διαλύτε για να καθαρίσετε τη συσκευή.
ΠΡΟΕΙΔΟΠΟΙΗΣΕΙΣ
- Η συσκευή αυτή προορίζεται αποκλειστικά για οικιακή χρήση.
- Μη χρησιοποιείτε τη συσκευή κοντά σε ντου, πανιέρε, πισίνε
κλπ.
- Χρησιοποιείτε τη συσκευή πάντα και όνο σε κατακόρυφη θέση.
- Η συσκευή δεν πρέπει να τοποθετείται ακριβώ κάτω από σταθερή
πρίζα ρεύατο.
- Μην καλύπτετε τη συσκευή ενώ λειτουργεί, για να αποφύγετε κινδύνου πυρκαγιά.
- Μη χρησιοποιείτε τη συσκευή για το στέγνωα των ρούχων. Μη
σκεπάζετε τι γρίλιε εισόδου και εξόδου του αέρα (κίνδυνο υπερθέρανση).
- Μην επιτρέπετε τη χρήση τη συσκευή σε άτοα (ακόα και παιδιά)
ε ειωένε ψυχοφυσικέ ικανότητε ή ε ανεπαρκή επειρία,
εκτό εάν επιβλέπονται ε προσοχή και εκπαιδεύονται από έναν
υπεύθυνο για τη σωατική ακεραιότητά του. Παρακολουθείτε τα
παιδιά και βεβαιωθείτε ότι δεν παίζουν ε τη συσκευή.
- Σε απόσταση 50 cm επρό από τη συσκευή δεν πρέπει να υπάρχουν έπιπλα, τοίχοι, κουρτίνε ή άλλα αντικείενα.
- Όταν η συσκευή χρησιοποιείται σαν φορητή, ην την χρησιοποιείτε κοντά σε τοίχου, έπιπλα, κουρτίνε κλπ.
- Αποφύγετε τη χρήση προεκτάσεων. Εάν η χρήση του είναι αναγκαία, τηρήστε σχολαστικά τι οδηγίε τη προέκταση έτσι ώστε
να ην υπερβείτε το όριο ισχύο που αναγράφεται στην προέκταση.
- Εάν το ηλεκτρικό καλώδιο παρουσιάζει φθορέ, πρέπει να αντικατασταθεί από τον κατασκευαστή, το εξουσιοδοτηένο Σέρβι ή από
εξειδικευένο τεχνικό για την αποφυγή κάθε κινδύνου.
- Μη χρησιοποιείτε τη συσκευή σε δωάτια ε εβαδόν ικρότερο
από 4 m
2
.
Ορισένα οντέλα διαθέτουν σύστηα προστασία από ανατροπή
που σβήνει τη συσκευή σε περίπτωση πτώση. Για να λειτουργήσει
και πάλι η συσκευή αρκεί να την επαναφέρετε σε κατακόρυφη θέση.
Ένα θερμικό σύστημα ασφαλείας διακόπτει τη λειτουργία του
αερόθερου σε περίπτωση υπερθέρανση (π.χ. βούλωα γρίλια
εισόδου και εξόδου του αέρα, επλοκή ή αργή περιστροφή του
οτέρ). Για να αποκατασ τήσετε τη λειτουργία, πρέπει να αποσυνδέσετε το φι από την πρίζα για λίγα λεπτά, να εξαλείψετε την αιτία
τη υπερθέρανση και στη συνέχεια να συνδέσετε πάλι το φι.
ΠΡΟΕΙΔΟΠΟΙΗΣΗ: για να αποφύγετε κινδύνου από την τυχαία επαναφορά του θερικού συστήατο ασφαλεία, η συσκευή αυτή δεν πρέπει να
τροφοδοτείται έσω ενό εξωτερικού συστήατο ανάατο/σβησίατο, όπω ένα χρονοδιακόπτη, ούτε να συνδέεται σε ένα κύκλωα που
ανοίγει και κλείνει από την επιχείρηση ηλεκτρισού.
Σημαντικό: Για να αποφύγετε την υπερθέρανση, ην καλύπτετε ποτέ τη συσκευή ενώ λειτουργεί, γιατί αυτό πορεί να προκαλέσει επικίνδυνη άνοδο τη θεροκρασία τη.
Διάθεση της συσκευής
Σύφωνα ε την Ευρωπαϊκή Οδηγία 2002/96/ΕΚ, η συσκευή
δεν πρέπει να απορρίπτεται στα οικιακά απορρίατα αλλά να
διατίθεται σε επίσηα κέντρα διαφοροποιηένη συλλογή.
EL
12
ПОДКЛЮЧЕНИЕ ЭЛЕКТРОЭНЕРГИИ
- До того, как вилка будет вставлена в розетку электропитания,
убедитесь, что напряжение в сети электропитания вашего помещения соответствует значению напряжения в Вольтах (В), указанному на приборе, и, что розетка линии электропитания
рассчитана на требуемую мощность.
- ТЕПЛОВЕНТИЛЯТОР СООТВЕТСТВУЕТ НОРМАТИВУ 2004/108/СЕ ПО
ЭЛЕКТРОМАГНИТНОЙ.СОВМЕСТМОСТИ.
ФУНКЦИОНИРОВАНИЕ И ЭКСПЛУАТАЦИЯ
До того, как вставить вилку в электрическую розетку убедитесь, что прибор выключен.
1. Вс тавьте вилку в электрическую розетку.
2. Поверните ручку терморегулятора в максимальное положение
до упора.
3. Летний режим (только вентилятор): поверните переключа-
тель режимов в положение .
4. Режим с минимальной мощнос тью: поверните переключатель режимов в положение 1 (в моделях с 2-х скоростным вентилятором скорость обдува минимальна).
5. Работа на средней мощности: поверните переключатель режима в положение 2 (в моделях с 2-х скоростным вентилятором
скорость обдува максимальна).
6. Режим с максимальной мощностью: поверните переключатель режимов в положение 3 (скорость обдува максимальна).
7. Вык лючение: поверните переключатель режимов в положение 0. Примечание: в моделях, оснащенных 2-м уровнями мощности положение 2 соответствует максимальной мощности.
Регулировка терморегулятора
Переведите терморегулятор в максимальное положение. Когда температура в помещении достигнет требуемой, медленно поверните
ручку терморегулятора против часовой стрелки до щелчка (вентилятор
выключится). Установленная таким образом температура будет автоматически регулироваться прибором и поддерживаться на постоянном уровне.
ФУНКЦИЯ ПРЕДОТВРАЩЕНИЯ ЗАМЕРЗАНИЯ
Если ручка выбора режима находится в положении 3, а ручка терморегулятора в положении , прибор поддерживает температуру в
помещении на уровне около 5°С при минимальном расходе электроэнергии.
Модель только с терморегулятором
Прибор включается при повороте ручки по часовой стрелке до ограничителя в максимальном положении, для полного отключения прибора поверните ручку в минимальное положение против часовой
стрелки, а затем извлеките вилку из розетки электропитания.
МОДЕЛИ С ПОВОРОТНОЙ МОТОРИЗОВАННОЙ ПОДС ТАВКОЙ
Некоторые модели оснащены моторизованной поворотной подставкой. Для того, чтобы воздух распространялся по более широкому пространству, нажмите переключатель на подставке. После этого прибор
начнет поворачиваться вправо и влево. Для остановки поворота в требуемом положении достаточно еще раз нажать кнопку.
УХОД
- До выполнения любого ухода извлеките вилку из розетки электропитания.
- Регулярно очищайте решетки на входе и выходе воздуха.
- Для очистки прибора ни в коем случае не используйте абразивные порошки или растворители.
МЕРЫ ПРЕДОСТОРОЖНОСТИ
- Данный прибор предназначен только для использования в домашнем хозяйстве.
- Не используйте прибор в непосредственной близости от душа,
ванны, рукомойника, бассейна и т.д.
- Используйте прибор только в вертикальном положении.
- Прибор не должен находиться непосредственно под розеткой
электропитания.
- Чтобы избежать риска пожара не накрывайте прибор во время
работы.
- Не используйте прибор для сушки белья. Не засоряйте решетки
на входе и выходе воздуха (опасность перегрева).
- Не разрешайте пользоваться прибором людям (в том числе и
детям) с пониженным уровнем восприятия и психофизических
возможностей или с недостаточным опытом и знаниями, за исключением случаев, когда за ними внимательно следят, и они
обучены отвечающим за их безопасность человеком. Следите за
детьми, убедитесь в том, что прибор не служит им игрушкой.
- Прибору нельзя находиться на расстоянии ближе 50 см от мебели, стен, занавесей или других предметов.
- Когда прибор используется в переносном виде, не устанавливайте его вблизи стен, мебели, занавесок и т.д.
- Не рекомендуется пользоваться удлинителем. Если использование удлинителя становится необходимым, внимательно следуйте
инструкциям, прилагаемым к удлинителю, не превышая предельной мощности, указанной на удлинителе.
- Если шнур питания поврежден, он должен быть заменен производителем или его сервисной технической службой или, в любом
случае, квалифицированным специалистом, что позволит избежать любого риска.
- Не используйте прибор в помещении с площадью меньше 4 м
2
.
Некоторые модели оснащены защитным предохранителем, который отключает прибор, если он падает. Для повторного вк лючения прибора достаточно перевести его в вертикальное
положение.
Устройство термозащиты отключит тепловентилятор в
случае его случайного перегрева (например, если закрыты решетки подачи и выхода воздуха, при медленном вращении мотора или его остановке). Для возобновления работы необходимо
на несколько минут извлечь вилку из розетки электропитания,
устранить причину перегрева и затем вновь вставить вилку в розетку.
ПРЕДУПРЕЖДЕНИЕ: для того, чтобы избежать опасностей, связанных
со случайным сбросом термозащиты, данный прибор не должен подключаться через внешнее устройство вк лючения/выключения, такое,
как таймер, а также быть подключенным к сети, которая регулярно отключается и включается поставщиком электроэнергии.
Обратите внимание: для того, чтобы избежать перегрева
ни в коем случае не накрывайте прибор во время работы,
так как это может привести к опасному повышению температуры.
RU

13
ELEKTROMOS BEKÖTÉS
- Mielőtt a villásdugót a hálózati csatlakozóaljzatba illesztené,
gondosan ellenőrizze, hogy lakhelyének hálózati feszültsége
megegyezik-e a készüléken Voltban (V) feltüntetett értékkel,
valamint hogy a hálózati csatlakozóaljzat és a tápvezeték a kívánt terheléshez vannak-e méretezve.
- EZ A KÉSZÜLÉK MEGFELEL AZ ELEKTROMÁGNESES ÖSSZEFÉRHETŐSÉGRE VONATKOZÓ 2004/108/EK IRÁNYELVNEK.
KEZELÉS ÉS HASZNÁLAT
Mielőtt a villásdugót a hálózati csatlakozóaljzatba illesztené
ellenőrizze, hogy a készülék ki van-e kapcsolva.
1.
Illessze a villásdugót a hálózati csatlakozóaljzatba
2. Fordítsa el a termosztát gombját a maximum fokozatba.
3. Nyári üzem (csak ventiláció): a funkcióválasztót állítsa a
fokozatba.
4. Minimális teljesítményű működés: a funkcióválasztót
tegye az 1-es fokozatba (a 2 ventiláció sebességgel rendelkező
modelleknél a ventilátor sebessége minimális).
5. Közepes teljesítményű működés: a funkcióválasztót tegye
a 2. pozícióba (a 2 ventiláció sebességgel rendelkező modelleknél a ventilátor sebessége maximális).
6. Maximális teljesítményű működés: a funkcióválasztót állítsa a 3-as fokozatba (maximális ventiláció sebesség).
7. Kikapcsolás: a funkcióválasztót tegye a “0” pozícióba. Megjegyzés: A csak 2 teljesítményfokozattal rendelkező modelleknél
a 2 pozíció megfelel a maximális teljesítménynek.
A termosztát beállítása
Állítsa a termosztátot a maximum fokozatba, és amikor a helyiség
elérte a kívánt hőfokot a termosztát gombját lassan fordítsa el az óramutató járásával ellentétes irányba addig, amíg egy kattanást nem
hall (ekkor a ventilátor kikapcsol). A termosztát az így beállított
hőmérsékletet ezután automatikusan szabályozza és állandó szinten tartja.
FAGYÁS ELLENI FUNKCIÓ
Amikor a funkcióválasztó a 3-as, a termosztát pedig a fokozatban
van, a készülék kb. 5°C-on tartja a környezet hőmérsékletét és minimális energiafogyasztással megakadályozza a fagyást.
Csak termosztáttal rendelkező modellek
A készülék bekapcsol, ha a termosztát gombját az óramutató járásával megegyező irányban elforgatja egészen addig, amíg a maximum fokozaton meg nem áll. A készülék teljes kikapcsolásához
forgassa a gombot a minimum fokozatba az óramutató járásával ellentétes irányban, majd húzza ki a villásdugót a csatlakozóaljzatból.
MOTORIZÁLT FORGÓ TALPRÉSSZEL RENDELKEZŐ MODELL
Néhány modell motorizált forgó talprésszel van ellátva. A légáramlat nagyobb területre való szétterjesztéséhez nyomja meg a talprészen található kapcsolót. Az így bekapcsolt készülék váltakozva jobbra és balra fog
forogni. Az oszcilláció kívánt pozícióban történő leállításához ismét meg
kell nyomni a gombot.
KARBANTARTÁS
- Mielőtt bármilyen tisztítási műveletbe kezdene, mindig húzza
ki a villásdugót a hálózati csatlakozóaljzatból.
- Rendszeresen tisztítsa a szellőzőrácsokat.
- Soha ne használjon dörzshatású tisztítószereket vagy oldósze reket a készülék tisztításához.
FIGYELMEZTETÉSEK
-
A készülék kizárólag háztartási használatra készült.
- Soha ne használja a készüléket zuhanyozó, fürdőkád, uszodamedence, stb. közvetlen közelében.
- A készüléket mindig és kizárólag csak függőleges helyzetbe állítva szabad üzemeltetni.
- A készüléket nem szabad közvetlenül egy csatlakozóaljzat alá
helyezni.
- Üzemelés közben ne takarja le a készüléket, nehogy meggyulladjon.
- A készüléket ne használja ruhaszárításra. Ne zárja el a szellőzőnyílásokat (túlhevülés veszélye). FOGAK “ON” POZÍCIÓBAN.
- Ne engedje, hogy a készüléket csökkent szellemi-fizikaiszenzorikus képességű vagy kevés tapasztalattal és nem elegendő ismerettel rendelkező személyek (beleér tve gyermekek)
használják, ha valaki nem ügyel a testi épségükre és nem tanítja
meg őket a készülék használatára.
- A készülék eleje és a bútorok, vagy más tárgyak között hagyjon
legalább 50 cm-es távolságot.
- A hordozható formában használt készüléket nem szabad falak,
bútorok, függönyök, stb. közelébe helyezni.
- Nem tanácsos hosszabbítókat használni. Ha ezek használatára
mégis szükség van, akkor kövesse a hosszabbító használati útmutatójában ismertetett utasításokat, és ne lépje túl a hosszabbítón feltüntetett teljesítményhatárt.
- A sérült tápkábel cseréjét a veszélyek elkerülése érdekében kizárólag a gyártó, egy márkaszerviz vagy egy szakképzett villanyszerelő végezheti el.
- Tilos a készüléket 4 m
2
-nél kisebb alapterületű helyiségben üzemeltetni.
Néhány modell egy felborulás elleni védőszerkezettel van ellátva,
amely leesés esetén kikapcsolja a készüléket.
Az újraindításhoz
elég visszaállítani a készüléket függőleges helyzetbe.
A készülék véletlen túlhevülése (pl. szellőzőnyílások elzáródása, a motor lassú forgása, illetve megakadása) esetén egy
biztonsági hőkapcsoló megszakítja a termoventilátor működését. Az ismételt beüzemeléshez a készülék villásdugóját egy
pár percre ki kell húzni a hálózati csatlakozóaljzatból, meg kell
szüntetni a túlhevülés okát, majd a villásdugót ismét vissza kell
kapcsolni az elektromos hálózatra.
FIGYELEM! A biztonsági hőkapcsoló véletlenszerű lenullázása által
okozott veszélyek elkerülése érdekében a készüléket nem szabad
külső be/kikapcsoló szerkezettel, pl. timerrel (időkapcsoló) működtetni, és nem szabad olyan áramkörre csatlakoztatni, amelyet az energiaszolgáltató rendszeresen ki- ill. bekapcsolhat.
Fontos: Üzemelés közben a készüléket nem szabad letakarni, mert az túlhevülés veszélyével járhat.
A készülék ártalmatlanítása és hulladékkezelés
A 2002/96/EK irányelv értelmében a leselejtezett készüléket nem szabad a lakossági hulladékkal együtt
kezelni, hanem egy kijelölt szelektív hulladékgyűjtő
szigeten kell elhelyezni.
HU
14
ELEKTRICKÁ PŘIPOJENÍ
- Před zapojením zástrčky přípojného kabelu do zásuvky elektrického proudu překontrolujte pozorně, zda napětí rozvodu elektrického proudu ve Vaší domácnosti odpovídá hodnotě uvedené na
spotřebiči ve Voltech (V) a zda jsou elektrická zástrčka a přívodní
linka uzpůsobeny pro požadované zatížení.
- TENTO VÝROBEK JE V SOULADU SE SMĚRNICÍ 2004/108/ES O ELEKTROMAGNETICKÉ KOMPATIBILITĚ
PROVOZ A POUŽITÍ
Před zapojením spotřebiče do elektrické zásuvky zkontrolujte,
zda je vypnutý.
1. Zastrčte zástrčku do elektrické zásuvky.
2. Otočte ručkou termostatu až na polohu maxima.
3. Letní provoz (pouze ventilace): otočte voličem funkcí do polohy .
4. Provoz s min. výkonem: otočte voličem funkcí do polohy 1 (u
modelů vybavených 2-rychlostní ventilací je rychlost ventilátorů
minimální).
5. Provoz při středním výkonu: otočte voličem funkcí do polohy
2 (u modelů vybavených 2-rychlostní ventilací je rychlost ventilátorů maximální).
6. Provoz s max. výkonem: otočte voličem funkcí do polohy 3
(maximální rychlost ventilace).
7. Vypnutí: otočte voličem funkcí do polohy “0”. Poznámka: U mo-
delů vybavených pouze 2 úrovněmi výkonu, odpovídá poloha 2
maximálnímu výkonu.
Nastavení termostatu
Nastavte termostat na maximální polohu v okamžiku, kdy teplota
prostředí dosáhne Vámi požadované teploty, otáčejte pozvolna kolečkem
termostatu proti směru hodinových ručiček, dokud neuslyšíte cvaknutí
(ventilátor se vypne). Termostat bude automaticky udržovat takto nastavenou stálou teplotu.
PROTIZÁMRAZOVÁ FUNKCE
Nastavte volič funkcí do polohy 3 a otočný knoflík termostatu do polohy
. spotřebič bude udržovat teplotu prostředí na cca 5°C. Zabrání se
tak zamrznutí s minimální spotřebou elektrické energie.
Modely vybavené pouze termostatem
Zapnutí spotřebiče se provádí otočením knoflíku ve směru hodinových
ručiček až do jeho zastavení v poloze maximum, pro úplné vypnutí
spotřebiče je třeba otáčet knoflíkem proti směru hodinových ručiček do
polohy minimum a poté vytáhnout přívodní šňůru ze zásuvky elelektrického proudu.
MODELY S MOTORIZOVANOU OTOČNOU ZÁKLADNOU
Některé modely jsou vybavené otočným podstavcem poháněným motorem. Stisknutím tlačítka na základně dosáhnete šíření proudu vzduchu pokrývajícího větší prostory. Po zapnutí se spotřebič začne otáčet
zprava doleva. Pokud chcete zastavit otáčení v určité poloze, stačí stisknout tlačítko.
ÚDRŽBA
- Před jakýmkoliv čištěním spotřebiče je třeba vždy vytáhnout
zástrčku přípojného kabelu ze zásuvky elektrického proudu.
- Čistěte pravidelně štěrbiny proudění vzduchu.
- Pro čištění spotřebiče v žádném případě nepoužívejte abrazivní
práškové čistící prostředky nebo rozpouštědla.
UPOZORNĚNÍ
- Tento přístroj je určen výhradně k domácímu používání.
- Neinstalujte spotřebič v bezprostřední blízkosti sprch, van, bazénů
atp.
- Spotřebič používejte vždy a pouze ve svislé poloze.
- Spotřebič se nesmí instalovat přímo pod pevnou zásuvku elektrického proudu.
- Nikdy přístroj nepřikrý vejte, pokud je v provozu, předejdete tak nebezpečí vzniku požáru.
- Nepoužívejte spotřebič k sušení prádla, nepřikrývejte mřížku
vstupu a výstupu vzduchu (nebezpečí přehřátí).
- Nedovolte používání spotřebiče osobám (ani dětem) s omezenými
psychickými, fyzickými nebo smyslovými schopnostmi nebo s nedostatečnými zkušenostmi a znalostmi, pokud nejsou pod
pečlivým dohledem a instruovány osobou odpovědnou za jejich
bezpečnost. Dohlížejte na děti a kontrolujte, aby si se spotřebičem
nehrály.
- Ve vzdálenosti do 50 cm před spotřebičem se nesmí nacházet nábytek, stěny, záclony nebo jiné předměty.
- Pokud budete ventilátor používat jako přenosný, neumisťujte ho do
těsné blízkosti stěn, nábytku, záclon atd.
- Nedoporučuje se používání prodlužovací šňůry. Pokud je nutné
použít prodlužovací šňůru, dodržujte pečlivě pokyny, které jsou
uvedené na obalu prodlužovačky. Dbejte na to, abyste nepřesáhli
mezní hodnotu výkonu vyznačenou na prodlužovací šňůře.
- Pokud je napájecí kabel poškozen, jeho výměnu smí provést pouze
výrobce anebo autorizované servisní středisko, v každém případě
však kvalifikovaný odborník, tak aby se předešlo jakémukoliv
možnému riziku.
- Nepoužívat tento spotřebič v prostorách se základnou menší než 4
m2.
Některé modely jsou opatřené pojistkou zabraňující převrácení,
která přístroj vypne v případě pádu. V případě, že se převrátí nebo
spadne, k opětovnému spuštění ventilátoru stačí spotřebič postavit do svislé polohy.
Přístroj je osazen tepelným bezpečnostním zařízením, které
přeruší chod tepelného ventilátoru v případě náhodného přehřátí
a vypne jej (např. při zanešení štěrbin proudění vzduchu anebo
pokud se motor neotáčí nebo se otáčí pomalu). K obnovení provozu spotřebiče je nutné vytáhnout zástrčku ze zásuvky elektrického proudu na několik minut, odstranit příčinu přehřátí a znovu
zástrčku zasunout do zásuvky.
UPOZORNĚNÍ: aby se zabránilo nebezpečí spojenému s náhodným
spuštěním bezpečnostního tepelného zařízení, nesmí být tento přístroj
napájen prostřednictvím vnějšího zapínacího/vypínacího zařízení, jako je
například časový spínač, ani nesmí být napojen na okruh, který je pravidelně zapínán a vypínán dodavatelem energie.
Důležité: Aby se zabránilo přehřátí, nikdy nezakrývejte
spotřebič během chodu, došlo by k nebezpečnému zvýšení
teploty.
Likvidace
Podle evropské směrnice 2002/96/ES neprovádějte likvidaci
spotřebiče spolu s domácím odpadem, nýbrž ho odevzdejte
do ociální sběrny.
CS

15
ELEKTRICKÉ NAPOJENIE
- Prv než zasuniete zásuvku do elektrickej zástrčky pozorne
skontrolujte, či sa napätie Vašej elektrickej siete zhoduje s hodnotou vo voltoch (V) uvedenou na prístroji a či elektrická
zástrčka a rozvod energie majú požadované zaťaženie.
- TENTO PRÍSTROJ VYHOVUJE POŽIADAVKÁM SMERNICE
2004/108/ES O ELEKTROMAGNETICKEJ KOMPATIBILITE.
CHOD A POUŽITIE
Pred vsunutím zástrčky do zásuvky elektrickej siete sa uistite, že je spotrebič vypnutý.
1. Vsuňte zástrčku do zásuvky elektrickej siete
2. Točte rukoväťou termostatu, až kým nedosiahne maximálnu
polohu.
3. Letná funkcia (iba ventilácia): točte voličom funkcií do po-
lohy .
4. Chod pri minimálnom výkone: točte voličom funkcií do
polohy 1 (u modelov, ktoré majú k dispozícii 2 rýchlosti ventilátora, bude rýchlosť ventilátora minimálna).
5. Chod pri str. výkone: otočte volič funkcií do polohy 2 (u mo-
delov, ktoré majú k dispozícii 2 rýchlosti ventilátora, bude
rýchlosť ventilátora maximálna).
6. Chod pri maximálnom výkone: točte voličom funkcií do
polohy 3 (Rýchlosť ventilátora je maximálna).
7. Vypnutie: točte voličom funkcií do polohy “0”.
Poznámka: U modelov, ktoré majú k dispozícii iba 2 úrovňami
výkonu, poloha 2 zodpovedá maximálnemu výkonu.
Nastavenie termostatu
Nastavte termostat na maximálnu polohu, keď okolie dosiahne žiadanú teplotu, pomaly točte rukoväťou v protismere hodinových
ručičiek, až kým nezačujete kliknutie (vypne sa ventilátor). Takto
určená teplota bude automaticky nastavená a termostatom
konštantne udržiavaná
MRAZUVZDORNÁ FUNKCIA
Keď je volič funkcií v polohe 3 a rukoväť termostatu v polohe ,
prístroj udržuje teplotu okolia okolo 5°C, zabrániac tak, s minimálnou stratou energie, mrazeniu.
Modely iba s termostatom
Prístroj zapnete točením rukoväti v smere hodinových ručičiek do
maximálnej polohy a až do dorazu. Prístroj úplne vypnete točením
rukoväti proti smeru hodinových ručičiek do minimálnej polohy a
vytiahnutím zástrčky z elektriny.
MODELY S TOČIACIM PODSTAVCOM NA MOTOR
Niektoré modely sú vybavené otočným podstavcom s elektrickým
pohonom. Na rozptýlenie prúdu vzduchu do širšieho okolia stlačte
vypínač na podstavci. Takto zapnutý spotrebič sa bude otáčať doprava a doľava. Na zastavenie otáčania v želanej polohe stačí jednoducho opäť stlačiť vypínač.
ÚDRÎBA
- Pred akýmkoľvek čistením vytiahnite zásuvku zo zástrčky.
- Pravidelne čistite mriežky vstupu a výstupu vzduchu.
- Na čistenie spotrebiča nikdy nepoužívajte drsné prášky alebo
riedidlá.
UPOZORNENIA
- Tento spotrebič je určený na používanie v domácnosti.
- Nepoužívajte prístroj v tesnej blízkosti spŕch, vaní, bazénov,
atď.
- Prístroj používajte vždy a iba vo vodorovnej polohe.
- Prístroj nesmie byť umiestnený tesne pod pevnú elektrickú
zástrčku.
- Prístroj počas chodu neprikrývajte; vyhnete sa tak nebezpečenstvu vzbĺknutia.
- Nepoužívajte prístroj na sušenie bielizne. Neupchávajte
mriežky vstupu a výstupu vzduchu (nebezpečenstvo prehriatia).
- Nedovoľte, aby spotrebič používali osoby (vrátane detí) s obmedzenými fyzickými, rozumovými alebo zmyslovými schopnosťami alebo ktoré nemajú skúsenosti a poznatky o používaní
spotrebiča, ak nie sú pod starostlivým dohľadom a neboli
poučené osobou zodpovednou za ich bezpečnosť. Dohliadajte
na deti, aby ste sa uistili, že sa nebudú so spotrebičom hrať.
- Vo vzdialenosti 50.-tich cm od prístroja nesmie byť nábytok,
stena, záclony, alebo iné predmety.
- Keď je prístroj v prenosnej konfigurácii, neumiestňujte ho v
tesnej blízkosti steny, nábytku, záclon, atď.
- Neodporúčame používať predlžovačku. V prípade, že jej
použitie je nevyhnutné, riaďte sa návodom k použitiu
predlžovačky, hlavne aby ste neprekročili limit výkonu, označený na predlžovačke.
- Poškodenú elektrickú šnúru musí vymeniť výrobca, poverené
servisné stredisko, alebo kvalifikovaná osoba. Vyhnete sa tak
každému riziku.
- Nepožívajte tento prístroj v miestnosti, menšej ako 4m
2
.
Niektoré modely sú vybavené zariadením proti prevráteniu,
ktoré spotrebič pri páde vypne. Pre uvedenie do chodu stačí
prístroj postaviť.
Bezpečnostné tepelné zariadenie preruší chod tepelného ventilátora v prípade, keď sa tento náhodne prehreje
(napr. upchatie mriežok vstupu a v ýstupu vzduchu, motor sa
netočí, alebo sa točí pomaly). Pre znovuuvedenie do chodu je
potrebné vytiahnuť na niekoľko sekúnd zástrčku zo zásuvky,
odstrániť príčinu prehriatia a znovu zasunúť zásuvku.
UPOZORNENIE: aby sa predišlo nebezpečenstvu spojenému s náhodnou aktiváciou bezpečného tepelného zariadenia, nesmie byť
tento spotrebič napájaný vonkajším zariadením na zapnutie/vypnutie, ako timer, ani nesmie byť zapojený k okruhu, ktorý pravidelne
zapína a vypína dodávateľ energie.
Dôležité: Aby sa predišlo prehriatiu, v žiadnom prípade
neprikrývajte prístroj počas chodu, lebo týmto by sa nebezpečne zvýšila teplota.
Likvidácia spotrebiča
V súlade s pokynmi európskej smernice 2002/96/ES nelikvidujte spotrebič spoločne s komunálnym odpadom,
ale odovzdajte ho v autorizovanom zbernom stredisku.
SK

16
PODŁĄCZENIE ELEKTRYCZNE
- Przed podłączeniem wtyczki do gniazdka należy dokładnie
sprawdzić, czy napięcie domowej sieci zasilania odpowiada wartości w Voltach (V) podanej na urządzeniu i czy gniazdko wtyczkowe i przewód zasilający są zgodne z wymaganym obciążeniem.
- URZĄDZENIE JEST ZGODNE Z DYREKTYWĄ 2004/108/WE DOTYCZĄCĄ KOMPATYBILNOŚCI ELEKTROMAGNETYCZNEJ.
DZIAŁANIE I WYKORZYSTANIE
Przed włożeniem wtyczki do gniazdka zasilającego należy
sprawdzić, czy urządzenie jest wyłączone.
1. Włożyć wtyczkę do gniazdka zasilającego.
2. Przekręcić pokrętło termostatu do maksymalnej pozycji.
3. Zastosowanie letnie (tylko wentylacja): przekręcić przełącznik
funkcji na pozycję .
4. Działanie z minimalną mocą: przekręcić przełącznik funkcji do
pozycji 1 (w modelach wyposażonych w dwie prędkości wentylacji, prędkość wentylatora jest minimalna).
5. Działanie ze średnią mocą: przekręcić przełącznik funkcji do po-
zycji 2 (w modelach wyposażonych w dwie prędkości wentylacji,
prędkość wentylacji jest maksymalna).
6. Działanie z pełną mocą: przekręcić przełącznik funkcji do pozycji 3 (prędkość went ylacji jest maksymalna).
7. Wyłączanie: przesunąć przełącznik funkcji do pozycji "0". Uwaga:
w modelach wyposażonych tylko w dwa poziomy mocy, pozycja 2
odpowiada pełnej mocy.
Ustawianie termostatu
Ustawić termostat w maksymalnym położeniu i kiedy pomieszczenie
osiągnie żądaną temperaturę, powoli przekręcić pokrętło termostatu w
kierunku przeciwnym do ruchu wskazówek zegara, aż pojawi się odgłos
kliknięcia (wentylator wyłączy się). W ten sposób ustawiona temperatura
będzie automatycznie regulowana i utrzymywana przez termostat.
FUNKCJA ZAPOBIEGA JĄC A ZAMARZANIU
Po ustawieniu przełącznika funkcji w pozycji 3 i pokrętła termostatu w pozycji , urządzenie będzie utrzymywać temperaturę pomieszczenia na
poziomie 5°C zapobiegając zamarzaniu przy minimalnym zużyciu energii elektrycznej.
Modele z samym termostatem
Urządzenie włącza się poprzez przekręcenie pokrętła w kierunku zgodnym z ruchem wskazówek zegara do pozycji maksymalnej; aby całkowicie wyłączyć urządzenie należy przekręcić pokrętło w kierunku
przeciwnym do ruchu wskazówek zegara, a następnie wyjąć wtyczkę z
gniazdka wtyczkowego.
MODELE Z RUCHOMĄ PODSTAWĄ OBROTOWĄ
Niektóre modele wyposażone są w ruchomą podstawę obrotową.
Aby zwiększyć strefę przepływu powietrza, należy wcisnąć włącznik znajdujący się w podstawie. W ten sposób włączone urządzenie będzie się
przechylać w prawo i w lewo. Aby zatrzymać pr zechylanie w żądanej pozycji, wystarczy ponownie wcisnąć przycisk.
KONSERWACJ
- Przed prz ystąpieniem do czyszczenia należy zawsze wyjąć wtyczkę
z gniazdka wtyczkowego.
- Należy regularnie czyścić kratki wlotowe i wylotowe powietrza.
- Do cz yszczenia urządzenia nie należy nigdy stosować proszków ani
rozpuszczalników.
WAŻNE INFORMACJE DOTYCZĄCE
BEZPIECZEŃSTWA
- Niniejsze urządzenie jest przeznaczone wyłącznie do użytku domowego.
- Nie używać urządzenia bezpośrednio w pobliżu instalacji prysznicowych, wanny, basenu, itp
- Urządzenie używać wyłącznie w pozycji pionowej.
- Urządzenia nie należy ustawiać bezpośrednio przy gniazdku zasilającym.
- Nie przykrywać działającego urządzenia w celu uniknięcia niebezpieczeństwa pożaru.
- Nie używać urządzenia do suszenia bielizny. Nie zasłaniać kratek
wlotowych i wylotowych powietrza (niebezpieczeństwo przegrzania).
- Nie należy pozwolić na korzystanie z urządzenia osobom (w tym
również dzieciom) o ograniczonych możliwościach psychicznych, fizycznych i ruchowych lub o niewystarczającym doświadczeniu i
wiedzy, chyba że są one uważnie nadzorowane i pouczone przez
osobę, która jest za nie odpowiedzialna. Należy pilnować, by dzieci
nie bawiły się urządzeniem.
- Urządzenie ustawiać w odległości 50 cm od mebli, ścian, zasłon i
innych przedmiotów.
- W przypadku używania urządzenia w wersji przenośnej, nie należy go ustawiać w pobliżu ścian, mebli, zasłon, itp.
- Nie należy stosować przedłużaczy. W razie konieczności ich użycia
należy starannie przestrzegać dołączonych do nich instrukcji zwracając uwagę, by nie przekroczyć limitu mocy podanego na
przedłużaczu.
- Jeżeli kabel zasilający jest uszkodzony, jego wymiany może dokonać jedynie producent, autoryzowany serwis techniczny lub wykwalifikowana osoba, aby zapobiec wszelkiemu niebezpieczeństwu.
- Nie należy stosować urządzenia w pomieszczeniu o powierzchni
mniejszej od 4m
2
.
Niektóre modele wyposażone są w specjalne urządzenie zabezpieczające, które powoduje wyłączenie termowentylatora w razie
jego przewrócenia.W celu ponownego włączenia wystarczy ustawić termowentylator w pozycji pionowej.
Bezpiecznik termiczny przerywa działanie termowentylatora w razie przypadkowego przegrzania (np. z powodu zatkania
kratek wlotowych i wylotowych powietrza, braku pracy silnika lub
zbyt wolnych obrotów). W celu ponownego włączenia urządzenia
należy wyjąć wtyczkę z gniazdka, odczekać kilka minut, wyeliminować przyczynę przegrzania, a następnie ponownie włożyć
wtyczkę do gniazdka.
ZALECENIE: aby zapobiec zagrożeniom związanym z przypadkowym
zresetowaniem bezpiecznika termicznego, urządzenia nie można
podłączać do zasilania przy pomocy zewnętrznego urządzenia
włączającego/wyłączającego, takiego jak regulator czasowy (timer), i
nie można go też podłączać do obwodu regularnie włączanego i wyłączanego przez dostawcę energii.
Ważne: Aby zapobiec przegrzaniu, w żadnym wypadku nie
należy przykrywać działającego termowentylatora, ponieważ
może to spowodować niebezpieczne przegrzanie urządzenia.
WAGA NETTO
Mod.: DCH5531= 1.8 kg - DCH5231= 1.7 kg
Składowanie urządzenia
Zgodnie z dyrektywą europejską 2002/96/WE, nie składować urządzenia wraz z nieposortowanymi odpadami komunalnymi, lecz dostarczyć do ocjalnego punktu segregacji
odpadów.
PL

17
ELEKTRISK TILKOBLING
- Før man setter innkontakten må man kontrollere nøye at
nettspenningen på stedet samsvarer med spenningen i
Volt V angitt på apparatets merkeskilt, samt at kontakten og tilførselsledningen er dimensjonert i forhold til
strømbehovet.
- DETTE APPARATET ER I OVERENSTEMMELSE MED EU-DIREKTIV 2004/108/CE OM ELEKTROMAGNETISK KOMPABILITET.
FUNKSJON OG BRUK
Kontrollere at apparatet er avslått før du setter støpselet i kontakten.
1. Sett støpselet i kontakten, varsellampen tennes.
2. Vri termostatbryteren helt til maks. posisjon.
3. Sommerfunksjon (bare vifting): still funksjonsvel-
geren på .
4. Funksjon på minste styrke: still funksjonsvelgeren på
1 (på modeller med to viftehastigheter er viftehastigheten på minimum).
5. Funksjon på medium styrke: Still funksjonsvelgeren
på 2 (på modeller med to viftehastigheter er viftehastigheten maksimal)
6. Funksjon på maks. styrke: still funksjonsvelgeren på 3
(maksimal viftehastighet).
7. Slå av: still funksjonsvelgeren på "0". Merk: På modeller med kun to styrkenivåer tilsvarer posisjo 2 maksimal
styrke.
Termostatregulering
Still termostaten på maksimal styrke, når du har oppnådd ønsket temperatur i rommer, vri termostatbryteren sakte mot urviserne helt til du hører et klikk (viften slås av). Temperaturen
vil automatisk holdes konstant av termostaten.
ANTIFRYS-FUNKSJON
Med funksjonsvelgeren på 3 og termostatbryteren på vil apparatet gi en temperatur på ca. 5°C, noe som hindrer at det
fryser med minimalt energiforbruk.
Modeller som kun har termostat
Apparatet slås på ved å vri termostatvelgeren mot høyre, helt
til den stanser opp i maks.posisjon. For å slå av apparatet vrir
man bryteren i mot urviserne til minimumsposisjon, og trekker deretter ut kontakten.
MODELLER MED ROTERENDE MOTORISERT SOKKEL
Noen modeller er ustyrt med en motorisert, roterende sokkel.
For å spre luftstrømmen til et større område, trykk på bryteren
på sokkelen. På denne måten dreier apparatet til høyre og venstre. For å stanse apparatet i ønsket posisjon tr ykker du bare på
bryteren igjen.
VEDLIKEHOLD
- Ta ut støpselet av stikkontakten før ethvert vedlikehold.
- Rengjør rillene for innslipp og utslipp av luft regelmessig.
- Bruk aldri slipemidler eller løsemidler for å rengjøre apparatet.
ADVARSLER
- Dette apparatet er kun beregnet for bruk i hjemmet.
- Ikke bruk apparatet like ved siden av dusjer, badekar,
svømmebasseng osv.
- Apparatet skal alltid stå i vertikal stilling.
- Apparatet må ikke plasseres direkte under en veggkontakt.
- Ikke bruk apparatet for å tørke tøy. Ikke tildekk rillene for
innslipp og utslipp av luft (fare for overoppheting).
- Ikke la apparatet brukes av personer (også barn), med
begrensede psykiske, fysiske og sansemessige evner, eller
med for liten erfaring eller kunnskap, med mindre de har
tilstrekkelig tilsyn og opplæring av en ansvarlig voksen,
som kan forebygge ulykker. Pass på at barn ikke leker
med apparatet.
- Forsiden av apparatet må plasseres minst 50 cm. Fra møbler, vegger, gardiner og andre gjenstander.
- Når apparatet brukes i bærbar konfigurasjon, ikke plasser
det i nærheten av vegger, møbler, gardiner osv.
- Vi anbefaler at du ikke bruker skjøteledninger. Hvis du
må det, følg bruksanvisingen som følger med skjøteledningen meget nøye, og ikke overstig styrken angitt på
skjøteledningen.
- Dersom den elektriske ledningen er blitt skadd må denne
byttes ut av produsenten eller av tekniske assistanse, eller
i allefall av en fagperson, slik at all risiko forebygges.
- Ikke bruk apparatet i er rom som er mindre enn 4 m
2
.
Noen modeller er ustyrt med en anti-velteinnretning som
slår av apparatet hvis det skulle velte. For å slå på apparatet igjen, er det nok å plassere det i riktig stilling.
Et termisk sikkerhetsinnretning avbryter funksjonen hvis en tilfeldig overoppheting skulle oppstå (f.eks.
ved tildekking av rillene for innslipp og utslipp av luft,
motor som ikke går eller som går sakte). For å gjeninnstille funksjonen, må du ta ut støpselet av stikkontakten
noen minutter, fjerne årsaken til overopphetingen og deretter sette støpselet i stikkontakten igjen.
ADVARSEL: For å unngå risiko knyttet til tilfeldig nullstilling
av sikkerhetsanordningen, må dette apparatet ikke få strømtilførsel fra en ekstern bryterkrets, for eksempel en tidsbryter,
og celler ikke til en krets som der strømforsyningen blir slått av
og på.
Viktig: For å unngå overoppheting må du ikke dekke
til apparatet på noen måte mens det er i bruk, fordi
dette vil føre til farlig temperturstigning.
NO

18
ELEKTRISK ANSLUTNING
- Kontrollera noggrant att nätspänningen motsvarar det
värde i volt (V) som anges på apparaten och att eluttaget
och elsladden är anpassade för belastningen i fråga innan du
sätter i stickproppen.
- DENNA APPARAT ÖVERENSSTÄMMER MED DIREKTIV
2004/108/EG OM ELEKTROMAGNETISK KOMPATIBILITET.
FUNKTIONSSÄTT OCH ANVÄNDNING
Kontrollera att apparaten är avstängd innan du sätter i
stickproppen i eluttaget.
1. Sätt i stickproppen i eluttaget.
2. Vrid termostatvredet till maximiläget.
3. Sommardrift (endast fläkt): sätt funktionsväljaren i läge
.
4. Drift med minimieffekt: sätt funktionsväljaren i läge 1
(på modeller med 2 fläkthastigheter går fläkten med den
lägsta hastigheten).
5. Drift med medeleffekt: sätt funktionsväljaren i läge 2
(på modeller med 2 fläkthastigheter går fläkten med den
högsta hastigheten).
6. Drift med maximieffekt: sätt funktionsväljaren i läge 3
(fläkten går med den högsta hastigheten).
7. Avstängning: sätt funktionsväljaren i läge 0. OBS: på mo-
deller med endast 2 effektlägen motsvarar läge 2 maximieffekten.
Inställning av termostaten
Sätt termostaten i maximiläget. Vrid den seadn långsamt motsols
tills du hör ett klick (fläkten stängs av) när önskad omgivningstemperatur har uppnåtts. Termostaten kommer då automatiskt att ställa in och bibehålla den temperatur som på så sätt har
fastställts.
FROSTSKYDDSFUNKTION
När funktionsväljaren står i läge 3 och termostaten i läge bibehåller fläkten en omgivningstemperatur på cirka 5 °C och förhindrar frost med en minimal energiförbrukning.
Modeller med endast termostat
Sätt på apparaten genom att vrida väljaren medsols till maximiläget. För att stänga av fläkten helt vrider du väljaren motsols till
minimiläget och drar sedan ut stickproppen ur uttaget.
MODELLER MED MOTORISERAT ROTERANDE UNDERREDE
Vissa modeller har motoriserade roterande underreden. Tryck ned
omkopplaren för att sprida luftströmmen över ett större område.
Fläkten förflyttar sig då från höger till vänster och tillbaka igen.
Tryck på omkopplaren igen för att stoppa den i önskat läge.
UNDERHÅLL
- Dra alltid ut stickproppen ur eluttaget innan du utför någon
form av rengöring.
- Rengör luftintagen och -utsläppen med jämna mellanrum.
- Använd aldrig rengöringsmedel med slipverkan eller lösningsmedel.
VARNINGAR
- Denna apparat är endast avsedd för hushållsbruk.
- Använd inte fläkten i omedelbar anslutning till duschar, badkar, simbassänger eller dylikt.
- Använd bara fläkten i vertikal position.
- Apparaten får inte placeras omedelbart under ett fast eluttag.
- Täck inte över fläkten när den är i drift, för att undvika brandrisk.
- Använd inte fläkten för att torka tvätt. Täpp inte till luftintagen och –utsläppen (risk för överhettning).
- Låt inte personer med reducerad psykisk, fysisk eller sensorisk förmåga eller otillräcklig erfarenhet och kunskap (däribland barn) använda apparaten utan noggrann övervakning
och ledning av en person som ansvarar för deras säkerhet.
Se till att barn inte leker med apparaten.
- Inom ett avstånd på 50 cm framför fläkten får det inte finnas möbler, väggar, gardiner eller andra föremål.
- Placera inte fläkten nära väggar, möbler, gardiner och dylikt
när den inte är fast monterad.
- Använd helst inte förlängningssladdar. Om du måste använda en förlängningssladd bör du noggrant följa instruktionerna för denna och se till att inte överskrida den
maximieffekt som anges på den.
- Om elsladden är skadad ska den för att undvika fara bytas
ut av tillverkaren, dennes serviceverkstad eller annan behörig person.
- Använd inte fläkten i rum som är mindre än 4 m
2
.
Vissa modeller är försedda med ett tippskydd som stänger
av apparaten om den faller. För att starta fläkten igen behöver du bara placera den i vertikal position.
En säkerhetsanordning stänger av värmefläkten vid
överhettning (t. ex. om luftintaget
eller–utsläppet är tilltäppt eller om motorn inte snurrar eller
snurrar långsamt). För att återställa funktionen måste du
dra ut stickproppen och vänta i några minuter, åtgärda orsakerna till överhettningen och sedan sätta i stickproppen
igen.
OBS: För att undvika risker till följd av att överhettningsskyddet
återställs av misstag får det inte finnas några externa omkopplare
(t. ex. en timer) för matarströmmen. Apparaten får inte heller anslutas till en krets som regelbundet sätts på och stängs av av elbolaget.
Viktigt: täck aldrig över apparaten när den är igång
eftersom detta kan orsaka en farlig temperaturhöjning.
Avfallshantering
I enlighet med EU-direktiv 2002/96/EG ska apparaten
inte kastas bland hushållssoporna, utan lämnas till en
återvinningscentral.
SV

19
TILSLUTNING TIL EL-NETTET
- Inden stikket sættes i stikkontakten kontrolleres omhyggeligt,
at den elektriske spænding i hjemmets elforsyning stemmer
overens med den volt-værdi (V) der angives på apparatet, og at
stikkontakten samt el-forsyningen har en kapacitet der svarer
til det forespurgte.
- DETTE APPARAT ER I OVERENSSTEMMELSE MED DIREKTIV
2004/108/EØF VEDRØRENDE ELEKTROMAGNETISK KOMPATIBILITET.
FUNKTION OG BETJENING
Kontrollér, at apparatet er slukket, inden stikket tages ud af
stikkontakten.
1. Sæt stikket i stikkontakten
2. Drej termostatknappen,indtil den står i maksimal position.
3. Sommerdrift (kun ventilation): Drej funktionsvælgeren til
position .
4. Drift med min. styrke: Drej funktionsvælgeren til position 1
(på modeller med 2 ventilationshastigheder er blæserens hastighed minimal).
5. Drift med gennemsnitshastighed: Drej funktionsvælgeren over til position 2 (på modeller med 2 ventilationshastigheder er blæserens hastighed maksimal).
6. Drift med max. styrke: Drej funktionsvælgeren til position 3
(maksimal ventilationshastighed).
7. Slukning: Drej funktionsvælgeren til position “0” . Bemærk:
På modeller med 2 styrker svarer position 2 til maksimal styrke.
Regulering af termostaten
Stil termostaten på maksimal position, når man har opnået den ønskede temperatur i rummet, drejes termostatknappen langsomt mod
uret, indtil der høres et klik (blæseren slukkes) . Temperaturen der
således er blevet fastsat, reguleres og holdes automatisk konstant af
termostaten.
ANTIFROST FUNKTION
Når funktionsvælgeren står i position 3 og termostatknappen i position , holder apparatet rummet opvarmet med en temperaturen
på ca. 5ºC og forhindrer således frostskader med et minimum energiforbrug.
Modeller kun med termostat
Apparatet tændes ved at dreje knappen i retning med uret indtil den
stopper i max. position. Apparatet slukkes helt ved at dreje knappen
mod uret over til min. position og derefter tage stikket ud af stikkontakten.
MODELLER MED MOTORDREVEN DREJESOKKEL
Nogle modeller er forsynet med en motorstyret drejesokkel.
For at fordele luftstrømmen ud over et større areal, trykkes der på afbryderen på soklen. Når apparatet er aktiveret på denne måde svinger det fra højre til venstre. For at stoppe svingningen og indstille
apparatet i en fast position behøver man blok trykke på tasten igen.
VEDLIGEHOLDELSE
- Før ethvert indgreb på apparatet trækkes stikket ud af stikkontakten.
- Rens jævnligt luftindsugnings- og udstødningsristene.
- Brug aldrig skurepulver eller opløsningsmidler til rengøring af
apparatet.
ADVARSLER
- Dette apparat må kun anvendes i en almindelig husholdning.
- Apparatet må ikke anvendes i nærheden af brusebad, badekar,
svømmebassiner o.l.
- Brug altid kun apparatet i opretstående stilling.
- Apparatet må ikke placeres umiddelbart under en fast stikkontakt.
- På grund af brandfare må apparatet under ingen omstændigheder tildækkes mens det er i brug.
- Brug aldrig apparatet til at tørre tøj på. Dæk aldrig luftindsugnings- og udstødningsristene til (risiko for overophedning).
- Sørg for, at apparatet ikke anvendes af personer (derunder
børn) med nedsatte psykiske, fysiske og sensoriske evner eller
med utilstrækkelig erfaring eller kendskab, med mindre en ansvarlig person overvåger og vejleder dem og derved opretholder sikkerheden. Hold øje med børnene, og sørg for, at de ikke
leger med apparatet.
- Foran apparatet bør der være mindst 50 cm afstand til møbler,
vægge, gardiner og andre genstande.
- Når apparatet benyttes transportabelt, bør det aldrig placeres
i nærheden af vægge, møbler, gardiner o.l.
- Det frarådes at bruge forlængerledning. Hvis brug af disse skulle
blive nødvendig, rådes der til omhyggeligt at følge instruktio nerne der følger med disse. Vær opmærksom på ikke at overskride den effekt grænse der er angivet på forlængerledningen.
- Hvis el-ledningen er beskadiget, skal den udskiftes af fabrikanten eller af et af dennes tekniske servicecentre eller i alle
tilfælde af en faguddannet person for at undgå enhver form
for fare.
- Brug ikke apparatet i rum med et gulvareal på mindre end 4m.
Nogle modeller er forsynet med en antikip-anordning, der slukker apparatet, hvis det vælter.For at tænde for apparatet igen,
er det tilstrækkeligt at rejse det op igen.
En varmesikring afbryder varmeblæserens drift, hvis den
fejlagtigt bliver overophedet (f.eks. tilstopning af indsugningseller udblæsningsristene, motoren der ikke kører eller kører langsomt). For at tænde for apparatet igen, skal du tage stikket
ud af stikkontakten og lade apparatet køle af i et par minutter,
fjern årsagen til overophedningen, og sæt stikket i stikkontakten igen.
ADVARSEL: For at undgå farer forbundet med hændelig tilbagestilling af sikkerhedsanordningerne, må dette apparat ikke fødes vha. en
ekstern tænde-/slukkeanordning, såsom en timer, og det må heller
ikke forbindes til en kreds, som energiforsyningsselskabet tænder og
slukker med jævne mellemrum.
Vigtigt: For at undgå overophedning må man under ingen
omstændigheder dække apparatet til mens den er tændt,
da dette vil forårsage en farlig forøgelse af temperaturen.
Bortskaelse af apparatet
I medfør af EU-direktivet 2002/96/EF må apparatet ikke
bortskaes sammen med husholdningsaaldet, det skal
derimod aeveres til et godkendt indsamlingscenter.
DA

20
SÄHKÖKYTKENTÄ
- Tarkista huolellisesti ennen pistokkeen asettamista pistorasiaan, että kotitalouden verkkojännite vastaa laitteessa tunnuksella Volt V ilmaistua arvoa ja että sähköpistoke ja- verkko
on mitoitettu tarvittavalle sähkökuormitukselle.
- TÄMÄ LAITE VASTAA SÄHKÖMAGNEETTISTA YHTEENSOPIVUUTTA
KOSKEVAN EU-DIREKTIIVIN 2004/108 VAATIMUKSIA.
TOIMINTA JA KÄYTTÖ
Tarkista ennen pistokkeen asettamista pistorasiaan, että
laite on sammutettuna.
1. Aseta pistoke pistorasiaan.
2. Käännä lämmönsäätimen nuppia aina maks. asentoon saakka.
3. Kesäkäyttö (vain tuuletus): käännä toiminnon valitsin asen-
toon .
4. Toiminta minimiteholla: käännä toiminnon valitsin asentoon 1 (kahdella tuuletusteholla varu stetuissa malleissa tuuletinlämmittimen nopeus on minimi).
5. Toiminta keskiteholla: käännä toiminnon valitsin asentoon
2 (kahdella tuuletusteholla varustetuissa malleissa tuuletinlämmittimen nopeus on maksimi)
6. Toiminta maks. teholla: käännä toiminnon valitsin asentoon
3 (maksimi tuuletusteho).
7. Sammutus: käännä toiminnon valitsin asentoon “0”. Huom:
Kahdella tehotasolla varustetuissa malleissa asento 2 vastaa
maksimitehoa.
Lämmönsäätimen käyttö:
Aseta lämmönsäädin maksimiasentoon ja kun huoneilma on saavuttanut toivomasi lämpötilan, käännä nuppia hitaasti vastapäivään
aina siihen saakka, kunnes kuulet naksahduksen (tuuletin sammuu).
Lämmönsäädin pitää näin säädetyn lämpötilan automaattisesti
muuttumattomana.
JÄÄTYMISEN ESTO
Aseta toiminnon valitsin asentoon 3 ja lämmönsäätimen nuppi asentoon , jolloin laite säilyttää huoneen lämpötilan noin 5°C lämpöasteessa. Näin jäätymiseltä vältytään jo erittäin pienellä
virrankulutuksella.
Vain lämmönsäätimellä varustetut mallit
Voit panna lämmittimen päälle kääntämällä nuppia myötäpäivään
aina maksimiasentoon saakka. Käännä nuppia vastapäivään minimiasentoon saakka, kun haluat sammuttaa lämmittimen ja irrota pistoke tämän jälkeen pistorasiasta.
MOOTTOROIDULLA ALUSTALLA VARUSTETUT MALLIT
Jotkin mallit on varustettu kiertävällä moottoroidulla alustalla.
Paina alustalla olevaa katkaisinta, mikäli haluat ilman virtaavan laajemmalle alueelle. Näin laite alkaa kiertämään oikealta vasemmalle
ja takaisin. Voit pysäyttää kier totoiminnon haluamaasi asentoon yksinkertaisesti painamalla katkaisinta uudelleen.
HUOLTO
- Irrota pistoke pistorasiasta ennen minkään puhdistustoimenpiteen aloittamista.
- Puhdista ilman syöttö- ja poistoritilät säännöllisesti.
- Älä puhdista laitetta koskaan hankaavilla jauheilla tai liuottimilla.
VAROITUKSIA
- Laite on tarkoitettu vain kotitalouskäyttöön.
- Älä käytä tuuletinlämmitintä kylpyammeiden, suihkujen, uimaaltaiden jne. läheisyydessä.
- Älä asenna laitteita suoraan kiinteän sähköpistorasian alapuolelle.
- Käytä tuuletinlämmitintä aina yksinomaan pystysuorassa asennossa.
- Älä koskaan peitä laitetta millään tavoin toiminnan aikana. Tulipalon vaara.
- Älä käytä laitetta pyykin kuivaukseen tai tuki millään tavoin
ilman syöttö- ja poistoritilöitä (ylikuumenemisen vaara).
- Älä anna psyykkisesti, fyysisesti tai muutoin laitteen käyttöön
kykenemättömien, kokemattomien tai laitteen ominaisuuksia
tuntemattomien henkilöiden (tai lasten), käyttää laitetta, ellei
laitteen käyttö tapahdu kyseisten henkilöiden turvallisuudesta
vastaavien henkilöiden tarkassa valvonnassa. Varmista, etteivät
lapset pääse leikkimään laitteella.
- Varmista, ettei laitteen edessä ole huonekaluja, seiniä, verhoja
tai muita kohteita 50 cm etäisyydellä.
- Älä aseta kannettavaa laitemallia seinien, huonekalujen, verhojen jne. läheisyydessä.
- Emme suosittele jatkojohtojen käyttöä. Mikäli jatkojohdon
käyttö on välttämätöntä, noudata huolellisesti johdon mukana
tulleita ohjeita ja varmista, ettet ylitä jatkojohdolle merkittyä
tehorajaa.
- Anna rikkoutuneen verkkojohdon vaihto ainoastaan valmistajan, sen valtuuttaman teknisen huoltoliikkeen tai ammattitaitoisen henkilön suoritettavaksi. Näin vältyt turhilta riskeiltä.
- Älä käytä tätä laitetta tiloissa, joiden pinta-ala on alle 4 m
2
.
Jotkin mallit on varustettu turvalaitteella, joka pysäyttää laitteen toiminnan välittömästi sen mahdollisen kumoon kaatumisen yhteydessä. Voit käynnistää lämmittimen uudelleen
yksinkertaisesti asettamalla sen uudelleen pystyasentoon.
Lämpöturvalaite sammuttaa laitteen mahdollisen tahattoman ylikuumenemisen yhteydessä (esim. ilman syöttö- ja
poistoritilöiden tukkeutumisen, moottorin hitaan käynnin tai
sammumisen yhteydessä). Irrota tässä tapauksessa pistoke pistorasiasta muutaman minuutin ajaksi, poista ylikuumenemisen aiheuttanut syy ja aseta pistoke takaisin pistorasiaan.
VAROITUS: Lämpöturvalaitteen moitteettoman toiminnan kannalta
on tärkeää, ettei lämmittimen kanssa käytetä ulkoisia
käynnistys/sammutuslaitteita, kuten esim. ajastinta. Sitä ei saa
tämän lisäksi kytkeä sähköpiiriin, jonka sähkövirta kytketään jatkuvasti päälle tai pois päältä.
Tärkeää: Varmista, ettei laite pääse kuumenemaan liikaa.
Älä koskaan peitä laitetta millään tavoin toiminnan aikana,
sillä tämä saattaisi nostaa sen lämpötilan vaarallisen korkeaksi.
Laitteen hävitys
Euroopan unionin direktiivin 2002/96 mukaisesti laitetta
ei saa hävittää tavallisten kotitalousjätteiden tapaan,
vaan se on toimitettava valtuutettuun kierrätyskeskukseen.
FI

21
PRIKLJUČIVANJE NA ELEKTRIČNU MREŽU
- Prije nego ukopčate uređaj u napajanje, pažljivo provjerite
odgovara li napon vaše mreže vrijednosti u voltima (V) označenoj na uređaju, te jesu li utičnica i linija napajanja dimenzionirane za predviđeno opterećenje.
- OVAJ UREĐAJ U SKLADU JE S DIREKTIVOM 2004/108/CE O
ELEKTROMAGNETSKOJ KOMPATIBILNOSTI.
NAČIN RADA I UPORABA
Prije ukopčavanja utikača u struju provjerite je li uređaj
isključen.
1. Ukopčajte utikač u struju.
2. Okrenite regulator termostata do maksimalnog položaja.
3. Ljetni način rada (samo ventilacija): okrenite dugme za
odabir funkcija u položaj .
4. Grijanje manjom snagom: okrenite dugme u položaj 1
(kod modela opremljenih s 2 brzine ventilatora brzina će biti
manja).
5. Grijanje srednjom snagom: okrenite dugme u položaj 2
(kod modela opremljenih s 2 brzine ventilatora brzina će biti
veća)
6. Grijanje punom snagom: okrenite dugme u položaj 3.
(veća brzina ventiliranja)
7. Isključivanje: okrenite dugme za odabir funkcija u položaj
“0”. Napomena: kod modela opremljenih s 2 razine snage,
položaj 2 odgovara najvećoj snazi.
Podešavanje termostata
Postavite termostat u maksimalni položaj, kad je u prostoriji postignuta željena temperatura pažljivo okrenite dugme termostata
u smjeru suprotnom od kazaljke na satu dok se ne čuje 'klik' (ventilator će se isključiti). Tako podešenu temperaturu termostat će
automatski regulirati i održavati.
FUNKCIJA ZAŠTITE OD SMRZAVANJA
Okrenite dugme za odabir funkcija u položaj 3, zatim postavite
regulator termostata u položaj . Tako će uređaj održavati temperaturu prostora na oko 5° C sprječavajući smrzavanje uz minimalnu potrošnju energije.
Modeli samo s termostatom
Uređaj se uključuje okretanjem dugmeta u smjeru kazaljke na
satu dok se ne zaustavi u krajnjem položaju; da biste potpuno
isključili uređaj okrenite dugme termostata u smjeru suprotnom
od kazaljke na satu u najmanji položaj, zatim iskopčajte uređaj iz
napajanja.
MODELI S POKRETNIM MOTORNIM POSTOLJEM
Neki modeli opremljeni su pokretnim motornim postoljem.
Da biste strujanje zraka usmjerili na šire područje pritisnite prekidač na postolju. Aktiviran na taj način, uređaj će se okretati udesno i ulijevo. Da biste zaustavili okretanje jednostavno pritisnite
prekidač.
ODRŽAVANJE
- Prije čišćenja grijalice uvijek izvucite utikač iz struje.
- Redovito čistite rešetke za ulaz i izlaz zraka.
- Nemojte koristiti abrazivna sredstva ili otopine za čišćenje
uređaja.
UPOZORENJA
- Ovaj uređaj namijenjen je isključivo za uporabu u domaćinstvu.
- Nemojte koristiti uređaj blizu tuša, kade, umivaonika, bazena itd.
- Uvijek koristite grijalicu u uspravnom položaju.
- Uređaj se ne smije postaviti izravno ispod fiksne utičnice.
- Ne pokrivajte uređaj dok radi da biste izbjegli opasnost od
požara.
- Nemojte koristiti uređaj za sušenje rublja, ne stavljajte ništa
na rešetke za ulaz i izlaz zraka (zbog opasnosti od pregrijavanja).
- Ne dozvolite da uređaj upotrebljavaju osobe (ili djeca) smanjenih psihofizičkih sposobnosti ili s nedovoljnim iskustvom
i znanjem, ako ih pažljivo ne nadziru i daju im upute osobe
zadužene za njihovu sigurnost. Nadzirite djecu, pazeći da se
ne igraju uređajem.
- Grijalica treba stajati najmanje 50 cm od namještaja, zidova,
zavjesa i drugih predmeta.
- Kad se uređaj koristi kao prijenosna grijalica, ne stavljajte
ga uz zidove, namještaj, zavjese itd.
- Ne savjetuje se uporaba produžnih kablova. Ako je neophodna, slijedite upute priložene uz produžni kabel, pazeći
da ne prekoračite razinu snage označene na kablu.
- Ako je kabel za napajanje oštećen, mora ga zamijeniti proizvođač, ovlašteni servisni centar ili kvalificirani stručnjak,
kako bi se izbjegla svaka opasnost.
- Nemojte koristiti uređaj u prostorijama manjim od 4 m
2
.
Neki modeli opremljeni su uređajem protiv prevrtanja koji
isključuje uređaj u slučaju pada. Da biste ponovno pokrenuli
rad grijalice dovoljno je staviti je u vertikalni položaj.
Grijalica je opremljena sigurnosnim termičkim
uređajem koji će je isključiti u slučaju pregrijavanja (npr. kod
otežanog protoka zraka kroz rešetke za ulaz i izlaz zraka,
sporog ili zaustavljenog rada motora). Kako biste ponovo
pokrenuli rad grijalice, isključite je iz napajanja na nekoliko
minuta, otklonite uzrok pregrijavanja i ponovno uključite
uređaj u struju.
UPOZORENJE: da biste izbjegli opasnosti vezane uz slučajno aktiviranje sigurnosnog uređaja, uređaj ne smijete napajati pomoću
vanjskog uređaja za uključivanje/isključivanje kao što je tajmer,
niti spajati na mrežu koja se redovito uključuje i isključuje iz napajanja električnom energijom.
Važno: Da ne bi došlo do pregrijavanja ni u kojem
slučaju nemojte pokrivati uređaj tijekom rada, jer bi
moglo doći do opasnog povećanja temperature.
HR

22
PRIKLJUČITEV NA ELEKTRIČNO OMREŽJE
- Preden vtič aparata priključite v električno vtičnico, natančno
preverite, da napetost hišne napeljave ustreza vrednosti v voltih (V), ki je označena na aparatu in da je omrežna napeljava
primerna zahtevani moči.
- TA APARAT JE IZDELAN V SKLADU Z DIREKTIVE 2004/108/ES O
ELEKTROMAGNETNI ZDRUŽLJIVOSTI.
DELOVANJE IN UPORABA
Preden vtikač vklopite v električno omrežje preverite, da je
aparat izklopljen.
1. Vtikač priklopite v vtičnico.
2. Zasučite gumb termostata vse do maksimalnega položaja.
3. Delovanje v poletnem času (samo ventilator): obrnite se-
lektor funkcij v položaj .
4. Ogrevanje z minimalno močjo: obrnite selektor funkcij v po-
ložaj 1 (pri modelih na 2 hitrosti ventilatorja je hitrost slednjega
minimalna).
5. Delovanje s srednjo močjo: selektor funkcij obrnite v položaj
2 (pri modelih na 2 hitrosti ventilatorja je hitrost slednjega maksimalna)
6. Delovanje z maksimalno močjo: selektor funkcij obrnite v
položaj 3 (hitrost ventilatorja je maksimalna).
7. Izklop: selektor funkcij obrnite v položaj “0”.
Opomba: pri modelih, ki imajo samo 2 stopnji moči, položaj 2
pomeni največjo moč.
Nastavitev termostata
Termostat postavite v najvišji položaj. Ko je v prostoru dosežena želena
temperatura, gumb termostata počasi obrnite v nasprotni smeri urinih kazalcev, dokler ne zaslišite klik (ventilator se ustavi). Na ta način
nastavljeno temperaturo bo termostat vzdrževal samodejno.
FUNKCIJA PROTI ZMRZOVANJU
Ko je selektor funkcij v položaju 3, gumb termostata pa v položaju
, se v prostoru vzdržuje temperatura približno 5°C. S tem pri minimalni porabi energije preprečimo, da v prostoru prihaja do zmrzovanja.
Model samo s termostatom
Aparat se vključi z zasukom gumba v smeri urinega kazalca dokler se
ne ustavi na maksimalnem položaju. Če želite aparat povsem izključiti, obrnite gumb termostata v nasprotni smeri urinih kazalcev na
minimalno vrednost in izključite vtič iz električne vtičnice.
MODELI Z MOTORIZIRANIM PODSTAVKOM
Nekateri modeli so opremljeni z motoriziranim vrtljivim podstavkom.
Za razširjanje zračnega toka na večje območje, pritisnite stikalo na
podstavku.
Po aktiviranju bo aparat nihal levo in desno.
S ponovnim pritiskom na tipko nihanje ustavite v želenem položaju.
VZDRŽEVANJE
- Pred kakršnimkoli postopkom čiščenja vedno izvlecite vtič iz
električne vtičnice.
- Redno čistite vstopne in izstopne rešetke za zrak.
- Za čiščenje aparata nikoli ne uporabljajte grobih čistilnih sredstev ali topil.
OPOZORILA
- Ta aparat je namenjen izključno za uporabo v gospodinjstvu.
- Aparata ne postavljajte v bližino tuš kabin, kopalnih kadi, umivalnikov, ipd.
- Aparat uporabljajte izključno v vertikalnem položaju.
- Aparat ne sme biti nameščen neposredno pred električno
vtičnico.
- Aparata med delovanjem ne pokrivajte, ker lahko pride do nevarnosti požara.
- Aparata ne uporabljajte za sušenje perila; ne pokrivajte vstopnih in izstopnih rešetk za zrak, ker lahko pride do pregretja aparata.
- Uporabo aparata ne dovolite osebam (tudi otrokom) z omejenimi psihofizičnimi in senzoričnimi sposobnostmi ali z nezadostnim znanjem in izkušnjami, razen če jih pozorno nadzira in
jim svetuje za njihovo varnost odgovorna oseba. Otroke nadzirajte, da se z aparatom ne bi igrali.
- Na razdalji 50 cm pred aparatom ne sme biti pohištva, zidov,
zaves ali drugih predmetov.
- Če aparat uporabljate v prenosni konfiguraciji, ga ne smete postaviti k steni, pohištvu, zavesam, itd.
- Uporaba podaljškov ni priporočljiva. Če se temu ni mogoče izogniti, jih priključite v skladu z navodili, priloženimi samemu podaljšku, pri tem pa pazite, da ne boste presegli vrednosti moči,
ki je označena na podaljšku.
- Če je napajalni kabel poškodovan, ga mora zamenjati proizvajalec, pooblaščeni servis ali vsekakor usposobljena oseba, da se
tako izognete morebitnim nevarnostim.
- Aparata ne uporabljajte v prostoru, katerega površina je manjša
od 4 m
2
.
Nekateri modeli so opremljeni z napravo proti prevrnitvi, ki v
primeru padca aparat izklopi. Ko bo aparat znova v vertikalnem
položaju, bo ponovno pričel delovati.
V primeru slučajnega pregrevanja aparata bo toplotni varnostni mehanizem prekinil delovanje slednjega (na primer pokrite vstopne in izstopne rešetke za zrak, motor ne deluje ali se
vrti upočasnjeno). Za ponovno vključitev aparata je potrebno
za nekaj minut izvleči vtič iz električne vtičnice, odpraviti vzrok
pregrevanja, nato pa vtič ponovno priključiti v vtičnico.
OPOZORILO: za preprečitev nevarnosti v zvezi z nenamernim vklopom varnostnega toplotnega mehanizma, se ta aparat ne sme priklopiti na napajanje prek zunanje naprave za vklop/izklop kot na
primer timer, niti povezati na napeljavo, ki jo praviloma vklopi dobavitelj energije.
Pomembno: za preprečitev pregrevanja v nobenem primeru ne pokrivajte aparata, kadar ta deluje, ker lahko pride
do nevarnega zvišanja temperature aparata.
Odstranitev aparata
Skladno z Evropsko direktivo 2002/96/ES aparat ne smete
odstraniti skupaj z gospodinjskimi odpadki, ampak ga
morate izročiti pooblaščenemu centru za ločeno zbiranje
odpadkov.
SI

23
СВЪРЗВАНЕ КЪМ ЕЛЕКТРИЧЕСКАТА МРЕЖА
- Преди да включите щепсела в контакта, проверете внимателно
дали напрежението на вашата битова мрежа съответства на стойността във волтове (V), указана върху уреда и дали контактът и захранващата мрежа са оразмерени за това натоварване.
- УРЕДЪТ СЪОТВЕТСТВА НА ДИРЕКТИВА 2004/108/CE ЗА ЕЛЕКТРОМАГНИТНА СЪВМЕСТИМОСТ.
РАБОТА И УПОТРЕБА
Проверете дали уредът е изключен, преди да включите щепсела в контакта.
1. Включете щепсела в контакта.
2. Завъртете термос тата в максимално положение.
3. Летен режим на работа (с амо вентилация): Завъртете пре-
включвателя за избор на работна функция в положение .
4. Работа при минимална мощност: Завъртете превключвателя
за избор на работна функция в положение 1(за модели с 2 скорости на вентилация скоростта на вентилатора е минимална).
5. Работа при средна мощност: завъртете превключвателя за
избор на работна функция в положение 2(при модели с 2 скорости на вентилация скоростта на вентилатора е максимална).
6. Работа при максимална мощност: Завъртете превключва-
теля за избор на работна функция в положение 3 (максимална
скорост на вентилация).
7. Изключване: Завъртете превключвателя за избор на работна
функция в положение “0”. Забележка: При модели само с 2 степени на мощност положение 2 съответства на максимална мощност.
Регулиране с термостата
Поставете термостата в максимално положение, и когато помещението
достигне желаната температура завъртете бавно термостата в посока,
обратна на часовниковата стрелка, докато чуете щракване (вентилаторът се изк лючва). Фиксираната по този начин температура ще се регулира и автоматично ще се поддържа постоянна от термостата
ФУНКЦИЯ ПРОТИВ ЗАМРЪЗВАНЕ
С превключвател за избор на работна функция в положение 3 и термостат в положение , уредът поддържа в помещението температура
около 5°C, като по този начин се предотвратява замръзването при минимален разход на енергия.
Модели само с термостат
Уредът се вк лючва със завъртане на термостата в посока на часовниковата стрелка до максимално положение. За да спрете напълно уреда,
завъртете термостата в посока, обратна на часовниковата стрелка, до
минимално положение, след което изключете щепсела от контакта.
МОДЕЛИ С МЕХАНИЧНО ВЪРТЯЩА СЕ ОСНОВА
Някои модели са снабдени с моторизирана въртяща се основа.
За разпространяване на въздушния поток в по-голямо помещение натиснете педала в основата на уреда. Задействаният по-този начин уред
ще се върти наляво и надясно. За да спрете въртенето в желаното положение, достатъчно е да натиснете бутона.
ПОДДРЪЖКА
- Преди всяко почис тване на уреда изключвайте щепсела от електрическия контакт.
- Редовно почиствайте изходящите и входящи решетки за въздуха.
- Никога не използвайте абразивни прахове или разтворители за
почистване на уреда.
ПРЕДУПРЕЖДЕНИЯ
- Този уред е предназначен само за домашна употреба.
- Не използвайте уреда в непосредствена близос т до душове, вани,
басейни и др.
- Винаги използвайте уреда само във вертикално положение.
- Уредът не трябва да се поставя непосредствено под неподвижен
електрически контакт.
- По време на работа не покривайте уреда, за да избегнете риск от
пожар.
- Не използвайте уреда за сушене на пране. Не запушвайте решетките на входа и изхода на въздуха (има опаснос т от прегряване).
- Не допускайте употреба на уреда от хора (и деца) с намалени психофизически и сензорни възможности или с недостатъчен опит и
познания, освен ако не са внимателно наблюдавани и обучени от
отговорно за тяхната безопасност лице. Наглеждайте децата и се
уверете, че не играят с уреда.
- На разстояние 50 см пред уреда не трябва да има мебели, стени,
завеси или други предмети.
- Когато уредът се използва в преносим вариант, той не трябва да
се разполага в близост до стени, мебели, щори и др.
- Не се препоръчва употребата на удължите ли. Когато тяхната употреба е наложителна, следвайте внимателно инструкциите, приложени към удължителя, като внимавате да не надвишите
пределната мощност, отбелязана върху удължителя.
- Ако захранващият кабел е повреден, той трябва да бъде заменен
от производителя или от негов сервиз за техническо обслужване,
или от квалифициран персонал, за да се избегне всякакъв риск.
- Не употребявайте уреда в помещения с основна площ по-малка
от 4 кв.м.
Някои модели са снабдени с устройство против преобръщане,
което незабавно изключва уреда в случай на падане. За да включите пак уреда, е достатъчно да го поставите отново във вертикално положение. Термозащитната функция прекъсва
работатана термовентилатора в случай на внезапно прегряване
(напр. запушване на решетките на входа и на изход а на въздух а;
двигател, който не работи или работи бавно). За възобновяване на
работата е необходимо да извадите щепсела от контакта за няколко минути, да отстраните причината за прегряването, с лед
което отново да включите щепсела.
ПРЕДУПРЕЖДЕНИЕ: за избягване на риска, свързан с деблокиране на
защитния механизъм, този уред не трябва да се захранва чрез външно
приспособление за включване/изключване като таймер, нито пък
трябва да се свързва към захранване, което често се включва и изключва от доставчика на електроенергия.
Важно: За да избегнете прегряване, не покривайте в никакъв
случай уреда по време на работа, защото това ще предизвика
опасно увеличаване на температурата.
Изхвърляне на уреда
Съгласно Европейска директива 2002/96/EО уредът не
трябва да се изхвърля с битовите отпадъци, а да се предаде
в оторизиран пункт за разделно събиране.
BG

24
RACORDAREA ELECTRICĂ
- Înainte de a introduce ştecherul în priza de curent verificaţi cu multă
atenţie dacă voltajul reţelei dvs. domestice corespunde cu valoarea în (Volt) V indicată pe aparat şi dacă priza de curent şi linia de
alimentare sunt dimensionate cu sarcina cerută.
- ACEST APARAT ESTE CONFORM CU DIRECTIVA 2004/108/CEE PRIVIND COMPATIBILITATEA ELEC TROMAGNETICĂ.
FUNCŢIONAREA ŞI FOLOSIREA
Verificaţi ca aparatul să fie stins înainte de a introduce ştecherul în priza de curent.
1. Introduceţi ştecherul în priza de curent.
2. Rotiţi butonul termostatului până va ajunge la poziţia maximă.
3. Serviciu de vară (doar ventilaţie): rotiţi selectorul de funcţiuni
în poziţia .
4. Funcţionarea la puterea min.: rotiţi selectorul de funcţiuni în
poziţia 1 (la modelele dotate cu 2 viteze de ventilaţie viteza ventilatorului este minimă).
5. Funcţionarea la puterea med.: rotiţi selectorul de funcţiuni în
poziţia 2 (la modelele dotate cu 2 viteze de ventilaţie viteza ventilatorului este maximă).
6. Funcţionarea la puterea max.: rotiţi selectorul de funcţiuni în
poziţia 3 (viteză de ventilaţie maximă).
7. Stingerea: rotiţi selectorul de funcţiuni în poziţia”0”. Notă: La
modelele dotate cu numai 2 nivele de putere, poziţia 2 corespunde
cu puterea maximă.
Reglarea termostatului
Poziţionaţi termostatul pe poziţia maximă, atunci când mediul ambiant
va ajunge la temperatura dorită, rotiţi încet butonul termostatului în sensul acelor de ceasornic până când se va auzi un declic (ventilatorul se va
stinge).
Temperatura astfel fixată va fi reglată în mod automat şi menţinută constantă de termostat.
FUNCŢIUNEA ANTIÎNGHEŢ
Cu selectorul de funcţiuni în poziţia 3, iar butonul termostatului în poziţia
, aparatul menţine mediul ambiant la o temperatură de circa 5°C,
împiedicând congelarea cu o cheltuială minimă de energie.
Modelele doar cu termostat
Aparatul se aprinde rotind butonul în sensul acelor de ceasornic până la
oprirea în poziţia maximă, pentru stingerea completă a aparatului rotiţi
butonul în sens invers acelor de ceasornic şi apoi scoateţi ştecherul din
priza de curent.
MODELE CU BAZĂ ROTATIVĂ MOTORIZATĂ
Anumite modele sunt dotate cu bază rotativă motorizată.
Pentru a difuza fluxul de aer într-un spaţiu mai mare apăsaţi pe între-
rupătorul de pe bază. Aparatul astfel activat va oscila la dreapta şi la
stânga. Pentru a opri oscilarea în poziţia dorită trebuie doar sa apăsaţi
din nou pe boton.
ÎNTREŢINEREA
- Înainte de orice operaţie de curăţire trebuie scos mereu ştecherul
din priza de curent.
- Curăţaţi în mod regulat grilele de intrare şi de ieşire a aerului.
- Nu folosiţi niciodată prafuri abrazive sau solvenţi pentru a curăţa
aparatul.
AVERTISMENTE
- Acest aparat este destinat excusiv pentru uzul casnic.
- Nu utilizaţi aparatul în imediata apropiere a duşurilor, căzilor de
baie, piscinelor, etc.
- Utilizaţi aparatul întotdeauna şi doar în poziţie verticală.
- Aparatul nu trebuie să fie aşezat imediat dedesubtul unei prize de
curent fixă.
- Nu acoperiţi aparatul în timpul funcţionării, pentru evitarea riscurilor de incendii.
- Nu folosiţi aparatul pentru uscarea rufelor. Nu obstruiţi grilele de
intrare şi de ieşire a aerului (pericol de supraîncălzire).
- Nu permiteţi folosirea aparatului de către persoane (chiar şi copii)
cu capacităţi psihico-fizico- senzoriale reduse, sau cu experienţă şi
cunoştinţe insuficiente, decât dacă sunt supravegheate cu atenţie
şi instruite de un responsabil al integrităţii lor. Supravegheaţi copiii, asigurându-vă că nu se joacă cu aparatul.
- Pe o distanţă de 50 cm în faţa aparatului nu trebuie să se găsească
mobile, pereţi, perdele sau alte obiecte.
- Atunci când aparatul este folosit în configurare portabilă, nu trebuie
să fie poziţionat lângă pereţi, mobile, perdele, etc.
- Nu se recomandă folosirea prelungitoarelor. În cazul în care folosi-
rea lor este absolut necesară, urmaţi cu atenţie instrucţiunile anexate prelungitorului, făcând atenţie să nu se depăşească limita de
putere înscrisă pe prelungitor.
- Dacă cablul de alimentare este avariat, acesta trebuie să fie înlocuit
de către constructor sau de serviciul său de asistenţă tehnică sau în
orice caz de o persoană calificată, astfel încât să se prevină orice fel
de riscuri.
- Nu utilizaţi acest aparat într-o încăpere a cărei suprafeţe să fie mai
mică de 4m
2
.
Anumite modele sunt dotate cu un dispozitiv antirăsturnare care
stinge aparatul în cazul căderii acestuia. Pentru a pune din nou în
funcţiune aparatul, este suficient să îl reaşezaţi în poziţia verticală.
Un dispozitiv termic de siguranţă întrerupe funcţionarea termoventilatorului în cazul unei supraîncălziri accidentale (de ex. ob-
struirea grilelor de intrare şi de ieşire a aerului, motorul care nu se
roteşte sau se roteşte încet). Pentru repunerea în funcţionare, este
necesar să se scoată ştecherul din priză pentru câteva minute, să se
elimine cauza supraîncălzirii, iar apoi să se reintroducă ştecherul.
AVERTISMENT: pentru a evita riscurile legate de reactivarea accidentală a dispozitivului termic de siguranţă, acest aparat nu trebuie să fie
alimentat printr-un dispozitiv de aprindere/stingere extern, cum ar fi un
timer şi nici să fie racordat la un circuit care să fie aprins sau stins în mod
regulat de către furnizorul de energie.
Important: Pentru a evita supraîncălzirea, nu trebuie să aco-
periţi în nici un caz aparatul în timpul funcţionării, întrucât acest
lucru ar provoca o creştere periculoasă a temperaturii.
Eliminarea aparatului
În conformitate cu directiva Europeană 2002/96/EC, nu aruncaţi aparatul împreună cu gunoiul domestic, ci duceţi-l la un
centru de colectare diferenţiată ocială.
RO

25
ELEKTRİK BAĞLANTISI
-Fişi prize takmadan önce ev şebekenizdeki voltaj değeri-
nin cihazda belirtilmiş V değerine karşılık geldiğini, akım
prizinin ve elektrik hatlarının talep edilen yükte boyutlandırılmış olduğunu kontrol edin.
- BU CİHAZ ELEKTROMANYETİK UYUM HAKKINDAKİ
2004/108/CE ELEKTROMANYETİK UYUM DİREKTİFİNE UYGUNDUR.
ÇALIŞTIRMA VE KULLANIM
Akım prizine fişi takmadan önce cihazın kapalı olduğunu tetkik edin
1. Fişi akım prizine takın.
2. Termostat manivelasını en yüksek pozisyona ulaşana
kadar çevirin
3. Yaz fonksiyonu (yalnız havalandırma): fonksiyon selektörünü pozisyonuna getirin.
4. Asgari kuvvette çalışma: fonskiyonlar selektörünü 1
pozisyonuna getirin (2 havalandırma hızı ile donatılmış
modellerde havalandırma hızı asgaridir).
5. Or ta kuvvette çalışma: fonskiyonlar selektörünü 2 po-
zisyonuna getirin (2 havalandırma hızı ile donatılmış modellerde havalandırma hızı azamidir).
6. A zami kuvvette çalışma: fonksiyon selektörünü 3pozisyonuna getirin (azami havalandırma hızı).
7. Kapatma: fonksiyon selektörünü “0” pozisyonuna geti-
rin. Not: Yalnızca 2 kuvvet seviyesi ile donatılmış modellerde pozisyon 2 azami kuvvete karşılık gelir.
Termostat ayarı
Termostatı azami pozisyona getirin, oda arzu edilen sıcaklık
seviyesine ulaştığında, termostat manivelasını saatin aksi istikametinden bir klik sesi duyuluncaya kadar yavaşça çevirin
(vantilatör kapanır). Böylelikle sabitlenen sıcaklık termostat
tarafından otomatik olarak ayarlanır ve sabit tutulur.
Antifriz fonksiyonu
Fonksiyon selektörü 3 pozisyonunda ve termostat manivelası
pozisyondayken , cihaz ortamı yaklaşık 5°C ısıda tutarak
azami bir enerji harcaması ile buzlanmayı önler.
YALNIZ TERMOSTATLI MODELLER
Cihazı çalıştırmak için termostat manivelasını saat yönünde
azami pozisyona ulaşıncaya kadar çevirin. Termostatı tamamen kapatmak için manivelayı asgari pozisyona kadar saatin
aksi istikametinde çevirin ve ardından fişi akım prizinden çekin.
MOTORİZE DÖNER KAİDELİ MODELLER
Bazı modellerde hareketli döner taban bulunmaktadır. Hava
akımını daha geniş bir alana yaymak için bu taban üzerindeki
düğmeye basın. Cihaz, bu şekilde çalıştırıldığında sağa ve sola
doğru hareket edecektir. Cihazın hareketini arzu edilen konumda durdurmak için düğmeye tekrar basmak yeterlidir.
BAKIM
- Herhangi bir temizlikten önce daima fişi elektrik prizin-
den çıkarınız.
- Hava giriş ev çıkış ızgaralarını düzenlik olarak temizleyin.
- Asla aşındırıcı toz deterjan ve çözücü maddeler kullanmayın.
UYARILAR
- Bu cihaz yalnızca domestik amaçlı kullanım içindir.
- Cihazı duş, banyo küveti, lavabo, havuzların vs. hemen
yakınında kullanmayın.
- Cihazı yalnızca dikey pozisyonda iken kullanın.
- Cihaz asla bir sabit akım prizinin hemen altına yerleşti-
rilmemelidir.
- Yangın riskini önlemek için cihazı çalışma safhasında örtmeyin.
- Cihazı çamaşır kurutmak için kullanmayın. Hava giriş ve
çıkış ızgarasını tıkamayın (aşırı ısınma tehlikesi).
- Cihazın düşük fiziksel-psikolojik-algısal kapasiteli (çocuklar dahil), deneyim ve bilgisi yetersiz kişiler tarafından
kullanımına, kendilerinden sorumlu kişilerin dikkatli
eğitimi ve gözetimi olmadığı takdirde, izin vermeyin.
Küçük çocukları, cihaz ile oynamadıklarından emin olmak
için izleyin.
- Cihazın önünde 50 cm mesafede mobilyalar ve diğer objeler bulunmamalıdır.
- Cihaz taşınır versiyonda kullanılırken, duvar, mobilyalar,
perdeler vs. arkasında çalıştırılmamalıdır.
- Uzatmalar kullanılması tavsiye edilmez. Eğer uzatma kullanımı gerekli ise, uzatmalar ile ilgili talimatları dikkatle
izleyin ve uzatma üzerinde işaretlenmiş kuvvet limitlerini aşmayın.
- Eğer elektrik kablosu hasarlı ise her türlü riski önlemek
için üretici veya kendi teknik servisi ya da eşdeğer bilgiye
sahip herhangi bir kişi tarafından değiştirilmelidir.
- Bu cihazı 4 m
2
den küçük taban alanlı odalarda kullanmayın.
Bazı modellerde, düşmesi halinde cihazı kapatan, devrilmeye karşı bir mekanizma bulunmaktadır. Cihazı yeniden çalıştırmak için dikey pozisyona getirmek yeterlidir.
Bir güvenlik aksamı beklenmedik bir ısı yükselmesi görüldüğünde termovantilatörün çalışmasını durdurur (ör,
hava giriş/çıkış ızgaralarının tıkanması, dönmeyen ya da
yavaşlayan motor). İşleyişi tekrar başlatmak için, fişi prizden birkaç dakikalığına çekmek, aşırı ısınma nedenini engellemek ve fişi tekrar takmak gerekir.
UYARILAR: güvenlik cihazının beklenmedik resetlenmesine
bağlı riskleri önlemek için, bu cihaz, timer gibi bağlandığı
zaman açılış ve kapanışı düzenli olarak enerji kaynağı tarafından yapılan, bir harici açma/kapama aksamı aracılığı ile
beslenmesi gereklidir.
ÖNEMLİ: Aşırı ısınmaları önlemek için, tehlikeli
sıcaklık artışlarına neden olacağından cihazı örtmeyin.
TR
 Loading...