Dbx goRack User Manual [ru]
PERFORMANCE PROCESSOR
Owner’s Manual

Warranty
1.Please register your product online at dbxpro.com. Proof-of-purchase is considered to be the responsibility of the consumer. A copy of the original purchase receipt must be provided for any warranty service.
2.dbx warrants this product, when purchased new from an authorized U.S. dbx dealer and used solely within the U.S., to be free from defects in materials and workmanship under normal use and service. This warranty is valid to the original purchaser only and is non-transferable.
3.dbx liability under this warranty is limited to repairing or, at our discretion, replacing defective materials that show evidence of defect, provided the product is returned to dbx WITH RETURN AUTHORIZATION from the factory, where all parts and labor will be covered up to a period of two years. A Return Authorization Number must first be obtained from dbx. The company shall not be liable for any consequential damage as a result of the product’s use in any circuit or assembly.
4.dbx reserves the right to make changes in design or make additions to or improvements upon this product without incurring any obligation to install the same additions or improvements on products previously manufactured.
5.The foregoing is in lieu of all other warranties, expressed or implied, and dbx neither assumes nor authorizes any person to assume on its behalf any obligation or liability in connection with the sale of this product. In no event shall dbx or its dealers be liable for special or consequential damages or from any delay in the performance of this warranty due to causes beyond their control.
Technical Support & Service
If you require technical support, contact dbx Technical Support. Be prepared to accurately describe the problem. Know the serial number of your device – this is printed on a sticker attached to the chassis.
Before you return a product to the factory for service, we recommend you refer to this manual. Make sure you have correctly followed installation steps and operating procedures. For further technical assistance or service, please contact our Technical Support Department at (801) 566-8800 or visit dbxpro.com. If you need to return a product to the factory for service, you MUST first contact our Technical Support Department to obtain a Return Authorization Number.
NO RETURNED PRODUCTS WILL BE ACCEPTED AT THE FACTORY WITHOUT A RETURN AUTHORIZATION NUMBER.
Please refer to the Warranty information, which extends to the first end-user. After expiration of the warranty, a reasonable charge will be made for parts, labor, and packing if you choose to use the factory service facility. In all cases, you are responsible for transportation charges to the factory. If the product is still under warranty, dbx will pay the return shipping.
Use the original packing material if it is available. Mark the package with the name of the shipper and with these words in red: DELICATE INSTRUMENT, FRAGILE! Insure the package properly. Ship prepaid, not collect. Do not ship parcel post.

Table of Contents
Overview 2
Introduction 2 Features 2
User Interface & Connectors 3
Top Panel 3 Rear Panel 4
Setup 5
Making Connections 5 Configuring The goRack’s Routing 6 Setting Initial System Levels 8
Operating The goRack 10
Master Volume 10 Output Limiter & Clipping 10 Anti-Feedback 11 Compressor 14 Subharmonic Synthesizer 16 EQ 18
Application Diagrams 22
Application 1: Speech/Presentation 22 Application 2: Solo Artist/Duo Performance 23 Application 3: Band Performance/DJ 24 Application 4: Using Powered Subwoofers 25
Technical Information 26
Audio Cable Diagrams 26 Specifications 27
Additional Resources 28
1

Overview
Introduction
The dbx® goRack™ is an easy-to-operate portable loudspeaker processor. Based on our industry-leading DriveRack® Series processors, the goRack sits next to a set of powered speakers and provides powerful signal processing, including
Anti-Feedback, Compression, Subharmonic Synthesis, and EQ. Each processing function can easily be enabled or disabled via the top-panel buttons, and settings can be adjusted via the goRack’s large rotary encoder.
The goRack can be used to provide loudspeaker processing in a conventional sound system by placing it between the mixer and powered speakers/amplifiers or as a stand-alone 2-channel mixer/loudspeaker processor, making it ideal for band rehearsal spaces, live performance of solo artists or duos, weddings, or speech/presentation applications.
The goRack’s rear panel houses combination 1/4” / XLR inputs that can be connected to either mixer outputs, or straight to instrument or microphone outputs. The Mic/Line switch on each input selects the proper input sensitivity while dual gain controls on the top panel provide independent level adjustment. The goRack’s stereo 1/8” Mini Aux Input allows for direct connection of a mobile device or portable music player. The XLR outputs allow for interfacing with powered speakers or stand-alone amplifiers.
The goRack represents the best of dbx’s DriveRack processing in its purest, most simplified form, all housed in a sleek, compact form factor that fits in your hand, or back pocket.
Thanks for choosing dbx.
Features
•48 kHz / 24-Bit Processing
•3 Routing Options (Dual Mono Sum, Stereo, & Advanced)
•Anti-Feedback Using dbx’s Proprietary Advanced Feedback Suppression Algorithm
•dbx Compression
•dbx Subharmonic Synthesis For Deep, Punchy Bass
•16 Selectable EQ Curve Presets
•2 Combination XLR / TRS Inputs (Selectable Between Mic or Line Level)
•Stereo 1/8” Aux Mini Input
•2 XLR Outputs
•Output Mute Button
•7-Segment Display
•Independent Mic / Line Input Level Controls
•Included Power Adapter
2
User Interface & Connectors
Top Panel
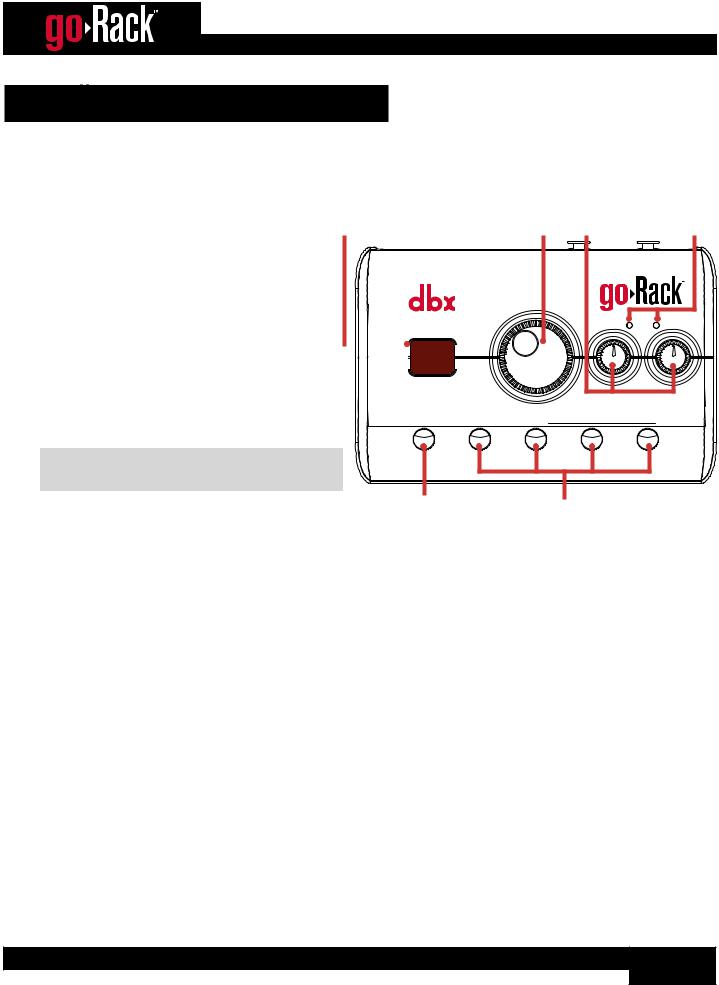
1. 7-Segment Display
This display shows selected options and processor settings.
2. VOLUME (EDIT) Encoder
This rotary encoder is used for adjusting the goRack’s output volume or for editing settings after pressing and holding any of the processor buttons.
3. LEFT / RIGHT Input Gain Knobs
Adjust these gains to optimize the signal levels for the main LEFT/RIGHT inputs. The MIC/ LINE switches on the rear panel should be set to the correct position for the application before adjusting these knobs.
NOTE: AUX INPUT signals are not affected by the Input Gain knobs.
1 |
2 |
3 |
4 |
VOLUME
(EDIT)


 90 90
90 90

MUTE |
ANTI-FEEDBACK |
COMPRESSOR |
|
MODE |
|
|
(HOLD) EDIT |
|
INPUT |
LEFT |
SIGNAL |
RIGHT |
|
SUB SYNTH |
EQ |
4. INPUT SIGNAL LEDs |
5 |
6 |
These multi-colored LEDs display the input signal level strength and available headroom.
•Green
Indicates signal is present.
•Orange
Indicates the signal level is approaching the headroom limit.
•Red
Indicates the input signal is clipping and the input gain should be reduced.
5.MUTE (MODE) Button
Pressing this button will mute/unmute the goRack’s outputs. Pressing and holding this button for 2 seconds enters Routing mode (indicated by a flashing LED), where you can select a routing option. See ‘Configuring The goRack’s Routing’ on page 6 for more information on the routing options available in the goRack.
6. Processor Buttons
Pressing each of these buttons will enable/disable the corresponding processor type (LED off = processor disabled, LED on = processor enabled). Pressing and holding each button for 2 seconds will enter Edit mode (indicated by a flashing LED), where the selected processor can be edited using the VOLUME (EDIT) encoder.
3

Rear Panel
1. LEFT / RIGHT Combination Input Jacks
Connect your mixer, microphone, or instrument outputs to these combination 1/4” / XLR input jacks. The input sensitivity of these jacks are set using the MIC/LINE switches next to each jack and the input gain can be adjusted using to the top-panel LEFT/RIGHT input gain knobs.
The input signals can be routed in stereo or mono summed to the output jacks. See ‘Configuring The goRack’s Routing’ on page 6 for
more information on the Routing modes available in the goRack.
2. MIC / LINE Switches
|
|
|
|
|
|
|
|
|
|
|
|
|
|
|
1 |
|
|
|
|
|
|
|
4 |
|
|
|
|
|
|
6 |
|
|
|
|
|
|
|
|
||||||||||||||||||
|
|
|
|
|
|
|
|
|
|
|
|
|
|
|
|
|
|
|
|
|
|
|
|
|
|
|
|
|
|
|
|
|
|
|
|
|
|
|
|
|
|
|
|
|
|
|
|
|
|
|
|
|
|
|
|
|
|
|
|
|
|
|
|
|
|
|
|
|
|
|
|
|
|
|
|
|
|
|
|
|
|
|
|
|
|
|
|
|
|
|
|
|
|
|
|
|
|
|
|
|
|
|
|
|
|
|
|
|
|
|
|
|
|
|
|
|
|
|
|
|
|
|
|
|
|
|
|
|
|
|
|
|
|
|
|
|
|
|
|
|
|
|
|
|
|
|
|
|
|
|
|
|
|
|
|
|
|
|
|
|
|
|
|
|
|
|
|
|
|
|
|
|
|
|
|
|
|
|
|
|
|
|
|
|
|
|
|
|
|
|
|
|
|
|
|
|
|
|
|
|
|
|
|
|
|
|
|
|
|
|
|
|
|
|
|
|
|
|
|
|
|
|
|
|
|
|
|
|
|
|
|
|
|
|
|
|
|
|
|
|
|
|
|
|
|
|
|
|
|
|
|
|
|
|
|
|
|
|
|
|
|
|
|
|
|
|
|
|
|
|
|
|
|
|
|
|
|
|
|
|
|
|
|
|
|
|
|
|
|
|
|
|
|
|
|
|
|
|
|
|
|
|
|
|
|
|
|
|
|
|
|
|
|
|
|
|
|
|
|
|
|
|
|
|
|
|
|
|
|
|
|
|
|
|
|
|
|
|
|
|
|
|
|
|
|
|
|
|
|
|
|
|
|
|
|
|
|
|
|
|
|
|
|
|
|
|
|
|
|
|
|
|
|
|
|
|
|
|
|
|
|
|
|
|
|
|
|
|
|
|
|
|
|
|
|
|
|
|
|
|
|
|
|
|
|
|
|
|
|
|
|
|
|
|
|
|
|
|
|
|
|
|
|
|
|
|
|
|
|
|
|
|
|
|
|
|
|
|
|
|
|
|
|
|
|
|
|
|
|
|
|
|
|
|
|
|
|
|
|
|
|
|
|
|
|
|
|
|
|
|
|
|
|
|
|
|
|
|
|
|
|
|
|
|
|
|
|
|
|
|
|
|
|
|
|
|
|
|
|
|
|
|
|
|
|
|
|
|
|
|
|
|
|
|
|
|
|
|
|
|
|
|
|
|
|
|
|
|
|
|
|
|
|
|
|
|
|
|
|
|
|
|
|
|
|
|
|
|
|
|
|
|
|
|
|
|
|
|
|
|
|
|
|
|
|
|
|
|
|
|
|
|
|
|
|
|
|
|
|
|
|
|
|
|
|
|
|
|
|
|
|
|
|
|
|
|
|
|
|
|
|
|
|
|
|
|
|
|
|
|
|
|
|
|
|
|
|
|
|
|
|
|
|
|
|
|
|
|
|
|
|
|
|
|
|
|
|
|
|
|
|
|
|
|
|
|
|
|
|
|
|
|
|
|
|
|
|
|
|
|
|
|
|
|
|
|
|
|
|
|
|
|
|
|
|
|
|
|
|
|
|
|
|
|
|
|
|
|
|
|
|
|
|
|
|
|
|
|
|
|
|
|
|
|
|
|
|
|
|
|
|
|
|
|
|
|
|
|
|
|
|
|
|
|
|
|
|
|
|
|
|
|
|
|
|
|
|
|
|
|
|
|
|
|
|
|
|
|
|
|
|
|
|
|
|
|
|
|
|
|
|
|
|
|
|
|
|
|
|
|
|
|
|
|
|
|
|
|
|
|
|
|
|
|
|
|
|
|
|
|
|
|
|
|
|
|
|
|
|
|
|
|
|
|
|
|
|
|
|
|
|
|
|
|
|
|
|
|
|
|
|
|
|
|
|
|
|
|
|
|
|
|
|
|
|
|
|
|
|
|
|
|
|
|
|
|
|
|
|
|
|
|
|
|
|
|
|
|
|
|
|
|
|
|
|
|
|
|
|
|
|
|
|
|
|
|
|
|
|
|
|
|
|
|
|
|
|
|
|
|
|
|
|
|
|
|
|
|
|
|
|
|
|
|
|
|
|
|
|
|
|
|
|
|
|
|
|
|
|
|
|
|
|
|
|
|
|
|
|
|
|
|
|
|
|
|
|
|
|
|
|
|
|
|
|
|
|
|
|
|
|
|
|
|
|
|
|
|
|
|
|
|
|
|
|
|
|
|
|
|
|
|
|
|
|
|
|
|
|
|
|
|
|
|
|
|
|
|
|
|
|
|
|
|
|
|
|
|
|
|
|
|
|
|
|
|
|
|
|
|
|
|
|
|
|
|
|
|
|
|
|
|
|
|
|
|
|
|
|
|
|
|
|
|
|
|
|
|
|
|
|
|
|
|
|
|
|
|
|
|
|
|
|
|
|
|
|
|
|
|
|
|
|
|
|
|
|
|
|
|
|
|
|
|
|
|
|
|
|
|
|
|
|
|
|
|
|
|
|
|
|
|
|
|
|
|
|
|
|
|
|
|
|
|
|
|
|
|
|
|
|
|
|
|
|
|
|
|
|
|
|
|
|
|
|
|
|
|
|
|
|
|
|
|
|
|
|
|
|
2 |
3 |
5 |
Match these swtches to the type of connections being made to the input jacks. Select the LINE option when connecting the outputs of a line-level device, such as a mixer or the output of an instrument with a built-in pickup. Select the MIC option when connecting a microphone.
3. AUX INPUT Jack
Connect a mobile device or portable music player to this 1/8” (3.5mm) stereo Mini jack. There are a couple of different processing routing options available for this jack (see ‘Configuring The goRack’s Routing’ on page 6 for more information).
4. XLR Output Jacks
Connect these electronically balanced XLR outputs to the amplifier or powered speaker inputs.
5. DC Power Input Jack
Connect the included Harman power adapter to this power input jack.
6. Power Adapter Cord Retaining Clip
Route the power adapter cord through this retaining clip to prevent accidental removal of the power plug (see ‘Applying Power’ on page 5 for more information).
4
Setup
Making Connections
Audio Connections
1.Ensure the power is turned off on all interconnecting equipment and the goRack before making audio connections.
2.Connect the outputs of the mixing console, microphones, or instruments to the inputs of the goRack and set the goRack’s MIC/LINE input switches accordingly. Use the highest quality cable available with the shortest possible cable runs.
3.Connect the goRack’s outputs to the amplifier or powered speaker inputs.
TIP: See ‘Application Diagrams’ on page 22 for application notes and system diagrams which can be used for reference when connecting the goRack to your system. See ‘Audio Cable Diagrams’ on page 26 for information on cable wiring.
Applying Power
1. Ensure your power amplifiers or powered speakers are turned off.
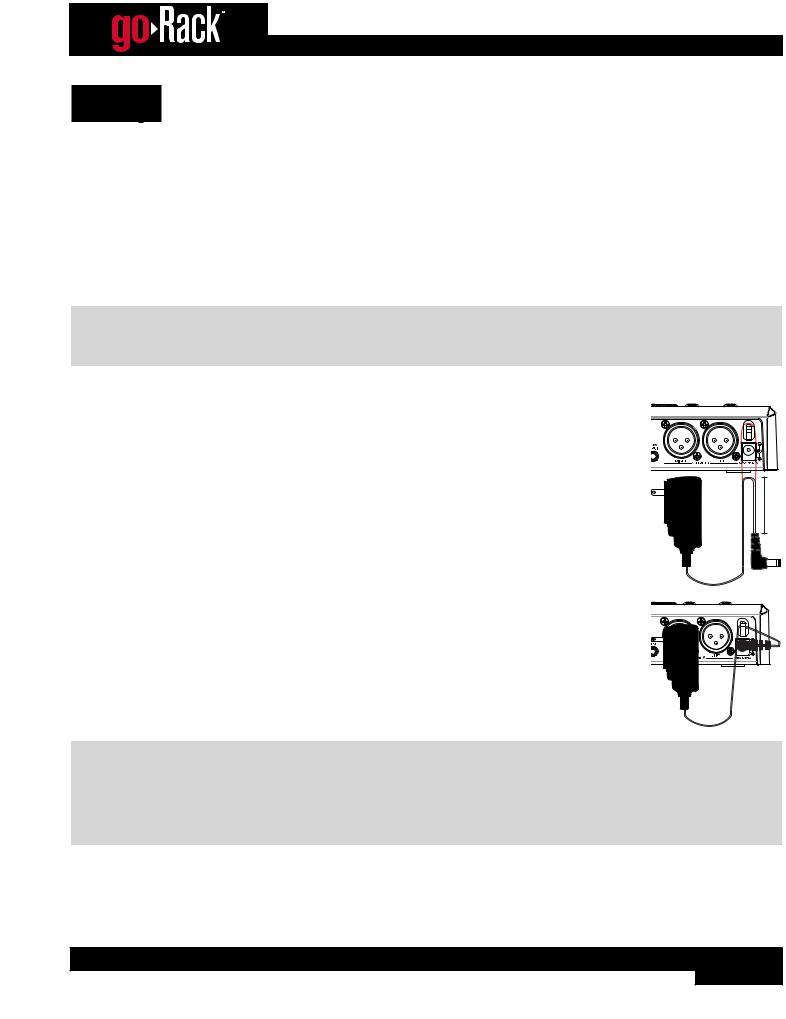
2. As shown in the illustration to the right, pinch the power adapter cord together, leaving approximately 2 inches of cable before the power plug, then route the cord into the cord retaining clip on the goRack’s rear panel.
2”
3. Connect the power adapter jack to the DC power input.
4. Apply power to the goRack by connecting the other end to an available AC power outlet. Since the goRack does not have a power switch, an AC power strip or power conditioner can be used for switching power to the goRack on or off.
5. Apply power to your mixer then your power amplifiers or powered speakers.
WARNING! When powering up a fully connected PA system, it is advisable to ALWAYS turn on the goRack (and mixer if applicable) first then turn on your amplifiers or powered speakers last. It’s also a good idea to ensure the goRack VOLUME or mixer output gains are reduced before applying power to the amplifiers. When powering down the system, you should ALWAYS power down the amplifiers/powered speakers first, wait about 10 seconds to allow them to discharge, then power down the goRack (and mixer if applicable). In short, every time you use your system, the power amps should be the last components turned on and the first components turned off.
5
Configuring The goRack’s Routing
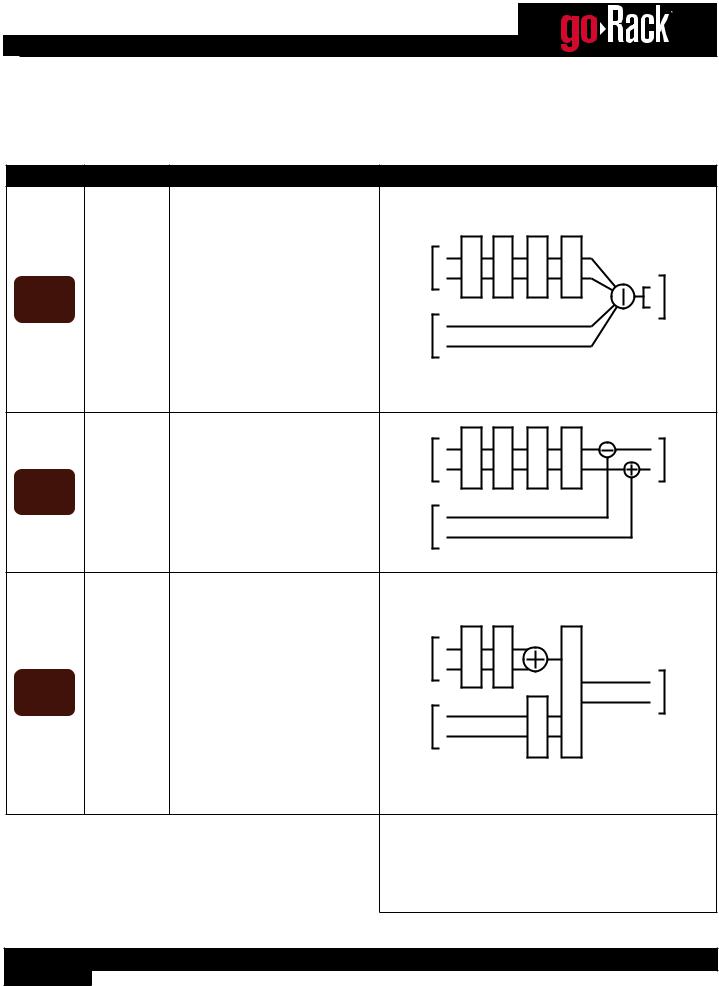
The goRack offers 3 routing options to select from. The following table provides a description of each of these routing options.
Routing Options
Option |
Type |
Description |
Routing Diagram |
|
|
This is the default setting from |
|
|
P |
|
|
|
|
|
|
the factory. This option mono |
|
|
M |
B |
|
|
|
|
|
sums all input signals and feeds |
|
|
O |
|
|
|
|
|
|
|
|
U |
|
|
|
||
|
|
them to both outputs. This |
|
L |
F C |
S |
Q |
|
|
|
|
MIC/LINE |
A |
E |
|
|
|||
|
|
option is ideal for the solo artist |
|
|
|
||||
|
|
INPUTS |
R |
|
|
|
|
|
|
|
|
or duo. For example, one input |
|
|
|
L |
|
||
0 01 |
|
|
|
|
|
|
|||
|
|
|
|
|
|
OUTPUTS |
|||
Mono |
could be used for connecting a |
|
|
|
|
|
R |
||
|
|
microphone and the other for an |
|
L |
|
|
|
|
|
|
|
instrument, such as an acoustic |
AUX |
|
|
|
|
|
|
|
|
|
|
|
|
|
|
||
|
|
guitar with a built-in pickup. |
INPUT |
R |
|
|
|
|
|
|
|
|
P |
|
|
|
|
||
|
|
This option is also well-suited |
|
|
|
|
|
|
|
|
|
|
|
|
|
|
|
|
|
|
|
for speech/presentation |
|
|
P |
|
|
|
|
|
|
applications. |
|
|
|
|
|
|
|
|
|
|
|
|
M |
B |
|
|
|
|
|
|
|
|
O |
|
|
|
|
|
|
|
|
|
U |
|
|
|
|
|
|
|
|
|
F C |
Q |
|
|
|
|
|
This option maintains stereo |
|
L |
S |
L |
|
||
|
|
MIC/LINE |
A |
E |
|
||||
|
|
imaging through the goRack. |
|
OUTPUTS |
|||||
|
|
INPUTS |
R |
|
|
|
R |
||
|
|
|
|
|
|
|
|||
0 02 |
|
Select this option when |
|
|
|
|
|
||
|
|
|
|
|
|
|
|
||
Stereo |
connecting the goRack between |
|
|
|
|
|
|
|
|
|
|
the mixer and powered speakers |
AUX |
L |
|
|
|
|
|
|
|
or amplifier in a conventional, |
|
|
|
|
|
||
|
|
INPUT |
R |
|
|
|
|
|
|
|
|
stereo PA system. |
|
|
|
|
|
||
|
|
|
P |
|
|
|
|
||
|
|
|
|
|
|
|
|
|
|
|
|
|
|
|
M |
|
|
|
|
|
|
This option mono sums the |
|
|
P |
|
|
|
|
|
|
MIC/LINE inputs just like |
|
|
|
|
|
|
|
|
|
|
|
M |
|
|
|
|
|
|
|
option 1, but maintains stereo |
|
|
O |
|
|
|
|
|
|
imaging in the AUX INPUT. It |
|
L |
F C |
|
|
|
|
|
|
also moves the Subharmonic |
MIC/LINE |
A |
|
|
|
|
|
|
|
Synthesis processing and adds |
INPUTS |
R |
|
|
Q |
|
|
|
|
|
|
B |
L |
|
|||
3 |
Advanced |
EQ processing to the AUX |
|
|
|
E |
OUTPUTS |
||
0 0 |
|
INPUT. Use this option when you |
|
|
|
U |
|
R |
|
|
|
don’t want signals connected |
AUX |
L |
|
S |
|
|
|
|
|
to the MIC/LINE inputs to be |
INPUT |
R |
|
|
|
|
|
|
|
|
|
|
|
|
|
|
|
|
|
processed with Subharmonic |
|
|
|
|
|
|
|
|
|
Synthesis and want to add |
|
|
|
|
|
|
|
|
|
equalization to the AUX INPUT |
|
|
|
|
|
|
|
|
|
signal. |
|
|
|
|
|
|
|
|
|
|
LEGEND |
|
|
|
|
|
|
|
|
|
AF = Anti-Feedback |
|
|
|
|
||
|
|
|
COMP = Compressor |
|
|
|
|
||
|
|
|
SUB = Subharmonic Synthesiser |
|
|
||||
|
|
|
EQ = Equalizer |
|
|
|
|
||
6
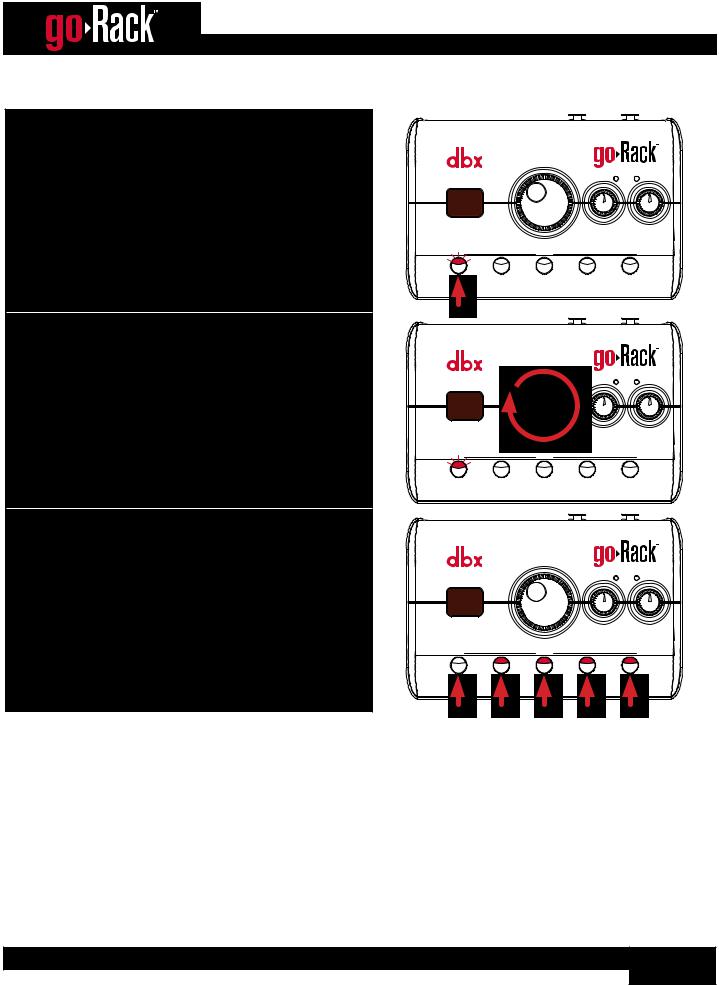
To select a Routing option:
1.Press and hold the MUTE (MODE) button for 2 seconds (the LED will flash, indicating Route mode is active).
2. Select the desired option by turning the VOLUME (EDIT) encoder.
3. When done, press any button to exit Route mode.
|
|
|
|
INPUT |
|
VOLUME |
|
|
SIGNAL |
|
|
LEFT |
RIGHT |
|
|
(EDIT) |
|
||
0 01 |
|
|
|
|
MUTE |
ANTI-FEEDBACK |
COMPRESSOR |
SUB SYNTH |
EQ |
MODE |
|
(HOLD) EDIT |
|
|
|
|
|
|
INPUT |
|
VOLUME |
|
|
SIGNAL |
|
|
LEFT |
RIGHT |
|
0 02 |
|
|
|
|
MUTE |
ANTI-FEEDBACK |
COMPRESSOR |
SUB SYNTH |
EQ |
MODE |
|
(HOLD) EDIT |
|
|
|
|
|
|
INPUT |
|
VOLUME |
|
|
SIGNAL |
|
|
LEFT |
RIGHT |
|
|
(EDIT) |
|
||
07 0 |
|
|
|
|
MUTE |
ANTI-FEEDBACK |
COMPRESSOR |
SUB SYNTH |
EQ |
MODE |
|
(HOLD) EDIT |
|
|
7
Setting Initial System Levels
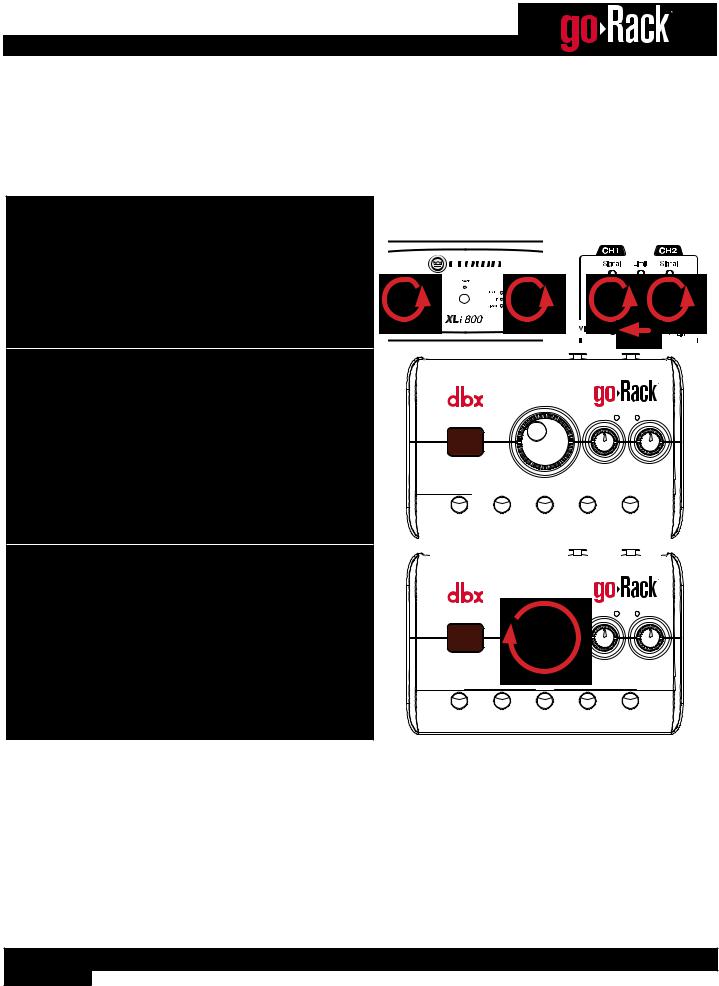
Properly setting system levels will help keep distortion and noise levels down, improve anti-feedback operation, and provide ample headroom for clean and safe operation of the sound system.
To set system levels:
Amplifier |
or |
Powered |
|
Speakers |
|||
|
|
1. Turn down your amp or powered speaker levels. If your powered speakers have Mic/Line switches, set them to “Line”.
2. Make sure all processors are turned off. |
06 |
0 |
|
|
|
|
INPUT |
|
VOLUME |
|
SIGNAL |
|
LEFT |
RIGHT |
||
(EDIT) |
|
|
|
|
|
|
|
|
|
|
|
|
|
MUTE |
|
|
ANTI-FEEDBACK |
COMPRESSOR |
SUB SYNTH |
EQ |
|
|
|
|
||
MODE |
|
|
|
(HOLD) EDIT |
|
|
|
|
|
|
|
|
|
|
|
|
|
|
|
|
|
|
|
|
|
|
|
|
|
|
|
|
|
|
|
|
|
|
|
|
|
|
|
|
|
|
|
|
|
|
|
|
|
|
|
|
|
|
|
|
|
|
|
|
|
|
|
|
|
|
|
|
|
|
|
|
|
|
|
|
|
|
INPUT |
|
|
VOLUME |
|
|
SIGNAL |
|
|
|
LEFT |
RIGHT |
|
|
|
|
|
||
3. Turn the VOLUME encoder to 70. |
07 |
0 |
|
|
|
|
|
|
|
|
|
|
MUTE |
ANTI-FEEDBACK |
COMPRESSOR |
SUB SYNTH |
EQ |
|
MODE |
|
(HOLD) EDIT |
|
|
8
 Loading...