

Danby Products Limited, Guelph, Ontario Canada N1H 6Z9
Danby Products Inc., Findlay, Ohio USA 45840
OWNER’S MANUAL
GUIDE DU
PROPRIÉTAIRE
Model • Modèle
DWC257BL
CAUTION:
Read and Follow All
Safety Rules and
Operating Instructions
Before First Use of this
Product.
ATTENTION :
Avant de faire fonctionner
cet appareil, lisez et suivez
toutes les consignes de sé
curité de ce guide en premier lieu.
Table of Contents . . . . . . . . . . ........ 2
Table des matières . . . . . . ............ 13
v.DWC257EFOM1.5.08
SAVE THESE INSTRUCTIONS!
SAUVEGARDEZ CES INSTRUCTIONS!
?
R
R

WELCOME
Start Here!…Before using your Wine Cooler
Model number: DWC257BL
Serial number:
Date purchased:
NEED HELP?
Before you call for service,
there are a few things you can
do to help us serve you
better...
Read this manual
It contains instructions to help
you use and maintain your
appliance properly.
If you received a
damaged appliance...
Immediately contact the
dealer (or builder) that sold
you the Wine Cooler.
Save time
and
money
Check the Trouble Shooting
section before calling. This
section helps you solve
common problems that may
occur.
If you do need service, you
can relax knowing help is only
a phone call away.
Tel: 1-800-263-2629
This owner’s manual provides
information necessary for the
proper care and maintenance of
your new appliance. If properly
maintained, your Wine Cooler will
give you many years of trouble
free operation. To avoid difficulties,
read these instructions completely
before starting.
For easy reference, you want to
attach a copy of your sales receipt
to this page. This information is
needed when you contact a
Customer Service Representative.
Write down the date of purchase and serial number in the spaces provided below. The serial number is located on a white label on the back
of the Wine Cooler.

Important Safety Information
Warning 3
Safety Precautions 3
Grounding Instructions 4
Location 4
Part Identification
Door Reversal
Operation
The Controls of your Wine Cooler 7
Loading Instructions 8
Care and Cleanig
Helpful Hints 9
Cleaning the Inside & Outside 9
Moving & Vacations 9
Trouble Shooting
Before you Call for Service 10
Warranty 11
5
6
2
TABLE OF CONTENTS
3
7
9
10
3
IMPORTANT SAFETY INFORMATION
WARNING
READ ALL SAFETY INFORMATION BEFORE USING
• This appliance must be
grounded. Connect only to a
properly grounded outlet (see
Grounding Instructions on Page
4).
• Do not operate this appliance
if it has a damaged power cord
or plug, if it is not working
properly, or if the appliance has
been damaged or dropped.
• Do not splice the power cord
that is equipped with this
appliance.
• Keep power cord away from
heated surfaces.
• Do not immerse power cord,
plug or the appliance itself in
water.
• Do not use this product near
water (for example, in a wet
basement, near a swimming
pool or sink).
• Do not use corrosive
chemicals or vapors in this
appliance.
• Use this appliance only for
it’s intended use, asdescribed
in this manual.
• Do not store perishable food
items such as (but not limited
to) meats and dairy products
in your Wine Cooler.
• Store wine in sealed bottles
only.
• See door surface cleaning
instructions in the Care and
Cleaning section of this manual
(page 9).
• Do not cover or block any
openings on the appliance.
• This appliance is intended for
household use only. Do not
attempt to operate or store this
appliance outdoors.
• This appliance should be
serviced only by qualified
service personnel. Contact the
nearest authorized service
facility for examination, repair or
adjustment.
SAFETY
PRECAUTIONS
SAVE THESE INSTRUCTIONS
DANGER, RISK OF CHILD ENTRAPMENT!
An empty refrigerator is a very dangerous attraction to children. Remove either the
gasket, latches, lids, lock and/or doors from unused or discarded appliances, or take
some other action to guarantee it harmless.
DON’T WAIT, DO IT NOW!
CAUTION
To avoid installation/operation difficulties, read these instructions thoroughly.

4
This appliance must be
grounded. In the event of an
electrical short circuit,
grounding reduces the risk of
electric shock by providing an
escape wire for the electric
current.
This appliance is equipped with
a power cord having a
grounding wire with a
grounding plug. The plug must
be plugged into an outlet that is
properly installed and
grounded.
Consult a qualified electrician
or service technician if the
grounding instructions are not
completely understood, or if
doubt exists as to whether the
appliance is properly
grounded.
If the outlet is a standard 2prong wall outlet, it is your
personal responsibility and
obligation to have it replaced
with a properly grounded 3prong wall outlet.
For best operation, plug this
appliance into its own electrical
outlet to prevent flickering of
lights, blowing of fuse or
tripping of circuit breaker.
Do not under any
circumstances cut or remove
the third (ground) prong from
the power cord.
Do not use an adapter plug
with this appliance.
Do not use an extension cord
with this appliance. If the power
cord is too short, have a
qualified electrician or service
technician install an outlet near
the appliance.
GROUNDING
INSTRUCTIONS
IMPORTANT SAFETY INFORMATION
Location
DO...
• Select a location with a
strong, level floor.
• Allow 5 inches of space
between the back of the appliance and any adjacent wall.
• Avoid direct sunlight and
heat. Direct sunlight may
affect the acrylic coating, heat
sources nearby will cause
higher electricity consumption.
DO NOT...
• Use this appliance outdoors: This appliance is
intended for
household use
only
. Do not attempt to operate
or store this appliance outdoors.
• Build this appliance
into an enclosure:.This appli-
ance is designed for a freestanding application only and
is not intended to be “built-in”.
WARNING!
Improper use of the grounding plug can result in a risk of
electrical shock.
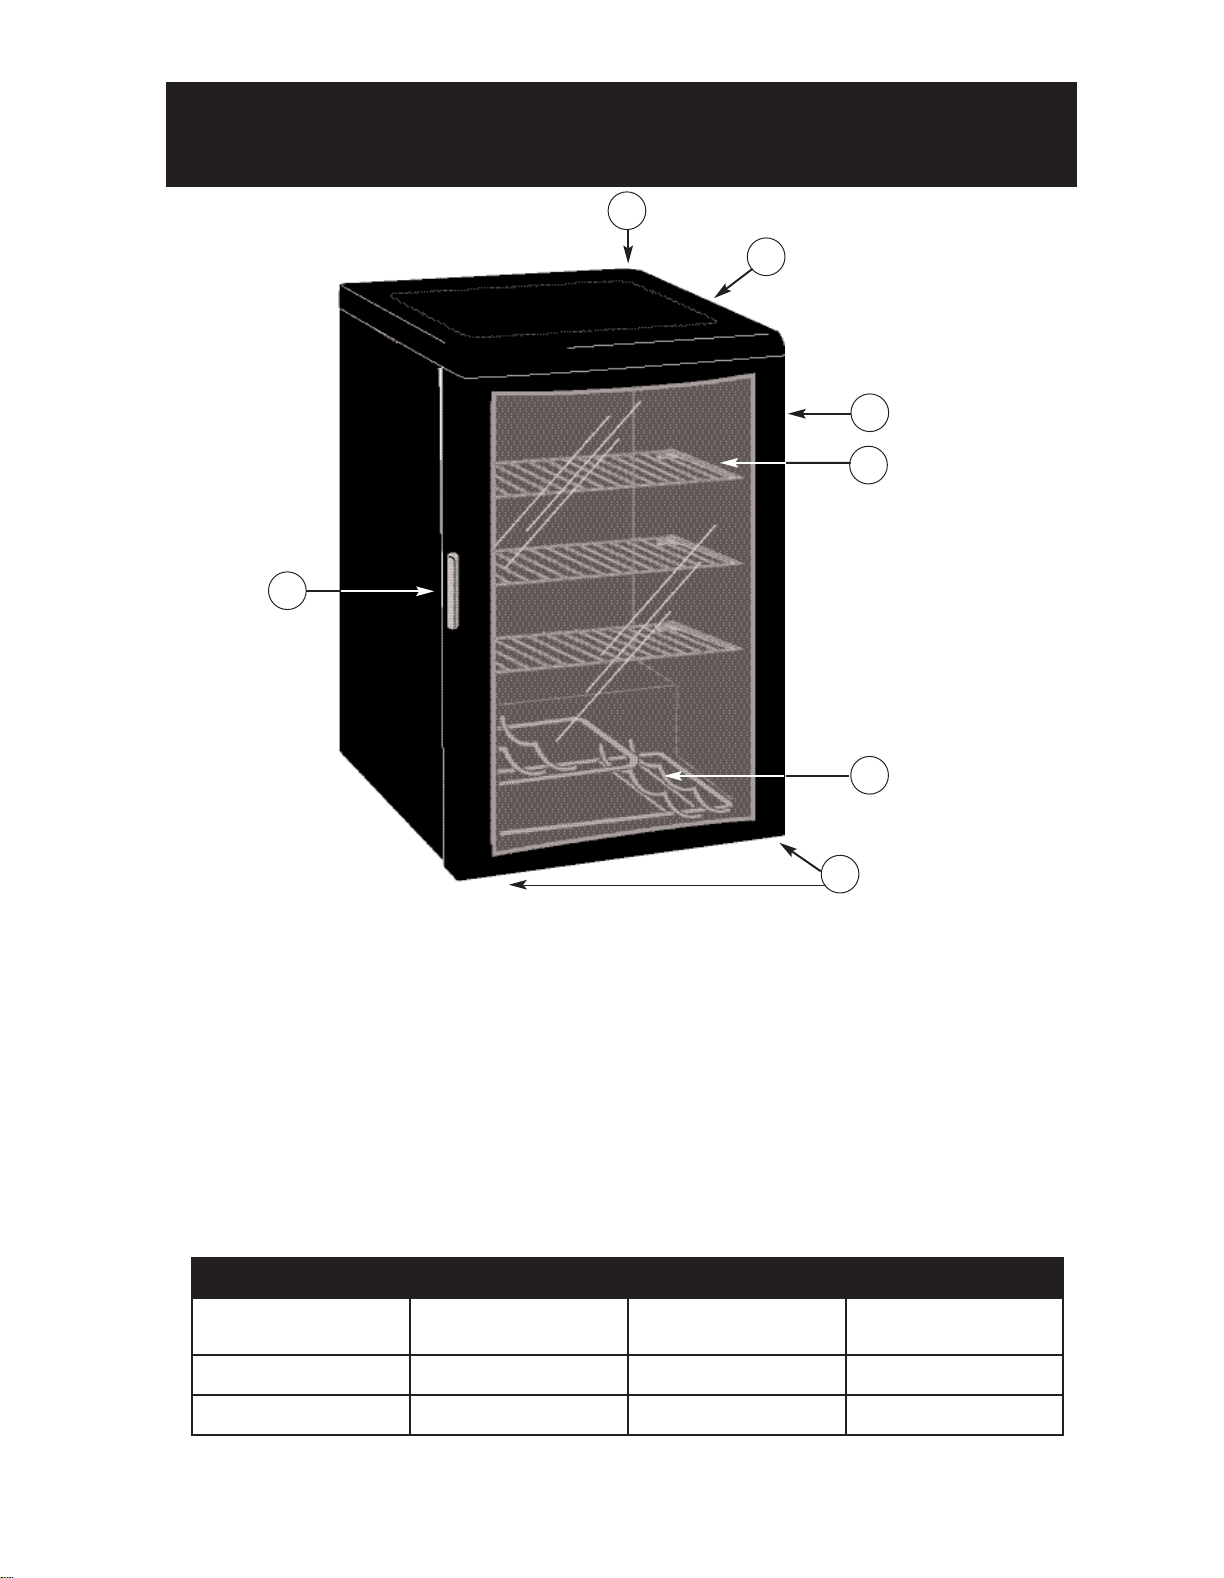
PART IDENTIFICATION
1. Rear Mounted Mechanical Thermostat
Controls the temperature of your Wine
Cooler, from 6°C /42.8°F ~ 14°C/ 52.7°F.
2. Worktop
3. Tempered Glass Door
Tinted for UV protection while still allowing
for easy interior viewing.
4. Plastic Coated Wire Racks
5. Black Staggered Wine Rack
Holds up to six (6) bottles of wine.
6. Leveling Legs
7. Dual Recessed Pocket Handles
Accommodates a right or (optional) left
hand door opening.
8. Interior Light (not shown)
Illuminates the compartment when the
door is open.
Specifications
Width 17.65 in. / 447.8 mm
Total Net Volume
Capacity
2.5 cu.ft. / 72 L
Height 20 in. / 508 mm Net Weight 51 lbs / 23 kg
Depth 27 in. / 685.8 mm
5
1
2
3
4
5
6
7
6
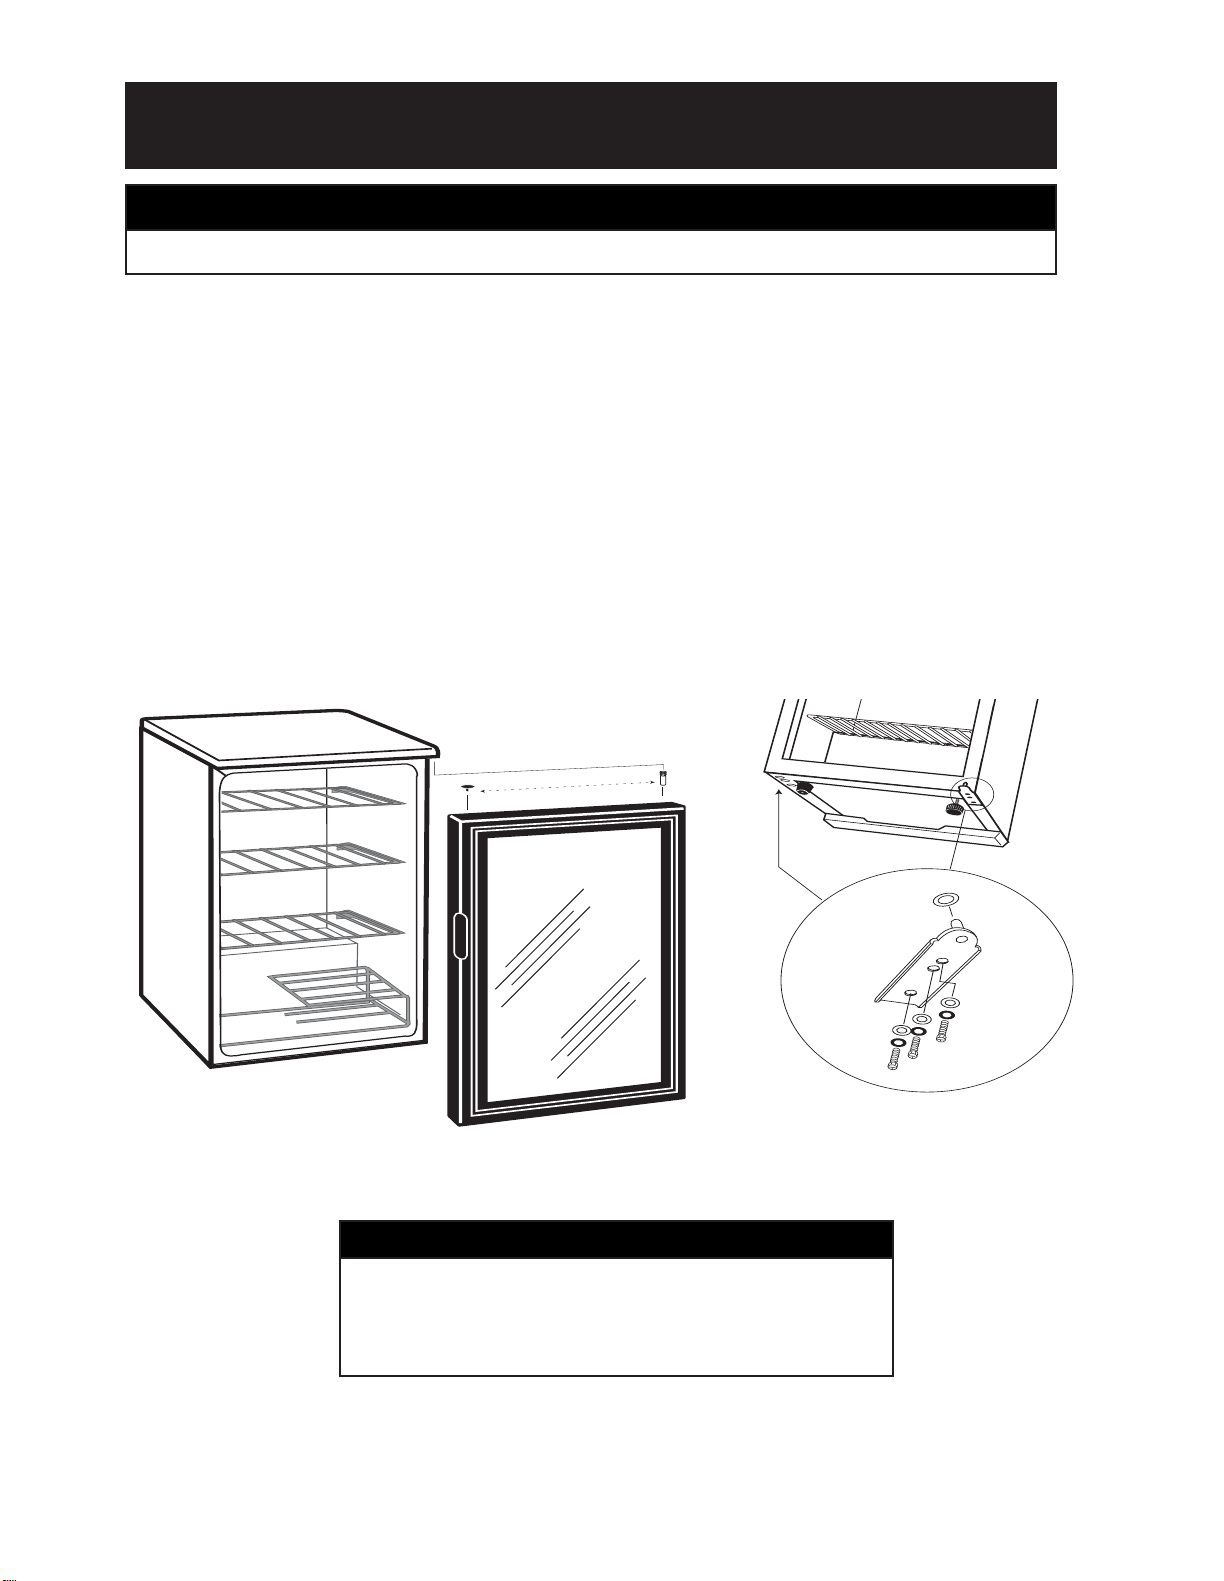
DOOR REVERSAL
1. Unplug the unit from the electrical outlet (if
connected) and lay it on its back.
2. Remove the screws from the Lower Hinge
Assembly.
3. Pull the door downward to remove it from the
cabinet of the Wine Cooler.
4. Remove the upper hinge pin from the top
right side of the cabinet and reinstall it on the
top left side.
5. Remove the plastic cap from the right side of
the door frame and reinstall it on the left side
of the door frame (the previous pin location).
6. Carefully reposition the door on the cabinet
and push up until the top hinge pin is
inserted into the top of the door.
7. While the door remains closed install the
lower hinge assembly.
8. Close the door and return the unit to its
upright position (wait 60 minutes before re-
connecting power to the Wine Cooler),
verify the door alignment and proper seal
against the cabinet.
Lower Hinge Assembly
and Door Support Bracket
Upper Hinge Pin
IMPORTANT!
REQUIRES: Phillips #2 Screwdriver.
NOTE
Ensure all screws and fittings are tightly fastened
and that the door is squarely aligned with the cabinet before using. Adjust if necessary.

7
OPERATION
The Controls of your
Wine Cooler
Setting The Temperature Control:
The temperature of t
he Wine Cooler is controlled
by adjusting/setting the thermostat control knob,
located on the exterior rear wall of the cabinet.
To start t
he Wine Cooler
and achieve maximum
cooling quickly;
• Turn the temperature control knob clockwise
to the furthest ‘Max’ (maximum) setting on
the wider blue section of the graduated
control dial.
• Allow the unit to run at this setting for 3-4
hours.
• When maximum cooling is achieved, turn
back the temperature control knob setting to
the 10 o’clock position on the graduated blue
control dial. See fig.B.
• To turn off th
e Wine Cooler, (no cooling)
rotate the control knob to the “O” (off)
position. See fig.A
Turn the control to the “O” (off) position to temporarily disconnect the cooling cycle. When
the
Wine Cooler is not to be used for a long period
of
time, disconnect the plug and leave the door partially open.
Defrosting:
Your Wine Cooler is designed with an “AutoCycle” defrost system. What is Auto Cycle
defrost?
The refrigerated surfaces defrost automatically
during the “off” cycle of the cold control. (thermostat) Defrost water is disposed of automatically,
by means of being channeled onto a drip tray
located on the compressor. Heat transfer from
the compressor causes the defrost water to
evaporate.
Fig. A
Fig. B
NOTE
Wait 3 to 5 minutes before restarting if operation has been interrupted.
Moving &
Vacations
Vacation Time
For short vacation periods,
leave the control knobs at
their usual settings. During
longer absences;
1. Remove all bottles.
2. Disconnect from
electrical outlet.
3. Clean the Wine
Cooler thoroughly.
4. Leave the door open
to avoid formations of
condensate, mold or
odors.
IMPORTANT!
If you move, remove or
securely fasten down all
loose items inside the Wine
Cooler. To avoid damaging
the leveling screws, turn
them all the way into the
base.

8
The Top Rack
Load up to five (5) bottles
on to the rack, with the
direction of the middle bottle being reversed (see figure below):
Top Rack: 5 Bottles
Middle Racks
Load up to seven (7) bottles
onto the wine rack with
each bottle neck pointing
outwards.
Middle Racks: 14 Bottles
Loading
Instructions
OPERATION
The Bottom Wine Rack
With all the bottle necks facing the rack’s handle: Load
the bottom level of the rack
with up to three (3) bottles,
and then load the top level of
the rack with up to another
three (3) bottles.
Bottom Rack: 6 Bottles
IMPORTANT
The maximum* capacity of
the Wine Cooler is twentyfive (25) 750 mL wine bottles.
*When stocked as per instruc-
tions .
Store wine in sealed
bottles only.
IMPORTANT!
Do not cover racks with aluminum foil or any other covering material that
may prevent air circulation within the cabinet.

9
Helpful Hints
Leave the Wine Cooler door
open for a few minutes after
manual cleaning to allow the
air to dry the inside of the
cabinet.
Cleaning the
Inside
Walls, Floor, Inside
Glass and Shelves
Some water deposits and dust
can be removed with a dry
paper towel, other deposits
may require the use of a damp
cloth.
CARE AND CLEANING
WARNING!
Be certain the power is off before cleaning any part of this appliance.
IMPORTANT!
Never use any commercial
or abrasive cleaners or
sharp objects on any part
of the Wine Cooler.
NOTE
Do not use cleaners con-
taining ammonia or alcohol
on the Wine Cooler.
Ammonia or alcohol can damage the appearance of the
appliance.
Cleaning the
Outside
Door Frame and Glass
Door
Use only mild, non-abrasive
detergents applied with a
clean sponge or soft cloth. Do
not use cleaning sprays, large
amounts of soap and water,
abrasive or sharp objects on
glass; these can damage it.
Some paper towels may also
scratch the door glass.
Outer Case
It’s important to keep the area
clean where the door seals
against the cabinet. Clean this
area with a mild detergent.
Rinse and then dry.

Before You Call For Service
If none of the above has rectified the situation please contact our customer care
department at 1-800-263-2629
10
Trouble Shooting
Problem Possible Cause What to do
No Power. A fuse in your home may Replace fuse or reset circuit breaker.
be blown or the circuit
breaker tripped.
Power surge. Unplug the Wine Cooler, wait a
few seconds and then plug it back in.
Plug not fully inserted into Make sure the 3-prong plug is fully
wall outlet. inserted into outlet.
Cabinet Temperature Temperature setting. Verify the temperature control setting
too High. and adjust if neccessary.
Door not shut properly Ensure that the door is fully closed
or opened excessively. and that the gasket is sealing against
the cabinets. Open the doors only as
needed and for short periods of time.
Recently added a large Limit the quantity of warm beverages
quantity of warm beverages being introduced to the cabinet at the
to the cabinet. same time. Attempt to stagger the
load introduction if possible.
Condensation on the High humidity conditions The condensation will subside once
cabinet and/or doors. in the home. humidity conditions return to normal.
Door not shut properly Ensure that the door is fully closed
or opened excessively. and that the gasket is sealing against
the cabinets. Open the door only as
needed and for short periods of time.

LIMITED WINE COOLER
WARRANTY
This quality product is warranted to be free from manufacturer’s defects in material and workmanship, provided that the unit is used under the normal operating
conditions intended by the manufacturer.
This warranty is available only to the person to whom the unit was originally sold by Danby or by an authorized distributor of Danby, and is non-transferable.
TERMS OF WARRANTY
Plastic parts are warranted for thirty (30) days only from purchase date, with no extensions provided.
First 12 Months
During the first eighteen (18) months, any electrical parts of this product found to be defective, including any sealed system units, will be
repaired or replaced, at warrantor’s option, at no charge to the ORIGINAL purchaser.
To obtain
Danby reserves the right to limit the boundaries of “In Home Service” to the proximity of an Authorized Service Depot. Any appliance
Service
requiring service outside the limited boundaries of “In Home Service” , it will be the consumer’s responsibility to transport the appliance
(at their own expense) to the original retailer (point of purchase) or a service depot for repair. Contact your dealer from whom your unit
was purchased, or contact your nearest authorized Danby service depot, where service must be performed by a qualified service
technician. If service is performed on the units by anyone other than an authorized service depot, or the unit is used for commercial
application, all obligations of Danby under this warranty shall be at an end.
Nothing within this warranty shall imply that Danby will be responsible or liable for any spoilage or damage to wine or other contents of this appliance, whether
due to any defect of the appliance, or its use, whether proper or improper.
EXCLUSIONS
Save as herein provided, Danby Products Limited (Canada) or Danby Products Inc. (U.S.A.), there are no other warranties, conditions, representations or guarantees, express or implied, made or intended by Danby Products Limited or its authorized distributors and all other warranties, conditions, representations or guarantees, including any warranties, conditions, representations or guarantees under any Sale of Goods Act or like legislation or statue is hereby expressly excluded. Save as herein provided, Danby Products Limited (Canada) or Danby Products Inc. (U.S.A), shall not be responsible for any damages to persons or property,
including the unit itself, howsoever caused or any consequential damages arising from the malfunction of the unit and by the purchase of the unit, the purchaser
does hereby agree to indemnify and save harmless Danby Products Limited from any claim for damages to persons or property caused by the unit.
GENERAL PROVISIONS
No warranty or insurance herein contained or set out shall apply when damage or repair is caused by any of the following:
1) Power Failure.
2) Damage in transit or when moving the appliance.
3) Improper power supply such as low voltage, defective house wiring or inadequate fuses.
4) Accident, alteration, abuse or misuse of the appliance such as inadequate air circulation in the room or abnormal operating conditions,
(extremely high or low room temperature).
5) Use for commercial or industrial purposes.
6) Fire, water damage, theft, war, riot, hostility, acts of God such as hurricanes, floods etc.
7) Service calls resulting in customer education.
Proof of purchase date will be required for warranty claims; so, please retain bills of sale. In the event warranty service is required, present this document to our
AUTHORIZED SERVICE DEPOT.
Danby Products Limited
PO Box 1778, 5070 Whitelaw RD, Guelph, Ontario, Canada N1H 6Z9
Telephone: (519) 837-0920 FAX: (519) 837-0449
Danby Products Inc.
PO Box 669, 101 Bentley Court, Findlay, Ohio, U.S.A. 45840
Telephone: (419) 425-8627 FAX: (419) 425-8629
05/08
Warranty Service
In Home Service on models with a capacity greater than 25 bottles.
R
11

12
BIENVENUE
EN CAS DE BESOIN
D’ASSISTANCE
Ce manuel du propriétaire fournit l’information
nécessaire pour prendre soin et entretenir
votre nouvel appareil ménager. Avec un
entretien adéquat votre cabinet à vin vous
servira durant de longues années sans
ennuis.
Pour éviter les ennuis, lisez ces instructions
au complet avant de l’utiliser.
Pour vous servir de référence en cas de
besoin, vous pourriez vouloir attacher une
copie de votre reçu d’achat à cette page.
Ceux-ci seront requis si vous avez besoin de
contacter un représentant de service.
Voici quelques contributions
que vous pouvez effectuer
avant de faire un appel de
service, pour nous aider à
mieux vous servir :
Lisez ce guide
Il comprend des instructions
pour vous assister à l’utilisation et l’entretien adéquats de
votre refroidisseur de vin.
Si votre appareil neuf est
avarié
Communiquez immédiatement
avec le revendeur (ou le manufacturier).
Épargnez temps et argents
Avant de faire un appel de
service, révisez le chapitre
intitulé “Dépannage”. Ce
chapitre vous aidera à solutionner des problèmes communs qui pourraient survenir.
Si une réparation est requise,
vous pouvez avoir l’esprit tranquille parce que de l’aide ne
sera l’affaire que d’un appel
téléphonique.
Tél.:
1-800-263-2629
Enregistrez ici les numéros de modèle
et de série. Ces numéros se trouvent
sur l’étiquette au dos de l’appareil.
Numéro de modèle DWC257BL
Numéro de série
Date d’achat
Point de départ...AVANT d’utiliser votre Cabinet à Vin

Informations de Sécurité Importantes
Avertissement 14
Précautions 14
Instructions de mise à la terre 15
Emplacement 15
Identification des ÉléMENTS
Inversion du sens d'ouverture de la porte
Fonctionnement
Chargement 18
Les Réglages de Votre
Refroidisseur à vin 19
Soins et Nettoyage
Conseils utiles 20
Nettoyage intérieur et extérieur 20
Périodes de vacances et déménagements 20
En cas de panne
Avant de placer un appel de service 21
Garantie 22
14
16
18
20
13
TABLE DES MATIÈRES
17
21

LISEZ TOUTES LES INFORMATIONS DE SÉCURITÉ
AVANT DE FAIRE FONCTIONNER L’APPAREIL
14
INFORMATIONS DE SÉCURITÉ IMPORTANTES
AVERTISSEMENT
PRÉCAUTIONS
• Cet appareil doit être mis à latterre. Branchez le seulement dans
une prise correctement mise à la
terre. Référez-vous au chapitre intitulé “Instructions de mise à la terre” à
la page 15.
• Ne faites pas fonctionner cet
appareil s’il a un cordon ou fiche
électrique endommagé, s’il ne fonctionne pas correctement, ou si
l’appareil a été endommagé ou
échappé.
• Ne faites pas d’épissure sur le
cordon électrique
• Gardez le cordon électrique
éloigné des sources de chaleur.
• N'immergez pas le cordon ou sa
fiche dans aucun liquide.
• N’utilisez pas cet appareil près de
bassins d’eau, par exemple dans un
sous-sol détrempé, près d’une
piscine ou d’un évier.
• N’utilisez pas de produits
chimiques ou vapeurs corrosives
dans/près de cet appareil.
• N’utilisez cet appareil que pour
les fins auxquelles il est conçu
comme indiqué dans ce guide.
• Ne placez pas de nourriture périssable dans votre refroidisseur à vin,
(par exemple les viandes et les produits laitiers)
• Entreposez seulement des
bouteilles de vin scellées.
• Référez-vous aux instructions de
nettoyage du fini de la porte se trouvant au chapitre de Soins et nettoyage de ce guide (page 20).
• Ne recouvrez pas ou n’obstruez
aucune ouverture de l’appareil.
• Cet appareirl est conçu pour un
usage domestique à l’intérieur
seulement. Ne pas entreposer ou
utiliser cet appareil à l’extérieur.
• Cet appareil ne devrait être réparé
que par du personnel qualifié. Pour
tout examen, réparation ou réglage,
contactez votre centre de service le
plus rapproché.
SAUVEGARDEZ CES INSTRUCTIONS
DANGER : RISQUE D’EMPRISONNEMENT POUR LES ENFANTS!
La cavité d’un refroidisseur à vin vide est une attraction très dangereuse pour les enfants. En situation de mise au rancart, retirez soit le joint d'étanchéité, tout verrou ou loquet, la porte ou couvercle de tout appareil creux ou prenez d'autres mesur.es pour assurer qu'il soit inoffensif.
N'ATTENDEZ PAS! FAITES-LE DÈS QUE MIS AU RANCART!
MISE EN GARDE
Pour éviter les difficultés durant l’installation et/ou le fonctionnement, lire ces direc-
tives attentivement.

15
Cet appareil doit être mis à la
terre. Dans l'éventualité d'un
court-circuit, la mise à la terre
procure un chemin direct de
contournement du courant
pour prévenir l'électrocution
des manipulateurs de l'appareil.
Cet appareil est muni d'un cordon comprenant une fiche et
fil de mise à la terre.
La fiche doit être branchée
dans une prise correctement
installée et mise à la terre.
Si les directives de mise à la
terre ne sont pas tout à fait
comprises ou en cas de tout
doute relatif à la mise à la
terre appropriée de l'appareil,
faites appel à un électricien
licencié ou à un technicien de
service.
Si la prise murale est une
prise à 2 branches, c'est votre
obligation, et la responsabilité
vous en incombe, de la faire
remplacer par une prise à trois
branches adéquatement mise
à la terre.
Pour un meilleur rendement et
pour éviter que les ampoules
d'éclairage de la résidence
soient affectées d'un affaissement de tension, ou que le
fusible ou disjoncteur du circuit
ne grille ou ne se déclenche,
dédiez un circuit d’alimentation
individuel à l’appareil de
refroidissement.
Sous aucun prétexte il est
permis de couper ou d'enlever
la troisième branche (mise à la
terre) de la fiche du cordon
électrique.
N'utilisez pas d'adaptateur
de fiche avec cet appareil.
N'utilisez pas de cordon de
rallonge avec cet appareil. Si
le cordon électrique de l'appareil ne rejoint pas la prise
murale, faites installer une
prise plus rapprochée par un
électricien ou un technicien
qualifié.
INSTRUCTIONS DE MISE
À LA TERRE
INFORMATIONS DE SÉCURITÉ IMPORTANTES
EMPLACEMENT
À FAIRE :
• Choisir un endroit avec un
plancher solide et au niveau.
• Laisser un espace de 13 cm
(5 po)
entre l'arrière de l'appareil et
tout mur adjacent.
• Éviter l'exposition au soleil
direct et à la chaleur. Le soleil
direct peut affecter la couche
d'acrylique. Les sources de
chaleur à proximité peuvent
causer une plus grande consommation d'électricité.
À NE PAS FAIRE :
• Utiliser cet appareil à l'extérieur: Cet appareil a été
conçu pour usage domestique
seulement. Ne pas faire fonctionner ou entreposer cet
appareil à l'extérieur.
• Incorporer cet appareil
dans une armoire: Cet
appareil est conçu pour une
utilisation autonome seulement et n'est pas prévu pour
être encastré.
AVERTISSEMENT!
Une utilisation fautive de la
fiche mise à la terre peut constituer un danger d’électrocution.

IDENTIFICATION DES ÉLÉMENTS
1. Thermostat mécanique monté à l’arrière
Règle la température de votre cabinet à vin
entre 6 °C (42,8 °F) et 14 °C (52,7 °F).
2.
Surface de travail
3. Portes En Verre Trempé: Teinté pour
protéger contre les rayons UV tout en
permettant de voir facilement le contenu
du cabinet.
4. Étagère Plastifiée pour Bouteilles
5. Porte-bouteilles étagé
Capacité de six (6) bouteilles de vin.
6. Pieds Adjustables
7.
8. Lumière Intérieures (non illustré)
S’aIllume lorsqu’on ouvre la porte du
cabinet.
Spécifications
Largeur 447,8 mm (17,65 po) Volume total net 72 l (2,5 pi3)
Hauteur 508 mm (20 po) Poids net 23 kg (51 lb)
Profondeur 685,8 mm (27 po)
16
1
2
3
4
5
6
7

Inversion du sens d'ouverture de la porte
17
1. Débrancher l'appareil de la prise électrique (si
branché) et le déposer avec l'arrière à plat sur
le sol.
2. Enlever les vis de la charnière du bas.
3. Tirer la porte vers le bas pour l'enlever du
cabinet du refroidisseur de bouteilles de vin.
4. Retirez l'axe de la charnière supérieure en
haut à gauche de la porte et l'installer en haut
à droite de la porte.
5. Enlever le capuchon de plastique du côté
gauche de porte et le réinstaller sur le côté
droit de porte (l'endroit de l'axe de la charnière
superiéure précédente).
6. Replacer soigneusement la porte sur le
cabinet et remontez-la jusqu'à ce que l'axe de
la charnière supérieure rentre dans le haut de
la porte.
7. Alors que la porte sera fermée, installez la
charnière du bas.
8. Fermer la porte et remettre l'appareil debout
(attendre 60 minutes avant de brancher à
nouveau le refroidisseur à vin), vérifier
l'alignement de la porte et l'étanchéité contre
le cabinet.
IMPORTANT !
OUTILS REQUIS : Tournevis Phillips #2
REMARQUE
Avant d’utiliser votre cabinet à vin, assurez vous que la porte est bien alignée sur le
cabinet et que tous les boulons et attaches sont bien serrés, sinon, apportez les correctifs nécessaires.
L’axe de la charnière
supérieure
Charnière du bas et sup-
port de porte

18
Instructions de Fonctionnement
Les Réglages de Votre
Refroidisseur à vin
Réglage du contrôle de température
La température du refriodisseur à vin est contrôlée en ajustant/réglant la roulette
de contrôle de température, située à l'arrière du
cabinet.
Pour démarrer le refroidisseur à vin et obtenir
un refroidissement maximum rapidement :
• Tourner la roulette de contrôle de
température au réglage 'Max' (maximum) à la
section (large) bleu foncé du cadran gradué
de contrôle.
• Laisser l'appareil fonctionner à ce réglage
pour 3-4 heures.
• Lorsque le refroidissement maximum est
atteint, tourner la roulette de contrôle de
température à la position « 10 heures »
sur le cadran bleu de contrôle gradué. Voir
fig. B.
• Pour arrêter le refroidisseur de vin, (pas
de refroidissement) tourner la roulette de
contrôle à la position "O". Voir fig. A.
Mettre le contrôle à la position "O" pour arrêter
temporairement le cycle de refroidissement.
Si vous prévoyez ne pas vous servir de votre
refroidisseur à vin pour une longue période de
temps, débrancchez le du réceptacle mural et
laissez la porte entrouverte.
Dégivrage
La conception de votre cabinet à vin comprend
un ciruit de cyclage de dégivrage automatique.
Qu'est-ce que le cycle de dégivrage automatique?
Les surfaces réfrigérantes se dégivrent automatiquement durant le temps d'arrêt de la commande de refroidissement (Thermostat). L'eau
de fonte du givre s'évapore automatiquement en
étant acheminée dans un plateau au dessus du
compresseur et dont la chaleur produit ce travail.
Fig. A
Fig. B
REMARQUE
Après avoir rebranché l'appareil, attendez
entre 3 à 5 minutes avant de tourner son contrôle de température.
Périodes de
vacances et
déménagements
Périodes de vacances
Pour les courtes absences,
laissez le bouton de commande à son réglage usuel.
Pour les longues absences :
1. Retirez toutes les bouteilles
du cabinet.
2. Débranchez l’appareil de la
prise électrique.
3. Nettoyez le cabinet à vin de
fond en comble.
4. Laissez la porte ouverte
pour prévenir la formation
de condensat, de
moisissures et de
mauvaises odeurs.
IMPORTANT
Si vous déménagez, retirez
ou fixez solidement tout article restant à l’intérieur du
cabinet. Pour ne pas
endommager les vis de mise
à niveau, vissez les complètement dans la base.

19
L’étagère du haut
Chargez jusqu’à cinq (5)
bouteilles sur l’étagère
en plaçant la bouteille
du centre en sens
inverse (voir la figure cidessous)
L’étagère du haut : 5
bouteilles
Les étagères médianes
Chargez jusqu’à sept (7)
bouteilles sur les étagères
en plaçant tous les goulots
de bouteilles en direction
vers l'extérieur.
outwards.
Étagères médianes : 14
bouteilles
Chargement
FONCTIONNEMENT
L’étagère du bas
Avec tous les goulots de
bouteilles en direction de
la poignée du support,
chargez, d’un maximum de
trois (3) bouteilles, le
niveau inférieur du support
et puis chargez le niveau
supérieur d’un autre trois
(3) bouteilles.
Étagère du bas ; 6
bouteilles
IMPORTANT
Le cabinet à vin peut
accepter un maximum* de
vingt-cinq (25) bouteilles
de vin de 750 ml.
*Lorsque chargées selon les
instructions.
Entreposez le vin dans des
bouteilles scellées seullement.
IMPORTANT !
Ne recouvrez PAS les étagères de feuilles d’aluminium ou de tout autre
membrane qui préviendrait la circulation de l’air à l’intérieur du cabinet.

20
Conseils utiles
Après un nettoyage manuel,
laissez la porte du cabinet à vin
ouverte durant quelques minutes pour aérer et assécher l’intérieur de du cabinet.
Nettoyage
intérieur
SOINS ET NETTOYAGE
Parois internes, plancher,
intérieur de la porte vitrée et étagères
Certaines traces d'eau évaporée et la poussière peuvent
être essuyées avec des
essuie-tout mais d'autres taches peuvent nécessiter un linge
humide.
IMPORTANT
Ne jamais utiliser de nettoy-
ants industriels ou abrasifs ou
des objets acérés sur n'importe quelle partie de votre
cabinet à vin
REMARQUE
Ne pas utiliser de nettoyants
contenant de l'ammoniaque
ou de l'alcool sur le cabinet à
vin.
L’ammoniaque ou l’alcool
peut altérer le fini du cabinet.
MISE EN GARDE!
Assurez vous que l’alimentation est coupée avant de nettoyer n’importe
quelle partie de cet appareil.
Nettoyage
extérieur
Fini extérieur
Il est important de garder la
région de scellement de la
porte sur l’armoire propre.
Nettoyez la région avec un
chiffon savonneux puis rincez
et asséchez.
Cadre de porte
N’utilisez que des détergents
doux et non abrasifs appliqués
avec une éponge ou un chiffon
doux. Rincez abondamment.
Porte vitrée
Essuyez avec un chiffon
humide et asséchez à fond
avec un chiffon sec. N’utilisez
pas de nettoyants en aérosol
ou de grandes quantités d’eau
savonneuse ou d’abrasifs /
d’objets acérés sur la surface
vitrée car ceux-ci pourrait l’endommager. Certains essuietout peuvent aussi égratigner
la vitre de la porte.

21
Avant de placer un appel de service
Si aucune des suggestions ci-dessus ne corrigent le problème, communiquez avec
notre service d’assistance au 1-800-263-2629
En cas de panne
Problème Cause possible Ce qu'il faut faire
L'appareil n'est pas
alimenté
Un fusible de votre panneau
de distribution peut être grillé ou le disjoncteur
déclenché.
Remplacez le fusible ou réarmez
le disjoncteur.
Surtension. Débranchez le refroidisseur à vin
et attendez 3 minutes, et puis
rebranchez le.
La fiche n'est pas complètement insérée dans la prise
murale.
Assurez-vous que la fiche à 3
branches du refroidisseur à vin
est complètement insérée dans la
prise.
La température à
l’intérieur du cabinet
est trop élevée
Réglage de la température Vérifiez le réglage du thermostat
et corriger s'il y a lieu.
La porte n'est pas bien fermée ou est ouverte trop
souvent
Assurez-vous que la porte est fermée et que le joint d’étanchéité
fasse contact avec le cabinet.
N’ouvrez la porte que brièvement
et seulement lorsque nécessaire.
Stocké une grande quantité
de bouteilles non réfrigérées
dans le cabinet
Limitez la quantité de bouteilles
non réfrigérées qui sont ajoutées
simultanément dans le cabinet. Si
possible, essayez d'introduire progressivement les bouteilles non
refroidies.
Condensation
sur le cabinet et/ou
autour de la porte
Niveau d’humidité élevé
dans la maison
La condensation se résorbera
quand le niveau d'humidité
retournera à la normale
La porte n'est pas bien fermée ou est ouverte trop
souvent
Assurez-vous que la porte est fermée et que le joint d’étanchéité
fasse contact avec le cabinet.
N’ouvrez la porte que brièvement
et seulement lorsque nécessaire.

GARANTIE LIMITÉE DE
REFROIDISSEUR DE VIN
Cet appareil de qualité est garantie exempt de tout vice de matière première et de fabrication, s’il est utilisé dans les conditions normales recommandées par
le fabricant.
Cette garantie n’est offerte qu’à l’acheteur initial de l’appareil vendu par Danby ou par l’un des ses distributeurs agréés et elle ne peut être transférée.
CONDITIONS
Les pièces en plastique sont garanties pour trente (30) jours seulement à partir de la date de l’achat, sans aucune prolongation prévue.
Première 12 mois
Pendant les première dix-huit (18) mois, toutes pièces électriques de ce produit s’avèrent défectueuses, y compris les unités ayant des
systèmes obturés, seront réparées ou remplacées, selon le choix du garant, sans frais à l’acheteur INITIAL.
Pour bénéficier du
Danby réserve le droit de limiter le rayon du “Service au domicile” selon la proximité d’un dépot de service autorisé. Le client sera
service sous garantie
responsable pour le transport et tous les frais d’expédition de tout appareil exigeant le service en dehors des limites du “Service au domicile” au dépot de service autorisé le plus proche. S’adresser au détaillant qui a vendu l’appareil, ou à la station technique agréée de
service la plus proche, où les réparations doivent être effectuées par un technicien qualifié. Si les réparations sont effectuées par
quiconque autre que la station de service agréée où à des fins commerciales, toutes les obligations de Danby en vertu de cette garantie
seront nulles et non avenues.
Cette garantie indique en aucun temps la responsabilité de Danby de l’avarie ou dommage de la vin ou autre contenu, soit par les vices de l’appareil, ou soit par
l’utilisation convenable ou inexacte.
EXCLUSIONS
En vertu de la présente, il n’existe aucune autre garantie, condition ou représentation, qu’elle soit exprimée ou tacite, de façon manifeste ou intentionnelle, par
Danby Products Limitée (Canada) ou Danby Products Inc. (E.- U. d’A.) ou ses distributeurs agréés. De même, sont exclues toutes les autres garanties, conditions
ou représentations, y compris les garanties, conditions ou représentations en vertu de toute loi régissant la vente de produits ou de toute autre législation ou
règlement semblables.
En vertu de la présente, Danby Products Limitée (Canada) ou Danby Products Inc. (E.- U. d’A.) ne peut être tenue responsable en cas de blessures corporelles
ou des dégâts matériels, y compris à l’appareil, quelle qu’en soit les causes. Danby ne peut pas être tenue responsable des dommages indirects dus au fonctionnement défectueux de l’appareil. En achetant l’appareil, l’acheteur accepte de mettre à couvert et de dégager Danby Products Limitée de toute responsabilité en
cas de réclamation pour toute blessure corporelle ou tout dégât matériel causé par cet appareil.
CONDITIONS GÉNÉRALES
La garantie ou assurance ci-dessus ne s’applique pas si les dégâts ou réparations sont dus aux cas suivants:
1) Panne de courant;
2) Dommage subis pendant le transport ou le déplacement de l’appareil;
3) Alimentation électrique incorrecte (tension faible, câblage défectueux, fusibles incorrects);
4) Accident, modification, emploi abusif ou incorrect de l’appareil;
5) Utilisation dans un but commercial ou industriel;
6) Incendie, dommage causés par l’eau, vol, guerre, émeute, hostilités, cas de force majeure (ouragan, inondation, etc.);
7) Visites d’un technicien pour expliquer le fonctionnement de l’appareil au propriétaire.
Une preuve d’achat doit être présentée pour toute demande de réparation sous garantie. Prière de garder le reçu. Pour faire honorer la garantie, présenter ce
document à la station technique agréée.
Danby Products Limited
PO Box 1778, 5070 Whitelaw RD, Guelph, Ontario, Canada N1H 6Z9
Telephone: (519) 837-0920 FAX: (519) 837-0449
Danby Products Inc.
PO Box 669, 101 Bentley Court, Findlay, Ohio, U.S.A. 45840
Telephone: (419) 425-8627 FAX: (419) 425-8629
05/08
R
Service sous-garantie
Service au domicile sur modèles d'une capacité plus de 25 bouteilles.
23

Danby Products Limited, Guelph, Ontario Canada N1H 6Z9
Danby Products Inc., Findlay, Ohio USA 45840
OWNER’S MANUAL
GUIDE DU PROPRIÉTAIRE
Model •
Modèle
DWC257BL
For service, contact your nearest service
depot or call:
to recommend a depot in
your area.
Pour obtenir de l’assistance, communiquez
avec votre centre de service le plus rap-
proché ou composez le :
1-800-263-2629
pour localiser le dépositaire de votre
région
R
Free-Standing Wine Cooler
The model number of your wine cooler is found on the
serial plate located on the back, top-left hand corner of
the refrigerator.
All repair parts available for purchase or special order
when you visit your nearest service depot. To request
service and/or the location of the service depot nearest
you, call the toll free number listed to the left in Canada
and the U.S.
When requesting service or ordering parts, always provide the following information:
• Product type
• Model number
• Part description
Refroidisseur de Vin pour application
autonome
Le numéro de modèle se trouve sur la plaque signalétique au dos de l’unité.
Vous pouvez vous procurer/commander toute pièce de
rechange chez votre dépositaire le plus rapproché.
Pour toute demande de service ou pour localiser le
dépositaire/centre de service le plus rapproché, composez le numéro SANS FRAIS.
Pour toute demande de service ou commande de
pièces, fournissez toujours l’information suivante :
• Type de produit
• Numéro de modèle
• Description de la pièce requise
1-800-263-2629
Printed in P.R.C
?
 Loading...