


Danby Products Limited, Ontario, Canada N1H 6Z9
Danby Products Inc., Findlay, Ohio, USA 45840
Model • Modèle • Modelo
V1.03.11 DM
• Owner’s Use and Care Guide
• Guide d’utilisation et soin de Propriètaire
• Guía a utilizar y a cuidar del Proprietario
PORTABLE WASHING MACHINE
LAVEUSE À CHARGEMENT SUPERIEUR
LAVADORA DE CARGA SUPERIOR
DWM17WDB

Contents
CAUTION:
PRECAUTION:
Read and follow all safety rules and operating instructions before first use of this
product.
Veuillez lire attentivement les consignes de
sécurité et les instructions d’utilisation avant
l’utilisation initiale de ce produit.
LAVEUSE À CHARGEMENT SUPERIEUR
Guide d'utilisation et d'entretien ........................
• Bienvenue
• Renseignements importants relatifs à la sécurité
• Caractéristiques et pièces
• Notice d’installation
• Mode d’emploi
• Soins et Entretien
• Dépannage
• Garantie
LAVADORA DE CARGA SUPERIOR
Guía para utilizar y cuidar del Proprietario........
• Bienvenida
• Información de seguridad importante
• Características y piezas
• Instrucciones d’instalación
• Instrucciones de funcionamiento
• Cuidado y mantenimiento
• Resolución de fallas
• Garantia
2-14
PORTABLE WASHING MACHINE
Owner’s Use and Care Guide .............................
• Welcome
• Important Safety Information
• Features
• Installation
• Operation Instructions
• Care and Maintenance
• Troubleshooting
• Warranty
Model • Modèle • Modelo
DWM17WDB
15-27
28-40
PRECAUCION
Lea y observe todas las reglas de seguridad
y las instrucciones de operación antes de
usar este producto por primera vez.

Welcome
Thank you for choosing a Danby appliance. This Owner’s Use and Care Guide will provide you with valuable information necessary for the proper care and maintenance of your new appliance. If properly maintained, your Danby appliance will give you many years of trouble free operation. Please take a few moments to read the instructions thoroughly
and familiarize yourself with all of the operational aspects of this appliance.
For easy reference, may we suggest you attach a copy of your sales slip/receipt to this page, along with the following
information, located on the manufacturers nameplate on the side of the unit.
Model Number:
Serial Number:
Date of Purchase:
This information will be necessary if your unit requires servicing and/or for general inquiries. To contact a Customer
Service Representative, call Danby TOLL FREE: 1-800-263-2629
2
WARNING
Improper connection of the grounding plug can result in risk of
Fire, Electric Shock and/or injury to Persons associated with the
appliance. Check with a qualified service representative if in doubt
that the appliance is proplery grounded.

Important Safety Information
READ AND FOLLOW ALL SAFETY INSTRUCTIONS
SAFETY
PRECAUTIONS
FOR YOUR SAFETY: Read these instructions carefully before operating the unit.
• Read all instructions before using the portable washer.
• Do not wash articles that have been previously cleaned in, washed in,
soaked in, or spotted with gasoline, dry-cleaning solvents, or other
flammable or explosive substances, as they give off vapours that could
ignite or explode.
• Do not add gasoline, dry-cleaning solvents, or other flammable or
explosive substances to the wash water. These substances give off
vapours that could ignite or explode.
• Under certain conditions, hydrogen gas may be produced in a hot-water
system that has not been used for 2 weeks or more. HYDROGEN GAS
IS EXPLOSIVE. If the hot-water system has not been used for such a
period, before using a washing machine, turn on all hot-water faucets
and let water flow from each for several minutes. This will release any
accumulated hydrogen gas. As the gas is flammable, do not smoke or
use an open flame during this time.
• Before you throw away your old portable washer: Take off the lid.
• Never allow children to operate, play with, or crawl inside the portable
washer. Close supervision of children is necessary when the washer is
used near children.
• Do not reach into the washer if the agitator or inner tub is moving.
• Do not tamper with controls.
• Do not repair or replace any part of the washer or attempt any servicing
unless specifically recommended in the user-maintenance instructions or
in published user-repair instructions.
• Never clean portable washer parts with flammable fluids. The fumes can
create a fire hazard or explosion.
• Do not place the washer in steamy rooms or where the washer is directly
exposed to rain. Moisture may destroy the electrical insulation causing
an electrical shock hazard.
• Do not store, use gasoline, or any other flammable vapors and liquids in
the vicinity of this or any other portable washer. The fumes can create a
fire hazard or explosion.
• If the power cord is damaged, it must be replaced by the manufacturer or
it’s service agent or a similar qualified person in order to avoid a hazard.
Save these instructions
3
DANGER
Risk of child entrapment. Child entrapment and suffocation are not
problems of the past. Junked or abandoned appliances are still
dangerous . . . even if they will “just sit in the garage a few days.”
4
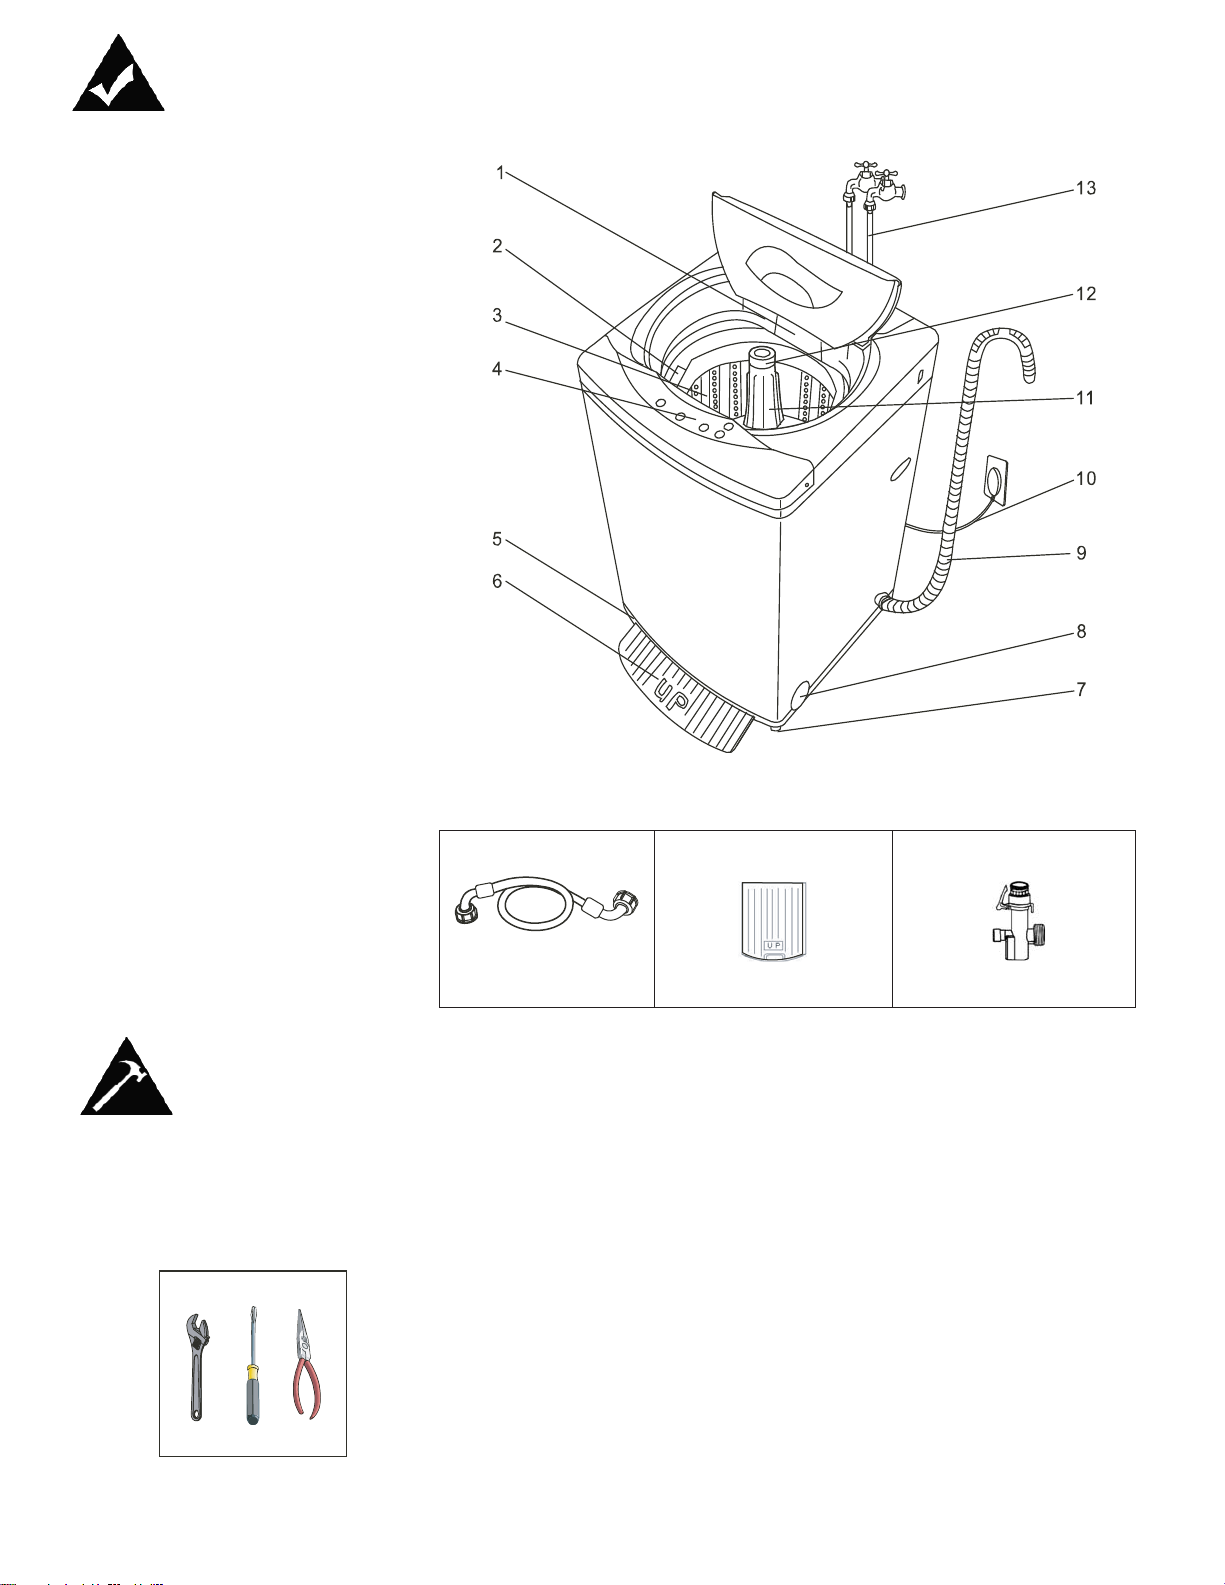
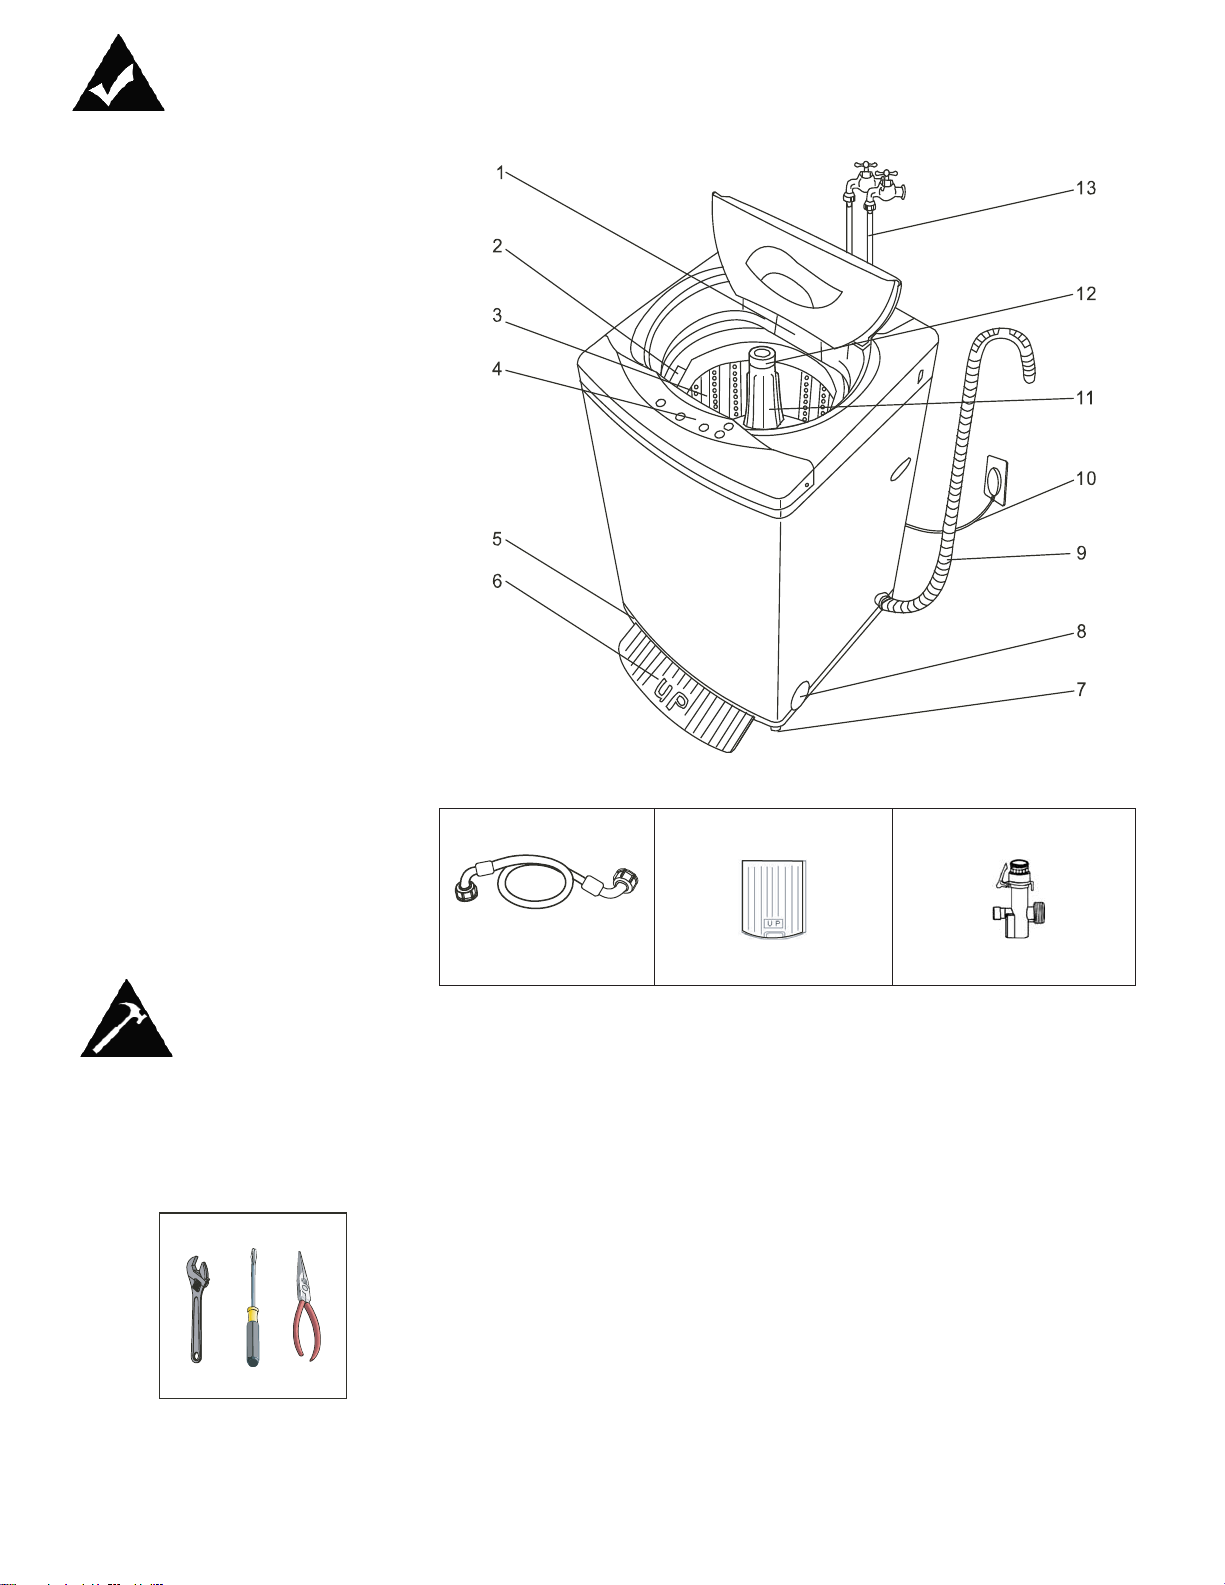
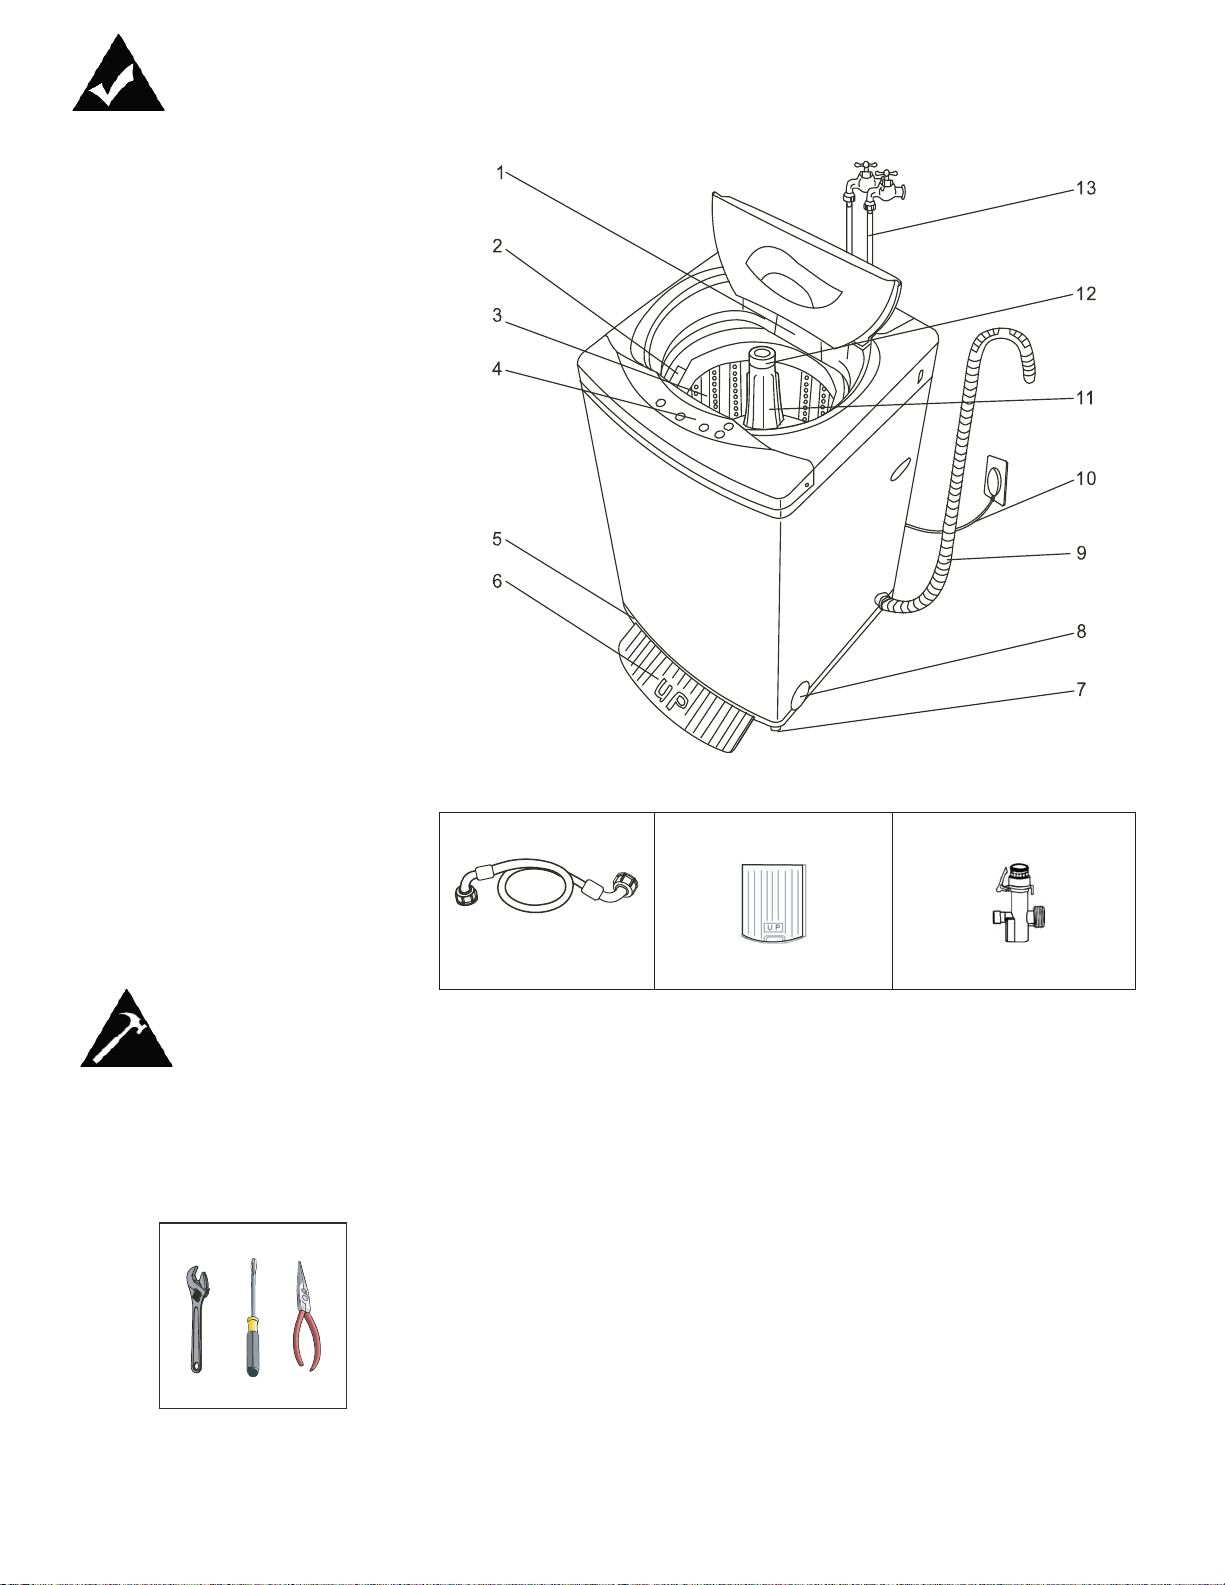
Features and Parts
Installation Instructions
1. DETERGENT CASE
2. SOFTENER DISPENSER
3. INNER TUB
4. CONTROL PANEL
5. BASE
6. NOISE PROOF PLATE
7. ADJUSTABLE FOOT
8. LEVEL ADJUSTABLE KNOB
9. DRAIN HOSE (1PC)
10. POWER SUPPLY CORD
11. AGITATOR
12. LINT FILTER
13. INLET HOSES (2PCS)
ACCESSORIES
INLET
HOSE
NOISE PROOF PLATE
1 PIECE
1 PIECE
CONNECTOR
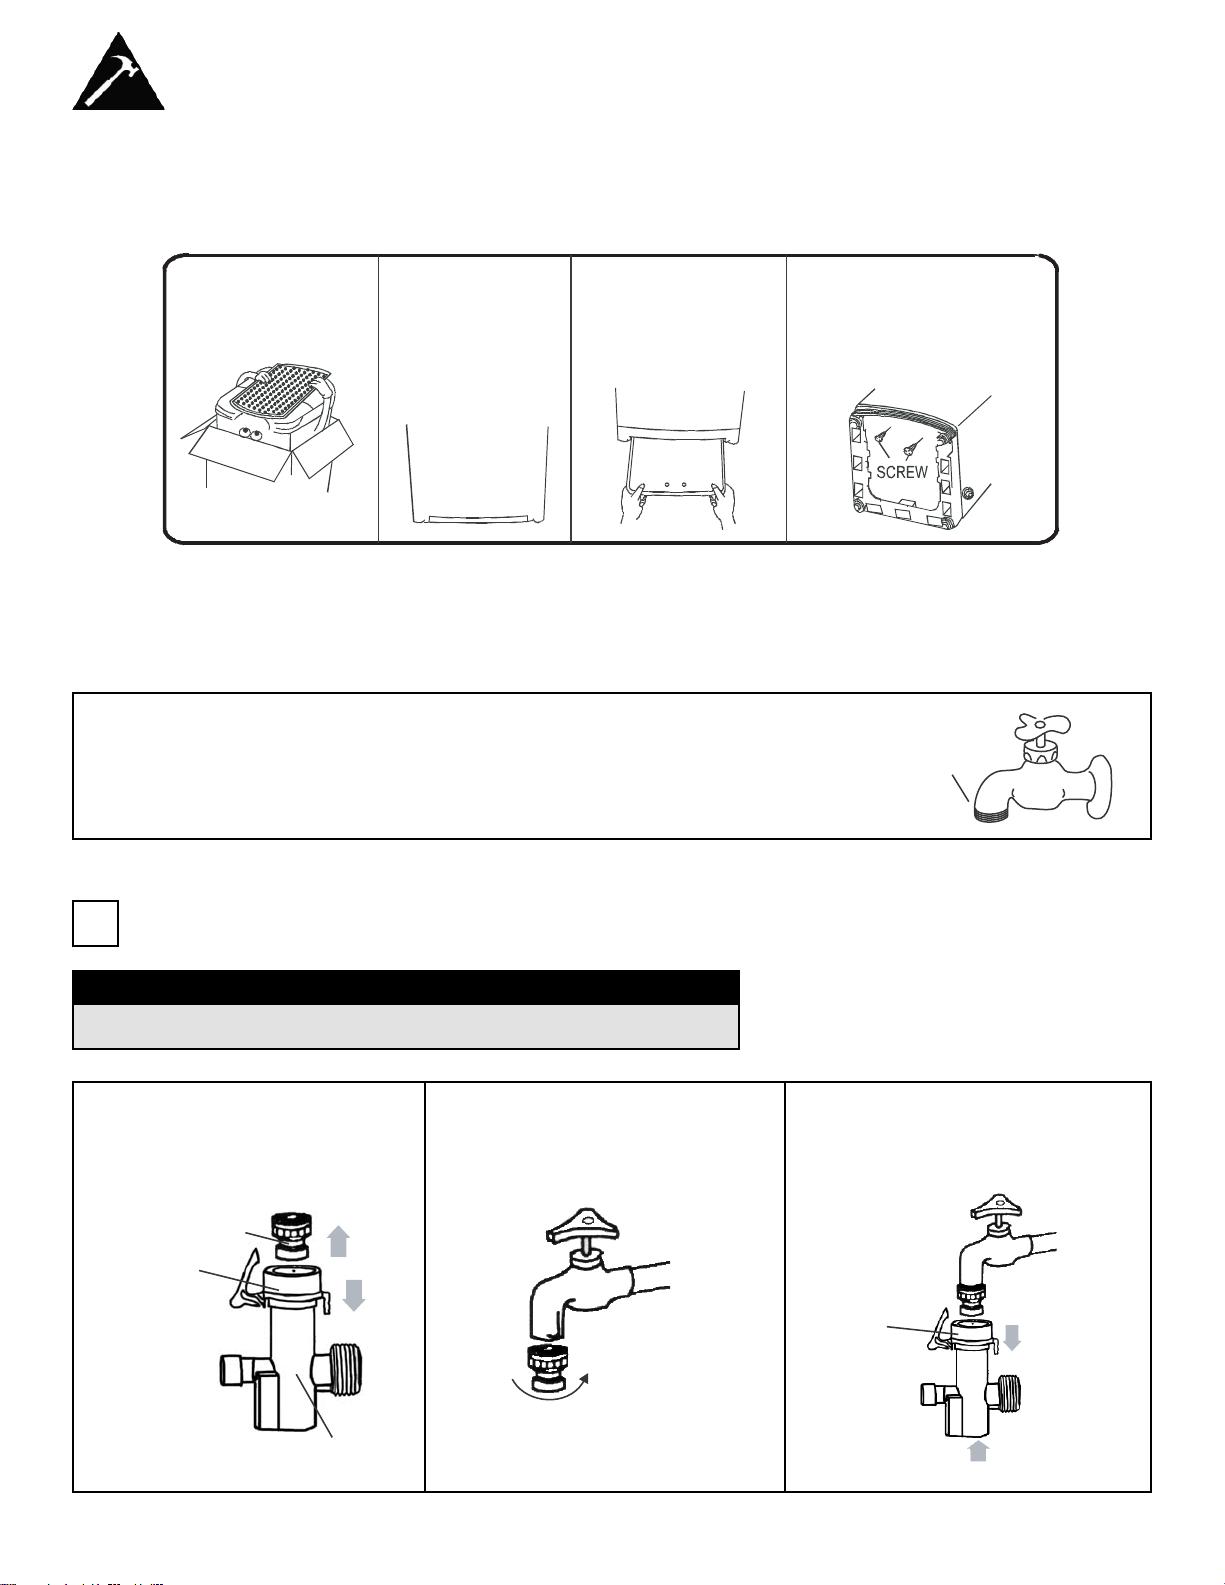
BEFORE USING YOUR
PORTABLE WASHER
Remove the exterior and interior packing.
You will need the following tools:
• Wrench
• Pliers
• Screwdriver
Check to be sure you have all of the following parts:
• 2 Inlet Hoses
• Faucet Adapter
• 1 Noise Proof Plate With Screws
• 4 Casters
• Remove shipping brace. Note - It should be saved and used (to prevent
damage to washer components) whenever washer is moved or
transported to a new location.
• Clean the interior surface with lukewarm water using a soft cloth.
• Allow 2 inches of space between the back and sides of the appliance.
Screwdriver
Wrench
Pliers
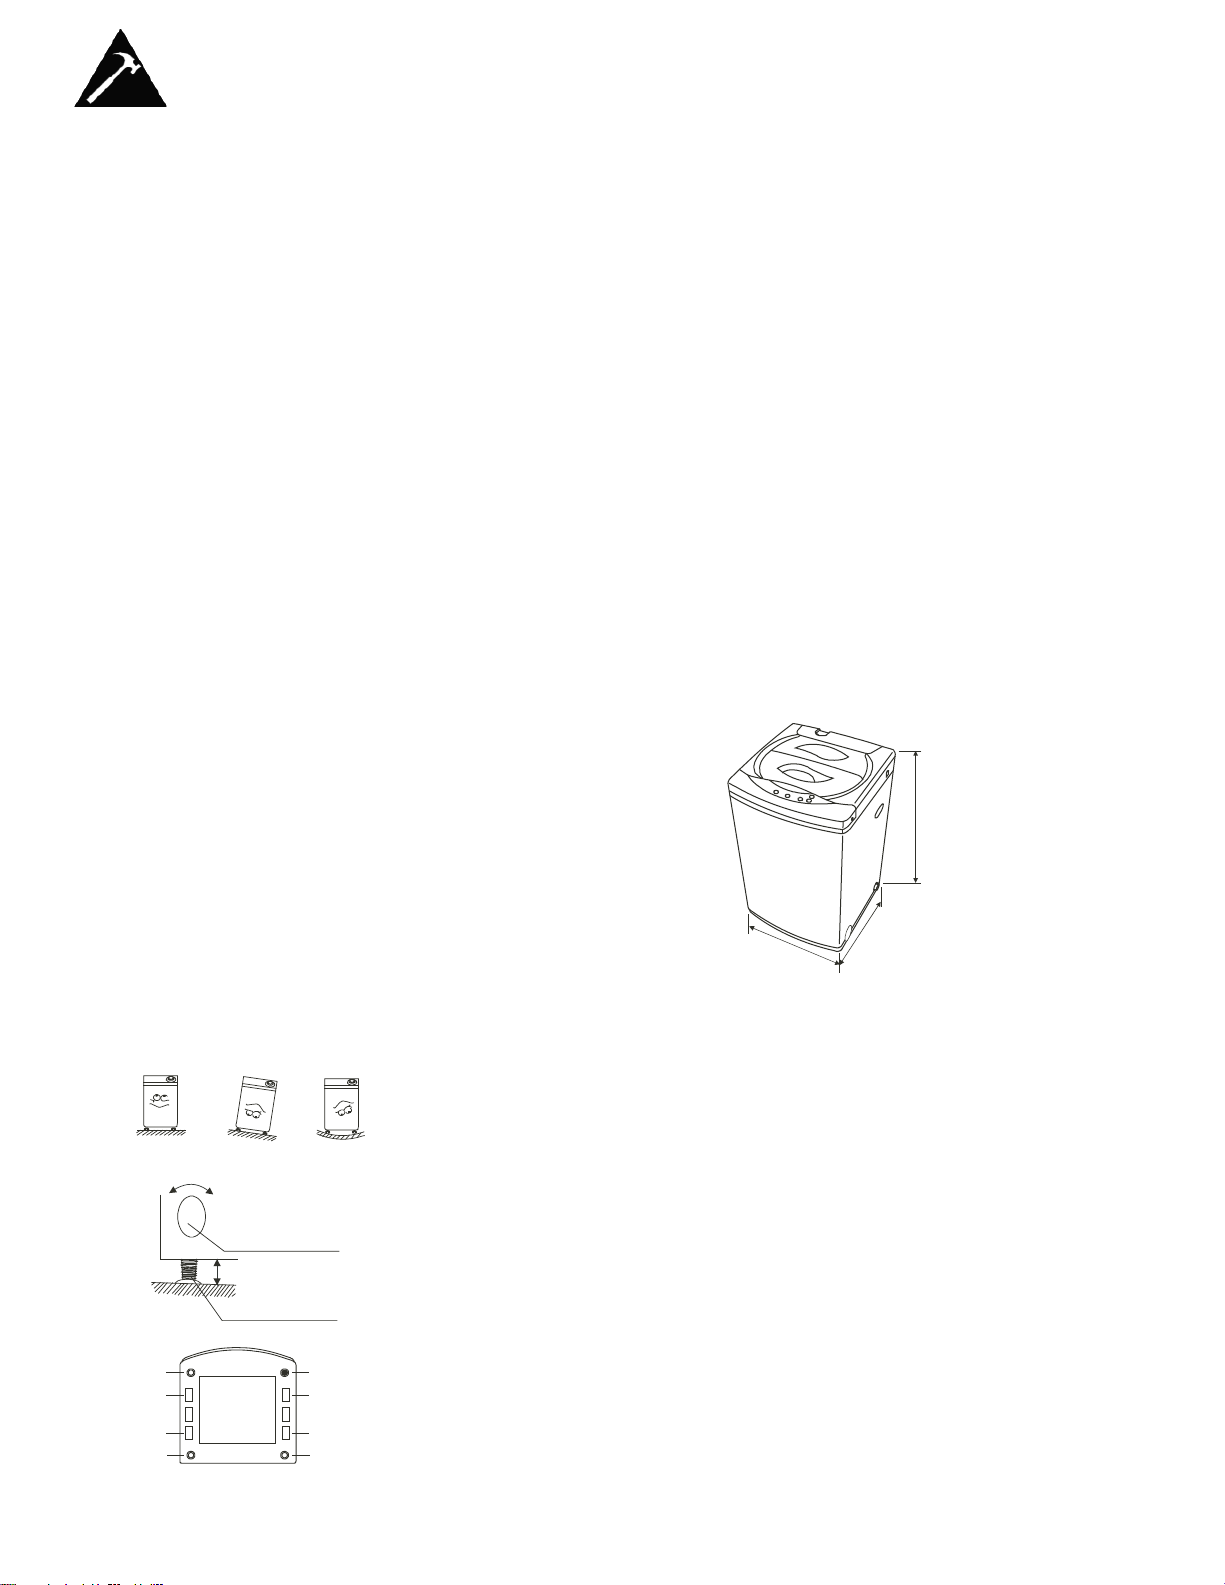
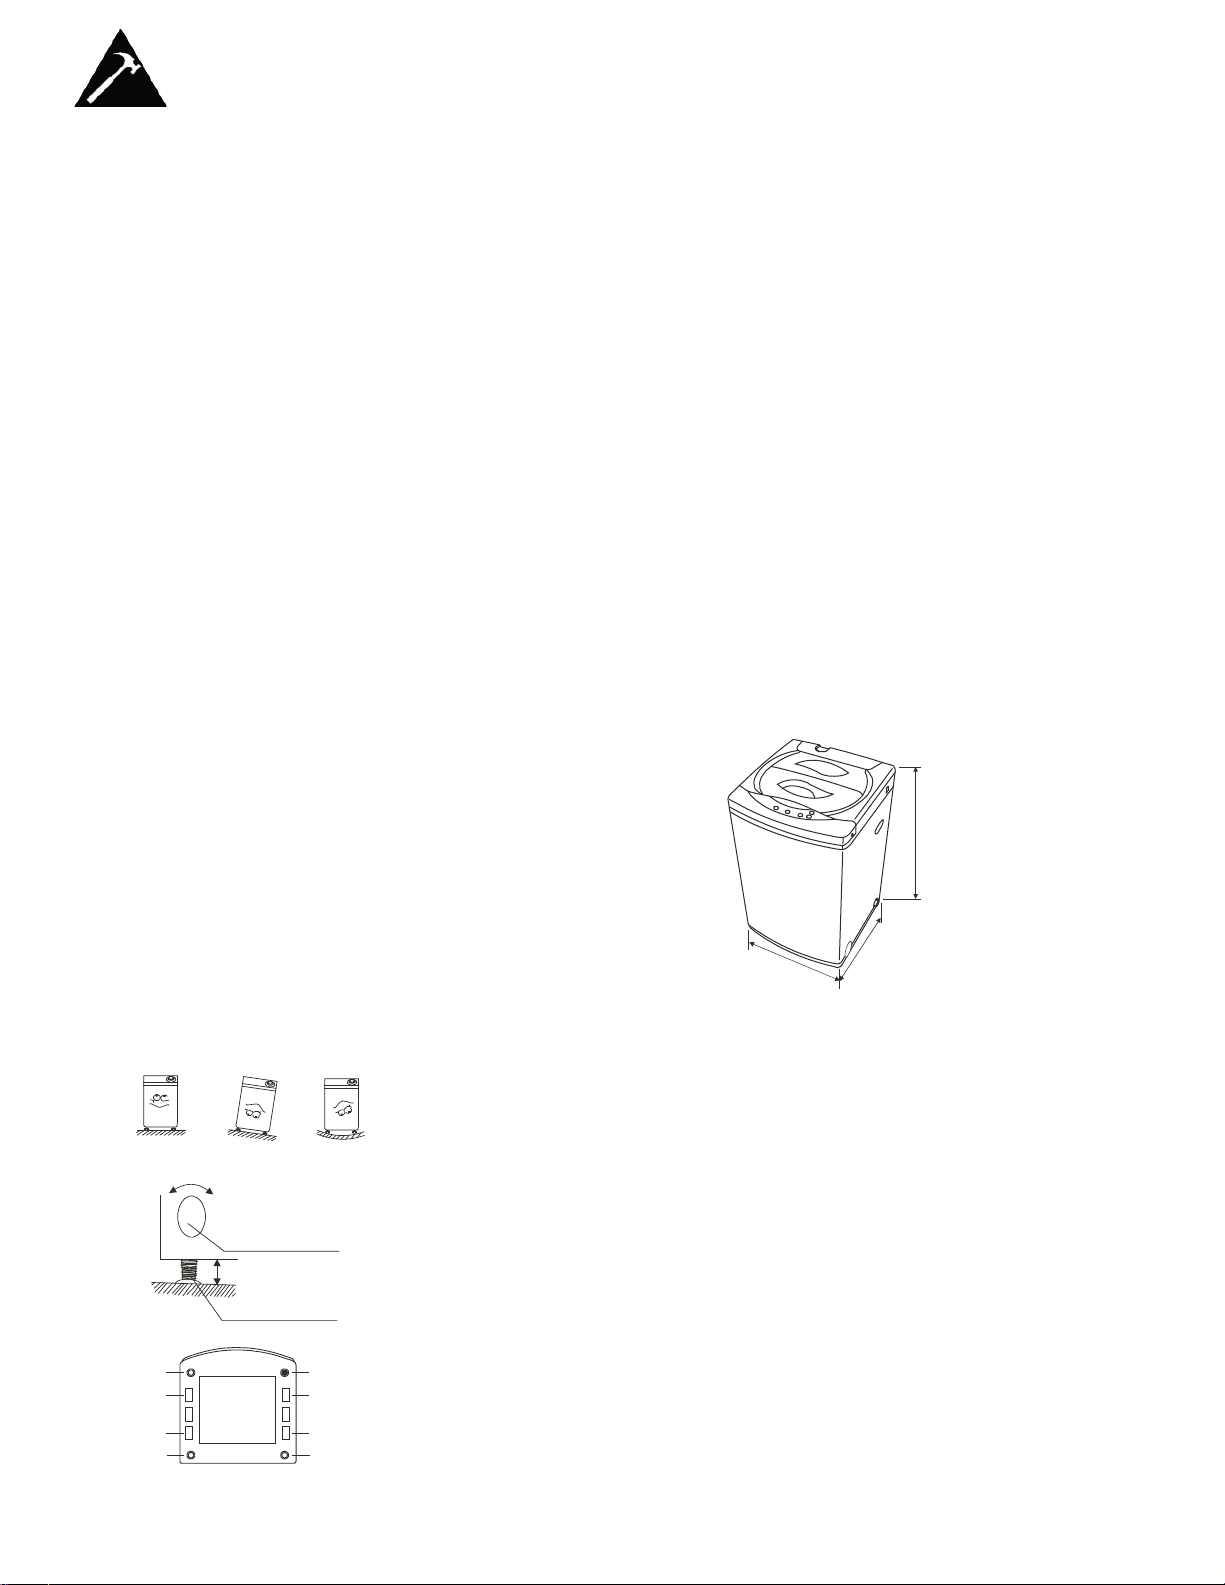
860mm
550mm
545mm
Installation Instructions
5
BEFORE USING YOUR
PORTABLE WASHER
(con’t)
• Put your laundry into the washer evenly. Uneven laundry may cause
noise or vibration.
• Don’t use excessively hot water (50°C or more). Plastic parts may be
deformed or damaged. Also, clothing may be deformed or bleached.
• Before washing, check all pockets. If nails or pins remain in pockets, they
may damage the washer or clothes.
• Never splash water on the control panel.
• Plug the washer into an exclusive, properly installed-grounded wall outlet.
• Do not under any circumstances cut or remove the third (ground) prong
from the power cord. Any questions concerning power and/or grounding
should be directed toward a certified electrician.
SELECTING A
LOCATION
Before you install the portable washer, select a location with the following
characteristics:
• A hard level surface (if the surface is uneven, see Adjusting The
Adjustable Foot).
• Away from direct sunlight. Direct sunlight may affect the acrylic coating,
plastic and electrical components.
• Adequate ventilation.
• Away from sources of heat such as coal or gas. Make sure that the
washing machine does not stand on its power cord. Ventilation openings
must not be obstructed by carpeting when the portable washer is
installed on a carpeted floor.
LEVELING LEGS
If the floor is uneven adjust the adjustable foot (do not insert pieces of
wood, or any other objects under the feet).
• Loosen the adjustable foot by turning the level adjustable knob with your
hand until it is at the desired height.
• Tighten the adjustable foot by turning the level adjustable knob in the
reverse direction.
• Place the washer on a sturdy flat surface.
• If the washer is placed on an uneven or weak surface, noise or vibration
occurs (Allowable is 1° ).
• For portable applications, the washing machine comes equipped with
four north/south casters that can easily be installed to assist in the
movement of the machine to and from the sink. Lay the unit on its back.
Install the casters into the bottom of the base as depicted.
• Return the machine to the upright position. When the machine is
positioned for operation set the height of the adjustment foot slightly
higher than the front caster to prevent movement of the machine during
wash and spin operation.
NOTE: Not all movement will be totally eliminated, this is normal.
Correct
Incorrect
Incorrect
Loosen
Tighten
Level Adjustable
Knob
Adjustable Foot
Fixed Foot
Caster
Caster
Fixed Foot
Adjustable foot
Caster
Caster
Fixed Foot
Bottom View

Installation Instructions
6
INSTALLING A NOISE
PROOF PLATE
Take the noise proof
plate out of the
package .
The opening of the
noise proof plate is
at the bottom of
the machine.
Insert the noise proof
plate into the washing
machine base.
Lay down the machine
and secure the noise
proof plate by fastening
the two set screws.
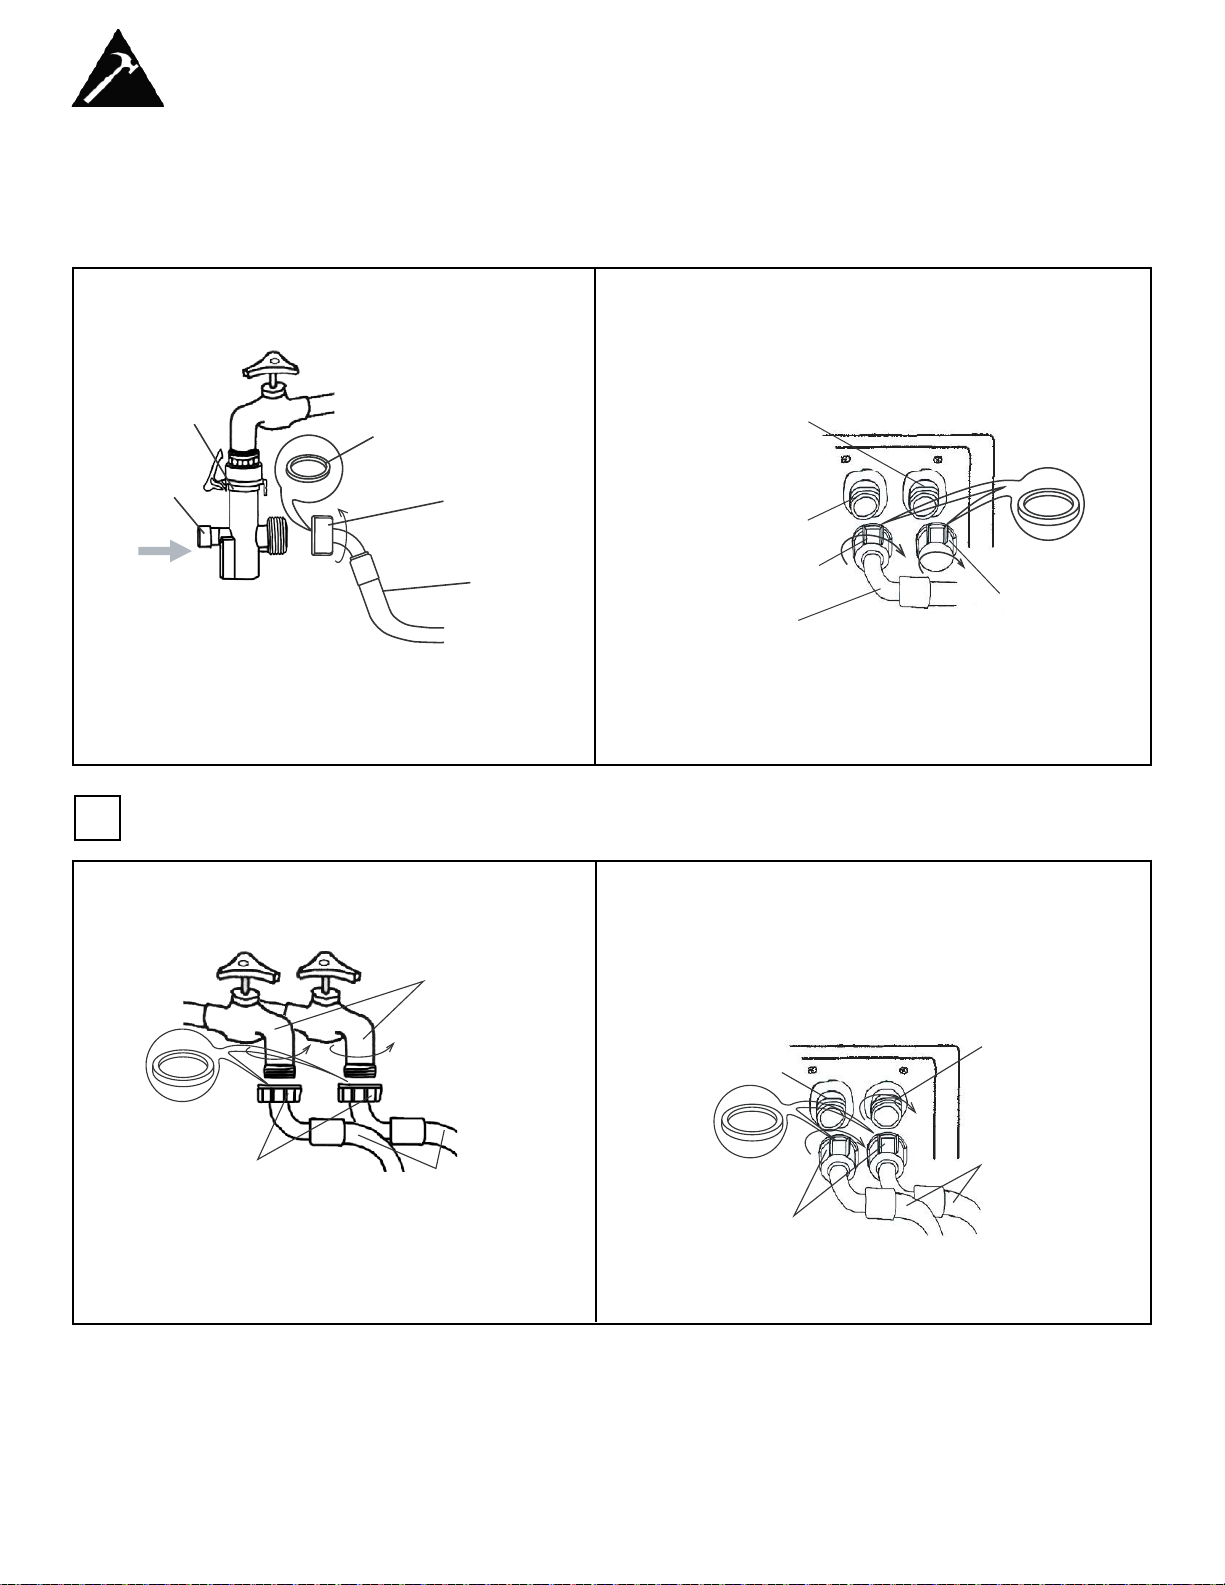
CONNECTING THE
WATER SUPPLY HOSE
Standard 3/4 Inch
WATER FAUCET
Water supply faucets must fit standard 3/4 inch (19.05mm)
female garden hose couplings. Do not use slip-on or clamp-on
connections.
Note: Refer to section on water supply requirements before connecting water inlet hoses.
If you just have one water supply line (cold or warm water), connect the inlet hose to the cold water
connector on the water mixing valve.
IMPORTANT
In this situation you can not set the wash temperature to hot.
Hold down the plate of the inlet hose
connector and disconnect the tap
connector from the inlet hose
connector.
Screw on the tap connector counter
clockwise.
Hold down the plate and connect
the inlet hose connector to the tap
connector.
Tap
Connector
Plate
Inlet hose
connector
Plate
1
7
Installation Instructions
Connect the water inlet hose to the connector by
turning the connecting nut.
Be sure a rubber
ring is inside the
connecting nut.
Plate
Release
button
Connecting
nut
Water
inlet hose
Rubber
Ring
To release, turn off the water faucet and press the
release button to release the pressure of water
then press down the plate.
CONNECTING THE
WATER SUPPLY HOSE
Do not unscrew the lid of the hot water connector on the
water mixing valve, and then connect the other end of
water inlet hoses to the cold connector in water mixing
valve by turning the connecting nut.
Hot water
connector
Cold water
connector
Connecting
Nut
Water
inlet hose
Lid of
hot water
connector
Rubber
Ring
2
If you have both cold and hot water supplied, connect the inlet hose cold to cold and hot to hot.
Connect the water inlet hose to the tap connector by
turning the connecting nut.
Water faucet
Rubber
ring
Connecting nut
Water
inlet hose
To release, turn off the water faucet and turn on the
washer to run about 5 minutes and then disconnect the
inlet hoses.
Unscrew the lid of the hot water connector in water mixing valve, and then connect the other end of water inlet
hoses to the connectors in water mixing valve by turning
the connecting nut.
Hot water
connector
Cold water
connector
Water
inlet hose
Rubber
ring
Connecting
nut
Note:
1. Do not over tighten or cross thread the nut in order to prevent the elbow of the water inlet from breaking.
2. If water seeps, you should check the nut to see if there is a rubber sealed ring.
8
Installation Instructions
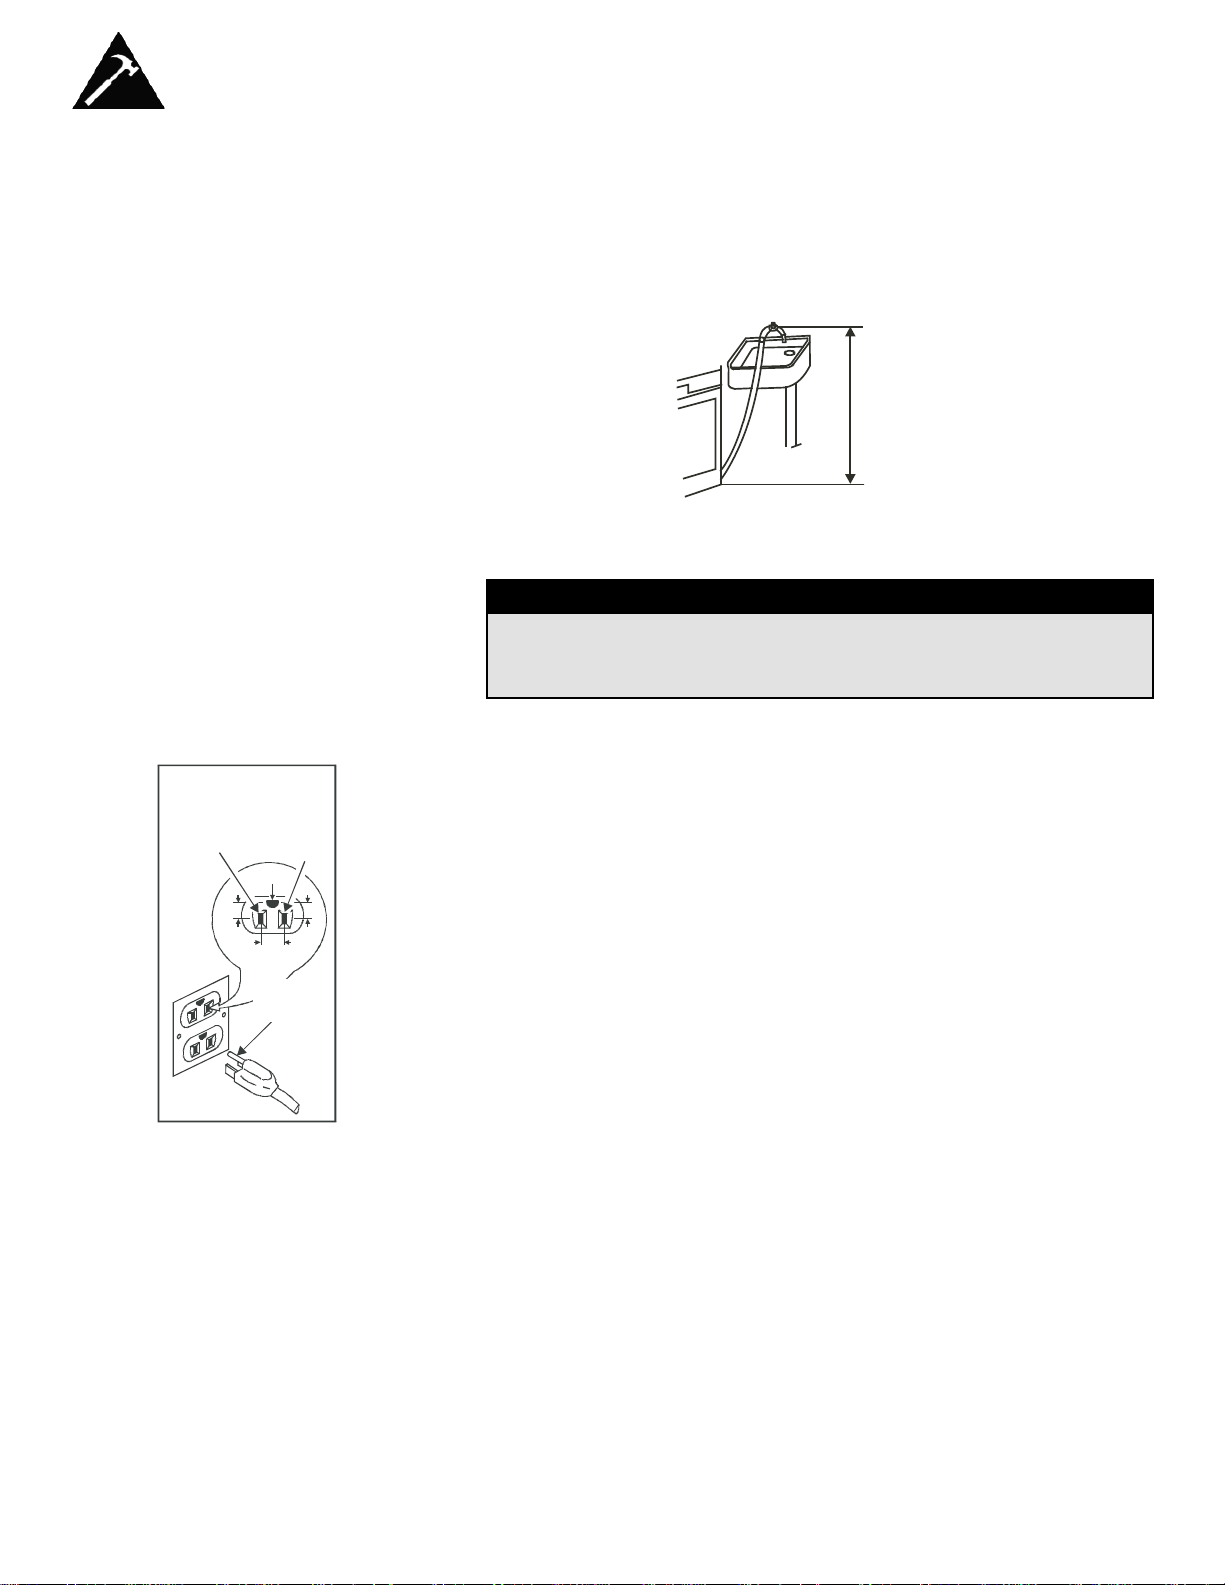
POSITIONING THE
DRAIN HOSE
Connect the drain hose to the water outlet of the washing machine then
fasten it with a pinchcork. Since both horizontal or vertical drainage is
available, the drain hose can be laid down on the ground, or in the basin
or bathtub, as long as the drainage range is not higher than 70 cm (27”).
0.7-1.2m
ELECTRICAL
CONSUMPTION
IMPORTANT
Improper use of the grounded plug can result in the risk of electrical shock. If the power cord is damaged, have it replaced by an
authorized service technician.
This portable washer should be properly grounded for your safety. The
power cord of this portable washer is equipped with a three-prong plug
which mates with standard three prong wall outlets to minimize the possibility of electrical shock.
Do not under any circumstances cut or remove the third ground prong
from the power cord supplied.
This portable washer requires a standard 120 Volts~./60Hz electrical outlet
with three-prong ground.
To prevent injury the cord should be secured behind the portable washer
and not left exposed or dangling.
Never unplug the portable washer by pulling the power cord. Always grip
the plug firmly and pull straight out from the receptacle.
Do not use an extension cord with this appliance. If the power cord is too
short, have a qualified electrician or service technician install an outlet
near the appliance.
STANDARD 120 VOLTS,
60 HERTZ, 3-WIRE
SOCKET
L1
Neutral
Side
ROUND
GROUNDING
PRONG
120 12
V.A.C.
¨
V.A.C.
115 12
¨
V.A.C.
0
Operating Instructions
9
LEVEL
PR OG RA M
NO RM AL
HARD
SPEED Y
GE NTLE
SOAK
ST AR T/PA USE
POWER
CO LD
HO T
MEDIUM
LOW
EXTRA LOW
FUNC TION
FULLY AUTO MA TIC W ASH INGM ACHINE
WA SH
SPIN
HIGH
WA TER
SU PPL Y
2 3 4 5
67
8
9
1
10
WA TER
RINSE
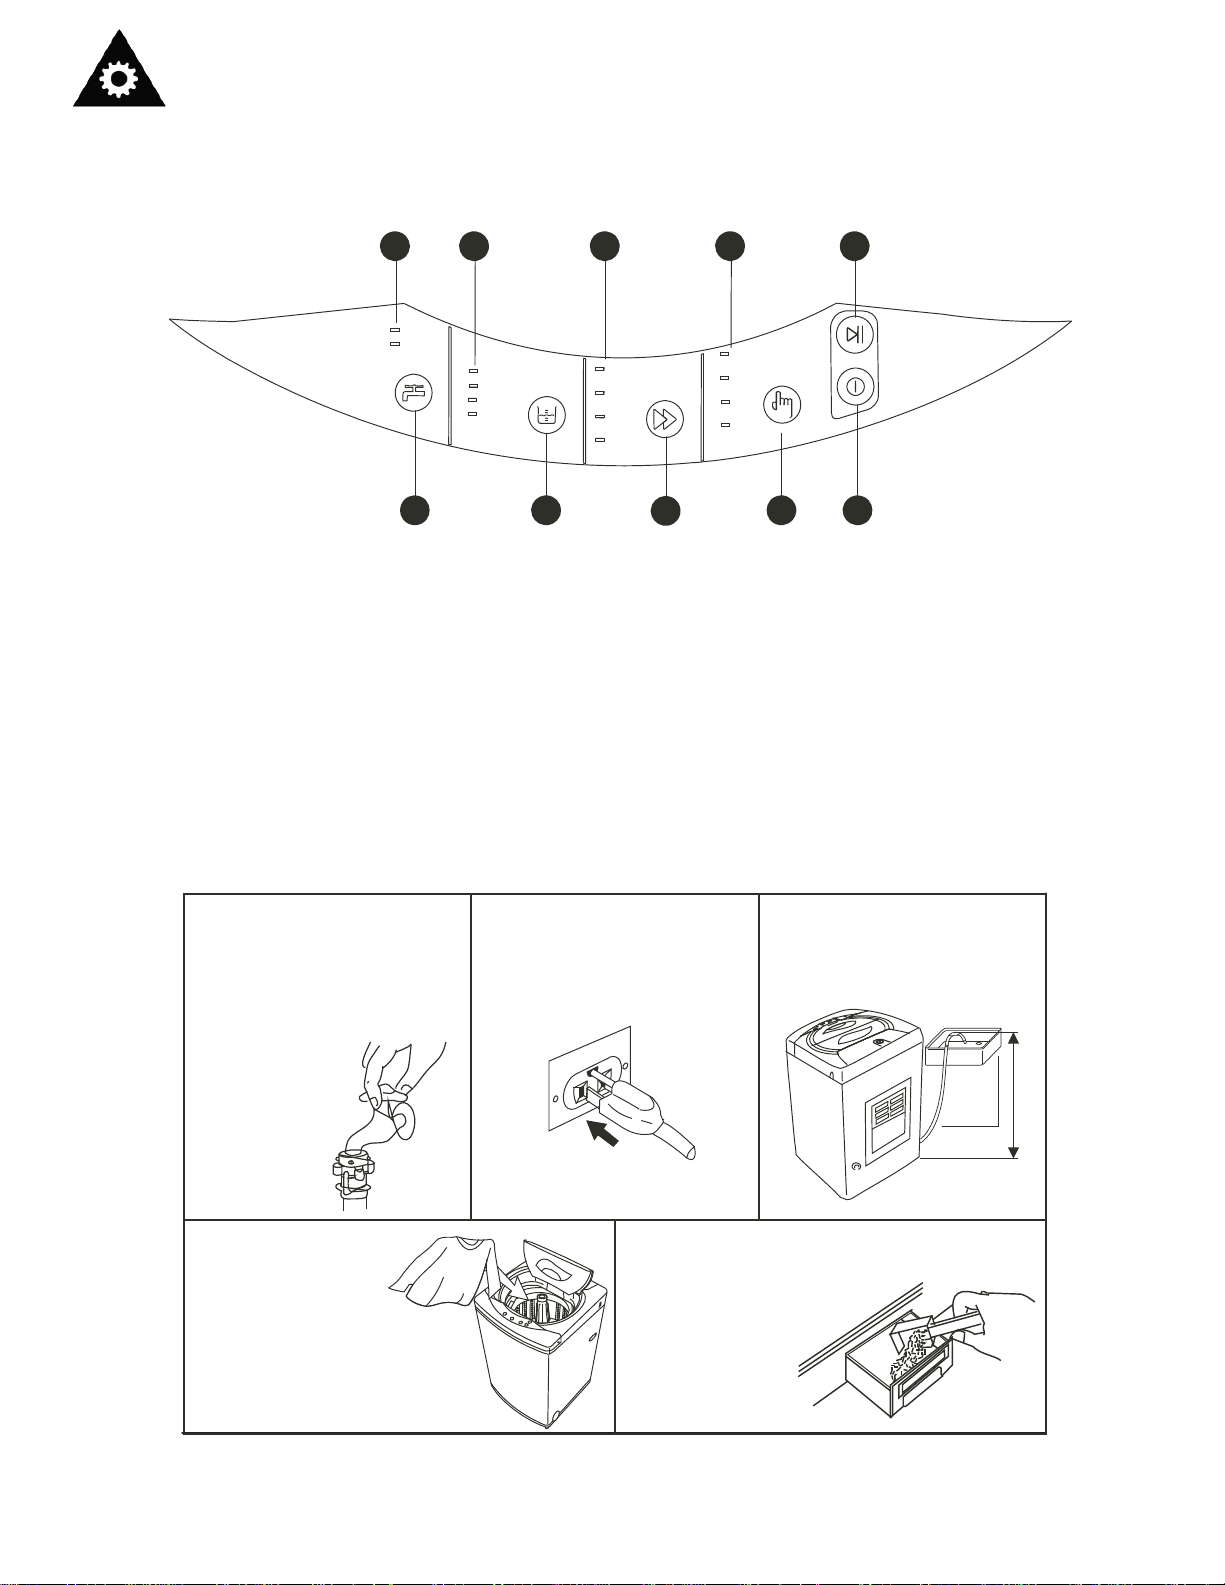
CONTROL PANEL
1. Water Temperature Indicator
2. Water Level Indicator
3. Wash Mode Selection Indicator
4. Process Selection Indicator
5. Start/Pause Button
6. Power Button
7. Function Selection Button
8. Wash Selection Button
9. Water Level Selection Button
10. Water Temperature Selection Button
PREPARATION
0.7m~1.2m
1) Connect the inlet hose and
turn on the faucet, Don’t
switch on the power if water
pressure is lower than 0.05
Mpa and higher than 0.5
Mpa.
2) Open the faucet.
3) Put the plug into the
socket. For safety the plug
should have ground
connection.
4) Insert the end of the drain
hose into the hook shelf,
and hang the drain hose
over a drain outlet.
5) Put the wash load
into the tub and
close the lid.
If the lid is not
closed the washing
machine will not
operate.
6) Add the suitable quantity
of detergent into the
detergent dispenser.
Operating Instructions
10
BEFORE WASHING
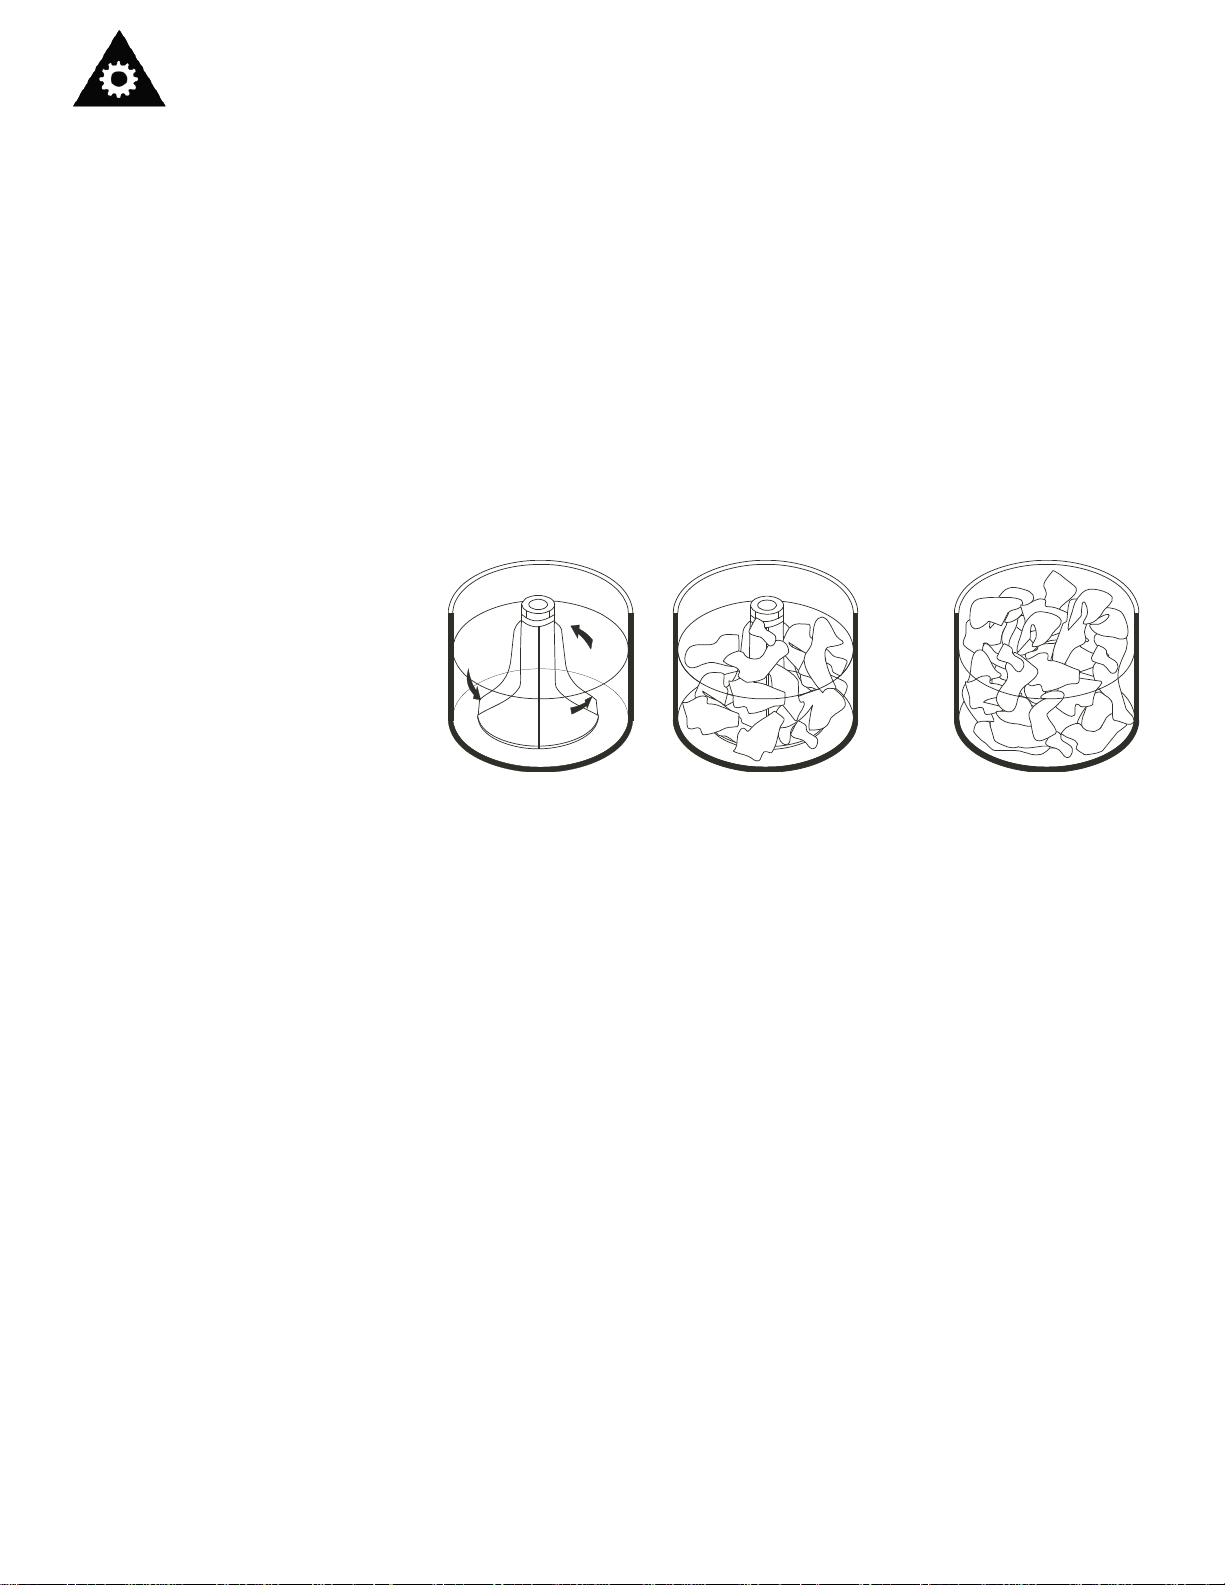
Prepare the wash load. Mix large and small articles in a load to get the
best washing results. Drop articles loosely into the inner tub. Do not pack
articles in or wrap them. Articles should move freely through the wash
water for best cleaning results. Articles should rollover, sink and then
reappear.
When washing very large articles, do not fill inner tub as full as with other
loads. The water level in your washer should fit the size of your wash load.
Small load will use lower water levels. There must be enough water in the
inner tub to allow articles to move and turn over freely. Overloading the
inner tub can result in poor washing and rinsing. Overloading may also
cause wrinkling and tearing of articles.
RIGHT WRONG
WATER LEVEL
OPERATING
Press down the power button.
Press down the water level button.
Choose appropriate water level according to wash load quantity and then
the corresponding indicator will blink.
Water temperature choice
Push down the water temperature choice button, you can choose the inlet
(cold water or hot water). When the cold-water indicator and the hot-water
indicator turn on simultaneously, means you chose the warm water.
NOTE: The washer will provide a cold rinse in all TEMPERATURE
settings.
IMPORTANT: A single cold hose system does not allow the washing
machine to automatically (select) regulate incoming water temperatures to
match those listed on the control panel such as WARM or HOT.
Press down the program select button.
Choose the appropriate program mode according to wash load quantity
and then the corresponding indicator blink.
Press down the function select button.
Choose the desired function group and then the corresponding indicator
will blink.
Press down the Start/Pause button once and the machine will begin
operation.
Please press this button to stop the normal operation, if it continues to
work, press it again. Water level can be reset during the normal operation.
If higher water level is selected, the machine will operate after refilling the
water.

Operating Instructions
11
FUNCTIONS
Each wash is preprogrammed; see the details in the wash program chart.
SOAK
WASH
RINSE
SPIN
Normal
Hard
Speedy
Gentle
20 min
30 min
10 min
10 min
12 min
12 min
5 min
4 min
2 cycles
2 cycles
1 cycle
2 cycle
5 min
5 min
2.5 min
5 min
Note:
Clothes easily discolored should be washed separately to prevent
inter-dyeing.
• If you want to change a selected program, press the Start/Pause button first, then
press the Program button before pushing Start/Pause button again to restart.
• When Rinse & Drain program is on, do not use detergent.
• If you want to drain water during washing, press the Start/Pause button, then
select Rinse and Drain program. Press Start/Pause button again to restart.
• If you open the lid, all the operations would be interrupted within 7 seconds,
closing the lid the operation would continue.
SO AK WA SH RINSE SPIN
Normal
Hard
Speedy
Gentle
20 Minutes 12 Minutes 2Cycles 5 M inutes
30 Minutes 12 Minutes 2Cycles 5 M inutes
10 Minutes 5 M inutes 1Cycle 2.5Minutes
10 Minutes 4 M inutes 2Cycles 5 M inutes

12
Care and Maintenance
CLEANING
• Clean the surface of your portable washer regularly with soft fabric.
• Clean the inner tub regularly, especially immediately after starch or
bleach operation.
• Clean the filter in the inlet valve or inlet hose regularly in order to prevent
it from clogging.
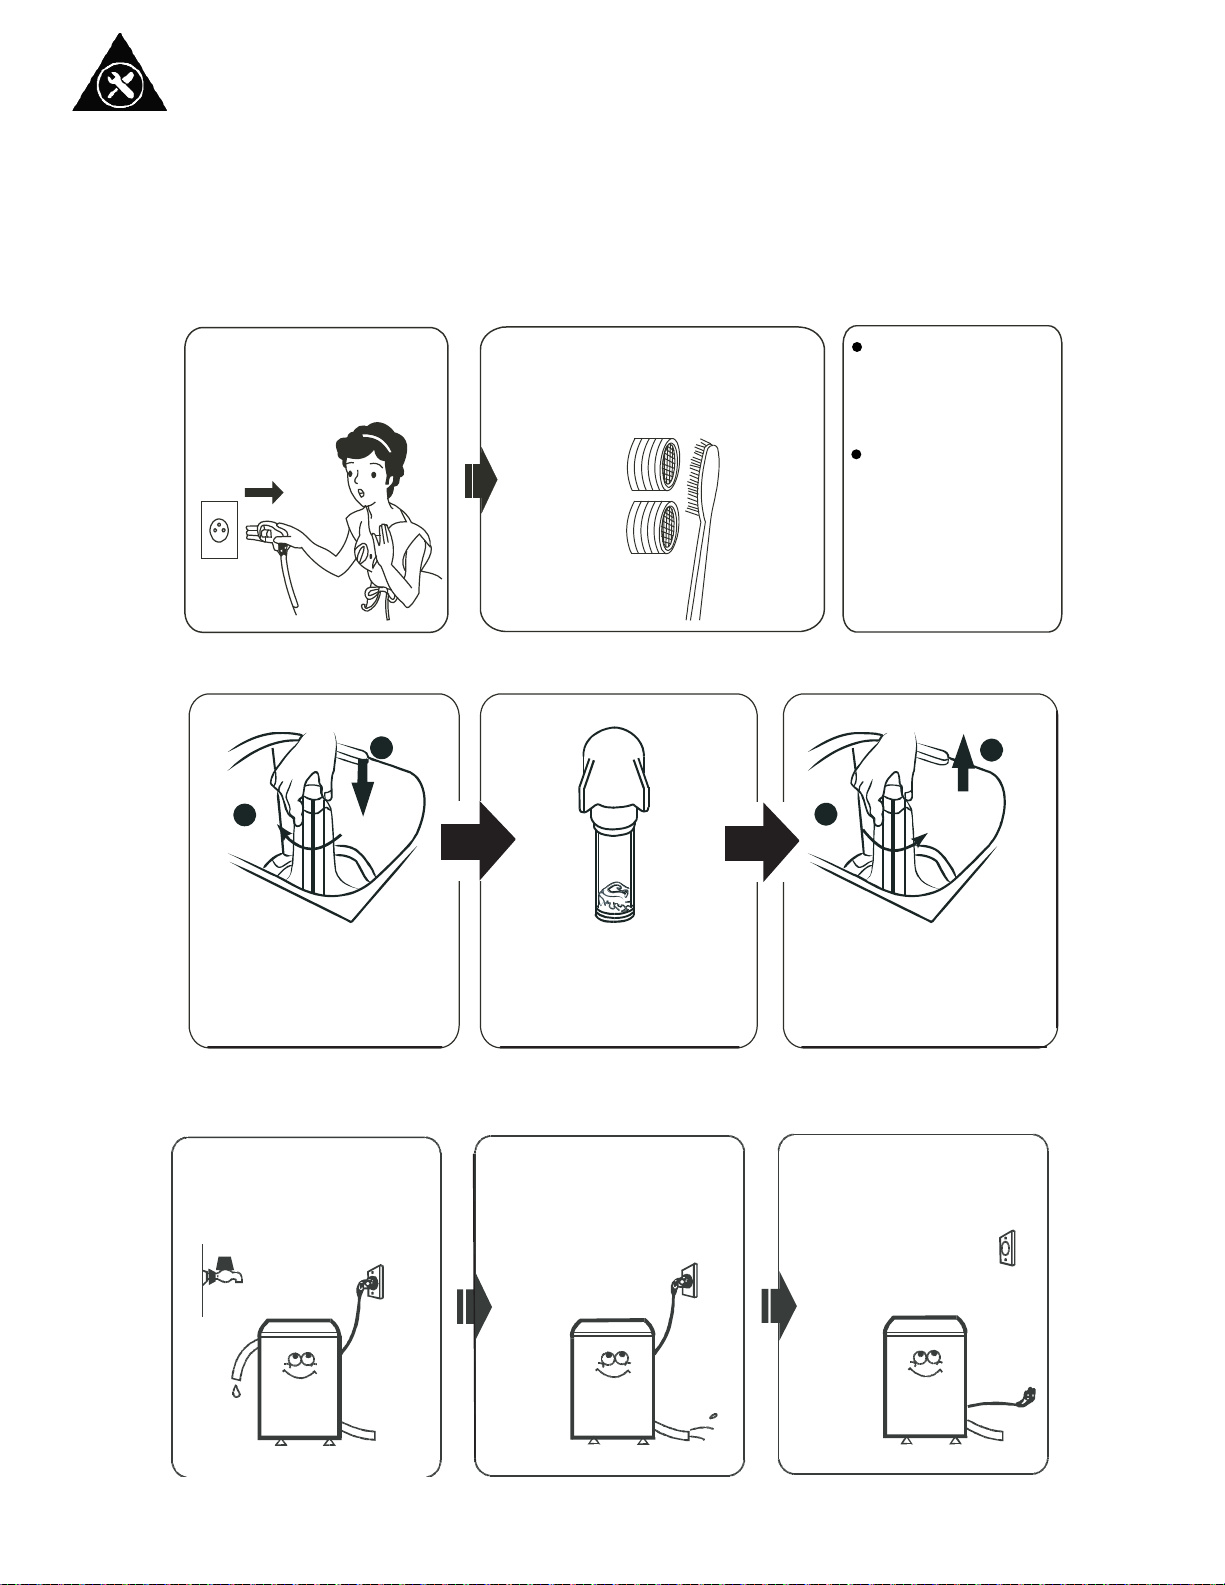
1. Unplug the power cord.
2. Remove the inlet hose and
clean the filter with a brush.
Clean the surface of
the washing machine
with a soft cloth
regularly.
Clean the inner tub
regularly, especially
after washing starched
or bleached laundry.
• Clean the lint filter.
Insert the filter frame into
the agitator as it was.
Turn the filter inside out
and wash the lint off with
water.
Remove the filter frame by
pulling it upward.
• Vacation Time
1. Turn off the tap, remove
water inlet hose and let
water drain out from the
hose.
2. Set spin cycle for 1
minute.
3. Unlpug the power cord.
1
2
2
1

Troubleshooting
Occasionally a problem may arise that is minor in nature, and a service call may not be neccessary. Use this troubleshooting guide for a possible solution. If the unit continues to operate improperly, call an authorized service depot or
Danby’s Toll Free Number 1-800-263-2629 for assistance.
PROBLEM
POSSIBLE CAUSE
Washer does not operate.
No water or insufficient water supply.
The washing machine does not drain.
Washing machine vibrates or is too noisy.
Washing machine does not spin.
Not plugged in.
The circuit breaker tripped or a blown fuse.
The lid is not closed.
Make sure the water source is turned on.
The water source faucet is not turned on.
The water source hose is frozen.
The water intake hose is bent.
The filter on the water intake hose is clogged.
The drain hose is squashed or bent.
The water hose mesh filter is clogged.
Check to assure that the washer is level.
The washing machine is touching another object.
The laundry load is not balanced.
The lid is not closed.
The washer is not on a level surface.
13

LIMITED IN-HOME APPLIANCE WARRANTY
This quality product is warranted to be free from manufacturer’s defects in material and workmanship, provided that the unit is used under the normal operating
conditions intended by the manufacturer.
This warranty is available only to the person to whom the unit was originally sold by Danby Products Limited (Canada) or Danby Products Inc. (U.S.A.) (hereafter
“Danby”) or by an authorized distributor of Danby, and is non-transferable.
TERMS OF WARRANTY
Plastic parts, are warranted for thirty (30) days only from purchase date, with no extensions provided.
First Year
During the first twelve (12) months, any functional parts of this product found to be defective, will be repaired or replaced, at warrantor’s
option, at no charge to the ORIGINAL purchaser.
To obtain
Danby reserves the right to limit the boundaries of “In Home Service” to the proximity of an Authorized Service Depot. Any appliance
Service
requiring service outside the limited boundaries of “In Home Service” ,
it will be the consumer’s responsibility to transport the appliance
(at their own expense) to the original retailer (point of purchase) or a service depot for repair. See “Boundaries of In Home Service”
below. Contact your dealer from whom your unit was purchased, or contact your nearest authorized Danby service depot, where service
must be performed by a qualified service technician.
If service is performed on the units by anyone other than an authorized service depot, or the unit is used for commercial application, all
obligations of Danby under this warranty shall be void.
Boundaries of
If the appliance is installed in a location that is 100 kilometers (62 miles) or more from the nearest service center your unit must be
In Home Service
delivered to the nearest authorized Danby Service Depot, as service must only be performed by a technician qualified and certified for
warranty service by Danby. Transportation charges to and from the service location are not protected by this warranty and are the
responsibility of the purchaser.
Nothing within this warranty shall imply that Danby will be responsible or liable for any spoilage or damage to food or other contents of this appliance, whether
due to any defect of the appliance, or its use, whether proper or improper.
EXCLUSIONS
Save as herein provided, Danby, there are no other warranties, conditions, representations or guarantees, express or implied, made or intended by Danby or its
authorized distributors and all other warranties, conditions, representations or guarantees, including any warranties, conditions, representations or guarantees
under any Sale of Goods Act or like legislation or statue is hereby expressly excluded. Save as herein provided, Danby shall not be responsible for any damages
to persons or property, including the unit itself, howsoever caused or any consequential damages arising from the malfunction of the unit and by the purchase of
the unit, the purchaser does hereby agree to indemnify and hold harmless Danby from any claim for damages to persons or property caused by the unit.
GENERAL PROVISIONS
No warranty or insurance herein contained or set out shall apply when damage or repair is caused by any of the following:
1) Power failure.
2) Damage in transit or when moving the appliance.
3) Improper power supply such as low voltage, defective house wiring or inadequate fuses.
4) Accident, alteration, abuse or misuse of the appliance such as inadequate air circulation in the room or abnormal operating conditions
(extremely high or low room temperature).
5) Use for commercial or industrial purposes (ie. If the appliance is not installed in a domestic residence).
6) Fire, water damage, theft, war, riot, hostility, acts of God such as hurricanes, floods etc.
7) Service calls resulting in customer education.
8) Improper Installation (ie. Building-in of a free standing appliance or using an appliance outdoors that is not approved for outdoor application).
Proof of purchase date will be required for warranty claims; so, please retain bills of sale. In the event warranty service is required, present this document to our
AUTHORIZED SERVICE DEPOT.
Danby Products Limited
PO Box 1778, Guelph, Ontario, Canada N1H 6Z9
Telephone: (519) 837-0920 FAX: (519) 837-0449
Danby Products Inc.
PO Box 669, Findlay, Ohio, U.S.A. 45840
Telephone: (419) 425-8627 FAX: (419) 425-8629
04/09
1-800-263-2629
Warranty Service
In-home
Bienvenue
Bienvenue dans la famille Danby. Nous sommes fiers de nos produits de qualité et croyons au bien fondé de fournir une
assistance fiable à nos clients. Vous le découvrirez grâce à ce guide facile d’utilisation et vous pourrez l’entendre en
provenance des voix amicales de notre service d’assistance à la clientèle.
Mais, ce qui est encore mieux, vous pourrez bénéficier de ces valeurs à chaque utilisation de votre appareil. Ceci est
important parce que votre nouvel appareil fera partie de votre famille pour longtemps.
Numéro de Modèle:
Numéro de Serie:
Date d’achat:
Si ces renseignements ne vous aident pas à résoudre le problème, consultez votre représentant de service autorisé ou
appelez Danby au numéro SANS FRAIS: TEL 1-800-263-2629
15
MISE EN GARDE:
Ne laissez pas un climatiseur de chambre sans surveillance dans
un espace où se trouvent des gens ou des animaux qui ne peuvent
pas réagir à un appareil défaillant. Un appareil défaillant peut
causer une surchauffe extrême ou entraîner la mort dans un tel
espace confiné et sans surveillance.
S'il vous plaît noter les informations suivantes.

Renseignements importants relatifs à la sécurité
LISEZ ET RESPECTEZ TOUTES LES CONSIGNES RELATIVES À LA SÉCURITÉ
MESURES DE
SÉCURITÉ
POUR VOTRE SÉCURITÉ : Veuillez lire ces consignes attentivement avant de faire fonctionner l’appareil.
• Veuillez lire toutes ces consignes avant d’utiliser la laveuse portative.
• Ne lavez aucun article ayant été auparavant lavé, nettoyé, ou dont les taches
ont été traitées avec de l’essence, des solvants pour nettoyage à sec, ou
d’autres substances inflammables ou explosives ou ayant trempé dans ces
substances, car les vapeurs qui s’en dégagent pourraient causer un
embrasement ou une explosion.
• N’ajoutez ni essence, ni solvant pour nettoyage à sec, ni autres substances
inflammables ou explosives à l’eau de lavage. Ces substances émettent des
vapeurs susceptibles de causer un embrasement ou une explosion.
• Dans certaines conditions, de l’hydrogène peut être produit dans un réseau de
distribution d’eau chaude qui n’a pas été utilisé depuis 2 semaines ou plus.
L’HYDROGÈNE EST UN GAZ EXPLOSIF. Si le réseau de distribution d’eau
chaude n’a pas été utilisé pendant ce temps, avant d’utiliser une machine à
laver, ouvrez les robinets d’eau chaude et laissez l’eau s’écouler de chacun
pendant plusieurs minutes. Cela permettra de libérer tout hydrogène qui s’est
accumulé. Comme il s’agit d’un gaz inflammable, il ne convient pas de fumer ou
d’utiliser une flamme nue à une telle occasion.
• Avant de jeter votre vieille laveuse portative, retirez le couvercle.
• Ne permettez jamais aux enfants de faire fonctionner la laveuse portative, de
jouer avec celle-ci ou d’y pénétrer. Il est nécessaire de superviser étroitement
les enfants qui se trouvent à proximité de la laveuse lorsqu’elle est en marche.
• Ne vous introduisez pas dans la laveuse si l’agitateur ou la cuve interne est en
mouvement.
• Ne trafiquez pas les commandes.
• Ne réparez et ne remplacez aucune pièce de la laveuse et ne tentez pas
d’effectuer son entretien sans que cela soit expressément recommandé dans
les consignes d’entretien ou de réparation destinées à l’utilisateur.
• Ne nettoyez aucune pièce de la laveuse portative avec des liquides
inflammables. Les vapeurs peuvent constituer un risque d’incendie ou
provoquer une explosion.
• Ne placez pas la laveuse dans des locaux très humides ou à un endroit où elle
serait directement exposée à la pluie. L’humidité peut détruire l’isolation
électrique, ce qui entraînerait des risques de choc électrique.
• N’entreposez et n’utilisez ni essence, ni autres vapeurs ou liquides inflammables
à proximité d’une laveuse portative, à savoir celle-ci ou toute autre. Les vapeurs
peuvent constituer un risque d’incendie ou provoquer une explosion.
• Si le cordon d’alimentation est endommagé, il doit être remplacé par le fabricant
ou la personne attitrée par le fabricant pour en assurer l’entretien ou par une
telle personne également qualifiée afin d’éviter les risques.
Conservez ces instructions
16
DANGER
Risque qu’un enfant soit emprisonné dans la laveuse. Des enfants
emprisonnés et asphyxiés dans la laveuse ne sont pas des problèmes
n’appartenant qu’au passé. Les appareils électroménagers abandonnés ou
jetés aux ordures représentent toujours un risque, . . même s’ils ne font
que « reposer au garage pendant quelques jours ».
17
Caractéristiques et pièces
Notice d’installation
1. COMPARTIMENT DU
DÉTERGENT
2. DISTRIBUTEUR DE PRODUITS
ASSOUPLISSANTS
3. CUVE INTÉRIEURE
4. PANNEAU DE COMMANDE
5. BASE
6. PLAQUE INSONORISÉE
7. PIED RÉGLABLE
8. BOUTON DE RÉGLAGE DE
NIVEAU
9. TUYAU D’ÉVACUATION (1 PIÈCE)
10. CORDON D’ALIMENTATION
11. AGITATEUR
12. FILTRE À CHARPIE
13. TUYAUX D’ADMISSION (2
PIÈCES)
ACCESSOIRES
D’ADMISSION
TUYAU
PLAQUE INSONORISÉE
1 PIÈCE
1 PIÈCE
RACCORD
AVANT D’UTILISER
VOTRE LAVEUSE
PORTATIVE
Enlevez les emballages extérieur et intérieur.
Vous aurez besoin des outils suivants :
• Clé
• Pince
• Tournevis
Assurez-vous que vous avez en main toutes les pièces suivantes :
• 2 tuyaux d’admission
• Adaptateur de robinet
• 1 plaque insonorisée avec vis
• 4 roulettes
• Retirez la cale d’expédition. Remarque : elle doit être conservée et utilisée (pour
éviter que les composants de la laveuse soient endommagés) au cas où la
laveuse serait déplacée ou transportée vers un nouveau lieu.
• Nettoyez la surface intérieure à l’eau tiède avec un chiffon doux.
• Laissez un espace de 2 pouces entre l’arrière et les côtés de l’appareil
électroménager.
Tournevis
Clé
Pince

860 mm
550 mm
545 mm
Notice d’installation
18
AVANT D’UTILISER
VOTRE LAVEUSE
PORTATIVE
(suite)
• Mettez votre linge à laver dans la laveuse en répartissant la charge de manière
uniforme. Une charge mal répartie peut occasionner du bruit ou des vibrations.
• N’utilisez pas de l’eau chaude à l’excès (température égale ou supérieure à 50 °C).
Les pièces en plastique peuvent se déformer ou s’abîmer. Les vêtements peuvent
également perdrent leur forme ou être délavés.
• Avant de laver, vérifiez le contenu de toutes les poches. Si des clous ou des
épingles restent dans les poches, ils peuvent endommager la laveuse ou les
vêtements.
• N’aspergez pas le panneau de commande avec des éclaboussures.
• Branchez la laveuse à une prise murale exclusive, correctement mise à la terre.
• Sous aucun prétexte, vous ne devez couper ou enlever la troisième broche (mise à
la terre) de la fiche du cordon électrique. Pour toute question relative à
l’alimentation ou à la mise à la terre, faites appel à un électricien qualifié.
CHOIX DE
L’EMPLACEMENT
Avant d’installer la laveuse portative, choisissez l’emplacement en fonction des
caractéristiques recherchées suivantes :
• Une surface dure à niveau (si la surface est irrégulière, voir « Ajustement du pied
réglable »).
• À l’abri des rayons directs du soleil. Les rayons directs du soleil peuvent affecter
le revêtement acrylique ainsi que les composants électriques et en plastique.
• Une ventilation appropriée.
• À l’abri des sources de chaleur telles que le charbon ou le gaz. Assurez-vous que
la laveuse ne repose pas sur son cordon d’alimentation. Les prises d’air de
ventilation ne doivent pas être obstruées par le tapis lorsque la laveuse est
installée sur un tapis.
PIEDS DE
NIVELLEMENT
Si le sol est irrégulier, ajustez le pied réglable (n’insérez aucun morceau de bois,
ou tout autre objet sous le pied).
• Desserrez le pied réglable à la main en tournant le bouton de réglage du niveau
jusqu’à la bonne hauteur.
• Resserrez le pied réglable en tournant le bouton de réglage du niveau en sens
inverse.
• Placez la laveuse sur une surface plate et rigide.
• Si la laveuse est placée sur une surface irrégulière ou faible, cela pourrait
occasionner du bruit ou des vibrations (une inclinaison de 1° est permis).
• Pour les applications portables, la laveuse est munie de quatre roulettes
orientées nord/sud qui peuvent être facilement installées pour aider à déplacer la
laveuse vers l’évier et vers son lieu de rangement. Inclinez la laveuse à la
renverse et déposez-la sur le sol. Installez les roulettes dans la base de la
laveuse comme dans l’illustration.
• Remettez la laveuse à l’endroit. Une fois la laveuse positionnée en vue du
fonctionnement, réglez la hauteur du pied réglable à un niveau légèrement
supérieur à la roulette avant afin d’éviter que la laveuse se déplace pendant le
lavage et l’essorage.
REMARQUE : Il n’est pas possible d’éliminer tous les mouvements de la laveuse,
cela est normal.
Correct
Incorrect
Incorrect
Desserrer
Resserrer
Bouton de réglage
du niveau
Pied réglable
Pied fixe
Roulette
Roulette
Pied fixe
Pied réglable
Roulette
Roulette
Pied fixe
Vue de dessous
Notice d’installation
19
INSTALLATION D’UNE
PLAQUE INSONORISÉE
Retirez la plaque
insonorisée de
l’emballage.
L’ouverture pour
insérer la plaque
insonorisée est
située dans la partie
inférieure de la
laveuse.
Insérez la plaque
insonorisée dans la
base de la laveuse.
Posez la laveuse à la
renverse sur le sol et fixez
la plaque insonorisée à
l’aide des deux jeux de vis.
RACCORDEMENT DU TUYAU
D’ALIMENTATION EN EAU
3/4 po standard
ROBINET
Les robinets doivent être compatibles avec les raccords femelles de tuyau
d’arrosage standards de 19,05 mm (3/4 po). N’utilisez ni bride à assemblage
coulissant ni collier de serrage.
Remarque : reportez-vous à la section des exigences relatives à l’alimentation en eau avant de raccorder les tuyaux d’admission.
Si vous avez uniquement une conduite d’arrivée d’eau (eau chaude ou froide), branchez le tuyau d’admission au raccord d’eau
froide sur la soupape de mélange d’eau.
IMPORTANT
Si c’est votre cas, vous ne pouvez opter pour le réglage de l’eau chaude.
Tirez vers le bas sur la plaque de raccord
du tuyau d’admission et débranchez le
raccord de robinet du raccord de tuyau
d’admission.
Vissez le raccord du robinet en le
tournant dans le sens antihoraire.
Tirez la plaque vers le bas et branchez le
raccord du tuyau d’admission au raccord
de robinet.
Raccord du
robinet
Plaque
Raccord du tuyau
d’admission
Plaque
1

20
Notice d’installation
Branchez le tuyau d’admission au raccord en tournant
l’écrou de raccordement.
Assurez-vous qu’une bague
de caoutchouc se trouve à
l’intérieur de l’écrou de
raccordement.
Plaque
Bouton de
dégagement
Écrou de
raccordement
Tuyau
d’admission
Bague de
caoutchouc
Pour libérer le raccordement, fermez le robinet et appuyez
sur le bouton de dégagement pour supprimer la pression
de l’eau, puis tirez vers le bas sur la plaque.
RACCORDEMENT DU TUYAU
D’ALIMENTATION EN EAU
Ne dévissez pas le capuchon du raccord d’eau chaude situé sur
la soupape de mélange d’eau, mais raccordez l’autre extrémité
des tuyaux d’admission au raccord d’eau froide de la soupape
de mélange d’eau en tournant l’écrou de raccordement.
Raccord
d’eau chaude
Raccord
d’eau froide
Écrou de
raccordement
Tuyau
d’admission
Capuchon du
raccord d’eau
chaude
Bague de
caoutchouc
2
Dans le cas où l’alimentation en eau chaude et l’alimentation en eau froide sont disponibles, raccordez le tuyau d’admission
d’eau froide à l’eau froide et le tuyau d’admission d’eau chaude à l’eau chaude.
Branchez le tuyau d’admission au raccord du robinet en
tournant l’écrou de raccordement.
Robinet
Bague de
caoutchouc
Écrou de
raccordement
Tuyau
d’admission
Pour libérer le raccordement, fermez le robinet et mettez la
laveuse sous tension pour qu’elle fonctionne pendant 5
minutes, puis débranchez les tuyaux d’admission.
Dévissez le capuchon du raccord d’eau chaude situé dans la
soupape de mélange d’eau, puis raccordez l’autre extrémité
des tuyaux d’admission aux raccords de la soupape de
mélange d’eau en tournant l’écrou de raccordement.
Raccord d’eau
chaude
Raccord
d’eau froide
Tuyau
d’admission
Bague de
caoutchouc
Écrou de
raccordement
Remarque :
1. Ne serrez pas trop l’écrou et ne faussez pas le filetage afin d’éviter de provoquer la rupture du coude du tuyau d’admission.
2. Si une fuite se produit, vous devriez vérifier la présence d’un anneau de caoutchouc dans l’écrou.

21
Notice d’installation
POSITIONNEMENT DU
TUYAU D’ÉVACUATION
Branchez le tuyau d’évacuation à la sortie d’eau de la laveuse, puis fixez-le à
l’aide d’une pince pression. L’évacuation tant horizontale que verticale étant
disponible, le tuyau d’évacuation peut être déposé sur le sol, dans une cuve ou
dans la baignoire, aussi longtemps que la hauteur à laquelle le tuyau d’évacuation
est déposé n’est pas supérieure à 70 cm (27 po).
de 0,7 à 1,2 m
CONSOMMATION
D’ÉLECTRICITÉ
IMPORTANT
Une utilisation incorrecte de la fiche mise à la terre peut entraîner un
risque de choc électrique. Si le cordon d’alimentation est endommagé,
faites-le remplacer par un technicien en entretien et en réparation autorisé.
Pour votre sécurité, cette laveuse doit être mise à la terre convenablement. Le
cordon d’alimentation de cette laveuse portative est équipé d’une fiche à trois
broches qui s’insère dans les prises murales standard à trois alvéoles afin de
minimiser la possibilité de choc électrique.
Sous aucun prétexte, vous ne devez couper ou enlever la troisième broche (mise
à la terre) de la fiche du cordon électrique.
Cette laveuse portative nécessite une prise électrique standard de 120 volts,60
Hz, à trois alvéoles et avec mise à la terre.
Pour éviter les blessures, le cordon doit être fixé derrière la laveuse portative et ne
doit ni pendre ni rester exposé.
Ne débranchez jamais la laveuse portative en tirant sur le cordon d’alimentation.
Tenez toujours la fiche fermement et tirez droit pour la retirer de la prise.
N’utilisez pas de rallonge avec cet appareil. Si le cordon d’alimentation est trop
court, faites installer une prise près de l’appareil par un électricien qualifié ou un
technicien en entretien et en réparation autorisé.
DOUILLE À 3 FILS,
STANDARD 120 VOLTS,
60 HERTZ
L1
Côté
neutre
BROCHE DE
MISE À LA
TERRE
RONDE
120 12
V.A.C.
¨
V.A.C.
115 12
¨
V.A.C.
0

Mode d’emploi
22
LEVEL
PR OG RA M
NO RM AL
HARD
SPEED Y
GE NTLE
SOAK
ST AR T/PA USE
POWER
CO LD
HO T
MEDIUM
LOW
EXTRA LOW
FUNC TION
FULLY AUTO MA TIC W ASH INGM ACHINE
WA SH
SPIN
HIGH
WA TER
SU PPL Y
2 3 4 5
67
8
9
1
10
WA TER
RINSE
PANNEAU DE
COMMANDE
1. Indicateur de température de l’eau
2. Indicateur du niveau d’eau
3. Indicateur de sélection du mode de lavage
4. Indicateur de sélection du processus
5. Bouton de mise en marche/pause
6. Bouton de mise en marche
7. Bouton de sélection de fonction
8. Bouton de sélection du mode de lavage
9. Bouton de sélection du niveau d’eau
10. Bouton de sélection de la température de l’eau
PRÉPARATION
0.7m~1.2m
1) Branchez le tuyau d’admission
et ouvrez le robinet. Ne mettez
pas sous tension la laveuse si
la pression de l’eau est
inférieure à 0,05 Mpa ou
supérieure à 0,5 Mpa.
2) Ouvrez le robinet.
3) Mettez la fiche dans la douille.
Pour des raisons de sécurité,
la prise devrait être mise à la
terre.
4) Insérez l’extrémité du tuyau
d’évacuation dans une pince et
suspendez-la au-dessus d’une
sortie d’eau.
5) Mettez la brassée
dans la cuve et
fermez le couvercle.
La laveuse ne
fonctionne pas tant
que le couvercle est
ouvert.
6) Ajoutez la quantité de
détergent qui convient dans le
distributeur de détergent.

Mode d’emploi
23
AVANT LE LAVAGE
Préparez la brassée. Mélangez les articles de petite et de grande taille dans une
même brassée pour obtenir des résultats optimaux. Déposez les articles dans la
cuve interne sans les tasser. Ne condensez pas les articles et ne les enroulez pas.
Les articles devraient pouvoir se déplacer librement dans l’eau de lavage afin
d’obtenir des résultats optimaux. Les articles devraient culbuter, couler et
réapparaître à la surface.
Lorsque vous lavez des articles de grande taille, ne remplissez pas la cuve interne
au même niveau que les autres brassées. Le niveau d’eau de votre laveuse doit
être adapté à la taille de votre brassée. Une petite brassée exige des niveaux
d’eau moins élevés. La quantité d’eau dans la cuve interne doit être suffisante
pour permettre aux articles de se déplacer et de culbuter librement. Surcharger la
cuve interne peut nuire à la qualité du lavage et du rinçage. Le fait de surcharger
peut également occasionner le froissement et le déchirement des articles.
BON MAUVAIS
NIVEAU DE L’EAU
FONCTIONNEMENT
Appuyez sur le bouton de mise en marche.
Appuyez sur le bouton de sélection du niveau d’eau.
Choisissez le niveau d’eau qui convient en fonction de la taille de la brassée et
l’indicateur correspondant clignotera.
Choix de la température de l’eau
Appuyez sur le bouton de sélection de la température de l’eau; vous pouvez
choisir la sortie (eau froide ou chaude). Lorsque l’indicateur d’eau chaude/froide et
l’indicateur d’eau chaude clignotent en même temps, cela signifie que l’eau
chaude a été sélectionnée.
REMARQUE : un cycle de rinçage à l’eau froide est prévu pour tous les réglages
de TEMPÉRATURE de la laveuse.
IMPORTANT : un système de tuyau unique pour l’eau froide ne permet pas à la
laveuse de régler (sélectionner) automatiquement la température de l’eau à
l’entrée en fonction des options du panneau de commande, telles que CHAUDE
ou FROIDE.
Appuyez sur le bouton de sélection du programme.
Choisissez le mode programme qui convient en fonction de la taille de la brassée,
puis l’indicateur correspondant clignotera.
Appuyez sur le bouton de sélection de la fonction.
Choisissez le groupe de fonctions désirées, puis l’indicateur correspondant
clignotera.
Appuyez une fois sur le bouton de mise en marche/pause et la laveuse se
mettra à fonctionner.
Appuyez sur ce bouton pour faire cesser le fonctionnement normal; si la laveuse
ne s’arrête pas, appuyez de nouveau. Le niveau d’eau peut être réinitialisé
pendant que la laveuse fonctionne normalement. Lorsqu’un niveau d’eau plus
élevé est sélectionné, la laveuse se remettra à fonctionner une fois son
remplissage effectué.

Mode d’emploi
24
FONCTIONS
Chaque lavage est préprogrammé; voir les détails figurant sur le tableau du
programme de lavage.
TREMPAGE
LAVAGE
RINÇAGE
ESSORAGE
Normal
Intensif
Court
Délicat
20 min.
30 min.
10 min.
10 min.
12 min.
12 min.
5 min.
4 min.
2 cycles
2 cycles
1 cycle
2 cycles
5 min.
5 min.
2,5 min.
5 min.
Remarque :
Les vêtements qui se décolorent facilement doivent être lavés séparément afin d’éviter que
les autres vêtements en soient affectés.
• Si vous désirez changer la sélection du programme, appuyez d’abord sur le bouton de
mise en marche/pause, puis appuyez sur le bouton du programme avant d’appuyer sur le
bouton de nouveau pour redémarrer la laveuse.
• Lorsque le programme de rinçage et d’évacuation est activé, n’utilisez aucun détergent.
• Si vous désirez faire évacuer l’eau au cours du lavage, appuyez sur le bouton de mise en
marche/pause, puis sélectionnez le programme de rinçage et d’évacuation. Appuyez sur le
bouton de mise en marche/pause de nouveau pour redémarrer la laveuse.
• Lorsque vous ouvrez le couvercle, tout s’arrête en 7 secondes et la laveuse se remet en
marche lorsque le couvercle est fermé.
SO AK WA SH RINSE SPIN
Normal
Hard
Speedy
Gentle
20 Minutes 12 Minutes 2Cycles 5 M inutes
30 Minutes 12 Minutes 2Cycles 5 M inutes
10 Minutes 5 M inutes 1Cycle 2.5Minutes
10 Minutes 4 M inutes 2Cycles 5 M inutes

25
Entretien
NETTOYAGE
• Nettoyez régulièrement la surface de votre laveuse portative avec un chiffon
doux.
• Nettoyez régulièrement la cuve intérieure, surtout après y avoir versé de l’amidon
ou de l’eau de Javel.
• Nettoyez régulièrement le filtre situé dans la vanne d’admission ou dans le tuyau
d’admission afin de prévenir le colmatage.
1. Débranchez le cordon
d’alimentation.
2. Retirez le tuyau d’admission et
nettoyez le filtre à l’aide d’une
brosse.
Nettoyez
régulièrement la
surface de la laveuse
avec un chiffon doux.
Nettoyez
régulièrement la cuve
intérieure, surtout
après avoir utilisé de
l’amidon ou de l’eau
de Javel pour le
lavage.
• Nettoyez le filtre à charpie.
Insérez le cadre du filtre dans
l’agitateur dans la position où
il était auparavant.
Mettez le filtre à l’envers et
rincez le filtre à l’eau.
Retirez le cadre du filtre en
tirant vers le haut.
• Période de vacances
1. Fermez le robinet, retirez
le tuyau d’admission et
laissez l’eau s’écouler du
tuyau.
2. Réglez le cycle d’essorage
à 1 minute.
3. Débranchez le cordon
d’alimentation.
1
2
2
1

Dépannage
Il peut arriver qu’un problème mineur se produise qui ne nécessite pas d’appel de service. Consultez ce guide de dépannage pour
trouver une solution possible. Si l’appareil continue de mal fonctionner, appelez un atelier de réparation autorisé ou le numéro sans
frais de Danby, au 1-800-263-2629, pour obtenir de l’assistance.
La laveuse ne fonctionne pas.
Appareil débranché.
Le disjoncteur s’est déclenché ou le fusible a grillé.
Le couvercle n’est pas fermé.
Assurez-vous que l’alimentation en eau est ouverte.
Aucune alimentation en eau ou la quantité est
insuffisante.
Le robinet n’est pas ouvert.
Le tuyau d’admission est gelé.
Le tuyau de prise d’eau forme un coude.
Le filtre situé sur le tuyau de prise d’eau est colmaté.
L’évacuation de la laveuse ne fonctionne pas. Le tuyau d’évacuation est écrasé ou forme un coude.
Le filtre à tamis du tuyau est colmaté.
La laveuse vibre ou fait du bruit. Assurez-vous que la laveuse est bien au niveau.
La laveuse est en contact avec un autre objet.
La brassée n’est pas bien répartie.
Le cycle d’essorage ne fonctionne pas. Le couvercle n’est pas fermé.
La laveuse n’est pas placée sur une surface à niveau.
PROBLÈME
CAUSE POSSIBLE
26

GARANTIE LIMITÉE SUR
APPAREIL ÉLECTROMÉNAGER À DOMICILE
Cet appareil de qualité est garantie exempt de tout vice de matière première et de fabrication, s’il est utilisé dans les conditions normales recommandées par
le fabricant.
Cette garantie n’est offerte qu’à l’acheteur initial de l’appareil vendu par Danby Products Limited (Canada) ou Danby Products Inc. (E.- U. d’A) (ci-après “Danby”)
ou par l’un des ses distributeurs agréés et elle ne peut être transférée.
CONDITIONS
Les pièces en plastique sont garanties pour trente (30) jours seulement à partir de la date de l’achat, sans aucune prolongation prévue.
Première 12 mois
Pendant les douze (12) mois, toutes pièces fonctionnelles de ce produit s’avèrent défectueuses, seront réparées ou remplacées, selon le
choix du garant, sans frais à l’acheteur INITIAL.
Pour bénéficier du
Le client sera responsable pour le transport et tous les frais d’expédition de tout appareil exigeant le service au dépot de service
Service
autorisé le plus proche. S’adresser au détaillant qui a vendu l’appareil, ou à la station technique agréée de service la plus proche, où
les réparations doivent être effectuées par un technicien qualifié. Si les réparations sont effectuées par quiconque autre que la station
de service agréée où à des fins commerciales, toutes les obligations de Danby en vertu de cette garantie seront annulées.
Limites de l’entretien
Si l'appareil est installé à plus de 100 kilomètres (62 milles) du centre de service le plus proche, il doit être livré à l'atelier de
à domicile
réparation autorisé par Danby le plus proche, car l'entretien doit uniquement être réalisé par un technicien qualifié et certifié pour
effectuer un entretien couvert par la garantie de Danby. Les frais de transport entre votre domicile et le lieu de l'entretien ne sont pas
couverts par la présente garantie et doivent être acquittés par l'acheteur.
Cette garantie indique en aucun temps la responsabilité de Danby de l’avarie ou dommage de la vin ou autre contenu, soit par les vices de l’appareil, ou soit
parl’utilisation convenable ou inexacte.
EXCLUSIONS
En vertu de la présente, il n’existe aucune autre garantie, condition ou représentation, qu’elle soit exprimée ou tacite, de façon manifeste ou intentionnelle, par
Danby ou ses distributeurs agréés. De même, sont exclues toutes les autres garanties, conditions ou représentations, y compris les garanties, conditions ou
représentations en vertu de toute loi régissant la vente de produits ou de toute autre législation ou règlement semblables.
En vertu de la présente, Danby ne peut être tenue responsable en cas de blessures corporelles ou des dégâts matériels, y compris à l’appareil, quelle qu’en soit
les causes. Danby ne peut pas être tenue responsable des dommages indirects dus au fonctionnement défectueux de l’appareil. En achetant l’appareil,
l’acheteur accepte de mettre à couvert et de dégager Danby de toute responsabilité en cas de réclamation pour toute blessure corporelle ou tout dégât matériel
causé par cet appareil.
CONDITIONS GÉNÉRALES
La garantie ou assurance ci-dessus ne s’applique pas si les dégâts ou réparations sont dus aux cas suivants:
1) Panne de courant.
2) Dommage subis pendant le transport ou le déplacement de l’appareil.
3) Alimentation électrique incorrecte (tension faible, câblage défectueux, fusibles incorrects).
4) Accident, modification, emploi abusif ou incorrect de l’appareil tel qu'une circulation d'air inadéquate dans la pièce ou des conditions de fonctionnement
anormales (température extrêmement élevée ou basse).
5) Utilisation dans un but commercial ou industriel (à savoir, si l'appareil n'est pas installé dans un domicile résidentiel).
6) Incendie, dommage causés par l’eau, vol, guerre, émeute, hostilités, cas de force majeure (ouragan, inondation, etc.).
7) Visites d’un technicien pour expliquer le fonctionnement de l’appareil au propriétaire.
8) Installation inappropriée (par exemple, encastrement d'un appareil autoportant, ou utilisation extérieure d'un appareil non conçu à cet effet).
Une preuve d’achat doit être présentée pour toute demande de réparation sous garantie. Prière de garder le reçu. Pour faire honorer la garantie, présenter ce
document à la station technique agréée ou s’adresser à:
Danby Products Limited
PO Box 1778,Guelph, Ontario, Canada N1H 6Z9
Telephone: (519) 837-0920 FAX: (519) 837-0449
Danby Products Inc.
PO Box 669, Findlay, Ohio, U.S.A. 45840
Telephone: (419) 425-8627 FAX: (419) 425-8629
04/09
1-800-263-2629
Service sous-garantie
Service au domicile

Bienvenida
Bienvenido a la familia Danby. Estamos orgullosos de nuestros productos de alta calidad y creemos en el servicio
confiable. Usted lo podrá apreciar en este manual fácil de usar, y lo escuchará enlas voces amistosas de nuestro
departamento de servicio al consumidor.
Sobre todo, usted apreciará estas ventajas cadavez que use su aparato. Eso es importante, ya que su nuevo artefacto
formará parte de su familia por mucho tiempo.
Número de modelo:
Número de serie:
Fecha de compra:
Si surgen problemas, comuniquese con un representante de servicio autorizado o llame a Danby a teléfono gratis:
TEL: 1-800-263-2629
28
PRECAUCIÓN:
El conectar indebidamente el enchufe de conexión a tierra puede
crear riesgos de incendio, descarga eléctrica y/o ocasionar
lesiones a las personas que usen el aparato. Si tiene dudas sobre
la debida conexión a tierra del aparato, consulte un representante
de servicios calificado.
Por favor, escriba la siguiente información.

Información de seguridad importante
LEA Y SIGA TODAS LAS INSTRUCCIONES DE SEGURIDAD
PRECAUCIONES DE
SEGURIDAD
POR SU PROPIA SEGURIDAD: Antes de hacer funcionar esta unidad, lea detenidamente estas instrucciones.
• Antes de hacer funcionar la lavadora portátil, lea todas las instrucciones.
• No lave prendas que hayan sido limpiadas, lavadas, empapadas o manchadas
con gasolina, productos disolventes de limpieza en seco, o substancias
inflamables o explosivas, pues estos pueden emanar vapores que podrían
encenderse o explotar.
• No añada gasolina, productos disolventes de limpieza en seco, ni substancias
inflamables o explosivas al agua de lavado. Estas substancias emanan vapores
que podrían encenderse o explotar.
• En determinadas condiciones, los sistemas de tuberías de agua caliente que no
hayan sido utilizados durante dos semanas o más, pueden producir gas
hidrógeno. EL GAS DE HIDRÓGENO ES EXPLOSIVO. Si no ha sido utilizado el
agua caliente del sistema por dicho tiempo, abra todos los grifos de agua
caliente y deje correr el agua durante varios minutos, antes de usar la máquina
de lavar. Con esto se eliminará el hidrógeno acumulado. Como el gas es
inflamable, no fume ni encienda llamas desprotegidas durante ese tiempo.
• Antes de deshacerse de su antigua lavadora portátil, quítele la tapa.
• Nunca deje que los niños usen o jueguen con la lavadora, ni que se metan en
ella. Cuando use la lavadora cerca de los niños, es necesario que los supervise.
• No meta las manos en la lavadora cuando las aspas o el tambor estén en
movimiento.
• No haga cambios indebidos en los controles.
• No repare ni cambie ninguna de las piezas ni intente darle servicio a menos que
se recomiende específicamente en las instrucciones de mantenimiento para el
usuario o en las instrucciones publicadas para reparación por el usuario.
• Nunca limpie las piezas de la lavadora con líquidos inflamables. Las
emanaciones pueden crear el riesgo de incendio o explosión.
• No ponga la lavadora en habitaciones donde haya vapor ni en lugares donde
quede directamente expuesta a la lluvia. La humedad puede destruir el
aislamiento eléctrico, y crear el riesgo de descargas eléctricas.
• No guarde ni use gasolina u otros vapores o líquidos inflamables cerca de esta o
de cualquier otra lavadora portátil. Las emanaciones pueden crear el riesgo de
incendio o explosión.
• Si el cordón eléctrico está dañado, debe ser cambiado por el fabricante o su
agente de servicios, o por una persona debidamente calificada con el fin de
evitar riesgos.
Guarde estas instrucciones
29
PELIGRO
Puede ser una trampa para los niños. El riesgo de quedar
atrapados o de asfixia no son cosas del pasado. Los aparatos
domésticos abandonados siguen siendo peligrosos . . aún cuando
se “dejen sólo por algunos días en la cochera”.
30
Características y piezas
Instrucciones de instalación
1. DEPÓSITO PARA EL
DETERGENTE
2. RECIPIENTE PARA EL
ENJUAGUE SUAVIZANTE
3. TAMBOR INTERIOR
4. TABLERO DE CONTROL
5. BASE
6. PLACA AISLANTE CONTRA EL
RUIDO
7. PATA NIVELADORA
8. PERILLA DE REGULACIÓN DEL
NIVEL
9. MANGUERA DE DESAGÜE
(1 unidad)
10. CABLE DE SUMINISTRO
ELÉCTRICO
11. AGITADOR DE ASPAS
12. FILTRO CONTRA LA PELUSA
13. MANGUERAS DE ENTRADA
(2 unidades)
ACCESORIOS
MANGUERA
DE ENTRADA
PLACA AISLANTE
CONTRA EL RUIDO
1 UNIDAD
1 UNIDAD
CONECTOR
ANTES DE USAR LA
LAVADORA PORTÁTIL
Retire el empaque de la parte exterior e interior.
Necesitará las siguientes herramientas:
• Llave inglesa
• Alicantes
• Destornillador
Verifique que tenga todas estas piezas:
• 2 mangueras de entrada
• Adaptador para el grifo
• 1 placa aislante contra el ruido, con tornillos
• 4 rueditas
• Retire LA placa de sujeción para el transporte. Nota - Guárdela para volverla a
utilizar cada vez que sea necesario mover o transportar la lavadora a otro lugar,
a fin de evitar que se produzcan daños.
• Limpie la superficie interior con agua tibia y un paño suave.
• Deje un espacio libre de dos pulgadas a los lados y en la parte posterior del
aparato.
Destornillador
Llave
inglesa
Alicates
860 mm
550 mm
545 mm
Instrucciones de instalación
31
ANTES DE USAR LA
LAVADORA PORTÁTIL
(continuación)
• Ponga la ropa sucia en la lavadora y distribúyala uniformemente. La ropa que no
está distribuida uniformemente puede producir ruido o vibración.
• No use agua demasiado caliente (a 50 °C o más) Las partes de plástico se
pueden deformar o dañar. Además, la ropa se puede deformar o DESTEÑIR.
• Antes de lavar, revise todos los bolsillos. Si quedan uñas u horquillas para el pelo
en los bolsillos, pueden dañar la lavadora o la ropa.
• Nunca salpique agua sobre el tablero de control.
• Conecte la lavadora únicamente en tomacorrientes correctamente instalados y con
conexión a tierra.
• Nunca, bajo ninguna circunstancia, corte o quite la tercera pata (de puesta a tierra)
del enchufe del cordón eléctrico. Cualquier pregunta acerca de la electricidad o de
la conexión a tierra debe hacerla directamente a un electricista titulado.
ELECCIÓN DEL
LUGAR
Antes de instalar la lavadora debe elegir un lugar que reúna las siguientes
características:
• Una superficie dura, bien nivelada (si la superficie está desnivelada, lea la
sección titulada Cómo ajustar la pata niveladora).
• Alejado de la luz solar directa. La luz solar directa puede afectar el revestimiento
de acrílico, las piezas de plástico y los componentes eléctricos.
• Ventilación adecuada.
• Alejado de las fuentes de calor, como el carbón o el gas. Verifique que la
lavadora no esté pisando el cordón eléctrico. Las aberturas de ventilación no
deben quedar obstruidas por la alfombra cuando la lavadora esté instalada sobre
un piso alfombrado.
PATAS NIVELADORAS
Si el piso está desnivelado, regule la pata niveladora (no introduzca piezas de
madera u otros objetos debajo de la pata).
• Para aflojar la pata niveladora, gire la perilla de regulación del nivel con la mano
hasta que quede a la altura deseada.
• Para apretar la pata niveladora, gire la perilla de regulación del nivel en la
dirección opuesta.
• Coloque la lavadora sobre una superficie plana y resistente.
• Si la coloca sobre una superficie desnivelada o débil, se producirán ruidos o
vibraciones (el margen de desnivel aceptable es de 1°).
• Los modelos portátiles a vienen con cuatro rueditas unidireccionales fáciles de
instalar para acercarla o alejarla cómodamente del fregadero. Tienda la unidad
sobre su parte posterior. Instale las rueditas en el fondo de la base, como se
ilustra.
• Vuelva a colocar la unidad en posición vertical. Cuando esté ubicada para su
funcionamiento, fije la pata niveladora a una altura ligeramente superior que la de
la ruedita delantera, para evitar el movimiento de la máquina durante el lavado o
el centrifugado.
NOTA: No es posible eliminar todos los movimientos, lo que es normal.
Correcto
Incorrecto
Incorrecto
Aflojar
Apretar
Perilla de regulación del
nivel
Pata niveladora
Pata fija
Ruedita
Ruedita
Pata fija
Pata niveladora
Ruedita
Ruedita
Pata fija
Vista del fondo

Instrucciones de instalación
32
CÓMO INSTALAR LA PLACA
AISLANTE CONTRA EL RUIDO
Retire la placa aislante
contra el ruido de la
caja de embalaje.
La abertura para la
placa aislante contra
el ruido está en la
parte inferior de la
lavadora.
Introduzca la placa en la
base de la lavadora.
Tienda la lavadora sobre
uno de sus lados y apriete
los dos tornillos de presión
para fijar la placa.
CONEXIÓN DE LA MANGUERA DE
SUMINISTRO DE AGUA
Estándar de 3/4”
GRIFO DE AGUA
Los grifos de suministro de agua deben ser los adecuados para acoplamientos
hembra de tamaño estándar de 3/4” (19.05 mm) para manguera de jardín. No
emplee conexiones a presión o de abrazadera.
Nota: Consulte la sección sobre los requisitos para el suministro de agua antes de conectar las mangueras de entrada de agua.
Si el suministro de agua tiene sólo una tubería (de agua fría o tibia), conecte la manguera de entrada al conector de agua fría
de la válvula de mezcla de agua.
IMPORTANTE
En esta situación no puede no puede graduar la temperatura del
agua en caliente.
Sujete la placa del conector de la
manguera de entrada de agua y
desconecte el conector del grifo del de la
manguera.
Enrosque el conector del grifo en el
sentido de las agujas del reloj.
Sujete la placa y conecte el conector de
la manguera de entrada al del grifo.
Conector
del grifo
Placa
Conector de la
manguera de entrada
Placa
1
33
Instrucciones de instalación
Conecte la manguera de entrada al conector girando la
tuerca de conexión.
Verifique que la
empaquetadura de caucho
esté dentro de la tuerca de
conexión.
Placa
Botón de
liberación
Tuerca de
conexión
Manguera
de entrada
de agua
Empaquetadura
de caucho
Para soltarlo, cierre el grifo de agua y oprima el botón para
liberar la presión de agua, luego empuje la placa hacia
abajo.
CONEXIÓN DE LA MANGUERA DE
SUMINISTRO DE AGUA
No desenrosque la tapa del conector de agua caliente ubicado
en la válvula de mezcla de agua, luego conecte el otro extremo
de la manguera de entrada de agua al conector de agua fría en
la válvula de mezcla de agua girando la tuerca de conexión
Conector de
agua caliente
Conector de
agua fría
Tuerca de
conexión
Manguera de
entrada de
agua
Tapa del
conector de
agua caliente
Empaquetadura
de caucho
2
Si el suministro tiene tanto una tubería de agua fría como de agua caliente, conecte la manguera de entrada de agua fría a la
tubería de agua fría y la otra a la de agua caliente.
Conecte la manguera de entrada de agua al conector
girando la tuerca de conexión.
Grifo de agua
Empaquetadura
de caucho
Tuerca de
conexión
Manguera de
entrada de agua
Para soltarlo, cierre el grifo de agua y encienda la lavadora
para que funcione durante unos cinco minutos, luego
desconecte las mangueras de entrada.
Desenrosque la tapa del conector de agua caliente ubicado en
la válvula de mezcla de agua, luego conecte el otro extremo de
las otras mangueras de entrada de agua en los conectores de
la válvula de mezcla de agua girando la tuerca de conexión.
Conector de
agua caliente
Conector de
agua fría
Manguera
de entrada
de agua
Empaquetadura
de caucho
Tuerca de
conexión
Nota:
1. No apriete demasiado la tuerca para no robar la rosca y evitar que se rompa el codo de la conexión de entrada del agua.
2. Si el agua se filtra, debe examinar la tuerca para ver si tiene una empaquetadura de caucho.

34
Instrucciones de instalación
UBICACIÓN DE LA
MANGUERA DE
DESAGÜE
Conecte la manguera de desagüe a la salida de agua de la lavadora, luego
apriétela con una pinza de presión. Como la lavadora viene con drenaje tanto
vertical como horizontal, la manguera de drenaje puede tenderse sobre el suelo o
en una cubeta o bañera, siempre y cuando no quede a una distancia mayor que
70 cm (27”).
De 0.7 a 1.2 m
CONSUMO DE
ELECTRICIDAD
IMPORTANTE
El empleo indebido del enchufe con pata de puesta a tierra puede producir
descargas eléctricas. Si el cordón eléctrico está dañado, hágalo cambiar
en un técnico de servicios autorizado.
Por su propia seguridad, la lavadora debe estar debidamente conectada a tierra. A
fin de evitar descargas eléctricas, el cordón eléctrico de esta lavadora trae un
enchufe de tres patas que se puede conectar a cualquier tomacorriente normal
para enchufes de tres patas.
Nunca, bajo ninguna circunstancia, corte o quite la tercera pata (de puesta a
tierra) del enchufe del cordón eléctrico.
Para esta lavadora portátil se necesita un tomacorriente estándar de 120
voltios~/60 Hz, con orificio para pata de conexión a tierra.
Para evitar lesiones, el cordón debe quedar fijado detrás de la lavadora portátil y
no debe quedar expuesto ni colgando.
Nunca desenchufe la lavadora tirando del cordón. Siempre, para sacarlo del
tomacorriente, agarre firmemente el enchufe y tire directamente de él.
No use un cordón de prolongación con este aparato. Si el cordón eléctrico es
demasiado corto, pida a un electricista profesional o a un técnico de servicio que
instale un tomacorriente cerca de la lavadora.
TOMACORRIENTE
ESTÁNDAR DE 120
VOLTIOS, 60 HERCIOS,
PARA TRES PATAS
L1
Polo
neutro
PATA
REDONDA
DE
CONEXIÓN A
TIERRA
120 12
V.A.C.
¨
V.A.C.
115 12
¨
V.A.C.
0

Instrucciones de funcionamiento
35
LEVEL
PR OG RA M
NO RM AL
HARD
SPEED Y
GE NTLE
SOAK
ST AR T/PA USE
POWER
CO LD
HO T
MEDIUM
LOW
EXTRA LOW
FUNC TION
FULLY AUTO MA TIC W ASH INGM ACHINE
WA SH
SPIN
HIGH
WA TER
SU PPL Y
2 3 4 5
67
8
9
1
10
WA TER
RINSE
TABLERO DE CONTROL
1. Indicador de la temperatura del agua
2. Indicador del nivel del agua
3. Indicador de elección del modo de lavado
4. Indicador de elección del proceso
5. Botón de inicio/pausa
6. Botón de encendido
7. Botón de elección de la función
8. Botón de elección del lavado
9. Botón de elección del nivel del agua
10. Botón de elección de la temperatura del agua
PREPARACIÓN
0.7m~1.2m
1) Conecte la manguera de
entrada y abra el grifo de
agua. No encienda la
electricidad si la presión
del agua es menor que
0.05 Mpa y mayor que 0.5
Mpa.
2) Abra el grifo.
3) Meta el enchufe en el
tomacorriente. Por razones de
seguridad, el enchufe debe
tener conexión a tierra.
4) Introduzca el extremo de la
manguera de desagüe en el
gancho y cuélguela sobre el
desagüe.
5) Ponga la ropa en la
lavadora y cierre la
tapa.
Si la tapa no está
cerrada, la lavadora
no funcionará.
6) Vierta una cantidad adecuada
de detergente en el depósito
para el detergente.

Instrucciones de funcionamiento
36
ANTES DE LAVAR
Prepare la carga de ropa. Mezcle prendas grandes y pequeñas en la carga para
obtener mejores resultados en el lavado. Ponga las prendas sueltas dentro de la
lavadora. No enrolle ni doble las prendas. Para mejores resultados en el lavado,
las prendas deben poder moverse libremente en el agua de la lavadora. Deben
enrollarse, hundirse y volver a aparecer.
Cuando lave prendas muy grandes, no llene la lavadora tanto como con otras
cargas. El nivel del agua de la lavadora debe ser adecuado para el tamaño de la
carga de ropa. Las cargas pequeñas se lavan con un menor nivel de agua. Debe
haber suficiente agua en la lavadora para que las prendas se puedan mover y
voltear libremente. Si recarga la lavadora las prendas podrían quedar mal lavadas
y mal enjuagadas, y podrían arrugarse y desgarrarse.
CORRECTO INCORRECTO
NIVEL DEL AGUA
FUNCIONAMIENTO
Oprima el botón de encendido.
Oprima el botón de nivel del agua
Elija el nivel apropiado de agua para la cantidad de ropa que va a lavar, y el
indicador correspondiente comenzará a encenderse y apagarse.
Elija la temperatura del agua
Oprima el botón de elección de la temperatura, puede elegir la entrada de agua
(fría o caliente). Cuando el indicador de agua fría y el indicador de agua caliente
se enciendan simultáneamente, significa que ha elegido agua tibia.
NOTA: La lavadora enjuagará una vez la ropa en agua fría automáticamente, en
cualquier graduación de la TEMPERATURA.
IMPORTANTE: Los sistemas de suministro de agua fría de una sola tubería no
permiten que la lavadora regule (o elija) automáticamente la temperatura del agua
de entrada para igualarla a las indicadas en el tablero de control, como FRÍA o
CALIENTE.
Oprima el botón de elección del programa
Elija el modo de programa apropiado según la cantidad de ropa que va a lavar, y
el indicador correspondiente comenzará a encenderse y apagarse
intermitentemente.
Oprima el botón de elección de la función.
Elija el grupo de funciones que desee, y el indicador correspondiente empezará a
encenderse y apagarse intermitentemente.
Oprima una vez el botón de inicio/pausa y la lavadora empezará a funcionar.
Oprima este botón si desea detener el funcionamiento en modo normal; si la
lavadora continúa funcionando, oprímalo de nuevo. Durante el lavado en modo
normal se puede modificar el nivel del agua. Si elige un mayor nivel de agua, la
máquina empezará a funcionar después de rellenar el agua.

Instrucciones de funcionamiento
37
FUNCIONES
Cada lavada se programa; vea los pormenores en la siguiente tabla:
EMPAPAR
LAVAR
ENJUAGAR
CENTRIFUGAR
Normal
Fuerte
Rápido
Suave
20 min.
30 min.
10 min.
10 min.
12 min.
12 min.
5 min.
4 min.
2 ciclos
2 ciclos
1 ciclo
2 ciclos
5 min.
5 min.
2.5 min.
5 min.
Nota:
La ropa que se destiñe fácilmente debe lavarse por separado, para evitar que tiña a otras
prendas.
• Si desea cambiar el programa que ha elegido, oprima una vez el botón de inicio/pausa,
luego oprima el botón del programa y oprima de nuevo el botón de inicio/pausa para
volver a poner la lavadora a funcionar.
• No use detergente cuando el programa de enjuagar y escurrir esté encendido.
• Si desea escurrir el agua durante el lavado, oprima el botón de inicio/pausa, luego elija el
programa enjuagar y escurrir. Oprima nuevamente el botón de inicio/pausa para volver a
poner la lavadora a funcionar.
• Si abre la tapa, se interrumpirá el funcionamiento en siete segundos; cuando vuelva a
cerrarla continuará el funcionamiento.
SO AK WA SH RINSE SPIN
Normal
Hard
Speedy
Gentle
20 Minutes 12 Minutes 2Cycles 5 M inutes
30 Minutes 12 Minutes 2Cycles 5 M inutes
10 Minutes 5 M inutes 1Cycle 2.5Minutes
10 Minutes 4 M inutes 2Cycles 5 M inutes
38
Cuidado y mantenimiento
LIMPIEZA
• Limpie regularmente la superficie de la lavadora con un paño suave.
• Limpie el tambor de la lavadora, sobre todo inmediatamente después de haber
lavado con lejía o haber lavado ropa almidonada.
• Limpie el filtro de la válvula de entrada de la manguera de entrada, para evitar
que se obstruya.
1. Desconecte el cordón
eléctrico.
2. Retire la manguera de entrada y
limpie el filtro con un cepillo.
Limpie regularmente
la superficie de la
lavadora con un paño
suave.
Limpie regularmente
el tambor de la
lavadora, sobre todo
inmediatamente
después de haber
lavado con lejía o
haber lavado ropa
almidonada.
• Limpie el filtro para la pelusa.
Introduzca el bastidor del filtro
en el agitador de aspas en la
posición en que estaba
colocado.
Voltee el filtro al revés y
lávelo para quitarle la pelusa.
Retire el bastidor del filtro
tirando de él hacia arriba.
• Vacaciones
1. Cierre el grifo de agua,
retire la manguera de
entrada y deje que el agua
se escurra de la manguera.
2. Gradúe el ciclo de
centrifugado para que
funcione durante 1 minuto.
3. Desconecte el cordón
eléctrico.
1
2
2
1
Resolución de fallas
De vez en cuando se pueden presentar problemas menores, que no requieren tener que llamar para solicitar servicio. Use esta guía
de solución de problemas para tratar de resolverlos. Si la unidad continúa funcionando inadecuadamente, llame a un centro
autorizado de servicio o al número gratuito de Danby, 1-800-263-2629 para solicitar asistencia.
La lavadora no funciona. No está enchufada.
El disyuntor de circuito se disparó o hay un fusible
quemado.
La tapa no está cerrada.
Verifique que el suministro de agua esté abierto.
No hay suministro de agua o es insuficiente. El grifo del suministro de agua no está abierto.
El agua de la manguera de suministro está congelada.
La manguera de entrada de agua está doblada.
El filtro de la manguera de suministro de agua está
obturado.
La lavadora no se desagua. La manguera de drenaje está aplastada o doblada.
El filtro de malla de la manguera de agua está obstruido.
La lavadora vibra o hace demasiado ruido. Verifique que la lavadora esté bien nivelada.
La lavadora está tocando otro objeto.
La carga de ropa sucia no está bien distribuida.
La lavadora no funciona en el ciclo de centrifugado. La tapa no está cerrada.
La lavadora no está sobre una superficie nivelada.
PROBLEMA
POSIBLE CAUSA
39

GARANTÍA LIMITADA PARA
ELECTRODOMÉSTICO
Este producto de calidad está garantizado contra defectos de fabricación, incluyendo partes y mano de obra, siempre y cuando la unidad se utilice bajo las
condiciones normales de funcionamiento para las que fue diseñado.
Esta garantía está solamente disponible para la persona que haya comprado originalmente esta unidad directamente de Danby Products Limited (Canada) o
Danby Products Inc. (U.S.A.) (en adelante “Danby”) o uno de sus distribuidores autorizados, y no es transferible.
CONDICIONES DE LA GARANTÍA
Las piezas plásticas, se autorizan por treinta (30) días solamente a partir de la fecha de la compra, sin las extensiones proporcionadas.
Primeros 12 Meses
Durante los primer 12 meses, cualquier parte en buen estado de este producto que resulte defectuosa, incluyendo cualquier sistema
sellado, será reparado o reemplazado, a opción del fabricante, sin cargo para el comprador ORIGINAL.
Para obtener
Danby se reserva el derecho de limitar la cobertura de "Servicio en Domicilio" sujeto a la proximidad de un Taller de Servicio Autorizado.
Servicio
Para todo artefacto que requiera servicio fuera del área limitada de "Servicio en Domicilio", el cliente será responsable por transportar
dicho artefacto hasta el Taller de Servicio Autorizado mas cercano. Consulte "Límites del servicio técnico a domicilio", a continuación.
Comuníquese con el distribuidor donde haya comprado la unidad, o llame al Taller de Servicio Autorizado más cercano, donde debe ser
reparada por un técnico calificado. Si esta unidad es reparada en otro lugar que no sea un Taller de Servicio Autorizado, o si la unidad se
utiliza para aplicaciones comerciales, Danby no se hará responsable de ninguna forma y la garantía será anulada.
Límites del servicio
Si el electrodoméstico está instalado en un lugar que se encuentra a 100 kilómetros (62 millas) o más del centro de servicios más
técnico a domicilio
cercano, se debe llevar la unidad al Centro de servicios Danby autorizado más cercano, ya que dicho servicio sólo puede realizarlo un
técnico calificado y certificado por Danby para prestar servicios de garantía. Los cargos por transporte desde y hacia el lugar en que se
efectúe el servicio técnico no están cubiertos por esta garantía y son de responsabilidad del comprador.
Nada dentro de esta garantía implica que Danby será responsable por cualquier daño que hayan sufrido los alimentos u otros contenidos de este aparato, ya sea
debido a un defecto del aparato, o su uso, adecuado o inadecuado.
EXCLUSIONES
Salvo lo aquí indicado por Danby, no existen otras garantías, condiciones o representaciones, explícitas o implícitas, concretas o intencionales por parte de
Danby o sus distribuidores autorizados y todas las demás garantías, condiciones o representaciones, incluyendo cualquier garantía, condiciones o
representaciones bajo cualquier Acta de Venta de Productos o legislación o estatuto similar, quedan de esta forma expresamente excluidas. Salvo lo aquí
indicado, Danby no serán responsables por ningún daño a personas o bienes, incluyendo la propia unidad, sin importar su causa, o de ningún daño indirecto
causado por el desperfecto de la unidad, y al comprar esta unidad, el comprador acepta por la presente, indemnizar y proteger a Danby contra cualquier reclamo
por daños a personas o bienes causados por la unidad.
CONDICIONES GENERALES
No se considerará ninguna de estas garantías o seguros cuando el daño o la necesidad de reparación sea el producto de los siguientes casos:
1) Falla del suministro eléctrico.
2) Daños en tránsito o durante el transporte de la unidad.
3) Alimentación incorrecta, como bajo voltaje, instalación eléctrica defectuosa o fusibles inadecuados.
4) Accidente, modificación, abuso o uso incorrecto del artefacto, tal como insuficiente ventilación del ambiente o condiciones de operación anormales
(temperatura ambiente extremadamente alta o baja).
5) Utilización comercial o industrial (v.g., si el electrodoméstico no está instalado en una vivienda particular).
6) Incendio, daños por agua, robo, guerra, disturbios, hostilidades, actos de fuerza mayor como huracanes, inundaciones, etc.
7) Pedidos de servicio debido a desinformación del usuario.
8) Instalación inadecuada (v.g., instalación empotrada de un electrodoméstico diseñado como unidad independiente o uso de un electrodoméstico al aire
libre que no esté aprobado para dicho fin).
Para acceder a la garantía se solicitará un comprobante de compra; por lo tanto, guarde su recibo. En caso de necesitar servicio de garantía, presente ese
documento al TALLER DE SERVICIO AUTORIZADO.
Danby Products Limited
PO Box 1778, Guelph, Ontario, Canada N1H 6Z9
Telephone: (519) 837-0920 FAX: (519) 837-0449
Danby Products Inc.
PO Box 669, Findlay, Ohio, U.S.A. 45840
Telephone: (419) 425-8627 FAX: (419) 425-8629
04/09
1-800-263-2629
Servicio de Garantía
Servicio en Domicilio

Danby Products Limited, Guelph Ontario Canada N1H 6Z9
Danby Products Inc., Findlay, Ohio USA 45839-0669
Model • Modèle • Modelo
DWM17WDB
Danby Products Limited, Ontario, Canada N1H 6Z9
Danby Products Inc., Findlay, Ohio, USA 45840
PORTABLE WASHING MACHINE
The model number can be found on the serial plate located
on the back panel of the unit.
All repair parts are available for purchase or special order
when you visit your nearest service depot. To request service
and/or the location of the service depot nearest you, call the
TOLL FREE NUMBER.
When requesting service or ordering parts, always provide
the following information:
• Product Type
• Model Number
• Part Number
• Part Description
LAVEUSE À CHARGEMENT SUPERIEUR
Le numéro de modèle se trouve sur la plaque d'information
sur le panneau arrière de l’appareil.
Toutes les pièces de rechange ou commandes spéciales
sont disponibles à votre centre de service régional autorisé.
Pour obtenir le service et/ou la localité de votre centre de
service régional, signalez le NUMÉRO D’APPEL SANS
FRAIS.
Ayez les renseignements suivants à la portée de la main lors
de la commande de pièce ou service:
• Type de produit
• Numéro de modèle
• Numéro de pièce
• Description de la pièce
Model • Modèle
LAVADORA DE CARGA SUPERIOR
El número de modelo se puede encontrar en la placa serial
situada en el panel trasero de la unidad.
Todas las piezas de reparación disponibles para la compra o
la orden especial cuando usted visita su depósito más
cercano del servicio. Para pedir servicio y/o la localización
del depósito del servicio lo más cerca posible usted, llama
Danby gratis.
Al pedir servicio o pidiendo piezas, proporcione siempre la
información siguiente:
• Tipo de Producto
• Número de Modelo
• Pieza número
• Descripción de la Parte
Tel: 1-800-26-
(1-800-263-2629)
 Loading...