

Owner’s Use and Care Guide
Guide d’utilisation et soins de
Propriètaire
Model • Modèle
DWC310BLA
DWC350BLPA
Danby Products Limited, Guelph, Ontario Canada N1H 6Z9
Danby Products Inc., Findlay, Ohio USA 45840
V 1.5.08.09 JF
INTEGRATED WINE COOLER
Owner’s Use and Care Guide
. . . . . . . . . . . . . . . . . . . . . . . . . . . . . . . . . . . . . 1 - 7
• Important Safety Information
• Installation Instructions
• Operating Instructions
• Care and Cleaning
• Troubleshooting
• Warranty
REFROIDISSEUR INTÉGRÉ DE VIN
Guide d’utilisation et soins de Propriètaire
. . . . . . . . . . . . . . . . . . . . . . . . . . 8 - 14
• Consignes de Sécurité Importantes
• Instructions d’installation
• Instructions de Fonctionnement
• Soins et Entretien
• Dépannage
• Garantie
CAUTION:
Read and Follow All
Safety Rules and
Operating Instructions
Before First Use of
This Product.
PRÉCAUTION:
Avant de faire
fonctionner cette
machine, lisez et
suivez toutes les
consignes de sécurité
de ce guide en
premier lieu.
WELCOME
Welcome to the Danby family. We’re proud of our quality products and we believe in dependable
service. You’ll see it in this easy-to-use manual and you’ll hear it in the friendly voices of our
consumer service department.
1-800-26-
(1-800-263-2629)
Best of all, you’ll experience these values each time you use your Wine Cooler. That’s important,
because your new appliance will be part of your family for a long time.
BEFORE USING YOUR
WINE COOLER
Write down the model and serial numbers here. They are on a label located on the back of the unit.
Staple your receipt to this manual; you will need it to obtain service under warranty.
Model Number:
Serial Number:
Date Purchased:
NEED HELP?
Before you call for service, there are a few things you can do to help us serve you better...
Read this manual
It contains instructions to help you use and maintain your appliance properly.
If you received a damaged appliance
Immediately contact the dealer (or builder) that sold you the Wine Cooler.
Save time and money
Check the Troubleshooting section before calling. This section helps you solve common problems
that may occur.
If you do need service, you can relax knowing help is only a phone call away:
Tel: 1-800-26-
(1-800-263-2629)
1
READ ALL SAFETY INFORMATION BEFORE USING
SAFETY
PRECAUTIONS
• Do not operate this appliance if it has a damaged
power cord or plug, if it is not working properly, or if
the appliance has been damaged or dropped. Do not
splice the power cord that is equipped with this
appliance.
• Keep power cord away from heated surfaces.
• Do not immerse power cord, plug or the appliance
itself in water.
• Do not use this product near water- for example, in
a wet basement, near a swimming pool or near a sink.
• Do not use corrosive chemicals or vapors in this
appliance.
• Use this appliance only for its intended use, as
described in this manual.
• Do not store perishable food items such as (but not
limited to) meats and dairy products in your Wine Cooler.
• Store wine in sealed containers only.
• See door surface cleaning instructions in the “Care
and Cleaning” section(s) of this manual.
• Do not cover or block any openings on the appliance.
• This appliance is intended for household use only. Do
not attempt to operate or store this appliance outdoors.
• This appliance should be serviced only by qualified
service personnel. Contact nearest authorized service
facility for examination, repair or adjustment.
• This appliance must be grounded. Connect only to a properly grounded outlet. See
“Grounding Instructions” section below.
IMPORTANT SAFETY INFORMATION
2
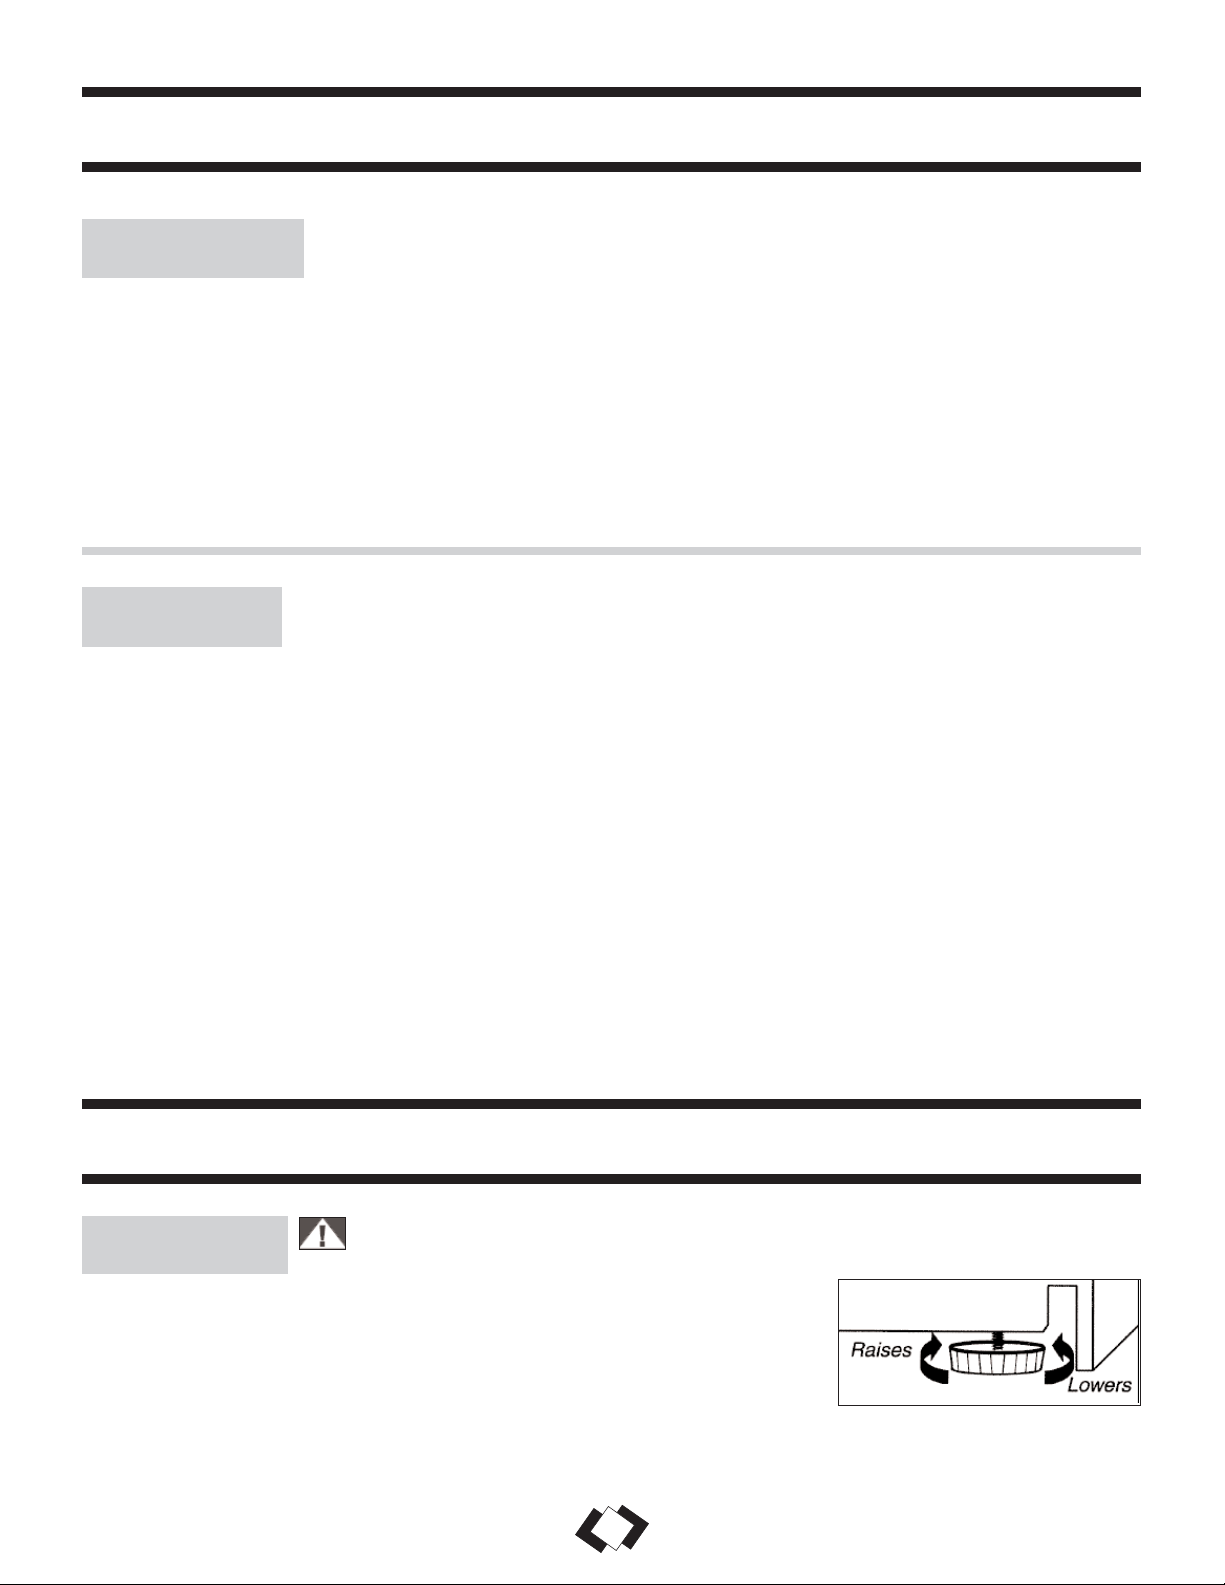
LEVELING
INSTRUCTIONS
It is important that your Wine Cooler is level. To level the Wine Cooler:
1) Move the Wine Cooler to its final location.
2) Have someone gently lean on the front of the Wine Cooler to take some of
the weight off of the leveling leg.
3) Turn the leveling leg clockwise to raise, and counter-clockwise to lower the
Wine Cooler. Continue in this manner until the Wine Cooler is level.
WARNING! Extreme Weight Hazard! Use 2 or more people when moving the
Wine Cooler.
ELECTRICAL
REQUIREMENTS
This appliance is equipped with a cord having a
grounding wire with a grounding plug. The plug
must be plugged into an outlet that is properly
installed and grounded.
IMPORTANT WARNING
An empty refrigerator can pose a threat to children.
To render the unit harmless we strongly recommend
removing the door prior to disposal.
WARNING- Improper use of the grounding plug can
result in a risk of electric shock. Consult a qualified
electrician or serviceman if the grounding instructions
are not completely understood, or ifdoubt exists as to
whether the appliance is properly grounded.
DO NOT USE AN EXTENSION CORD
Use an exclusive wall outlet. Do not connect your
refrigerator to extension cords or together with any
other appliance in the same wall outlet.
This appliance must be grounded. In the event of an electrical short circuit, grounding
reduces the risk of electrical shock by providing an escape wire for the electrical current.
SAVE THESE INSTRUCTIONS!
INSTALLATION INSTRUCTIONS
3
INSTALLATION INSTRUCTIONS
LOCATION
DO...
• Select a location with a strong, level
floor.
• Allow for 5 inches of space between
the back of the appliance and any
adjacent wall.
• Avoid direct sunlight and heat. Direct
sunlight may affect the acrylic coating;
heat sources nearby will cause higher
electricity consumption.
DO NOT...
• Use this appliance outdoors: This
appliance is intended for household
use only. Do not attempt to operate or
store this appliance outdoors.
• Build this appliance into an enclosure:
This appliance is designed for a FreeStanding application only and is not
intended to be “Built-In”.
5 In.
5 In.
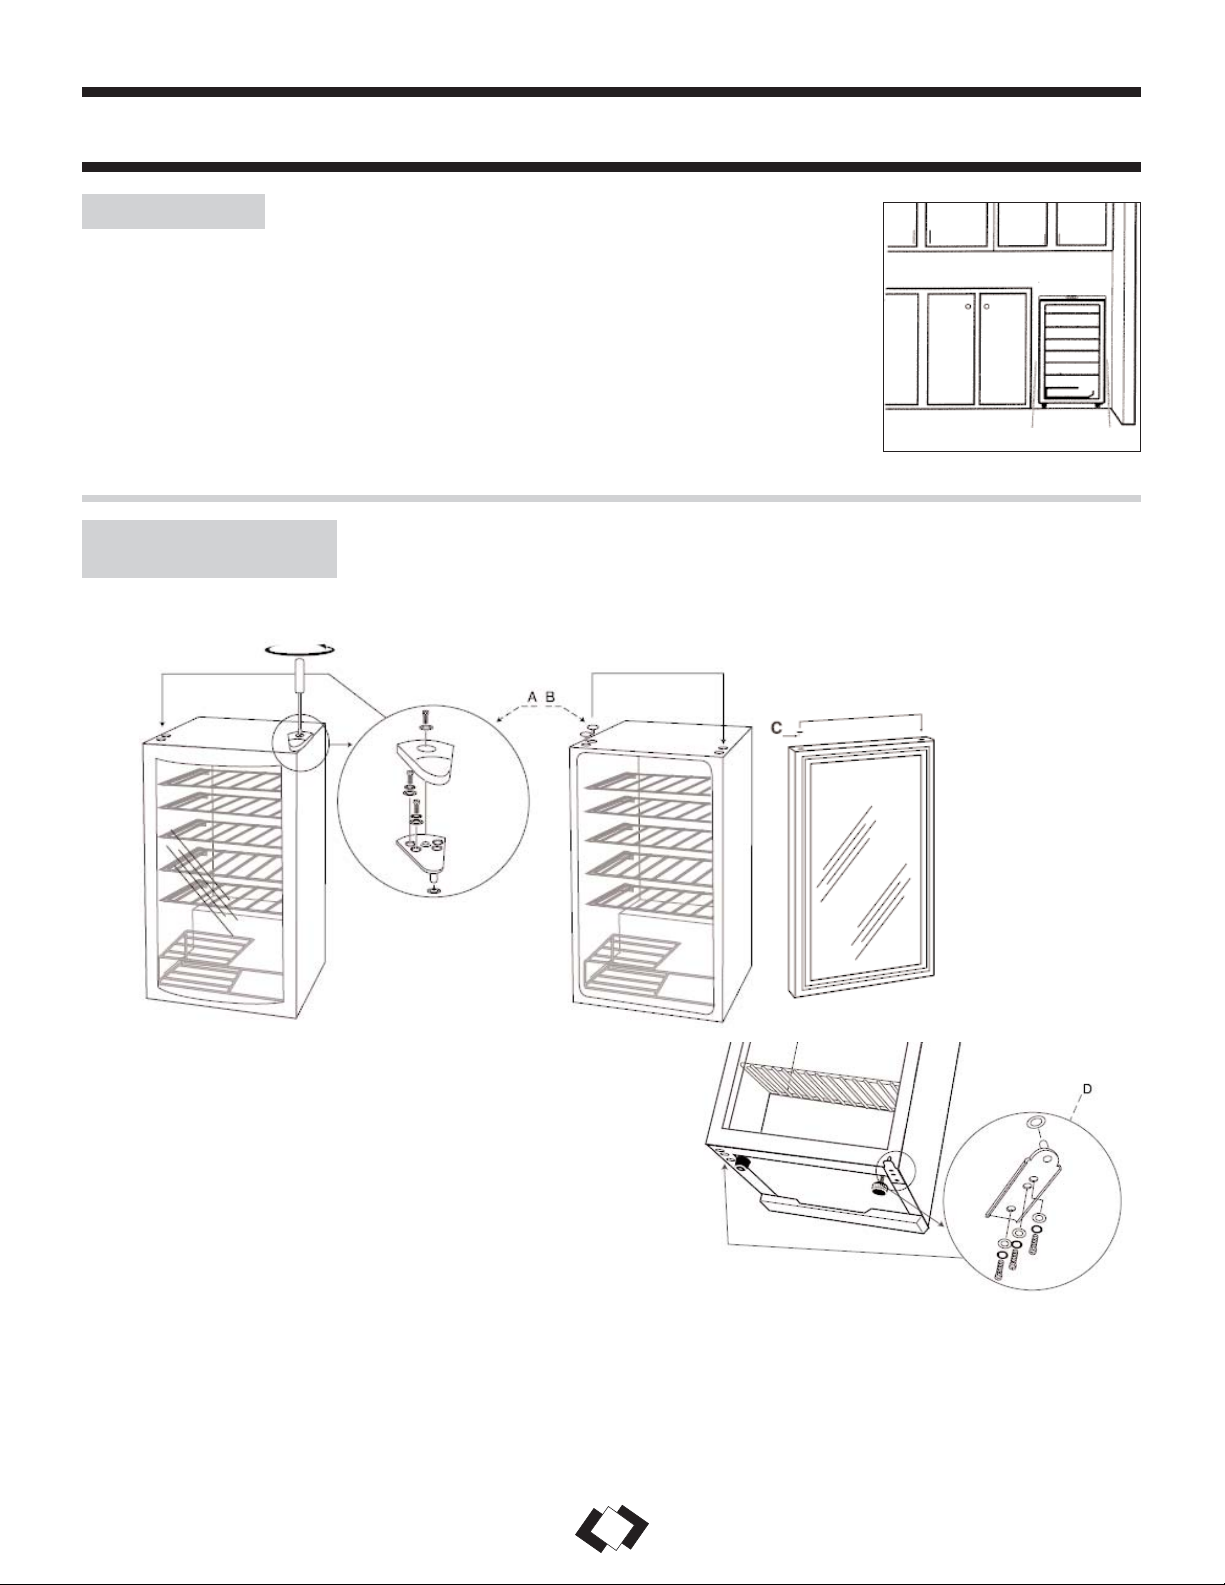
DOOR REVERSAL
INSTRUCTIONS
STEP 1
STEP 2
STEP 3
STEP 4
1
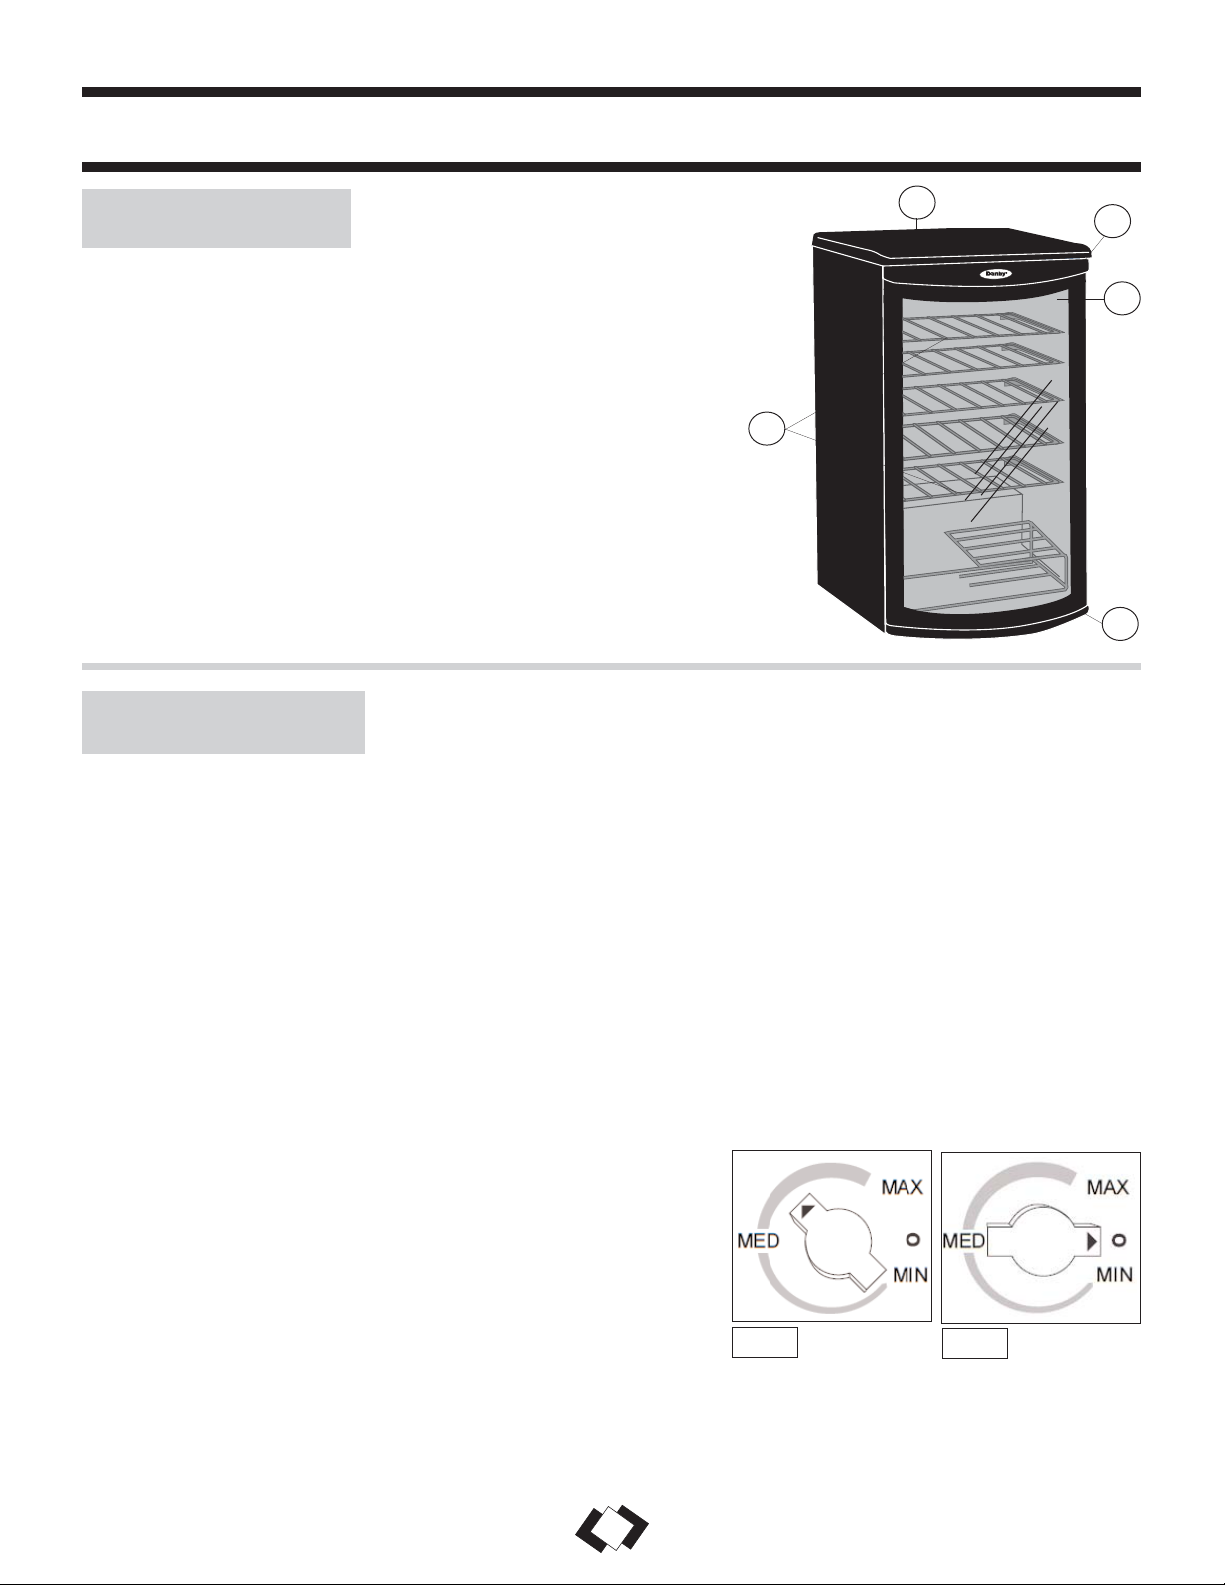
FEATURES OF YOUR
WINE COOLER
1) Tempered Glass Door: Tinted for UV protection while still
allowing for easy interior viewing.
2) Thermostat Dial: (Externally mounted rear wall thermostat)
For controlling the temperature inside the wine cooler. Turns the
motor (compressor) on /off as soon as the temperature rises/falls
above/below the set cooling level.
3) Magnetic Door Gaskets: Tight fitting seals retain all the
cooling power and humidity levels.
4) Plastic Coated Shelves: Odor resistant, rustproof, and
removable for easy cleaning.
5) Leveling Leg.
6) Interior Light (not shown)
THE CONTROLS OF
YOUR WINE COOLER
OPERATING INTRUCTIONS
2
4
3
4
5
To start the wine cooler, turn the temperature control to the position corresponding to your desired cooling
level. The wine cooler temperature will vary depending on the quantity of bottles stored, and on the frequency
with which the door is opened.
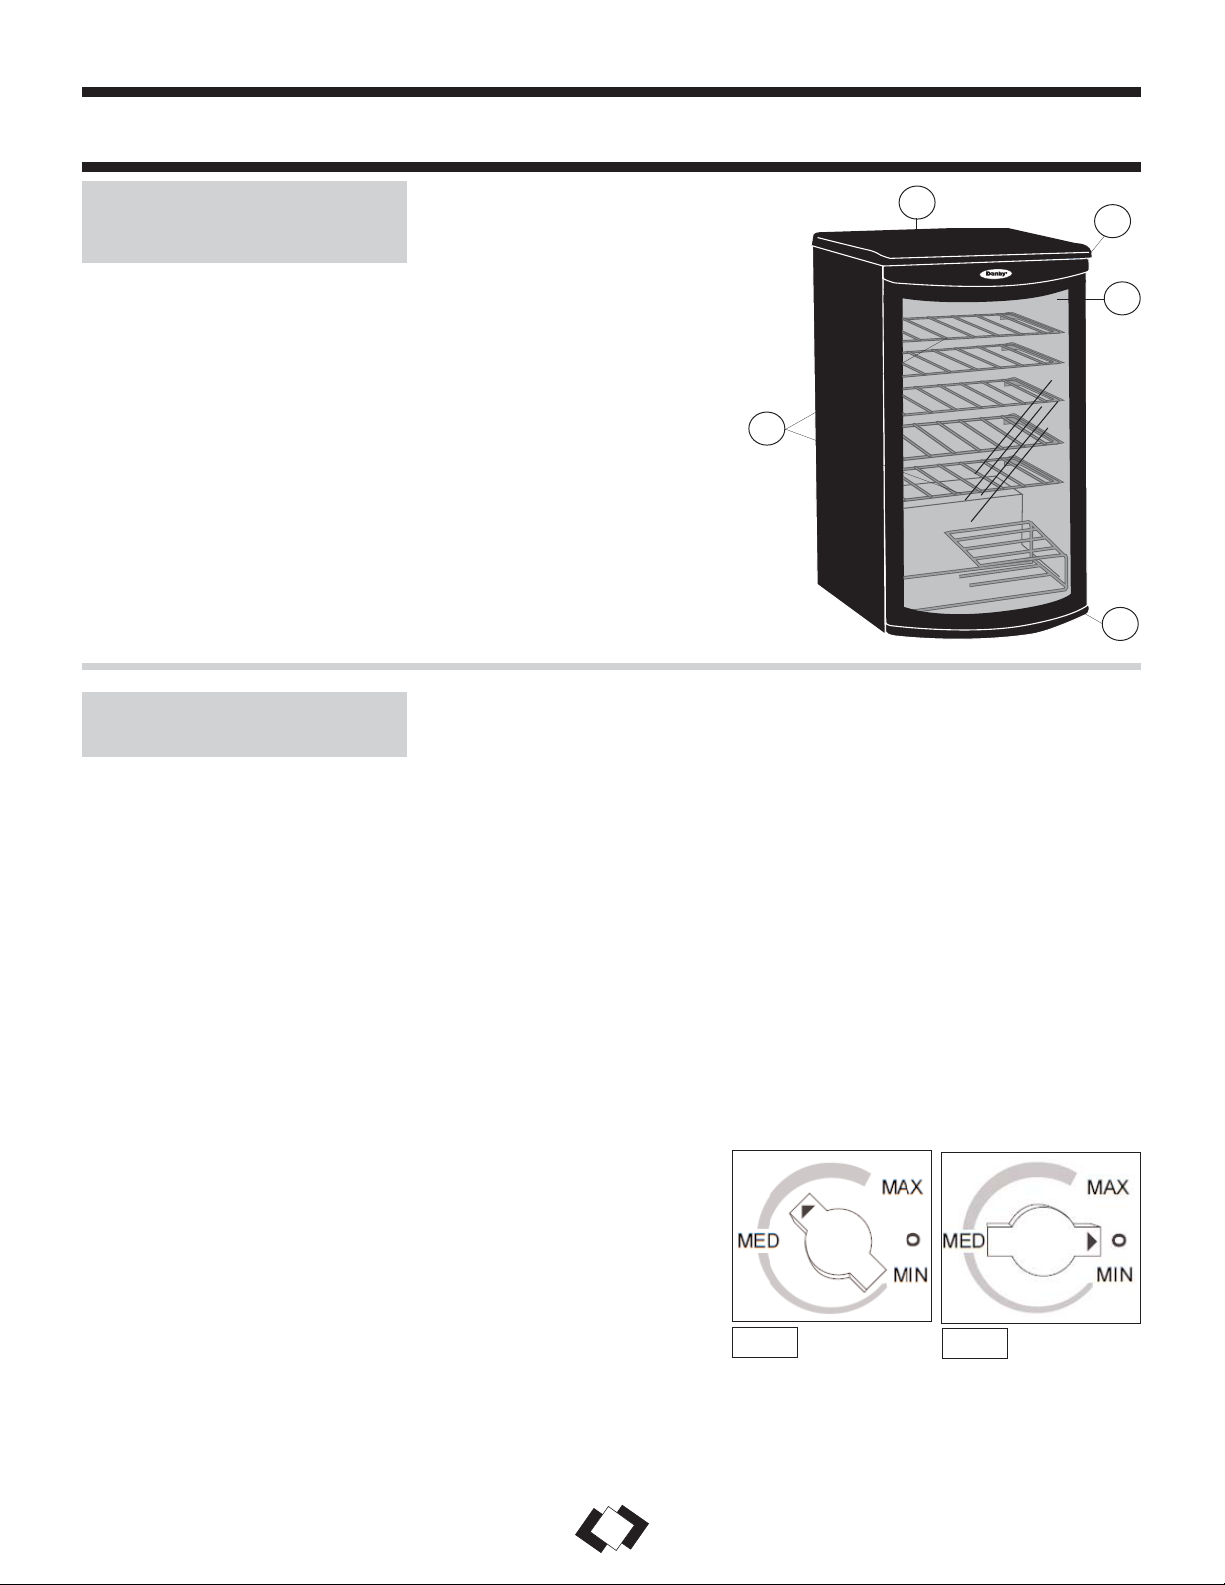
SETTING THE TEMPERATURE:
The temperature of the wine cooler compartment is controlled by adjusting/setting the thermostat control knob,
located on the exterior rear wall of the unit. To start the wine cooler and achieve maximumcooling quickly;
• Turn the temperature control knob clockwise to the furthest (maximum) setting on the darker blue (wide)
section of the graduated control dial.
• Allow the unit to run at this setting for 3-4 hours.
• When maximum cooling is achieved, turn back the temperature control knob setting to the 2 o’clock position
on the graduated blue control dial. See Fig.1.
• To turn off the wine cooler, (no cooling) rotate the control knob to the “0” (off) position. See Fig. 2.
Turn the control to the “OFF” (0) position to temporarily disconnect the cooling cycle. When the wine cooler
is not to be used for long periods of time, disconnect from power and leave the door partially open.
NOTE: Wait 3 to 5 minutes before restarting if operation has been
interrupted.
LIGHT BULB REPLACEMENT:
To replace the interior light bulb;
• Remove the screw holding the light bulb cover, and remove cover.
• Unscrew the light bulb and replace.
NOTE: Light bulb should not exceed 15 watts.
DEFROSTING: Your wine cooler is designed with an “Auto-
Cycle” defrost system.What is Auto Cycle defrost?
The refrigerated surfaces of the fresh food compartment defrost automatically during the “off” cycle of the
cold control (thermostat). Defrost water from the fresh food compartment is disposed of automatically, by
means of being channeled onto a drip tray located on the compressor. Heat transfer from the compressor
causes the defrost water to evaporate.
Fig. 1
Fig. 2

WINE STORAGE
The Maximum Capacity* of the DWC310BLA / DWC350BLPA is 35 (750mL) wine
bottles. * When stocked as per instructions below.
In order to achieve the maximum storage
capacity of thirty five (35) bottles, it will be
necessary to:
1) Position four (4) bottles on the first shelf,
two on either side of the controls
2) Position 5 bottles across, as in Fig. A, on
shelves two (2) through six (6).
3) Finally, position three (3) bottles per
staggered bottom shelf, as shown in Fig. B, for
a total of six (6) bottles per tier on the bottom 2
tiered, staggered shelf. This will give you a
total loading capacity of 35 bottles.
SHELF
INSTRUCTIONS
To remove a rack from its locked position, lift the rear of the rack
upward and then slide the rack out from the unit, as shown in Fig. C.
To re-install, ensure the rack is resting securely on the support brackets,
and push the rack inward until it locks into place.
Fig. C
OPERATING INTRUCTIONS (cont’d)
5
Fig. A
Fig. B
CARE AND CLEANING
HELPFUL
HINTS
Allow the Wine Cooler door to remain open for a few minutes after manual cleaning to air
out and dry the inside of the Wine Cooler.
NOTE: Be certain the power is off before cleaning any part of this appliance.
HOW TO CLEAN
THE INSIDE
Never use any commercial or abrasive cleaners or sharp objects on any part of
the Wine Cooler.
Walls, Floor, Inside Window, and Shelves:
Some water deposits and dust can be removed with a dry paper towel, others may require a damp cloth.
Do not use cleaners containing ammonia or alcohol on the Wine Cooler.
Ammonia or alcohol can damage the appearance of the appliance.
Outer Case:
It’s important to keep the area clean where the door
seals against the unit. Clean this area with a sudsy
cloth. Rinse and then dry.
Door surface:
Use only mild, non-abrasive detergents applied with a
clean sponge or soft cloth. Rinse well.
Control Panel and Door:
Wipe with a damp cloth and dry thoroughly. Do not
use cleaning sprays, large amounts of soap and water,
abrasive or sharp objects on the panel-they can
damage it. Some paper towels may also scratch the
control panel and door glass.
HOW TO CLEAN
THE OUTSIDE
IMPORTANT! Do not cover any part of the rack
with aluminum foil or any other material that will
prevent adequate air circulation within the unit.

If none of the above rectify the situation please contact our customer care department at
1-800-26- (1-800-263-2629)
BEFORE YOU CALL FOR SERVICE
TROUBLESHOOTING
PROBLEM POSSIBLE CAUSE SOLUTION
1) No power.
• A fuse in your home may be
blown or a circuit breaker tripped
• Power surge
• Plug is not fully insterted into
wall outlet.
• Replace fuse or reset circuit
breaker.
• Unplug the wine cooler, wait a
few
seconds and plug back in.
• Make sure the 3-prong plug is
fully inserted into outlet.
2) Cabinet temperature too
high.
• Temperature Setting.
• Door not shut properly or
opened excessively.
• Interior lights toggled on.
• Exhaust vent is obstructed.
• Recently added large quantity of
warm bottles to cabinet.
• Verify the temperature control
setting; adjust if necessary.
• Ensure door is fully closed and
the gasket is sealing against the
cabinets. Open door only as
needed and for short periods of
time.
• The interior lights are intended
for temporary lighting of cabinets
for display purposes only. They
are not intended to be left on for
prolonged periods of time.
• Verify that nothing is blocking
front-mounted exhaust vent.
• Limit quantity of warm bottles
introducted at the same time.
Stagger the load introduction if
possible.
3) Condensation on the cabinet
and/or doors.
• High humidity conditions in the
home.
• Ensure door is fully closed and
gasket is sealing against the
cabinet. Open the door only as
needed and for short periods of
time.
6

LIMITED IN-HOME APPLIANCE WARRANTY
This quality product is warranted to be free from manufacturer’s defects in material and workmanship, provided that the unit is used under the normal operating
conditions intended by the manufacturer.
This warranty is available only to the person to whom the unit was originally sold by Danby Products Limited (Canada) or Danby Products Inc. (U.S.A.) (hereafter
“Danby”) or by an authorized distributor of Danby, and is non-transferable.
TERMS OF WARRANTY
Plastic parts, are warranted for thirty (30) days only from purchase date, with no extensions provided.
First Year
During the first twelve (12) months, any functional parts of this product found to be defective, will be repaired or replaced, at warrantor’s
option, at no charge to the ORIGINAL purchaser.
To obtain
Danby reserves the right to limit the boundaries of “In Home Service” to the proximity of an Authorized Service Depot. Any appliance
Service
requiring service outside the limited boundaries of “In Home Service” ,it will be the consumer’s responsibility to transport the appliance
(at their own expense) to the original retailer (point of purchase) or a service depot for repair. See “Boundaries of In Home Service”
below. Contact your dealer from whom your unit was purchased, or contact your nearest authorized Danby service depot, where service
must be performed by a qualified service technician.
If service is performed on the units by anyone other than an authorized service depot, or the unit is used for commercial application, all
obligations of Danby under this warranty shall be void.
Boundaries of
If the appliance is installed in a location that is 100 kilometers (62 miles) or more from the nearest service center your unit must be
In Home Service
delivered to the nearest authorized Danby Service Depot, as service must only be performed by a technician qualified and certified for
warranty service by Danby. Transportation charges to and from the service location are not protected by this warranty and are the
responsibility of the purchaser.
Nothing within this warranty shall imply that Danby will be responsible or liable for any spoilage or damage to food or other contents of this appliance, whether
due to any defect of the appliance, or its use, whether proper or improper.
EXCLUSIONS
Save as herein provided, Danby, there are no other warranties, conditions, representations or guarantees, express or implied, made or intended by Danby or its
authorized distributors and all other warranties, conditions, representations or guarantees, including any warranties, conditions, representations or guarantees
under any Sale of Goods Act or like legislation or statue is hereby expressly excluded. Save as herein provided, Danby shall not be responsible for any damages
to persons or property, including the unit itself, howsoever caused or any consequential damages arising from the malfunction of the unit and by the purchase of
the unit, the purchaser does hereby agree to indemnify and hold harmless Danby from any claim for damages to persons or property caused by the unit.
GENERAL PROVISIONS
No warranty or insurance herein contained or set out shall apply when damage or repair is caused by any of the following:
1) Power failure.
2) Damage in transit or when moving the appliance.
3) Improper power supply such as low voltage, defective house wiring or inadequate fuses.
4) Accident, alteration, abuse or misuse of the appliance such as inadequate air circulation in the room or abnormal operating conditions
(extremely high or low room temperature).
5) Use for commercial or industrial purposes (ie. If the appliance is not installed in a domestic residence).
6) Fire, water damage, theft, war, riot, hostility, acts of God such as hurricanes, floods etc.
7) Service calls resulting in customer education.
8) Improper Installation (ie. Building-in of a free standing appliance or using an appliance outdoors that is not approved for outdoor application).
Proof of purchase date will be required for warranty claims; so, please retain bills of sale. In the event warranty service is required, present this document to our
AUTHORIZED SERVICE DEPOT.
Danby Products Limited
PO Box 1778, 5070 Whitelaw RD, Guelph, Ontario, Canada N1H 6Z9
Telephone: (519) 837-0920 FAX: (519) 837-0449
Danby Products Inc.PO Box 669,
1800 Production Drive Findlay, Ohio, U.S.A. 45840
Telephone: (419) 425-8627 FAX: (419) 425-8629
04/09
1-800-263-2629

Bienvenue dans la famille Danby. Nous sommes fiers de nos produits de qualité et croyons au bien
fondé de fournir une assistance fiable à nos clients. Vous le découvrirez par ce guide facile
d’utilisation et vous pourrez l’entendre en provenance des voix amicales de notre service d’assistance
à la clientèle.
1-800-26-
(1-800-263-2629)
Mais, ce qui est encore mieux, vous pourrez bénéficier de ces valeurs à chaque utilisation de votre
Refroiddisseur de Vin. Ceci est important parce que votre nouvelle appareil fera partie de votre
famille pour longtemps.
AVANT D’UTILISER VOTRE
REFROIDISSEUR DE VIN
Enregistrez ici les numéros de modèle et de série. Ces numéros se trouvent sur l’étiquette au dos de
l’appareil. Agrafez votre reçu d’achat à l’arrière de de guide. Il sera requis pour faire une réclamation
de la garantie.
Numéro de modèle:
Numéro de série:
Date d’achat:
EN CAS DE BESOIN
D’ASSISTANCE
Voici quelques contributions que vous pouvez effectuer avant de faire un appel de service, pour nous
aider à mieux vous servir :
Lisez ce guide
Il comprend des instructions pour vous assister à l’utilisation et l’entretien adéquats de votre
Refroidisseur de Vin.
Si votre appareil neuf est avarié
Communiquez immédiatement avec le revendeur (ou le manufacturier).
Épargnez temps et argents
Avant de faire un appel de service, révisez le chapitre intitulé “Dépannage”. Ce chapitre vous aidera
à solutionner des problèmes communs qui pourraient survenir.
Si une réparation est requise, vous pouvez avoir l’esprit tranquille parce que de l’aide ne sera l’affaire
que d’un appel téléphonique.
Tel: 1-800-26-
(1-800-263-2629)
BIENVENUE
8

LISEZ TOUTES LES INFORMATIONS DE SÉCURITÉ AVANT DE FAIRE FONCTIONNER L’APPAREIL
PRÉCAUTIONS
• Ne faites pas fonctionner cet appareil s’il a un
cordon ou fiche électrique endommagé, s’il ne
fonctionne pas correctement, ou si l’appareil a été
endommagé ou échappé.
• N'épissez pas le cordon électrique
• Gardez le cordon électrique éloigné des sources de
chaleur.
• N’immersez pas le cordon ou sa fiche dans aucun
liquide.
• N’utilisez pas cet appareil près de bassins d’eau,
par exemple dans un sous-sol détrempé, près d’une
piscine ou d’un évier.
• N’utilisez pas de produits chimiques ou vapeurs
corrosives dans/près de cet appareil.
• N’utilisez cet appareil que pour les fins aux quelles
il est conçu comme indiqué dans ce guide.
• Ne placez pas les articles périssables de nourriture
dans votre centre de breuvages (pour example, les
viandes et les produits laitiers).
• Entreposez les breuvages dans des bouteilles
scellées seullement.
• Référez-vous aux instructions de nettoyage du fini
de la porte se trouvant au(x) chapitre Soins et
Entretien.
• Ne recouvrez pas ou n’obstruez aucune ouverture
de l’appareil.
• Cet appareirl est conçu pour un usage domestique à
l’intérieur seulement. N’entreposez ni n’utilisez pas
cet appareil à l’extérieur.
• Cet appareil ne devrait être réparé que par du
personnel qualifié. Pour tout examen, réparation ou
réglage, contactez votre centre de service le plus
rapproché.
Cet appareil doit être mis à la terre. Branchez le seulement dans une prise correctement mise
à la terre. Référez-vous au chapitre intitulé “Instructions de mise à la terre” ci-dessous.
INFORMATION DE SÉCURITÉ IMPORTANTES
9
INSTRUCTIONS DE
MISE À NIVEAU
Il est important que votre
Refroidisseur de Vin soit à niveau.
Pour mettre le Refroidisseur de Vin à
niveau :
1) Installez le refroidisseur de vin à sa
position finale.
2) Demandez à une autre personne
d’appliquer une légère pression sur la
partie avant supérieure du
refroidisseur de vin pour l’incliner et
alléger la pesanteur sur les pattes de
réglage de mise à niveau.
3) Pivotez les pattes de mise à niveau
dans le sens des aiguilles d’une
montre pour lever le refroidisseur à
vin oudans le sens contraire pour
l’abaisser
Danger de poids excessif! Il faut deux personnes ou plus pour déplacer le
Refroidisseur de Vin.
CONDITIONS
ÉLECTRIQUES
This appliance is equipped with a cord having a
grounding wire with a grounding plug. The plug
must be plugged into an outlet that is properly
installed and grounded.
IMPORTANT WARNING
An empty refrigerator can pose a threat to children.
To render the unit harmless we strongly recommend
removing the door prior to disposal.
WARNING- Improper use of the grounding plug can
result in a risk of electric shock. Consult a qualified
electrician or serviceman if the grounding instructions
are not completely understood, or ifdoubt exists as to
whether the appliance is properly grounded.
DO NOT USE AN EXTENSION CORD
Use an exclusive wall outlet. Do not connect your
refrigerator to extension cords or together with any
other appliance in the same wall outlet.
This appliance must be grounded. In the event of an electrical short circuit, grounding
reduces the risk of electrical shock by providing an escape wire for the electrical current.
SAUVEGARDE CES INSTRUCTIONS!
CONSIGNES D’INSTALLATION
Pour
Lever
Pour Abaisser

10
INSTRUCTIONS DE
L’INVERSION DE PORTE
CONSIGNES D’INSTALLATION (suite)
LOCATION
ÉTAPE 1
ÉTAPE 2
ÉTAPE 3
ÉTAPE 4
À FAIRE...
• Choisir un endroit avec un plancher
solide et au niveau.
• Laisser un espace de 12.7 cm (5 po)
entre l'arrière de l'appareil et tout mur
adjacent.
• Éviter l'exposition au soleil direct et à
la chaleur. Le soleil direct peut affecter
la couche d'acrylique. Les sources de
chaleur à proximité peuvent causer une
plus grande consommation d'électricité.
À NE PAS FAIRE...
• Utiliser cet appareil à l'extérieur: Cet
appareil a été conçu pour usage
domestique seulement. Ne pas faire
fonctionner ou entreposer cet appareil à
l'extérieur.
• Incorporer cet appareil dans une
armoire: Cet appareil est conçu pour
une utilisation autonome seulement et
n'est pas prévu pour être encastré.
5 po.
5 po.
CARACTÉRISTIQUES
DE VOTRE
REFROIDISSEUR DE VIN
1) Portes En Verre Trempé: Teinté pour protéger contre les rayons
UV tout en permettant de voir facilement le contenu du cabinet.
2) Contôles Électroniques de la Température: (contrôles installés à
l’avant, à l’extérieur du cabinet)Ces commandes contrôlent la
température à l’intérieur du cabinet à vins. Ils mettent le moteur en
marche ou l’arrêtent dès que la température dépasse en plus ou en
moins le niveau de refroidissement demandé.
3) Joint Étanche Magnétique: Le joint étanche permet de conserver
le niveau de température et d’humidité à l’intérieur du cabinet.
4) Étageres Plastifiées: Résistent auxodeurs et à la rouille.
Amovibles pour faciliter l'entretien.
5) Pied Ajustable.
6) Lumière Intérieures (non illustré)
INSTRUCTIONS DE FONCTIONNEMENT
11
Mettre l'appareil en marche en tournant la commande du
thermostat à la position désirée de refroidissement. La
température du refroidisseur de vin varie selon la
quantité de bouteilles rangées et du nombre d'ouverture
de la porte.
RÉGLAGE DE LA COMMANDE DE
TEMPÉRATURE:
La temp. intérieure du cabinet à vins est contrôlée à
l’aide dubouton de contrôle du thermostat. Ce bouton
se trouve à l’extérieur du cabinet, sur la paroi arrière.
Pour mettre le cabinet à vins en marche et pour en tirer
un refroidissement maximum rapidement, procédez
comme suit :
• Tournez le bouton de commande de la temp. en sens
horaire, en direction du réglage maximum (partie bleu
foncé large) de la commande graduée.
• Laissez le cabinet fonctionner à ce niveau pendant 3
ou 4 heures.
• Lorsque le refroidissement maximum est atteint,
placez l’aiguille du bouton de commande de la
temp. à la position de 2 heures sur le cadran gradué
(voir la Fig. 1).
• Pour arrêter le cabinet à vins (arrêt du
refroidissement), tournez le bouton de commande de la
temp. à la position «0» (OFF) (voir la Fig. 2).
• Tournez la commande en position «OFF» (0) pour
couper temporairement le cycle de refroidissement.
Lorsque le cabinet à vins n’est pas utilisé pendant une
longue période, débranchez la prise de courant et
laissez la porte partiellement ouverte. Régler la
commande à la position “OFF” pour arrêter
temporairement le cycle de refroidissement. Si le
refroidisseur de vin ne doit pas être en marche pendant
quelques temps, débrancher la prise et laisser la porte
entre-ouverte.
Fig. 1
Fig. 2
À NOTER: Retarder la mise en marche de 3 à 5 minutes si le
fonctionnement a été interrompu.
REMPLACEMENT D'AMPOULE:
Pour remplacer l'ampoule intérieure;
• Enlevez la vis tenant la couverture d'ampoule, et enlevez la
couverture.
• Dévissez l'ampoule et la remplacez.
NOTE : L'ampoule ne devrait pas dépasser 15 watts.
DÉGIVRAGE: Le refroidisseur de vin est pour vu d'un
système de dégivrage auto-cycle.Qu'est ce que le dégivrage
auto-cycle?
Les surfaces réfrigérées du compartiment dégivrent automatiquement pendant le cycle "OFF" du thermostat.
L'eau de dégivrage se débarrasse automatiquement en entrant un bac. Le transfert de chaleur du compresseur
fait évaporer l'eau.
COMMANDES DE VOTRE
REFROIDISSEUR DE VIN
1
2
3
4
5
ENTREPOSAGE
DES VINS
La capacité *maximum du DWC310BLA / DWC350BLPA est 35 bouteilles du vin
(750ml). * Quand il est stocké en utilisant les instructions fournies.
INSTRUCTIONS
POUR TABLETTES
IMPORTANT ! Ne couvrez toute partie des
étagères de papier d'aluminium ou d'aucun
autre matériel qui empêcheront à circulation
d'air proportionnée dans le coffret.
Pour enlever une tablette de la position verrouillée, incline l'étagère
comme montré dans la figue C et tire à l'extérieur.
Pour réinstaller, assurez l'étagère se repose sur les supports et poussée la
tablette vers l'intérieur jusqu'à cequ'elle soit verrouillée en place.
INSTRUCTIONS DE FONCTIONNEMENT (suite)
12
Afin de réaliser la capacité de stockage
maximum de trente-cinq (35) bouteilles, il sera
nécessaire de:
1) Placez quatre (4) bouteilles sur la première
étagère, deux de chaque côté des commandes
2) Placez 5 bouteilles à travers, comme dans fig.
A, sur les étagères deux (2) à six (6).
3) Puis, placez trois (3) bouteilles, suivant les
indications de Fig. B, sur le étagère à deux
niveaux inférieur, pour un total de six (6)
bouteilles par rangée. Ceci te donnera un total
capacité de chargement de 35 bouteilles.
Fig. A
Fig. B
Fig. C
CONSEILS UTILS
Après nettoyage, laissez la porte de la machine ouverte durant quelques minutes pour aérer et assécher l’intérieur
de l’armoire. NOTE : Avant de nettoyer cet appareil, assurez-vous que l’alimentation est coupée.
COMMENT NETTOYER
L’INTÉRIEUR
N’utilisez jamais de nettoyant industriels sur aucune partie de votre
refroidisseur de vin
Parois, Plancher, Intérieur de la Visière et Tablettes:
Certaines éclaboussures d’eau et poussières peuvent être essuyées avec des essuie-tout. D’autres taches peuvent
nécessiter un linge humide.
N’utilisez pas de produits nettoyants comprenant de l’ammoniaque ou de
l’alcool sur l’appareil. L’ammoniaque ou l’alcool peuvent altérer le fini de
l’appareil.
Extérieur de l’armoire:
Il est important de garder la région de scellement de la
porte sur l’armoire propre. Nettoyez avec un tissu
savonneux, rincez le régionr et puis séchez
Surface du Porte:
N’utilisez que des détergents doux, non abrasifs,
appliqués avec une éponge propre ou un chiffon doux.
Rincez abondamment.
Panneau de commande et Porte:
Essuyez avec un chiffon humide. Asséchez bien avec un
chiffon sec. N’utilisez pas de nettoyants en aérosol, de
grandes quantités d’eau et de savon, d’abrasifs ou
d’objets acérés sur le panneau, ceci pourrait
l’endommager. Certains essuie-tout peuvent aussi
égratigner le panneau de commande et verre de la porte.
SOINS ET ENTRETIEN
COMMENT NETTOYER
L’EXTÉRIEUR

AVANT DE PLACER UN APPEL DE SERVICE
Si aucune de ce qui précède ne rectifie la situation svp entrez en contact avec notre département de soin de
client à 1-800-26- (1-800-263-2629)
PROBLÈME CAUSE PROBABLE SOLUTION
1) L’appareil n’es pas alimenté.
• Un fusible de votre panneau de
distribution peut être grillé ou le
disjoncteur déclenché.
• Surtension.
• La fiche n’est pas
complètement insérée dans la
prise murale.
• Remplacez le fusible ou réarmez
le disjoncteur.
• Débranchez la refroidisseur de
Vin et attendez quelques
secondes, et puis rebranchez la.
• Assurez-vous que la fiche à 3
branches de l’appareil est
complètement insérée dans la
prise.
2) La température dans la
cabinet est trop haute.
• Réglage du température.
• Le porte n’est pas fermées
correctement ou ouverte trop
souvent.
• Lumières Intérieures.
• L'échappement est obstrué.
• Stocké une grande quantité de
bouteilles chaudes dans le
cabinet.
• Vérifiez que la commande est
réglée le cabinet est trop haute.
à la bonne arrangement.
• Assurez-vous que la porte est
fermées et que le joint étanche
est contre le coffret. Ouvrez la
porte seulement quand nécessaire.
• Les lumières intérieures sont
pour éclairage provisoire
seulement. Ils ne sont pas censés
d'être laissées allumées pendant
des périodes prolongées
• Vérifiez qu'il n'y a rien qui
bloque l’échappement sur le
devant
.
• Limitez la quantité de bouteilles
chaudes qui sont stockées dans le
cabinet en même temps.Essayez
d'introduire progressivement des
charge chaudes si possible.
3) L’eau de condensation sur le
coffret et/ou les portes.
• Niveau de humidité élevé dans
la maison.
• La porte n’est pas fermées
correctement ou son ouverte trop
souvent.
• La formation de l'eau de
condensation s'arrêtera quand le
niveau d'humidité retours à
normale.
• Assurez-vous que la porte est
fermée et que le joint étanche
est contre le coffret. Ouvrez la
porte seulement quand nécessaire.
DÉPANNAGE
13

GARANTIE LIMITÉE SUR
APPAREIL ÉLECTROMÉNAGER À DOMICILE
Cet appareil de qualité est garantie exempt de tout vice de matière première et de fabrication, s’il est utilisé dans les conditions normales recommandées par
le fabricant.
Cette garantie n’est offerte qu’à l’acheteur initial de l’appareil vendu par Danby Products Limited (Canada) ou Danby Products Inc. (E.- U. d’A) (ci-après “Danby”)
ou par l’un des ses distributeurs agréés et elle ne peut être transférée.
CONDITIONS
Les pièces en plastique sont garanties pour trente (30) jours seulement à partir de la date de l’achat, sans aucune prolongation prévue.
Première 12 mois
Pendant les douze (12) mois, toutes pièces fonctionnelles de ce produit s’avèrent défectueuses, seront réparées ou remplacées, selon le
choix du garant, sans frais à l’acheteur INITIAL.
Pour bénéficier du
Le client sera responsable pour le transport et tous les frais d’expédition de tout appareil exigeant le service au dépot de service
Service
autorisé le plus proche. S’adresser au détaillant qui a vendu l’appareil, ou à la station technique agréée de service la plus proche, où
les réparations doivent être effectuées par un technicien qualifié. Si les réparations sont effectuées par quiconque autre que la station
de service agréée où à des fins commerciales, toutes les obligations de Danby en vertu de cette garantie seront annulées.
Limites de l’entretien
Si l'appareil est installé à plus de 100 kilomètres (62 milles) du centre de service le plus proche, il doit être livré à l'atelier de
à domicile
réparation autorisé par Danby le plus proche, car l'entretien doit uniquement être réalisé par un technicien qualifié et certifié pour
effectuer un entretien couvert par la garantie de Danby. Les frais de transport entre votre domicile et le lieu de l'entretien ne sont pas
couverts par la présente garantie et doivent être acquittés par l'acheteur.
Cette garantie indique en aucun temps la responsabilité de Danby de l’avarie ou dommage de la vin ou autre contenu, soit par les vices de l’appareil, ou soit par
l’utilisation convenable ou inexacte.
EXCLUSIONS
En vertu de la présente, il n’existe aucune autre garantie, condition ou représentation, qu’elle soit exprimée ou tacite, de façon manifeste ou intentionnelle, par
Danby ou ses distributeurs agréés. De même, sont exclues toutes les autres garanties, conditions ou représentations, y compris les garanties, conditions ou
représentations en vertu de toute loi régissant la vente de produits ou de toute autre législation ou règlement semblables.
En vertu de la présente, Danby ne peut être tenue responsable en cas de blessures corporelles ou des dégâts matériels, y compris à l’appareil, quelle qu’en soit
les causes. Danby ne peut pas être tenue responsable des dommages indirects dus au fonctionnement défectueux de l’appareil. En achetant l’appareil, l’acheteur accepte de mettre à couvert et de dégager Danby de toute responsabilité en cas de réclamation pour toute blessure corporelle ou tout dégât matériel
causé par cet appareil.
CONDITIONS GÉNÉRALES
La garantie ou assurance ci-dessus ne s’applique pas si les dégâts ou réparations sont dus aux cas suivants:
1) Panne de courant.
2) Dommage subis pendant le transport ou le déplacement de l’appareil.
3) Alimentation électrique incorrecte (tension faible, câblage défectueux, fusibles incorrects).
4) Accident, modification, emploi abusif ou incorrect de l’appareil tel qu'une circulation d'air inadéquate dans la pièce ou des conditions de fonctionnement
anormales (température extrêmement élevée ou basse).
5) Utilisation dans un but commercial ou industriel (à savoir, si l'appareil n'est pas installé dans un domicile résidentiel).
6) Incendie, dommage causés par l’eau, vol, guerre, émeute, hostilités, cas de force majeure (ouragan, inondation, etc.).
7) Visites d’un technicien pour expliquer le fonctionnement de l’appareil au propriétaire.
8 ) Installation inappropriée (par exemple, encastrement d'un appareil autoportant, ou utilisation extérieure d'un appareil non conçu à cet effet).
Une preuve d’achat doit être présentée pour toute demande de réparation sous garantie. Prière de garder le reçu. Pour faire honorer la garantie, présenter ce
document à la station technique agréée ou s’adresser à:
Danby Products Limited
PO Box 1778, 5070 Whitelaw RD, Guelph, Ontario, Canada N1H 6Z9
Telephone: (519) 837-0920 FAX: (519) 837-0449
Danby Products Inc.PO Box 669,
1800 Production Drive Findlay, Ohio, U.S.A. 45840
Telephone: (419) 425-8627 FAX: (419) 425-8629
04/09
1-800-263-2629

Model • Modèle
DWC310BLA
DWC350BLPA
For service, contact your
nearest service depot or call:
1-800-26-
(1-800-263-2629)
to recommend a depot in
your area.
Pour obtenir de l’assistance,
communiquez avec votre
centre de service le plus
rapproché ou composez le :
1-800-26- D
(1-800-263-2629)
pour localiser le dépositaire de
votre région
FREE-STANDING WINE COOLER
The model number can be found on the serial plate located on the back
panel of the unit.
All repair parts are available for purchase or special order when you visit
your nearest service depot. To request service and/or the location of the
service depot nearest you, call the TOLL FREE NUMBER.
When requesting service or ordering parts, always provide the following
information:
• Product Type
• Model Number
• Part Description
REFROIDISSEUR DE VIN POUR APPLICATION AUTONOME
Le numéro de modèle se trouve sur la plaque signalétique au dos de l’unité.
Vous pouvez vous procurer/commander toute pièce de rechange chez votre
dépositaire le plus rapproché. Pour toute demande de service ou pour
localiser le dépositaire/centre de service le plus rapproché, composez le
NUMÉRO SANS FRAIS.
Pour toute demande de service ou commande de pièces, fournissez toujours
l’information suivante :
• Type de produit
• Numéro de modèle
• Description de la pièce requise
Danby Products Limited, Guelph, Ontario Canada N1H 6Z9
Danby Products Inc., Findlay, Ohio USA 45840
Printed in China (P.R.C.)
 Loading...