

Model • Modèle • Modelo
DWC512BL
DELUXE WINE COOLER
The model number of your wine cooler is found on the serial
plate located on the back, top left-hand corner of the refrigerator.
All repair parts available for purchase or special order when you
visit your nearest service depot. To request service and/or the
location of the service depot nearest you, call the toll free number
listed to the left in Canada and the U.S.
When requesting service or ordering parts, always provide the
following information:
• Product Type
• Model Number
• Part Number
• Part Description
For service, contact
your nearest service depot or call:
1-800-26D-anby
to recommend a depot in
your area.
Pour obtenir le service, consultez
votre succursale régionale de
service ou téléphonez:
1-800-26D-anby
qui vous recommandera un
centre régional.
Para sevicio, communíquese con
su departamento de servicios más
cercano o llame al:
1-800-26D-anby
para que le recomienden un
departamento de servicios
en su zona.
REFROIDISSEUR DE VIN
Le numéro de modèle de votre refroidisseur de vin se trouve sur
la plaque d'identification qui se trouve sur le coin du haut gauche
de l'arrière du réfrigérateur.
Toutes les pièces de rechange sont disponibles immédiatement
ou peuvent être commandées de votre Centre de Service
régional. Pour obtenir le service et/ou le Centre de Service le
plus proche, téléphonez le numéro sans-frais indiqué à gauche
pour le Canada et les États-Unis.
Ayez les informations suivantes à la portée de la main lors de la
commande de pièces ou service:
• Genre de produit
• Numéro de modèle
• Numéro de pièce
• Description de la pièce
REFRIGERADOR PARAVINOS
El número del modelo de su refrigerador para vinos se encuentra
en la placa de serie ubicada en el ángulo posterior superior
izquierdo del refrigerador.
Todas las piezas de repuesto se encuentran disponibles para la
compra o por pedido especial cuando Ud. visite su departamento
de servicio más cercano. Para solicitar servicio y/o la ubicación
del departamento de servicio más cercano, llame al número de
marcando gratis que aparece a la izquierda en el Canadá y en
los E.U.
Cuando solicite servicio o encargue repuestos, siempre
proporcione la siguiente información:
• Tipo de producto
• Número de modelo
• Número del repuesto
• Descripción del repuesto
Printed in China (P.R.C.)
Danby Products Limited, PO Box 1778, Ontario, Canada N1H 6Z9
Danby Products Inc., PO Box 669, Findlay, Ohio, USA 45839-0669

OWNER’S MANUAL
MANUEL D'UTILISATION
MANUAL DEL PROPIETARIO
Model • Modèle • Modelo
DWC512BL
CAUTION:
Read and follow all safety rules and
operating instructions before first
use of this product.
PRÉCAUTION:
Veuillez lire attentivement les
consignes de sécurité et les
instructions d'utilisation avant
l'utilisation initiale de ce produit.
PRECAUCIÓN:
Lea y observe todas las reglas de
seguridad y las instrucciones de
operación antes de usar este
producto por primera vez.
DELUXE WINE COOLER
Owner’s Manual . . . . . . . . . . . . . . . . . . . . . . .1-5
• Safety Instructions
• Installation
• Operation
• Care and Maintenance
REFROIDISSEUR DE VIN
Manuel d'utilisation . . . . . . . . . . . . . . . . . . . .6-10
• Consignes de sécurité
• Installation
• Fonctionnement
• Soins et entretien
REFRIGERADOR PARAVINOS
Manual del propietario . . . . . . . . . . . . . . . .11-15
• Instrucciones de seguridad
• Instalación
• Operación
• Cuidado y Mantenimiento
Danby Products Limited, PO Box 1778, Ontario, Canada N1H 6Z9
Danby Products Inc., PO Box 669, Findlay, Ohio, USA 45839-0669
512.11.02
LIMITED PRODUCT WARRANTY
This quality product is warranted to be free from manufacturer’s defects in material and workmanship, provided that the unit is used under the normal operating
conditions intended by the manufacturer.
This warranty is available only to the person to whom the unit was originally sold by Danby or by an authorized distributor of Danby, and is non-transferable.
TERMS OF WARRANTY
Plastic parts (ie. evaporator door, door rails, covers and trays are warranted for thirty (30) days only from purchase date, with no extensions provided.
2 Years During the first two years (2), any electrical parts of this product found to be defective, including any sealed system units, will be repaired
or replaced, at warrantor’s option, at no charge to the ORIGINAL purchaser. Consumable parts (ie. light bulbs) are not warranted or
guaranteed for any length of time.
Third Through During the next three years (3) any part of the sealed system found to be defective (consisting of compressor, condenser, evaporator,
Fifth Year dryer and all related tubing) will be replaced without charge. The purchaser shall pay for all labour and return freight during this three
year (3) period for repair or replacement of any sealed system components. Any unit being diagnosed as non-functional due to sealed
system failure and warranting an exchange during the existing three (3) years will be subject to an appropriate depreciation or user fee,
including any and all freight charges being levied against the consumer.
To obtain Service Danby reserves the right to limit boundaries of “In Home Service” due to the proximity of an Authorized Service Depot. Any appliance
requiring service outside the limited boundaries of “In Home Service”, it will be the customer’s responsibility to transport the appliance to
the closest Authorized Service Depot at their own expense. Contact your dealer from whom your unit was purchased, or contact your
nearest authorized Danby service depot, where service must be performed by a qualified service technician. If service is performed on
the units by anyone other than an authorized service depot, or the unit is used for commercial application, all obligations of Danby under
this warranty shall be at an end.
The following clause refers to single and double door refrigerators, supplied with or without a separate freezer section. Nothing within this warranty shall imply that
Danby will be responsible or liable for any spoilage or damage to food or other contents of this appliance, whether due to any defect of the appliance, or its use,
whether proper or improper.
EXCLUSIONS
Save as herein provided, Danby Products Limited (Canada) or Danby Products Inc. (U.S.A.), there are no other warranties, conditions, representations or
guarantees, express or implied, made or intended by Danby Products Limited or its authorized distributors and all other warranties, conditions, representations or
guarantees, including any warranties, conditions, representations or guarantees under any Sale of Goods Act or like legislation or statue is hereby expressly
excluded. Save as herein provided, Danby Products Limited (Canada) or Danby Products Inc. (U.S.A), shall not be responsible for any damages to persons or
property, including the unit itself, howsoever caused or any consequential damages arising from the malfunction of the unit and by the purchase of the unit, the
purchaser does hereby agree to indemnify and save harmless Danby Products Limited from any claim for damages to persons or property caused by the unit.
GENERAL PROVISIONS
No warranty or insurance herein contained or set out shall apply when damage or repair is caused by any of the following:
1) Power Failure.
2) Damage in transit or when moving the appliance.
3) Improper power supply such as low voltage, defective house wiring or inadequate fuses.
4) Accident, alteration, abuse or misuse of the appliance such as inadequate air circulation in the room or abnormal operating conditions,
(extremely high or low room temperature).
5) Use for commercial or industrial purposes.
6) Fire, water damage, theft, war, riot, hostility, acts of God such as hurricanes, floods etc.
7) Service calls resulting in customer education.
Proof of purchase date will be required for warranty claims; so, please retain bills of sale. In the event warranty service is required, present this document to our
AUTHORIZED SERVICE DEPOT.
With-In Canada With-In United State
In Home In Home
Danby Products Limited
PO Box 1778, 5070 Whitelaw Road,
Guelph, Ontario, Canada N1H 6Z9
Telephone: (519) 837-0920 FAX: (519) 837-0449
Warranty Service
9/02
1
PO Box 669, 101 Bentley Court,
Danby Products Inc.
Findlay, Ohio, U.S.A. 45839-0669
Telephone: (419) 425-8627 FAX: (419) 425-8629

SAFETY INSTRUCTIONS
GROUNDING INSTRUCTIONS
This wine cooler must be grounded in the event of an electrical short circuit. Grounding reduces the risk of
electrical shock. This wine cooler is equipped with a power cord having a grounding wire with a grounding plug.
The wine cooler plug must be plugged into a properly installed and grounded electrical outlet.
WARNING iMPROPER USE OF THE GROUNDING PLUG CAN RESULT IN THE RISK OF ELECTRIC SHOCK.
Consult a qualified electrician or service person if the grounding instructions are not completely understood.
CAUTION: Read and follow all safety rules and operating instructions before using this product.
INSTALLATION INSTRUCTIONS
Remove the exterior and interior packaging. Use a soft dry cloth to thoroughly wipe the outside of the wine
cooler. Use a wet, lukewarm cloth to wipe the inside of the wine cooler.
Air must circulate freely in front of the wine cooler. Avoid placing the wine cooler near any heat source, direct
sunlight or moisture. Direct sunlight may affect the finish of the wine cooler. Nearby heat sources will cause
higher electricity consumption.
INSTALLATION OF SHELVES
WOOD SHELVES
1. Place wood shelves on grooves at height desired.
2. Insert metal stoppers (knobs) in the holes (pre-drilled) on both sides of black liner.
Attention
-Store wine in sealed bottles.
-Do not overload the cabinet.
-Do not open the door unless necessary
-DO NOT cover shelves with aluminum foil or any other shelf material which may prevent air circulation.
-Should the wine cooler be stored without use for long periods it is suggested, after a careful cleaning,
to leave the door ajar to allow air to circulate inside the cabinet in order to avoid possible formations of
condensation, mold or odors.
2
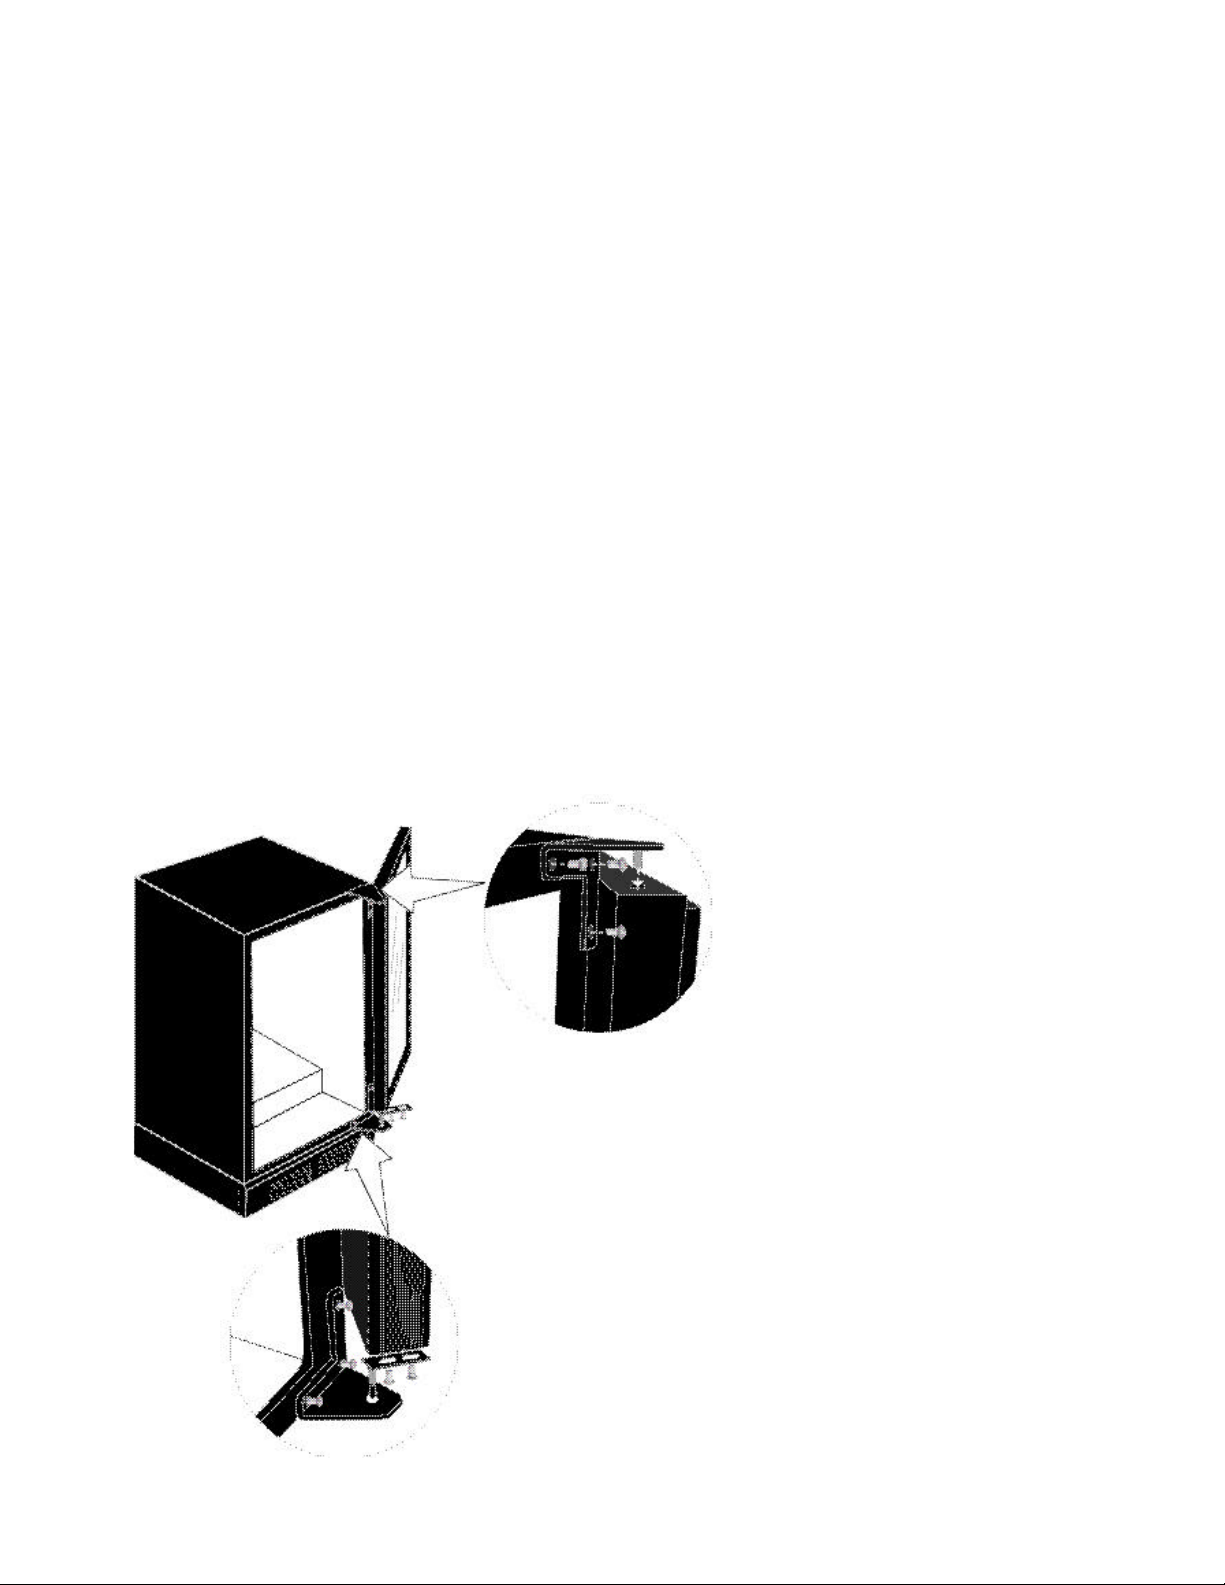
DOOR REVERSAL
To facilitate door reversal, we recommend someone assist you during this process.
Tools required: Phillips Screwdriver
1. Lay the unit in it’s back.
2. Open the door until the screws securing the lower door support bracket are exposed on the bottom of the door.
This will require the door to be opened to a 90 degree angle.
Remove the screw closest to the bracket, as shown if Fig #1.
This will require someone to hold the door in the open position while the screw is being removed.
3. Close the door.
4. Remove the remaining screw in the lower door support.
5. Lift the door upwards and remove from the cabinet of the wine cooler.
6. Remove the 3 screws each securing the top and bottom hinge.
NOTE: Keep these hinges in a safe place in the event you ever need to revert back to a right hand door swing.
7. Remove the plastic screw caps from the left hand side of the door frame.
There are six (6) plastic caps to be removed.
8. Install the left hand top and bottom hinge (supplied with the unit) There are three (3) screws for each hinge.
9. Insert the lower door support onto the bottom hinge. Do not secure with screws until the door is installed.
10. Carefully re-position the door onto the lower door support and cabinet.
11. With door closed against the cabinet install one screw into the lower door support bracket.
12. Open the door to 90 degrees and install the second screw.
13. Close the door and check the door alignment and gasket seal.
14. Install the plastic screw caps in the right side of the cabinet.
15. Return the wine cooler to it’s upright position.
16. Check the door again for proper sealing.
NOTE: Allow the unit to stand upright for 1 hour before putting the unit into operation.
Upper Hinge
Lower Hinge Figure 1.
3

OPERATION:
Before turning on the wine cooler, ensure that the cabinet is level. This will eliminate any vibrations.
NOTE: The power (RUN) indicator light is located on the LED control panel inside the unit and will illuminate
when the compressor (cooling) cycle is operational. Set the desired cooling temperature by pressing the
buttons adjacent to the “up”/”down” arrows. Each depression of the buttons will increase/decrease the set
temperature in increments of 1degree. The set temperature will be displayed in the LED (TEMPSET) window.
It is possible to display temperatures in either Celsius or Fahrenheit. To change the setting, press and hold
both buttons simultaneously for approximately 5 seconds. The green pilot light adjacent to the mode
selection will illuminate the selection made.
To temporarily disconnect the cooling cycle, unplug the wine cooler. When disengaging the cooling function
for long periods of time, disconnect the plug and leave the door partially open.
NOTE: Wait 3 to 5 minutes before restarting the wine cooler if operation has been interrupted.
INTERIOR LIGHT
The interior light can operate “manually” or “automatically”. The light automatically comes on with the opening
of the door and goes out when the door is closed. To operate the light manually, press the light/toggle switch
located at the bottom right of the wine cooler exterior cabinet to the “on” position. To turn the light off, toggle
the switch to the “off” position.
DEFROSTING/CONDENSATION
Your wine cooler is designed with an “Auto-Cycle” defrost system. During the “Off Cycle” the refrigerated
surfaces of the wine cooler defrost automatically. Defrost water from the wine cooler storage compartment
drains automatically, and is channeled into a condensate drain pan which is located in the back of the wine
cooler next to the compressor. The heat transferred from the compressor evaporates any condensation that
has collected in the pan.
CARE & MAINTENANCE
Upon receiving your wine cooler, leave the door open for 24 hours. When cleaning the inside of the wine
cooler you can use a solution of a tablespoon of baking soda to one (1) quart of water, or a mild soap suds
solution, or some mild detergent. Wood shelving does not require cleaning. To clean the exterior cabinet of
your wine cooler, use a soft damp cloth with mild detergent or appliance cleaner.
4

STORING YOUR WINE COOLER
If you intend not to use the wine cooler for short periods of time, leave the control panel at its usual settings.
During longer periods of absences:
1. Remove bottles from wine cooler.
2. Unplug wine cooler from the electrical outlet.
3. Thoroughly clean the inside and outside of the wine cooler.
4. Leave the door open to avoid possible formations of condensation, mold or odors.
WHATTO DO REGARDING POWER FAILURE
Most power failures are corrected within a short period of time. An hour or two loss of power will not affect your wine
cooler temperatures. To protect your wines while the power is off, you should minimize the number of door openings.
For power failures of longer durations, take steps to protect your wine.
IF YOU HAVE TO MOVE YOUR WINE COOLER
Remove ALLbottles from the wine cooler and securely fasten down all loose items inside the wine cooler.
To avoid damaging the levelling legs, turn them all the way into the base of the unit.
HUMIDITY MAINTENANCE SYSTEM
The wine cooler is equipped with a system for maintaining the correct level of humidity. If humidity is too low,
insert the small plastic reservoir on to the top rack of the wine cooler. Fill this reservoir 3/4 full with water.
Check water level occasionally and refill as necessary.
REPLACING INTERIOR LIGHT BULBS
To replace an interior light bulb:
1. Remove the screw holding the light bulb cover. Remove the cover.
2. Unscrew light bulb. Replace the light bulb. NOTE: The light bulb should not exceed 25 watts.
3. Replace light bulb cover. Re-install screw to secure cover.
FEATURES AND BENEFITS
Powder coated, heavy duty steel cabinet with high density thermal insulation.
1. DIGITALELECTRONIC THERMOSTAT: Controls the temperature inside the wine cooler.
The compressor will cycle on as soon as the temperature rises above the desired level.
2. WOODEN SHELVES: Easily removable for easy access to your wine.
3. MAGNETIC DOOR GASKET: Tight fitting magnetic door seal keeps all the
cooling power and humidity sealed inside.
4. TEMPERED,REVERSIBLE GLASS DOOR: Tempered glass door is tinted for UV protection
allows for easy interior visibility
5 INTERIOR LIGHT: Allows for manual operation of interior lights to enable viewing
of wines prior to opening of the door.
STORAGE OF WINE
The upper shelves are recommended for storing “Red” wine.
The lower shelves are recommended for storing “White” wine.
The humidor should be positioned in the center of the top rack.
To acheive maximum storage capacity it will be necassary to position (store) the bottles alternately on the racks.
(see below diagram)
5

Model • Modèle • Modelo
DWC512BL
DELUXE WINE COOLER
The model number of your wine cooler is found on the serial
plate located on the back, top left-hand corner of the refrigerator.
All repair parts available for purchase or special order when you
visit your nearest service depot. To request service and/or the
location of the service depot nearest you, call the toll free number
listed to the left in Canada and the U.S.
When requesting service or ordering parts, always provide the
following information:
• Product Type
• Model Number
• Part Number
• Part Description
For service, contact
your nearest service depot or call:
1-800-26D-anby
to recommend a depot in
your area.
Pour obtenir le service, consultez
votre succursale régionale de
service ou téléphonez:
1-800-26D-anby
qui vous recommandera un
centre régional.
Para sevicio, communíquese con
su departamento de servicios más
cercano o llame al:
1-800-26D-anby
para que le recomienden un
departamento de servicios
en su zona.
REFROIDISSEUR DE VIN
Le numéro de modèle de votre refroidisseur de vin se trouve sur
la plaque d'identification qui se trouve sur le coin du haut gauche
de l'arrière du réfrigérateur.
Toutes les pièces de rechange sont disponibles immédiatement
ou peuvent être commandées de votre Centre de Service
régional. Pour obtenir le service et/ou le Centre de Service le
plus proche, téléphonez le numéro sans-frais indiqué à gauche
pour le Canada et les États-Unis.
Ayez les informations suivantes à la portée de la main lors de la
commande de pièces ou service:
• Genre de produit
• Numéro de modèle
• Numéro de pièce
• Description de la pièce
REFRIGERADOR PARAVINOS
El número del modelo de su refrigerador para vinos se encuentra
en la placa de serie ubicada en el ángulo posterior superior
izquierdo del refrigerador.
Todas las piezas de repuesto se encuentran disponibles para la
compra o por pedido especial cuando Ud. visite su departamento
de servicio más cercano. Para solicitar servicio y/o la ubicación
del departamento de servicio más cercano, llame al número de
marcando gratis que aparece a la izquierda en el Canadá y en
los E.U.
Cuando solicite servicio o encargue repuestos, siempre
proporcione la siguiente información:
• Tipo de producto
• Número de modelo
• Número del repuesto
• Descripción del repuesto
Printed in China (P.R.C.)
Danby Products Limited, PO Box 1778, Ontario, Canada N1H 6Z9
Danby Products Inc., PO Box 669, Findlay, Ohio, USA 45839-0669

OWNER’S MANUAL
MANUEL D'UTILISATION
MANUAL DEL PROPIETARIO
Model • Modèle • Modelo
DWC512BL
CAUTION:
Read and follow all safety rules and
operating instructions before first
use of this product.
PRÉCAUTION:
Veuillez lire attentivement les
consignes de sécurité et les
instructions d'utilisation avant
l'utilisation initiale de ce produit.
PRECAUCIÓN:
Lea y observe todas las reglas de
seguridad y las instrucciones de
operación antes de usar este
producto por primera vez.
DELUXE WINE COOLER
Owner’s Manual . . . . . . . . . . . . . . . . . . . . . . .1-5
• Safety Instructions
• Installation
• Operation
• Care and Maintenance
REFROIDISSEUR DE VIN
Manuel d'utilisation . . . . . . . . . . . . . . . . . . . .6-10
• Consignes de sécurité
• Installation
• Fonctionnement
• Soins et entretien
REFRIGERADOR PARAVINOS
Manual del propietario . . . . . . . . . . . . . . . .11-15
• Instrucciones de seguridad
• Instalación
• Operación
• Cuidado y Mantenimiento
Danby Products Limited, PO Box 1778, Ontario, Canada N1H 6Z9
Danby Products Inc., PO Box 669, Findlay, Ohio, USA 45839-0669
512.11.02

GARANTIE LIMITÉE
Cet appareil de qualité est garantie exempt de tout vice de matière première et de fabrication, s’il est utilisé dans les conditions normales recommandées par le
fabricant.
Cette garantie n’est offerte qu’à l’acheteur initial de l’appareil vendu par Danby ou par l’un des ses distributeurs agréés et elle ne peut être transférée.
CONDITIONS
Pièces en plastique (la porte de l’évaporateur, gardes de porte, couvercle et bacs sont couverts par une garantie sans extension de 30 jours de la date d’achat.
Premières Deux années
De la troisième à Pendant les prochaines trois (3) années, les pièces s’avèrent défectueuses (y compris le: compresseur, condensateur, évaporateur,
la cinquième années sécheuse, et tous leurs boyaux) seront remplacés sans frais. L’acheteur est responsable envers tous les frais de main-d’oeuvre et de
Pour bénéficier du Danby réserve le droit de limiter le rayon du “Service au domicile” selon la proximité d’un dépot de service autorisé. Le client sera
service sous garantie responsable pour le transport et tous les frais d’expédition de tout appareil exigeant le service en dehors des limites du “Service au
L’article suivante se reporte aux réfrigérateurs à porte simple ou double, avec ou sans une section de congélation. Cette garantie indique en aucun temps la
responsabilité de Danby de l’avarie ou dommage de la nourriture ou autre contenu, soit par les vices de l’appareil, ou soit par l’utilisation convenable ou inexacte.
En vertu de la présente, il n’existe aucune autre garantie, condition ou représentation, qu’elle soit exprimée ou tacite, de façon manifeste ou intentionnelle, par
Danby Products Limitée (Canada) ou Danby Products Inc. (E.- U. d’A.) ou ses distributeurs agréés. De même, sont exclues toutes les autres garanties, conditions
ou représentations, y compris les garanties, conditions ou représentations en vertu de toute loi régissant la vente de produits ou de toute autre législation ou
règlement semblables.
En vertu de la présente, Danby Products Limitée (Canada) ou Danby Products Inc. (E.- U. d’A.) ne peut être tenue responsable en cas de blessures corporelles ou
des dégâts matériels, y compris à l’appareil, quelle qu’en soit les causes. Danby ne peut pas être tenue responsable des dommages indirects dus au
fonctionnement défectueux de l’appareil. En achetant l’appareil, l’acheteur accepte de mettre à couvert et de dégager Danby Products Limitée de toute
responsabilité en cas de réclamation pour toute blessure corporelle ou tout dégât matériel causé par cet appareil.
La garantie ou assurance ci-dessus ne s’applique pas si les dégâts ou réparations sont dus aux cas suivants:
1) Panne de courant;
2) Dommage subis pendant le transport ou le déplacement de l’appareil;
3) Alimentation électrique incorrecte (tension faible, câblage défectueux, fusibles incorrects);
4) Accident, modification, emploi abusif ou incorrect de l’appareil;
5) Utilisation dans un but commercial ou industriel;
6) Incendie, dommage causés par l’eau, vol, guerre, émeute, hostilités, cas de force majeure (ouragan, inondation, etc.);
7) Visites d’un technicien pour expliquer le fonctionnement de l’appareil au propriétaire.
Une preuve d’achat doit être présentée pour toute demande de réparation sous garantie. Prière de garder le reçu. Pour faire honorer la garantie, présenter ce
document à la station technique agréée ou s’adresser à:
Pendant les deux (2) années, toutes pièces électriques de ce produit s’avèrent défectueuses, y compris les unités ayant des systèmes
obturés, seront réparées ou remplacées, selon le choix du garant, sans frais à l’acheteur INITIAL. Les autres pièces courantes (par ex.,
les ampoules) ne sont couvertes par aucune garantie.
transport pendant cette période de trois (3) ans pour la réparation et le rechange sur tous les composants du système obturé. Toute unité
de diagnositique inadéquate due à un vice du système obturé et qui exige une unité de rechange pendant ces trois (3) ans subira un taux
de dépréciation convenable ou à un frais pour l’acheteur. Ceci inclut tous les frais de transport qui seront imposés contre l’acheteur.
domicile” au dépot de service autorisé le plus proche. S’adresser au détaillant qui a vendu l’appareil, ou à la station technique agréée de
service la plus proche, où les réparations doivent être effectuées par un technicien qualifié. Si les réparations sont effectuées par
quiconque autre que la station de service agréée où à des fins commerciales, toutes les obligations de Danby en vertu de cette garantie
seront nulles et non avenues.
EXCLUSIONS
CONDITIONS GÉNÉRALES
Service sous-garantie
Canada E.-U. d’A
Domicile Domiciler
Danby Products Limitée
PO Box 1778, 5070 Whitelaw Road,
Guelph, Ontario, Canada N1H 6Z9
Téléphone: (519) 837-0920 Télécopieur: (519) 837-0449
09/02
PO Box 669, 101 Bentley Court,
Danby Products Inc.
Findlay, Ohio, U.S.A. 45839-0669
Telephone: (419) 425-8627 FAX: (419) 425-8629
6

ENTREPOSAGE DU CABINET À VIN
Si vous avez l'intention de ne pas utiliser votre cabinet pendant une courte période, laissez les
commandes à leur réglage habituel.
Si vous comptez vous absenter pendant une période plus longue, procédez comme suit :
1. Retirez les bouteilles de vin du cabinet.
2. Débranchez le cordon d'alimentation électrique du cabinet.
3. Nettoyez à fond l'intérieur du cabinet ainsi que l'extérieur.
4. Laissez la porte entrouverte pour éviter toute formation possible de condensation, de moisissures et d'odeurs.
QUE FAIRE EN CAS DE PANNNE ÉLECTRIQUE
La plupart des pannes électriques sont réparées rapidement. Une perte d'alimentation électrique pendant une heure ou deux
n'aura pas d'incidence sur la température à l'intérieur de votre cabinet à vin. Pour protéger votre vin pendant une panne
d'électricité, minimisez le nombre de fois où vous ouvrez la porte. Si la panne dure longtemps, prenez les mesures
nécessaires pour protéger votre vin.
SI VOUS DÉSIREZ DÉMÉNAGER VOTRE CABINET À VIN
Retirez TOUTES les bouteilles du cabinet à vin et fixez bien les objets qui se trouvent à l'intérieur de votre cabinet. Pour ne
pas endommager les pattes de mises au niveau, entrez-les complètement dans la base du cabinet.
SYSTÈME DE MAINTIEN DE L'HUMIDITÉ
Le cabinet à vin comprend un système de maintien du bon niveau d'humidité. Si le niveau d'humidité est trop bas, ouvrez le
petit réservoir en plastique qui se trouve sur le support supérieur du cabinet à vin et remplissez-le aux trois quarts d'eau.
Vérifiez occasionnellement le niveau d'eau et ajoutez-en au besoin.
REMPLACEMENT DES AMPOULES INTÉRIEURES
Pour remplacer les ampoules électriques intérieures, procédez comme suit :
1. Retirez la vis retenant le couvre-ampoule. Retirez le couvercle.
2. Dévissez l'ampoule et remplacez-la. NOTA : La puissance de l'ampoule ne devrait pas dépasser 25 watts.
3. Remettez le couvre-ampoule en place et réinstallez la vis retenant le couvercle.
CARACTÉRISTIQUES ET AVANTAGES
Cabinet en acier pour service intense enduit de poudre avec isolation thermique à haute densité.
1. THERMOSTAT ÉLECTRONIQUE NUMÉRIQUE : Le thermostat contrôle la température à l'intérieur du cabinet à vin.
Le compresseur se met en marche dès que la température à l'intérieur du cabinet dépasse le niveau désiré.
2. TABLETTES EN BOIS: Les tablettes sont faciles à retirer pour donner facilement accès au vin.
3. JOINTS ÉTANCHES MAGNÉTIQUES AUTOUR DE LA PORTE : Le joint étanche magnétique situé autour de la
porte conserve toute la capacité de refroidissement et toute l'humidité à l'intérieur du cabinet.
4. VITRE EN VERRE TREMPÉ RÉVERSIBLE : La porte en verre trempé est contrede voir facilement le contenu du cabinet.
5 LUMIÈRE INTÉRIEURE : Permet d'utiliser l'éclairage en mode manuel pour voir les vins avant d'ouvrir la porte.
ENTREPOSAGE DES VINS
Les tablettes supérieures sont recommandées pour les vins «rouges».
Les tablettes inférieures sont recommandées pour les vins «blancs».
L’humidificateur devrait être placé au centre du support supérieur.
Pour maximiser la capacité d’entreposage des bouteilles, placez les bouteilles alternativement sur les supports. (Voir le
schéma ci-dessous)
HUMIDIFICATEUR
10

INSTRUCTIONS DE SÉCURITÉ
MISE À LATERRE
Ce cabinet à vin doit être mis à la terre au cas où il y aurait un court-circuit. La mise à la terre réduit les risques
de chocs électriques. Le cordon d'alimentation électrique de ce cabinet à vin est prévu pour une mise à la terre.
La prise du cabinet doit être branchée dans une prise de courant électrique murale bien installée et mise à la terre.
AVERTISSSEMENT: UNE MAUVAISE UTILISATION DE LA PRISE DE COURANT MISE À LA TERRE
POURRAIT ENTRAÎNER DES CHOCS ÉLECTRIQUES. Consultez un électricien qualifié ou un spécialiste du
service si vous ne comprenez pas complètement les instructions de mise à la terre.
MISE EN GARDE : Lisez et observez toutes les règles de sécurité et les instructions
d'utilisation avant d'utiliser ce produit.
INSTRUCTIONS D'INSTALLATION
Retirez les matériaux d'emballage extérieurs et intérieurs. Utilisez un chiffon sec et doux pour essuyer
complètement l'extérieur de votre cabinet à vin. Utilisez un chiffon imbibé d'eau tiède pour essuyer
l'intérieur du cabinet à vin.
L'air doit circuler librement à l'avant du cabinet à vin. Évitez le placer le cabinet à vin près d'une source de
chaleur, sous les rayons solaires directs ou en présence de sources d'humidité. Les rayons solaires directs
pourraient ternir le fini du cabinet à vin. Les sources de chaleur à proximité du cabinet à vin feront
augmenter la consommation d'électricité.
INSTALLATION DES TABLETTES
TABLETTES EN BOIS
1. Placez les tablettes en bois à la hauteur désirée sur les encoches pratiquées.
2. Insérez les butoirs métalliques (boutons) dans les orifices (déjà perforés) des deux côtés du chemisage noir.
avant
vis
tablette en bois
ATTENTION
-Entreposez le vin dans des bouteilles scellées.
-Ne surchargez pas le cabinet.
-N'ouvrez la porte que lorsque c'est nécessaire.
-NE COUVREZ PAS les tablettes avec du papier d'aluminium ou avec d'autres matériaux pour
les tablettes pour ne pas nuire à la circulation de l'air.
-Si le cabinet à vin n'est pas utilisé pendant de longues périodes, nettoyez le cabinet et laissez la porte
entrouverte pour permettre à l'air de circuler à l'intérieur du cabinet de façon à éviter toute
formation possible de condensation, de moisissures ou d'odeurs.
7

POUR FACILITER LE RENVERSEMENT DE LA PORTE, NOUS VOUS RECOMMANDONS DE
VOUS FAIRE AIDER LORS DE CE PROCESSUS.
Pour faciliter l'inversion de la porte, nous vous suggérons d'avoir une autre personne avec vous. Outils requis : tournevis Phillips
1.Placez l'appareil sur son dos.
2. Ouvrez la porte jusqu'à ce que vous puissiez voir les vis retenant le support inférieur de la porte au bas de celle-ci. Pour cela,
la porte doit être ouverte à 90 degrés. Retirez la vis la plus proche du support (voir la Fig. 1). Pour cette opération, vous devrez
avoir quelqu'un qui tient la poste ouverte pendant le retrait de la vis.
3. Fermez la porte.
4. Retirez l'autre vis du support inférieur de la porte.
5. Soulevez la porte et retirez-la du cabinet à vin.
6. Retirez les 3 vis retenant les charnières supérieure et inférieure.
NOTA : Conservez ces charnières à un endroit sûr pour éventuellement inverser de nouveau le sens d'ouverture de la porte pour
qu'elle ouvre du côté droit.
7. Retirez les capuchons en plastique insérés du côté gauche du cadre de la porte.
Vous devrez retirer six (6) capuchons en plastique.
8. Installez les charnières supérieure et inférieure gauches (fournies avec l'unité). Chaque charnière comporte trois (3) vis.
9. Insérez le support inférieur de la porte dans la charnière inférieure. Ne serrez pas les vis avant que la porte ne soit installée.
10. Remettez la porte en place avec soin sur le support inférieur de la porte et le cabinet.
11. Fermez la porte sur le cabinet et installez une vis dans le support inférieur de la porte.
12. Ouvrez la porte à 90 degrés et installez la deuxième vis.
13. Fermez la porte et vérifiez son alignement ainsi que son joint étanche.
14. Installez les capuchons en plastique sur les vis du côté droit du cabinet.
15. Remettez le cabinet à vin debout.
16. Vérifiez la porte pour vous assurer de son bon scellement.
NOTA : LAISSER L’APPAREIL EN POSITION DEBOUT PENDANT UNE HEURE AVANT DE LE METTRE EN MARCHE.
charnière supérieure
charnière inférieure Fig. 1.
8

MISE EN MARCHE :
Avant d’allumer la cave à vin, s’assurer que le cabinet est à niveau. Cela évitera toute vibration.
NOTA : Le témoin indicateur d’alimentation (RUN) se trouve sur le tableau de commande DEL à l’intérieur de l’appareil et
s’allumera lorsque le cycle du compresseur (de refroidissement) sera opérationnel.
Régler la température de refroidissement désirée en appuyant sur les boutons à côté des flèches « up/haut »/« down/bas ».
Chaque dépression des boutons augmente / réduit la température réglée par incréments d’un degré.
La température réglée s’affiche sur la fenêtre DEL (TEMPSET).
Il est possible d’afficher les températures en degrés Celsius ou Fahrenheit. Pour modifier le réglage, appuyer sur les deux
boutons en même temps et les maintenir enfoncés pendant approximativement 5 secondes. Le témoin vert à côté de la
sélection de mode indique la sélection choisie.
Pour débrancher temporairement le cycle de refroidissement, débranchez le cordon d'alimentation électrique du
cabinet à vin. Lorsque le cabinet n'est pas utilisé pendant une longue période, débranchez également le cordon d'alimentation
électrique et laissez la porte entrouverte.
NOTA : Si l'alimentation électrique est coupée pendant un certain temps, attendez entre 3 à 5 minutes avant de rebrancher le
cordon d'alimentation électrique.
LUMIÈRE INTÉRIEURE
La lumière intérieure peut être utilisée en mode "manuel" ou "automatique". Le voyant s'allume automatiquement lorsque la
porte s'ouvre et il s'éteigne lorsque la porte est refermée. Pour utiliser la lumière manuellement, appuyez sur l'interrupteur à
bascule situé sur l'extérieur du cabinet, dans le coin inférieur droit, pour le mettre en position "on". Pour éteindre la lumière,
placez l'interrupteur à bascule en position "off".
DÉGIVRAGE ET CONDENSATION
Le système de dégivrage de votre cabinet à vin est conçu pour fonctionner en mode "automatique". Pendant le cycle de
dégivrage, les surfaces réfrigérées du cabinet à vin se dégivrent automatiquement. L'eau découlant du dégivrage du logement
d'entreposage des bouteilles de vin se vidange automatiquement et elle s'évacue dans un bac contenant l'eau de condensation
situé à l'arrière du cabinet, à proximité du compresseur. La chaleur produite par le compresseur fait évaporer toute l'eau de
condensation contenue dans le bac.
9
 Loading...