


ER36DCLP
Dacor ER36DCLP, ER48DCNGH, ER48DSCHNGH, ER48DCLP, ER48DCNG Installation Guide
...
Installation Instructions
Renaissance
®
Range
Part No. 100843 Rev. Z
THIS APPLIANCE HAS BEEN TESTED IN ACCORDANCE WITH THE LATEST EDITION
OF ANSI Z21.1 STANDARD FOR HOUSEHOLD GAS COOKING APPLIANCES.
For use with models ER36D, ER36D-C, ER48D, ER48D-C

Table of Contents
IMPORTANT:
• Installer: In the interest of safety and to minimize problems, read these installation instructions completely and carefully before you
begin the installation process. Leave these installation instructions with the customer.
• Customer: Keep these installation instructions for future reference and the local building inspector’s use.
Specifications contained within are subject to change without notice.
No liability is assumed by Dacor
®
for changes in specifications.
© 2007 Dacor, all rights reserved.
Important Safety Instructions .....................................................1
General Safety Precautions ........................................................2
Customer Service Information ....................................................3
Planning the Installation
..............................................................4
Electrical Requirements ..............................................................4
Electrical Requirements - Canada ..............................................4
Gas Supply Requirements
..........................................................4
Product Dimensions ....................................................................5
Cabinet Layout ............................................................................6
Installation Instructions
...............................................................7
Preparing for Installation .............................................................7
Electrical Connection ..................................................................8
Gas Connection
........................................................................13
Final Installation ........................................................................14
Installing the Burner Knobs ......................................................15
Cooktop Assembly
....................................................................16
Verifying Proper Operation .......................................................17
Installation Checklist .................................................................17
1
Important Information About Safety
Instructions
The Important Safety Instructions and warnings in this manual
are not meant to cover all possible problems and conditions
that can occur. Use common sense and caution when installing,
maintaining or operating this or any other appliance.
Always contact the Dacor Customer Service Team about problems
and conditions that you do not understand.
Safety Symbols and Labels
DANGER
Immediate hazards that WILL result in severe personal injury or
death.
WARNING
Hazards or unsafe practices that COULD result in severe
personal injury or death.
CAUTION
Hazards or unsafe practices that COULD result in minor
personal injury or property damage.
Important Safety Instructions
READ AND SAVE THESE INSTRUCTIONS
WARNING
IMPORTANT: If you smell gas:
• Do not use or light any appliance.
• Do not touch any electrical switch or use any electrical
devices, including the telephone, in your building.
• From a neighbors phone, immediately call the gas supplier.
Follow the gas supplier’s instructions.
• If you cannot contact the gas supplier, call the fire
department.
IMPORTANT: Do not store or use combustible, flammable or
explosive vapors and liquids (such as gasoline) inside or in the
vicinity of this or any other appliance. Also keep items that could
explode, such as aerosol cans, away from the burners and the
oven. Do not store flammable or explosive materials in adjacent
cabinets or areas.
IMPORTANT: Child entrapment and suffocation are not
problems of the past. Junked or abandoned appliances are
still dangerous, even if they sit out for “just a few days.” When
taking an appliance out of service, please follow the instructions
below to help
prevent accidents:
• Take off the door.
• Leave the racks in place so children cannot easily climb
inside.
• Cut the prongs off the power cable plug and discard them.
• Cut the power cable off and discard it separately from the
old appliance.
WARNING
WARNING – NEVER use this appliance as a space heater
to heat or warm the room. Doing so may result in carbon
monoxide poisoning and overheating of the appliance.
WARNING
NEVER cover any slots, holes or passages on the inside or
outside of the range or cover an entire rack with materials such
as aluminum foil. Doing so blocks air flow through the oven and
may cause carbon monoxide poisoning. Aluminum foil linings
may also trap heat, causing a fire hazard.
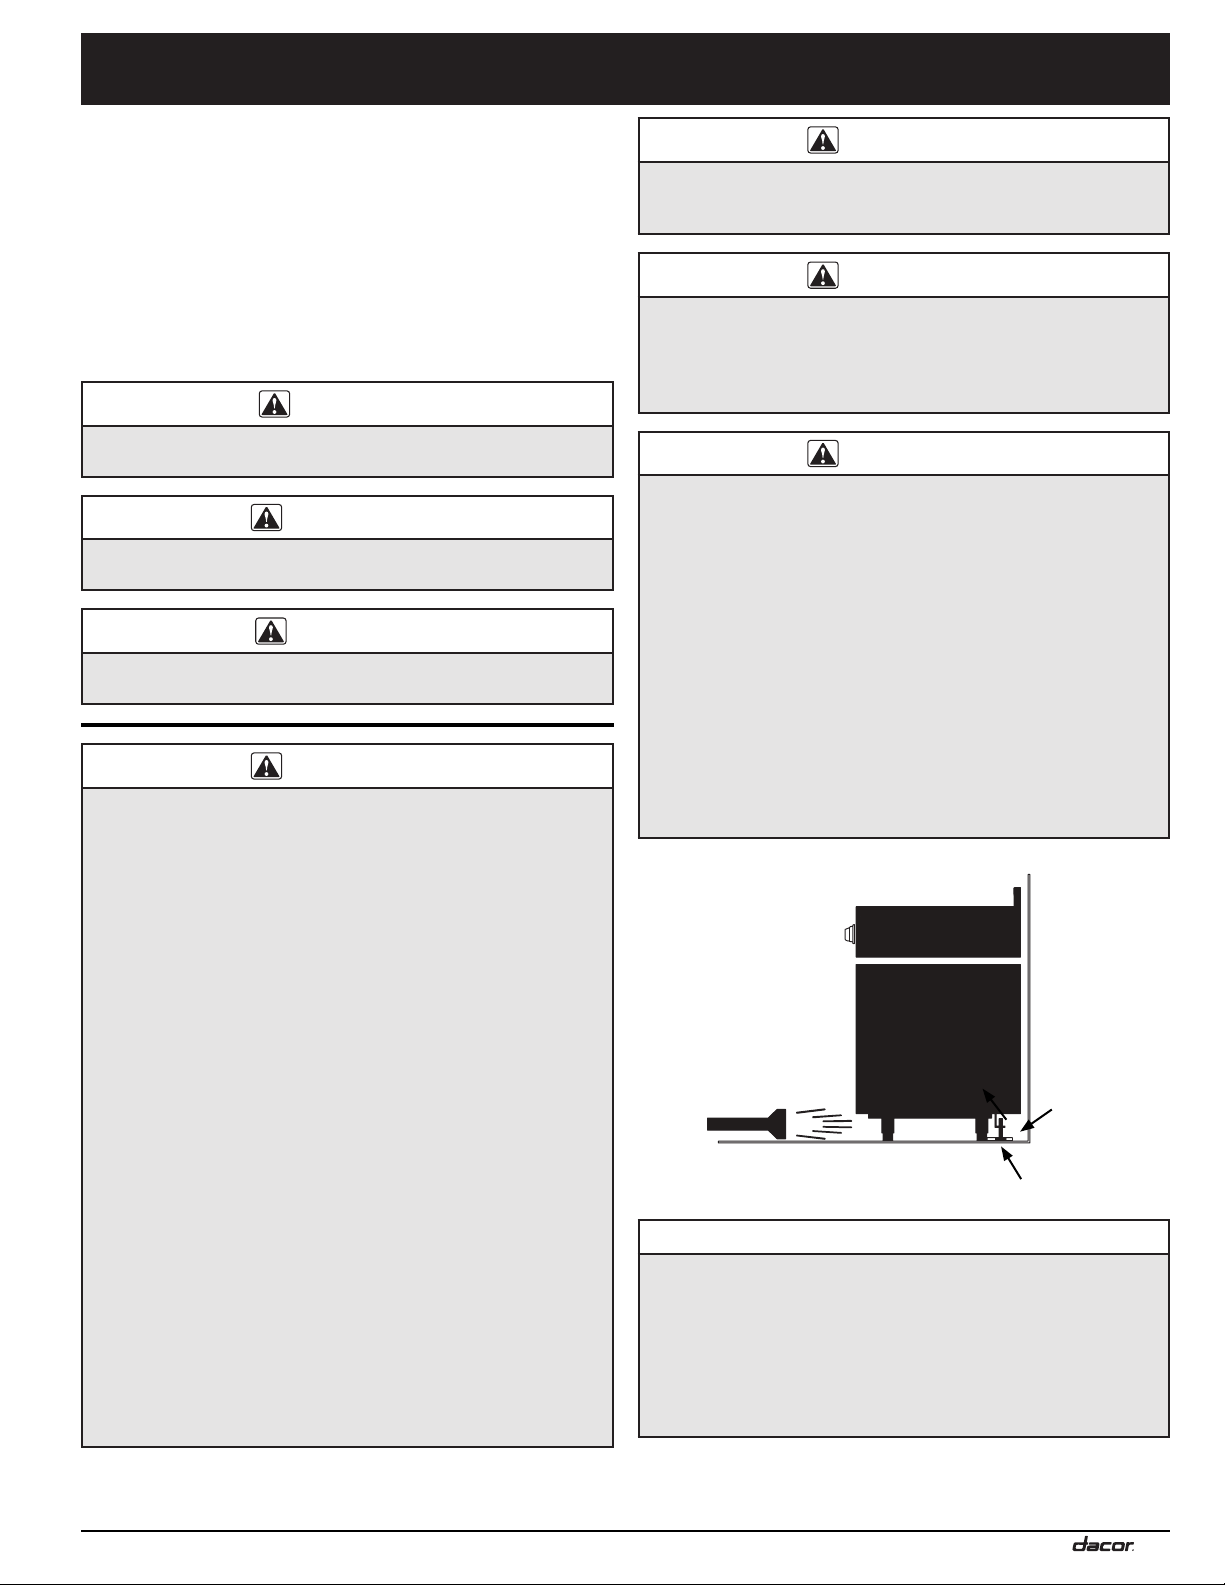
WARNING
Tip-over hazard:
• A child or adult can tip the range and be killed.
• Attach the anti-tip bracket to the floor as directed in these
installation instructions.
• Engage the anti-tip bracket by sliding the anti-tip foot on
the range into it according to these installation instructions.
Using a flashlight, be sure that the anti-tip bracket engages
the range’s anti-tip foot as shown below.
• After moving the range, be sure to re-engage the anti-tip
foot into the anti-tip bracket as shown below.
• See the anti-tip bracket installation instructions in this guide
for further details.
• Failure to follow these instructions can result in death or
serious burns to children or adults.
CALIFORNIA PROPOSITION 65 WARNING
The burning of gas cooking fuel generates some by-products
that are on the list of substances which are known by the State
of California to cause cancer or reproductive harm. California
law requires businesses to warn customers of potential
exposure to such substances. To minimize exposure to these
substances, always operate this unit according to the use
and care manual, ensuring you provide good ventilation when
cooking with gas.
Anti-tip
bracket
Anti-tip foot
2
Important Safety Instructions
General Safety Precautions
To reduce the risk of fire, explosion, electric shock, serious injury or death when installing or using this appliance, follow basic safety
precautions, including the following:
• Read the accompanying use and care manual before operating this appliance.
• Keep packaging materials away from children. Plastic sheets and bags can cause suffocation.
• If you receive a damaged product, immediately contact your dealer or builder. Do not install or use a damaged appliance.
• This range must be properly installed and grounded by a qualified installer according to these installation instructions prior to
use. The installer should show the customer the location of the gas shut off valve and the fuse or junction box so that they know
where and how to turn off the gas supply and electric power to the range.
• Do not install, repair or replace any part of the range unless specifically recommended in the literature accompanying it. A
qualified service technician should perform all other service.
• Do not connect this range to the gas supply without the supplied gas pressure regulator installed.
• Before performing any type of service or installation, make sure the gas supply and electric power to the range are turned off.
• NEVER block or cover any slots, holes or passages anywhere inside the oven or on the outside of the range or cover an
oven rack with materials such as aluminum foil. Doing so blocks airflow through the oven and cooktop and may cause carbon
monoxide poisoning or fire. See the Getting to Know Your Range section of the use and care manual for the location of the
various air holes (slots).
• Only use the range for cooking tasks expected of a home appliance as outlined in the literature accompanying it. This range is
not intended for commercial use.
• DO NOT TOUCH THE SURFACES OF THE OVEN OR COOKTOP DURING OR IMMEDIATELY AFTER USE.
• To avoid the possibility of fire, never leave this appliance unattended when the cooktop is in use.
• Do not climb on any part of the appliance.
• Do not leave children or pets alone or unattended in the area around the range. Do not allow children to play with the controls,
pull on the handle(s), or touch other parts of the range.
• Do not store items of interest to children on top of or above the range. Children could be burned or injured while climbing on the
appliance.
• Do not attempt to use this appliance in the event of a power failure.
• Clean the cooktop thoroughly before operating it for the first time.
• Keep flammable items, such as paper, cardboard, plastic and cloth away from the burners and other hot surfaces. Do not place
such items in the oven(s). Do not allow pot holders to touch hot surfaces or gas burners.
• Do not wear loose or hanging apparel while using the range. Do not allow clothing to come into contact with the interior of the
oven(s) or the cooktop and surrounding areas during and immediately after use.
• To avoid a fire hazard, do not hang flammable or heat sensitive objects over the range. If the range is near a window, do not use
long curtains as window treatment. The curtains could blow over the cooktop and create a fire hazard.
• Do not use the oven(s) for storage.
• Do not touch the burner assembly, grates or surrounding surfaces (including the backguard) or the interior surfaces of the
oven(s) during use. After use, make sure these surfaces have had sufficient time to cool before touching them.
• Do not touch the outside surfaces of the range during the self-clean cycle. They will be hot. Venting from the oven may cause the
cooktop and backguard to become hot.
• Make sure that all the cooktop parts are dry before lighting a burner.
• Turn the knobs to the “OFF” position prior to removing them from the valve stems.
• The cooktop should never be operated without the knobs and trim rings in place.
• For your safety, do not use the oven to cook without the convection filter(s) installed. When the filter is not installed, the spinning
fan blades at the back of the oven are exposed.
• Non-stick coatings, when heated, can be harmful to birds. Remove birds to a separate, well-ventilated room during cooking.
WARNING
3
Important Safety Instructions
• To prevent damage, remove the meat probe from the oven(s) when it is not being used.
• Do not line the oven(s) with aluminum foil or other materials. These items can melt or burn up during self-cleaning and cause
permanent damage to the oven.
• Do not leave metal objects, such as aluminum foil, the meat probe, cookie sheets, etc. on the bottom of the oven(s). Objects left
on the bottom of the oven could damage the bake element. In addition, the objects themselves could be damaged.
• On some ovens, the bake and broil elements are behind glass panels on the floor and ceiling of the oven chamber. Do not cover
these glass panels with cookie sheets, aluminum foil, pots, pans, etc. Covering them could cause the heating elements to over-
heat, damaging the oven.
• Do not expose the knobs or trim rings to direct flame, hot utensils or other sources of heat.
• Always ensure that the light fixture lens covers are in place when using the oven(s). The lens covers protect the light bulbs from
breakage caused by high oven temperatures or mechanical shock.
WARNING
Customer Service Information
If you have questions or problems with installation, contact your
Dacor dealer or the Dacor Customer Service Team. For repairs
to Dacor appliances under warranty call the Dacor Distinctive
Service line. Whenever you call, have the model and serial
number of the appliance ready. The serial number and rating
labels are inside the grate, inside the door.
Dacor Customer Service Team
Phone: (800) 793-0093 ex. 2813 (U.S.A. and Canada)
Monday — Friday 6:00
a.m. to 5:00 p.m. Pacific Time
Web site: www.dacor.com
Dacor Distinctive Service (for repairs under warranty only)
Phone: (800) 793-0093 ex. 2822 (U.S.A. and Canada)
Monday — Friday 6:00
a.m. to 5:00 p.m. Pacific Time
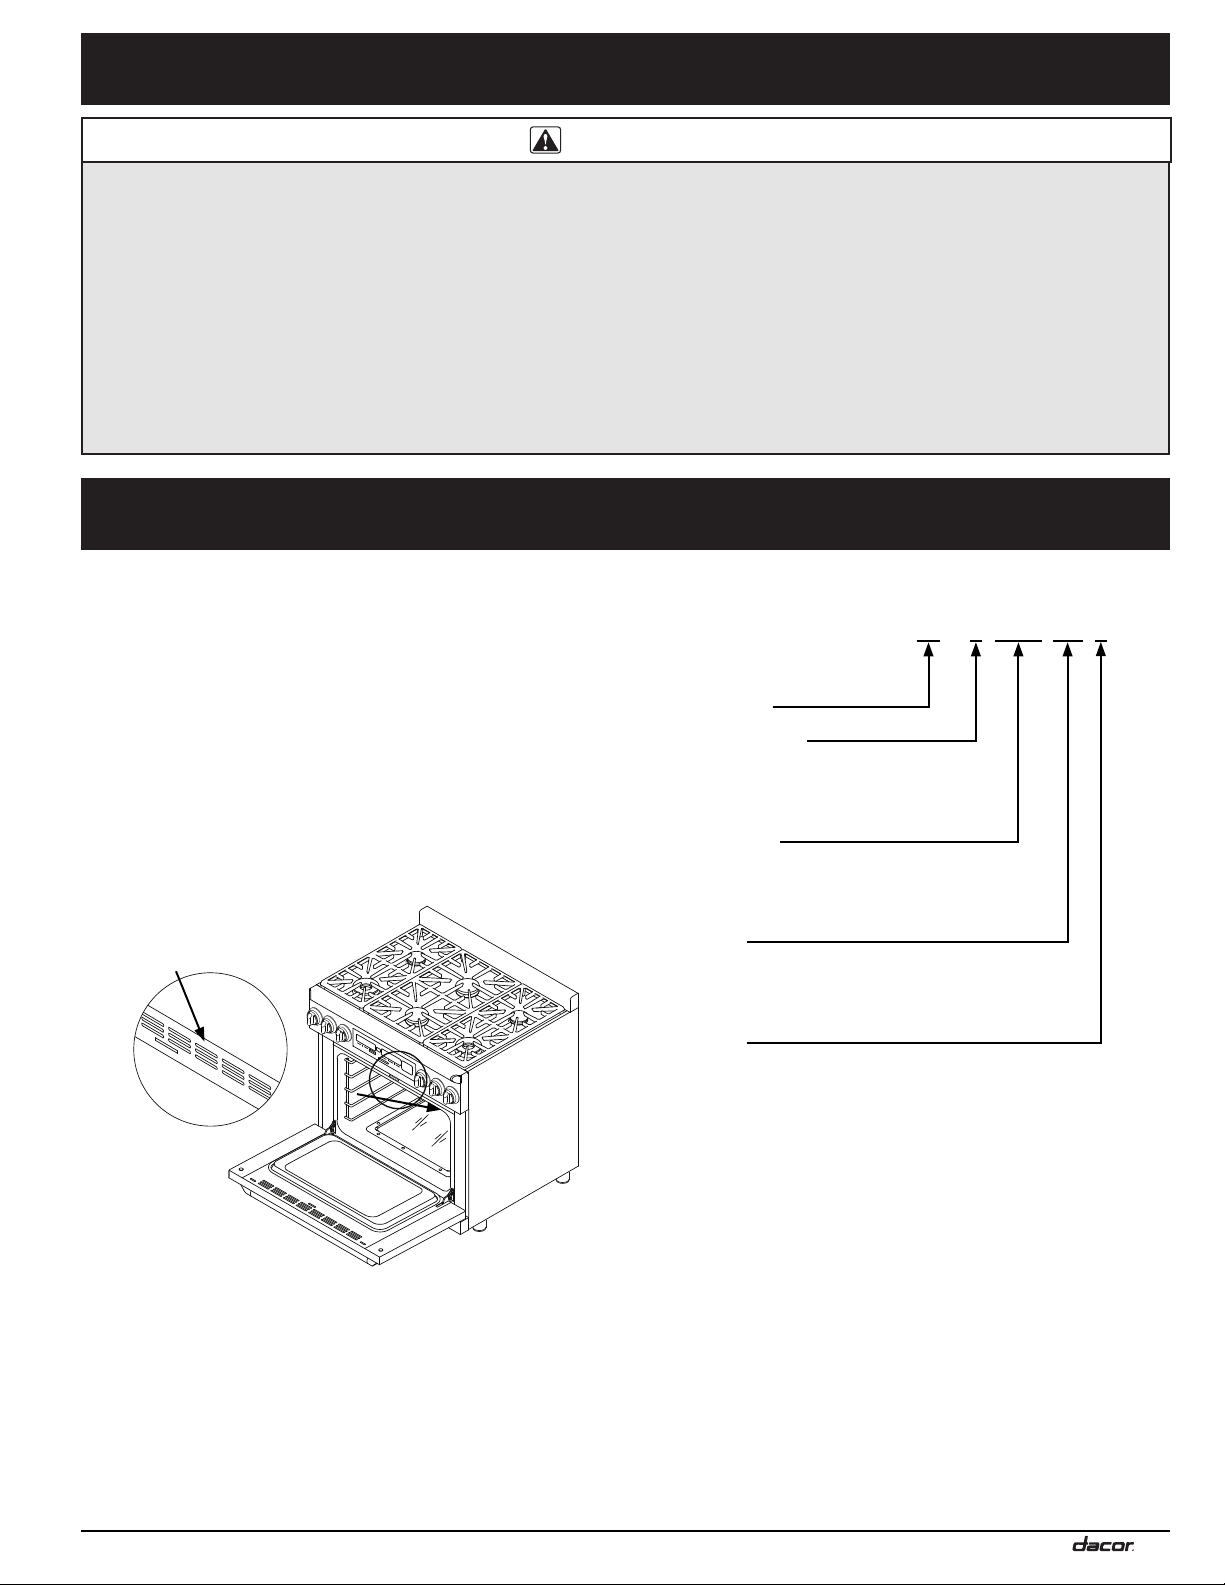
Model Identification
Model and Serial Number Location
Model and serial
number label located
inside grill
ER36D-C-SCH/NG/H
SIZE (inches)
COUNTRY CODE
COLOR CODE
GAS TYPE
ALTITUDE
-C- = Equipped for use in Canada
No Character = Equipped for use in U.S.A.
C = Custom color
SCH = Stainless steel
NG = Natural Gas
LP = Liquid Petroleum (Propane)
H = Equipped for high altitude operation,
4000 ft. (1219 m) and up
No Character = Equipped for low altitude operation

4
Planning the Installation
WARNING
IMPORTANT: Observe all governing codes and ordinances
during planning and installation. Contact your local building
department for further information.
Electrical Requirements
IMPORTANT: The information below does not apply to units
equipped for use in Canada.
It is the owner’s responsibility to ensure that the electrical
connection of this appliance is performed by a licensed electrician.
The electrical installation, including minimum supply wire size
and grounding, must be in accordance with the National Electric
Code ANSI/NFPA 70-1993 (or latest revision) and local codes and
ordinances. The standard is available from:
National Fire Protection Association
1 Batterymarch Park
Quincy, Massachusetts 02269-9101
• The correct voltage, frequency and amperage must be
supplied to the appliance from a separate, grounded, circuit
that is protected by a properly sized circuit breaker or time
delay fuse. If a fuse is utilized, fuse both sides of the line (L1
and L2).
NOMINAL ELECTRIC CIRCUIT REQUIREMENTS - U.S.A.
Range
Model
Circuit Required
Total Connected
Load
ER36D
240 Vac*, 60 Hz, 30 Amp. (Min.)
40 Amp. (Recommended)
6.5 kW (28 Amp.)
ER48D 240 Vac*, 60 Hz, 50 Amp. 10.0 kW (42 Amp.)
* 4-wire, two 120 Vac hot (L1 and L2), one neutral, one ground
The ratings above are for reference only. Refer to the range rating
label for exact specifications (see page 3 for location).
• Consult local building codes for the type and minimum wire
gauge to use for the power requirements listed on the rating
label.
• Suggested wiring color code: Black, white, red and green.
• The wiring needs to be long enough to allow the range
to be pulled out from the wall for service, while remaining
connected. See page 8 for further details.
• The wiring to the range must:
◊ Have a minimum rating of 250 Volts @ 30 Amps for
model ER36D, 250 Volts @ 50 amps for model ER48D
◊ Include a strain relief
◊ Be terminated by tinned leads, closed loop terminals or
open ended spade lugs with upturned ends
• Where local code permits, a three (3) or four (4) wire
appliance cord may be used. The appliance cord must:
◊ Be UL listed type SRD or SRDT
◊ Be equipped with a NEMA 14-50P 4 wire plug or, where
local code permits, a NEMA 10-50P 3 wire plug.
• Prior to range installation, have a licensed electrician install a
conduit junction box or electrical receptacle according to the
type of wiring used.
Electrical Requirements - Canada
It is the owner’s responsibility to ensure that the required 4 wire
electrical outlet is installed by a licensed electrician as specified
below prior to range installation. The electrical outlet installation,
including minimum supply wire size and grounding, must be in
accordance with all governing codes and ordinances.
• The correct voltage, frequency and amperage must be
supplied to the appliance from a separate, grounded, circuit
that is protected by a properly sized circuit breaker or time
delay fuse. If a fuse is utilized, fuse both sides of the line (L1
and L2). Refer to the data on the range rating label.
NOMINAL ELECTRIC CIRCUIT REQUIREMENTS - CANADA
Range
Model
Circuit Required
Total Connected
Load
ER36D
240 Vac*, 60 Hz, 30 Amp. (min.)
40 Amp. (Recommended)
6.5 kW (28 Amp.)
ER48D 240 Vac*, 60 Hz, 50 Amp. 10.0 kW (42 Amp.)
* 4-wire, two 120 Vac hot (L1 and L2), one neutral, one ground
The ratings above are for reference only. Refer to the range rating
label for exact specifications (see page 3 for location).
• Freestanding ranges equipped
for use in Canada come pre-
wired with a 4 wire appliance
cord and NEMA 14-50P plug.
• Do not modify the factory wiring.
The plug is designed to plug
directly into a NEMA 14-50R
electrical receptacle installed by
a licensed electrician according
to the above specifications.
Gas Supply Requirements
• Check your local building codes for the proper method of
installation. In the absence of local codes, this appliance
should be installed in accordance with the National Fuel Gas
Code ANSI Z223.1.
• Be certain that the appliance being installed is correct for
the gas service provided (natural gas or LP gas). Also, if
operating the range at an altitude above 4000 ft. (1219 m)
make sure it is equipped for high altitude operation. Refer
to the range rating label and the table on page 3 to
determine the correct model.
• See the table below for gas supply pressure requirements.
• The regulator inlet accommodates a 3/4” gas line. The range
ships with a 1/2” to 3/4” adapter connected to the regulator.
GAS SUPPLY PRESSURE REQUIREMENTS*
Gas Type
Minimum
Manifold Pressure
Minimum Gas
Supply Pressure**
Natural Gas 5” Water Column 6” Water Column
Liquid Propane (LP) 10” Water Column 11” Water Column
* The gas supply pressure for testing the regulator setting shall
be at least 1 inch water column (249 Pa) above the specified
manifold pressure.
** Maximum gas supply pressure for all models: 1/2 psi.
The ratings above are for reference only. Refer to the range rating
label for exact specifications (see page 3 for location).
NEMA 10-50P PlugNEMA 14-50P Plug
NEMA 14-50R Receptacle
(All units)
 Loading...