Dacor EWO24, EWO27, MWO27, EWO30, PWO30 Installation Instructions
...
Installation Instructions
Warming Ovens
SAVE AND READ THESE INSTRUCTIONS
TESTED IN ACCORDANCE WITH THE LATEST EDITION OF ANSI/UL 858-2001 AND CAN/CSA-C22.2 NO. 64 STANDARD FOR HOUSEHOLD ELECTRIC COOKING AND LIQUID HEATING APPLIANCES.
CONVENTIONS USED IN THESE INSTRUCTIONS
WARNINGS:
Must be followed carefully to avoid personal injury or damage.
NOTES:
Contain helpful hints and tips to facilitate the installation.
IMPORTANT
1.Before beginning installation, please thoroughly read and become familiar with these instructions.
2.Installation and service must be completed by a qualified installer or service agency.
3.Installer: Please leave these Installation Instructions with the owner.
4.Owner: Please keep these instructions for local electrical inspector’s use and for future reference.
5.Read the accompanying Use & Care Manual prior to operating this appliance.
TABLE OF CONTENTS
Verifying package contents |
Page |
2 |
Installation planning |
Page |
2 |
Overall dimensions |
Pages 2-3 |
|
Cabinet preparation |
Page |
4 |
Electrical power supply requirements |
Page |
6 |
Installing the warming oven |
Page |
6 |
Electrical connection |
Page |
6 |
Verifying proper operation |
Page |
6 |
Part No. 65034 Rev. G |
|
|

IMPORTANT SAFETY INSTRUCTIONS
 WARNINGS:
1.Read all instructions before using the appliance.
2.This appliance must be grounded. Connect only to a properly grounded outlet. See “Grounding Instructions”.
3.Install or locate this appliance only in accordance with these installation instructions.
4.Use this appliance only for its intended use as described in this manual. Do not use corrosive chemicals or vapors in this appliance. This type of oven is specifically designed to heat and cook food. It is not designed for industrial or laboratory use.
5.As with any appliance, close supervision is necessary when used by children.
6.Do not operate this appliance if it has a damaged electrical cord or plug, if it is not working properly or if it has been damaged or dropped.
7.This appliance should be serviced only by qualified service personnel. Contact the nearest DACOR Authorized Servicer at (800) 772-7778,
or at www.dacor.com for examination, repair or adjustment.
8.Do not cover or block any openings on the appliance.
9.Do not store or use this appliance outdoors, execpt as noted below. Do not use this product near water – for example, near a kitchen sink, in a wet basement or near a swimming pool, etc.
10.Do not immerse the electrical cord or plug in water.
11.Keep the electrical cord away from heated surfaces.
•Some products, such as whole eggs, and sealed containers such as closed glass jars may explode and should not be heated in this oven.
•To reduce the risk of fire in the oven cavity: Do not overcook food. Carefully attend the appliance if paper, plastic or other combustible materials are placed inside the oven.
•If materials inside the oven should ignite, keep the oven drawer closed and shut off the power at the fuse or the circuit breaker panel.
NOTES:
1.The IOWO model is approved for use in outdoor applications and near water (bathrooms).
2.The IOWO, when installed as a towel warmer, must have the wire rack (supplied with the product) installed in the drawer bottom. Secure the rack with with a screw and clip supplied with the rack.
1

Verifying the Package Contents
•Use and Care manual
•Mouning screws
•Wire rack with mounting hardware (IOWO model only)
Installation Planning
A qualified technician must complete the installation of this built-in appliance. Proper installation is your responsibility.
Carefully check the location where the oven is to be installed. The oven should be placed for convenient access. Make certain that electrical power can be provided in the selected location.
Plan the installation so that all minimum clearances are met or exceeded. Dimensions shown provide minimum clearances, unless otherwise noted. Be certain that proper clearance is provided for the oven door when it is in the open position.
The specified minimum cabinet depth and width must be provided. The cabinet depth and width must completely enclose the recessed portion of the oven.
Cabinet cutout dimensions must be used as indicated. All contact surfaces between the appliance and the cabinet must be solid and level. The oven support platform must be flush with the bottom edge of the cabinet cutout.
Make certain that you have everything necessary to ensure a proper installation before proceeding.
 NOTE:
NOTE:
All dimensional tolerances are + 1/16”, - 0” unless otherwise stated.
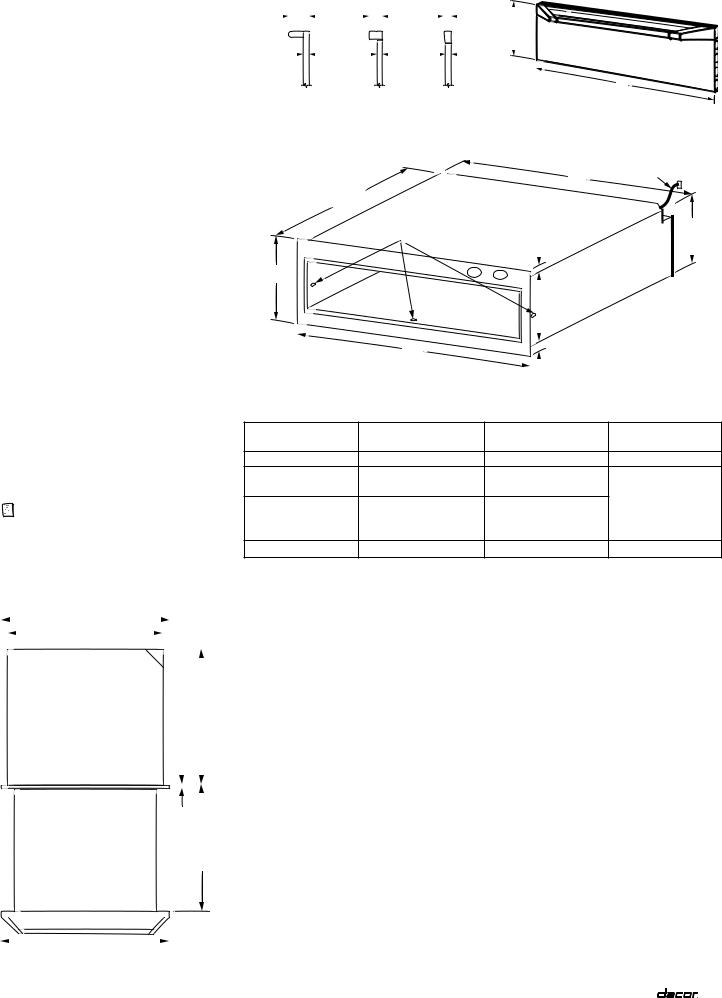
Overall Dimensions
(EWO, PWO, MWO)
"D"
"E"
23 3/16" (589mm)
Chassis
|
|
|
|
|
|
|
|
|
|
|
5/64" |
|
||
|
(2mm) |
|
||
Drawer open |
|
|
|
|
23 13/16 |
||||
|
||||
|
|
(605mm) |
||
"C"
Overall Dimensions
Top View
(EWO Shown)
EPICURE™ |
PREFERENCE™ MILLENNIA™ |
|
|
|
3 5/16" |
2 3/16" |
1 5/16" |
10 1/8" |
|
(84mm) |
(56mm) |
(33mm) |
|
|
|
|
|
(257mm) |
|
1" |
1" |
1" |
|
|
(25mm) |
(25mm) |
(25mm) |
|
|
|
|
|
|
"C" |
Handle Dimensions |
|
|
||
|
|
|
Drawer Face Dimensions |
|
|
|
|
(EWO Shown) |
|
|
|
|
|
48" (1219mm) |
|
|
|
|
3 prong |
|
|
|
"E" |
120v power cord |
|
|
|
|
|
|
23 3/16" |
|
|
|
|
(589mm) |
|
|
|
|
|
Mounting |
1/2" |
9" |
|
|
holes |
(13mm) |
(229mm) |
10" |
|
|
|
|
(254mm) |
|
|
|
|
|
|
Chassis view |
|
|
|
|
without drawer |
|
|
|
|
"D" |
|
|
|
|
|
1/2" |
|
|
|
|
(13mm) |
|
|
|
Chassis Dimensions |
|
|
Warming Oven |
Dimension “C” |
Dimension “D” |
Dimension “E” |
|
Model No. |
|
Drawer face width |
Chassis face width |
Chassis width |
EWO24 |
|
23 15/16” (608mm) |
23 5/8” (600mm) |
22 3/16” (564mm) |
EWO27 |
|
|
|
|
MWO27 |
|
26 15/16” (684mm) |
26 5/8” (676mm) |
|
EWO30 |
|
|
|
25 3/16” (640mm) |
PWO30 |
|
29 15/16” (760mm) |
29 5/8” (752mm) |
|
MWO30 |
|
|
|
|
EWO36 |
|
35 15/16” (913mm) |
35 11/16” (906mm) |
35 1/4” (870mm) |
Warming Oven Overall Dimensions
2
 Loading...