


Dacor DYO130B, DYO130FS, DYO130S, DYO130PB, DYO130PS User Guide
...Use and Care Manual
Discovery® iQ™
Wall Oven
Models: DYO130B, DYO130FS, DYO130S
DYO130PB, DYO130PS, DYO130PW
Ta b l e o f C o n t e n t s |
|
Important Safety Instructions........................................................ |
1 |
Getting to Know Your Oven............................................................. |
3 |
Setting Up Your Oven.......................................................................... |
6 |
Operating Your Oven - The Basics........................................... |
11 |
Operating Your Oven - Deluxe Features............................... |
19 |
Additional Features............................................................................ |
35 |
Cooking Tips........................................................................................... |
36 |
Parts and Accessories..................................................................... |
37 |
Care and Cleaning............................................................................... |
38 |
Before You Call for Service............................................................ |
43 |
Warranty and Service....................................................................... |
45 |

© Copyright 2016 Dacor Inc. All rights reserved.
Important Safety Instructions
Installer: Leave these instructions with the appliance.
Customer: Read this use and care manual completely before using this appliance. Save it for future reference.
For service and warranty information see page 45.
If you have any questions, call:
Dacor Customer Service
(800) 793-0093 (U.S.A. and Canada)
Monday — Friday 6:00 a.m. to 5:00 p.m. Pacific Time Web site: www.dacor.com
Important Information About
Safety Instructions
The Important Safety Instructions and warnings in this manual cannot cover all possible problems and conditions that can occur. Use common sense and caution when installing, maintaining or operating this appliance.
Always contact the Dacor Customer Service Team about problems or conditions that you don’t understand.
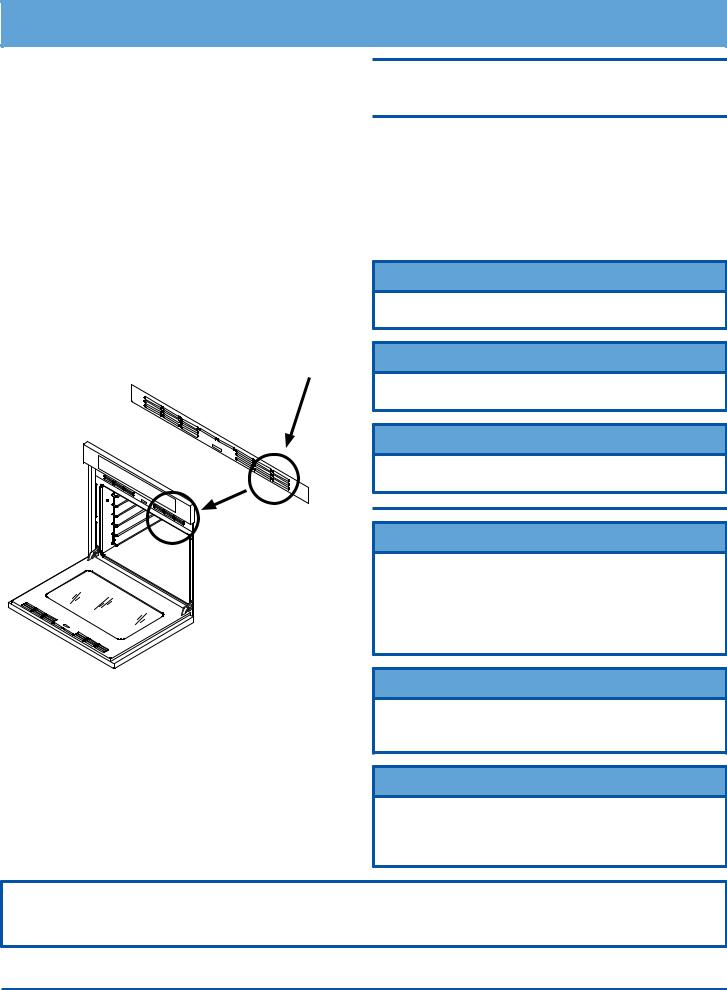
Have the complete model and serial number for your appliance available. The numbers are found on the appliance data plate, located inside the grill, below the control panel. Open the door to expose the grill. Write these numbers below for future reference.
View data plate through grate
Model number __________________________________
Serial number __________________________________
Date of purchase ________________________________
Safety Symbols and Labels
 DANGER
Immediate hazards that WILL result in severe personal injury or death.
 WARNING
Hazards or unsafe actions that COULD result in severe personal injury or death.
 CAUTION
Hazards or unsafe actions that COULD result in minor personal injury or property damage.
 DANGER
IMPORTANT: To avoid the possibility of explosion or fire, do not store or use combustible, flammable or explosive vapors and liquids (such as gasoline) inside or in the vicinity of this or any other appliance. Keep items that could explode, such as aerosol cans away from the oven. Do not store flammable or explosive materials in adjacent cabinets or areas.
 WARNING
WARNING - NEVER use this appliance as a space heater to heat or warm the room. Doing so may result in overheating of the appliance.
Since Dacor continuously improves the quality and performance of our products, we may need to make changes to the appliance without updating this manual.
Visit www.dacor.com to download the latest version of this manual.
 WARNING
WARNING - NEVER cover any slots, holes or passages in the oven bottom or cover an entire rack with materials such as aluminum foil. Doing so blocks air flow through the oven causing a fire hazard.
State of California Proposition 65 Warnings:
WARNING: This product contains one or more chemicals known to the State of California to cause cancer.
WARNING: This product contains one or more chemicals known to the State of California to cause birth defects or other reproductive harm.
READ AND SAVE THESE INSTRUCTIONS
1

Important Safety Instructions
General Safety Precautions
To reduce the risk of fire, electric shock, serious injury or death when using your oven, follow basic safety precautions, including the following:
 WARNING
•If you receive a damaged product, immediately contact your dealer or builder. Do not install or use a damaged appliance.
•Make sure that the oven has been properly installed and grounded by a qualified installer according to the accompanying installation instructions. Have the installer show you the location of the circuit breaker panel or fuse
box so that you know where and how to turn off power to the oven.
•Do not install, repair or replace any part of the oven unless specifically recommended in the literature accompanying it. A qualified service technician should perform all other service.
•Before performing any type of service, make sure that the electrical power to the oven is turned off at the circuit breaker panel or fuse box.
•Only use the oven for cooking tasks expected of a home appliance as outlined in this manual. This oven is not intended for commercial use.
•DO NOT TOUCH THE SURFACES OF THE OVEN DURING OR IMMEDIATELY AFTER USE.
•Make sure individuals who use the oven are able to operate it properly.
•Never allow anyone, including children to sit, stand or climb on any part of the oven including the door. Doing so may cause tipping, damage, serious injury or death.
•Do not leave children alone or unattended in the area around the oven. Do not allow children to play with the controls, pull on the handle or touch other parts of the oven.
•Do not store items of interest to children above the oven. Children could be burned or injured while climbing on the appliance.
•Do not tamper with the controls.
•To prevent the unit from tipping forward and to provide a stable installation, make sure the oven is secured to the cabinet according to the accompanying installation instructions.
•Do not heat unopened food containers such as baby food jars and cans. Pressure build up may cause the container to burst and cause injury.
•Do not use water on grease fires. A violent steam explosion may result. Smother any flames with a lid, cookie sheet
or flat tray. Use baking soda or a foam extinguisher to extinguish flaming grease. Be careful to avoid getting burned.
•Keep flammable items, such as paper, cardboard, plastic and cloth away from and out of the oven. Do not allow pot holders to touch hot surfaces.
 WARNING
•Do not wear loose or hanging apparel while using the oven. Do not allow clothing to come into contact with the interior of the oven and surrounding areas during and immediately after use.
•Do not use towels or bulky cloth as pot holders.
•Do not use the oven for storage.
•Clean and maintain the oven regularly as instructed in this manual. Keep the entire oven free of grease that could catch fire.
•Do not touch the outside surfaces of the oven during the Self Clean cycle. They will be hot.
•Use cookware only for its intended purpose. Check the manufacturer’s recommendations before use to determine if a utensil is suitable for use in an oven. Certain types of glass, ceramic and earthenware are not suitable for use in an oven. Personal injury or damage may result from the improper use of cookware.
•Exercise caution when opening the oven door. Let hot air or steam escape before looking or reaching inside.
•Use extreme caution if adding water to food. Steam can cause serious burns or scalds.
•Use only dry pot holders when removing food and cookware from the oven. Wet pot holders can cause steam burns.
•For your safety, do not use the oven to cook without the convection filter installed. When the filter is not installed, the spinning fan blades at the back of the oven are exposed.
•Do not allow food to sit in the oven for more than one hour before or after cooking. Eating spoiled food can result in food poisoning.
•Do not leave objects, such as aluminum foil, the meat probe or cookie sheets on the bottom of the oven. Do not allow the broil elements on the ceiling of the oven chamber to be covered up. Do not line the oven with aluminum foil or other materials. Doing so may cause the oven or the items in it to overheat, creating a fire hazard or causing property damage.
•Non-stick coatings, when heated, can be harmful to birds. Remove birds to a separate, well-ventilated room during cooking.
•Do not allow acids (citrus juices, tomato sauces, etc.) to remain on the oven’s surfaces. The porcelain finish may stain or pit.
2
Getting to Know Your Oven
Control Panel Layout
|
|
|
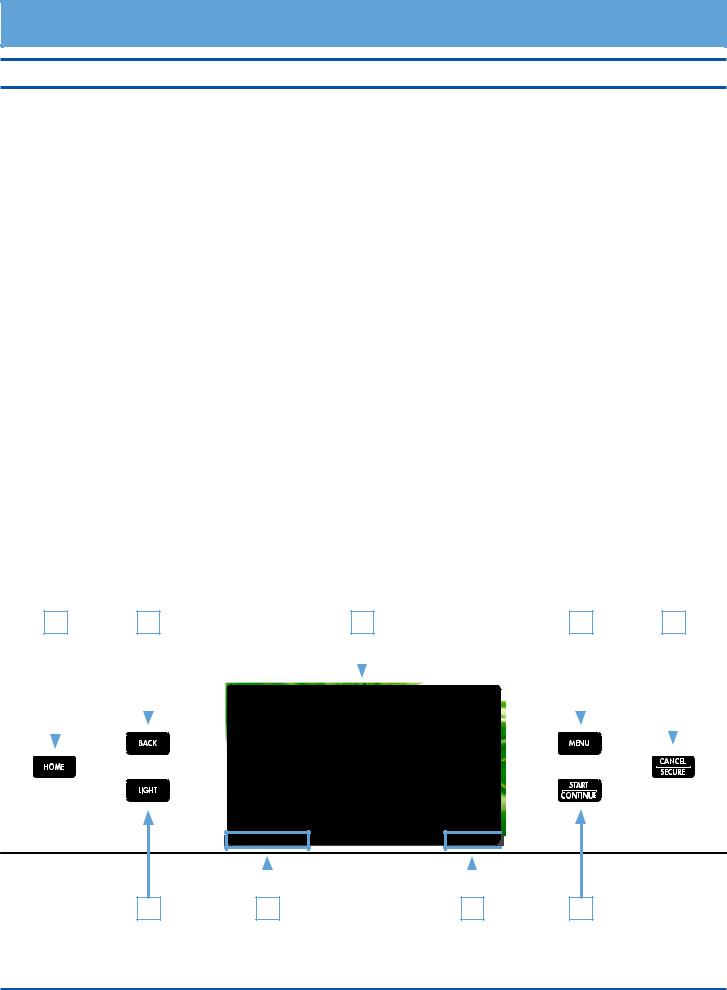
Touch display |
The touch display allows you to navigate and select the various features and func- |
|
A |
|||
|
|
|
|
tions of your oven. It can be set to dim after 5 minutes of non-use (see Energy |
|
|
|
|
Saving Mode, page 7). |
|
|
|
|
|
|
|
|
HOME key |
Touch this key to go back to the oven home screen on the touch display, except |
|
B |
|||
|
|
|
|
when the oven home screen is already displayed. When you touch the HOME |
|
|
|
|
key when the oven home screen is already displayed, the display jumps to the |
|
|
|
|
Android home screen. When the Android home screen is displayed, touch HOME |
|
|
|
|
again to return to the oven home screen. IMPORTANT: Touching the HOME key |
|
|
|
|
does not turn off the oven once started, even if the oven status is not currently |
|
|
|
|
displayed. |
|
|
|
MENU key |
Touch this key (or Oven Menu on the touch display) to go to the main oven cook- |
|
C |
|||
|
|
|
|
ing menu. See page 13. |
|
|
|
|
|
|
|
|
BACK key |
Touch this key to go back one menu on the touch display. IMPORTANT: Touching |
|
D |
|||
|
|
|
|
the BACK key does not turn off the oven once started, even if the oven status is |
|
|
|
|
not currently displayed. |
|
|
|
|
|
|
|
|
START ● CONTINUE key |
Touch this key (or Start on the touch display) to start the oven after selecting the |
|
E |
|||
|
|
|
|
desired settings. See page 13. |
|
|
|
CANCEL ● SECURE key |
Use this key to turn off the oven. This key sets all temperature settings back to |
|
F |
|||
|
|
|
|
zero and turns off any features that are currently in use. It also activates the lock- |
|
|
|
|
out feature (see page 15). NOTE: This key does not turn off the timers. The |
|
|
|
|
timers do not control the functions of the oven. |
|
|
|
LIGHT key |
If you need to turn the oven lights on or off, touch the light key. |
|
G |
|
||
|
|
|
|
|
|
|
|
Android system keys |
Touching these keys on the touch screen allows you to navigate the Android |
|
H |
|
||
|
|
|
|
operating system and settings. See page 35 for more details. |
|
|
|
|
|
|
B |
|
D |
|
|
A |
|
|
C |
|
F |
|
|||||
|
|
|
|
|
|
|
|
|
|
|
|
|
|
|
|
|
|
|
|
|
|
|
|
|
|
|
|
|
|
|
|
|
|
|
|
|
|
|
|
|
|
|
|
|
|
|
|
|
|
|
|
|
|
|
|
|
|
|
|
|
|
|
|
|
|
|
|
|
|
|
|
|
|
|
|
|
|
|
|
|
|
|
|
|
|
|
|
|
|
|
|
|
|
|
|
|
|
|
|
|
|
|
|
|
|
|
|
11:05 

|
|
|
|
|
|
|
|
|
G |
|
H |
|
H |
|
E |
||
|
|
|
|
|
|
|
|
|
Control Panel
3
Getting to Know Your Oven
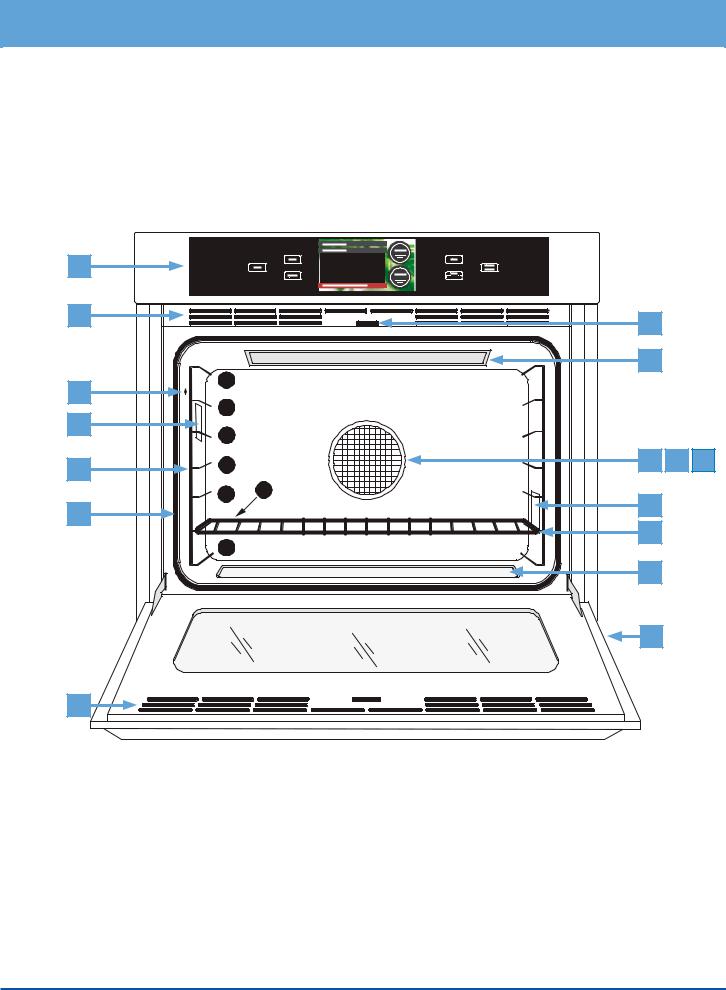
Parts of the Oven
|
|
|
|
|
|
Control panel |
Your oven’s control panel consists of touch keys and a touch display. Use the control |
|
A |
||||||
|
|
|
|
|
|
|
panel to control all the oven’s features (sometimes called modes). |
|
|
|
|
|
|
|
|
|
|
|
|
|
|
Air intake/ |
The oven draws air in through the intake slots to cool its internal parts. The air comes |
|
B |
|
|||||
|
|
|
|
|
|
exhaust slots |
out through the exhaust slot at the bottom of the oven. Do not block or cover the air |
|
|
|
|
|
|
|
intake or exhaust slots. |
|
|
|
|
|
|
|
|
|
|
|
|
|
|
Meat probe connector |
When you use the meat probe, insert the skewer into the meat and plug the other |
|
C |
|
|
||||
|
|
|
|
|
|
|
end into this connector. See the Using the Meat Probe section on page 26 for |
|
|
|
|
|
|
|
proper operation. |
|
|
|
|
|
|
|
|
|
|
|
|
|
|
Oven lights |
There are two oven lights inside the oven chamber so that you can easily see the food |
|
D |
|
|
||||
|
|
|
|
|
|
|
inside. Touch the light key on the control panel to turn them on. The bulbs are 12 |
|
|
|
|
|
|
|
volt, 20 Watt, halogen. |
|
|
|
|
|
|
|
|
|
|
|
|
|
|
Rack supports |
There are seven sets of rack supports inside each oven chamber. They support the |
|
E |
|
|
||||
|
|
|
|
|
|
|
adjustable oven racks. They are numbered from the bottom up. |
|
|
|
|
|
|
|
|
|
F |
|
|
|
|
Door gasket |
The door gasket prevents heat from escaping when the door is closed. |
|
|
|
|
|
|
|
|
|
|
|
|
|
|
Self Clean latch |
The Self Clean latch automatically locks the oven door during the Self Clean process. |
|
G |
|
|
||||
|
|
|
|
|
|
|
The door latches for your safety. There are very high temperatures inside the oven |
|
|
|
|
|
|
|
during the Self Clean process. |
|
|
|
|
|
|
|
|
|
|
|
|
|
|
Broil elements |
The broil elements are located on the ceiling of the oven chamber. They are the |
|
H |
|
|
||||
|
|
|
|
|
|
|
source of top heat. |
|
|
|
|
|
|
|
|
|
|
|
|
|
|
Convection fan |
The convection fan circulates heated air through the oven chamber during the convec- |
|
J |
|
|
||||
|
|
|
|
|
|
|
tion cooking process. The convection filter covers it. |
|
|
|
|
|
|
|
|
|
|
|
|
|
|
Convection element |
The convection element heats the air that is circulated through the oven chamber by |
|
K |
|
|
||||
|
|
|
|
|
|
|
the convection fan during the convection cooking process. The convection filter covers |
|
|
|
|
|
|
|
it. |
|
L |
|
|
|
|
Convection filter |
The convection filter covers the convection fan. It helps prevent the transfer of taste |
|
|
|
|
|
|
|
from one food to another when you are cooking a whole meal. It also keeps the oven |
|
|
|
|
|
|
|
cleaner and covers the moving fan blades for safety purposes. |
|
|
|
|
|
Oven rack |
Your oven comes with a set of GlideRack™ oven racks and one standard rack. |
|
|
M |
|
|
|
|||
|
|
|
|
|
|
|
|
|
|
|
|
|
Bake element |
Hidden below the floor of the oven chamber is the bake element. It is the source of |
|
|
N |
|
|
|
|||
|
|
|
|
|
|
|
bottom heat. |
|
|
|
|
|
|
|
|
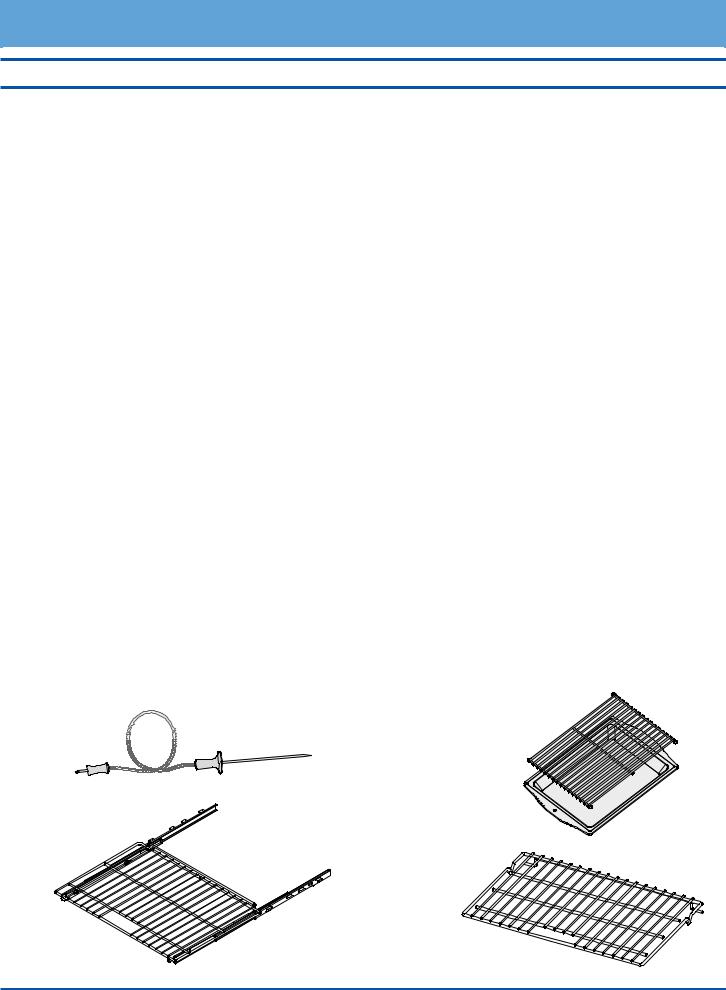
Included Accessories
Meat Probe (1) |
Broil Pan with |
|
Grill (1 Set) |
GlideRack™ Oven
Rack (2)
Standard Oven
Rack (1)
4
Getting to Know Your Oven
A
12:15 pm
B |
|
G |
|
|
|
|
|
|
|
|
|
H |
|
|
C |
7 |
|
|
|
6 |
|
|
|
|
D |
|
|
|
|
5 |
|
|
|
|
|
|
|
|
|
E |
4 |
J |
K |
L |
|
|
|
||
|
3 |
2 |
|
|
F |
|
D |
|
|
|
M |
|
|
|
|
1 |
|
|
|
|
|
|
|
|
|
|
N |
|
|
|
|
B |
|
|
|
|
At bottom |
||
|
|
of door |
|
|
B |
|
|
|
|
5
Setting Up Your Oven
Control Panel/Display Settings
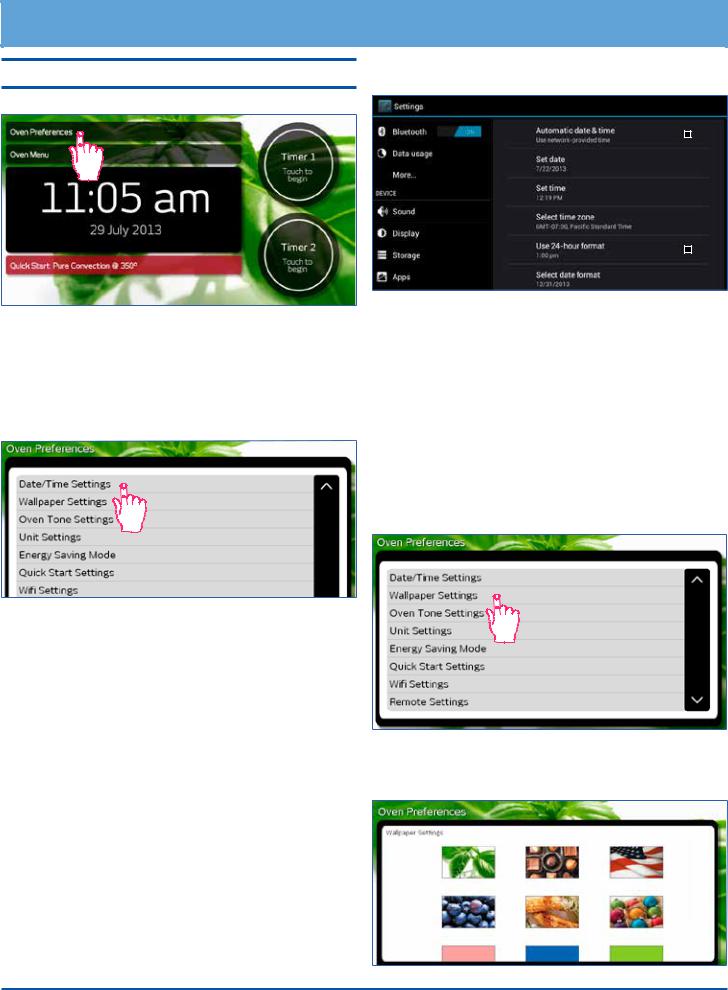
•Touch Oven Preferences on the oven home screen.
•The Oven Preferences menu will be displayed. Use the up ( ) and down ( ) arrows to view all of the various options.
Date/Time Settings Menu
1.From the Oven Preferences menu, touch Date/ Time Settings.
2.Touch one of the following selections:
◊Automatic date & time - Touch to check or uncheck. This setting is preferred unless WiFi internet service is not available. If WiFi internet service is not available, use the Set date and Set time functions below to set the time and date manually.
◊Set date (manual) - Use to manually set the date only when Automatic date & time (above) is unchecked. Touch the up ( ) and down ( ) arrows to select the date, then touch Set.
◊Set time (manual)- Use to manually set the time only when Automatic date & time (above) is unchecked. Touch the up ( ) and down ( ) arrows to select the date, then touch Set.
◊Select time zone - Touch and “drag” to scroll up or down to the various time zones. Tap to select.
◊Use 24-hour format - Touch to check or uncheck. When checked, the oven is set to 24 hour time, also known as military time. For example, 1:36 PM = 13:36 military time.
◊Select date format - Touch to select the preferred date format shown on the display.
3.Touch BACK on the control panel to save.
4.Touch HOME to return to the oven home screen.
IMPORTANT: The above menu makes changes to Android system operations, not just the oven cooking operations.
Wallpaper Settings (background)
You can select from several different patterns to customize the background of the touch display.
To change the wallpaper:
1.From the Oven Preferences menu, touch Wallpaper Settings.
2.Touch and “drag” up and down to see the entire selection. To select, touch the desired graphic. NOTE: The available backgrounds vary with software version.
6
Setting Up Your Oven
3.Touch HOME on the control panel to return to the oven home screen.
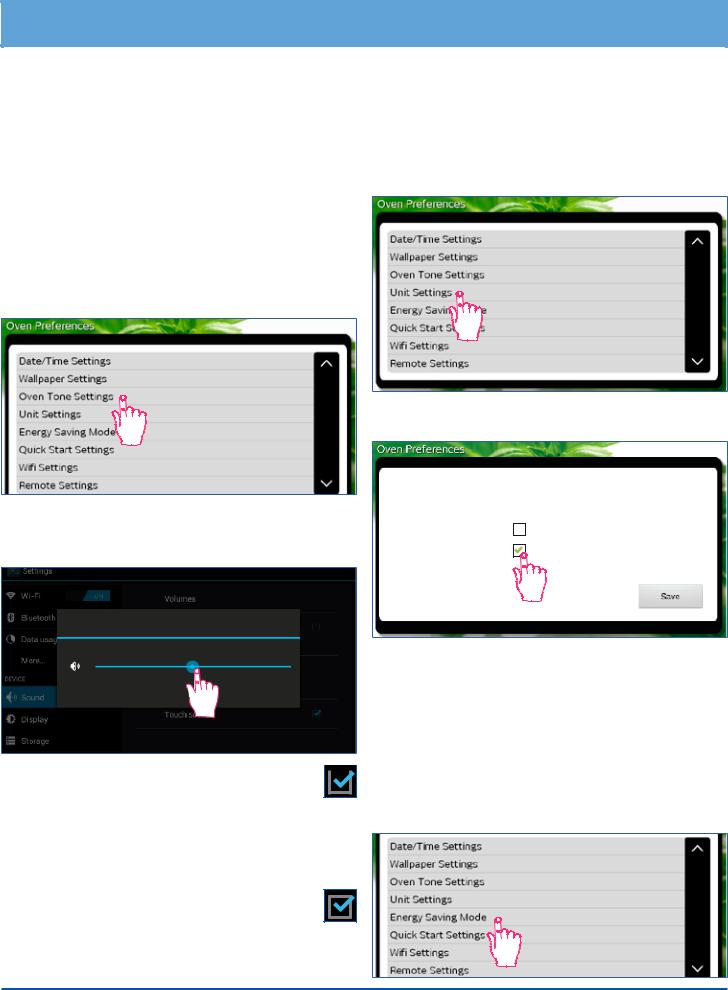
Oven Tone Settings
The volume of the various sounds may be adjusted or silenced. A tone or click sounds any time you touch any of the keys or when various error conditions exist. A tone also sounds when a timer is done counting (see page 20) or whenever the oven notifies the user it has performed certain functions, for example, preheating is complete.
To turn off, adjust or silence the various oven tones:
1.From the Oven Preferences menu, touch Oven Tone Settings.
Unit Settings (Temperature Scale)
You can select the temperature scale (Fahrenheit or Celsius) the oven uses to display the cooking temperature.
The oven is preset at the factory to Fahrenheit.
To change the temperature scale:
1.From the Oven Preferences menu, touch Unit Settings.
2.Touch the check box for the desired setting, “F” or “C” then touch SAVE.
2.Touch to select one of the following:
◊Volumes - Displays the master volume control.
Touch and drag left or right to adjust.
Volumes
Music, video, games & other media
OK 
◊Silent mode - Touch to check or un-check. 
When checked, all oven sounds are silenced (the volume control is set to 0).
◊Default notification - Touch to select the default
Android system tones (does not change tones emitted during cooking operations). Touch the desired tone (a sample will play).
◊ Touch sounds - Touch to check or uncheck. When checked, click sound on control panel keys is enabled.
3.Touch OK to exit.
4.Touch HOME to return to the oven home screen.
Unit Settings
F° Fahrenheit
C° Celsius
3. Touch HOME to return to the oven home screen.
Energy Saving Mode
The oven home screen can be set to stay on constantly or dim after 15 minutes of non-use. When energy saving mode is on, touch the screen to reactivate the oven home screen.
To change the energy saving setting:
1.From the Oven Preferences menu, touch Energy Saving Mode.
7

Setting Up Your Oven
Control Panel/Display Settings (cont)
2. Touch the check box for NO Sleep, Light Sleep or
Deep Sleep, then touch Save.
Energy Saving Settings
NO Sleep
Display fully lit at all times
Light Sleep
Display lit 50% when idle for 15 min

 Deep Sleep
Display all black when idle for 15 min
Save
3. Touch HOME to return to the oven home screen.
Quick Start Settings
The Quick Start mode, selected from the oven home screen may be set to your own personal preferences.
To change the Quick Start setting:
1.From the Oven Preferences menu, touch Quick Start Settings.
2.Touch the down arrow ( ) under Cooking Mode to select a cooking mode (see below). Touch and “drag” up and down to see the entire selection of cooking modes. To select, tap the desired mode.
3.Touch the up ( ) and down ( ) Temperature arrows to select the cooking temperature, then touch Save.
Quick Start Settings
Cooking Mode |
Temperature |
325
temp
4. Touch HOME to return to the oven home screen.
WiFi Settings
See page 35 for instructions on WiFi set up.
Remote Settings
Future versions of the software will support remote operation of your oven. This feature is not currently available on your oven.
Oven Setup
Select this option if the initial oven setup was skipped the first time power to the oven was turned on.
Tutorial
From the Oven Preferences menu, touch Tutorial to access the oven tutorial. This is the same tutorial that comes up on the touch display the first time power to the oven is turned on.
•Touch BACK to exit to the Oven Preferences screen.
•Touch HOME to return to the oven home screen.
About (System Information)
From the Oven Preferences menu, touch About to view:
•The Android operating system revision
•The Dacor software version
•The oven serial number
•The oven model number
8
Setting Up Your Oven
Text Message Settings
You can set your oven to send text messages when the following events occur:
•One of the timers has finished counting down.
•Preheat cycle completed (food can be placed in the oven).
•Cook Time feature completed (see page 24).
•Keep Warm mode completed (oven is off).
From the Oven Preferences menu, touch Text Message
Settings.
To add phone numbers to be texted:
1. Touch Add. The text messaging keyboard will appear.
2. Enter the new phone number, then touch Done.
3. Touch the appropriate wireless provider for the phone.
To delete phone numbers
1.Touch the number to be deleted (not the check box).
2.Touch Delete.
To turn on text messaging:
1.Touch On on the text messaging screen (On is blue when texting is enabled).
2.Touch the check boxes next to the phone numbers to select/deselect which phone numbers with receive texts (blue indicates texting is on for that phone number).
To turn off text messaging:
1.Touch Off on the text messaging screen (Off is blue when texting is disabled).
To change the message that is sent:
1.Touch the message (on the right side of the screen).
2.Enter the new message on the keyboard.
3.Touch Done.
9

Setting Up Your Oven
Control Panel/Display Settings (cont)
Manuals
This option allows you to view the oven manuals on the touch display. From the Oven Preferences menu, touch Manuals to access.
Check for Updates
This option allows you to update the oven application software to the latest version.
1.From the Oven Preferences menu, touch Check for Updates. The screen will jump to the Google Play
Store download page.
2.If a newer version of the oven application software is available, Install will appear on the display (touch Install to continue). If Uninstall appears on the dis-
play, the latest version of software is already install on the oven, touch HOME on the control panel to exit.
Clear Data
This option clears the user data entered during the oven setup process. Use this function if you need to enter new user information into the oven, for example, when the oven is sold to a new owner. After the data is cleared, the screen jumps immediately to Oven Setup so that the new user data can be entered.
•From the Oven Preferences menu, touch Clear Data. Touch Clear Application Data to continue or
Ok to cancel.
10
Operating Your Oven - The Basics
Important Things to Know Before Operation
•Dacor recommends turning the oven on for one hour at 500°F (260°C) to burn off any residual oils used during the manufacturing process. Any of these oils left on the inner parts can cause an undesirable smell the first few times the oven is used.
•When you use your oven in one of the convection, bake or roast modes, it preheats automatically. The preheat cycle rapidly brings the oven chamber up to the proper cooking temperature. Wait for the oven to finish preheating (Insert Food appears on the
display) before placing the food in the oven. Excessive browning will occur if you put the food in the oven while it is preheating.
•While the oven is preheating the actual oven temperature will appear on the display, next to the temperature setting. It takes several minutes to preheat the oven. Preheat time depends on the temperature settings. The time may be longer depending on the type of electrical supply in your community. There is no preheat cycle for any of the broil modes.
•After you pull food out of the oven, it will continue to cook. This process is called “carry-over.” The larger the portion of food, the longer it will cook. It is best to let meat rest for 10 to 15 minutes after it comes out of the oven before carving. Doing so will allow the meat to retain its juices and make it easier to carve.
•After you turn off the oven, the cooling fans may continue to run until the internal parts have cooled down.
•Broil modes do not work with the meat probe connected.
•This unit has been tested and found to comply with the limits for a class B digital device, pursuant to
Part 15 of the FCC rules. These limits are designed to provide reasonable protection against harmful interference in a residential installation. This unit generates, uses and can radiate radio frequency energy and, if not installed and used in accordance with the instructions, may cause harmful interference to radio communications. However there is no guarantee that interference will not occur in a particular installation. If this unit does cause harmful interference to radio or television reception, which can be determined by turning the unit off and on, the user is encouraged to try to correct the interference by one or more of the following measures:
◊Reorient or relocate the receiving antenna.
◊Increase the distance between the unit and receiver.
◊Connect the unit into an outlet or a circuit different from that to which the receiver is connected.
Preset Temperature Settings
Your oven has a suggested preset temperature setting for each of the cooking modes to reduce the need to always enter the temperature each time you cook. See the table below. You have the choice (in most cooking modes) of cooking at the preset cooking temperature or selecting a different one. See Starting Your Oven.
Cooking Mode |
Preset Temperature |
|
|
Bake |
350°F (176°C) |
Broil |
550°F (287°C) |
Convection Bake |
325°F (162°C) |
Convection Broil |
550°F (287°C) |
Convection Roast |
350°F (176°C) |
|
|
Defrost |
130°F (54°C) |
|
|
Dehydrate |
125°F (51°C) |
|
|
Max Broil |
550°F (287°C) |
|
|
Pure Convection |
325°F (162°C) |
|
|
Pure Convection Sear |
350°F (176°C) |
|
|
Proof |
110°F (43°C) |
|
|
Roast |
375°F (190°C) |
|
|
Surround Bake |
350°F (176°C) |
|
|
Warm/Hold |
150°F (65°C) |
|
|
11

Operating Your Oven - The Basics
Oven Racks
You may use either rack type on any level inside the oven.
 WARNING
To reduce the chance of burns, position the oven racks when the oven is cool. If you must reposition a rack when the oven is hot, use pot holders.
To insert the standard oven rack...
1.Insert the end of the rack with the safety notches into the oven first.
2.Attach both sides of the rack to the rack supports in the oven as shown in the diagram below.
3.Begin to slide the rack in, and then, lift up so that the safety notches clear the ends of the rack supports.
4.Push the rack all the way in with both hands.
To remove the standard oven rack...
•Grasp it with both hands and pull gently straight out toward you until it stops.
•To remove the rack completely, lift the front of the rack up about six inches and continue to pull it out.
Lifting the rack releases the safety notches. The safety notches reduce the chances of a rack coming out of the oven accidentally.
To insert a GlideRack oven rack...
Your oven also comes with Dacor GlideRack oven racks. You can pull a GlideRack oven rack out further than a standard rack and still support heavy pots and pans full of food. It is great for heavier foods and the optional Dacor baking stone.
1.Align both sets of safety clips (right and left) on the back of the rack guides with the oven rack supports as shown below. NOTE: The diagram below shows installation with the rack guides extended but, the rack may be installed with or without the guides extended, whichever is easier.
2.Begin to slide the rack in, lifting the front safety clips over the front of the oven rack supports.
3.Push the rack all the way in.
4.Grasp the rack in the center of the front and pull. The rack should come forward while the guides remain in place.
To remove a GlideRack oven rack...
•Grasp the rack with both hands and pull it gently straight out toward you until it stops.
•Lift up until the front safety clips just clear the front of the rack supports on the oven. Continue to pull out. Moving the end of the rack back and forth slightly, left to right, as you pull, will make it easier to remove.
Back of rack
Front of rack
Rack support
Standard
Rack
Safety
notch
Slide oven rack supports into slots on the rack
Rack guides
Lift front safety clips over rack supports
Front of
rack
|
Back of |
GlideRack |
guide |
Oven Rack |
|
|
Oven rack |
|
support |
|
Slide oven rack supports |
|
between back safety clips |
12
Operating Your Oven - The Basics
Starting Your Oven - Quick Start
The quick start feature allows you to start cooking quickly.
Using the main menu (see next section), allows you more cooking options and features.
 NOTE
NOTE
You can change quick start mode to your favorite cooking settings. See page 8 for set up.
1.Adjust the racks to the appropriate level.
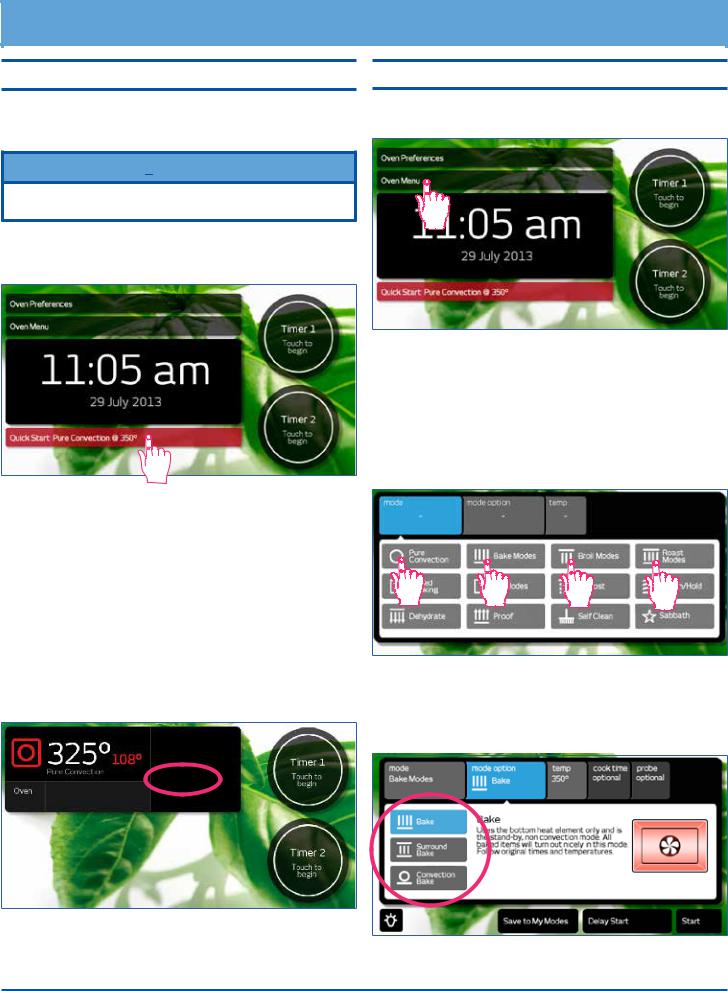
2.Touch Quick Start. The quick start settings will appear on the display.
Starting Your Oven - Main Menu
1.Adjust the racks to the appropriate level.
2.Touch Oven Menu.
3.The main cooking menu will appear on the display. Touch the best type of cooking mode for the type of food to be cooked on the main menu:
◊Pure Convection modes
◊Bake modes
◊Broil modes
◊Roast modes
3.If quick start is set to one of the broil modes, insert the food in the oven. If quick start is set for a convection, bake or roast mode, wait to insert the food to avoid excessive browning during preheat.
4.Touch START. The oven temperature setting appears in white and the actual temperature appears in red, as shown below.
If Preheating appears on the display, wait for preheat to complete (Insert Food appears on the display). When Insert Food appears on the display, place the food in the oven, or touch START to maintain the oven temperature until you are ready to put the food in the oven.
For additional cooking features see Operating Your
Oven - Deluxe Features
4.Touch the desired sub-mode. When you touch each sub-mode, a description of that mode appears on the display.
Preheating...
5. To turn off the oven touch CANCEL · SECURE on the
control panel.
continued...
13
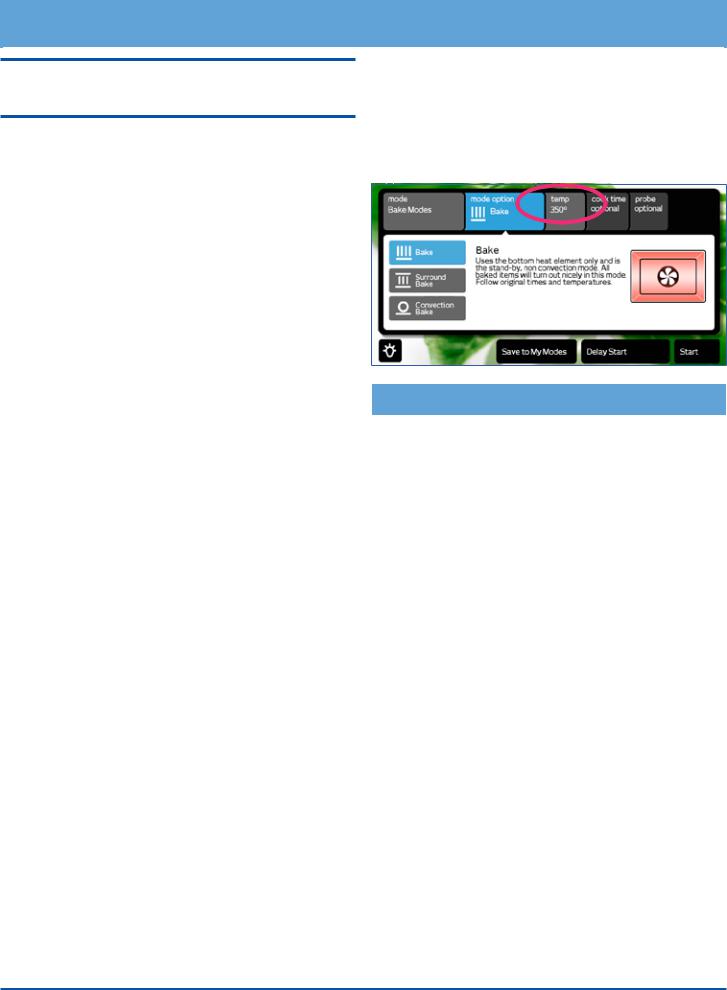
Operating Your Oven - The Basics
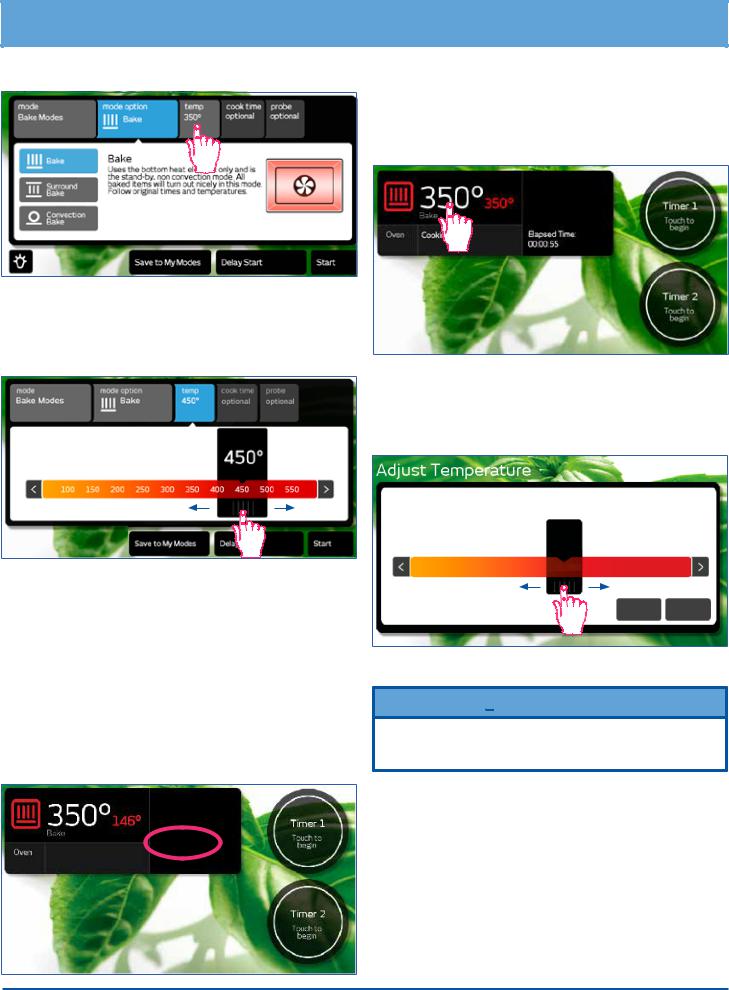
5.If you want to change the preset cooking temperature, touch temp.
The temperature adjustment bar will appear. Touch and slide the pointer back and forth to select the desired cooking temperature. Touch the arrows on either end of the adjustment bar to make minor adjustments.
6.If using one of the broil modes, insert the food in the oven. If using a convection, bake or roast mode, wait to insert the food to avoid excessive browning during preheat.
7.Touch START. The oven temperature setting appears in white and the actual temperature appears in red, as shown below.
If Preheating appears on the display, wait for preheat to complete (Insert Food appears on the display). When Insert Food appears on the display, place the food in the oven, or touch START to maintain the oven temperature until you are ready to cook.
Preheating...
8.To turn off the oven, touch CANCEL · SECURE on the control panel.
Changing the Temperature
To change to a different temperature while the oven is on: 1. Touch the temperature setting on the display.
2.The temperature adjustment bar will appear. Touch and slide the pointer back and forth to select the desired cooking temperature. Touch the arrows on either end of the adjustment bar to make minor adjustments.
350°
100 150 200 250 300 350 400 450 500 550
Cancel Start
3. Touch Start.
 IMPORTANT
If you increase the temperature by more than 50°F (28°C), to reach the new temperature, the oven needs to preheat. Remove the food from the oven to prevent excessive browning.
14
 Loading...