


USE AND CARE MANUAL
RENAISSANCE® ELECTRIC RANGE
WITH INDUCTION COOKTOP
Models: RR30NS[-C], RR30NFS[-C], RR30NIS[-C] and RR30NIFS[-C]
|
Style varies, model RR30NFS shown |
Ta b l e o f C o n t e n t s |
|
Important Safety Instructions................................................. |
1 |
Getting to Know Your Range................................................ |
4 |
Operating the Cooktop....................................................... |
7 |
Operating the Oven............................................................ |
9 |
Care and Cleaning........................................................... |
20 |
Before You Call for Service................................................ |
25 |
Parts and Accessories........................................................ |
27 |
Warranty and Service....................................................... |
27 |
Warranty Card..................................................... |
Back Cover |
Part No. 105911 Rev C

© 2013 Dacor, all rights reserved |

Important Safety Instructions
Installer: Leave these instructions with the appliance.
Consumer: Read this use and care manual completely before using this appliance. Save it for future reference.
For service and warranty information, see page 27.
If you have any questions call: Dacor Customer Service
Phone: (800) 793-0093 (U.S.A. and Canada) Monday — Friday 6:00 a.m. to 5:00 p.m. Pacific Time
Web site: www.dacor.com
Have the complete model and serial number for your range ready. The product model and serial number label can be seen through the grill below the control panel, on the right side. Write these numbers below for easy access.
Product model and serial number label, (view through right side of grate with flashlight) 
Model number ______________________________
Serial number ______________________________
Date of purchase____________________________
About Safety Instructions
The Important Safety Instructions and warnings in this manual are not meant to cover all possible problems and situations that can occur. Use common sense and caution when installing, maintaining or operating this or any other appliance.
Always contact the Dacor Customer Service Team about problems or situations that you do not understand.
Safety Symbols and Labels
 danger
Immediate hazards that WILL result in severe personal injury or death.
 warning
If the information in this manual is not followed exactly, a fire or explosion may result causing property damage, personal injury or death.
 warning
Persons with a pacemaker or other medical device should use caution when standing near an induction cooktop when it is in use. The electromagnetic field generated by an induction cooktop may affect operation of a pacemaker or other medical device. Consult your doctor or medical device manufacturer about your particular situation.
 warning
WARNING - NEVER cover any slots, holes or passages anywhere on the range or cover an entire oven
rack with materials such as aluminum foil. Doing so blocks air flow through the range and may result in overheating of the appliance. Aluminum foil linings may also trap heat, causing a fire hazard.
 warning
WARNING - NEVER use this appliance as a space heater to heat or warm the room. Doing so may result in overheating of the appliance.
 warning
Tip-over hazard:
•A child or adult can tip the range and be killed.
•Verify that the anti-tip bracket has been properly attached to the floor or wall as directed in the installation instructions. Using a flashlight, verify that the range’s rear leg is engaged with the anti-tip bracket as shown below.
•After moving the range, be sure to re-engage the rear leg with the floor or wall mounted anti-tip bracket as shown below.
•Do not operate the range without the rear leg engaged with the anti-tip bracket.
•Failure to follow these instructions can result in death or serious burns to children and adults.
 warning
Hazards or unsafe practices that COULD result in severe personal injury or death.
 caution
Hazards or unsafe practices that COULD result in minor personal injury or property damage.
 Anti-tip bracket
 Rear leg
READ AND SAVE THESE
INSTRUCTIONS
1

Important Safety Instructions
General Safety Precautions
To reduce the risk of fire, electric shock, serious injury or death when using your range, follow basic safety precautions, including the following:
 danger
IMPORTANT: To avoid the possibility of explosion or fire, do not store or use combustible, flammable or explosive vapors and liquids (such as gasoline)
inside or in the vicinity of this or any other appliance. Also keep items that could explode, such as aerosol cans away from the cooktop and oven. Do not store flammable or explosive materials in adjacent cabinets or areas.
 warning
•If you receive a damaged product, immediately contact your dealer or builder. Do not install or use a damaged appliance.
•Make sure that the range has been properly installed and grounded by a qualified installer according to the accompanying installation instructions. Have the installer show you the location of the circuit breaker panel or fuse box so that you know where and how to turn off power to the range.
•Do not install, repair or replace any part of the range unless specifically recommended in the literature accompanying it. A qualified service technician should perform all other service.
•Only use the range for cooking tasks expected of a home appliance as outlined in this manual. This range is not intended for commercial use.
•Never allow anyone, including children to sit, stand or climb on any part of the range, including the door. Doing so may cause tipping, damage, serious injury or death.
•CAUTION - Do not store items of interest to children in cabinets above the range or on the backguard of the range. Children climbing on the range to reach items could be seriously injured.
•Do not tamper with the controls.
•Never leave cooktop elements unattended at high heat settings. Boil-over causes smoking and greasy spill-overs that may ignite.
•Keep flammable items, such as paper, cardboard, plastic, cloth (including potholders) away from hot surfaces. Do not place such items in the oven.
•Do not place or store items that could melt or catch fire on the cooktop or in the oven, even when the range is not in use.
•Do not wear loose or hanging apparel when using the range. Do not allow clothing to come into contact with the cooktop, oven interior or surrounding areas during and immediately after use.
•To avoid overheating, do not allow pans to boil dry.
 warning
•Do not hang flammable or heat sensitive objects over the range. If the range is near a window, do not use long curtains as window treatment. The curtains could blow over the cooktop and create a fire hazard.
•For your safety, do not use the oven to cook without the convection filter installed. When the filter is not installed, the spinning fan blades at the back of the oven are exposed.
•When deep fat frying:
▪▪ Be certain that the pan is large enough to contain the desired volume of food without overflow caused by the bubbling of the fat. Never leave a deep fat fryer unattended.
▪▪ Avoid frying moist or frost-covered foods. Foods with high water content may cause spattering or spilling of the hot fat.
▪▪ Heat fat slowly, and stir together any combination of oils and fats prior to applying heat. Utilize a deep fat frying thermometer to avoid heating the fat to temperatures above the flash point.
▪▪ Let fat cool before attempting to handle it. ▪▪ Wipe up spill-overs immediately.
•DO NOT TOUCH THE SURFACES OF THE OVEN OR COOKTOP DURING OR IMMEDIATELY AFTER USE. Surface elements may be hot even though they are dark in color. Use potholders to handle hot utensils.
•Hold the handle of the utensil to prevent movement when stirring or turning food.
•Use cookware only for its intended purpose. Check the manufacturer’s recommendations before use to determine if a utensil is suitable for use on a cooktop or in an oven. Personal injury or damage may result from the improper use of cookware.
•Glazed cookware not designed for high heat use may crack or break, causing a spill or burn hazard. Before using glazed cookware, such as glass, ceramic or earthenware, check the manufacturer’s temperature and usage recommendations.
•This appliance is equipped with heating elements of different sizes. Select utensils having flat bottoms large enough to cover the heating element. The use of undersized utensils will expose a portion of the heating element to direct contact and may result in ignition of clothing. Proper relationship of utensil to element will also improve efficiency.
•Exercise caution when opening the oven door. Let hot air or steam escape before looking or reaching into the oven.
•Do not use towels or bulky cloth as potholders.
2

Important Safety Instructions
 warning
•Use extreme caution if adding water to food on a hot cooktop or in the oven. The steam can cause serious burns or scalds.
•Do not use the cooktop to heat aluminum foil, aluminum pots or items wrapped in aluminum foil.
GREASE IS FLAMMABLE AND SHOULD BE HANDLED CAREFULLY. TO REDUCE THE RISK OF INJURY TO PERSONS IN THE EVENT OF A RANGE TOP GREASE FIRE:
a.SMOTHER FLAMES with a close-fitting lid, cookie sheet or metal tray, then turn off the element. BE CAREFUL TO PREVENT BURNS. If the flames do not go out immediately, EVACUATE AND CALL THE FIRE DEPARTMENT.
b.NEVER PICK UP A FLAMING PAN - you may be burned.
c.DO NOT USE WATER, including wet dish cloths or towels - a violent steam explosion may result.
d.If you are “flaming” liquors or other spirits under an exhaust, turn the fan off. The draft could cause the flames to spread out of control.
e.Use a fire extinguisher ONLY if:
▪▪ You have a Class ABC extinguisher, and you already know how to operate it.
▪▪ The fire is small and contained in the area where it started.
▪▪ The fire department is being called.
▪▪ You can fight the fire with your back to an exit.
f.In the event that personal clothing catches fire, drop and roll immediately to extinguish flames.
•Use only dry potholders when removing food and cookware from the cooktop or oven. Wet potholders can cause steam burns. Do not let potholders come into contact with hot heating elements.
•Do not use utensils that do not attract and hold a magnet and never use a steel plate or griddle to heat a nonmagnetic utensil, which can cause INJURY or DAMAGE to the cooktop elements and controls.
•Do not heat eggs or unopened food containers such as baby food jars and cans. Pressure build up may cause them to burst and cause injury.
•Do not leave children or pets alone or unattended in the area around the range. Do not allow children to play with the controls, pull on the handle or touch other parts of the range.
•Make sure individuals who use the range are able to operate it properly.
•Clean the range thoroughly before operating it for the first time.
•Clean and maintain the range regularly as instructed in this manual. Keep the entire range, ventilation filters and range hoods free of grease that could catch fire.
 warning
•Do not allow food to sit in the oven for more than one hour before or after cooking. Eating spoiled food can result in food poisoning.
•Do not cook on a broken cooktop. If the cooktop should break, cleaning solutions and spill-overs may penetrate the broken cooktop and create a risk of electric shock. Contact a qualified technician immediately to replace a damaged/pitted cooktop.
•Non-stick coatings, when heated, can be harmful to birds. Remove birds to a separate, well-ventilated room during cooking.
•CAUTION: DO NOT LEAVE FOOD, COOKING UTENSILS, OVEN RACKS, THE CONVECTION FILTER, ETC., IN THE OVEN DURING THE SELF CLEAN CYCLE.
•ATTENTION : NE LAISSER AUCUN ALIMENT, UTENSILE DE CUISINE, GRILLES DU FOUR, LE FILTRE DE CONVECTION, ETC., DANS LE FOUR DURANT LE CYCLE D’AUTONETTOYAGE.
 caution
•Do not allow acids (citrus juices, tomato sauces, etc.) to remain on the range’s surfaces. The finishes may stain.
•Do not slide cookware across the cooktop. Sliding may damage the finish. Lift utensils to reposition them. Utensils with rough surfaces should be avoided since they can scratch the glass surface.
•Never use the cooktop surface as a cutting board.
•Do not try to remove heavy spills with a sharp object such as a knife or metal spatula. Sharp objects may scratch the range’s surfaces.
•Do not line the oven with aluminum foil or other materials that can melt or burn up during self cleaning and cause permanent damage to the oven.
•Do not leave objects, such as aluminum foil, the meat probe, cookie sheets, etc. on the bottom of the oven. Objects left on the bottom of the oven may cause damage.
•Do not allow the broil element on the oven ceiling to become covered up by cookie sheets,
aluminum foil, pots, pans, etc. Doing so may cause overheating and damage the oven.
•To prevent damage, do not allow aluminum foil or the meat probe to come into contact with heating elements.
•Always ensure that the light fixture lens cover is in place when using the oven. It protects the light bulb from breakage caused by high oven temperatures or mechanical shock.
At Dacor, we continuously improve the quality and performance of all our products. As a result, we may need to make changes to this appliance without updating these instructions. Visit www.dacor.com to download the latest version of this manual.
3
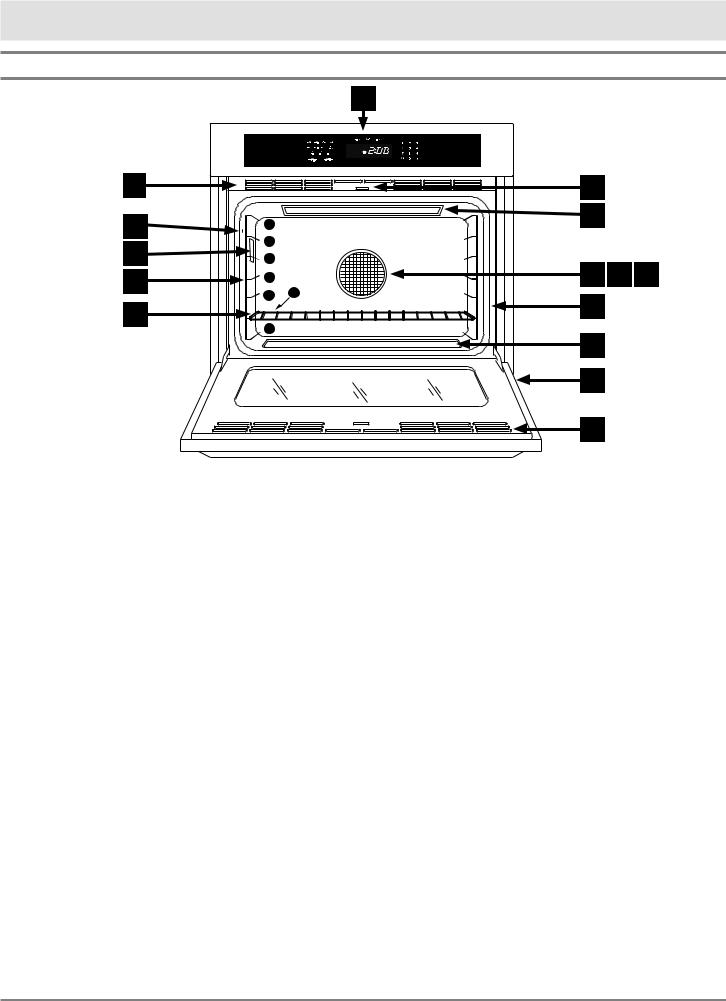
Getting to Know Your Range
Parts of the Oven
|
|
A |
|
j |
|
b |
|
k |
7 |
c |
|
|
|
||
6 |
|
|
|
L |
|
|
|
5 |
D |
E F |
|
M |
4 |
||
3 |
2 |
|
|
|
|
||
n |
|
G |
|
1 |
|
|
|
|
H |
|
|
|
|
(below oven floor) |
|
|
|
j |
(at bottom of door) |
|
|
j |
|
|
|
|
|
|
|
|
|
Control panel |
The control panel consists of keys and a display. Use the control panel to |
|
A |
||||||||
|
|
|
|
|
|
|
|
|
control all the oven’s features (sometimes called modes). |
|
|
|
|
|
|
|
|
Self clean latch |
The self clean latch automatically locks the oven door during the self clean |
|
B |
||||||||
|
|
|
|
|
|
|
|
|
cycle. The door latches for your safety. There are very high temperatures |
|
|
|
|
|
|
|
|
|
inside the oven during the self clean cycle. |
|
|
|
|
|
|
|
|
Broil element |
The broil element is located on the ceiling of the oven chamber. It is the |
|
C |
|
|||||||
|
|
|
|
|
|
|
|
|
source of top heat. |
|
|
|
|
|
|
|
|
Convection element |
The convection element heats the air that is circulated through the oven |
|
D |
|
|
||||||
|
|
|
|
|
|
|
|
|
chamber by the convection fan during the convection cooking process. |
|
|
|
|
|
|
|
|
Convection fan |
The convection fan circulates heated air through the oven chamber during |
|
E |
|
|
||||||
|
|
|
|
|
|
|
|
|
the convection cooking process. The convection filter covers it. |
|
|
|
|
|
|
|
|
Convection filter |
The convection filter covers the convection fan. It helps prevent the |
|
F |
|
|
||||||
|
|
|
|
|
|
|
|
|
transfer of taste from one food to another when you are cooking a whole |
|
|
|
|
|
|
|
|
|
meal. It also keeps the oven cleaner and covers the moving fan blades for |
|
|
|
|
|
|
|
|
|
safety purposes. |
|
|
|
|
|
|
|
Door gasket |
The door gasket prevents heat from escaping when the door is closed. |
|
|
G |
|
|
|
|||||
|
|
|
|
|
|
|
|
|
|
|
|
|
|
|
|
|
Bake element |
Hidden below the floor of the oven chamber is the bake element. It is the |
|
|
H |
|
|
|
|||||
|
|
|
|
|
|
|
|
|
source of bottom heat. |
|
|
|
|
|
|
|
Air intake/Exhaust slots |
The range draws air in through the intake slots to cool its internal parts. The |
|
|
J |
|
|
|
|||||
|
|
|
|
|
|
|
|
|
air comes out through the exhaust slot at the bottom of the oven door. Do |
|
|
|
|
|
|
|
|
|
not block or cover the air intake or exhaust slots. |
|
|
|
|
|
|
|
|
|
|
|
|
|
|
|
|
|
Meat probe connector |
When you use the meat probe, insert the skewer into the meat and plug the |
|
|
K |
|
|
|
|||||
|
|
|
|
|
|
|
|
|
other end into this connector. See Using the Meat Probe on page 16 for |
|
|
|
|
|
|
|
|
|
proper operation. |
|
|
|
|
|
|
|
Oven light |
There is a light inside the oven chamber so that you can easily see the food |
|
|
L |
|
|
|
|||||
|
|
|
|
|
|
|
|
|
inside. Press the light key on the control panel to turn it on. The bulb is |
|
|
|
|
|
|
|
|
|
120 Volt, 20 Watt, halogen. |
|
|
|
|
|
|
Rack supports |
There are seven rack positions inside the oven chamber. The rack positions |
||
|
M |
|
|
|
|
||||
|
|
|
|
|
|
|
|
|
are numbered counting up from the bottom. |
|
|
|
|
|
|
Oven rack |
Your oven comes with two GlideRack™ oven racks. |
||
|
NN |
|
|
|
|
||||
|
|
|
|
|
|
|
|
|
|
4

Getting to Know Your Range
Control Panel Layout
|
|
|
|
|
|
p |
|
|
|
|
|
R |
|
S |
|
|
R |
|
|
T |
|
|||||||||||
|
|
|
|
|
|
|
|
|
|
|
|
|
|
|
|
|
|
|
|
|
|
|
|
|
|
|
|
|
|
|
|
|
|
|
|
|
|
|
|
|
|
|
|
|
|
|
|
|
|
|
|
|
|
|
|
|
|
|
|
|
|
|
|
|
|
|
|
|
|
|
|
|
|
|
|
|
|
|
|
|
|
|
|
|
|
|
|
|
|
|
|
|
|
|
|
|
|
|
|
|
|
|
|
|
|
|
|
|
|
|
|
|
|
|
|
|
|
|
|
|
|
|
|
|
|
|
|
|
|
|
|
|
|
|
|
|
|
|
|
|
|
|
|
|
|
|
|
|
|
|
|
|
|
|
|
|
|
|
|
|
|
|
|
|
|
|
|
|
|
|
|
|
|
|
|
|
|
|
|
|
|
|
|
|
|
|
|
|
|
|
|
|
|
|
|
|
|
|
|
|
|
|
|
|
|
|
|
|
|
|
|
|
|
|
|
|
|
|
|
|
|
|
|
|
|
|
|
|
|
|
|
|
|
|
|
|
|
|
|
|
|
|
|
|
|
|
|
|
|
|
|
|
|
|
|
|
|
|
|
|
|
|
|
|
|
|
|
|
|
|
|
|
|
|
|
|
|
|
|
|
|
|
|
|
|
|
|
|
|
|
|
|
|
|
|
|
|
|
|
|
|
|
|
|
|
|
|
|
|
|
|
|
|
|
|
|
|
|
|
|
|
|
|
|
|
|
|
|
|
|
|
|
|
|
|
|
|
|
|
|
|
|
|
|
|
|
|
|
|
|
|
|
|
|
|
|
|
|
|
|
|
|
|
|
|
|
|
|
|
|
|
|
|
|
|
|
|
|
|
|
|
|
|
|
|
|
|
|
|
|
|
|
|
|
|
|
|
|
|
|
|
|
|
|
|
|
|
|
|
|
|
|
|
|
|
|
|
|
|
|
|
|
|
|
|
|
|
|
|
|
|
|
|
|
|
|
|
|
|
|
|
|
|
|
|
|
|
|
|
|
|
|
|
|
|
|
|
|
|
|
|
|
|
|
|
|
|
|
|
|
|
|
|
|
|
|
|
|
|
|
|
|
|
|
|
|
|
|
|
|
|
|
|
|
|
|
|
|
|
|
U |
|
|
V |
|
W |
|
X |
|
y |
|
|
Z |
|
|
|
|
|
|
|
|
|
|
|
|
|
|
|
|
|
|
|
|
|
|
|
|
|
|
Cooking mode keypad |
|
Select the type of cooking you want to perform by pressing one of the cook- |
||||||||||||
|
P |
|
|||||||||||||||||
|
|
|
|
|
|
|
|
|
|
|
|
ing mode keys. Also includes the SELF CLEAN and PROBE keys. |
|
|
|||||
|
|
|
|
|
TIMER keys |
|
|
|
Use the TIMER 1 and TIMER 2 keys to time an event. The two timers |
|
|
||||||||
|
R |
|
|
|
|
|
|
||||||||||||
|
|
|
|
|
|
|
|
|
|
|
|
operate separately from each other. You can use them even if the oven is |
|||||||
|
|
|
|
|
|
|
|
|
|
|
|
not in use. They do not turn the oven on or off. See page 13. |
|
|
|||||
|
|
|
|
|
|
|
|
|
|
|
|
|
|
|
|
|
|
|
|
|
|
|
|
|
CLOCK key |
|
|
|
Use this key to set the clock. See page 8. |
|
|
|
|
|
|||||
|
S |
|
|
|
|
|
|
|
|
|
|||||||||
|
|
|
|
|
|
|
|
|
|
|
|
|
|
|
|
|
|
|
|
|
|
|
|
|
Number keypad |
|
|
|
The number keypad is used to set the temperature, cook time or the clock. |
||||||||||
|
T |
|
|
|
|
||||||||||||||
|
|
|
|
|
|
|
|
|
|
|
|
See Operating the Oven. |
|
|
|
|
|
||
|
|
|
|
|
|
|
|
|
|
|
|
|
|
|
|
|
|||
|
|
|
|
|
START · CONTINUE key |
|
When you use the various features (or modes) on your oven, select the |
||||||||||||
|
U |
|
|
||||||||||||||||
|
|
|
|
|
|
|
|
|
|
|
|
cooking mode first, then press the START · CONTINUE key. Also, use the |
|||||||
|
|
|
|
|
|
|
|
|
|
|
|
START · CONTINUE key to start the timers. See Operating the Oven. |
|||||||
|
|
|
|
|
CANCEL · SECURE key |
|
Use this key to turn off your oven. This key sets all temperature settings |
||||||||||||
|
V |
|
|
|
|||||||||||||||
|
|
|
|
|
|
|
|
|
|
|
|
back to zero and turns off any features (except the timer) that are currently |
|||||||
|
|
|
|
|
|
|
|
|
|
|
|
in use. It also activates the lock-out feature. |
|
|
|
|
|
||
|
|
|
|
|
|
|
|
|
|
|
|
|
|
|
|
|
|||
|
|
|
|
|
Delay timed cooking |
|
Use these keys to set the oven to turn on or off automatically at a later |
||||||||||||
|
W |
|
|
|
|
||||||||||||||
|
|
|
|
|
keys |
|
|
|
time. See page 14 for instructions. |
|
|
|
|
|
|||||
|
|
|
|
|
Display |
|
|
|
The control panel display provides various types of information about the |
||||||||||
|
X |
|
|
|
|
|
|
||||||||||||
|
|
|
|
|
|
|
|
|
|
|
|
oven, including the current time (once the clock is set), the current cook |
|||||||
|
|
|
|
|
|
|
|
|
|
|
|
settings and the cooking temperature. See below for the symbols that |
|
|
|||||
|
|
|
|
|
|
|
|
|
|
|
|
appear on the display. |
|
|
|
|
|
||
|
|
|
|
|
Light key |
|
|
|
Located on the number keypad. If you need to turn the oven light on or off, |
||||||||||
|
Y |
|
|
|
|
|
|
||||||||||||
|
|
|
|
|
|
|
|
|
|
|
|
press the light key. |
|
|
|
|
|
||
|
|
|
|
|
Sabbath key (#) |
|
|
|
Use this key to start Sabbath mode. See page 15. |
|
|
|
|
|
|||||
|
Z |
|
|
|
|
|
|
|
|
|
|
|
|||||||
|
|
|
|
|
|
|
|
|
|
|
|
|
|
|
|
|
|
|
|
|
|
|
|
|
1 |
2 |
Convection Bake |
Broil |
Roast |
Meat |
Door lock Timer Self clean |
Timer numbers |
|
|
|
|
probe |
(self clean) |
|
|
Display Symbols
5

Getting to Know Your Range
About the Cooktop
•Your range is equipped with an induction type cooktop. Induction cooking is totally different from traditional types of cooking. A magnetic induction element below the cooking surface heats utensils (magnetic only) directly. Induction cooking is much more efficient because less energy is lost heating the cooktop itself. Also, food that spills on the cooktop does not burn since the cooktop is much cooler.
•The cooktop has four circular cooking zones. Below each cooking zone is the magnetic induction cooking element. Each cooking zone has its own set of controls. The control keys are activated by touching them with your fingertip. Pressing hard is not necessary because the keys are not pressure sensitive. NOTE: Spills or cleaning solutions on the keys can cause unwanted operation. Dry the control area with a clean cloth and reset the control to correct.
•All of the induction elements under the cooking zones feature temperature limiters to ensure a safe operating temperature for the glass ceramic top. The elements automatically cycle on and off. At higher power settings, the induction element will stay on for longer periods of time.
Cooktop surface
Cooking zone
Style varies,
model RR30NS shown
Cooktop Control Panel
•A ON/OFF Key: Turns on the indicated cooking zone.
•b Cooking Zone Position: Indicates the location of the cooking zone that is adjusted by that set of controls.
•c Power Light: Turns on when the indicated cooking zone is on. Power turns off automatically if a utensil is not placed on the cooking zone within 30 seconds of being turned on.
•d Power Level Display: Shows the current power level and flashes when no utensil is placed on the cooking zone. Available cooking levels are L, 1, 2, 3, 4, 5, 6, 7, 8, 9, H*.
•e Hot Surface Indicator Light: Indicates corresponding cooking zone is hot.
•F Power Level DOWN Key: Touch this key repeatedly to lower the power level.
•g Power Level UP Key: Touch this key repeatedly to raise the power level.
•h LOW Key: Touch this key to jump directly to power level “2”.
•j MEDIUM Key: Touch this key to jump directly to power level “6”.
•k HIGH Key: Touch this key to jump directly to “H” power level.
7 ¾ inch |
7 ¾ inch |
2800 Watt |
2800 Watt |
5 ½ inch |
5 ½ inch |
2200 Watt |
2200 Watt |
I N D U C T I O N
 Cooktop
controls
Cooktop Layout - Top View
C D E
*The Dacor induction power management feature regu- |
|
|
|
|
|
|
|
|
|
|
|
|
|
|
|
|
|
|
|
|
|
|
|
|
|
|
|
|
|
|
|
|
|
lates the amount of power one side (left or right) can |
|
|
|
|
|
|
|
|
|
|
|
|
|
|
|
|
|
|
|
|
|
|
|
|
|
|
|
|
|
|
|
|
|
|
|
|
|
|
|
|
|
|
|
|
|
|
|
|
|
|
|
|
|
|
|
|
|
|
|
|
|
|
|
|
|
|
|
draw at the same time. If you set both controls on the |
|
|
|
|
|
|
|
|
|
|
|
|
|
|
|
|
|
|
|
|
|
|
|
|
|
|
|
|
|
|
|
|
|
|
|
|
|
|
|
|
|
|
|
|
|
|
|
|
|
|
|
|
|
|
|
|
|
|
|
|
|
|
|
|
|
|
|
|
|
|
|
|
|
|
|
|
|
|
|
|
|
|
|
|
|
|
|
|
|
|
|
|
|
|
|
|
|
|
|
|
|
same side to the HIGH power setting, power to both |
|
|
|
|
|
|
|
|
|
|
|
|
|
|
|
|
|
|
|
|
|
|
|
|
|
|
|
|
|
|
|
|
|
A |
|
|
|
|
|
B |
|
|
F |
|
|
|
|
G |
|
|
|
H |
|
J |
|
|
K |
|
|||||||||
elements will be reduced slightly and cooking times will |
|
|
|
|
|
|
|
|
|
|
|
|
|
|
|
|
|||||||||||||||||
be slightly longer. When cooking on two elements at the |
|
|
|
|
|
|
|
|
|
|
|
|
|
|
|
|
Control Layout |
|
|
|
|
|
|
|
|||||||||
HIGH setting, Dacor recommends using one element on |
|
|
|
|
|
|
|
|
|
|
|
|
|
|
|
|
|
|
|
|
|
|
|
||||||||||
the left side and one on the right.
6
Operating the Cooktop
Before Using the Cooktop
Before using the cooktop for the first time:
•Be sure all packing materials, labels or tape are removed from the cooktop surface.
•Wipe the cooktop with a clean, damp sponge and dry.
•Apply Dacor Cooktop Cleaning Crème, according to the Care and Cleaning section.
•During the first uses of the cooktop, you may smell a slight burning odor or see light smoke. These conditions are normal for new glass ceramic cooktops.
•Be certain that the cookware and glass surfaces are clean and dry before you place a pot or pan on the cooktop and turn on an element.
Selecting the Proper Cookware
 warning
This appliance is equipped with one or more surface units of different size. Always use utensils that have flat bottoms. Use utensils that best match the surface unit size (smaller utensils on smaller surface units) and are a minimum of four inches in diameter.
•All utensils used on an induction cooktop MUST be magnetic.
•Utensils will affect the overall safety and performance of cooktop cooking, so it is important to select them carefully. An improperly selected utensil will not cook efficiently or evenly.
•Use medium to heavy-gauge metal cookware with flat and smooth bottoms. Also choose cookware that
closely matches the diameter of the cooking zone. Use utensils with tight fitting lids to retain heat, odors and steam.
•Properly center utensils in the cooking zone for proper operation.
Do not use:
•Cooking utensils that have bottoms that are rounded, convex or concave.
•Utensils that are smaller in diameter than the cooking zone being used.
•Utensils made of materials that are poor heat conductors.
•Griddle plates that cover more than one cooking zone.
•Dirty pans or pans with greasy build-up.
Improper utensils will not heat properly, wobble and may cause vibration.
Operating the Controls
 warning
•Turn on the induction cooktop only after placing the cookware on the element.
•Do not leave metallic utensils or lids on the cooking surface since they can become hot.
•Make sure the cooktop surface is clean and dry.
•Place the pan on the element selected, center for best operation.
•Locate the ON/OFF key operating the selected cooking zone and touch it with your finger for one second. Remove your finger when the power light turns on.
The power level display will flash “0”.
•Select the desired power level using the LOW, MEDIUM or HIGH keys or using the UP (▲) key. The selected power level will appear on the display.
NOTE:
◊If a power level is not selected within 30 seconds, the control will turn off.
◊You can change the power level setting at any time during the cooking process.
Recommended Settings
Type of Cooking |
Power Level |
|
|
Rapid heat up/rapid rolling boil |
HIGH |
|
|
Low level rolling boil |
6 to 7 |
|
|
Frying |
9 to HIGH |
|
|
General cooking or browning |
6 to 9 |
Simmer |
2 to 5 |
|
|
Keep warm* |
LOW to 1 |
*CAUTION: Avoid bacteria growth, keep food above 140ºF.
•Turn off power to the cooking zone by touching the ON/OFF key or simply remove the pan from the cooktop. 30 seconds after removing a pan the control for that cooking zone shuts off automatically. NOTE: If a pan is placed on the same cooking zone before 30 seconds has elapsed the cooking zone will remain on at the same setting.
Cooking Tips:
•Practice and experience will ultimately determine the power levels that work best for you. Don’t be afraid to experiment and arrive at your own preferred cooking settings. You may want to take notes when you find a setting that works good for a particular food item. There is a blank table in the back of this manual to help.
•There will be some variation in the efficiency of the pots being used. All brands do not behave in exactly the same way since the different metals used conduct the electromagnetic waves from the induction elements differently.
7

Operating the Oven
Control Panel Settings
Setting the Clock
1.Press the CLOCK key. The colon between the minutes and seconds on the time display will begin to flash.
2.Enter the current time on the number keypad before the colon stops flashing. For example: For 12:08, press 1-2-0-8 on the keypad. Press the # key to change the AM-PM indicator.
3.Press START · CONTINUE.
 important
•The clock cannot be set during delay timed cooking, if one of the timers is in use or if self clean or Sabbath mode is active.
•After a power failure, the time on the display may flash, indicating that the time may not be correct.
•After pressing the clock key, you must enter the time and press START · CONTINUE soon afterward. If you wait too long between pressing keys, the display will go back to the original setting.
24/12 Hour Clock (Military Time)
The oven is set to 12-hour (non-military) time at the factory. 24 hour time is also known as military time. 1:36 PM = 13:36 military time.
If you want to switch the clock to 24 hour time or switch from military back to regular time:
1.Press and hold the CLOCK key for six seconds. The display will indicate the mode the clock is currently set to, 12 Hr or 24 Hr.
2.Press the # key to change the clock mode. To leave the setting as is, do not touch any keys.
3.Press CANCEL · SECURE to return to the main display. If you have set the clock to 24 hour time, the keypad will allow you to enter military time when setting the clock.
Setting the Temperature Scale
You can select the temperature scale (Fahrenheit or Celsius) the oven uses to display the cooking temperature. The oven is preset at the factory to Fahrenheit.
To change the temperature scale:
1.Press and hold the BROIL key.
2.The display will indicate the temperature scale the control panel is currently set to, “F” or “C”.
3.Press the # key to change the temperature scale. To leave the setting as is, do not touch any keys.
4.Press CANCEL·SECURE. The control panel will go back to the regular clock display, set to the new temperature scale.
Turning the Control Panel “Beep” Off/On
The control panel beeps any time you press any of the keys or when various error conditions exist. It also beeps when a timer is done counting down (page 13) or whenever the oven performs certain preset functions, for example, pre-heat is complete. The tone may be silenced so that it does not function under the above conditions.
To turn the control panel “beep” off (or on):
1.Press and hold the START TIME key for six seconds, until “beep” appears on the display.
2.Press the # key repeatedly to switch between “On” and “Off”.
3.Press CANCEL · SECURE when the desired mode appears on the display.
4.To change the control panel back to the previous mode, repeat the above steps.
Lock-Out Feature
If you want to disable the keys on the control panel when the oven is not in use:
•Push and hold the CANCEL · SECURE key for about four seconds. The control panel keys will stop working and “OFF” will appear on the display. Only the CANCEL · SECURE and the oven light keys remain functional.
•To reactivate the control panel, press and hold the CANCEL · SECURE key for four seconds.
Before Using the Oven...
•Dacor recommends turning the oven on for one hour at 500°F to burn off any residual oils used during the manufacturing process. Any of these oils left on the inner parts can cause an undesirable smell the first few times the oven is used.
•When you use your oven to bake or roast, it preheats automatically. The preheat cycle rapidly brings the oven chamber up to the proper cooking temperature. It takes several minutes to preheat the oven. Preheat time depends on the temperature settings. The time may be longer depending on the type of electrical supply in your community. There is no preheat cycle for any of the broil modes.
•After you pull food out of the oven, it will continue to cook. This process is called “carry-over.” The larger the portion of food, the longer it will cook. It is best to let the meat rest after it comes out of the oven for 10 to 15 minutes before carving. Doing so will allow the meat to retain its natural juices and make it easier to carve.
8
 Loading...