


Epicure
NOTES:
Contains helpful hints and tips.
WARNINGS:
Must be followed carefully to avoid personal injury or damage.
IMPORTANT INFORMATION
• Operating Instructions
• Care and Cleaning Instructions
• Safety Tips
SAFETY IS EVERYONE’S RESPONSIBILITY. ALL DACOR APPLIANCES ARE DESIGNED
AND CONSTRUCTED TO GIVE YOU MANY YEARS OF SAFE OPERATION. THE
OPERATION WILL BE FURTHER ENHANCED IF PROPER CARE AND JUDGEMENT ARE
EXERCISED IN THE USE AND MAINTENANCE OF THIS APPLIANCE.
Place Serial Number Label Here
Use & Care
Epicure™ Ranges
Part No. 65091 Rev. G
Please Read Before Using Your Range

Dear DACOR Consumer,
Congratulations! You have purchased the very latest in kitchen appliances. Your new DACOR product offers features,
styling and performance not found in any other appliance.
Please read this manual before operating your new appliance. It
is imperative that you read the IMPORTANT
INSTRUCTIONS section and become familiar with the controls and procedures to understand the full potential of this
product.
All DACOR appliances are designed and manufactured to meet the highest quality standards. Each unit is thoroughly
tested. Should you have a problem, however, please first check the PROBLEM SOLVING section in this manual. This
section contains a checklist of possible problems and solutions that may save you the time and expense of an
unnecessary service call.
If you cannot readily find the solution to the problem, please contact your nearest DACOR Authorized Service
Representative. In the unlikely event they are unable to solve your problem to your satisfaction, please contact
DACOR Customer Service.
Web site: www.dacor.com
For a Dealer/Service: (800) 772-7778
Corporate Phone: (800) 793-0093
Fax: (626) 441-9632
Business Hours: 7:30 A.M. to 4:00 P.M. Pacific Time
DACOR Customer Service
1440 Bridge Gate Dr.
Diamond Bar, CA 91765
Thank you for selecting DACOR for your home. We are dedicated to you and ensure that this appliance in your home
will bring years of outstanding performance for your family and fr
iends.
Sincerely,
S. Michael Joseph
Chairman/CEO
i
ncere
l
y,
S
.
Micha
e
l
Jose
ph
2
1
12. Select utensils of the proper size, material,
and construction for the particular type of
cooking being done. Select utensils that
are large enough to contain the desired
quantity of food without boil-overs or spill-
overs. Choose pans with easy to hold
handles that will stay cool while cooking.
Do not use utensils with loose handles.
Avoid using pans that are too heavy to lift
safely. Use cookware only for its intended
purpose. Certain types of glass, ceramic,
and earthenware utensils are suitable for
use only in an oven and not in cooktop
applications.
13. When cooking, set the burner controls so
that the flame heats only the bottom of the
utensil and does not lick at the sides of the
utensil.
14. When deep fat frying, be certain that the
pan is large enough to contain the desired
volume of food without overflow caused by
bubbling of the fat. Never leave a deep fat
fryer unattended. Avoid deep fat frying of
moist or frost-covered foods, as foods with
high water content may cause spattering or
spilling of the hot fat. Heat fat slowly, and
stir together any combinations of oils and
fats prior to applying heat. Utilize a deep
fat frying thermometer to avoid heating the
fat to temperatures above the flash point.
15. Always turn pan handles to the side or
back of the range. Do not turn handles
towards the room where they are easily hit.
Handles should not extend over adjacent
burners.
16. Always check the positions of the control
knobs to make sure the cooktop is off when
you are finished cooking.
17. Before performing any service, turn off the
gas supply by closing the gas shut-off valve
and turning off electrical power supply.
18. Always light each burner prior to placing a
utensil on the burner grate. Also, turn the
control knob to the “off” position before
removing a utensil from the burner grate.
19. Always clean the cooktop cautiously. If
using a damp sponge or cloth, wait until
the cooktop has cooled sufficiently to
prevent steam burns. Also, some cleaners
can produce harmful or unpleasant fumes if
applied to hot surfaces.
20. Keep any ventilation filters clean to avoid
grease fires.
This Use & Care Manual is designed to enable
you to properly operate and maintain your new
range. Please keep this manual handy for easy
access and quick reference.
Additional information may be requested by
e-mailing, writing or phoning the DACOR
Customer Service Department. The address
and phone number of this department are listed
on the inside front cover of this manual.
Please enter the information requested in the spaces provided below. This information will be required in the unlikely event that a service call
becomes necessary:
Model No. Serial No.
Date Purchased Date Installed
Purchased From
Address
Phone
If you received a damaged product,
immediately contact your dealer or builder.
Do not install or use a damaged appliance.
TABLE OF CONTENTS .................................... 1
Purpose of this Manual ................................ 1
Product Registration .................................... 1
IMPORTANT INSTRUCTIONS ......................... 2
What To Do .................................................. 2
What Not To Do ............................................ 2
OVEN OPERATION ....................................... 3-7
Getting Started ............................................. 3
What is Pure Convection™? ........................ 4
Setting the Time of Day ................................ 4
Oven Modes ................................................. 4
Oven Racks & Supports ............................... 4
Oven Mode Selection ................................... 5
Preheating the Oven .................................... 5
Using the Minute Timers .............................. 5
Securing the Controls ................................... 6
Baking
..........................................................6
Roasting ....................................................... 6
Multiple Rack Baking ................................... 6
Delay Timed Cooking ................................ 6-7
Dehydrating/Defrosting ................................ 7
Broiling ......................................................... 7
COOKTOP OPERATION ...............................7-8
Selecting the Proper Cookware ................... 7
Burner Controls ............................................ 7
Setting the Burner Flame Height .................. 8
Using the Simmer Plate ............................... 8
CARE AND CLEANING ............................... 8-12
Cleaning Tips ............................................ 8-9
Control Panel ............................................... 9
Door Handle & Control Housing ................... 9
Door Glass ................................................... 9
Stainless Steel Surfaces .............................. 9
Porcelain Surfaces ....................................... 9
Brass and Chrome Surfaces ........................ 9
Broiler Pan ................................................... 9
Oven Racks ................................................. 9
Convection Fan Filter ................................... 9
Top Frame .................................................... 9
Oven Exhaust Cover .................................... 9
Knobs and Spill Protector rings .................. 10
Burner Bases ............................................. 10
Burner Rings .............................................. 10
Burner Ignitors ........................................... 10
Self-Cleaning ........................................ 10-11
Adjusting the Oven Temperature .................11
Replacing the Oven Light ...................... 11-12
PROBLEM SOLVING ................................. 12-14
Troubleshooting ....................................12-13
Product Maintenance ................................. 14
If You Need Service ................................... 14
PRODUCT WARRANTY ................................. 14
What Is Covered ........................................ 14
What Is Not Covered .................................. 14
Purpose of This Manual
Product Registration
What to Do
1. Begin by ensuring proper installation and
grounding of the appliance by a qualified
technician according to the accompanying
Installation Instructions. Have the installer
show you where the fuse or junction box
and gas valve are located so that you
know how and where to turn off the utilities.
If you smell gas, do not use the range.
Immediately turn off the gas supply at the
shut off valve, disconnect electrical power
to the unit at the fuse or junction box,
and contact the gas supplier or qualified
appliance technician.
2. Ensure that the range is used only by
those individuals who are able to operate it
properly.
3. Use the range only for cooking tasks
expected of a home oven as outlined in
this manual.
4. Properly clean and maintain the range as
recommended in this manual.
5. Use only dry potholders to avoid steam
burns when removing hot cookware.
6. Exercise caution when opening the oven
door. Let hot air or steam escape before
looking or reaching into the oven.
7. Allow the oven cool air intake (located at
the door handle) to remain unobstructed at
all times.
8. Position oven racks in desired locations
when the oven is cool. (If a rack must be
repositioned after the oven is already hot,
be certain that the potholder does not
contact a hot heating element in the oven.)
9. Before Self-Cleaning the oven, remove the
broiler grill and pan, oven racks, convection
fan filter and any other utensils.
10. Clean only those parts listed in this
manual.
11. In the event that a burner flame goes out
and gas escapes, turn off the gas control
and open a window or door. Wait at least
5 minutes before attempting to use the
cooktop.

2
What Not to Do
21. Always set utensils gently onto the grates
and center them so that they are well-
balanced.
22. Always keep the cooktop surface clean and
dry.
1. Do not use the range for warming or
heating the room.
2. Do not leave children alone or unattended
in the area where the range is in use.
Never allow children to sit or stand on any
part of the oven. Do not let children play
with the range.
3. Do not store items of interest to children
above the range. Children could be burned
or injured while climbing on the appliance.
4. Do not wear loose or hanging apparel while
using the range.
5. Do not store combustible, flammable or
explosive materials in the range or in
adjacent cabinets.
6. CAUTION: DO NOT LEAVE FOOD OR
COOKING UTENSILS, ETC., IN THE
OVEN DURING THE SELF-CLEAN
CYCLE.
7. Do not repair or replace any part of the
range unless specifically recommended
in literature accompanying this appliance.
All other service should be referred to a
qualified technician.
8. Do not use water on grease fires. A violent
steam explosion may result. Smother any
flames with a lid, cookie sheet or flat tray.
Flaming grease can be extinguished with
baking soda or foam extinguisher.
9. Do not allow potholders to touch hot
surfaces or gas burners. Do not use towels
or bulky cloth as potholders.
10. Do not use commercial oven cleaners or
oven liner protective coatings on any part
of the oven.
11. Do not clean the door gasket, because
rubbing, moving or in any way damaging
the gasket, may eliminate the required tight
door seal.
12. DO NOT TOUCH INTERIOR SURFACES
OF THE OVEN. During and after use, do
not touch or let clothing or other flammable
materials contact heating elements or
interior surfaces of the oven until they have
had sufficient time to cool.
13. Do not block or obstruct the holes below
the control knobs. Blocking these holes
may affect burner operation and may result
in a hazard.
14. When using the cooktop, do not touch the
grates, burner caps, burner bases, or any
other parts in proximity to the flame. These
components may be hot enough to cause
burns.
15. If the cooktop is near a window, do not use
long curtains as a window treatment. The
curtains could blow over the cooktop and
create a fire hazard.
16. Do not cover the burners and grates with
anything except properly selected utensils.
Decorative covers should not be used.
17. Do not heat unopened food containers,
such as baby food jars and cans. Pressure
build-up may cause the container to burst
and cause injury.
18. Do not use abrasive or caustic cleaners
or detergents on this appliance. They may
cause permanent damage. Do not use
aerosol cleaners. They may be flammable
or cause corrosion of metal parts.
19. Do not use or attempt to use this appliance
in the event of a power failure.
20. Do not touch the oven exhaust cover on
the cooktop when the oven is in use.
21. Do not slide cookware across the grates.
Sliding may damage the finish of the
grates. Lift utensils to reposition them.
22. Do not allow acids (citrus juices, tomato
sauces, etc.) to remain on the oven cell
surfaces. The porcelain finish may stain.
23. Do not touch the range top or backguard
with your bare hands during all cooking
and self cleaning modes. Venting from
the oven may cause the cooktop and
backguard to become hot.
Getting Started
Before using your range, become familiar with
the features and control panel layout.
Below the oven mode touch pads are three
touch pads labeled “CANCEL•SECURE,”
“LIGHT” and “COOK TIME”. The
“CANCEL•SECURE” touch pad enables the
user to cancel the selection of an oven mode
or Delay Timed program, or disable the control
panel by pressing and holding the pad for
approximately three (3) seconds. Once the
control panel is in the “SECURE” mode, “OFF”
will be displayed on the clock. The “LIGHT”
touch pad turns the interior oven light “on”
and “off.” The “LIGHT” touch pad will remain
functional if the control panel has been disabled.
The “COOK TIME” touch pad is used to select
the length of time for a cooking process in Delay
Timed cooking mode.
Clock functions are selected by pressing the
touch pads located below the clock display
and oven mode touch pads. Oven functions
are chosen by pressing the touch pad for the
desired mode. Once a clock or oven function
has been chosen, a description of the selection
will flash in the clock display area.
IMPORTANT:
After choosing a clock function or oven
mode, you have six seconds to perform the
next programming step. If the next step is
not completed within six (6) seconds, the
program selection displayed on the clock
will disappear. Should this occur, just repeat
the initial function selection
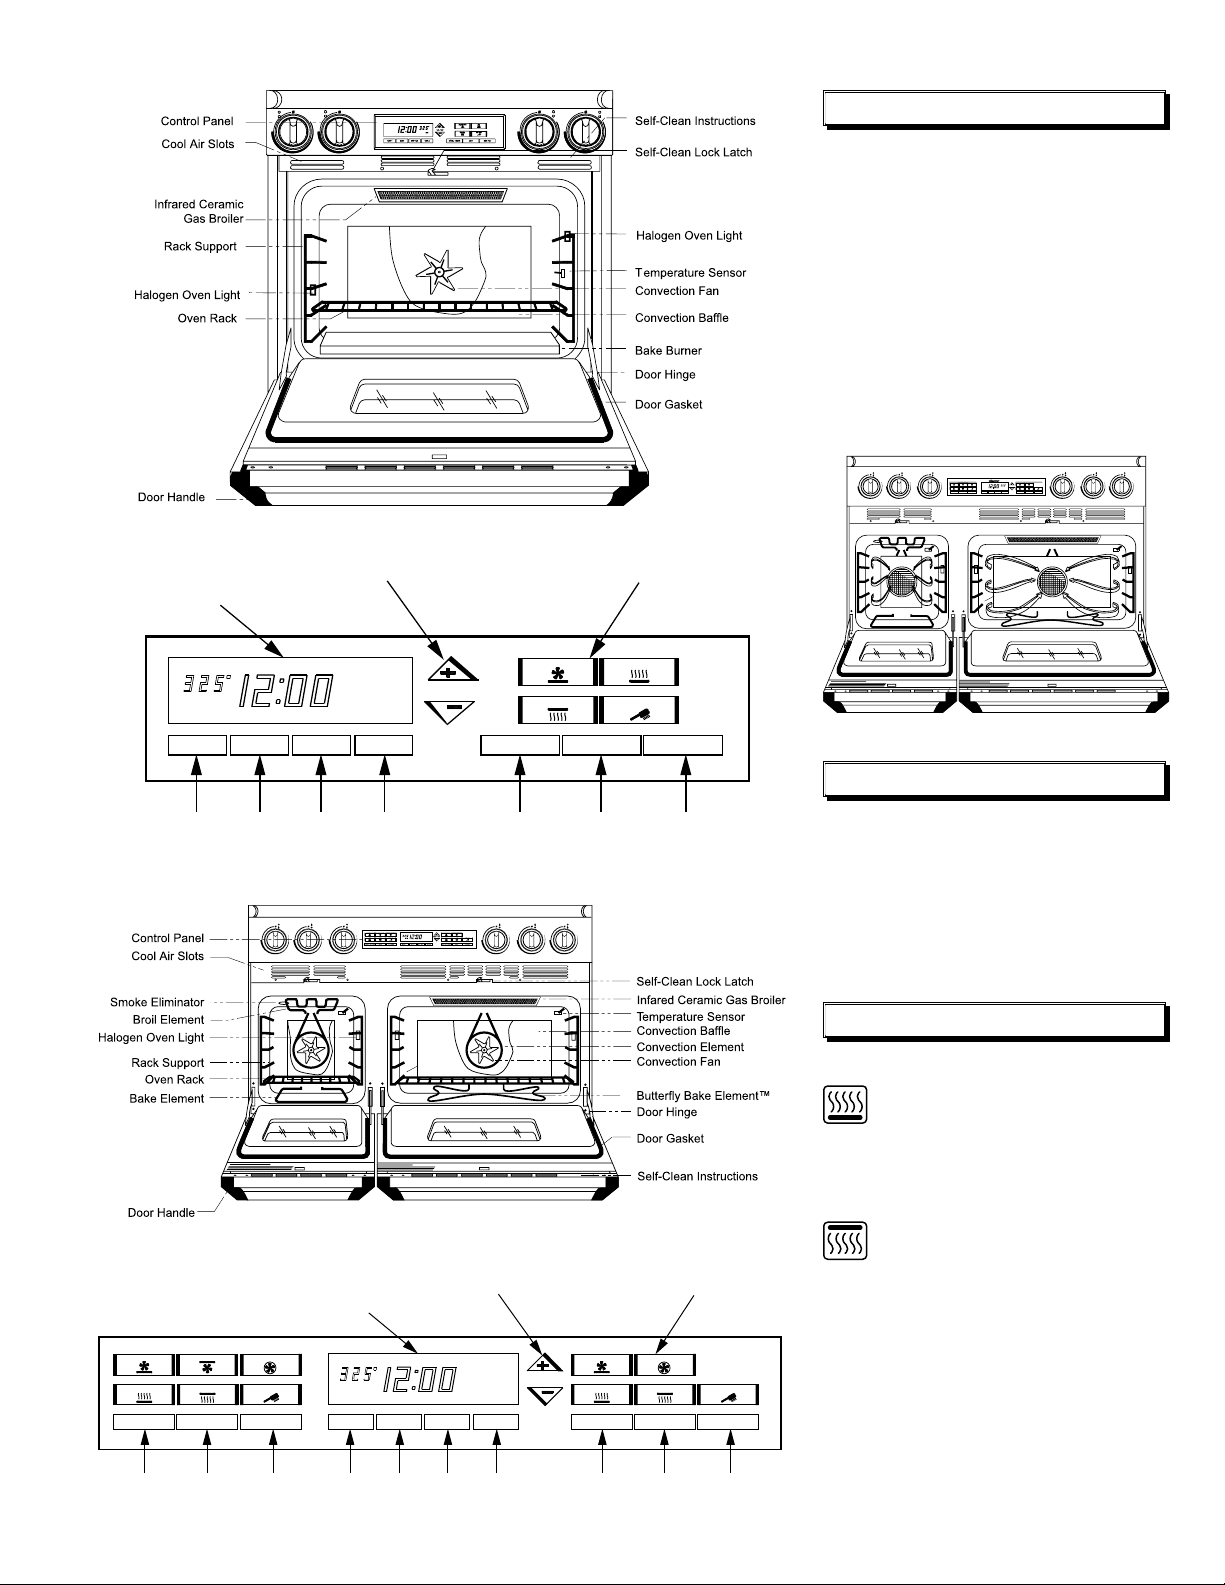
ERD30/36/60 Oven Features
(Convection Screen Not Shown)
Time and Temperature
Set Keys
Electronic Clock
Oven Mode
Indicators
CANCEL
SECURE
OVEN
LIGHT
COOK
TIME
MINUTE
TIMER #2
STOP
TIME
CLOCK
SET
MINUTE
TIMER #1
TIMER 1 CLOCK
BAKE
STOP TIME TIMER 2 CANCEL ● SECURE LIGHT COOK TIME
BAKE BROIL
CONVECTION BAKE PURE CONVECTION
SELF CLEAN
TIME ● TEMP
ERD30/36/60 Control Panel
3
3
ERG30 Oven Features
(Convection Screen Not Shown)
Time and Temperature
Set Keys
Electronic Clock
Oven Mode
Indicators
CANCEL
SECURE
OVEN
LIGHT
COOK
TIME
MINUTE
TIMER #2
STOP
TIME
CLOCK
SET
MINUTE
TIMER #1
TIMER 1 CLOCK
BAKE
STOP TIME TIMER 2 CANCEL • SECURE LIGHT COOK TIME
TIME • TEMP
BAKE
BROIL
CONVECTION BAKE
SELF CLEAN
EGR30 Control Panel
ERD48 Oven Features
(Convection Screen Not Shown)
Time and Temperature
Set Keys
Electronic Clock
Oven Mode
Indicators
CANCEL
SECURE
OVEN
LIGHT
COOK
TIME
MINUTE
TIMER #2
STOP
TIME
CLOCK
SET
MINUTE
TIMER #1
TIMER 1 CLOCK
BAKE
STOP TIME
TIMER 2
CANCEL ● SECURE
LIGHT COOK TIME
BAKE BROIL
CONVECTION BAKE PURE CONVECTION
SELF CLEAN
CANCEL
SECURE
OVEN
LIGHT
COOK
TIME
CANCEL ● SECURE
LIGHT COOK TIME
BAKE BROIL
CONVECTION BAKE CONVECTION BROIL PURE CONVECTION
SELF CLEAN
TIME ● TEMP
ERD48 Control Panel
What is Pure Convection™?
Your new oven has the best cooking system
available today, “Pure Convection™”. Pure
Convection™ is a total system approach to
cooking. The heat source is a third element
outside the cooking cell behind a “baffle.” Not
only does the baffle separate the food from
the heat source, it channels the air from the
“Convection Fan” evenly into the cell eliminating
any hot or cool spots in the oven. This system is
what allows multi-rack cooking while achieving
even results from one rack to another.
The other component in Pure Convection™ is
the “Filter.” The filter eliminates the transference
of flavors when cooking entire meals and also
keeps the oven cleaner
CANCEL • SECURE LIGHT COOK TIME
CONVECTION BAKE
CONVECTION BROI
L
PURE CONVECTIO
N
BAKE BROIL SELF CLEA
N
BAKE
TIMER 1 CLOCK STOP
TIME TIMER 2
TIME • TEM
P
CANCEL • SECURE LIGHT COOK TIM
E
CONVECTION BAKE
PURE CONVECTIO
N
BAKE BROIL SELF CLEA
N
Heated Air Circulation Pattern in Convection Modes
Setting the Time of Day
Follow these two steps to set the correct
time of day:
1. Press the “CLOCK” touch pad. The time
of day will flash, “AM” or “PM” will be
displayed, and “TIME” will flash in the
display.
2. Press the touch pad “+” or “–” until the
correct time of day is displayed and
release.
Oven Modes
All oven modes are described below:
STANDARD BAKE (Selected Models
Only) – In Standard Bake mode,
the bottom heat element provides
conventional baking heat. Temperatures
may be set from 135˚ to 555˚F in 5˚F
increments. Use Standard Bake for single
rack baking and roasting.
STANDARD BROIL – The Infrared
Ceramic Gas Broiler supplies the heat
in Broil mode. The high wattage, top
heating element supplies the heat in
Broil mode in the ERD48 left oven only.
The broil temperature is adjustable from
135˚F, to the “HI” setting (equivalent
to 555˚F) for greater cooking flexibility.
Broiling is performed with the door
closed.
4
CONVECTION BROIL (ERD48 left oven
only) – The high wattage, top heating
element supplies the heat in Broil mode
in combination with the convection fan
for better heat distribution. The broil
temperature is adjustable from 135˚F
to the “HI” setting (equivalent to 555˚F)
for greater cooking flexibility. Broiling is
performed with the door closed.
PURE CONVECTION™ (ERD models
only) – In Pure Convection™ mode a
third heating element, encircling the
convection fan located in the rear of the
oven chamber, acts as the heat source.
The convection fan draws air from the
oven chamber, then forces it across
the hot convection heating element.
The heated air is directed back into the
oven chamber through the convection
baffle. The baffle distributes the heated
air evenly to ensure uniform results.
Temperatures may be set from 135˚
to 555˚F in 5˚F increments. Use this
mode for single rack baking, multiple
rack baking, roasting, and preparation of
complete meals.
CONVECTION BAKE – In this
combination convection-radiant mode,
the lower element provides the heat.
As in Pure Convection™ mode, the
convection fan and baffle combine to
circulate heated air evenly throughout the
oven chamber. Temperatures may be set
from 135˚F to 555˚F in 5˚F increments.
Use this mode for single rack baking,
multiple rack baking and roasting.
SELF-CLEAN – In the pyrolytic Self-
Clean mode, the oven reaches extreme
high temperatures, thereby burning off
oven soil automatically. The Self-Clean
time is adjustable up to four hours so
that varying degrees of oven soil can
be successfully removed. Also, the Self-
Clean cycle can be delayed to start at a
later time if desired
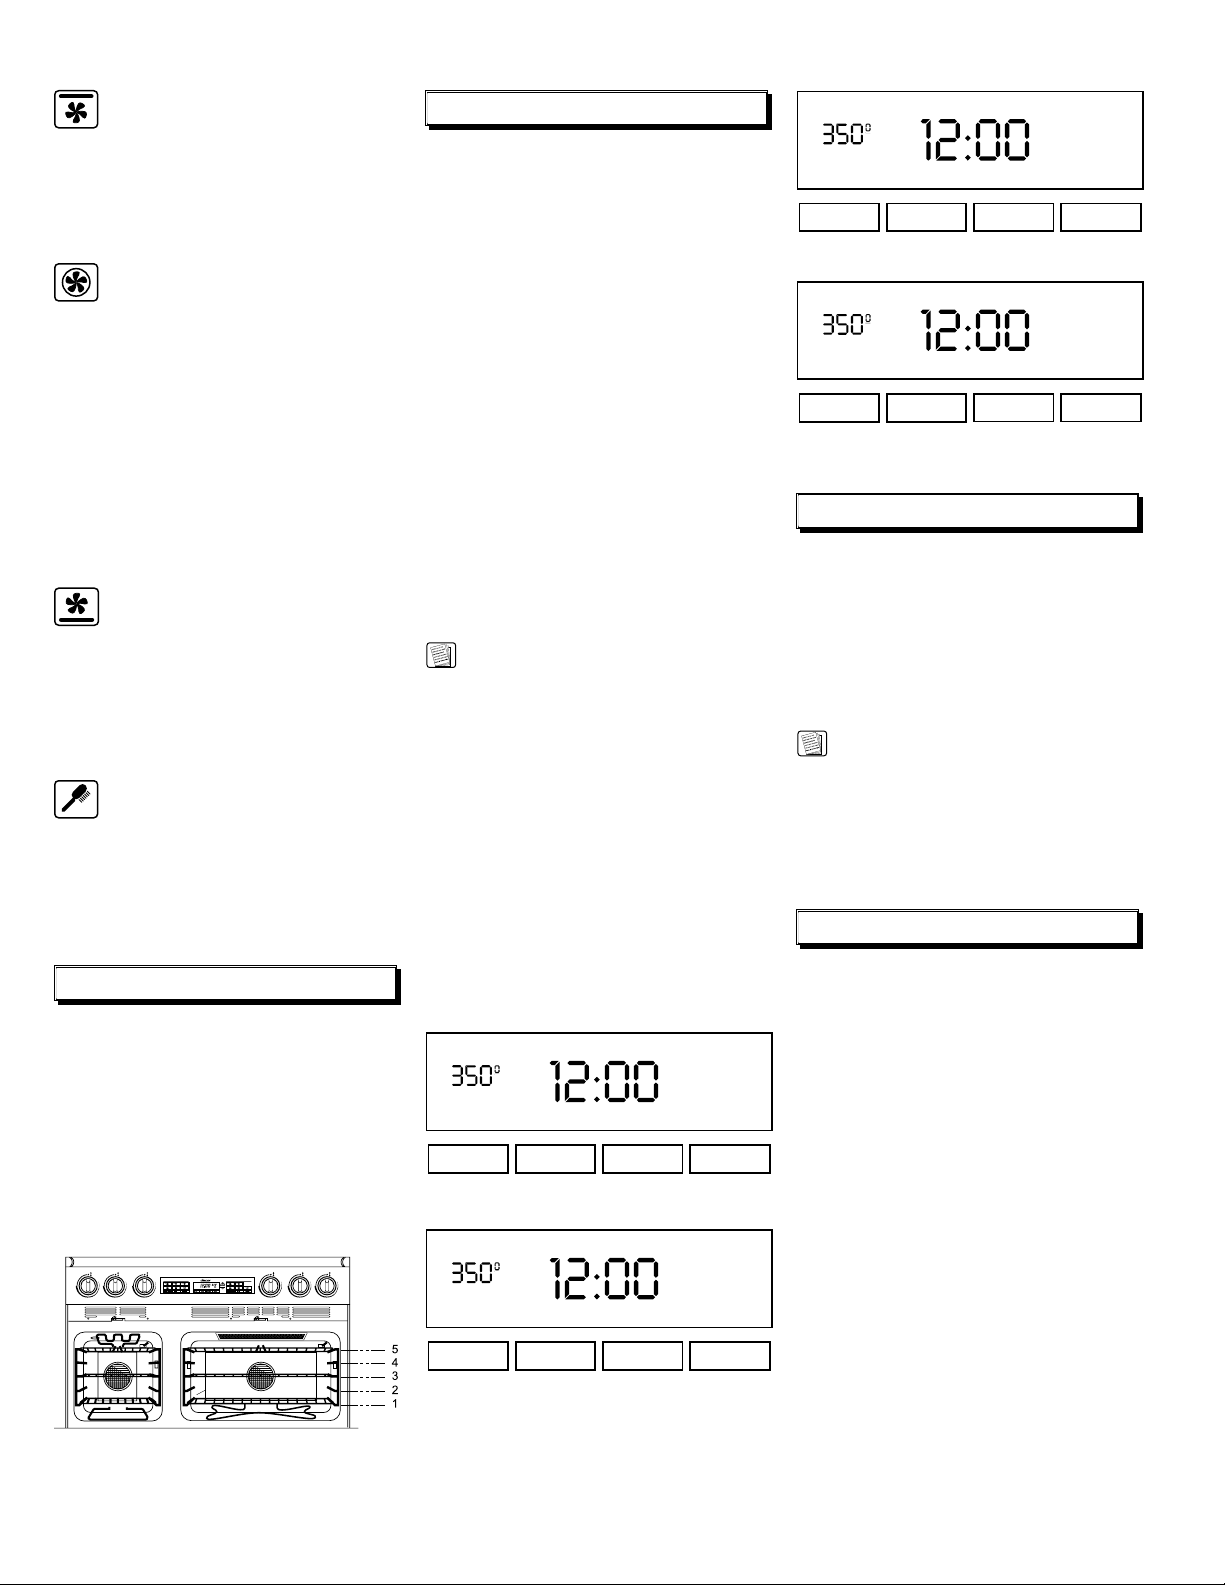
Oven Racks and Supports
Three chrome-plated oven racks are provided.
Always remember to position the racks prior to
heating the oven. Also, remove the oven racks
prior to self-cleaning to prevent permanent
discoloration of the racks
The porcelain rack supports provide five (5)
heights for positioning of the oven racks.
To install a rack, align the left and right edges of
the rack with the horizontal guide rails of the rack
supports, then slide the rack into the oven
Oven Rack Positions
(ERD48 Shown)
Oven Mode Selection
Follow these steps to operate the oven
modes:
1. Position oven rack(s) at the proper
height(s).
2. Press the touch pad for the modes of
your choice. The oven will beep once,
the selected cooking mode will flash, and
“– – –” will be displayed.
3. Press either the “+” or “–” pad. The default
temperature will be displayed.
4. To adjust the default temperature for
baking, press and hold the “TIME•TEMP”
pad. (Press “+” key to increase the
temperature setting, “–” to decrease.)
“PRE” and “ON” will appear in the
clock display, and the oven will begin
to heat. If in a convection mode, the
convection fan will turn on. Also, the
clock display will change from the desired
cooking temperature to the actual oven
temperature, starting with 135˚F. The
temperature display will increase in 5˚F
increments until the desired temperature is
reached. The cooling fan will turn on when
the oven temperature reaches 200˚F.
NOTE:
Do not place food inside the oven until the
Preheat cycle is complete.
When the desired temperature is attained, the
Preheat cycle is complete. The clock will beep
once and “PRE” and “ON” will disappear from
the display. (From this time forward, the “ON”
display will cycle on and off with the heating
elements.)
5. Carefully place the food onto the desired
rack(s) within the preheated oven.
6. It is recommended that a Minute Timer be
set to time the cooking process.
7. When the time expires and/or the
food is done cooking, press the
“CANCEL•SECURE” pad to turn off the
oven.
TIMER 1
CLOCK STOP TIME
TIMER 2
BAKE
ON
Clock Display
in Standard Bake
TIMER 1
CLOCK STOP TIME TIMER 2
ON
CONV
Clock Display
in Pure Convection™
TIMER 1 CLOCK STOP TIME TIMER 2
BAKE
ON
CONV
Clock Display
in Convection Bake
TIMER 1 CLOCK STOP TIME TIMER 2
CONV
BROIL
ON
Clock Display
in Convection Broil
(ERD48 left oven only)
Preheating the Oven
The oven features an automatic Preheat cycle
that rapidly brings the oven chamber up to
temperature. Simply by choosing a cooking
mode and setting a temperature, the oven will
automatically perform the Preheat function. The
Preheat cycle operates in Standard Bake, Pure
Convection™ and Convection Bake modes.
There is no Preheat cycle for the Broil or
Convection Broil modes.
NOTE:
Allowing the oven to completely pre-heat
prior to placing food in the oven will avoid
excessive browning of the food. After the
oven signals that the pre-heat is complete,
allow 3-5 more minutes for the heat patterns
to normalize in the oven and then place your
food inside.
Minute Times
The clock features two timers that may be used
for time cooking or other processes up to 11
hours, 50 minutes in length.
To use the Minute Timer function, follow
these steps:
1. Press the touch pad labeled “TIMER 1”, or
“TIMER 2”. The clock will display “00:00”,
and “TIMER 1”, or
“TIMER 2” will flash.
2. Press the “+” pad until the desired time is
displayed on the clock.
3. After “TIMER 1” has expired, the clock
will sound off with one second beeps and
“TIMER 1” will appear in the display. After
the “TIMER 2” minute timer has expired,
the clock will sound alternating one and
two second beeps and “TIMER 2” will
appear in the display. The beeper can be
silenced by pressing the “TIMER” touch
pad while the beeper is sounding.
 Loading...