


User Manual
Modernist Built-In Electric Wall Oven
DOB30M977S*
Part No. 112177 Rev A

Contents
Contents
Important information
Energy-saving tips
Safety information
What you need to know about safety instructions State of California Proposition 65 warning (US only) For your safety
Electrical safety Child safety Oven
Self-cleaning ovens Ventilating hood
Critical installation warnings Critical usage warning Usage cautions
Critical cleaning warnings
Introducing your new oven
Overview
What’s included with your oven
Operations
Control panel
Display
Water reservoir
Control lockout
Kitchen timer
Timed cooking
Delay start
Using the oven racks
Using the gliding rack
Using the temp probe
Oven functions
Setting the mode
Setting the temperature
Basic baking and broiling instructions
5
5
6
6
8
8
10
10
11
12
12
13
14
16
17
18
18
18
19
19
20
21
23
24
26
28
29
32
34
37
41
42
42
2 English

Using the special function feature Using the Chef Mode feature Using the iQ control feature Using the clean feature
Settings
Using the sabbath feature
Care and maintenance
are and cleaning of the oven Removing the oven doors Reinstalling the oven doors Changing the oven light
Troubleshooting
Information codes
Warranty and Service
Getting Help
Warranty
Regulatory Notice
Open Source Announcement
46
49
50
52
61
65
67
67
75
76
78
79
83
85
85
85
88
90
Contents
English 3

To Our Valued Customer:
Congratulations on your purchase of the very latest in Dacor® products! Our unique combination of features, style and performance make us The Life of the Kitchen™, and a great addition to your home.
In order to familiarize yourself with the controls, functions and full potential of your new Dacor Appliance, read this use and care manual thoroughly, beginning with the Important Safety Instructions section.
All Dacor appliances are designed and manufactured with quality and pride, while working within the framework of our company value. Should you ever experience a problem with your product, please first check the Troubleshooting section of this manual for guidance. It provides useful suggestions and remedies prior to calling for service.
Valuable customer input helps us to continuously improve our products and services, so please feel free to contact our Customer Service Team for assistance with any of your product support needs.
Dacor Customer Service Team
14425 Clark Avenue
City of Industry, CA 91745
Telephone: |
(800) 793-0093 |
Fax: |
(626) 403-3130 |
Hours of Operation: |
Monday through Friday 6:00 A.M. to 5:00 P.M. Pacific Time |
Website: |
www.Dacor.com |
Thank you for choosing Dacor for your home. We are a company built by families for families, and we are dedicated to serving yours. We are confident that your new Dacor product will deliver a high level of performance and enjoyment for many years to come.
Sincerely,
4 English

Important information
Clean the oven thoroughly before using it the first time. Then, remove the racks, set the oven to Bake at 400 °F for 1 hour. There will be a distinctive odor. This is normal.
The kitchen should be well ventilated during this conditioning session.
Energy-saving tips
• Leave the oven door closed except to turn food.
• For cook times over 30 minutes, you can turn the oven off 5-10 minutes early. The |
Important |
|
|
residual heat will finish cooking the food. |
|
• Plan your cooking schedule so you do not have to turn the oven off between items. |
|
• When possible, cook multiple items together. |
information |
|
English 5

information Safety
Safety information
Read and follow all directions before using your oven to avoid risk of fire, electric shock, personal injury, or other damage. Contact your service agent or the manufacturer about issues you do not understand or cannot resolve through troubleshooting (pg. 79).
What you need to know about safety instructions
Warnings and important safety instructions in this manual do not cover all possible conditions and situations that may occur. It is your responsibility to use common sense, caution, and care when maintaining, and operating your oven.
Important safety symbols and precautions
What the icons and signs in this user manual mean:
 WARNING
Hazards or unsafe practices that may result in severe personal injury or death.
 CAUTION
Hazards or unsafe practices that may result in minor personal injury or property damage.
6 English
CAUTION
To reduce the risk of fire, explosion, electric shock, or personal injury when using your oven, follow these basic safety precautions.
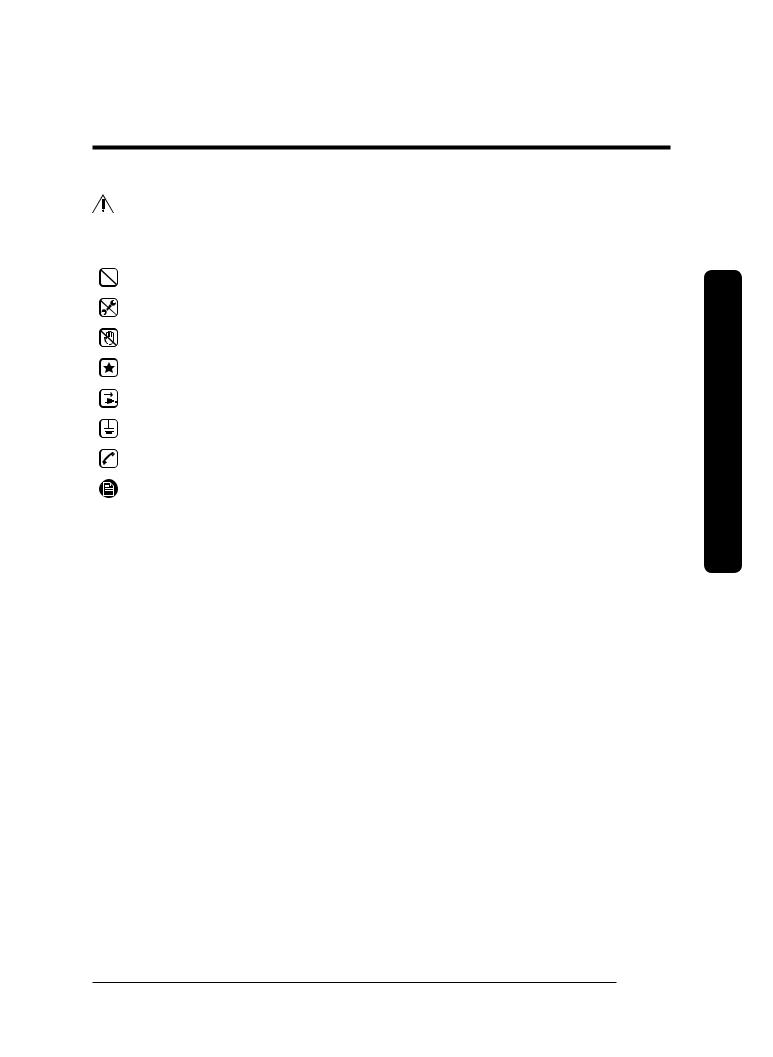
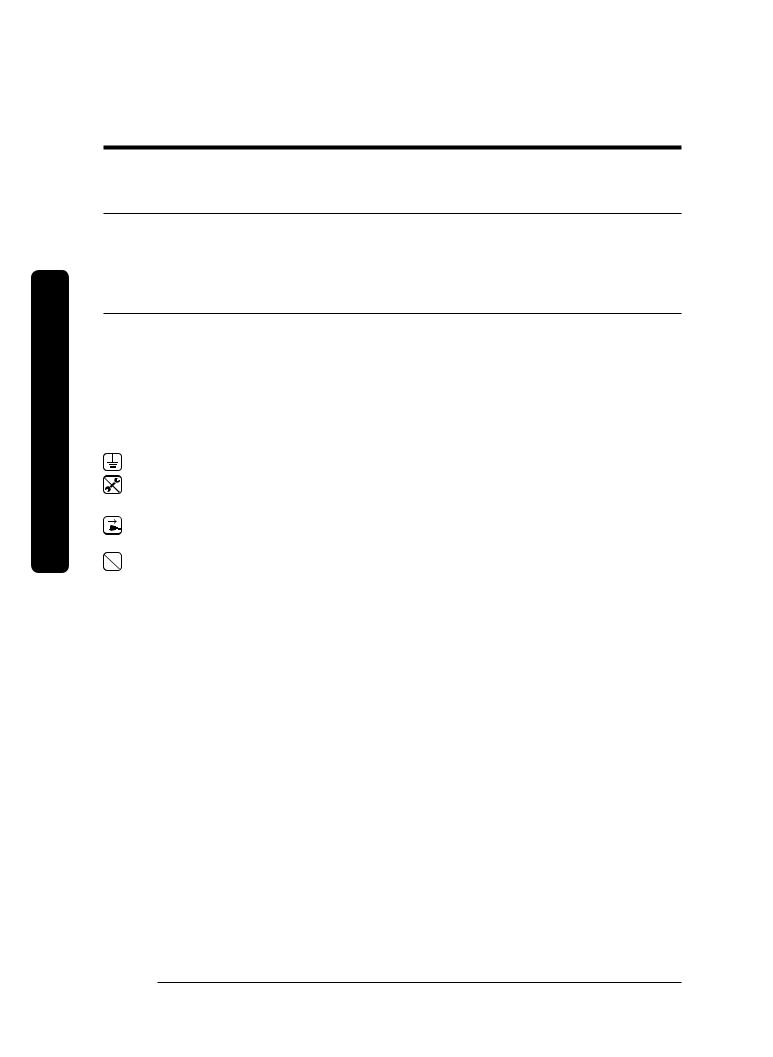
Do NOT attempt.
Do NOT disassemble.
Do NOT touch.
Follow directions explicitly.
Unplug the power plug from the wall socket.
Make sure the machine is grounded to prevent electric shock.
Call a Dacor Customer Service for help.
Note
Keep this manual in a convenient place for reference.
information Safety
English 7
information Safety
Safety information
State of California Proposition 65 warning (US only)
WARNING : This product contains chemicals known to the State of California to cause cancer and birth defects or other reproductive harm.
For your safety
When using electrical appliances, follow basic safety precautions, including:
 CAUTION
•Use the oven only as instructed in this manual.
•Potentially hot surfaces include the oven vent opening, surfaces near the opening, and crevices around the oven door.
Ensure the oven is properly installed and grounded by a qualified technician.
Do not repair/replace any components unless as specifically recommended in this manual. A qualified technician should perform all other service.
Before servicing the oven, remove power at the fusebox or circuit breaker.
•Do not leave children unattended around the oven when it is in use.
•Do not let children sit or stand on any part of the appliance.
•Do not use the oven as a space heater.
•Do not use water on grease fires. Turn off the oven to contain the flames. Smother the fire by closing the door, or use a dry-chemical, baking soda, or foam-type extinguisher.
•Avoid scratching or striking the glass doors and control panel. Do not use the oven is the door glass is damaged.
8 English

• If there is a fire in the oven during self-cleaning, turn the oven off, and wait for the fire to go out. Do not force the door open. Introducing fresh air at selfcleaning temperatures may cause a burst of flame from the oven.
• Oil buildup in the oven chamber is a fire hazard. Check periodically, and if you notice oil buildup, wipe up the oil with a paper towel or rag, then run a selfcleaning cycle before using the oven again.
• Do not keep flammable material (gasoline, plastic, clothing, paper) near the oven. |
|
|
• Remove all packing material before operating the oven. |
|
|
• Do not wear loose-fitting or hanging garments while using the appliance. |
Safety |
|
• Use only dry potholders. Placing moist or damp potholders on hot surfaces may |
||
|
||
cause steam burns. Do not let the potholder touch hot heating elements. Do not |
information |
|
substitute a towel or other bulky cloth for a potholder. |
||
|
||
• Do not let children play with any part of the oven. |
|
|
• Do not use high-pressure water cleaners or steam-jet cleaners on the oven. |
|
|
• A damaged power cord is an electric-shock hazard. Have the cord replaced by |
|
|
the manufacturer, its service agent, or an electrician. |
|
|
• The oven should not be operated by untrained users or anyone (including |
|
|
children) with reduced physical, sensory, or mental capacity, unless supervised |
|
|
by someone responsible for their safety. |
|
English 9

information Safety
Safety information
Electrical safety
• Use only the factory installed flexible power cord to connect to the power supply.
•The oven should be serviced only by qualified personnel. Repairs by unqualified persons may cause injury and oven malfunction, and may void the warranty. For service, contact a Dacor-authorized center.
•A flush-mounted oven should be operated only if installed in cabinetry that conforms to accepted safety standards as instructed in this manual.
•If your oven malfunctions, or if fractures, cracks, or splits appear:
-turn off and unplug the oven.
-contact Dacor Customer Service (pg. 4).
 WARNING
Turn off the oven before replacing the lamp to avoid the possibility of electric shock.
Child safety
 WARNING
•Children and infirm persons should only use the oven under the supervision of a responsible adult.
•Children should not be allowed to play with the oven.
•Keep children away from the oven door when opening or closing.
•During self-cleaning and even during normal use, oven surfaces get very hot. Keep children away from the oven during these times.
10 English
Oven
•DO NOT TOUCH THE HEATING ELEMENTS OR INTERIOR SURFACES. Heating elements may be hot even if dark in color. Interior surfaces become hot enough to cause severe burns. Do not touch or let clothing or other flammable materials touch the heating elements or interior oven surfaces unless those surfaces are cool to the touch. Other oven surfaces (e.g., oven vents and nearby surfaces , the oven door including the window) become hot enough to cause burns.
•Do not heat sealed food containers. Pressure buildup may burst the containers.
•Do not use the oven to dry newspapers.
•Do not the oven for storage.
• Open the oven door carefully to let out hot air or steam before removing food.
•Do not line the oven chamber or racks with aluminum foil. Doing so causes inefficient heating and creates fire and electric-shock hazards.
•To avoid a burn or fire risk, do not block the vents at the front base of the oven.
•Always adjust the racks when the oven is cool. If a rack must be moved while the oven is hot, use potholders (keeping them away from the heating element).
•Do not let aluminum foil or a meat probe touch the heating element.
•Do not clean the oven door glass with abrasive cleaners or sharp metal scrapers. These can mar the glass, possibly causing it to shatter in the future.
 CAUTION
Do not operate the oven during a power failure.
If the power fails, turn the oven off. If the oven is on when power returns, the oven may begin to operate again. Forgotten food may catch fire or spoil.
information Safety
English 11

Safety information
Self-cleaning ovens
|
Do not clean the door gasket. The door gasket is essential for a good seal. Care |
||
|
should be taken not to rub, damage, or move the gasket. |
||
|
• Fumes released during a self-clean cycle may be harmful or fatal to birds. Move |
||
|
|
birds to a well-ventilated room. |
|
|
• Before self-cleaning the oven, remove the divider, rack, utensils, and any food, |
||
|
|
and wipe away grease and food soil. (Excess grease may ignite, causing smoke |
|
Safety |
|
damage to your home.) |
|
|
the oven. |
||
information |
• |
Do not use commercial oven cleaner or oven protective coating anywhere on |
|
• |
If self-cleaning mode malfunctions, turn the oven off, and disconnect the power |
||
|
|||
supply. Have the oven serviced by a qualified technician.
Critical usage warning
 CAUTION
•If the oven is flooded by any liquid, call Dacor Customer Service (pg. 4). Failure to do so may result in electric shock or fire.
•If the oven emits a odd noise, burning smell, or smoke, unplug it immediately, and contact Dacor Customer Service. Failure to do so may result in electric shock or fire
•During use, do not touch the oven door, heating elements, or any hot surfaces.
•If material in the oven ignites, keep the oven door closed, turn off and unplug the oven, or shut off power at the fuse or circuit-breaker panel.
•Care remove the wrapping from hot food. Steam may billow out.
•Do not repair, disassemble, or modify the oven. For repair assistance, call Dacor Customer Service (pg. 4).
12 English
This page left blank intentionally
This page left blank intentionally

• Do not touch the power cord with wet hands.
• Do not turn the oven off while an operation is in progress.
• Do not insert fingers, foreign substances, or metal objects such as pins or needles into slots or holes in the oven.
• Do not modify the oven's construction or remove its outer shell. |
|
|
• Do not store or use the oven outdoors. |
|
|
• Use the oven only for cooking tasks consistent with residential use. |
|
|
• Do not heat sealed containers or food items with shells (eggs, nuts) in the oven. |
|
|
• Do not heat plastic or paper containers/wrapping in the oven. |
Safety |
|
• Do not strike the door or the oven chamber. |
||
|
||
• Do not hang on, slam, or yank the door. If the door is damaged, do not use the |
information |
|
oven. Call Dacor Customer Service(pg. 4). |
||
|
||
• Use oven mitts to touch cookware and oven surfaces during and just after |
|
|
cooking. |
|
English 15

information Safety
Safety information
Usage cautions
 CAUTION
• Oven-heated cookware is hot enough to burn. Handle with care.
•In removing coverings from hot cookware, direct steam away from exposed skin.
•Remove lids from baby food jars before heating. Afterward, stir the food well to distribute the heat evenly. Always taste-test the temperature before feeding the baby. The glass jar or the surface of the food may appear cooler than the interior, which can be hot enough to burn an infant’s mouth.
•Take care when heating liquids such as water or other beverages.
•Avoid using a slippery container with a narrow neck.
Wait at least 30 seconds after heating before removing the heated liquid. Failing to do so may result in an abrupt overflow of the contents and cause burns.
• Do not operate the appliance with wet hands.
•Do not spray volatile substances such as insecticide onto the surface of the appliance.
•Keep your face and body out of direct exposure to the hear when opening the door during cooking.
•Keep children away from the oven during cooking.
•Do not abruptly cool the door, oven chamber, or cookware by pouring water on/ in it during or just after cooking.
•Do not heat the oven while empty except for self-cleaning.
•Do not defrost beverages in narrow-necked bottles. The bottles can break.
•Do not let the food in the oven touch the heating element.
•Do not overheat food. Overheating food may result in fire.
•Take care not to pinch fingers or hands when opening or closing the door.
•The door reveals wires at the bottom for connecting LED lights. Take care not to damage the wires when handling the door.
16 English

Critical cleaning warnings
 CAUTION
• Do not spray water directly on the oven.
• Do not use substances such as benzene, thinner, or alcohol to clean the appliance. Discoloration, deformation, electric shock, or fire may result.
• When cleaning, take care not to injure yourself on the oven's sharp edges. |
|
|
• Do not clean the oven with a steam cleaner, which may corrode metal parts. |
Safety |
|
• Keep the oven chamber clean. Food residue can mar the finish and reduce |
||
|
||
oven inhibit oven function. |
information |
|
|
English 17

oven new your Introducing
Introducing your new oven
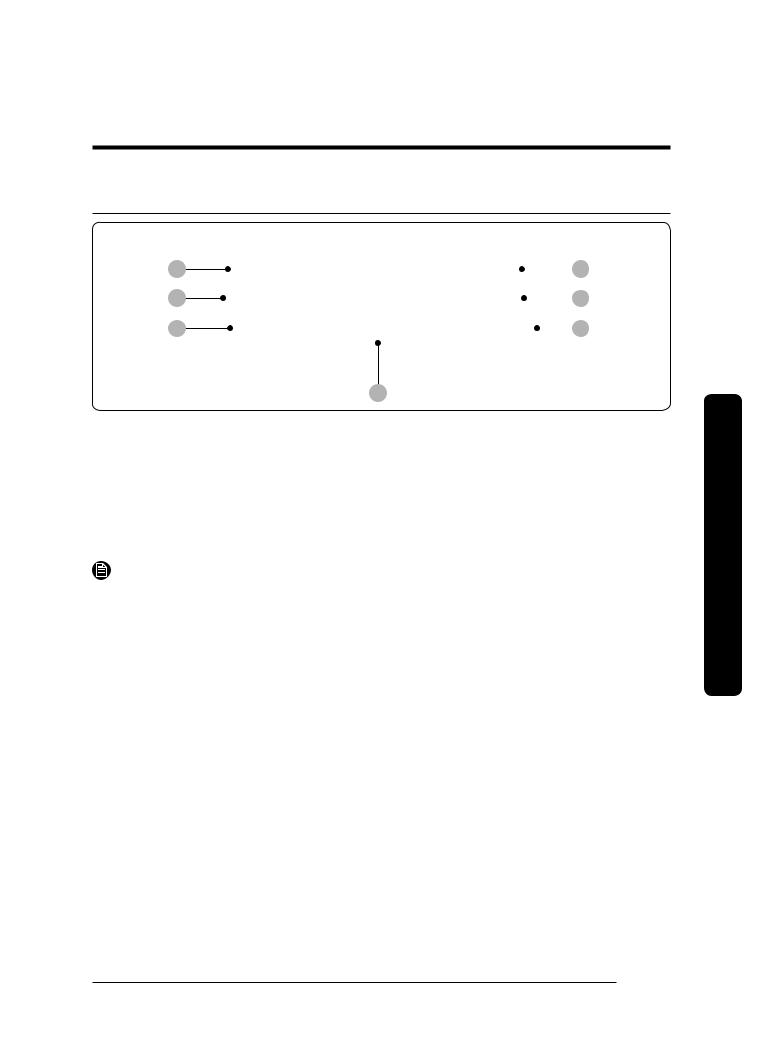
Overview
04 |
06 |
07 |
01
05 |
03 |
02
09 |
08 |
01 |
Oven control panel |
02 |
Oven door |
03 |
Oven gasket |
04 |
Halogen lamp* |
05 |
Door LED light |
06 |
Door latch |
07 |
Water reservoir |
08 |
Convection filter |
09 |
Rack support |
What’s included with your oven
Wire racks (1)* |
Gliding rack (2)* |
Temp probe (1)* |
 NOTE
NOTE
Accessories marked with an * can be purchased from Dacor Customer Service.
18 English
Operations
Control panel
|
01 |
|
|
TIMER |
|
OFF |
|
|
|
|
|
04 |
|
|
|
|
|
|
|
|
|
|
|||||
|
|
|
|
|
|
|
|
||||||
|
02 |
|
|
SETTINGS |
|
LIGHT |
|
|
|
|
|
05 |
|
|
|
|
|
|
|
|
|||||||
|
03 |
|
|
LOCK |
|
OPEN/CLOSE |
|
|
06 |
||||
|
|
|
(3sec) |
|
RESERVOIR |
|
|||||||
|
|
|
|
|
|
|
|
|
|
||||
|
|
|
|
|
|
|
|
|
|
|
|
|
|
|
|
|
|
|
|
|
|
|
|
|
|
|
|
|
|
07 |
|
|
|
|
|
|
|
|
|||
01 |
TIMER: Use to display the set Timer screen. |
|
|
|
|
|
|
|
|
||||
02 |
SETTINGS: Use to display the Setting screen. |
|
|
|
|
|
|
|
|
||||
03 |
LOCK (CONTROL LOCKOUT): Press-hold for 3 seconds to disable all oven functions. |
||||||||||||
04 |
OFF: Use to cancel when oven is cooking. |
|
|
|
|
|
|
|
|
||||
05 |
LIGHT: Use to turn the oven light on or off. |
|
|
|
|
|
|
|
|
||||
06 |
OPEN/CLOSE RESERVOIR: Touch to open or close the water reservoir. |
|
|
|
|||||||||
07 |
Display: Swipe to navigate the menus and tap to select a desired setting. |
||||||||||||
NOTE
You cannot operate the display while wearing gloves/mitts. Always touch the display with a bare finger.
Operations
English 19
Operations
Operations
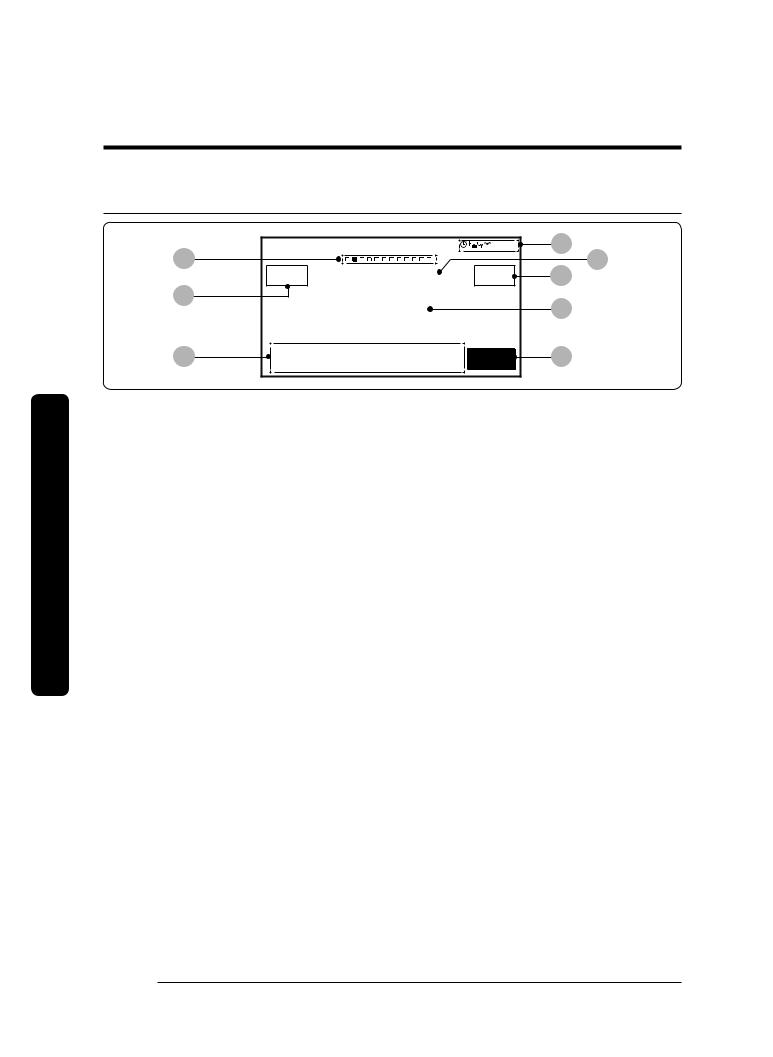
Display
|
|
|
|
|
|
4:35 PM |
01 |
02 |
OVEN |
|
|
|
|
View |
03 |
|
Convection Bake |
07 |
|||||
|
MODE |
Summary |
|||||
|
|
Faster, more even baking |
|
|
|||
08 |
|
|
325 |
°F |
|
|
|
|
|
|
|
|
|
||
|
|
|
|
|
|
04 |
|
05 |
Temp Probe Cook Time Delay Start |
InstantHeat™ |
|
06 |
|||
150° |
None |
None |
Off |
|
|||
|
|
|
|||||
01Indicator area
•Timer (
 ): When the timer is set, the timer indicator is displayed.
•Door lock ( ): Displayed when the oven door is locked.
•Wi-Fi ( ): Shows Wi-Fi signal strength. If Wi-Fi is disconnected,
  is appears.
•12-hour energy saving ( ): Displayed when 12-hour energy saving is turned on.
•Current time: The current time is displayed.
02 Page indicator: Shows location of current mode.
03 Mode: The current or selected menu is displayed with a mode description.
04Temperature: The current or selected temperature is displayed. When you tap this area, the temperature adjustment screen is displayed.
05Information area
•Temp Probe: Tap to show the Temp Probe screen.
•Cook Time: Tap to show the Cook Time screen.
•Delay Start: Tap to show the Delay Start screen.
•InstantHeat™: Shows that InstantHeat™ is on/off. (Convection Bake, Convection Roast modes only.)
•Steam: Tap to show the Steam Level screen. (Steam Bake, Steam Roast modes only.)
06 START: Tap to start the oven using the displayed settings. 07 View Summary: Tap to display the oven's cooking modes. 08 OVEN MODE: Tap to select an oven mode.
20 English
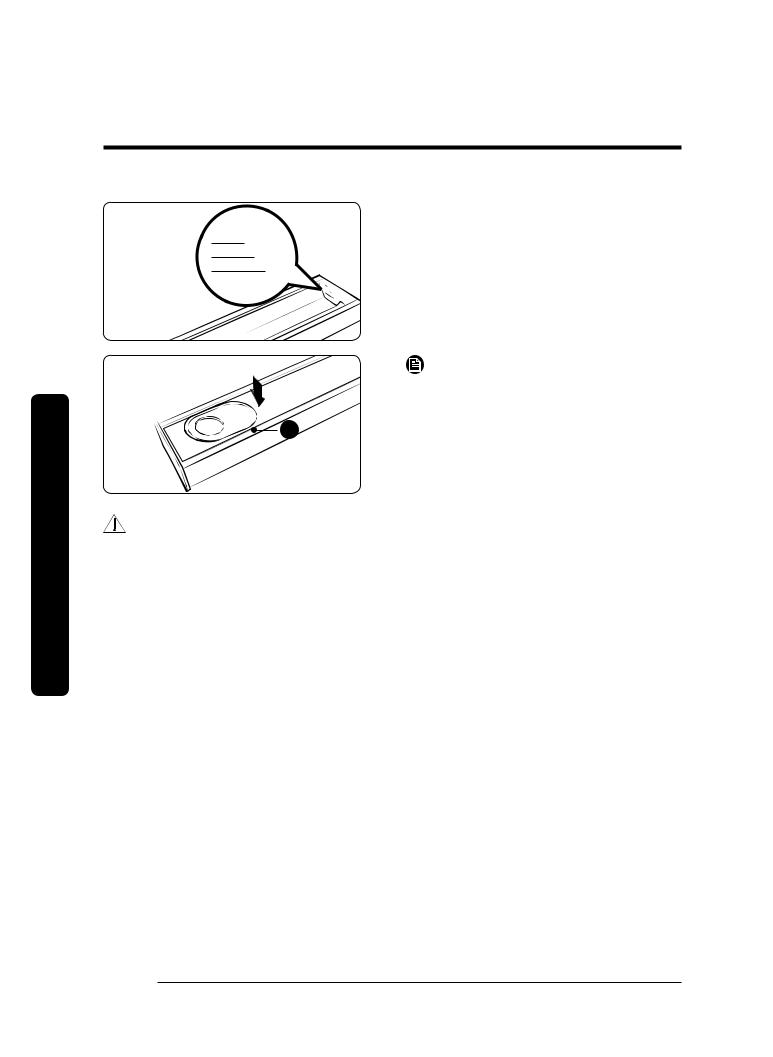
Water reservoir
The reservoir is used in Steam Bake and Steam Roast modes and to remove water scale left on the oven walls after steam-cooking modes.
1. Open the oven door. The reservoir is on the right-hand side of the oven
above the oven opening. On the control panel, touch OPEN/CLOSE RESERVOIR. The reservoir ejects. Pull the reservoirfrom its slot.
2. Open the reservoir cap, and fill it
with 22 oz (650ml) of drinkable water.
 NOTE
NOTE
You could also remove the rubber cap.
3. Replace the cap (or plastic top), and slide the reservoir into its slot. A soft click indicates it is seated correctly.
4. Touch OPEN/CLOSE RESERVOIR. The oven retracts the reservoir.
5. Close the oven door.
Operations
English 21
Operations
Operations
Max 0.5L
0.3L
A
 NOTE
NOTE
Do not exceed the max line.
NOTE
Close the cap and top portion of the reservoir (A) before using the oven.
CAUTION
The reservoir heats up during cooking. Wear oven mitts to remove/refill the reservoir.
22 English

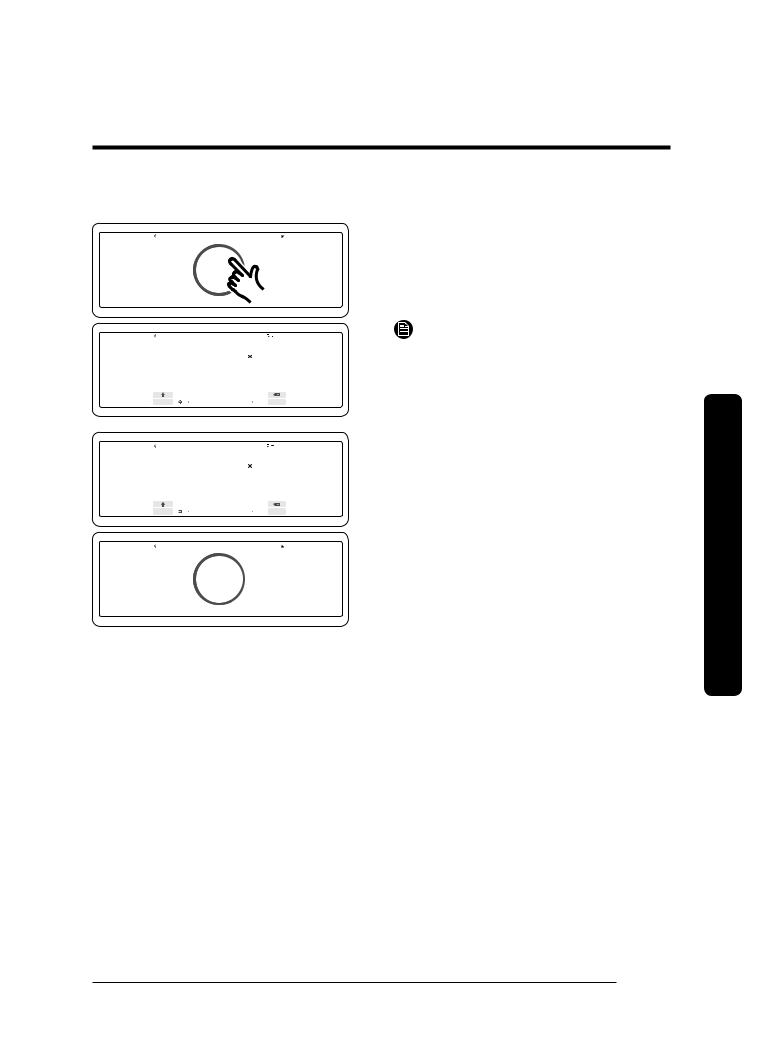
Control lockout
Control lockout lets you lock touchpad buttons to prevent undesired changing of the controls. This feature also locks the oven door(s). Control lockout must be activated when the oven is in Standby mode.
How to activate Control Lockout
|
|
|
|
|
4:35 PM |
|
TIMER |
|
MODE |
Convection Bake |
|
OFF |
|
|
|
OVEN |
|
|
|
|
|
|
|
Faster, more even baking |
|
|
|
|
|
|
|
|
||
SETTINGS |
|
|
325°F |
|
LIGHT |
|
|
|
|
Cook Time Delay Start |
InstantHeat™ |
|
OPEN/CLOSE |
|
|
|
|
RESERVOIR |
||
|
|
|
None None |
Off |
|
|
|
|
|
|
|
||
|
|
|
|
|
|
|
|
4:35 PM |
|
TIMER |
|
OFF |
SETTINGS |
Child Lock |
LIGHT |
|
|
|
LOCK |
|
OPEN/CLOSE |
(3sec) |
|
RESERVOIR |
|
|
|
 NOTE
NOTE
1.Cancel or turn off all functions.
2.Touch LOCK for 3 seconds.
•The display changes to the Child Lock screen, and the control lock confirmation appears at the bottom of the screen.
•Control Lockout is available only when the oven temperature is under 400 °F.
•All other functions must be cancelled before you activate Control Lockout.
How to unlock the controls
TIMER |
OFF |
SETTINGS |
LIGHT |
|
OPEN/CLOSE |
|
RESERVOIR |
1.Touch LOCK for 3 seconds. The control lock confirmation and the lock icon disappear.
 NOTE
NOTE
It may take up to 10 seconds for the doors to unlock.
Operations
English 23

Operations
Operations
Kitchen timer
This timer beeps when the set time elapses. It does not start/stop cooking functions. You can use the kitchen timer with any oven function.
How to set the timer
1. Touch TIMER. The display changes
|
|
|
4:35 PM |
|
to the timer screen. |
Convection Bake |
|
OFF |
|||
|
|
||||
Faster, more even baking |
|
|
|
||
|
325°F |
|
LIGHT |
|
|
Cook Time |
Delay Start |
InstantHeat™ |
|
OPEN/CLOSE |
|
|
RESERVOIR |
|
|||
None |
None |
Off |
|
|
|
|
|
|
|||
|
|
|
|
|
|
|
Timer |
|
TIMER |
|
OFF |
SETTINGS |
+ |
LIGHT |
|
Add |
|
LOCK |
|
OPEN/CLOSE |
(3sec) |
|
RESERVOIR |
|
|
|
|
|
4:35 PM |
TIMER |
0 hr |
00 min |
OFF |
||
|
|
||||
SETTINGS |
|
|
|
|
LIGHT |
LOCK |
1 |
2 |
3 |
4 |
OPEN/CLOSE |
(3sec) |
6 |
7 |
8 |
9 |
RESERVOIR |
|
|
||||
|
|
|
Timer |
|
+ ADD |
TIMER |
|
|
|
|
OFF |
SETTINGS |
|
|
|
|
LIGHT |
LOCK |
|
|
|
|
OPEN/CLOSE |
(3sec) |
|
DELETE |
|
RESERVOIR |
|
|
|
|
|
||
|
|
|
Timer |
|
+ ADD |
TIMER |
|
|
|
|
OFF |
SETTINGS |
|
|
|
|
LIGHT |
LOCK |
|
|
|
|
OPEN/CLOSE |
(3sec) |
|
DELETE |
|
RESERVOIR |
|
|
|
|
|
||
2.Tap + Add timer.
3.Tap the numbers on the touchpad to set the time (from 1 sec to 23 hr 59 min 59 sec).
4.Tap START. When the time elapses, the oven beeps, and the display shows the timer has finished.
•You can pause, reset, or delete the timer at any time by touching the screen.
24 English
How to change timer name
|
|
|
|
|
|
|
|
|
|
Timer |
|
|
|
|
+ ADD |
|
||||
TIMER |
|
|
|
|
|
|
|
|
|
|
|
|
|
|
|
|
|
|
|
OFF |
SETTINGS |
|
|
|
|
|
|
|
|
|
|
|
|
|
|
|
|
|
|
|
LIGHT |
|
|
|
|
|
|
|
|
|
|
|
|
|
|
|
|
|
|
|
||
LOCK |
|
|
|
|
|
|
|
|
|
|
|
|
|
|
|
|
|
|
|
OPEN/CLOSE |
(3sec) |
|
|
|
|
|
DELETE |
|
|
|
|
|
|
|
|
|
|
|
RESERVOIR |
||
|
|
|
|
|
|
|
|
|
|
|
|
|
|
|
|
|
|
|||
|
|
|
|
|
|
|
|
|
|
|
|
|
|
|
|
|
|
|
|
|
|
|
|
|
|
|
|
|
|
|
|
|
|
|
|
|
|
|
|
|
|
|
|
|
|
|
|
|
|
|
|
|
|
|
|
|
|
|
|
|
4:35 PM |
|
|
|
|
|
|
|
|
|
Enter timer name. |
|
|
|
|
|
|
|
|||||
TIMER |
|
|
|
|
|
Timer 01 |
|
|
|
|
|
|
|
|
|
OFF |
||||
|
|
|
|
|
|
|
|
|
|
|
|
|
|
|
|
|||||
SETTINGS |
|
|
|
|
|
|
|
|
|
|
|
|
|
|
|
|
|
|
|
LIGHT |
|
q 1 |
|
w 2 |
|
e 3 |
r 4 |
|
t 5 |
y 6 |
u 7 |
|
i |
8 |
o 9 |
|
p 0 |
|
|||
LOCK |
|
a |
- |
s |
@ |
|
d * |
f |
^ |
g |
: |
|
h ; |
j |
( |
k |
) |
l |
~ |
OPEN/CLOSE |
(3sec) |
|
|
|
z |
/ |
|
x ‘ |
c |
“ |
v |
: |
|
b , |
n ? |
m ! |
|
|
RESERVOIR |
||
|
?123 ... |
|
|
|
|
|
|
English |
|
|
|
. ... |
|
OK |
|
|||||
|
|
|
|
|
|
|
|
|
|
|
|
|
|
|
|
|
|
|
|
|
|
|
|
|
|
|
|
|
|
|
|
|
|
|
|
|
|
|
|
4:35 PM |
|
|
|
|
|
|
|
|
|
Enter timer name. |
|
|
|
|
|
|
|
|||||
TIMER |
|
|
|
|
|
Chicken |
|
|
|
|
|
|
|
|
|
|
OFF |
|||
|
|
|
|
|
|
|
|
|
|
|
|
|
|
|
|
|
||||
SETTINGS |
|
|
|
|
|
|
|
|
|
|
|
|
|
|
|
|
|
|
|
LIGHT |
|
q 1 |
|
w 2 |
|
e 3 |
r 4 |
|
t 5 |
y 6 |
u 7 |
|
i |
8 |
o 9 |
|
p 0 |
|
|||
LOCK |
|
a |
- |
s |
@ |
|
d * |
f |
^ |
g |
: |
|
h ; |
j |
( |
k |
) |
l |
~ |
OPEN/CLOSE |
(3sec) |
|
|
|
z |
/ |
|
x ‘ |
c |
“ |
v |
: |
|
b , |
n ? |
m ! |
|
|
RESERVOIR |
||
|
?123 ... |
|
|
|
|
|
|
English |
|
|
|
. ... |
|
OK |
|
|||||
|
|
|
|
|
|
|
|
|
|
|
|
|
|
|
|
|
|
|||
|
|
|
|
|
|
|
|
|
|
Timer |
|
|
|
|
+ ADD |
|
||||
TIMER |
|
|
|
|
|
|
|
|
|
|
|
|
|
|
|
|
|
|
|
OFF |
SETTINGS |
|
|
|
|
|
|
|
|
|
|
|
|
|
|
|
|
|
|
|
LIGHT |
|
|
|
|
|
|
|
|
|
|
|
|
|
|
|
|
|
|
|
||
LOCK |
|
|
|
|
|
|
|
|
|
|
|
|
|
|
|
|
|
|
|
OPEN/CLOSE |
(3sec) |
|
|
|
|
|
DELETE |
|
|
|
|
RESET |
|
|
|
|
|
RESERVOIR |
|||
|
|
|
|
|
|
|
|
|
|
|
|
|
|
|
|
|||||
|
|
|
|
|
|
|
|
|
|
|
|
|
|
|
|
|
|
|
|
|
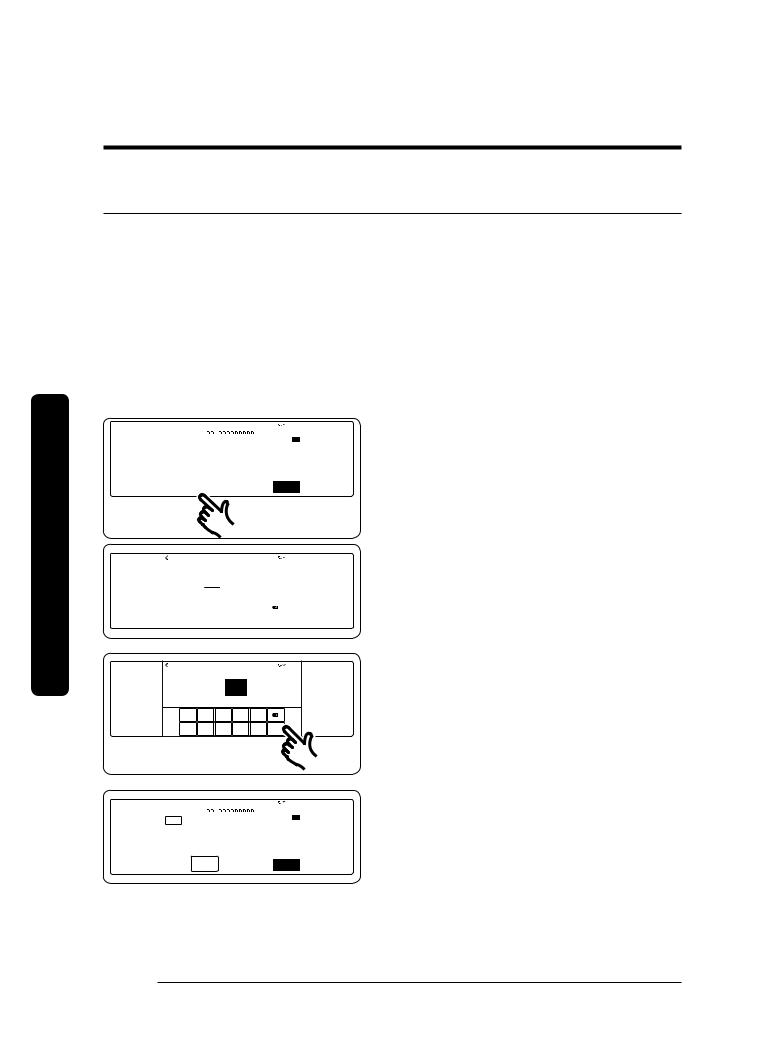
You can change the timer name to identify what you are timing, for example, a chicken defrosting.
1. Tap the timer name area.
•The keyboard appears.
NOTE
•You can name the timer in a max of 13 characters.
2.Tap the keyboard to set the new timer name.
•The display shows the changed timer name.
Operations
English 25

Operations
Operations
Timed cooking
In this mode, the oven turns on immediately and cooks for the length of time you set. At the end of the cooking time, the oven turns off automatically.
You can use Timed Cooking only with another cooking mode (Bake, Convection Bake, Convection Roast, Pure Conv. Sear, Convection Broil, Steam Bake, Steam Roast, Dual Four Part Pure Convection, Proof, Stone Bake Mode, Dehydrate).
How to set the oven for timed cooking
|
|
|
|
|
4:35 PM |
|
TIMER |
|
MODE |
Convection Bake |
|
OFF |
|
|
|
OVEN |
|
|
|
|
|
|
|
|
Faster, more even baking |
|
|
|
|
|
|
|
|
|
SETTINGS |
|
|
|
325°F |
|
LIGHT |
LOCK |
|
Cook Time |
Delay Start InstantHeat™ |
|
OPEN/CLOSE |
|
(3sec) |
|
|
RESERVOIR |
|||
|
|
|
|
Off |
|
|
|
|
|
|
|
|
|
|
|
|
|
|
|
|
|
|
|
|
|
|
|
|
|
|
4:35 PM |
|
|
|
|
|
|
Set cooking time |
|
|
|
|
||
TIMER |
|
|
|
|
|
|
|
|
|
|
OFF |
|
|
|
0 |
hr 00 min |
|||||||
|
|
|
|
|
|||||||
SETTINGS |
|
|
|
|
|
|
|
|
|
|
LIGHT |
|
|
|
|
|
|
|
|
|
|
|
|
LOCK |
|
1 |
2 |
|
3 |
4 |
5 |
|
|
OPEN/CLOSE |
|
(3sec) |
|
6 |
7 |
|
8 |
9 |
0 |
OK |
|
RESERVOIR |
|
|
|
|
|
|
|||||||
|
|
|
|
|
|
|
|
|
|
|
|
|
|
|
|
|
|
|
|
|
|
|
|
|
|
|
|
|
|
|
|
|
|
|
|
|
|
|
|
|
|
|
|
|
|
4:35 PM |
|
|
|
|
|
|
Set cooking time |
|
|
|
|
||
TIMER |
|
|
|
|
|
|
|
|
|
|
OFF |
|
|
|
0 |
hr |
|
|
|
|
|||
|
|
|
|
|
|
|
|
|
|||
SETTINGS |
|
|
|
|
|
|
|
|
5:05PM |
LIGHT |
|
|
|
|
|
|
|
|
|
|
|
||
|
|
|
|
|
|
|
|
|
|
|
|
LOCK |
|
1 |
2 |
|
3 |
|
|
|
|
OPEN/CLOSE |
|
(3sec) |
|
6 |
7 |
|
8 |
|
|
|
|
RESERVOIR |
|
|
|
|
|
|
|
|
|
||||
|
|
|
|
|
|
|
|
|
|
|
|
|
|
|
|
|
|
|
|
|
|
|
|
1.Swipe to the desired cooking mode.
2.Tap Cook Time. The display changes to the Set Cooking Time screen.
3.Tap numbers on the touchpad to
set the cooking time (from 1 min to 9 hr and 59 min).
|
|
|
|
|
4:35 PM |
|
|
|
|
Set cooking time |
|
|
|
TIMER |
|
|
1 hr |
45 min |
OFF |
|
|
|
|
|
|||
SETTINGS |
|
|
|
|
Ready at 5:05PM |
LIGHT |
|
|
|
|
|
|
|
LOCK |
1 |
2 |
3 |
4 |
5 |
OPEN/CLOSE |
(3sec) |
6 |
7 |
8 |
9 |
0 |
RESERVOIR |
|
|
|||||
26 English

TIMER |
|
MODE |
Convection Bake |
OFF |
||
|
|
OVEN |
|
|
|
|
|
|
|
|
Faster, more even baking |
|
|
|
|
|
|
|
||
SETTINGS |
|
|
|
|
325°F |
LIGHT |
LOCK |
|
Cook Time |
Delay Start |
InstantHeat™ |
OPEN/CLOSE |
|
(3sec) |
|
RESERVOIR |
||||
|
|
1hr 45min None |
Off |
|||
|
|
|
||||
|
|
|
|
|
|
|
CAUTION
•The cook time appears in the Cook Time area of the screen.
•Cancel the cook time at any time by setting the Cook Time to 0 minutes.
You can use timed cooking and delay start to cook cured or frozen meats, and most fruits and vegetables.
Food that spoils easily (e.g., eggs, fish, meat, poultry) should be chilled in the refrigerator first. Even so, it should sit in the oven no longer than 1 hour before cooking starts and should be removed promptly when done.
Eating spoiled food can cause food poisoning.
Operations
English 27
Operations
Operations
Delay start
In this mode, the oven timer turns the oven on at your preset time. At the same time, you can set the oven to turn off automatically via the Timed Cooking function.
•You can use Delay Start only with another cooking operation (Bake, Convection Bake, Convection Roast, Pure Conv. Sear, Steam Bake, Steam Roast, Dual Four Part Pure Convection, Proof, Stone Bake Mode, Dehydrate, Self clean, GreenClean™).
•You can set Delay Start before setting other cooking operations.
•The oven clock must be set to the current time.
How to set the oven for delay timed cooking
|
|
|
|
|
4:35 PM |
|
TIMER |
|
MODE |
Convection Bake |
|
OFF |
|
|
|
OVEN |
|
|
|
|
|
|
|
|
Faster, more even baking |
|
|
|
|
|
|
|
|
|
SETTINGS |
|
|
|
325°F |
|
LIGHT |
LOCK |
|
Cook Time |
Delay Start InstantHeat™ |
|
OPEN/CLOSE |
|
(3sec) |
|
|
RESERVOIR |
|||
|
|
None |
|
|
||
|
|
|
|
|
||
|
|
|
|
|
|
|
|
|
|
|
|
|
|
|
|
|
4:35 PM |
|
|
|
|
|
|
Set start time |
|
|
|
|
||
TIMER |
|
|
4 |
: |
35 PM |
|
|
OFF |
|||
|
|
|
|
|
|
|
|
AM |
|
|
|
SETTINGS |
|
|
|
|
|
|
|
|
|
|
LIGHT |
|
|
|
|
|
|
|
|
|
|
|
|
LOCK |
|
1 |
2 |
3 |
|
4 |
5 |
|
|
OPEN/CLOSE |
|
(3sec) |
|
6 |
7 |
8 |
|
9 |
0 |
OK |
|
RESERVOIR |
|
|
|
|
|
|
|||||||
|
|
|
|
|
|
|
|
|
|
|
|
|
|
|
|
|
|
|
|
|
|
|
|
1.Place the food in the oven.
2.On the control screen, swipe to the desired cooking operation.
3.Set the cook time if you want the oven to turn off automatically. (See Timed cooking, pg. 26.)
4.Tap Delay Start. The current time appears as the first entry.
|
|
|
|
|
4:35 PM |
|
5. Tap numbers on the touchpad to set |
|
|
|
Set start time |
AM |
|
the oven start time. |
|
TIMER |
|
|
5 : |
35 PM |
OFF |
|
|
SETTINGS |
|
|
|
|
|
LIGHT |
|
LOCK |
1 |
2 |
3 |
4 |
5 |
OPEN/CLOSE |
|
(3sec) |
6 |
7 |
8 |
9 |
0 |
RESERVOIR |
|
|
|
|
|||||
|
|
|
|
|
|
• The Delay Start screen closes. The start |
|
|
|
|
4:35 PM |
|
|
TIMER |
OVEN |
Convection Bake |
|
OFF |
time (and, if you set it) the cook time |
|
SETTINGS |
MODE |
|
LIGHT |
are displayed. |
||
|
|
325°F |
|
|||
|
|
Faster, more even baking |
|
|
|
|
LOCK |
Cook Time |
Delay Start |
InstantHeat™ |
|
OPEN/CLOSE |
|
(3sec) |
|
RESERVOIR |
|
|||
|
1hr 45min 5:35 PM |
Off |
|
|
||
|
|
|
|
|||
|
|
|
|
|
|
|
28 English
 Loading...