


Installation Instructions
Modernist / Heritage Built-In Dish Washer
DDW24M99* Series
DDW24T99* Series
DACOR_DW9500M_DD68-00197A-01_EN.indd 1 |
|
|
2017-08-23 8:54:48 |
|
|
||
|
|
|
|

Contents
Installation
|
What’s included |
|
|
Installation requirements |
|
Contents |
Dimensions and specifications |
|
Step-by-step installation |
||
|
2 English
3
3
7
9
11
DACOR_DW9500M_DD68-00197A-01_EN.indd 2 |
|
|
2017-08-23 8:54:48 |
|
|
||
|
|
|
|

Installation
Follow these instructions carefully to ensure proper installation of the dishwasher and to prevent accidents when washing dishes.
What’s included
Make sure all the parts are included in the product package. If you have a question about the dishwasher or the parts, contact a local Dacor customer center or your retailer. The actual appearance of the dishwasher may differ, depending on your model and country.
 CAUTION
After unpacking the dishwasher, keep the packaging materials out of children’s reach to ensure their safety.
DDW24T999BB/DA
Installation
Top brackets (2 ea) |
Ø4 X 12 screws |
Protective sticker |
Sub foot |
|
(6 ea) |
|
|
Custom panel |
Ø4 X 43 screws |
Ø4 X 20 screws |
Ø4 X 16 screws |
fixers (wood panel |
(4 ea) |
(2 ea) |
(2 ea) |
holders, 2 ea) |
|
|
|
Rubber skirt
English 3
DACOR_DW9500M_DD68-00197A-01_EN.indd 3 |
|
|
2017-08-23 8:54:49 |
|
|
||
|
|
|
|

Installation
Installation
DDW24M999**, DDW24T998US/DA
Top brackets (2 ea) |
Ø4 X 12 screws |
Protective sticker |
Sub foot |
|
(6 ea) |
|
|
Torx flat head |
|
Ø4 X 8 screws |
Kick plate brackets |
Kick plate |
||||||||||||||||||||||||||||||||
screws (for the top |
|
|
|
|
|
|
(2 ea) |
(2 ea) |
|
|||||||||||||||||||||||||||
brackets, 2 ea) |
|
|
|
|
|
|
|
|
|
|
|
|
|
|
|
|
|
|
|
|
|
|||||||||||||||
|
|
|
|
|
|
|
|
|
|
|
|
|
|
|
|
|
|
|
|
|
|
|
|
|
|
|
|
|
|
|
|
|
|
|
|
|
|
|
|
|
|
|
|
|
|
|
|
|
|
|
|
|
|
|
|
|
|
|
|
|
|
|
|
|
|
|
|
|
|
|
|
|
|
|
|
|
|
|
|
|
|
|
|
|
|
|
|
|
|
|
|
|
|
|
|
|
|
|
|
|
|
|
|
|
|
|
|
|
|
|
|
|
|
|
|
|
|
|
|
|
|
|
|
|
|
|
|
|
|
|
|
|
|
|
|
|
|
|
|
|
|
|
|
|
|
|
|
|
|
|
|
|
|
|
|
|
|
|
|
|
|
|
|
|
|
|
|
|
|
|
|
|
|
|
|
|
|
|
|
|
|
|
|
|
Badge |
Badge |
(for modernist |
(for heritage model) |
model) |
|
Installation kit (not provided)
Electrical tape & |
Hot water line |
90°Fitting (3⁄4") |
Tube fittings |
Standard duct tape |
|
|
|
Hose clamp |
Air gap |
Rubber connector |
Teflon tape or |
|
|
|
sealing compound |
 WARNING
Do not use plastic tubing. Plastic tubing can deteriorate over time and cause a leak inside the tube fitting.
4 English
DACOR_DW9500M_DD68-00197A-01_EN.indd 4 |
|
|
2017-08-23 8:54:50 |
|
|
||
|
|
|
|
NOTE |
|
|
• For the hot water line, we strongly recommend using 3⁄8" minimum O.D. copper tubing |
|
|
with a compression fitting or a flexible stainless steel braided hot water supply line. |
|
|
• You also need a 90°Fitting with 3⁄4" N.P.T. external pipe threads on one end and a fitting |
Installation |
|
sized to fit your hot water line (copper tubing/compression fitting or braided hose) on |
||
|
||
the other. |
|
|
• For the power cable, we recommend a jacketed grounded 12-2 cable. Note that some |
|
|
local codes may require the cable to have a BX style metal jacket. |
|
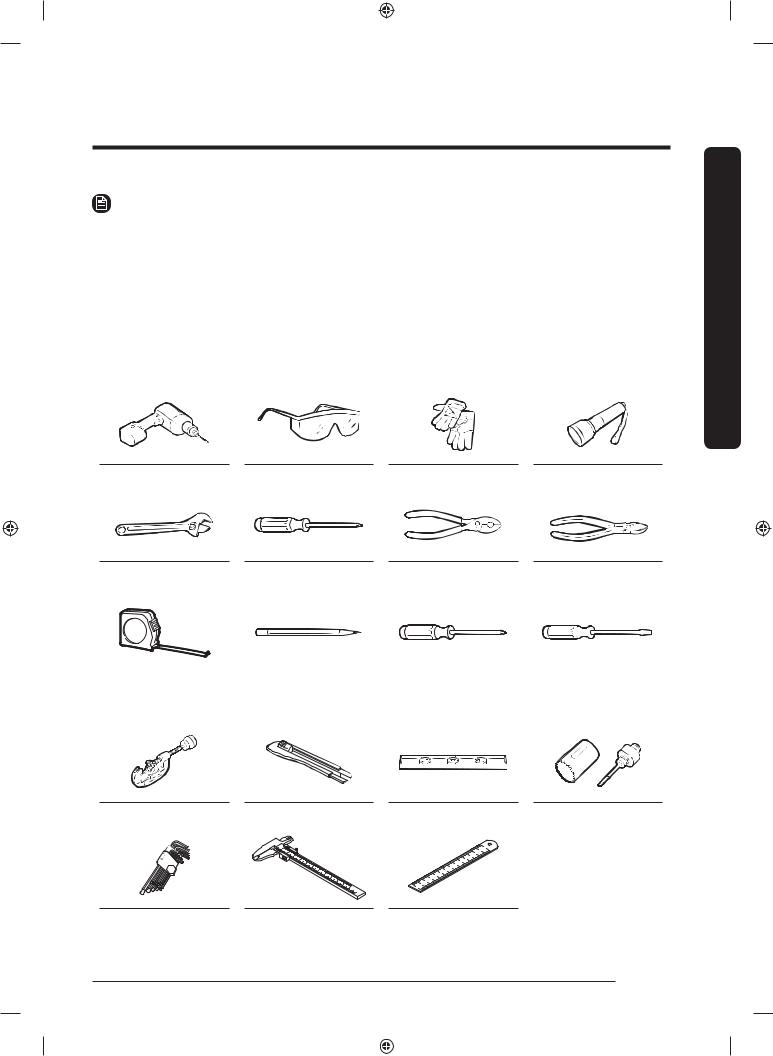
Tools required (not provided)
Electric drill |
Safety glasses |
Gloves |
Flashlight |
Adjustable wrench |
|
Torx T20 |
|
Pliers |
|
Nipper |
||
|
|
|
|
|
|
|
|
|
|
|
|
|
|
|
|
|
|
|
|
|
|
|
|
|
|
|
|
|
|
|
|
|
|
|
|
Tape measure |
Pencil |
Phillips screwdriver |
Flat head |
|
|
|
screwdriver |
Tubing cutter |
Cutting knife |
Level |
Hole saw |
Hex L-wrench |
Vernier calipers |
Steel ruler |
English 5
DACOR_DW9500M_DD68-00197A-01_EN.indd 5 |
|
|
2017-08-23 8:54:51 |
|
|
||
|
|
|
|

Installation
Installation
Unpacking
Unpack the dishwasher in an open area free of obstruction. We recommend keeping all the packing materials until the dishwasher is completely installed.
1. Position the carton right-side-up with the top arrows pointing upwards.
2. Unbuckle or cut the straps securing the packaging.
3. Unpack the product packaging with care.
4. Inspect every component for any signs of damage.
5. Locate and set aside the dishwasher's kick plate. The kick plate is attached beside of the dishwasher.
6. Lift the dishwasher from the packing material, and then place it on the floor.
 NOTE
NOTE
•There are also packing materials inside the dishwasher. Leave them in place until the dishwasher is installed.
•Do not remove the sound-absorbent padding that surrounds the exterior of the dishwasher.
6 English
DACOR_DW9500M_DD68-00197A-01_EN.indd 6 |
|
|
2017-08-23 8:54:51 |
|
|
||
|
|
|
|

Installation requirements
To prevent a risk of fire, electric shock, or personal injury, all wiring and grounding must be done by a qualified technician.
Power supply
•To prevent the risk of fire, electric shock, or personal injury, all wiring and grounding must be performed in accordance with the National Electrical
Code ANSI/FNPA, No. 70 Latest Revision and local codes and ordinances. It is the personal responsibility of the appliance owner to provide adequate electrical service for this appliance.
•When preparing for installation, make sure that your power supply provides an individual 120 Volt, 60 Hz branch circuit serving only your dishwasher with a 15 AMP fuse or circuit breaker.
•Your dishwasher must be grounded. If your dishwasher malfunctions or breaks down, grounding will reduce the risk of electric shock by providing a path of least resistance for the electric current.
 WARNING
•Do not use an extension cord.
•Use only the power plug that comes with the dishwasher.
Grounding
For permanent grounding, the dishwasher must be properly grounded to a grounded metal or permanent wiring system. The grounding conductor must be run with the circuit conductors and then connected to the grounding terminal or lead on the dishwasher.
 WARNING
•Do not connect the ground wire to plastic plumbing, gas lines, or hot water pipes. Improperly connected grounding conductors may cause electric shock.
•Do not modify the power plug of the dishwasher. If the power plug does not fit the outlet, have a proper outlet installed by a qualified electrician.
Installation
English 7
DACOR_DW9500M_DD68-00197A-01_EN.indd 7 |
|
|
2017-08-23 8:54:52 |
|
|
||
|
|
|
|

Installation
Installation
Water supply
•The hot water supply line must support water pressures between 20 psi and 120 psi (140-830 kPa).
•Water temperatures must be between 120 °F (49 °C)and 149 °F (65 °C).
To reduce a risk of leaks:
•Make sure water taps are easily accessible.
•Turn the water tap off when the dishwasher is not in use.
•Check for any leaks at the water hose fittings on a regular basis.
Flooring
For safety, the dishwasher must be installed on a solidly constructed floor. Wooden floors may need to be reinforced to minimize vibrations. Avoid installing on carpet or soft tile. Carpeting and soft tile may cause vibrations and may cause your dishwasher to move slightly while operating.
 WARNING
Do not install the dishwasher on a poorly supported structure.
8 English
DACOR_DW9500M_DD68-00197A-01_EN.indd 8 |
|
|
2017-08-23 8:54:52 |
|
|
||
|
|
|
|

Dimensions and specifications
Dishwasher
DDW24M99* Series (Modernist)
239/16" (598 mm) |
32 |
5 |
⁄ |
16 |
mm)3476-" |
1 |
⁄ |
2 |
8-(820 " |
Front view
DDW24T99* Series (Heritage)
239/16" (598 mm)
1 76 5 8-(820 "2⁄ 34-"mm)16⁄ 32
Front view
223⁄4" (578 mm)
201⁄2" (520 mm)
25⁄8"(67 
 mm) 23⁄4" (70 mm)
Side view
223/4" (578 mm)
201⁄2" (520 mm)  (DDW24T999BB/DA)
(60 23⁄8" |
(152 6" |
mm) |
mm) |
2" (50 mm) |
|
Side view
Installation
English 9
DACOR_DW9500M_DD68-00197A-01_EN.indd 9 |
|
|
2017-08-23 8:54:52 |
|
|
||
|
|
|
|

Installation
Installation
Cabinet
233/4" (603.0 mm) minimum
24" (610 mm)
minimum
822( " ⁄1087934-mm)- " ⁄632 16 16
•This dishwasher is designed to be enclosed on the top and on both sides by a standard, residential kitchen cabinet.
•The installation enclosure must be clean and free of any obstructions.
•The enclosure must be at least 233/4" inches wide, 24 inches deep, and 326/16" inches high.
•For the front door of the dishwasher to be flush with the leading edge of the countertop, the countertop must be at least 24 inches deep.
Specifications
Specifications are subject to change without notice for improved quality. The actual appearance of the dishwasher may differ from the illustrations in this manual.
Power supply |
120 V, 15 A, 60 Hz AC |
|
|
|
|
Water pressure |
20 - 120 psi (140 - 830 kPa) |
|
|
|
|
|
DDW24M999UM / DDW24M999US / DDW24T998US : |
|
Dimensions |
239/16" X 235/16-341/2" X 223/4 (598 X 820 - 876 X 578mm) |
|
(Width x Height x Depth) |
DDW24T999BB : |
|
|
239/16” X 325/16" - 341/2" X 22 3/4" (598 X 820 - 876 X 578 mm) |
|
Minimum inlet water |
120 °F (49 °C) |
|
temperature |
||
|
||
|
|
10 English
DACOR_DW9500M_DD68-00197A-01_EN.indd 10 |
|
|
2017-08-23 8:54:52 |
|
|
||
|
|
|
|
Step-by-step installation
The installation procedure may differ depending on the model.
STEP 1 Select a location
Select a location that meets the following conditions.
•The location must have a solid floor that can support the weight of the dishwasher.
•The location must be near a sink (9.8 ft/3 m) with easy access to the water supply, drain system, and electrical outlet.
•The location must let you load dishes into the dishwasher easily.
•The location must have sufficient space for the dishwasher door to open easily and provide enough space between the dishwasher and the cabinet sides (at least 0.1 inch/2 mm).
•The rear wall must be free of obstructions.
Installation in a new location
A
If you install the dishwasher in a new location, follow these instructions before installing the dishwasher.
1.Using a hole saw, cut a hole into the side of the cabinet that holds the sink (A).
2.If the base inside the sink cabinet is raised above the kitchen floor and is higher than the connections on the dishwasher, make a hole in the base inside the cabinet and in the cabinet side (B).
NOTE
•If you are replacing an old dishwasher, check the existing connections for compatibility with the new dishwasher and replace the connections as needed.
•You may need to cut a hole in the opposite side of the cabinet according to the location of the electrical outlet.
B
English 11
Installation
DACOR_DW9500M_DD68-00197A-01_EN.indd 11 |
|
|
2017-08-23 8:54:53 |
|
|
||
|
|
|
|

Installation
3. Clean the bottom of the countertop.
Installation
4. Attach the protective sticker as shown.
12 English
DACOR_DW9500M_DD68-00197A-01_EN.indd 12 |
|
|
2017-08-23 8:54:53 |
|
|
||
|
|
|
|

STEP 2 Connect the hot water line
• The water line pressure must be between 20 psi and 120 psi (140–830 kPa). |
|
|||
• Make sure that the water temperature is delivered between 120 °F and 149 °F (49- |
|
|||
60 °C). Exceeding this limit may cause the dishwasher to malfunction. |
Installation |
|||
• Make sure that the circuit breaker and water valve is turned off before connecting the |
||||
|
||||
water supply line to the dishwasher. |
|
|
||
• Make sure the water line is properly connected. Wrap Teflon tape around every |
|
|||
connection and joint to prevent water leaks. |
|
|
||
|
|
1. Insert the 3⁄4" 90-degree fitting into the |
|
|
3⁄16" |
(5 mm) |
inlet valve. Tighten the fitting until it |
|
|
points towards the water-hose channel |
|
|||
|
|
|
||
|
|
in the base of the dishwasher. Do not |
|
|
|
|
overtighten. |
|
|
|
|
|
|
|
2.Connect the hot water line to the fitting.
3.If you want to secure the dishwasher to the side wall for extra stability,
Water valve
bend the brackets of the left and right housings by referring to the figure.
Inlet valve |
90° elbow |
Hot water line |
|
fitting |
|
English 13
DACOR_DW9500M_DD68-00197A-01_EN.indd 13 |
|
|
2017-08-23 8:54:53 |
|
|
||
|
|
|
|

Installation
STEP 3 Arrange the hoses
Installation
1.Arrange the power cable and the drain hose so that they move together.
2.Gently move the dishwasher to the installation space under the sink. While moving the dishwasher, pull any excess portions of the water line, drain hose, and power cable into the space.
 NOTE
NOTE
For DDW24M99** models, go to Step 6.
 CAUTION
Use caution not to kink or step on the power plug or the hoses.
14 English
DACOR_DW9500M_DD68-00197A-01_EN.indd 14 |
|
|
2017-08-23 8:54:53 |
|
|
||
|
|
|
|
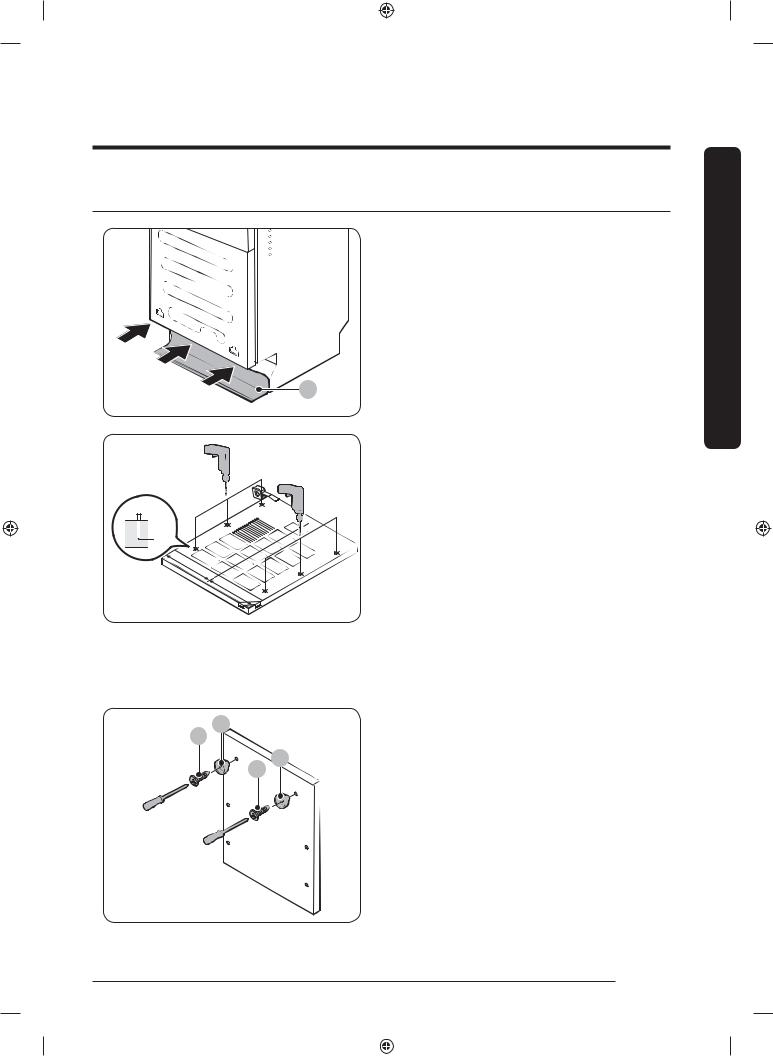
STEP 4 Install the custom panel (FBI models only (DDW24T999BB/DA))
1. Insert the supplied rubber skirt (A) into the 3 holes at the bottom of the door.
Installation
A
Ø 2
 10-12
10-12
2. Put the installation template on the back of the custom panel and fix it temporarily using transparent tape.
Note that the rear of the custom panel will be attached to the dishwasher door.
 CAUTION
• The top end of the custom panel must be aligned with the top end of the installation template.
• Use a custom panel between 7 lbs and
20lbs.
3.Pre-drill the 6 points marked on the installation template using a 2-pi drill bit to a depth of 10 -12 mm.
4.Remove the installation template and
B |
|
tighten the custom panel fixers (B) at |
|
C |
|
||
|
the top with 2 screws (C, Ø4 X 20) as |
||
|
|
B |
|
|
C |
shown. |
|
|
|
||
English 15
DACOR_DW9500M_DD68-00197A-01_EN.indd 15 |
|
|
2017-08-23 8:54:54 |
|
|
||
|
|
|
|

Installation
Installation
|
|
|
|
5. While holding the custom panel, attach |
B |
|
|
it to the door and insert the custom |
|
|
|
|
|
panel fixers (B) into the corresponding |
|
|
|
|
holes at the top of the door as shown. |
|
|
|
|
6. Push the custom panel downward to |
|
|
|||
|
|
|
|
fix. |
|
|
|
|
7. Cut the rubber skirt (A) using a cutting |
|
|
|
|
knife so that it is aligned with the |
|
|
|
|
front line of the dishwasher, which is |
|
|
|
|
represented as a dashed line. |
|
|
|
|
A |
|
|
|
|
|
|
|
|
|
|
|
|
|
|
8. Pull out the dishwasher from the |
|
|
|
|
cabinet, and then adjust the spring |
|
|
|
|
screw on the upper-right side of the |
|
|
|
|
dishwasher according to the weight |
|
|
|
|
of the custom panel. Refer to the table |
|
|
|
|
below. |
|
|
|
16.5-20 lbs (7.5-9 kg) |
|
|
|
|
15-16.5 lbs (7-7.5 kg) |
|
|
|
|
13-15 lbs (6-7 kg) |
|
|
|
|
11-13 lbs (5-6 kg) |
|
|
|
|
0-11 lbs (0-5 kg) |
|
|
|
|
|
|
Recommended spring levels
Level |
Weight of the custom panel |
|
|
Level 1 |
0-11 lbs (0-5 kg) |
|
|
Level 2 |
11-13 lbs (5-6 kg) |
|
|
Level 3 |
13-15 lbs (6-7 kg) |
|
|
Level 4 |
15-16.5 lbs (7-7.5 kg) |
|
|
Level 5 |
16.5-20 lbs (7.5-9 kg) |
|
|
16 English
DACOR_DW9500M_DD68-00197A-01_EN.indd 16 |
|
|
2017-08-23 8:54:54 |
|
|
||
|
|
|
|

9.Open the door and remove the
2 screws in the middle of the door.
 CAUTION
Use caution when opening the door. The door might open or close unexpectedly if the spring level is not adjusted appropriately, resulting in physical injury.
10.Secure the custom panel to the door by fastening the 4 screws (Ø4 X 43).
Installation
English 17
DACOR_DW9500M_DD68-00197A-01_EN.indd 17 |
|
|
2017-08-23 8:54:54 |
|
|
||
|
|
|
|

Installation
Installation
STEP 5 Install the door handle (DDW24T998US/DA only)
1. Loosen the hex nuts on the bar handle if they are blocking the circle holes.
NOTE
Blocking (X) Non-Blocking (O)
Before installing the door handle, pull out the dishwasher from the cabinet and check if the spring level is set on 4.
 16.5-20 lbs (7.5-9 kg)
 15-16.5 lbs (7-7.5 kg)
 13-15 lbs (6-7 kg)
 11-13 lbs (5-6 kg)
 0-11 lbs (0-5 kg)
2. Fit the bar handle into the 2 handle bolts on the door. Make sure the nut side of the handle faces downwards.
3. Tighten the hex nuts through the holes on both sides of the handle using the hex wrench.
4. Grab and move the bar handle slightly to check if the handle is fixed properly.
18 English
DACOR_DW9500M_DD68-00197A-01_EN.indd 18 |
|
|
2017-08-23 8:54:55 |
|
|
||
|
|
|
|

Checkpoints |
|
|
|
|
|
|
Bar handle / Outer door |
|
|
||
|
(Tools: Vernier callipers, steel ruler) |
|
|||
A |
|
Explanation |
Gap |
Installation |
|
B |
B |
||||
|
|||||
|
|
|
|||
|
A |
Left/Right |
2" (50.5 mm) |
|
|
C |
B |
Up/Down |
35⁄8" (91.8 mm) |
|
|
|
C |
All |
0" (0.1 mm) |
|
|
STEP 6 Attach the badge |
|
|
|
|
|
|
Attach the badge to the dishwasher’s door |
|
|||
|
as shown. |
|
|
||
91⁄2" (242 mm) |
|
|
|
|
|
23⁄16" (54 mm) |
|
|
|
||
DDW24M99* Series (Modernist)
95⁄8" (244 mm) |
25⁄16" (59 mm) |
DDW24T99* Series (Heritage)
English 19
DACOR_DW9500M_DD68-00197A-01_EN.indd 19 |
|
|
2017-08-23 8:54:55 |
|
|
||
|
|
|
|

Installation
Installation
STEP 7 Level the dishwasher
|
|
|
You can adjust the height of the |
|
|
|
|
dishwasher to level it. Note that in these |
|
|
|
|
steps, the dishwasher is currently inserted |
|
|
|
|
halfway. |
|
|
|
|
1. Use the level to check if the dishwasher |
|
(0-45 mm) |
(45-60 mm) |
|
|
is level. |
|
2. To adjust the front height, use the |
|||
|
|
normal sub foot for less than a 13⁄4" |
||
|
|
height, or the tall-kitchen sub foot for |
||
13⁄4"-0 |
23⁄8"-13⁄4" |
|
|
heights between 13⁄4" and 23⁄8". |
|
|
|
|
|
Normal |
|
Tall-kitchen |
• |
To lower the height, turn the foot |
|
|
|
clockwise. |
|
|
|
|
|
|
|
|
|
• To raise the height, turn the foot |
|
|
|
|
|
counter clockwise. |
|
|
|
3. To adjust the rear height, insert the |
|
|
|
|
|
Torx T20 screwdriver in the bottom |
|
|
|
|
center of the dishwasher. |
|
|
|
• To lower the height, turn the |
|
|
|
|
|
screwdriver clockwise. |
|
|
|
• To raise the height, turn the |
|
|
|
|
|
screwdriver counter clockwise. |
|
|
|
4. Leave at least a 3⁄16" space between the |
|
|
|
|
|
top of the dishwasher and the bottom |
|
|
|
|
of the countertop. |
Min. |
|
|
|
|
3⁄16" |
|
|
|
|
(5 mm) |
|
|
|
|
|
|
|
5. When levelling is complete, check if the |
|
|
|
|
|
door opens and closes properly. |
20 English
DACOR_DW9500M_DD68-00197A-01_EN.indd 20 |
|
|
2017-08-23 8:54:55 |
|
|
||
|
|
|
|
STEP 8 Secure the dishwasher
Correct positioning
Before securing the dishwasher, make sure the dishwasher is positioned in the center.
Installation
To the countertop
You can use the brackets to secure the dishwasher to the countertop. Alternatively, you can drill the side holes to secure the dishwasher to the cabinet sides.
1.Put a large towel on the bottom of the dishwasher (covering the sump) to prevent wood shavings or screws from falling into the dishwasher sump.
2.Insert the provided brackets into the top front holes of the dishwasher as shown.
3.Insert the dishwasher fully into place under the countertop.
English 21
DACOR_DW9500M_DD68-00197A-01_EN.indd 21 |
|
|
2017-08-23 8:54:55 |
|
|
||
|
|
|
|
Installation
Installation
Ø 2
~12
22 English
4.If the installation brackets on the front of the dishwasher are too long cut them down using a pliers.
5.Carefully drill 2 screw holes into the bottom of the countertop from beneath,
one for each countertop bracket.
•Make sure the hole you drill is smaller than the diameter of the screw.
6.Insert the provided screws into the hole of brackets, and then tighten to secure the dishwasher to the countertop.
 NOTE
NOTE
Use a magnetic screwdriver to help prevent screws from falling into the dishwasher.
7.Insert the provided screws into the brackets, and then tighten to secure the dishwasher to the countertop.
NOTE
•If the provided brackets are too long, cut them down using pliers.
•Use a magnetic screwdriver to help prevent screws from falling into the dishwasher.
8.Connect the water hose, but do not open the water tap until installation is complete.
DACOR_DW9500M_DD68-00197A-01_EN.indd 22 |
|
|
2017-08-23 8:54:56 |
|
|
||
|
|
|
|

To the side walls
3⁄16" (5 mm)
1.Put a large towel on the bottom of the dishwasher (covering the sump) to prevent wood shavings or screws from falling into the dishwasher sump.
2.To prevent damage to the drain hose through the water supply line, slightly pull out the dishwasher and bend the built-in ear brackets of the left and right housings by 3⁄16" (5 mm). When done, reinsert the dishwasher with its center aligned.
 NOTE
NOTE
Skip this process if you have performed it in Step 2 above.
3.Remove the side spacer caps with a flat-head screwdriver.
4.Drill one hole into both sides of the kitchen cabinet, totaling 2 screw holes.
•Make sure the hole you drill is smaller than the diameter of the screw.
•Make sure the drill bit does not strike the sides of the spacer cap holes.
5.Tighten the provided screws into the holes to secure the dishwasher to the cabinet.
English 23
Installation
DACOR_DW9500M_DD68-00197A-01_EN.indd 23 |
|
|
2017-08-23 8:54:56 |
|
|
||
|
|
|
|

Installation
Installation
STEP 9 Connect the drain hose
There are several ways to insert the drain hose into the drain hose connector of the sink. You must connect the drain hose in accordance with the water pipe installation regulations in your region.
Air gap

 Hose
Hose
clamp


 Drain hose
Hose clamp
Without disposal |
With an air gap/without disposal |
Without an air gap |
Drain system with no waste-disposal
Air gap


 Hose
Hose
clamp


 Drain hose
Hose clamp
With disposal |
With an air gap/with disposal |
Without an air gap |
Drain system with a waste-disposal
24 English
DACOR_DW9500M_DD68-00197A-01_EN.indd 24 |
|
|
2017-08-23 8:54:57 |
|
|
||
|
|
|
|

|
|
|
|
|
|
|
|
|
|
|
|
|
|
|
|
|
|
|
|
|
|
|
|
|
|
|
|
|
|
|
|
|
|
|
|
|
|
|
1 in. |
|
|
|
|
|
|
|
5⁄8 in. |
||||
|
||||||||||||
|
|
|
|
|
|
|
||||||
(25 mm) |
|
7⁄8 in. (16 mm) |
||||||||||
|
|
|
(22 mm) |
|||||||||
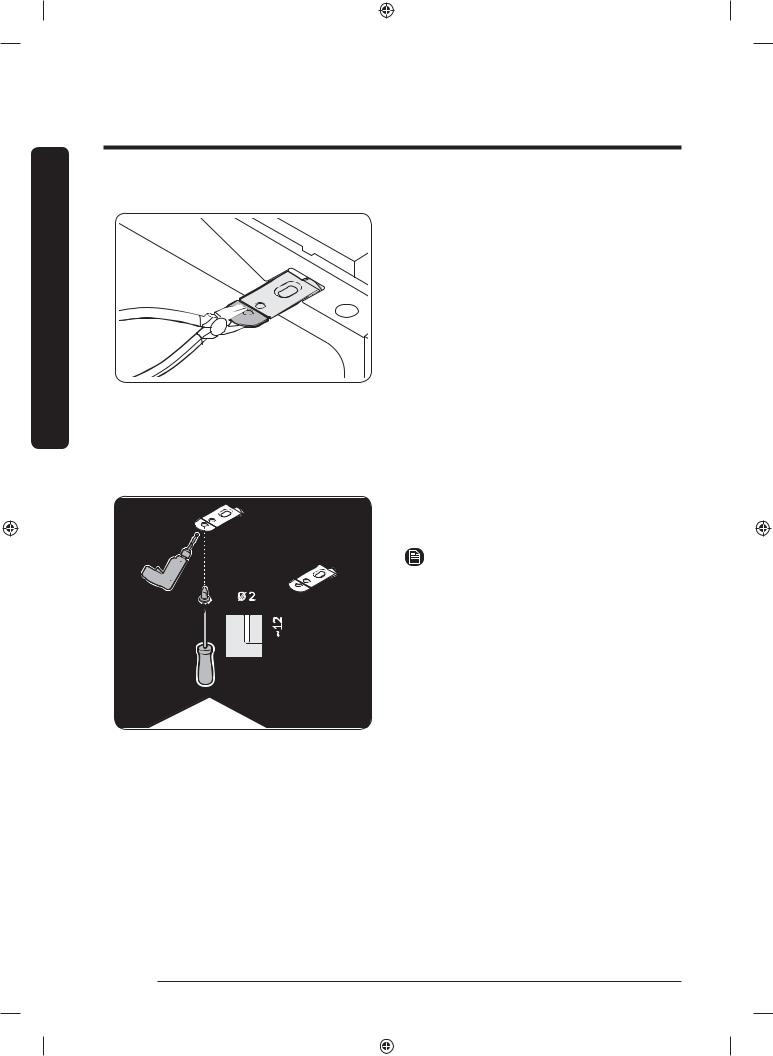
1.Check the size of the sink’s drain hose connector. If needed, cut the drain hose so its end fits into the sink connector.
NOTE |
Installation |
|
If the drain hose does not fit into the sink |
||
|
||
connector, you can purchase an adaptor at |
|
|
a plumbing/hardware store. |
|
2.Insert the drain hose into the sink connector, slide the hose clamp to the end of the hose, and then tighten the hose clamp.
3.If the sink does not have an air gap, detach the hose holder from the dishwasher, and then cut off the protruding part from the holder as shown.
English 25
DACOR_DW9500M_DD68-00197A-01_EN.indd 25 |
|
|
2017-08-23 8:54:57 |
|
|
||
|
|
|
|

Installation
Installation
|
Dishwasher |
4. When drilling a hole for the drain hose |
|
Sink |
on the cabinet wall, use caution not to |
||
|
|||
|
|
damage the drain hose on the sharp |
|
|
|
edges of the hole. |
|
Drain |
|
- On wooden walls, use sand paper to |
|
hose |
|
soften the edges. |
|
Min. 20 in. |
|
- On metal walls, use insulation tape |
|
|
or duct tape to cover the sharp |
||
(508 mm) |
|
||
|
|
edges around the hole. |
|
|
|
5. Secure the drain hose to the sink wall |
|
|
|
using cable ties or other fastening |
|
|
|
materials. |
 CAUTION
•Use caution not to damage the drain hose when installing the dishwasher.
•Install the drain system properly so that the drain hose does not disconnect from the drain outlet in the draining process.
•Make sure that the drain hose, supply hose, or power cord is not kinked or folded.
26 English
DACOR_DW9500M_DD68-00197A-01_EN.indd 26 |
|
|
2017-08-23 8:54:57 |
|
|
||
|
|
|
|

STEP 10 Final check
1. |
Remove all foam, paper packaging, and unnecessary parts from inside the dishwasher. |
|
2. |
Turn the circuit breaker on. |
Installation |
6. |
Check if the dishwasher turns on normally and if there are any water leaks while the |
|
3. |
Open the water valve to supply water to the dishwasher. |
|
4. |
Plug in the dishwasher. |
|
5. |
Turn the dishwasher on, and then select and run a cycle. |
|
|
dishwasher is operating. Make sure to check for water leaks on both ends of the water |
|
|
line and the drain hose connector. |
|
7. |
Check if the kick plate gasket is attached to the bottom of the kick plate. To install the |
|
|
kick plate, see the Kick plate section below. |
|
To fix leaks
You may encounter leaks during the final check. If this is the case, follow these instructions.
1.If an information code of LC appears on the control panel, press and hold START for more than 3 seconds to start draining. When the draining is complete, unplug the dishwasher and close the water valve.
2.Check if the inlet valve leaks. If so, reconnect the 90°Fitting with the hot water line because they were not properly connected.
English 27
DACOR_DW9500M_DD68-00197A-01_EN.indd 27 |
|
|
2017-08-23 8:54:58 |
|
|
||
|
|
|
|

Installation
Installation
Water leakage sensor
3.Once the leak is stopped, lay down the dishwasher as shown, and wipe out moisture from the water leakage sensor.
4.Plug in the dishwasher. Then, open the water valve and start a cycle.
5.If the LC information code continues to appear, contact a local Dacor service center.
Kick plate (BU model only)
If you want to install the kickplate, follow these instructions.
|
1. Turn the front legs of the dishwasher to |
|
adjust the height so that the kick plate |
Small |
fits in. |
Big |
NOTE |
|
• For dishwasher models without the |
|
adjustable legs, turn the kick plate |
|
upside down so that the kick plate fits |
|
in. |
|
• Dishwashers whose height is under 34" |
|
(864 mm) do not support installation of |
|
the kick plate. Use the furniture plate |
|
instead. |
28 English
DACOR_DW9500M_DD68-00197A-01_EN.indd 28 |
|
|
2017-08-23 8:54:58 |
|
|
||
|
|
|
|

2.Attach the kickplate to the dishwasher using the kickplate brackets. Make sure the kickplate brackets are in the correct direction. See the figure for details.
3.If you use the furniture plate instead of the kickplate, cut out the portion of the furniture plate that interrupts with the door before attaching the furniture plate to the dishwahser.
Installation
English 29
DACOR_DW9500M_DD68-00197A-01_EN.indd 29 |
|
|
2017-08-23 8:54:58 |
|
|
||
|
|
|
|
 Loading...