


Copyright © 1998-2004 Boson Software, Inc. All Rights Reserved.
No part of this copyrighted document or related copyrighted software may be reproduced, transmitted, translated, distributed, or otherwise copied in any manner or format whatsoever, without the prior written signed permission of Boson Software, its publishers, its licensees, and its licensors. This document is only licensed for use in connection with the Cisco CCNA Network Simulator product, published by Cisco Press. Please notify the publisher immediately of any suspected piracy at:
Cisco Press, 800 East 96th Street, Indianapolis, Indiana, 46240, or toll-free 800-858-7674.
License
This copyrighted document and its related copyrighted software is licensed to the End User for use only in accordance with the Boson End User License Agreement (EULA). This document and its related software are never sold and are only licensed under the terms of the EULA. You must agree to the terms of the EULA to install, register, and/or otherwise use this product.
Boson Trademarks
BOSON®, BOSON.COM®, BOSON ROUTER SIMULATOR®, QUIZWARE®, BOSONSOFTWARE®, BOSON TRAINING®, BOSON NETSIM®, BOSON SWITCH SIMULATOR™, BOSON STATION SIMULATOR™, BOSON NETWORK DESIGNER™, BOSON CERTIFIED LABS™, BOSON NETWORK SIMULATOR™, BOSON NETWORK EMULATOR™, BOSON CLASS IN A BOX™, BOSON ESWITCH™, BOSON EROUTER®, and BOSON ESTATION™, are trademarks or registered trademarks of Boson Software, Inc. in the United States and certain other countries.
Other Trademarks
Cisco®, Cisco Systems®, CCDA®, CCNA®, CCDP®, CCNP®, CCIE®, IOS®, CCSI™ the Cisco Systems logo and the CCIE logo are trademarks or registered trademarks of Cisco Systems, Inc. in the United States and certain other countries. Windows® is a trademark or registered trademark of Microsoft Corporation. Pentium® is a trademark or registered trademark of Intel Corporation. Athlon® is a trademark or registered trademark of Advanced Micro Devices, Inc. Adobe® and Acrobat® are trademarks or registered trademarks of Adobe Systems, Inc. Norton Personal Firewall™ is a trademark or registered trademark of Symantec Corporation. ZoneAlarm™ is a trademark or registered trademark of Zone Labs, Inc.
All other trademarks and/or registered trademarks are the property of their respective owners. Any use of a third party trademark does not constitute a challenge to said mark.
Any use of a product name or company name herein does not imply any sponsorship of, recommendation of, endorsement of, or affiliation with, Boson Software, its licensors, licensees, partners, affiliates, and/or publishers.
Version: 060104a
ISBN: 1-58720-131-3
First Edition June 2004
Disclaimers

Cisco CCNA Network Simulator
Contacts:
Cisco Press
•800 East 96th Street, 3rd Floor
•Indianapolis, IN 46240
•Phone: 800-858-7674
•Updates: http://www.ciscopress.com
Boson Software
•12655 Race Track Rd
•Tampa, FL 33626
•Phone: 813-925-0700
•Updates: http://www.boson.com/netsim/cp
Credits (Boson Software, Inc.):
Project Leaders:
•Chief Architect: John Swartz, CCIE # 4426
•Senior Programmer: Chad Altman, CCNP, CCDP
•Application Design & Documentation: David Rajala, CCNP, CCDP
Technical Consultants:
•Stephen Marcinek, CCIE # 7225
•Jonathan Van Vuren, CCNP, CCDP
Beta Testers:
•Barry Gursky, CCIE # 7208
•Jeff Poole, CCIE # 4298
•Steve McQuerry, CCIE # 6108
•Wendell Odom, CCIE # 1624
Boson Software is a:
Disclaimers
Table of Contents |
|
CISCO CCNA NETWORK SIMULATOR OVERVIEW.................................................... |
1 |
BASIC SIMULATOR FEATURES................................................................................... |
3 |
Simulator Components ............................................................................................................................................ |
4 |
Part 1 – The Lab Navigator ........................................................................................................................................ |
6 |
Introduction Video .................................................................................................................................................... |
6 |
View Chapter .......................................................................................................................................................... |
8 |
View Lab.................................................................................................................................................................. |
8 |
Load Lab.................................................................................................................................................................. |
9 |
Part 2 – The Network Simulator .............................................................................................................................. |
10 |
Part 3 – The Lab Grader........................................................................................................................................... |
16 |
Select the lab.......................................................................................................................................................... |
17 |
Grade the Lab ....................................................................................................................................................... |
17 |
Review Your Results............................................................................................................................................. |
18 |
ADVANCED SIMULATOR FEATURES ....................................................................... |
19 |
Using Telnet ........................................................................................................................................................... |
20 |
Step 1 - Load the Simulator ................................................................................................................................. |
20 |
Step 2 - Set Advanced Mode (Telnet).................................................................................................................. |
20 |
Step 3 - Lab Navigator Utility.............................................................................................................................. |
22 |
Step 4 - Different Methods for Telnet ................................................................................................................. |
24 |
Step 5 - Configuring Router 1 with Telnet.......................................................................................................... |
27 |
Step 6 - Self-Grade Your Lab .............................................................................................................................. |
28 |
FEATURE OVERVIEW................................................................................................. |
31 |
Control Panel (main menus)..................................................................................................................................... |
32 |
File Menu............................................................................................................................................................... |
33 |
View Menu............................................................................................................................................................. |
35 |
Devices Menu ........................................................................................................................................................ |
36 |
Tools Menu............................................................................................................................................................ |
37 |
Ordering Menu ..................................................................................................................................................... |
38 |
Window Menu....................................................................................................................................................... |
39 |
Help Menu ............................................................................................................................................................. |
40 |
Control Panel (advanced).......................................................................................................................................... |
42 |
Remote Control Toolbar ...................................................................................................................................... |
42 |
NetMap (Topology Viewer).................................................................................................................................. |
43 |
Virtual Terminal Server....................................................................................................................................... |
44 |
Simulated Workstations ....................................................................................................................................... |
45 |
LAB NAVIGATOR ........................................................................................................ |
47 |
Lab Topics.................................................................................................................................................................. |
49 |
Table of Contents |
i |
Your Labs.............................................................................................................................................................. |
49 |
Advanced Labs (from INTRO/ICND books)...................................................................................................... |
49 |
Scenario Labs ........................................................................................................................................................ |
50 |
Sequential Labs..................................................................................................................................................... |
50 |
Stand Alone Labs.................................................................................................................................................. |
50 |
Grade Lab.............................................................................................................................................................. |
51 |
Configuring your own labs for use with the “Grade Lab” feature................................................................... |
52 |
NETWORK DESIGNER................................................................................................ |
53 |
Device Information ............................................................................................................................................... |
55 |
Display Device Statistics....................................................................................................................................... |
56 |
Adding a Device with Drag-n-Drop..................................................................................................................... |
57 |
Using The Add Device Wizard............................................................................................................................. |
58 |
Deleting a Device................................................................................................................................................... |
60 |
Making Interface Connections Between Devices with Drag-n-Drop................................................................ |
61 |
How To Set Interface Connection Parameters................................................................................................... |
62 |
Connecting Ethernet Between Devices................................................................................................................ |
63 |
Connecting Serial PPP Between Devices............................................................................................................. |
64 |
Selecting DCE/DTE .............................................................................................................................................. |
65 |
Connecting ISDN Between Devices ..................................................................................................................... |
66 |
Connecting Multipoint Serial Between Devices ................................................................................................. |
67 |
Removing Connectors........................................................................................................................................... |
69 |
Clearing the Network Map (Topology)............................................................................................................... |
70 |
Saving a Custom Topology................................................................................................................................... |
71 |
Opening/Loading a Custom Topology ................................................................................................................ |
72 |
Printing the NetMap Topology ............................................................................................................................ |
73 |
APPENDICES............................................................................................................... |
74 |
Appendix A: Tested 3rd-Party Firewalls................................................................................................................. |
74 |
Zone Alarm............................................................................................................................................................ |
74 |
Norton Personal Firewall ..................................................................................................................................... |
75 |
Appendix B: Tested 3rd-Party Telnets..................................................................................................................... |
76 |
Absolute Telnet ..................................................................................................................................................... |
76 |
Telnet 2000 ............................................................................................................................................................ |
76 |
NetTerm................................................................................................................................................................. |
76 |
Koala Term............................................................................................................................................................ |
76 |
Tiny Term.............................................................................................................................................................. |
76 |
Appendix C: Supported Devices.............................................................................................................................. |
77 |
Fixed-Interface Routers........................................................................................................................................ |
77 |
Slot-Based Routers................................................................................................................................................ |
78 |
Switches and Stations ........................................................................................................................................... |
79 |
Appendix D: File Naming Conventions .................................................................................................................. |
80 |
Appendix E: Special Offer ....................................................................................................................................... |
81 |
Table of Contents |
ii |

Cisco CCNA Network Simulator Overview
The Cisco CCNA Network Simulator (which includes the Boson Router Simulator®) is a new category of simulation product. Many products simulate the end user experience without actually emulating what is really happening within the network. Boson’s Virtual Packet Technology creates individual packets that are routed and switched through the simulated network, allowing the Cisco CCNA Network Simulator to build an appropriate Virtual Routing Table for each protocol, thus fully emulating true networking. This technology allows many uses of the Cisco CCNA Network Simulator, far beyond the scope of the examples or included labs listed below.
Cisco® CCNA® certification is the goal of many people considering the purchase of this product. The Cisco CCNA Network Simulator covers far more than just the full CCNA (640-801), ICND (640-811) and INTRO (641-821) subject matter. The included labs guide you through the configuration of routers and switches in a variety of scenarios. After completing a lab, you can ask the Cisco CCNA Network Simulator to self-grade the lab to determine if it was done correctly. As you progress the 100+ labs, the skills needed to be a CCNA are learned and mastered. With the ability to guide and self-grade, the Cisco CCNA Network Simulator can actually be more helpful than using real routers and switches. The Cisco CCNA Network Simulator allows you to get experience without the equipment.
The Cisco CCNA Network Simulator can also be used for many non-certification oriented applications. The included full-version of the Network Designer is the optional tool that allows you to design and plan a network. This goes beyond most tools, in that you can actually create the router configurations which are going to be used, saving those configurations, and uploading them to real routers.
Routing Protocol implementation is one of the more challenging tasks you may encounter. The Cisco CCNA Network Simulator can allow you to create a virtual pilot or test network, and compare the differences in the results before implementing protocols like IGRP, EIGRP, RIP, or OSPF.
© 2004 Boson Software, Inc. All Rights Reserved. |
1 |

Troubleshooting a production network can be a frightening and frustrating experience. Fortunately, you can create a virtual copy of your network with the Cisco CCNA Network Designer, and troubleshoot the problems without taking down the network.
In summary, the Cisco CCNA Network Simulator is a flexible and powerful product that can help you become certified, and can aid in the design and troubleshooting of complex networks.
An Overview of Using the Cisco CCNA Network Simulator to Prepare for CCNA Certification
The Cisco CCNA certification requires you to learn and master a number of skills. In this next section we will discuss how to incorporate the Cisco CCNA Network Simulator as part of the learning process and how you can successfully complete the CCNA certification track by using the Cisco CCNA Network Simulator
One of the most common ways to use the Cisco CCNA Network Simulator is in conjunction with a book or in an instructor led class. For this example, we will assume that you are using a book or studying from the Cisco published objectives. Basically, learning Cisco routers involve two fundamental tasks; learning and mastering the theory of routers and switches, and the hands-on practical implementation of that theory by configuring the routers in a network and testing them in the lab.
The theory portion of the education can be taught by reading books or listening to an instructor. The purpose of the Cisco CCNA Network Simulator is to help you with the practical hands-on portion of your education, and ensures that you not only understand the concepts of routing, but can actually configure and implement routing on Cisco devices. Once you feel you have mastered both the theory and the practical labs, you can test your knowledge using one of the Boson Practice Tests available at http://www.boson.com which support and contain the industry’s newest testing methods of asking hands-on lab questions, drag and drop questions, and other simulation questions, where appropriate.
The Cisco CCNA Network Simulator is the most comprehensive product on the market for learning how to configure a Cisco router. The Cisco CCNA Network Simulator will not only help you become CCNA certified, but will actually help you learn and understand how to configure routers, switches, and networks.
© 2004 Boson Software, Inc. All Rights Reserved. |
2 |

© 2004 Boson Software, Inc. All Rights Reserved. |
3 |

Basic Simulator Features
After installing Cisco CCNA Network Simulator, you can choose one of two ways to start the program. The first way is to double-click on the Cisco CCNA Network Simulator icon placed on your desktop during installation. The second way to start the Cisco CCNA Network Simulator is to click on your Windows® Start Menu (normally in your lower left hand corner), then choose Programs, Cisco CCNA Network Simulator, and finally select the Cisco CCNA Network Simulator icon.
You must agree to be bound by the terms and conditions of the End User License Agreement (EULA) to register, activate, or otherwise use, any portion of the software.
Overview
This tutorial will guide you through the 1st lab, using the Basic Features of the Cisco CCNA Network Simulator. We will only show you how to select a lab, configure the devices, and then grade the lab. The first lab that you will complete is very simple but will provide an understanding of the components of the Cisco CCNA Network Simulator and how they interoperate. Advanced features and more functionality will be covered later.
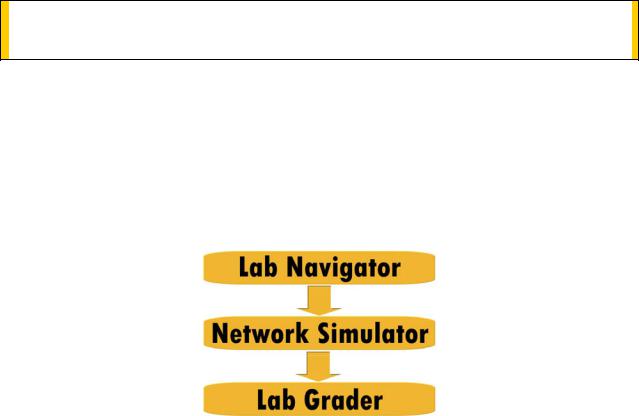
Simulator Components
The Simulator is actually a suite of programs that interact to provide a total learning experience. The primary components are:
•Lab Navigator
•Network Designer - optional
•Network Simulator
•Lab Grader
The purpose of the Lab Navigator is to allow you to view, select, and begin the lab of your choosing. The Lab Navigator provides a friendly interface for your learning experience.
The included Network Designer is the optional tool you can use to create your own custom network. Through this tool you can build a simple network, a complex network, or even model an existing network. Note that the Network Designer is not required to configure the included labs, as they are pre-created and require no additional configuration to complete as-is.
The Network Simulator is the tool that actually simulates the network and routes virtual packets. This program will allow you to control numerous devices and configure them as needed. The Network Simulator is not limited to just what is in the lab, it can do much, much more.
The lab grader will analyze the configuration you have completed and determine if you have completed the lab correctly.
© 2004 Boson Software, Inc. All Rights Reserved. |
4 |
eLearning Lab Flow
For a lab, the three basic parts are:
1.Use the Lab Navigator to load the lab, then
2.Use the Network Simulator to configure the Devices (Routers, Switches, Stations), and
3.Use the Lab Grader tool to check your lab answers (configs).
See diagram.
All three basic parts described above will now be covered in detail.
© 2004 Boson Software, Inc. All Rights Reserved. |
5 |
Part 1 – The Lab Navigator
When opening the program you will encounter the first screen below. For a brief overview of the program, click the play button on the video window. This will show a short movie that will introduce you to all components of the program and describe how to use the program. The next couple of pages will further elaborate on the topics covered by the video.
Introduction Video
Note The “Advanced Labs” are broken out as the “CCNA INTRO Labs” and the “CCNA ICND Labs” within the simulator.
© 2004 Boson Software, Inc. All Rights Reserved. |
6 |
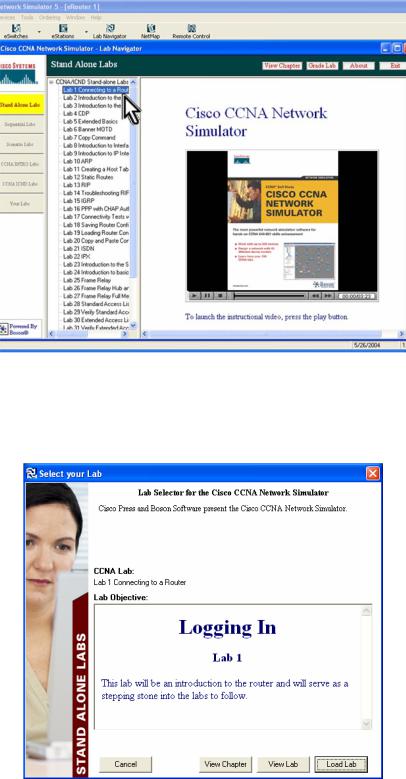
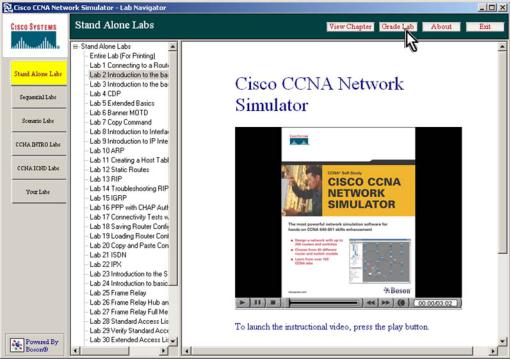
To get started with the lab, click on the Lab 1: Connecting to a Router lab.
Lab Navigator
Click on the lab to bring up the ‘Select your lab’ screen. There will be a brief overview of the lab, and you will be given the option to view the chapter, view the lab, load the lab or cancel. Each of the buttons help you with the individual lab.
Starting a Lab
© 2004 Boson Software, Inc. All Rights Reserved. |
7 |

View Chapter
The View Chapter button will load chapters taken straight from the Cisco CCNA Certification Library also published by Cisco Press. This will provide the theory and explanation necessary to understand the lab.
View Lab
The View Lab button will load the lab that you selected. This will open up in Adobe Acrobat. You can choose to print the lab out here or just follow along.
© 2004 Boson Software, Inc. All Rights Reserved. |
8 |
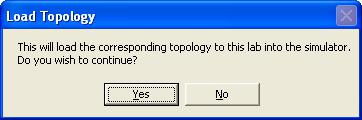
Load Lab
When clicking on the Load Lab button, you will be asked if you would like to load the corresponding topology into the Simulator. Selecting yes to this option will display the Simulator in the background creating new windows where each one represents a new device (eg a router, switch, or pc).
Proceed to Part 2.
© 2004 Boson Software, Inc. All Rights Reserved. |
9 |

Part 2 – The Network Simulator
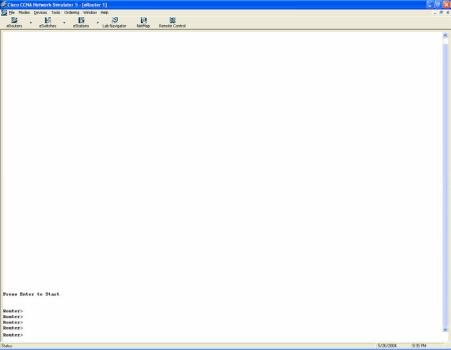
Once the lab is loaded, you will see the screen below:
After this device prompt screen is displayed, we are ready to begin the lab.
© 2004 Boson Software, Inc. All Rights Reserved. |
10 |
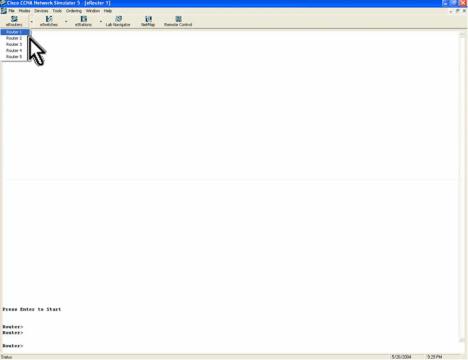
We will now follow the lab:
1.If you have not done so already, click on the Routers button located at the top of your screen and select "Router1". The Router1 window will open and the text “Press Enter to Start” will appear as follows:
Note the mouse pointer
© 2004 Boson Software, Inc. All Rights Reserved. |
11 |
2.Click inside the Router1 window and press the "Enter" key to get started. you are now connected to Router1 and are at the usermode prompt. The prompt is broken down into two parts, the hostname and the mode. "Router" is the Router1's hostname, and ">"means you are in usermode. Your input would be as follows:
Press RETURN to get Started
Router>
Follow along in the lab
© 2004 Boson Software, Inc. All Rights Reserved. |
12 |
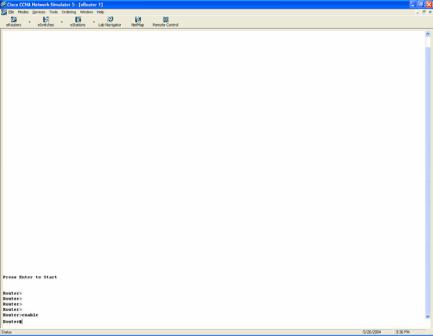
3.Next, type the command “ enable”e to get to the privileged mode prompt. Your input would be as follows:
Router>enable
Router#
© 2004 Boson Software, Inc. All Rights Reserved. |
13 |

4.Last, to get back to the user mode, simply type disable. From the usermode type logout or exit to leave the router. Your input would be as follows:
Router#disable
Router>
Router>exit
Router con0 is now available
Press RETURN to get started
© 2004 Boson Software, Inc. All Rights Reserved. |
14 |
You have now completed all the steps in this introductory lab. To grade your lab, select the “Grade Me” button on the Lab Navigator, as follows:
Starting the Grade Lab tool, from within the Lab Navigator
Finally, proceed to Part 3: The Lab Grader.
© 2004 Boson Software, Inc. All Rights Reserved. |
15 |
Part 3 – The Lab Grader
The Lab Grader is an easy to use tool for determining if you have completed the tasks as defined in the lab. This is a useful tool to ensure you are mastering the skills required for the CCNA.
Scrolling through the list of labs to grade
The three basic steps to use the Lab Grader:
•Select the lab you have completed
•Tell the program to grade your lab
•Review the results.
© 2004 Boson Software, Inc. All Rights Reserved. |
16 |

Select the lab
To select the lab you are working on, click on the down arrow to the right of the drop down box and select the lab you are working on.
Selecting a Lab to Grade
Grade the Lab
After you have select the lab, click the Grade Me button. The program will then begin an analysis of your current router and switch configurations and compare that to the expected configuration of the devices.
© 2004 Boson Software, Inc. All Rights Reserved. |
17 |

The Lab Grader Results
Review Your Results
If your results are as above, you have completed all necessary commands to complete the lab’s objectives, and are now ready to move on to the next lab. If not, you need to go back and fix the problems and grade the lab again. At this point you have completed the basic features overview, and are ready to move on to the advanced lab tutorial in the next section.
© 2004 Boson Software, Inc. All Rights Reserved. |
18 |

© 2004 Boson Software, Inc. All Rights Reserved. |
19 |

Advanced Features Tutorial – Using Telnet
This tutorial will demonstrate the advanced mode within the Cisco CCNA Network Simulator. NOTE: This section assumes you have already gone through the Setup Wizard for Telnet. These advanced features are optional, and you do not have to complete this lab using the Advanced simulator features to properly complete the lab or prepare for the CCNA. However, the advanced mode will teach you valuable skills that will aid you in the field and in the real world. Otherwise, you can complete this lab using the Basic functionality of the simulator as described in the previous section.
Step 1 - Load the Simulator
To get started, launch the Cisco CCNA Network Simulator.
Select Lab 2 from the “Stand Alone Labs” option within the Lab Navigator.
When the lab description screen loads, click the “Load Lab” button to launch.
Step 2 - Set Advanced Mode (Telnet)
From within the Cisco CCNA Network Simulator, select the “Advanced Mode (Telnet)” option under the “Modes” pull-down menu, as follows:
After the Control Panel appears (horizontal toolbar), simply click on the NetMap button to review the currently loaded default network topology.
The Cisco CCNA Network Simulator Control Panel horizontal toolbar
© 2004 Boson Software, Inc. All Rights Reserved. |
20 |
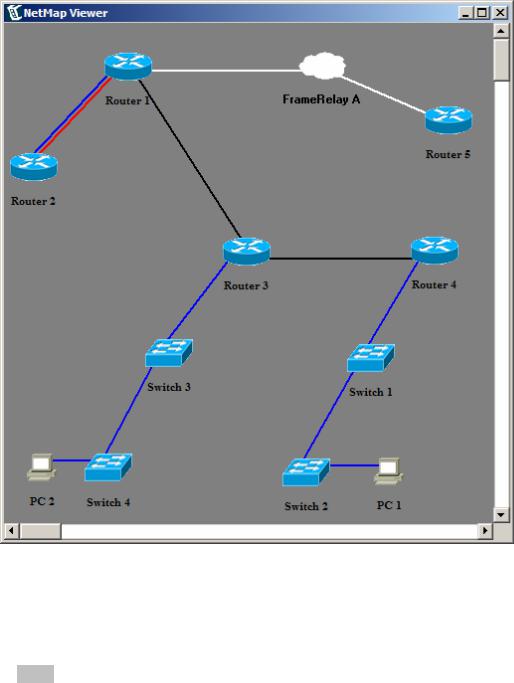
This will launch the NetMap Viewer application as a separate process, so you can ALT-TAB between your network diagram and the other Cisco CCNA Network Simulator components. The default NetMap for the lab is shown below:
The NetMap Viewer, showing your Current Network Diagram
Color legend, as defined in the Cisco CCNA Network Designer
•Blue is Ethernet
•Red is ISDN/Dialup or PRI
•Black is Serial PPP
•White is Serial Frame
© 2004 Boson Software, Inc. All Rights Reserved. |
21 |
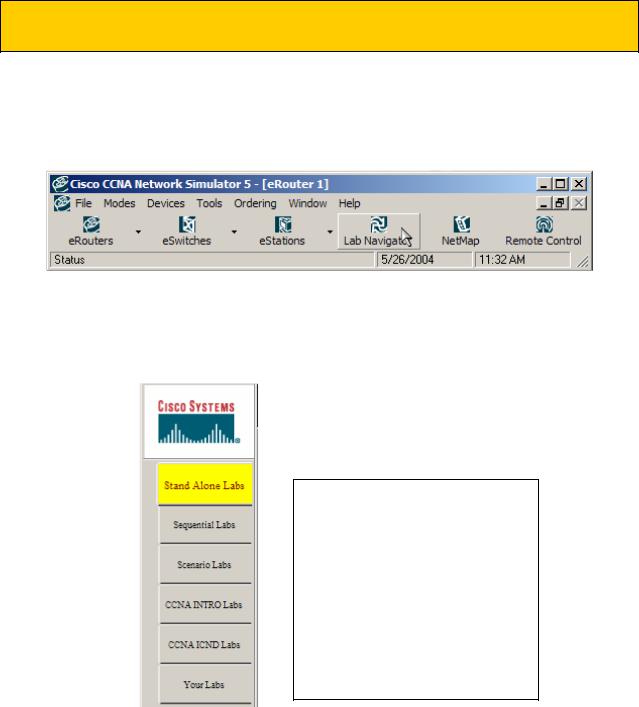
Step 3 - Lab Navigator Utility
To start a lab or lesson, click on the Lab Navigator button on the top horizontal tool bar (as shown below), or select it from the pull-down menu under the Window category. This launches the Cisco CCNA Lab Navigator application as a separate process, so you can ALT-TAB between the labs and multiple telnet windows.
The easy way to load the Lab Navigator utility
Within the Lab Navigator, you can access the included labs by selecting a section, which is illustrated by use of tabs, and then by selecting one of your lab choices from within the labs list that appears.
Tips:
The labs are organized into sections to match the Lab Navigator content bar, as shown to the left.
Note The “Advanced Labs” are broken out as the “CCNA INTRO Labs” and the “CCNA ICND Labs” within the simulator.
© 2004 Boson Software, Inc. All Rights Reserved. |
22 |
 Loading...