

Page 1

ENGLISH
GB
Use and maintenance manual
General Index
1. FOREWORD 5
1.1 GENERAL 5
1.2 PURPOSE OF THE MANUAL 5
1.3 WHERE AND HOW TO KEEP THE MANUAL 5
1.4 MANUAL UPGRADES 6
1.5 COLLABORATION WITH USERS 6
1.6 MANUFACTURER 6
1.7 MANUFACTURER’S RESPONSIBILITY AND WARRANTY 6
1.7.1 Terms of warranty 6
1.8 TECHNICAL ASSISTANCE SERVICE 7
1.9 COPYRIGHT 7
2. INSTALLATION 8
3. MACHINE DESCRIPTION 12
3.1 MACHINE FUNCTION 12
3.2 TECHNICAL SPECIFICATIONS 13
3.3 DIMENSIONS 13
3.4 WARNINGS 13
4. WHEEL LIFTING (OPTION) 16
5. WHEEL LOCKING 17
6. USE OF THE WHEEL BALANCING MACHINE 18
6.1 DIMENSION ACQUISITION 18
6.2 CORRECTION MODE SELECTION 19
I 0964 - 12/12 - Rev. 02
Page 2

6.3 UNBALANCE UNIT OF MEASURE SELECTION 20
6.4 UNBALANCE MEASUREMENT (FIRST SET OF BUTTONS) 21
6.4.1 Lock/release wheel in correction position 22
6.5 UNBALANCE MEASUREMENT (SECOND SET OF BUTTONS) 23
6.6 THRESHOLD DISPLAY 24
6.7 UNBALANCE CORRECTION 25
6.7.1 Iron rims 25
6.7.2 Aluminium rims 26
6.7.3 Change weight application distance 27
6.8 UNBALANCE SPLIT 28
6.9 UNBALANCE OPTIMISATION 29
6.10 TYRE SET 30
6.10.1Tyresetvaluecerticate 32
6.10.2 Tyre setcerticatecustomisation 32
6.11 WEIGHT STATISTICS 33
6.12 TRACEABILITY 35
6.13 BALANCING CERTIFICATE PRINTOUT 37
6.13.1 Balancingcerticatecustomisation 38
6.14 SCREENSAVER 43
6.15 WHEEL ANALYSIS 44
6.15.1 Runout 45
6.15.1.1 When and why TO USE MATCHING 45
6.15.1.2 Matching 46
6.15.1.2.1 When to perform matching 47
6.15.1.2.2 How to perform matching 47
6.15.1.3 Peak/peakandrstharmonicgraphs 48
6.15.2 Tread 49
6.15.3 Taper 51
6.16 OUTSIDE RIM RUNOUT 52
7. WHEEL DISMOUNTING 54
8. SETUP 55
8.1 MENU 55
Page 3

8.2 GENERAL SETUP 56
8.2.1 General setup 1/3 56
8.2.1.1 Screensaver customisation 58
8.2.2 General setup 2/3 59
8.2.3 General setup 3/3 60
8.3 RESERVED SETUP 61
8.3.1 LASER calibration 62
8.3.2 CC motor calibration 63
8.3.3 Spindle reset 64
8.3.4 Taper calibration 65
8.3.5 Correction weights 66
8.3.6 Wheel runout 67
8.3.7 Outside rim runout 68
8.3.8 Tread 69
8.3.9 Reserved for technical service 70
8.3.10 Saves the machine calibration 70
8.3.11 Loads the user manual 70
8.3.12 Firmware upgrade 71
8.3.13 Factory setting 72
8.4 MACHINE CALIBRATION 73
8.5 DIMENSIONS 74
8.6 SELF-DIAGNOSTICS 75
8.7 OSK 76
8.8 SOUNDS 78
8.9 TRACEABILITY 79
8.10 INSTRUCTION MANUAL 79
9. DIAGNOSTICS 80
10. MAINTENANCE 84
10.1 GENERAL 84
10.1.1 Introductory notes 84
10.1.2 Safety rules 84
10.1.3 Replacing fuses 84
Page 4

10.1.4 Periodic cleaning 84
11. DISPOSAL 85
11.1 DISPOSING OF THE BALANCER 85
11. 2 DISPOSING OF ELECTRONICS COMPONENTS 85
12. SPARE PARTS 85
12.1 IDENTIFICATION AND ORDERING METHOD 85
13. ATTACHED DOCUMENTATION 85
Page 5

Use and Maintenance Manual Rev. 12-2012
1. Foreword
ENGLISH
1.2 PURPOSE OF THE MANUAL
This manual, and the installation manual, contains the
instructions required to use the machine safely and carry
out routine maintenance work.
ThI s mA NuAl Is AN IN TeGR Al pART of The INsTAllATIoN
WARNING
mAN uAl WhIc h should b e coNsulTe d coNce RNIN G sTARTING
ANd usI NG T he m AchI Ne s Afely.
ReA d cA Refu lly bef oRe coNT INuI NG.
1.1 GENERAL
The machine has been constructed in conformity with the
current EC Directives and the technical standards implementing the requirements, as stated in the declaration
of conformity issued by the manufacturer and attached
to the manual.
This publication, hereinafter simply referred to as ‘man-
ual’, contains all the information required to safely use
and service the machine referred to in the Declaration of
Conformity.
This appliance, hereinafter is generically referred to as
‘machine’.
The manual addresses operators instructed on the precautions to take in relation to the presence of electric current
and moving devices.
This publication is intended for all ‘users’ who as far as
within their competence need to and/or are obliged to
give instructions to others or operate on the machine
themselves.
These persons can be identified as follows:
- operators directly involved in transporting, storing,
installing, using and servicing the machine from when
it is put on the market until when it is scrapped;
- direct private users.
The original Italian text of this publication constitutes the
only reference to resolve any interpretation controversies
related to the translation into the European Community
languages.
This publication forms an integral part of the machine
and must therefore be kept for future reference until final
dismantling and scrapping of the machine.
Any calibrations, adjustments and extraordinary maintenance operations are not considered in this document as
they may only be performed by the service engineer who
must work on the machine according to the technical and
rated characteristics for which it was built.
Though it is fundamental to read this manual, it cannot
replace skilled technical staff who must be adequately
trained beforehand.
The foreseen use and configurations of the machine are
the only ones allowed by the manufacturer; do not attempt
to use the machine in a different way.
Any other use or configuration must be agreed in advance
with the manufacturer in writing and in this case an annex
will be attached to this manual.
For use, the user must also comply with the specific
workplace legislation in force in the country where the
machine is installed.
The manual also refers to laws, directives, etc., that the
user must know and consult in order to accomplish the
goals that the manual sets out to achieve.
1.3 WHERE AND HOW TO KEEP THE
MANUAL
This manual (and relative attachments) must be kept in
a safe and dry place and must always be available for
consultation.
Make a copy and keep it in the archive.
When exchanging information with the manufacturer or
the technical assistance staff authorised by the former,
quote the rating plate information and the serial number
of the machine.
This manual must be kept for the entire lifetime of the
machine, and if necessary (e.g.: damage making all or
some of it illegible, etc.) the user must request another
copy exclusively from the manufacturer, quoting the publication code indicated on the cover.
Introduction
5
Page 6

1.4 MANUAL UPGRADES
Use and Maintenance Manual Rev. 12-2012
This manual is an integral part of the machine and reflects
ENGLISH
the state of the art at the moment it was put on the market.
The publication complies with the directives in force on
that date; the manual cannot be considered inadequate
as a result of regulatory updates or modifications to the
machine.
Any manual upgrades that the manufacturer may see fit to
send to users will become an integral part of the manual
and must be kept together with it.
1.5 COLLABORATION WITH USERS
The manufacturer will be pleased to provide its customers with any further information they may require and will
consider proposals for improving this manual in order to
more fully satisfy the requirements it was written for.
In case of transfer of ownership of the machine,
which must always be accompanied by the use and
maintenance manual, the original user must inform
the manufacturer of the name and address of the
new user in order to allow it to send the new user
any communications and/or updates deemed to be
indispensable.
This publication is the property of the Manufacturer
and may not be fully or partly reproduced without prior
written agreement.
- never exceed the limits of use of the machine;
- always constantly and carefully clean and service the
machine;
- have the machine used by people of proven capacity
and attitude, adequately trained for the purpose.
The manufacturer declines all direct and indirect liability
caused by:
- use of the machine in a different way from that indicated
in this manual
- use of the machine by people who have not read and
fully understood the contents of this manual;
- use in breach of specific regulations in force in the
country of installation;
- modifications made to the machine, software and operating logic, unless authorised by the manufacturer
in writing;
- unauthorised repairs;
- exceptional events.
Transfer of the machine to a third party must also include
this manual; failure to include the manual automatically
invalidates all the rights of the purchaser, including the
terms of warranty, where applicable.
If the machine is transferred to a third party in a country with
a different language from the one written in this manual,
the original user shall provide a faithful translation of this
manual in the language of country in which the machine
will operate.
1.7.1 Terms of warranty
1.6 MANUFACTURER
The machine identification data is indicated on the plate
mounted on the machine.
The plate below is shown for the sake of example.
1.7 MANUFACTURER’S RESPONSIBILITY
AND WARRANTY
In order to make use of the manufacturer’s warranty, the
user must scrupulously observe the precautions contained
in the manual, in particular he must:
The Manufacturer guarantees the machines it manufacturers against all manufacturing or assembly faults for 12
(twelve) months from the date of collection or delivery.
The Manufacturer undertakes to replace or repair any part
which it deems to be faulty free of charge at its factory,
carriage paid.
If a Manufacturer’s repairman (or a person authorised by
the same) is required to work at the user’s facilities, the
relative travel expenses and board and lodging shall be
charged to the user.
The free supply of parts under warranty is always subject
to the faulty part being inspected by the manufacturer (or
a person authorised by the same).
The warranty is not extended following repairs or other
work done to the machine.
The warranty does not cover damage to the machine
deriving from:
- transport;
- neglect;
- improper use and/or use not in compliance with the
6
Introduction
Page 7

Use and Maintenance Manual Rev. 12-2012
instructions in the operating manual
- incorrect electrical connections.
The warranty is invalidated in case of:
- repairs made by people who were not authorised by
the manufacturer;
- modifications that were not authorised by the manufacturer;
- use of parts and/or equipment that were not supplied
or approved by the manufacturer;
- removal or alteration of the machine identification
plate.
1.8 TECHNICAL ASSISTANCE SERVICE
For any technical service operation, contact the manufacturer
directly or an authorised dealer always quoting the model,
the version and the serial number of the machine.
ENGLISH
1.9 COPYRIGHT
The information contained in this manual may not be
disclosed to third parties. Partial or total duplication, unless authorised by the Manufacturer in writing, through
photocopying, duplication or other systems, including
electronic acquisition, is breach of copyright and can lead
to prosecution.
Introduction
7
Page 8

2. Installation
ENGLISH
Use and Maintenance Manual Rev. 12-2012
1. Unpack the machine and place the front guard on the
ground with the spindle locking/release pedal, the Zero
Weight lift and the side guard (1).
1
3. Do not install the machine in an area directly exposed
to sunlight or where there are reflections from the floor.
The machine might malfunction if there is excess light
(3).
3
4. Avoid positioning objects made of a particularly reflecting
material in the areas indicated in gray, as they might
interfere with laser reading (4).
4
2. Absolutely do not force the side column when unloading
the machine from the pallet and be careful with the
electrical wiring (2).
2
8
Installation
Page 9

Use and Maintenance Manual Rev. 12-2012
5. Hold up the lift using a wooden board (5)
5
6. Screw in the elbow union and fit all the wiring and
pneumatic connectors inside the lift (6)
6
8. Connect the 140 Ø tube (8)
8
ENGLISH
9. Connect the lift pedal cable with a male/female Faston
(9)
9
7. Connect the 8 Ø tube (7)
7
10. Connect the footboard micro limit switch cable with a
male/female Faston (10)
10
Installation
9
Page 10

Use and Maintenance Manual Rev. 12-2012
11. Connect the pneumatic locking pedal microswitch cable
with a male/female Faston (11)
11
8
ENGLISH
12. Position and fasten the front footboard (12)
12
14. Position the lift with the footboard in line with the
spindle (14)
14
13. Position the side guard and fasten it (13)
13
10
Installation
Page 11

Use and Maintenance Manual Rev. 12-2012
15. Drill the holes in the floor using a drill with an 8Ø bit and fit the expandable bolts provided as indicated in the
drawing and tighten them to a torque of 25 Nm. As indicated in the box, in the last phase, fasten the mounting
brackets on the side of the column and tighten to a torque of 25Nm (15) .
15
ENGLISH
25Nm
16. Check that the mains input voltage and frequency
parameters are compatible with the data shown on
the wheel balancing machine plate (±10%) (16).
16
17. Check proper pneumatic connection; the machine and
the lift require at least 8 kg/cm² (~ 0.8 MPa; ~8 BAR;
~115 PSI) (17).
17
17
18. Turn on the machine and carry out
operations:
▪ LASER CALIBRATION
▪ TAPER CALIBRATION
▪ MACHINE CALIBRATION
the following
Installation
11
Page 12

Use and Maintenance Manual Rev. 12-2012
3. Machine description
ENGLISH
3.1 MACHINE FUNCTION
It is a wheel balancing machine for cars, light commercial vehicles and 4-WDs .The wheels must weigh less than 75
kg. It can be operated in a temperature range of 0° to + 45° C.
It can operate only on a flat and non-resilient surface.
Do not mount any wheels other than motorcycle, car or truck wheels on the wheel balancing machine.
Thanks to the new and exclusive VDD (Virtual Direct Drive) system, reliable unbalance measurements can be made in
a short time, almost half the cycle time of other wheel balancing machines in this range.
TFT TOUCH SCREEN
WEIGHT TRAY
LASER POSITIONING
RIM INTERIOR LED LIGHT
PNEUMATIC LOCKING PEDAL
ZERO WEIGHT PEDAL
GUARD
CONE HOLDER
EXTERNAL SCANNING LASER
PNEUMATIC SPINDLE
INTERNAL SCANNING LASER
ZERO WEIGHT CARRIAGE LEVER
ZERO WEIGHT (OPTION)
The main features include:
▪ Automatic dimension measurement
▪ Inside and outside rim eccentricity measurement
▪ Automatic minimisation of static unbalance
▪ wheel taper measurement
▪ Selection of optimal wheel mounting
▪ Customisable certificate printout
▪ Machine setting menu
▪ Unbalance optimisation
▪ Static program, ALUS; SPLIT; BPC; indication of exact position of the correction weights; self-diagnostics; self-
calibration
▪ Statistics of weights used
12
Machine description
Page 13

Use and Maintenance Manual Rev. 12-2012
3.2 TECHNICAL SPECIFICATIONS
The following data refers to the wheel balancing machine
in its standard configuration.
Single phase power supply 115 /230 V 50/60 Hz
Protection class IP 54
Maximum power absorbed 0,15 kW
Balancing speed 100 min
Cycle time per wheel
Measurement uncertainty 0.5 g.
Average noise < 70 dB(A)
Rim width setting range 1.5”-20” or 40 - 510 mm
Settable diameter 10” ÷ 30” or 265 ÷ 765 mm
Min/max. compressed air pressure 8 ÷ 10 Kg/cm2
Machine weight 220 kg.
-1
4.7 seconds (5 3/4"x14") 15 Kg
~ 0.8 ÷ 1 Mpa;
~ 8 to 10 BAR;
~ 115 to 145 PSI.
3.3 DIMENSIONS
The function buttons are selected by pressing on the
TOUCH SCREEN.
cAuTIoN:
pRe ss T he b uTToN s oNly W ITh youR fIN GeRs .
Nev eR us e Th e co uNTe RWeIG hT G RIpp eRs oR oTh eR po INTe d
obj ecTs !
ENGLISH
3.4 WARNINGS
Kee p Th e AR eA I NdIc ATed IN The fIGu Re f Ree of T ools ,
Zona d’azione laser scansione
Scanning laser range
of action
Machine description
cAuTIoN:
AdA pTeR s, e Tc.
Ø250mm
13
Page 14

SE2-MOUNTING
A
C
B
D
E
G
F
SE2 MOUNTING
Page 15

360°
Cone
Quando possibile, centrare le ruote con cono dall'interno (vedi disegno).
Evitare di usare il manicotto RL con cerchi di ferro.
Whenever possible, centre the wheels with the cone from the inside (see the drawing
).
Avoid using the RL sleeve with metal rims.
Lorsque c’est possible, centrer les roues avec le cône de l’intérieur (voir dessin).
Eviter d’utiliser le manchon RL avec les jantes en fer.
Wenn möglich, die Räder mit Konus von Innen heraus zentrieren (siehe Zeichnung).
Bei Eisenfelgen die Verwendung der Muffe RL vermeiden.
Siempre que sea posible, centrar las ruedas con cono desde dentro (véase dibujo).
Evitar usar el manguito RL con llantas de hierro.
Quando possível, centre as rodas com cone pelo lado de dentro (ver
� gura).
Evite utilizar a luva RL com jantes de ferro.
SE2-DISMOUNTING
A
B
C
D
E
IT
GB
FR
DE
ES
PT
SE2 DISMOUNTING
Page 16

4. Wheel lifting (option)
ENGLISH
Use and Maintenance Manual Rev. 12-2012
Zero Weight carriage lever
Pneumatic locking pedal Zero Weight pedal
▪ Position the wheel on the carriage resting it against the ZERO WEIGHT carriage lever. Check that the pneumatic
spindle is enabled for mounting (open); if not, push the pneumatic locking pedal.
▪ Push the Zero Weight pedal.
Nev eR p ush The ZeRo WeI GhT pedA l If The Re I s AN yoNe sTA NdIN G IN The RAN Ge o f Ac TIoN of The lIfT .
bef oRe push ING The pedA l To lIf T A Whee l, A lWAy s ch ecK ThAT The spI Ndle Is opeN
(If NoT , Th e lI fT m IGhT NoT Asc eNd oR A sceN d IN coRR ecTl y).
As soon as the wheel lifts off the ground, it is ready for mounting on the wheel balancing machine at zero weight.
cAuTIoN:
cAuTIoN:
▪ Position the central hole of the wheel at the height of the spindle and slide the wheel onto the spindle with the aid
of the Zero Weight carriage lever.
16
Wheel lifting
Page 17

Use and Maintenance Manual Rev. 12-2012
5. Wheel locking
To lock/release the wheel on the pneumatic spindle, push the pneumatic locking pedal.
ENGLISH
If T he lIfT Is up A Nd T he p Neum ATIc loc KING ped Al I s pu shed To locK The Whe el o N Th e sp INdl e,
lIf T de sceN T WI ll A uTom ATIc Ally be eNAb led.
Wheel locking
17
Page 18

Use and Maintenance Manual Rev. 12-2012
6. Use of the wheel balancing machine
ENGLISH
6.1 DIMENSION ACQUISITION
Acquires the wheel dimensions
Enables/disables taper and tread
measurement
Return to main screen
Outside rim eccentricity measurement
(use with the rim only)
NEW WHEEL
Press the button to acquire the dimensions.
Close the guard to perform the balancing spin.
ATTeNZIoNe
bef oRe pRe ssIN G T he buTTo N , po sITI oN The Whe el IN such A WAy Th AT A Ny WeIG hTs AlR eAdy oN Th e R Im do NoT fAll WI ThIN
The ReA dING ARe A of The INT eRNA l lA seR, ThAT WAy excl udIN G AN y dI meN sIoN meA suRI NG I NAcc uRAc Ies.
WHEEL THE SAME AS PREVIOUS
Close the guard to perform the balancing spin.
The machine in any case checks the wheel dimensions and if they are different from the previous wheel, automatically
measures them again. With this innovative system you can balance a set of 4-5 wheels measuring the dimensions
only once, thus saving a lot of time.
TAPER AND TREAD MEASUREMENT AT THREE POINTS
Press the button to enable/disable complete taper and tread measurement.
This function uses a special measuring cycle that extends the cycle time by a few seconds.
The setting remains stored even when the wheel balancing machine is turned off.
OUTSIDE RIM ECCENTRICITY MEASUREMENT WITHOUT TYRE
Press the button ( OUTSIDE RIM RUNOUT )
CANCEL DIMENSION SETTING
Press the button .
18
Use of the wheel balancing machine
Page 19

Use and Maintenance Manual Rev. 12-2012
6.2 CORRECTION MODE SELECTION
Press from the unbalance measurement screen.
ENGLISH
Goes back to the unbalance measurement
screen, automatically recalculating the
unbalance values.
Press the weight symbol in the desired correction position.
If doing the unbalance correction in static mode only, press and hold the outside adhesive weight symbol for
once or twice (depending on the current correction mode)..
Use of the wheel balancing machine
19
Page 20

6.3 UNBALANCE UNIT OF MEASURE selection
ENGLISH
Press the button / from the unbalance measurement screen
Use and Maintenance Manual Rev. 12-2012
Selects grams
Selects ounces
Allows selecting whether to view the unbalance values expressed in grams or ounces.
20
Use of the wheel balancing machine
Page 21

Use and Maintenance Manual Rev. 12-2012
6.4 UNBALANCE MEASUREMENT (first set of buttons)
Displays the information screen
Selects unbalance display in g/oz
Traceability management
Enables/disables wheel in correction position
Splits the unbalance
Displays the second set of buttons
ENGLISH
Lift reset with wheel stopped / STOP during spin
To perform an unbalance measurement spin, close the guard.
After performing a balancing spin, the following are displayed:
1. The unbalance values.
▪ White: wheel locked in correction position / Internal scanning laser positioned on the side.
▪ Light blue: position not reached / Internal scanning laser not positioned.
2. The red weights that indicate the unbalance position.
3. The weight shadows that indicate where the correction weight should be applied: at the top at 12 o’clock or at the
point indicated by the internal laser.
If T he “Whe el I N po sITI oN” souN d Is eNA bled , A souN d WI ll b e em ITTe d Wh eN T he c oRRe cTIo N po sITI oN h As b eeN ReAc hed .
If Th e uNbA lANc e Is le ss Th AN The T hRes hold vAlu e seT, oK Is d Ispl Ayed I NsTe Ad of T he uNb AlAN ce vA lue To INdI cATe T hAT Th e
pRe ssIN G Th e bu TToN you cA N IN ANy cAs e vI eW T he R esId uAl uNbA lANc e.
Whe el I s WI ThIN Tol eRAN ce o N Th AT s Ide.
To R esu me W ITh The dIme NsIo Ns o f Th e Wh eel mouN Ted, ope N AN d cl ose The spIN dle.
when on, it indicates that the lasers are moving
when on, it indicates that the lift pedal is pressed
Use of the wheel balancing machine
21
Page 22

Use and Maintenance Manual Rev. 12-2012
when on, it indicates that the wheel locking pedal is pressed
ENGLISH
when on, it indicates that the spindle is closed
when on, it indicates that wheel positioning is enabled.
6.4.1 Lock/release wheel in correction position
The wheel balancer automatically keeps the wheel in the correction position on one of the sides. To release it press
.
If the wheel has been released and you need to move it into the correction position again, press .
22
Use of the wheel balancing machine
Page 23

Use and Maintenance Manual Rev. 12-2012
6.5 UNBALANCE MEASUREMENT (second set of buttons)
Prints the unbalance values
Displays the weight statistics
Menu
Unbalance optimisation
Goes back to the first set of buttons
ENGLISH
Lift reset with wheel stopped / STOP during spin
Use of the wheel balancing machine
23
Page 24

6.6 THRESHOLD DISPLAY
ENGLISH
Use and Maintenance Manual Rev. 12-2012
Displays the information screen
Selects unbalance display in g/oz
Traceability management
Enables/disables wheel in correction position
Splits the unbalance
Displays the second set of buttons
Lift reset with wheel stopped / STOP during spin
Press to view the residual unbalance values with an accuracy of 0.5 g. (0.1oz).
Press to go back to display of the approximate values.
24
Use of the wheel balancing machine
Page 25

Use and Maintenance Manual Rev. 12-2012
6.7 UNBALANCE CORRECTION
After an unbalance measurement spin, the weight shadow indicates the correct application point.
6.7.1 Iron rims
Displays the information screen
Selects unbalance display in g/oz
Traceability management
Enables/disables wheel in correction position
Unbalance split (not selectable for correction with
clip-on weights)
Displays the second set of buttons
ENGLISH
Lift reset with wheel stopped / STOP during spin
WEIGHT APPLICATION POSITION
Correction type Inside Outside
Clip-on weight at 12 o’clock Clip-on weight at 12 o’clock
Clip-on weight at 12 o’clock Adhesive weight at 12 o’clock
Adhesive weight at the point indicated
by the internal laser
Clip-on weight at 12 o’clock
Adhesive weight at the point indicated
Use of the wheel balancing machine
by the internal laser
Adhesive weight at the point indicated by the internal laser
Adhesive weight at 12 o’clock
25
Page 26

6.7.2 Aluminium rims
ENGLISH
Use and Maintenance Manual Rev. 12-2012
Displays the information screen
Selects unbalance display in g/oz
Traceability management
Enables/disables wheel in correction position
Splits the unbalance
Displays the second set of buttons
Lift reset with wheel stopped / STOP during spin
After the spin, the laser indicates the outside correction point; once you have applied the weight, press the “laser
positioning” button ( MACHINE DESCRIPTION) positioned on the weight tray of the wheel balancing machine to
move the laser so that it indicates the inside correction position.
The inside unbalance values indicated by the laser are graphically displayed in white.
WEIGHT APPLICATION POSITION
Correction type Inside Outside
Adhesive weight at the point indicated
by the internal laser
Clip-on weight at 12 o’clock
Adhesive weight at the point indicated by the
internal laser
Adhesive weight at the point indicated by the
internal laser
26
Use of the wheel balancing machine
Page 27

Use and Maintenance Manual Rev. 12-2012
6.7.3 Change weight application distance
ENGLISH
To change the correction positions indicated by the laser and automatically calculated by the machine, operate as
follows:
1. Position on the side to be changed by pressing the laser positioning button.
2. Press
3. Move the wheel by hand to move the laser.
4. When you have reached the desired position, press the button
To cancel this operation, press the button : The laser automatically goes back to indicating the correction
position previously saved.
Use of the wheel balancing machine
27
Page 28

Use and Maintenance Manual Rev. 12-2012
6.8 UNBALANCE SPLIT
ENGLISH
The split function is enabled for the outside of aluminium rims ( ALUMINIUM RIMS) and is used to hide any adhesive
unbalance correction weights behind the rim spokes.
To split the unbalance measured in two different positions, proceed as follows:
1. With the wheel in the outside correction position,
press the button to release it.
2. Select a spoke close to the position indicated by the
laser and press the button
The Wh ITe lINe oN The RIm INdI cATe s Th e uN bAlA Nce
If Th e sym bol A ppeA Rs, I T meAN s ThA T you c ANNo T
coRR ecTIoN pos ITIo N No T sp lIT.
sele cT The fIRs T sp oKe AT T hAT poIN T
(mA xImu m dI sTAN ce 150°).
3. Turn the wheel in the direction indicated on the screen
and select the second spoke by pressing the button
If Th e sym bol A ppeA Rs, I T meAN s ThA T you c ANNo T
sele cT The seco Nd s poKe AT ThAT poI NT
(mI NImu m dI sTAN ce 18°, mAxI mum dIsT ANce 120°).
4. At this stage, two indications appear on the screen for
positioning of the unbalance correction weights.
To cancel the split, press the button :
Any error in this procedure is clearly shown on screen.
28
Use of the wheel balancing machine
Page 29

Use and Maintenance Manual Rev. 12-2012
6.9 UNBALANCE OPTIMISATION
ENGLISH
Confirm
Return to main screen
Press the button from the second set of buttons on the unbalance measurement screen after performing a
balancing spin.
ThI s fu NcTI oN c ANNo T be Acc esse d If you hAv e No T fI RsT peRf oRme d A bAlA NcIN G sp IN.
The program allows total wheel unbalance to be reduced by compensating, when possible, tyre and rim unbalance
values. It requires two spins, rotating the tyre on the rim on the second spin.
At the end of the procedure, mark the rim and tyre positions indicated by the machine with a piece of chalk and remount both so that they coincide.
Use of the wheel balancing machine
29
Page 30

6.10 TYRE SET
ENGLISH
Use and Maintenance Manual Rev. 12-2012
Selects any one-way direction of the wheel
Prints the tyre set values
Return to main screen
Manual wheel position setting
This function allows balancing the four wheels of a vehicle, plus the spare wheel if necessary, and obtaining information
on how to mount them in order to reduce to a minimum the vibrations due to the residual eccentricity of each wheel.
The TYRE SET function can be enabled or disabled from the MENU; to best use this function, proceed as follows:
1. Prepare adhesive symbols to identify the wheels.
2. Mount the first wheel, measure the dimensions, balance it and identify it with the number 1.
3. Dismount the wheel and mount the next one, close the guard and balance the wheel without acquiring the
dimensions again.
4. Repeat step 3 for the remaining 3 wheels, plus any spare wheel, each time identifying the wheel with a progressive
number from 2 to 5.
5. Each time the spindle is opened, the wheel balancing machine indicates the best way to mount the wheels balanced
up to that point. On the left-hand side of the screen, a stylized vehicle is displayed with the four tyres plus the
spare wheel; at each spin, the number of the wheel to be mounted in each position is indicated on each of them
(right/left front/rear axle).
6. The procedure can be reset by measuring the dimensions like for a new wheel. If the spindle is incorrectly opened,
the balancing sequence is interrupted and consequently the end result will be incorrect.
7. To view a summary table with the wheel values, press the button :
Static residual unbalance
Radial runout
Tread measured as one value
30
Tread measurement
Wheel taper
Use of the wheel balancing machine
Page 31

Use and Maintenance Manual Rev. 12-2012
In the case of directional wheels, i.e. which can be mounted only on the right or only on the left, press the button
to set the direction:
▪ Left
▪ Right
▪ Left/right
The machine changes and immediately displays the new mounting order.
The wheel mounting order is established based on the residual radial eccentricity value of each wheel.
ENGLISH
To manually set the order of the wheels press + :
drag one wheel at a time to the desired position on the vehicle drawing and drop it when
the edges turn green
Resets the manual setting
Confirms manual setting
Cancels manual setting
AT e Ach uNb AlAN ce R ecAl culATI oN, The TyRe seT seT TING Goe s bA cK T o be ING bAse d oN The Whe el R uNou T.
Use of the wheel balancing machine
31
Page 32

6.10.1 Tyre set value certificate
ENGLISH
Press the button from the tyre set value summary screen.
LOGO
Use and Maintenance Manual Rev. 12-2012
Printout data setting
Saves the certificate to USB key
Loads the certificate from USB key
Prints the unbalance values
Return to main screen
6.10.2 Tyre set certificate customisation
Follow the instructions for customising the balancing certificate ( BALANCING CERTIFICATE CUSTOMISATION).
The .htm file to be customised is TyreSet.htm.
32
Use of the wheel balancing machine
Page 33

Use and Maintenance Manual Rev. 12-2012
6.11 WEIGHT STATISTICS
Clip-on weight graph
No. of daily spins:Indicates the number of spins performed by the machine per day
Total no. of spins: Indicates the number of spins performed by the machine starting from the reset date.
The two tables list all the weights (clip-on and adhesive) used starting from the reset date.
Adhesive weight graph
Resets the statistics
Print statistics
Displays the statistics of the weights used in grams
and ounces
Return to main screen
ENGLISH
When the RESET STATISTICS button is pressed, a pop-up menu appears that allows selecting which parameters
to reset.
Selects the counter to reset
Deselects the counter to reset
Resets the counters selected
Goes back to the measurement screen
Appears if the relative counter is selected to be reset.
Use of the wheel balancing machine
33
Page 34

ENGLISH
Use and Maintenance Manual Rev. 12-2012
Pressing on the buttons in the table header, graphic
display of the statistics of the weights used is enabled, which allows more intuitively understanding
the most common types of weight adopted.
34
Use of the wheel balancing machine
Page 35

Use and Maintenance Manual Rev. 12-2012
6.12 TRACEABILITY
Allows setting a series of information indicated on the balancing certificates.
ENGLISH
Allows alphanumerical setting of the field
Allows scrolling a list of possible selections
Confirms all the settings
Resets all the settings
(completely clearing the form)
Pressing the button to set a field, a virtual keyboard appears::
The virtual keyboard works exactly like a physical keyboard.
In particular:
Cancels any settings made
Resets the entire field
Deletes only the last character typed
Switches between small and capital letters (and vice versa)
Use of the wheel balancing machine
35
Page 36

Selects the QWERTY keyboard
Use and Maintenance Manual Rev. 12-2012
ENGLISH
Switches between various pages of special characters
Cancels the setting
Confirms the setting
36
Use of the wheel balancing machine
Page 37

Use and Maintenance Manual Rev. 12-2012
6.13 BALANCING CERTIFICATE PRINTOUT
Press the button from the second set of buttons on the unbalance measurement screen.
LOGO
Printout data setting
Saves the certificate to USB key
Loads the certificate from USB key
Prints the unbalance values
ENGLISH
Return to main screen
Use of the wheel balancing machine
37
Page 38

6.13.1 Balancing certificate customisation
ENGLISH
Insert a USB key in the port at the rear of the machine.
Use and Maintenance Manual Rev. 12-2012
USB PORT
Press to save the certificate management files to the USB key.
Afoldercalled“Certif”iscreatedonthekeycontainingallthelestobeeditedtocustomisethebalancing
certicate:
38
Use of the wheel balancing machine
Page 39

Use and Maintenance Manual Rev. 12-2012
File to be customised using an HTML editor (FinalCertificate.htm):
LOGO
Balancing certificate logo: 1241 × 278 pixel. It can be replaced with a personalised logo.
LOGO
ENGLISH
Use the following codes to insert the possible printable values in the balancing certificate.
Numeric code Field
Generic
#1# Date
#2# Time
Actual unbalances values
#10# Internal unbalance valueP2
#11# External unbalance value
#12# Static unbalance value
Run-out
#20# Radial run-out value
#21# Rim run-out value
#22# Tyre run-out value
Tread
#23# Tyre tread depht (standard)
#24# Tyre tread depht left (3 zones)
#25# Tyre tread depht center (3 zones)
#26# Tyre tread depht right (3 zones)
#27# Conicity value
Use of the wheel balancing machine
Conicity
39
Page 40

ENGLISH
Use and Maintenance Manual Rev. 12-2012
Units
#30# Unbalance unit measure (g/oz)
#31# Run-out unit measure (mm/”)
Tire set
#40# Radial run-out value for wheel nr.1
#41# Tyre tread depht. for wheel nr.1
#42# Internal unbalance value for wheel nr.1
#43# External unbalance value for wheel nr.1
#44# Static unbalance value for wheel nr.1
#45# Radial run-out value for wheel nr.2
#46# Tyre tread depht. for wheel nr.2
#47# Internal unbalance value for wheel nr.2
#48# External unbalance value for wheel nr.2
#49# Static unbalance value for wheel nr.2
#50# Radial run-out value for wheel nr.3
#51# Tyre tread depht. for wheel nr.3
#52# Internal unbalance value for wheel nr.3
#53# External unbalance value for wheel nr.3
#54# Static unbalance value for wheel nr.3
#55# Radial run-out value for wheel nr.4
#56# Tyre tread depht. for wheel nr.4
#57# Internal unbalance value for wheel nr.4
#58# External unbalance value for wheel nr.4
#59# Static unbalance value for wheel nr.4
#60# Radial run-out value for wheel nr.5
#61# Tyre tread depht. for wheel nr.5
#62# Internal unbalance value for wheel nr.5
#63# External unbalance value for wheel nr.5
#64# Static unbalance value for wheel nr.5
#65# Right front tyre number
#66# Left front tyre number
#67# Right rear tyre number
#68# Left rear tyre number
#69# Spare tyre number
#70# Tyre tread depht. 3 zones for wheel nr.1
#71# Tyre tread depht. 3 zones for wheel nr.1
#72# Tyre tread depht. 3 zones for wheel nr.1
#73# Tyre tread depht. 3 zones for wheel nr.2
#74# Tyre tread depht. 3 zones for wheel nr.2
#75# Tyre tread depht. 3 zones for wheel nr.2
#76# Tyre tread depht. 3 zones for wheel nr.3
#77# Tyre tread depht. 3 zones for wheel nr.3
#78# Tyre tread depht. 3 zones for wheel nr.3
#79# Tyre tread depht. 3 zones for wheel nr.4
#80# Tyre tread depht. 3 zones for wheel nr.4
#81# Tyre tread depht. 3 zones for wheel nr.4
#82# Tyre tread depht. 3 zones for wheel nr.5
#83# Tyre tread depht. 3 zones for wheel nr.5
#84# Tyre tread depht. 3 zones for wheel nr.5
#85# Conicity value for wheel nr.1
#86# Conicity value for wheel nr.2
40
Use of the wheel balancing machine
Page 41

Use and Maintenance Manual Rev. 12-2012
#87# Conicity value for wheel nr.3
#88# Conicity value for wheel nr.4
#89# Conicity value for wheel nr.5
Runout
#90# PP wheel runout
#91# I harmonic wheel runout
#92# II harmonic wheel runout
#93# III harmonic wheel runout
#94# IV harmonic wheel runout
#95# PP rim runout
#96# I harmonic rim runout
#97# II harmonic rim runout
#98# III harmonic rim runout
#99# IV harmonic rim runout
Rim Runout
#100# PP internal rim runout
#101# I harmonic internal rim runout
#102# II harmonic internal rim runout
#103# III harmonic internal rim runout
#104# IV harmonic internal rim runout
#105# PP external rim runout
#106# I harmonic external rim runout
#107# II harmonic external rim runout
#108# III harmonic external rim runout
#109# IV harmonic external rim runout
ENGLISH
Tolerance
#120# Runout tolerance
#121# Tread tolerance
#122# Conicity tolerance
Printout
#130# Unbalance
#131# Internal
#132# External
#133# Static
#134# Radial runout
#135# Rim runout
#136# Tire runout
#137# Tread depth
#138# Conicity
#139# Signature
Traceability
#150# Workshop laber
#151# Workshop
#152# Customer label
#153# Customer
Use of the wheel balancing machine
41
Page 42

ENGLISH
Use and Maintenance Manual Rev. 12-2012
#154# Car model label
#155# Car model
#156# Label Km
#157# Km
#158# Label registration
#159# Registration
#160# Label wheel position
#161# Wheel position
#162# Label tyre
#163# Tyre
#164# Label rim
#165# Rim
#166# Label pressure
#167# Pressure
#168# Label notes
#169# Notes
#170# Label 01
#171# Custom field 01
#172# Label 02
#173# Custom field 02
#174# Label 03
#175# Custom field 03
Edit the Finalcertificate.htm file based on your needs and save it to the USB key.
Insert the key in the machine and press to reload the customised balancing certificate.
42
Use of the wheel balancing machine
Page 43

Use and Maintenance Manual Rev. 12-2012
6.14 SCREENSAVER
ENGLISH
CUSTOMISED SCREENSAVER
If the machine is not used and remains on the initial screen for longer than the time settable from the menu, the
screensaver is automatically activated. Pressing on the screen at any point or moving the wheel, the main screen will
automatically be activated. Automatic start-up operated by the protection system is not available from the screensaver for safety reasons.
Use of the wheel balancing machine
43
Page 44

6.15 WHEEL ANALYSIS
ENGLISH
Press the button from the first set of buttons on the measurement screen.
Goes to the peak/peak and first harmonic graph screen
Goes to the tread analysis screen
Prints the information screen
Use and Maintenance Manual Rev. 12-2012
Return to main screen
This screen shows all the data read in the various unbalance measurement and wheel analysis phases.
For more information, refer to the paragraphs RUNOUT, TREAD, TAPER .
The button is displayed with a red I when:
▪ The first harmonic of the wheel runout exceeds the limit set in the setup parameters.
▪ The first harmonic value of the rim runout exceeds the limit set in the setup parameters.
▪ The tread value is less than the limit set in the setup parameters.
▪ The wheel taper value is considered unacceptable (indicator on red level).
44
Use of the wheel balancing machine
Page 45

Use and Maintenance Manual Rev. 12-2012
wheel
wheel
wheel
6.15.1 Runout
6.15.1.1 When and why TO USE MATCHING
The software associated with the eccentricity measurement is a powerful tool to determine the need to perform
the relative rotation between the wheel and the rim in
order to reduce the eccentricity to within acceptable limits. The criterion used is based on the fact that a rim with
acceptable tolerance, mounted with acceptable tyre, can
statistically generate an unacceptable total eccentricity
that can be improved by matching.
ER 100 is capable of automatically measuring the eccentricity of both the tyre and the rim from the inside.
The latter measurement generally corresponds to the rim
eccentricity in the tyre fitting area.
The RIm cAN be meA suRe d mo Re AccuRA Tely usI NG The sp ecIf Ic
pRo GRAm WIT houT The TyR e.
Example 1
ENGLISH
virtual wheel
rim
tyre
rotation axis
Tyre - 0.6 mm
Wheel + 0,3 mm
The eccentricity of the single elements is compensated.
The wheel is acceptable.
Example 3
virtual wheel
rim
tyre
rotation axis
Rim + 0.8 mm
Tyre + 0.6 mm
Wheel + 1.3 mm
The wheel eccentricityis excessive because an acceptable
rim or tyre has randomly been positioned in an “unfor-
tunate” position”.
virtual wheel
rim
tyre
rotation axis
Rim - 0 mm
Tyre + 1,2 mm
Wheel + 1.2 mm
The wheel eccentricity cannot be compensated by the rota-
tion because the rim is perfect!
SOLUTION: turn the tyre on the rim by 180°
RESULT: wheel eccentricity 0.3 – 0.4 mm (in tolerance)
Rim + 0.8 mm
Use of the wheel balancing machine
SOLUTION: turn the tyre on the rim by 180°
RESULT: No improvement.
45
Page 46

6.15.1.2 Matching
ENGLISH
Use and Maintenance Manual Rev. 12-2012
Goes to the peak/peak and first harmonic graph
screen.
Goes to the tread analysis screen
Prints the information screen
Enables/disables wheel in position
Return to main screen
The rim and wheel runout measurements are automatically made during the unbalance measurement cycle and no
extra time is required.
The purpose of these measurements is to check whether it is possible to reduce the total wheel runout by turning
only the tyre on the rim.
The information shown on the screen is:
Grey rim: outer tyre surface
Yellow rim: rim surface
: Tyre runout position (moved by turning the wheel)
: Rim runout position (moved by turning the wheel)
When highlighted:
indicates that the tyre needs to be marked with a piece of chalk at the top at 12 o’clock.
When highlighted:
indicates that the rim needs to marked with a piece of chalk at the top at 12 o’clock.
Wheel runout (rim plus tyre):
46
Tyre runout
Rim runout
The wheel and rim runout values are shown in white if they are within tolerance and in red if they are out of
tolerance.
Use of the wheel balancing machine
Page 47

Use and Maintenance Manual Rev. 12-2012
displayed when Wheel Runout or Rim Runout is out of tolerance.
displayed when both Wheel Runout and Rim Runout are within tolerance.
Percentage wheel runout reduction
Estimated residual wheel runout after matching
The rotation symbol and the residual wheel runout value are shown in red if the estimated value after matching is out
of tolerance with respect to the value set in the runout setup parameters.
6.15.1.2.1 When to perform matching
It is advisable to perform matching if the wheel runout value is displayed on a red background and the residual wheel
runout value is displayed in the Match box on a green background.
ENGLISH
6.15.1.2.2 How to perform matching
▪ Turn the wheel and mark the tyre and the rim with a piece of chalk at the two points indicated in the graph.
▪ Turn the tyre on the rim until the two marks coincide.
Use of the wheel balancing machine
47
Page 48

6.15.1.3 Peak/peak and first harmonic graphs
ENGLISH
Use and Maintenance Manual Rev. 12-2012
Goes back to the runout/matching analysis
screen
Displays the peak/peak, 1st, 2nd, 3rd, 4th harmonic graphs and values of the tyre and the rim.
Pressing on the graphs you can enlarge them to better highlight any wheel and rim defects.
you cAN dIs Able The Whe el o R RI m ec ceNT RIcI Ty m eAsu Reme NT f Rom GeNe RAl seTu p.
48
Use of the wheel balancing machine
Page 49

Use and Maintenance Manual Rev. 12-2012
6.15.2 Tread
ENGLISH
Goes to the peak/peak and first harmonic graph
screen.
Goes to the tread analysis screen
Prints the information screen
Enables/disables wheel in position
Return to main screen
Tread analysis can be performed
1. During the balancing cycle to obtain an average value measured over the whole tyre width.
No extra time is required.
2. Enable a special measuring cycle using the button to obtain the tread value for the three different areas:
inside edge, centre and outside edge of the tyre.
The cycle time is slightly longer.
The tread values that are out of tolerance are shown in red.
displayed when at least one tread value is out of tolerance.
displayed when all the tread values are within tolerance
By law (to be verified for each country) the minimum tread thickness must be 1.6mm at each point.
It is quite normal for tyres to wear irregularly and that the pivot pins wear more on one side.
By means of tread analysis at several points, you can measure the tyre tread depth with adequate accuracy on the
edges and in the centre.
Use of the wheel balancing machine
49
Page 50

For detailed tread analysis, press the button :
ENGLISH
Use and Maintenance Manual Rev. 12-2012
Increases the scale
Decreases the scale
Increases the scale
Decreases the scale
Enables cursor display for
tread measurement
Goes back to the information screen
When pressing the button two cursors are displayed (one red and one yellow) and a black window that shows
the difference in millimetres measured between the two cursors.
Dragging the cursors with your finger,
you can move them to another point
of the tread.
Goes back to the information screen
Indicates the distance between the
two cursors.
50
Use of the wheel balancing machine
Page 51

Use and Maintenance Manual Rev. 12-2012
6.15.3 Taper
ENGLISH
Goes to the peak/peak and first harmonic graph
screen.
Goes to the tread analysis screen
Prints the information screen
Return to main screen
Examination of the wheel taper requires a special measuring cycle to be enabled using the button and
requires a slightly longer cycle time.
After the measurement, you obtain:
GREEN indicator: wheel NOT TAPERED and in good conditions
YELLOW indicator: wheel SLIGHTLY TAPERED
to the right
or to the left
as indicated in the graph:
it is advisable to check the wheel soon.
RED indicator: TAPERED wheel
to the right
or to the left
as indicated in the graph.
Check the taper of the wheel to be mounted on the same axle, assess if there is any
toe-inor replace the wheel.
displayed when the wheel is not tapered.
displayed when the wheel taper value is deemed unacceptable (indicator on red level)
The wheel taper measurement is important to solve any vehicle drift problems. Wheels tapered in the same
direction and mounted on the same axle might lead to the vehicle having problems in maintaining the trajectory on a straight line.
Use of the wheel balancing machine
51
Page 52

6.16 OUTSIDE RIM RUNOUT
ENGLISH
Press the button after closing the spindle.
Use and Maintenance Manual Rev. 12-2012
mouN T o Nly The RIm WIT houT The TyR e.
Close the guard and press the button
Confirm
Goes back to the measurement screen
Return to main screen
52
Use of the wheel balancing machine
Page 53

Use and Maintenance Manual Rev. 12-2012
The machine automatically reads the rim dimensions and performs a spin.
During rotation the outside eccentricity measurement is executed on the inner and outer edges of the rim in the positions laid down by the international standards.
When complete, a screen with the graphs of the values just measured is displayed.
Repeats the outside rim eccentricity measurement
Goes back to the measurement screen
Return to main screen
ENGLISH
Identifies the rim outside
Identifies the rim inside
Outside rim runout within tolerance
Outside rim runout out of tolerance
Theoutsiderimrunoutmeasuredontheedgesoftherimisdeemedwithintoleranceifboththerstharmonic
and the peak/peak values measured are less than the limits set in OUTSIDE RIM RUNOUT setup
Use of the wheel balancing machine
53
Page 54

Use and Maintenance Manual Rev. 12-2012
7. Wheel dismounting
ENGLISH
▪ Push the Zero Weight pedal. The carriage moves up to the wheel retrieval position.
▪ Push the tyre locking pedal to open the spindle.
▪ Push the Zero Weight pedal or push on the Zero Weight carriage lever to lower the carriage and dismount the
wheel.
If T he Whee l hA s be eN m ouNT ed W ITho uT u sING The ZeR o We IGhT lIf T, p ushI NG T he ZeRo WeIG hT p edAl AN eRRo R me ssAG e
WIll be dIs plAyed: dIs mouN T Th e Wh eel WIT houT The AId of The lIfT IN The sAme WAy IT WAs m ouNT ed.
The Whe el m ouNT ING/dIsm ouNT ING opeR ATING loGI c Im plIe s Th AT The Whe el b e mo uNTe d AN d dI smo uNTe d
usI NG T he l IfT ANd NoT by h ANd.
54
Use of the wheel balancing machine
Page 55

Use and Maintenance Manual Rev. 12-2012
8. Setup
8.1 MENU
Press the button from the measurement screen (second set of buttons)
ENGLISH
Setup
55
Page 56

8.2 GENERAL SETUP
ENGLISH
Use and Maintenance Manual Rev. 12-2012
Gives the user the possibility of setting the machine according to need. All the settings remain
when the machine is turned off.
8.2.1 General setup 1/3
Decreases the value
Increases the value
Confirms the default parameters
Goes back to the main menu screen
Goes to the setup screen 2/3
Return to main screen
unaltered even
Language:
Screensaver (min.):
Screensaver type: allows customising the screensaver with any kind of image in .jpg format. ( SCREEN-
Linear unit of measure: selects the unit of measure (mm/inch)
Correction method: allows selecting from 3 correction methods: STANDARD, EXTERNAL PLANES, BPC
STANDARD The wheel balancing machine considers the unbalance within tolerance when the value of
EXTERNAL PLANES The unbalance is considered within tolerance when the weight recalculated on the external
allows selecting the language to be used to display the descriptive and diagnostic messages
relating to machine operation.
allows selecting when the screensaver will be activated after the machine has not been
used for a certain time.
SAVER CUSTOMISATION)
each single plane is lower than the tolerance set.
planes (clip-on weight) is lower than the tolerance set.
56
Setup
Page 57

Use and Maintenance Manual Rev. 12-2012
BPC (Best Possible Correction) Provides the best possible solution for reduction of vibrations noticeable in the
vehicle.
Many elements affect the vibration perceived in the vehicle due to wheel unbalances:
▪ Residual static unbalance
▪ Residual dynamic (or torque) unbalance
▪ Wheel weight (the heavier the wheel, the less the unbalance will make it vibrate)
▪ Wheel diameter (on which the application radiuses of the counterweights depend)
Comparison between conventional balancing and the BPC method
CONVENTIONAL BALANCING:
▪ Given a set tolerance of 5g, a wheel is considered balanced also with a residual unbalance of 4.9g per plane in
approximately the same angular position. This means that a static unbalance of 9.8 grams is tolerated, even
though the static unbalance is deemed the main cause of vibrations noticeable by the driver.
▪ The balancing tolerance for all wheel types, not taking any unbalance of 10g into account, produces different
vibrations on a 13” or a 22" wheel. The residual vibrations are inversely proportional to the wheel weight.
▪ The angular position of the residual unbalances is not taken into account.
BALANCING USING THE BPC METHOD:
▪ With this method, the balancing tolerance value is reprocessed based on the wheel dimensions and the permissible
residual static and torque unbalances, which are numerically different (greater torque unbalance than static
unbalance is permitted).
▪ The tolerance no longer refers to the correction planes but is UNIQUE and indicates the residual vibration limit
value permissible on the wheel.
▪ An indicator on the screen provides information on the residual vibration obtained after balancing with respect
to the maximum tolerable vibration.
▪ Bymeans of complex mathematical calculations, it indicates how many and where correction weights should be
added for the best possible reduction of the vibrations noticeable by the driver. This means that the customer
receives the best possible service.
ENGLISH
No alternative method can be more accurate, using moderate weights with steps of 5g.
The machine also measures by HOW MUCH the “noticeable vibration” in the vehicle has been reduced with respect to the
conventional method, indicating the percentage reduction, i.e. by how much it has improved with respect to conventional
machines.
Less vibration, more satised customers!
Display pitch: This represents the unbalance display pitch and varies based on the unit of measure
selected.
such as to set the static unbalance value to 0 (theoretical).
It is advisable to set this function for normal use of the machine, as it improves the
ancing quality. The computer makes a complex calculation
residualstaticunbalancebyvaryingthevalueandthepositionofthecounterweightsxed
in steps of 5 grams (1/4 oz).
Tolerance:
Default parameter setting: Resets the default machine settings.
This is the unbalance threshold below which OK appears on the screen instead of the
unbalance value at the end
Selecting 5g (1/4 oz) enables display of the correction values
which allows cancelling the
of the spin.
on the two sides
bal-
Setup
57
Page 58

Use and Maintenance Manual Rev. 12-2012
8.2.1.1 Screensaver customisation
ENGLISH
From the General Setup screen, select CUSTOMISED SCREENSAVER and press the button
CUSTOMISED
SCREENSAVER
Saves the current screensaver to the USB key. The directory ER100_Screensave is created on the key
containing the file screensave.jpg; replace this file with the desired image, keeping the same name and
the same format (.jpg)
Loads the customised screensaver to the machine.
58
Goes directly to the screensaver screen.
Goes back to the general setup screen
Setup
Page 59

Use and Maintenance Manual Rev. 12-2012
8.2.2 General setup 2/3
ENGLISH
Decreases the value
Increases the value
Confirms the default parameters
Goes back to the setup screen 1/3
Goes to the setup screen 3/3
Return to main screen
Static unbalace always present: Enables/disables temporary display of the unbalance on the correction planes
selected and the STATIC unbalance
Wheel locking: Enables/disables wheel locking in the correction position
Wheel runout: Enables/disables wheel eccentricity measurement
Rim runout: Enables/disables rim eccentricity measurement
Runout diagnosis: Enables/disables display of the runout values on the unbalance measurement
screen
Lift: Enables/disables the lift
Selecting ON+HELP, online help is enabled on the measurement screen, cre-
ated with the aim of helping the user to properly use the lift.
Printer: Enables/disables the printer
Tyre set: Enables/disables the tyre set function
Default parameter setting: Resets the default machine settings
Setup
59
Page 60

8.2.3 General setup 3/3
ENGLISH
Use and Maintenance Manual Rev. 12-2012
Decreases the value
Increases the value
Confirms the default parameters
Goes back to the setup screen 2/3
Return to main screen
Rim interior light: Enables/disables a light to come on when the wheel is in the correction
position
Anticipated laser movement: Enables/disables anticipated laser movement as soon as you start closing
the guard.
If disabled, the lasers start measuring the wheel dimensions only after
having completely closed the guard.
Vibration reduction display: Enables/disables display of the vibration reduction percentage of the BPC
method with respect to the conventional method.
Functions only if the BPC method is enabled.
Default parameter setting: Resets the default machine settings
Status icon: enables/disables display of status icons on the main screen
Positioning: enables/disables wheel positioning.
60
Setup
Page 61

Use and Maintenance Manual Rev. 12-2012
8.3 RESERVED SETUP
Access to this screen is password protected [1 - 3 - 5 - 7 ].
ENGLISH
Press to access to reserved setup second screen.
INc oRRe cTly cA RRyIN G ou T Th e Re seRv ed s eTup pRo cedu Res mIGh T cA use seRI ous pRo blem s WI Th W heel bAl ANcI NG A Nd d IAGN osIs .
Reserved Setup
61
Page 62

8.3.1 LASER calibration
ENGLISH
Use and Maintenance Manual Rev. 12-2012
Saves the laser calibration values
Confirm
Goes back to the measurement screen
Return to main screen
1. Open the spindle and fit the specific calibration tool as shown in the figure.
The Tool cAN NoT be f ITTe d IN A p osIT IoN dIff eReN T fR om T hAT I NdIc ATed I N Th e fI GuRe .
do N oT peRf oRm A bA lANc ING spIN WIT h Th e cA lIbR ATIoN Tool fIT Ted.
AlWAys fI T Th e cA p o N Th e co llAR .
1. Close the spindle and the guard and press the button.
2. Remove the calibration tool and press
3. Press to save the calibration
4. Press to exit from the screen.
62
Reserved Setup
Page 63
Use and Maintenance Manual Rev. 12-2012
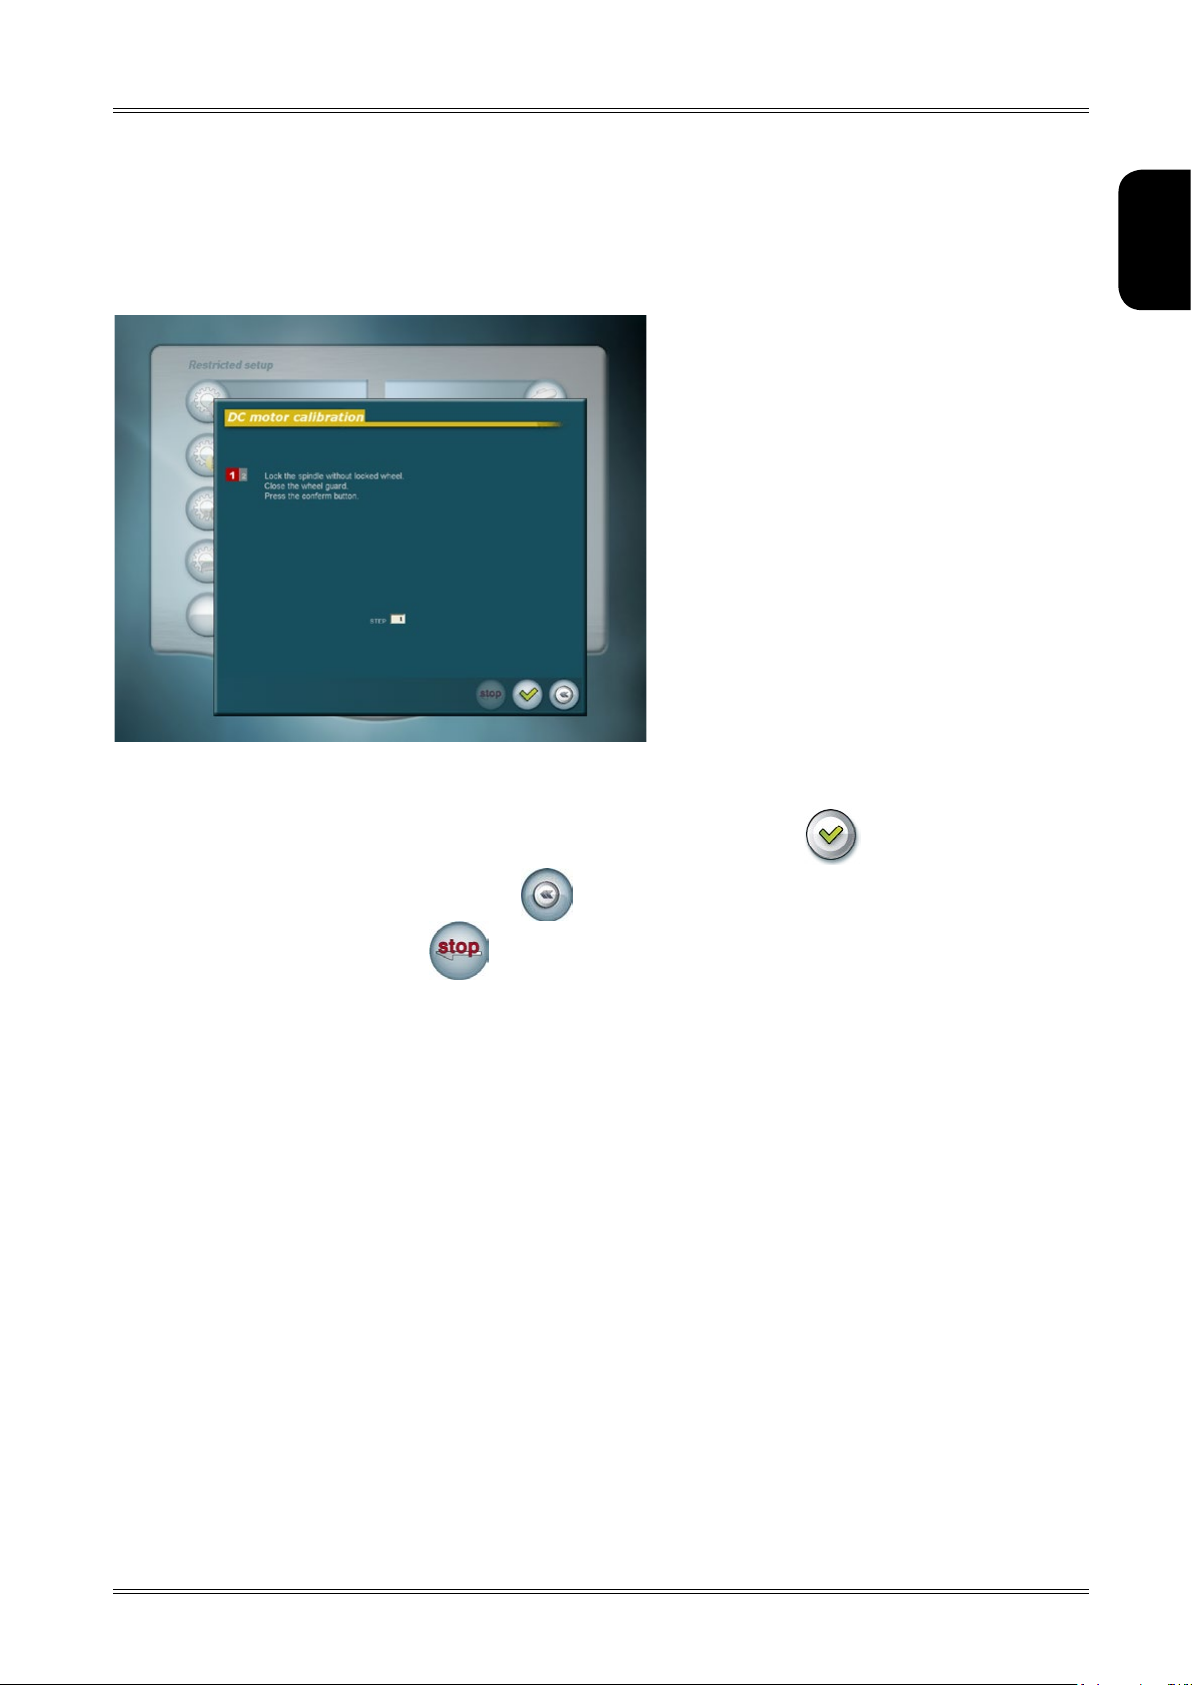
8.3.2 CC motor calibration
ENGLISH
1. Lock the spindle without a wheel or tools mounted. Close the guard and press
2. Wait for the procedure to complete.
3. If erroneously accessing the function, press
4. To interrupt the procedure, press .
Reserved Setup
63
Page 64

8.3.3 Spindle reset
ENGLISH
Use and Maintenance Manual Rev. 12-2012
Resets the spindle reset values.
Displays the spindle reset values saved
Saves the spindle reset values.
Confirm
Goes back to the measurement screen
Return to main screen
1. Lock the spindle without a wheel or tools. Close the guard and press the button
2. View the spindle reset values just read (if necessary for particular tests requested by Technical Service).
3. Press to save the spindle reset values
4. Press to exit from the screen.
64
Reserved Setup
Page 65

Use and Maintenance Manual Rev. 12-2012
8.3.4 Taper calibration
ENGLISH
Saves the calibration
Confirm
Goes back to the reserved setup screen
Return to main screen
1. Open the spindle and fit the calibration tool fastening it to the adapter with the screw and nut provided.
2. Position the tool in such a way that the laser crosses its central part during normal reading movement.
3. Close the guard and press the button
4. When prompted on the screen, remove the tool and then fit it on the other side.
do N oT opeN The spI Ndle .
5. When reading is complete, remove the calibration tool.
dAN GeR! do NoT peRf oRm A sp IN W ITh The Tool fITT ed!
6. Save the calibration.
7. Press to go back to the main screen.
Reserved Setup
65
Page 66

8.3.5 Correction weights
ENGLISH
Use and Maintenance Manual Rev. 12-2012
Decreases the value
Increases the value
Displays a calculator to
enter values directly
Confirms the default parameters
Goes back to the reserved setup screen
Return to main screen
Correctly set the length of the correction weights in order to improve the balancing quality.
Default parameter setting: Resets the default machine settings.
The zinc weights used for balancing generally become very long as the weight increases; in this condition the
weight can no longer be considered concentrated at the barycentre and the effect, for example, is a weight of
only 47 instead of 50 grams.
Correctly setting the length of the correction weights allows the wheel balancing machine to automatically compensate for the fact that all the weight cannot be applied at one point.
66
To o bTAIN The bes T Re sulTs, AlWAys u se W eIGh Ts o f Th e sA me m ANufA cTuR eR.
Reserved Setup
Page 67

Use and Maintenance Manual Rev. 12-2012
8.3.6 Wheel runout
ENGLISH
Decreases the value
Increases the value
Confirms the default parameters
Goes back to the reserved setup screen
Return to main screen
Wheel first harmonic limit: Represents the first harmonic limit beyond which it is considered appropriate
to turn the tyre on the rim by 180°. Recommended limit = 1.2 mm.
Rim first harmonic limit: Represents the first harmonic limit of the rim below which it is not considered
appropriate to turn the tyre on the rim.
Recommended limit = 0.3 mm.
Minimum correction limit: Represents the minimum correction limit obtainable below which it is not
considered appropriate to turn the tyre on the rim. Recommended limit =
0.8 mm.
Default parameter setting: Resets the default machine settings.
Reserved Setup
67
Page 68

8.3.7 Outside rim runout
ENGLISH
Use and Maintenance Manual Rev. 12-2012
Decreases the value
Increases the value
Confirms the default parameters
Goes back to the reserved setup screen
Return to main screen
Outside rimrunout: Enables/disables the outside rim runout measurement function
Inside first harmonic limit: Represents the threshold beyond which the first harmonic value read for
the rim inside is not considered acceptable.
Outside first harmonic limit: Represents the threshold beyond which the first harmonic value read for
the rim outside is not considered acceptable.
Inside peak/peak limit: Represents the threshold beyond which the peak/peak value read for the
rim inside is not considered acceptable.
Outside peak/peak limit: Represents the threshold beyond which the peak/peak value read for the
rim outside is not considered acceptable.
Default parameter setting: Resets the default machine settings.
68
Reserved Setup
Page 69

Use and Maintenance Manual Rev. 12-2012
8.3.8 Tread
ENGLISH
Decreases the value
Increases the value
Confirm
Goes back to the reserved setup screen
Return to main screen
Tread limit: Represents the threshold beyond which the tread is no longer acceptable.
Default parameter setting: Resets the default machine settings.
Reserved Setup
69
Page 70

8.3.9 Reserved for technical service
ENGLISH
Password-protected area reserved for technical service only.
Use and Maintenance Manual Rev. 12-2012
Acc ess To ThIs ARe A WIT houT The N eces sARy K NoWl edGe mIG hT le Ad To INcoRRecT fuN cTIo NING ANd e veN m ATeRI Al dA mAGe To Th e
Whe el b AlAN cING mAc hINe .
8.3.10 Saves the machine calibration
Saves the machine calibration values to key.
8.3.11 Loads the user manual
Allows loading manuals in languages different from that loaded in the machine.
70
Reserved Setup
Page 71

Use and Maintenance Manual Rev. 12-2012
8.3.12 Firmware upgrade
Allows updating the board firmware.
ENGLISH
Confirms access to the function
Goes back to the reserved setup screen
1. Press the Confirm button
2. Press the Browse Folders button to select the new firmware.
3. Select the file .BL5 and press the button
Browse folders
Goes back to the reserved setup screen
Starts the firmware upgrade
4. When the operation is complete, press to exit the function.
Reserved Setup
71
Page 72

8.3.13 Factory setting
ENGLISH
Use and Maintenance Manual Rev. 12-2012
Confirms loading of the factory settings
Goes back to the reserved setup screen
Restore all the default settings of the machine, including the instruction manual in English.
exe cuTe ThI s fu NcTI oN o Nly Whe N Re ques Ted by spec IAlI sed peRs oNs.
72
Reserved Setup
Page 73

Use and Maintenance Manual Rev. 12-2012
8.4 MACHINE CALIBRATION
ENGLISH
Reserved for Technical Service
Saves the calibration values
Confirm
Goes back to the setup screen
Goes back to the main screen
1. Select a commercial wheel or sample wheel based on the type of wheel you intend to use for calibration and press
the button.
2. Mount the wheel selected, close the guard and press the button.
3. Set the value of the sample weight used for the calibration.
4. Open the guard, apply the sample weight on the outside of the wheel, close the guard and press the button.
5. Open the guard, apply the sample weight on the inside of the wheel in the same position as it was applied on the
outside, close the guard and press the button.
6. Move the sample weight to 12 o’clock and press the button.
7. Press the calibration save button .
8. Press the button to go back to the measurement screen.
Reserved Setup
73
Page 74

8.5 DIMENSIONS
ENGLISH
Allows accessing the manual wheel dimension setting screen.
TEST scR eeN Res eRve d fo R ex peRT s.
use oNl y IN spe cIfI c cA ses.
Use and Maintenance Manual Rev. 12-2012
74
Reserved Setup
Page 75

Use and Maintenance Manual Rev. 12-2012
8.6 SELF-DIAGNOSTICS
ENGLISH
Automatic measuring cycle
Laser reset
Diagnosis parameter printout useful for Technical Service.
Goes back to the main menu screen
Return to main screen
Displays a screen containing numerous test parameters useful for the maintenance technician.
Enables an automatic unbalance and runout cycle useful to check any machine oscillation problems.
Execute this function only on specific request of Technical Service.
Enables a laser reset cycle, to be executed only on specific request of Technical Service.
Reserved Setup
75
Page 76

8.7 OSK
ENGLISH
Use and Maintenance Manual Rev. 12-2012
Increases the value
Decreases the value
Confirm
Goes back to the main menu screen
Time: enables/disables the display clock on the measurement screen
Hour screensaver: enables/disables the display clock on the screensaver screen
Time format: select the format to display the time
Allows correctly setting the date and time.
Increases the value
Decreases the value
Confirm
Goes back to the main menu screen
76
Reserved Setup
Page 77

Use and Maintenance Manual Rev. 12-2012
Press the button to go to date setting.
Increases the value
Decreases the value
Confirms and goes back to the main
menu screen
Goes back to the main menu screen
ENGLISH
Reserved Setup
77
Page 78

8.8 SOUNDS
ENGLISH
Use and Maintenance Manual Rev. 12-2012
Decreases the value
Increases the value
Confirms the default parameters
Goes back to the main menu screen
Return to main screen
Introduction: Enables/disables an introduction sound during machine power on.
Touch buttons: Enables and selects/disables the sound emitted when pressing any button
sev eRAl Typ es o f so uNd ARe AvAI lAbl e; s elec T Th e oN e yo u lI Ke T he m osT.
Wheel in position:
Default parameter setting: resets the default machine settings.
Enables/disables the sound emitted when the wheel is in the correction position
78
Reserved Setup
Page 79

Use and Maintenance Manual Rev. 12-2012
8.9 TRACEABILITY
ENGLISH
Traceability:
OFF: disabled
PRINTOUT: enables access to a screen for setting a series of parameters indicated on the balancing
certificates.
Default parameter setting: restores the default machine settings.
8.10 INSTRUCTION MANUAL
Displays the machine instruction manual .
Reserved Setup
79
Page 80

9. Diagnostics
ENGLISH
Use and Maintenance Manual Rev. 12-2012
The I NfoR mATI oN IN The possIble Remedy colu mN Re quIR es Wo RK To be peR foRm ed by spec IAlI sT Te chNI cIAN s oR oT heR A uTho R-
WARNING
Ise d peo ple Who musT AlW Ays W oRK usIN G Th e pe RsoN Al pRoTe cTIv e equ Ipme NT I NdIc ATed IN The INsTAllATIoN mAN uAl. IN s ome
SOFTWARE
ERRORS
Black The wheel balancing machine does not
Err. 1 STOP button pressed with the motor
Err. 2 Speed too low during measurement.
Err. 3 Unbalance too high. 1. Check the wheel dimensions setting.
Err. 5 Guard open.
Err. 6 Spindle open
Err. 8 Errorintransferoftheoutsideprole
Err. 9 Errorintransferoftheinsideprole
Err. 10 The inside adhesive weight distance is
Err. 11 Speed too high error.
Err.15 Error dimensions stored invalid (only for
Err. 16 Internal laser position error during the
CAUSE POSSIBLE REMEDY
switch on.
running.
During the unbalance measurement
spins, the wheel speed dropped to
below 42 rpm.
Guard opening during the measuring
cycle
Spinenabledwithoutrsthavingclosed
the spindle.
measurement data from the acquisition
board to the PC.
measurement data from the the acquisition board to the PC.
greater than the outside adhesive weight
distance.
During unbalance measurement rotation, wheel speed is more than 270 rpm.
releases prior to M3390).
machine calibration function.
cAs es, ThIs WoR K cA N be peR foRm ed b y A NoRm Al o peRA ToR.
1. Check the machine is properly connected to the mains power supply.
2. Check the fuses on the power board and replace if necessary.
3. Check display functioning.
4. Replace the PC.
1. Repeat the measuring cycle avoiding to press the STOP button
unless for an emergency.
1. Make sure that a vehicle wheel is mounted on the wheel balancing machine.
2. Use the self-diagnostics function to check the encoder.
3. Disconnect the measuring head connector from the board and perform
a spin (if there is no error, replace the measuring heads)
4. Replace the acquisition board.
2. Check the detection unit connections.
3. Run the machine calibration function.
4. Mountawheelwithamoreorlessknownunbalance(denitely less
than 100 grams) and check the response of the machine.
5. Replace the acquisition board.
1. Check functioning of the protection microswitch
2. Repeat the measurement keeping the guard closed until the end
of the spin.
1. Check functioning of the spindle closing microswitch
2. Close the spindle
3. Lower the guard
1. Repeattheoutsideprolemeasurement.
2. Replace the acquisition board.
1.Repeattheinsideprolemeasurement.
2. Replace the acquisition board.
1. Repeat the wheel dimension measurement.
2. Repeat the laser calibration function.
3. Replace the acquisition board.
1. Use the self-diagnostics function to check the encoder.
2. Separate the encoder cable from the motor power cable.
3. Replace the encoder.
4. Replace the acquisition board.
1. Repeat the wheel dimension measurement.
2. Use the self-diagnostics function to check proper functioning of the
lasers.
3. Replace the acquisition board.
1. Check that the internal laser is in the rest position.
2. Use the self-diagnostics function to check proper functioning of the
internal laser.
3. Check proper functioning of the microswitch that detects the internal
laser in rest position.
4. Turn off the wheel balancing machine, turn it back on again and
directly access the machine calibration screen.
80
Diagnostics
Page 81

Use and Maintenance Manual Rev. 12-2012
Err. 20 Message management error (incorrect
Err.21
Err. 22
Err. 31/
Err. 32/
Err. 33/
Err. 34/
Err. 39/
Err. 42
Err.50 Error in eccentricity measurement using
Err.51 Error in eccentricity measurement using
Err.60 Error: the spindle is not closing. 1. Use the self-diagnostics function to check proper functioning of the
Err.61 Error: the spindle is not opening 1. Check the pneumatic system air pressure.
Err.70 Error. Lift down and does not ascend.
Err.71 Error. Lift up and does not descend.
Err.72 Error. Lift up during unbalance,
Err.75 Error in the taper calibration function. 1. Use the self-diagnostics function to check proper functioning of the
Err.100 Error in sending parameters from the PC
Err. 121
Err. 123/124
Err. 125/126
Err. 127/128
Err. 129/130
Err. 141
Err. 143/144
Err. 145/146
Err. 147/148
Err. 149/150
Err. 122/131
Err. 142/151
Err. 127/147 Internal/external laser stepper motor
or no translations) (only for releases
prior to M3343).
Date and time setting error
Firmware upgrade management error.
the external laser
the internal laser
eccentricity and taper measurement
to the acquisition board.
Internal laser motor control error. 1. Reset the wheel balancing machine.
External laser motor control error. 1. Reset the wheel balancing machine.
The internal/external laser does not
reach the position requested.
turning in reverse direction.
1. Change the language, selectable in Setup.
2.ContactTechnicalServicetondoutiftheon-screenmessagescan
be updated in the various languages.
1. Repeat the date and time setting function.
2. Check that you have set numbers compatible with the date and time
format.
1. CheckthatyouhaveloadedalewithextensionBI5.
2. Repeatthermwareupgradefunction.
1. Check that you have correctly mounted the wheel or rim.
2. Check that during measurement (wheel at full speed), the red light
of the external laser is aimed at the tyre or the rim.
3. Open the spindle, close the spindle and repeat the eccentricity
measurement function.
1. Check that you have correctly mounted the wheel or rim.
2. Check that during measurement (wheel at full speed), the red light
of the internal laser is aimed at the tyre or the rim.
3. Open the spindle, close the spindle and repeat the eccentricity
measurement function.
spindle.
2. Check the spindle opening/closing control microswitch.
3. Check that there are no mechanical obstructions hindering spindle
opening/closing.
1. Use the self-diagnostics function to check proper functioning of the lift.
2. Check proper functioning of the microswitch that detects the lift in
rest position.
3. Check the pneumatic system air pressure.
1. Use the self-diagnostics function to check proper functioning of the lift.
2. Check proper functioning of the microswitch that detects the lift in
rest position.
3. Check that there are no mechanical obstructions hindering lift descent.
1. Lower the lift before starting any measuring cycle
external laser.
2. Check that the external laser light spot is aligned with the spindle.
3. Check that you have correctly fitted the calibration tool.
4. Repeat the taper calibration function.
1. Reset the wheel balancing machine.
If the problem persists:
1. Check the connection cables between the PC and the acquisition board.
2. Replace the acquisition board.
3. Replace the PC.
If the problem persists:
1. Check compatibility between the software and the firmware.
2. Reinstall the software and the firmware.
If the problem persists:
1. Check compatibility between the software and the firmware.
2. Reinstall the software and the firmware.
1. Check that there are no mechanical obstructions hindering
laser movement.
2. Check functioning of the stepper motor belt.
3. Check the stepper motor power supply.
4. Check the stepper motor connection cables.
5. Where provided, check the encoder on the stepper motor slide.
1. Check the stepper motor connection.
ENGLISH
Diagnostics
81
Page 82

Use and Maintenance Manual Rev. 12-2012
Err. 132/152 Internal/external laser stepper motor
Err. 133/153 Different internal/external laser
ENGLISH
Err.201 Lasercalibrationlewriteerror 1. Repeat the laser calibration function.
Err.202 Laser calibration incorrect or inexistent 1. Repeat the laser calibration function.
Err.203/
Err.204
Err. 205/
Err. 208/
Err. 209
Err. 206/
Err.207
Err. 210 Impossible to determine the type of error 1. Check the type of internal laser fitted on the slide.
Err. 211/
Err. 212/
Err. 213/
Err. 214
Err. 221/
Err. 222/
Err. 223/
Err. 224/
Err. 225
Err. 226
HARDWARE
ERRORS
movement stopped with STOP
command
positioning between the stepper motor
and the encoder
Internal laser read error during
calibration.
Error in the data read for laser
calibration.
External laser read error (during
calibration).
External laser read error 1. Check that the light spot is visible on the wheel to be measured.
Internal laser read error 1. Check that the light spot is visible on the wheel to be measured.
CAUSE CHECKS
1. Repeat the measurement avoiding to press the STOP button unless
for an emergency.
1. Check functioning of the stepper motor belt
2. Check the encoder on the stepper motor slide.
2. Replace the DOM.
2. Replace the DOM.
1. Check that you have correctly fitted the laser calibration tool.
2. Check that the laser light spot is able to read the calibration tool.
3. Check that there are no objects that may interfere with calibration
tool reading.
4. Repeat the laser calibration function.
1. Repeat the laser calibration function.
1. Check that you have correctly fitted the calibration tool.
2. Check that the external laser light spot is able to read the spindle
and the calibration tool.
3. Check that there are no objects that may interfere with calibration
tool reading.
4. Repeat the laser calibration function.
2. Check the internal laser mounting bracket.
3. Check fitting of the internal laser slide.
4. Replace the complete internal laser unit.
2. Check that you have correctly mounted the wheel to be balanced.
3. Check that there are no objects other than the wheel in the laser
measuring range.
4. Repeat the dimension measurement.
2. Check that you have correctly mounted the wheel to be balanced.
3. Check that there are no objects other than the wheel in the laser
measuring range.
4. Repeat the dimension measurement.
Err.2 Hardware error from acquisition board. ---
Code 21 Error. Guard open during measurement. 1. Repeat the measurement keeping the guard closed until the end
Code 22 STOP during a measuring cycle. 1. Repeat the measuring cycle avoiding to press the STOP button
Code 23 Error. Lift position during the measuring
cycle.
Code 24 Pneumatic spindle released during the
measuring cycle.
Code 25 Rotation start timeout. 1. Check that there are no obstructions to normal wheel rotation.
Code 26 Wheel braking timeout 1. Check functioning of the power board relay
Code 27 Inverse rotation. 1. Use the self-diagnostics function to check the encoder.
Code 28 Unbalance measurement timeout. 1. Repeat the unbalance measuring cycle.
82
of the spin.
unless for an emergency.
1. Enable the measuring cycle only when the lift is in rest position.
2. Do not move the lift during the measuring cycle.
1. Lock the wheel before starting the measuring cycle.
2. Check that the wheel is correctly locked on the spindle and that the
pneumatic system air pressure is sufficient to hold it locked.
2. Use the self-diagnostics function to check the encoder.
3. Use the self-diagnostics function to check proper functioning of the
electromagnetic switch.
4. Check the connection of the cables between the various boards.
AC versions - Check functioning of the power board relay
CC versions - Replace the motor drive board.
2. Check the connection of the cables between the various boards.
AC versions - Check functioning of the power board relay
CC versions - Replace the motor drive board.
Diagnostics
Page 83

Use and Maintenance Manual Rev. 12-2012
Code 29 Eccentricity measurement timeout. 1. Repeat the eccentricity measuring cycle.
ERRORS
HARDWARE
TYPE
Err.3 Software error from acquisition board. ---
CAUSE CHECKS
ENGLISH
Code: all Congurationparametersettingerrors
ERRORS
HARDWARE
TYPE
Err.128 Communication error between the PC
Code: all Communication errors via Ethernet
Err. 31/
Err. 32/
Err. 33/
Err. 34
Err. 35 A/D converter lock 1. Turn the wheel balancing machine off and on again.
Err. 36/
Err. 37/
Err. 38/
Err. 39/
Err. 40/
Err. 41/
Err. 42/
Err. 43
GENERAL
ERRORS
Unbalance
incorrect with
back centring
cones
from the PC to the computer board.
CAUSE CHECKS
and the acquisition board
between the PC and the acquisition
board.
PWM control error Only for DC versions:
Unbalance measurement error 1. Use the self-diagnostics function to check proper functioning of the
CAUSE CHECKS
Wheel slipping on the adapter because
the BP system is at the end of travel or
becauseofincorrectttingofthetyre
tie-rod
1. Turn the wheel balancing machine off and on again.
---
1. Turn the wheel balancing machine off and on again.
2. Check the Ethernet connection cables between the PC and the
acquisition board.
3. Replace the acquisition board.
1. Repeat the DC motor calibration function checking that there are no
obstructions hindering normal spindle rotation.
2. Use the self-diagnostics function to check proper functioning of the
encoder.
2. Replace the acquisition board.
encoder.
2. Check the sensor connections.
3. Check the machine earth connection.
4. Mount a wheel with a known unbalance (less than 100 g) and check
the response of the machine.
5. Replace the acquisition board.
Mount the wheel in vertical position and push the sleeve up against the
wheel. If necessary, repeat locking/unlocking/locking and perform the
procedure again.
Diagnostics
83
Page 84

10. Maintenance
ENGLISH
Use and Maintenance Manual Rev. 12-2012
10.1 GENERAL
cAuTIoN
bef oRe peR foRm ING ANy mAINTe NANc e opeRATI oNs, mAKe suRe
The mA chIN e h As bee N d Isco NNec Ted fR om The mA INs poW eR
sup ply. AlWAys use The peRso NAl pRoTe cTIv e equIpm eNT
INdI cATed IN The INs TAllATIo N mA NuAl .
10.1.1 Introductory notes
This machine has been designed so as not to require routine maintenance, apart from accurate periodic cleaning.
It is important to keep the machine perfectly clean in order to prevent dust or impurities from compromising the
operation of the balancer.
Specialist staff must be authorised and especially trained
concerning the dangers that may arise during operation
and the correct methods for avoiding them.
They must always work with great care and pay full attention.
If, exceptionally, the staff removes the guards to carry out
a particular specialist technical maintenance, inspection
or repair job, they are required to put them back after
work.
After work, staff must make sure that foreign objects, in
particular mechanical pieces, tools or devices used during the operative procedure that could cause damage or
malfunctions are not left inside the balancer.
For safety, before starting work, maintenance, inspection
and repair staff must disconnect all power sources and
take all the necessary preventive safety measures.
As well as operating frequencies, the operations described
below indicate the qualifications that staff must possess
in order to perform the operation.
10.1.3 Replacing fuses
The pe ople R espo NsIb le foR c leAN ING Th e AReA Wh eRe Th e
WARNING
mAchINe Is INsTAlled musT WeAR peRsoNAl pRoTecTIve equIpmeNT
IN oRd eR To W oRK IN sA feTy AN d A ccoR dING To Th e c uRRe NT
occ upATIoNA l he ATh AN d sA feTy ReG ulATIo Ns.
As extraordinary maintenance must be performed by service
staff or, in any case, by specifically authorised and trained
people, is not dealt with in this manual.
10.1.2 Safety rules
Performing specialist activities on the equipment, particularly if the guards need to be dismounted, exposes people
to serious danger due to the presence of potentially live
parts.
The rules shown below must be scrupulously followed.
People must always use the Personal Protective Equipment indicated in the Installation Manual. During activities, unauthorised people may not access the equipment
and WORK IN PROGRESS signs will be erected in the
department in such a way that they are visible from every
place of access.
Some protection fuses are located on the power board
(see wiring diagrams) accessible by dismantling the weight
shelf). If fuses require replacement, use ones with an
identical current intensity.
10.1.4 Periodic cleaning
cAuTIoN
The touch panel and the external scanning laser efficiency
can be guaranteed using a soft cloth and NON-ABRASIVE
commercial glass/plastic cleaning spray or ethanol or
natural detergents.
DO NOT USE:
Organic solvents type nitro thinner
Turpentine
Petrol
Trichloroethylene
Acetone
84
Maintenance
Page 85

Use and Maintenance Manual Rev. 12-2012
11. Disposal
cAuTIoN
The I NsTR ucTI oNs I N ThIs chAp TeR AR e INd IcATIv e. Ref eR To
The Re GulATI oNs IN fo Rce IN Th e couN TRy Whe Re The eq uIp-
meNT Is use d.
11.1 DISPOSING OF THE BALANCER
The balancer must be disposed of after dismounting the
various parts.
For disposal operations, as well as wearing the Personal
Protective Equipment indicated in the INSTALLATION
MANUAL, refer to the instructions and diagrams in this
manual. If necessary, request specific information from
the manufacturer.
Once you have removed the various parts and components,
separate them into the different types of materials according
to the differentiated waste disposal regulations in force in
the country where the machine is dismantled.
12. Spare parts
ENGLISH
12.1 IDENTIFICATION AND ORDERING
METHOD
The various parts can be identified using the explodeddrawings, the electrical drawings and diagrams in the machine
technical file which is archived by the Manufacturer to
which a request can be made.
For off-the-shelf parts, the technical manuals or the supplier’s original documents can be provided if the Manufacturer deems this to be useful.
If not supplied, this documentation is also included in the
machine Technical File, archived by the Manufacturer, as
regards by Ministerial Decree 98/37/EC.
In this case, contact the Technical Service to identify the
required piece.
If the required pieces are not in any position or they cannot be identified, contact the Technical Service, specifying the type of machine, its serial number and year of
construction.
This information is indicated on the machine identification plate.
If the various components must be stored before being
taken to the dump, make sure to keep them in a safe place
protected from atmospheric agents in order to prevent them
from contaminating the ground and the water table.
11.2 DISPOSING OF ELECTRONICS
COMPONENTS
Community directive 2002/96/EC, assimilated
in Italy with legislative decree n° 151 of 25th
July 2005, requires electrical and electronic
equipment manufacturers and users to comply
with a number of obligations concerning the
collection, treatment, recovery and disposal
of this waste.
Please scrupulously comply with these waste disposal
regulations.
Remember that abusive dumping of this waste leads to
the application of the administrative penalties established
by current law.
13. Attached
documentation
If not supplied, this documentation is included in the Technical File of the machine, archived by the Manufacturer.
In this case, contact the Technical Service for detailed
information concerning the machine.
Disposal – Spare parts – Attached documents
85
Page 86

 Loading...