


DualDual ProjectionProjection SystemSystem
XJ-SK600
http://world.casio.com/manual/projector/
報技術装置です。この装 置は、家庭環境で使用す ることを目的としてい ますが、この装置がラジ オやテレビジョン受信 機に近接して使用され ると、受信障害を引き起 こすことがあります。取 扱説明書に従って正し い取り扱いをしてくだ さい。VCCI-B
規格JIS C 61000-3-2
CkJEGFSISwRPoTrDPlFiCzNrChK
YA-S10
English
Setup Guide
Deutsch
Setup-Anleitung
Be sure to read the precautions in the “YA-S10 Setup Guide” that comes with the Dual Projection System.
Be sure to keep all user documentation handy for future reference.
To obtain the latest version of this manual visit the website at the URL to the left.
Lesen Sie unbedingt die wichtigen Hinweise und Vorsichtsmaßregeln in der zum Dualprojektionssystem mitgelieferten „YA-S10 Setup-Anleitung”.
Bitte bewahren Sie die gesamte Benutzerdokumentation für späteres Nachschlagen auf.
Für die neueste Ausgabe dieser Bedienungsanleitung besuchen Sie bitte unsere Website unter der links angegebenen URL.
Français
Guide d’installation
Español
Guía de configuración
Italiano
Guida di setup
Veuillez lire les précautions dans le « Guide d’installation de la YA-S10 » fourni avec le Système de projection double.
Conservez la documentation à portée de main pour toute référence future.
Pour obtenir la toute dernière version de ce manuel, consultez le site à l’adresse indiquée à gauche.
Asegúrese de leer las precauciones en la “Guía de configuración de YA-S10” suministrada con el Sistema de proyección dual.
Asegúrese de tener a mano toda la documentación del usuario para futuras consultas.
Para obtener la versión más reciente de este manual, visite nuestro sitio web en la URL a la izquierda.
Assicurarsi di leggere le avvertenze riportate nella “Guida di setup di YA-S10” fornita in dotazione con il Sistema di proiezione duplice.
Conservare l’intera documentazione dell’utente a portata di mano per riferimenti futuri.
Per ottenere la versione più aggiornata di questo manuale, visitare il sito web all’URL riportato alla sinistra.
Se noga till att läsa säkerhetsföreskrifterna i ”YA-S10 Installationshandbok” som Svenska medföljer projektorn för dubbelprojektion.
Förvara all användardokumentation nära till hands för framtida referens.
Installationshandbok Den senaste versionen av denna installationshandbok kan hämtas från webbplatsen med den URL-adress som anges till vänster.
|
|
|
|
Certifique-se de ler as precauções no “Guia de Configuração da YA-S10” que vem |
|
||||||||||||||||||||||||||||||
|
|
|
|
|
|||||||||||||||||||||||||||||||
|
|
|
|
|
|||||||||||||||||||||||||||||||
Português |
|
||||||||||||||||||||||||||||||||||
com o Sistema de Projeção Dual. |
|
||||||||||||||||||||||||||||||||||
Guia de Configuração |
Certifique-se de guardar toda a documentação do usuário à mão para futuras |
|
|||||||||||||||||||||||||||||||||
referências. |
|
||||||||||||||||||||||||||||||||||
|
|
|
|
Para obter a última versão deste manual, visite o site no endereço URL à esquerda. |
|
||||||||||||||||||||||||||||||
|
|
|
|
|
|
|
|
|
|
|
|
|
|
|
|
|
|
|
|
|
|
|
|
|
|
|
|
|
|
|
|
|
|
|
|
|
|
|
|
|
|
|
|
|
|
|
|
|
|
|
|
|
|
|
|
|
|
|
|
|
|
|
|
|
|
|
|
|
|
|
|
|
|
|
|
|
|
|
|
|
|
|
|
|
|
|
|
|
|
|
|
|
|
|
|
|
|
|
|
|
|
|
|
|
|
|
|
|
|
|
|
|
|
|
|
|
|
|
|
|
|
|
|
|
|
|
|
|
|
|
|
|
|
|
|
|
|
|
|
|
|
|
|
|
|
|
|
|
|
|
|
|
|
|
|
|
|
|
|
|
|
|
|
|
|
|
|
|
|
|
|
|
|
|
|
|
|
|
|
|
|
|
|
U moet de voorzorgen lezen in de “YA-S10 Instelgids” die wordt meegeleverd met |
|
||||||||||||||||||||||||||||||
|
|
|
|
|
|||||||||||||||||||||||||||||||
Nederlands |
|
||||||||||||||||||||||||||||||||||
het Tweevoudig projectiesysteem. |
|
||||||||||||||||||||||||||||||||||
Instelgids |
Bewaar alle documentatie op een veilige plaats voor latere naslag. |
|
|||||||||||||||||||||||||||||||||
Bezoek de hier links vermelde website om de nieuwste versie van de handleiding |
|
||||||||||||||||||||||||||||||||||
|
|
|
|
te verkrijgen. |
|
||||||||||||||||||||||||||||||
|
|
|
|
|
|
|
|
|
|
|
|
|
|
|
|
|
|
|
|
|
|
|
|
|
|
|
|
|
|
|
|
|
|
|
|
|
|
|
|
|
|
|
|
|
|
|
|
|
|
|
|
|
|
|
|
|
|
|
|
|
|
|
|
|
|
|
|
|
|
|
|
|
|
|
|
|
|
|
|
|
|
|
|
|
|
|
|
|
|
|
|
|
|
|
|
|
|
|
|
|
|
|
|
|
|
|
|
|
|
|
|
|
|
|
|
|
|
|
|
|
|
|
|
|
|
|
|
|
|
|
|
|
|
|
|
|
|
|
|
|
|
|
|
|
|
|
|
|
|
|
|
|
|
|
|
|
|
|
|
|
|
|
|
|
|
|
|
|
|
|
|
|
|
|
|
|
|
|
|
|
|
|
|
Lue kaksoisprojisointijärjestelmän mukana toimitetun YA-S10-laitteen |
|
||||||||||||||||||||||||||||||
|
Suomi |
|
|||||||||||||||||||||||||||||||||
|
Asetusoppaan varoitukset. |
|
|||||||||||||||||||||||||||||||||
Asetusopas |
Muista pitää kaikki käyttöä koskevat asiakirjat lähettyvillä tulevaa tarvetta varten. |
|
|||||||||||||||||||||||||||||||||
Saat uusimman version tästä oppaasta vasemmalla olevasta Internet-osoitteesta. |
|
||||||||||||||||||||||||||||||||||
|
|
|
|
|
|
|
|
|
|
|
|
|
|
|
|
|
|
|
|
|
|
|
|
|
|
|
|
|
|
|
|
|
|
|
|
|
|
|
|
|
|
|
|
|
|
|
|
|
|
|
|
|
|
|
|
|
|
|
|
|
|
|
|
|
|
|
|
|
|
|
|
|
|
|
|
|
|
|
|
|
|
|
|
|
|
|
|
|
|
|
|
|
|
|
|
|
|
|
|
|
|
|
|
|
|
|
|
|
|
|
|
|
|
|
|
|
|
|
|
|
|
|
|
|
|
|
|
|
|
|
|
|
|
|
|
|
|
|
|
|
|
|
|
|
|
|
|
|
|
|
|
|
|
|
|
|
|
|
|
|
|
|
|
|
|
|
|
|
|
|
|
|
|
|
|
|
|
|
|
|
|
|
|
|
|
|
|
|
|
|
|
|
|
|
|
|
|
|
|
|
|
|
|
|
|
|
|
|
|
|
|
|
|
|
|
|
|
|
|
|
|
|
|
|
|
|
|
|
|
|
|
|
|
|
|
|
|
|
|
|
|
|
|
|
|
|
|
|
|
|
|
|
|
|
|
Pass på å lese forholdsreglene i “Oppsettguide YA-S10” som følger med det doble |
|
||||||||||||||||||||||||||||||
|
|
|
|
|
|||||||||||||||||||||||||||||||
|
Norsk |
|
|||||||||||||||||||||||||||||||||
|
projeksjonssystemet. |
|
|||||||||||||||||||||||||||||||||
Oppsettguide |
Pass på å oppbevare all brukerdokumentasjon lett tilgjenglig for fremtidig bruk. |
|
|||||||||||||||||||||||||||||||||
For å få den nyeste utgaven av denne bruksanvisningen, besøk nettsiden ved bruk |
|
||||||||||||||||||||||||||||||||||
|
|
|
|
av URL-en til venstre. |
|
||||||||||||||||||||||||||||||
|
|
|
|
|
|
|
|
|
|
|
|
|
|
|
|
|
|
|
|
|
|
|
|
|
|
|
|
|
|
|
|
|
|
|
|
MA1303-A

Contents
XJ-SK600 Overview.................................... |
E-2 |
Configuring the Initial Settings of |
|
|
Unpacking ...................................................... |
E-2 |
the Two Projectors..................................... |
E-8 |
|
General Guide ................................................ |
E-3 |
Configuring Initial Control Box Settings ...... |
E-10 |
|
Getting Ready |
E-4 |
Adjusting the Positions of |
|
|
|
|
|||
the Two Projectors |
E-11 |
|
||
Installation Location |
E-4 |
|
||
Product Specifications |
E-15 |
|
||
Wiring ............................................................. |
E-7 |
|
||
|
||||
Preparing the Remote Controllers.................. |
E-8 |
|
|
|
Terms and Conventions
In this manual, the entire XJ-SK600 Dual Projection System (the two projectors, Geometric Correction Box, and the cabinet in which everything is contained) is referred to as the “Projector System”.
User Documentation
This manual explains how to set up the XJ-SK600 Dual Projection System, and shows how to configure the initial settings of the two projectors.
zAfter completing the setup procedures described in this manual, use the YA-S10 Geometric Correction Box (referred to as “Control Box” in this manual) to shape and adjust the projection images of the two projectors. For information about how to do this, see the YA-S10 Setup Guide.
zFor information about operating the Projector System after setting it up, refer to the YA-S10 User’s Guide, which you can download from the website below. http://world.casio.com/manual/projector/
zFor information about individual projector operations, refer to the manuals below. z DATA PROJECTOR Setup Guide (Booklet)
z “User’s Guide” (Download from the website above. With some projector models, the User’s Guide is also provided on a CD-ROM that comes with the projector.)
zHDMI, the HDMI Logo, and High-Definition Multimedia Interface are trademarks or registered trademarks of HDMI Licensing, LLC.
zOther company and product names may be registered trademarks or trademarks of their respective owners.
zThe contents of this User’s Guide are subject to change without notice.
zCopying of this manual, either in part or its entirety, is forbidden. You are allowed to use this manual for your own personal use. Any other use is forbidden without the permission of CASIO COMPUTER CO., LTD.
zCASIO COMPUTER CO., LTD. shall not be held liable for any lost profits or claims from third parties arising out of the use of this product or this manual.
zCASIO COMPUTER CO., LTD. shall not be held liable for any loss or lost profits due to loss of data caused by malfunction or maintenance of this product, or due to any other reason.
zThe sample screens shown in this manual are for illustrative purposes only, and may not be exactly the same as the screens actually produced by the product.
E-1

XJ-SK600 Overview
The XJ-SK600 Projector System uses a Control Box to sync two projectors so their output looks and acts as if it is coming from a single projector. A powerful collection of projected image shaping functions, enables clear image projection not only onto a flat screen, but also onto curved and irregular surfaces.
Important!
zAfter the Projector System has been installed and adjusted, do not alter the cabinet position or positions of the projectors inside the cabinet, the projector zoom ring settings, or the screen position.
Any changes to the above will require re-adjustment of the Projector System.
zWhen installing the Projector System or when adjusting the cabinet, take care to avoid getting your hands pinched under the cabinet or by door in the back of the cabinet.
Unpacking
Before getting into setup of the Projector System, take a few moments to make sure that all of the items listed below are included.
zXJ-SK600 Setup Guide (This manual)
zCabinet*1
zFeet ×4 (for placement on a flat surface)
zControl Box (YA-S10)*1
zProjectors (XJ-M250) ×2*1
zControl Box remote controller (YT-200)
zControl Box AC adapter and power cord
zProjector remote controller (YT-120)
zProjector power cords ×2
zRemote controller batteries (AAA-size, test use) ×4
zHDMI cables ×2
zRS-232C cables ×2
zMini D-Sub Cable
zDATA PROJECTOR CD-ROM (Contains projector User’s Guide)*2
zDATA PROJECTOR Setup Guide
zDATA PROJECTOR “Read this first” Sheet
zWarranty Certificate
*1 The Control Box and two projectors are installed in the cabinet at the factory.
*2 Some XJ-SK600 models do not come with a CD-ROM. If your projector does not come with a CD-ROM, download the User’s Guide from the CASIO projector website. See “User Documentation” (page E-1) for more information.
E-2

XJ-SK600 Overview
General Guide
Projectors |
Control Box |
Cabinet
Zoom ring
Smaller
Larger
Focus ring
E-3
Getting Ready
Installation Location
The Projector System can be placed on a flat surface or it can be ceiling mounted.
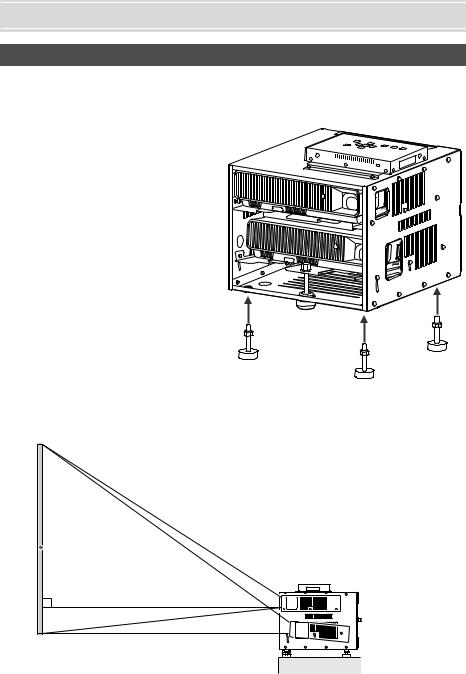
Placing the Projector System on a Flat Surface
When placing the Projector System on a flat surface, you need to install the four feet on the bottom of the cabinet.
Screw each of the feet into the holes at the corners on the bottom of the cabinet.
After attaching the feet to the cabinet, place the cabinet onto a table, desk, or stand or other level and firm surface, making sure you allow enough space around it. The nearby illustration shows how the Projector System should be oriented relative to the screen to achieve optimum projection.
For information about the relationship between the distance between the projectors and the screen and the size of the projected image, see “Projection Distance and Screen Size” in the projector User’s Guide. For information about the User’s Guide, see “User Documentation” (page E-1) in this manual.
 Screen
E-4

Getting Ready
Location Precautions
zUse a conveniently located power outlet that you can reach easily when you need to unplug the power cord.
zMake sure there is nothing inside the area (within 30 cm (11.8 inches) of the Projector System) indicated by the nearby illustration. Take particular care to ensure that there is nothing blocking the flow of air from the projector exhaust vents.
zAirflow from air conditioning equipment redirecting heat being exhausted from the area around a projector lens can cause heat ripples to appear in the projected image. If this happens, adjust the airflow of the air conditioning equipment or move the Projector System.
|
Projector |
30cm (11.8") |
|
||||||||||||
Cabinet |
|
|
|
||||||||||||
|
|
|
|||||||||||||
|
|
|
|
|
Intake vents |
|
|||||||||
Exhaust vents |
|
|
|
|
|
|
|
|
|
|
|
|
|||
|
|
|
|
|
|
|
|
|
|
|
|
|
|
|
|
|
|
|
|
|
|
|
|
|
|
|
|
|
|
|
|
|
|
|
|
|
|
|
|
|
|
|
|
|
|
||
|
|
|
|
|
|
|
|
|
|
|
|
|
|
|
|
30cm (11.8") |
|
|
|
|
|
|
|
|
|
|
30cm (11.8") |
|
|||
Airflow vents |
|
|
|
30cm (11.8") |
|
||||||||||
|
|
|
|
||||||||||||
|
|
|
|
||||||||||||
|
|
|
|
|
|
|
|
|
|
|
|
|
|
|
|
E-5
 Loading...