


 Loading...
Cover
CDP-S150
USER’S GUIDE
EN
|
|
|
|
|
|
|
|
|
|
|
|
|
|
Preparing a Power Supply |
Turning Power On or Off |
Connecting a Pedal |
Using Headphones |
||||||||||
|
|
|
|
|
|
|
|
|
|
|
|
|
|
|
|
|
|
|
|
|
|
|
|
|
|
|
|
|
|
|
|
|
|
|
|
|
|
|
|
|
|
|
|
|
|
|
|
|
|
|
|
|
|
|
|
|
|
|
|
|
|
|
|
|
|
|
|
|
|
|
|
|
|
|
|
|
|
|
|
|
|
|
|
|
|
|
|
|
|
|
|
|
|
|
|
|
|
|
|
|
|
|
|
|
|
|
|
|
|
|
|
|
|
|
|
|
|
|
|
|
|
|
|
|
|
|
|
|
|
|
|
|
|
|
|
|
|
|
|
|
|
|
|
|
|
|
|
|
|
|
|
|
|
|
|
|
|
|
|
|
|
|
|
|
|
|
|
Selecting a Tone |
Splitting the Keyboard for |
Changing the Pitch in |
Fine Tuning a Pitch (Tuning) |
|
Duet Play |
Semitone Steps (Transpose) |
|
Listening to Demo Play |
Using Effects |
Linking with a Smart Device |
|
|
(APP Function) |
CDPS150-E-2A
Contents
Overview and Setup |
EN-2 |
General Guide. . . . . . . . . . . . . . . . . . . . . . . . . . . . . EN-2 Preparing a Power Supply . . . . . . . . . . . . . . . . . . . EN-3 Turning Power On or Off. . . . . . . . . . . . . . . . . . . . . EN-5
Returning the Digital Piano to Its Factory
Default Settings . . . . . . . . . . . . . . . . . . . . . . . . . . EN-6 Connecting a Pedal. . . . . . . . . . . . . . . . . . . . . . . . . EN-6 Using Headphones . . . . . . . . . . . . . . . . . . . . . . . . . EN-7
Digital Piano Operation |
EN-8 |
Listening to Demo Play. . . . . . . . . . . . . . . . . . . . . . EN-8 Demo Song List. . . . . . . . . . . . . . . . . . . . . . . . . . . . EN-8 Selecting a Tone. . . . . . . . . . . . . . . . . . . . . . . . . . . EN-8 Using Effects. . . . . . . . . . . . . . . . . . . . . . . . . . . . . EN-10 Using the Metronome . . . . . . . . . . . . . . . . . . . . . . EN-11 Splitting the Keyboard for Duet Play. . . . . . . . . . . EN-12 Recording and Play Back . . . . . . . . . . . . . . . . . . . EN-14 Linking with a Smart Device (APP Function) . . . . EN-16
Configuring Settings |
EN-16 |
Changing the Keyboard Touch Response . . . . . . EN-16
Changing the Pitch in Semitone Steps
(Transpose) . . . . . . . . . . . . . . . . . . . . . . . . . . . . EN-17
Fine Tuning a Pitch (Tuning). . . . . . . . . . . . . . . . . EN-18
Selecting a Scale . . . . . . . . . . . . . . . . . . . . . . . . . EN-19
Changing the Beep Setting. . . . . . . . . . . . . . . . . . EN-20
Configuring MIDI Settings. . . . . . . . . . . . . . . . . . . EN-21
Included and Optional Accessories
Use only accessories that are specified for use with this Digital Piano.
Use of unauthorized accessories creates the risk of fire, electric shock, and personal injury.
•You can get information about accessories that are sold separately for this product from the CASIO catalog available from your retailer, and from the CASIO website at the URL or QR code below. https://support.casio.com/global/en/emi/manual/CDP-S150/
Connecting External Devices |
EN-22 |
Connecting to Audio Equipment . . . . . . . . . . . . . . |
EN-22 |
Connecting a Computer . . . . . . . . . . . . . . . . . . . . |
EN-23 |
Reference |
EN-24 |
Troubleshooting . . . . . . . . . . . . . . . . . . . . . . . . . . EN-24
Product Specifications. . . . . . . . . . . . . . . . . . . . . . EN-26
Tone List . . . . . . . . . . . . . . . . . . . . . . . . . . . . . . . . EN-27
Keyboard Function List . . . . . . . . . . . . . . . . . . . . . EN-28
•Any reproduction of the contents of this manual, either in part or its entirety, is prohibited. Except for your own, personal use, any other use of the contents of this manual without the consent of CASIO is prohibited under copyright laws.
•IN NO EVENT SHALL CASIO BE LIABLE FOR ANY DAMAGES WHATSOEVER (INCLUDING, WITHOUT LIMITATION, DAMAGES FOR LOSS OF PROFITS, BUSINESS INTERRUPTION, LOSS OF INFORMATION) ARISING OUT OF THE USE OF OR INABILITY TO USE THIS MANUAL OR PRODUCT, EVEN IF CASIO HAS BEEN ADVISED OF THE POSSIBILITY OF SUCH DAMAGES.
•The contents of this manual are subject to change without notice.
•The actual appearance of the product may be different from that shown in the illustrations in this User’s Guide.
•Company and product names used in this manual may be registered trademarks of others.
EN-1

Overview and Setup
General Guide
1 |
2 |
3 |
4 |
Back
6 7 8 9 bk
5
bl
|
|
|
|
|
|
|
|
|
|
|
|
|
|
|
|
|
|
|
|
|
|
|
|
|
|
|
|
|
|
|
|
|
|
|
|
|
|
|
|
|
|
|
|
|
|
|
|
|
|
|
|
|
|
|
|
|
|
|
|
|
|
|
|
|
|
|
|
|
|
|
|
|
|
|
|
|
|
|
|
|
|
|
|
|
|
|
|
|
|
|
|
|
|
|
|
|
|
|
|
|
|
|
|
|
|
|
|
|
|
|
|
|
|
|
|
|
|
|
|
|
|
|
|
|
|
|
|
|
|
|
|
|
|
|
|
|
|
|
|
|
|
|
|
|
|
|
|
|
|
|
|
|
|
|
|
|
|
|
|
|
|
|
|
|
|
|
|
|
|
|
|
|
|
|
|
|
|
|
|
|
|
|
|
|
|
|
|
|
|
|
|
|
|
|
|
|
|
|
|
|
|
|
|
|
|
|
|
|
|
|
|
|
|
|
|
|
|
|
|
|
|
|
|
|
|
|
|
|
|
|
|
|
|
|
|
|
|
|
|
|
|
|
|
|
|
|
|
|
|
|
|
|
|
|
|
|
|
|
|
|
|
|
|
|
|
|
|
|
|
|
|
|
|
|
|
|
|
|
|
|
|
|
|
|
|
|
|
|
|
|
|
|
|
|
|
|
|
|
|
|
|
|
|
A0 C1 |
|
|
|
|
|
|
|
C2 |
|
|
|
|
|
|
|
C3 |
|
|
|
|
|
|
|
C4 |
|
|
|
|
|
|
|
C5 |
|
|
|
|
|
|
|
C6 |
|
|
|
|
|
|
|
C7 |
|
|
|
|
|
|
|
C8 *1 |
|||||||||||||||||||
•Some of the button names shown here include the $ mark. This indicates that you need to long-press the button to perform its operation.
1 P (Power) button |
7 PEDAL UNIT jack |
2 VOLUME knob |
8 PHONES/OUTPUT jack |
3 GRAND PIANO, FUNCTION button |
9 AUDIO IN jack |
4 a, $ RECORD button |
bk DC 12V terminal |
5 USB port |
bl Functions assigned to keys*2 |
6 DAMPER PEDAL jack |
|
EN-2
Overview and Setup
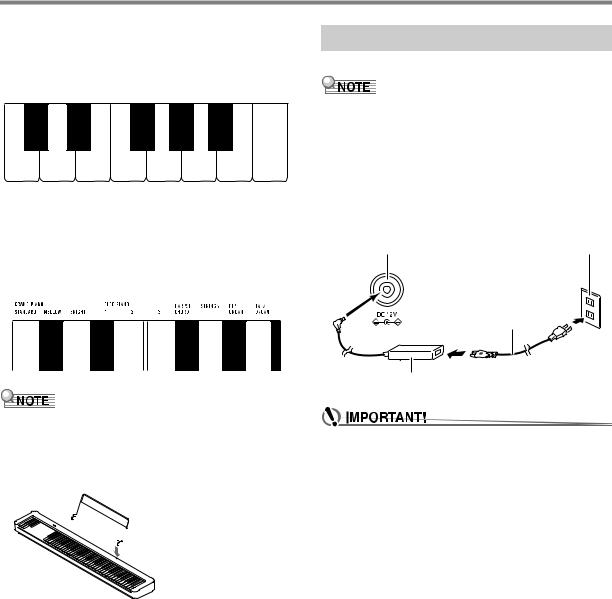
*1 Keyboard note names and pitches
The keyboard note names and pitches used in this manual follow the international standard. Middle C is C4, the lowest C is C1, and the highest C is C8. The illustration below (C4 through C5) shows keyboard key note names.
C 4 |
|
E 4 |
F 4 |
|
A 4 |
B 4 |
|
C4 |
D4 |
E4 |
F4 |
G4 |
A4 |
B4 |
C5 |
*2 Functions assigned to keys
While holding down the 3 FUNCTION button, you can use these keys to change settings, such as the currently selected tone, etc. Most of the functions that can be changed using keyboard keys are marked above the keyboard. For example, tone names assigned to the TONE setting keys (C3 to A3) are marked above the keys.
Preparing a Power Supply
Your Digital Piano uses an AC adaptor for power.
•Though this Digital Piano supports battery operation, use of an AC adaptor is generally recommended.
■ Using the AC Adaptor
Make sure that you use only the AC adaptor specified for this Digital Piano. Use of a different type of AC adaptor can cause malfunction.
Specified AC Adaptor: AD-A12150LW
(JEITA Standard plug)
bk DC 12V |
Household power outlet |
Power cord
AC adaptor
•Note that some assigned functions are not marked above the keys. For information about all of the functions that are assigned to keyboard keys, refer to the “Keyboard Function List” (page EN-28).
■ Preparing the Music Stand


 Music stand
•Never connect the AC adaptor (JEITA Standard, with unified polarity plug) that comes with this Digital Piano to any other device besides this Digital Piano. Doing so creates the risk of malfunction.
•Be sure to turn off Digital Piano power before connecting or disconnecting the AC adaptor.
•The AC adaptor will become warm to the touch after very long use. This is normal and does not indicate malfunction.
EN-3
Overview and Setup
•Note the important precautions below to avoid damage to the power cord.
During Use
•Never pull on the cord with excessive force.
•Never repeatedly pull on the cord.
•Never twist the cord at the base of the plug or connector.
During Movement
•Before moving the Digital Piano, be sure to unplug the AC adaptor from the power outlet.
During Storage
•Loop and bundle the power cord, but never wind it around the AC adaptor.
•Never insert metal, pencils, or any other objects into the product’s DC12V terminal. Doing so creates the risk of accident.
•Do not try to use the power cord that comes with the product with another device.
•Plug the AC adaptor into a power outlet that is close to the Digital Piano. This lets you immediately unplug from the power outlet should any problem occur.
•The AC adaptor is intended for indoor use only. Do not leave it in a location where it can become wet. Also, do not place a vase or any other container of liquid on the AC adaptor.
•Make sure that the AC adaptor does not become covered with a newspaper, table cloth, curtain, or any other type of fabric.
•If you do not plan to use the Digital Piano for a long time, unplug the AC adaptor from the power outlet.
•The AC adaptor cannot be repaired. If your AC adaptor malfunctions or becomes damaged, you need to purchase a new one.
•AC Adaptor Usage Environment
Temperature: 0 to 40°C Humidity: 10% to 90%RH
• Output Polarity: &
■ Using Batteries
•Be sure to turn off power before loading batteries.
•It is up to you to prepare six commercially available alkaline batteries.
•Note the precautions below while the Digital Piano is turned upside down to load batteries.
−Take care to avoid injury due to pinching your fingers under the Digital Piano.
−Do not allow the Digital Piano to tip over or otherwise be subjected to strong impact. Impact can damage the volume knob and keyboard keys.
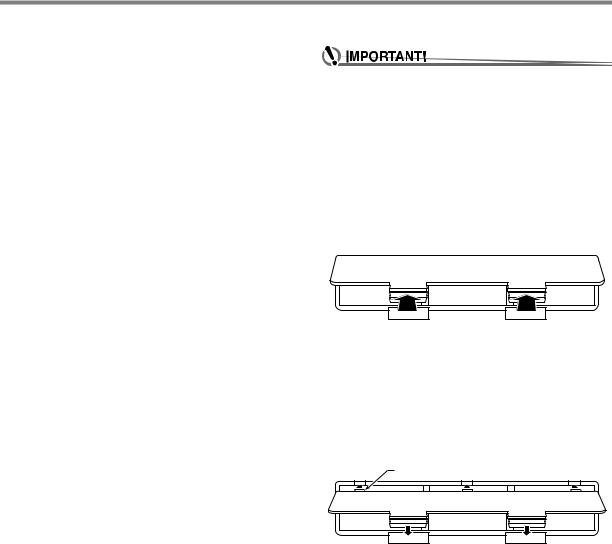
1.Open the battery cover on the bottom of the Digital Piano.
2.Load six AA-size batteries into the battery compartment.
Make sure the positive + and negative - ends of the batteries are facing as marked on the Digital Piano.
3.Insert the tabs of the battery cover into the holes along the side of the battery compartment, and close the cover.
Tabs |
EN-4
Overview and Setup
■ Low Battery Indication
Low batteries are indicated by the 1P(Power) button lamp flashing. When this happens, replace batteries.
•Using the Digital Piano while batteries are very low can cause it to turn off suddenly. This can cause data stored in Digital Piano memory to be corrupted or lost.
Turning Power On or Off
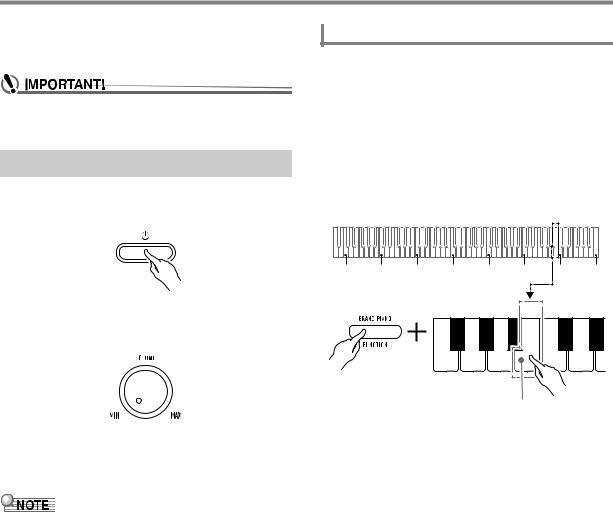
1.Press the 1P(Power) button to turn on Digital
Piano power.
Auto Power Off
This Digital Piano is designed to turn off automatically to avoid wasting power after no operation is performed for a preset amount of time. The Auto Power Off trigger time is about four hours when power is being supplied by the AC adaptor, or six minutes under battery power.
•You can use the procedure below to enable or disable Auto Power Off.
■ To enable or disable Auto Power Off
1.While holding down 3 FUNCTION, press the
B6 (Auto Power Off) keyboard key.
C1 |
C2 |
C3 |
C4 |
C5 |
C6 |
C7 |
C8 |
•The power lamp lights and the Digital Piano powers up. The power up operation takes a few seconds.
•Use 2 VOLUME to adjust volume.
2.To turn off the Digital Piano, hold down the 1P(Power) button until the power lamp goes out.
•Pressing the 1P(Power) button to turn off power actually puts the Digital Piano into a standby state. Minute amounts of current continue to flow within the Digital Piano in the standby state. If you do not plan to use the Digital Piano for a long time or if there is a lightning storm in your area, be sure to unplug the AC adaptor from the power outlet.
•Turning off power causes the Digital Piano settings to return to their initial defaults. The tuning setting (page EN-19) and recorded data (page EN-14), however, is retained.
B6 (Auto Power Off) key
•Each press of the B6 keyboard key causes a short beep to sound. A low beep sounds when Auto Power Off is disabled, and a high beep sounds when it is enabled.
2.After the setting is the way you want, release
3 FUNCTION.
EN-5
Overview and Setup
Returning the Digital Piano to Its Factory Default Settings
Perform the procedure below when you want to return the Digital Piano’s stored data and settings to their initial factory defaults.
1.While holding down 3 FUNCTION, perform steps (1) and (2) below.
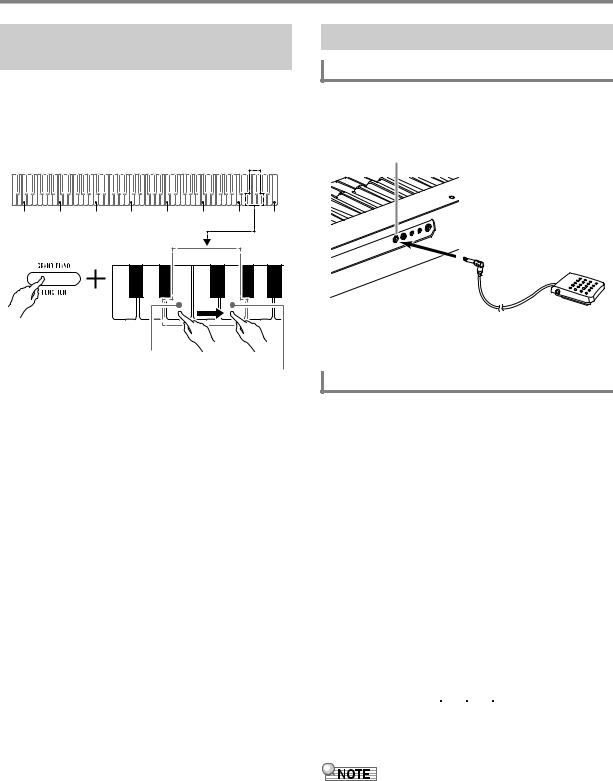
Connecting a Pedal
DAMPER PEDAL Jack
Connect the supplied pedal (SP-3) to the 6 DAMPER PEDAL jack.
Back
6 DAMPER PEDAL jack (Standard jack (6.3mm))
C1 |
C2 |
C3 |
C4 |
C5 |
C6 |
C7 |
C8 |
SP-3
E7 (Factory Reset) key
G7 (Execute) key
(1)Press the E7 (Factory Reset) keyboard key.
•This will cause a short beep to sound.
•Performing step (2) below will initialize the Digital Piano and return it to its factory default settings. If you want to cancel initialization at this point, release 3 FUNCTION.
(2)Press the G7 (Execute) keyboard key.
•This causes a short and then long beep to sound, indicating that the operation is complete and that initialization has started.
•The initialization operations takes some time to complete.
•After settings are returned to their initial factory defaults, Digital Piano power will turn off automatically.
2.Release 3 FUNCTION.
This pedal functions as a damper pedal under initial Digital Piano default settings. To change it to a different function, see “To change the functions assigned to pedals” (page EN-7).
PEDAL UNIT Jack
You can connect the optionally available 3-Pedal Unit (SP-34) to the 7 PEDAL UNIT jack on the back of the Digital Piano. You can then use the pedals for expression that is similar to that available on an acoustic piano.
■ SP-34 Pedal Functions
● Damper Pedal
Pressing the damper pedal while playing will cause the notes you play to reverberate. The SP-34 pedal also supports halfpedal operation, so pressing the pedal part way applies only a partial damper effect.
● Soft Pedal
Pressing this pedal suppresses notes played on the keyboard after the pedal was pressed, and makes them sound softer.
● Sostenuto Pedal
Only the notes of the keys that are depressed when this pedal is pressed are sustained, even if the keyboard keys are released, until the pedal is released.
|
|
|
|
|
|
|
|
|
|
|
|
|
|
Soft Pedal |
|
|
|
|
|
|
|
|
|
|
Damper Pedal |
||
|
|
|
|
|
|
|
|
|
|
||||
|
|
|
|
|
|
|
|||||||
|
|
|
|
|
|
|
|
|
|
|
|
|
|
Sostenuto Pedal
•A separately available pedal unit can be used at the same time as the pedal that comes with the Digital Piano.
EN-6
Overview and Setup
■ To change the functions assigned to pedals
1.While holding down 3 FUNCTION, perform procedure (A) or (B) below.
C1 |
C2 |
C3 |
C4 |
C5 |
C6 |
C7 |
C8 |
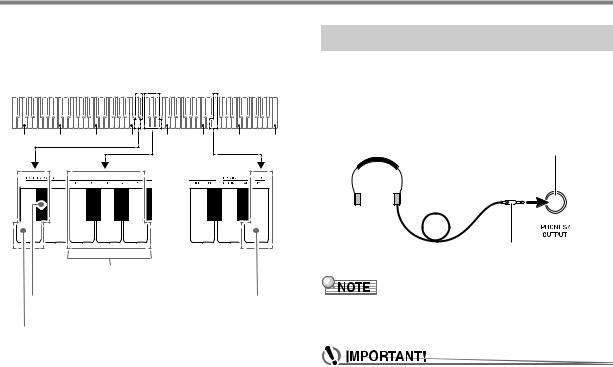
Using Headphones
Using headphones cuts off output from the built-in speakers, which means you can practice playing even late at night without disturbing others.
•Be sure to turn down the volume level before connecting headphones.
8 PHONES/OUTPUT jack (Stereo mini jack (3.5mm))
2 |
|
4 |
1 |
3 |
5 |
[1] (F4) to [5] (A4) keys
[+] key (E}4) |
PEDAL TYPE key (E6) |
[–]key (D4)
(A)Press the PEDAL TYPE (E6) keyboard key.
•Each press changes the setting. The setting that is selected by a key press will be indicated by the number of beeps that sound.
Beeps/ |
Provided Pedal |
Pedal Unit Functions |
|
Setting |
Function |
||
|
|||
1 |
Damper |
Left: Soft |
|
|
|
Center: Sostenuto |
|
2 |
Metronome start/stop |
||
Right: Damper |
|||
|
|
||
3 |
3 FUNCTION button |
||
|
|||
|
operation |
|
|
|
|
|
|
4 |
Recording standby |
|
|
|
enter/exit |
|
|
|
|
|
|
5 |
3 FUNCTION button |
Left: Recording |
|
|
operation |
standby enter/exit |
|
|
|
Center: Metronome |
|
|
|
start/stop |
|
|
|
Right: Damper |
|
|
|
|
•You can also cycle back or forward through the above settings using the [–] (D4) and [+] (E}4) keyboard keys.
•To return to the initial default setting (1), hold down the [–] (D4) and [+] (E}4) keyboard keys at the same time until a long beep sounds.
(B)Press the PEDAL TYPE keyboard key (E6), and then press a keyboard key in the range of [1] (F4) through [5] (A4).
•This will cause a short and then long beep to sound, indicating that the operation is complete and that the pedal setting (1 to 5 as shown in the table above) corresponding to the key you pressed is now enabled.
•Pressing a keyboard key outside the range of setting keys will cause a high and then low beep to sound, indicating that the setting was not changed.
2.Release 3 FUNCTION.
Stereo mini plug
•Headphones do not come with the Digital Piano.
•Use commercially available headphones. See page EN-1 for information about options.
•Do not listen to very high volume output over headphones for long period. Doing so creates the risk of hearing damage.
•If you are using headphones that require an adaptor plug, make sure you do not leave the adaptor plugged in when you unplug the headphones. If you do, nothing will sound from the speakers when you play.
EN-7
Digital Piano Operation
Listening to Demo Play
C1 |
C2 |
C3 |
C4 |
C5 |
C6 |
C7 |
C8 |
DEMO key (B2) |
[–] key (D4) |
[+] key (E}4)
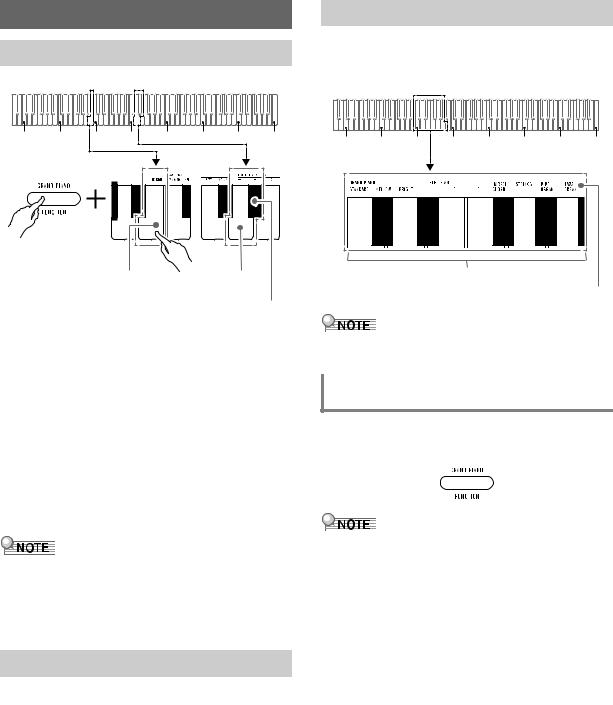
1.While holding down 3 FUNCTION, press the
DEMO (B2) keyboard key.
This starts playback of the two demo songs.
•For demo song play, the Digital Piano setup is changed automatically to optimize it for the demo song being played.
•To toggle between demo songs during playback, hold down 3 FUNCTION and press the [–] (D4) or [+] (E}4) keyboard key.
•Demo song play will repeat until you perform the operation in step 2 below.
2.To stop demo song play, press 3 FUNCTION or 4 a.
•If Auto Power Off is enabled, power will turn off automatically at the applicable trigger time after a period of non-use, even if demo play is being performed. You can disable Auto Power Off, if you want, by performing the operation under “To enable or disable Auto Power Off” (page EN-5).
Demo Song List
Song No. |
Song Name |
Tone Name |
1 |
Prélude |
GRAND PIANO |
|
[Suite bergamasque] |
STANDARD |
2 |
Original |
ELEC.PIANO 1 |
Selecting a Tone
The Digital Piano has 10 built-in tones. In addition to using a single tone, you can also select two different tones and sound them together.
Use the Tone keyboard keys (C3 through A3) to select a tone.
C1 |
C2 |
C3 |
C4 |
C5 |
C6 |
C7 |
C8 |
Tone keys (C3 through A3)
Tone names
•For information about tone names, refer to the “Tone List” (page EN-27) and “Keyboard Function List” (page EN-28).
Selecting the GRAND PIANO STANDARD
Tone
Press 3 GRAND PIANO. You can also select the GRAND PIANO STANDARD tone using the operation under “To select a single tone” (page EN-9).
•The GRAND PIANO STANDARD tone is the default tone when the Digital Piano is turned on.
EN-8
Loading...