


BN10
BN-10 (ZX-456)
BN-20 (ZX-457)
NOV. 1997
(without price)
BN-20
R

CONTENTS
1. SPECIFICATIONS................................................................................................3
2. GENERAL GUIDE
2-1. Appearances and Display Indicators.......................................................5
2-2. Modes and Cursor Keys etc. ....................................................................7
2-3. Backlight Operation (BN-20 only) ..........................................................13
2-4. Power Supply...........................................................................................14
3. RESET OPERATION and BATTERY REPLACEMENT
3-1. Reset Operation.......................................................................................16
3-2. Battery Replacement...............................................................................18
4. DATA COMMUNICATION
4-1. General .....................................................................................................24
4-2. Connecting the CASIO BN Unit to PC ...................................................25
4-3. PC sync for Windows (Brief explanation) .............................................27
5. OPERATION CHECK
5-1. To enter the operation check mode.......................................................29
5-2. Operation Check......................................................................................30
6. ERROR MESSAGES..........................................................................................38
7. TROUBLESHOOTING .......................................................................................40
8. LSI PIN FUNCTION
8-1. CPU ...........................................................................................................41
8-2. Gate Array ................................................................................................42
9. CIRCUIT EXPLANATION
9-1. Block Diagram .........................................................................................44
9-2. Power Supply...........................................................................................45
9-3. Function ...................................................................................................46
10. SCHEMATIC DIAGRAMS ..................................................................................48
11. DISASSEMBLY
11-1. Disassembly for keyboard side..............................................................58
11-2. Disassembly for display side .................................................................59
12. PARTS LIST .......................................................................................................60
13. EXPLODED VIEW ..............................................................................................63
— 2 —

1. SPECIFICATIONS
Model: BN-10/BN-20
Main Modes:
SCHEDULER (SCHEDULE, TO DO, REMINDER); CONTACTS; MEMO; EXPENSE MANAGER;
SPREADSHEET; CLOCK (Home Time, World Time); Pop-Up Tool (Calculator, Clock)
Data storage:
Storage and recall of SCHEDULE, TO DO, REMINDER, CONTACTS, MEMO, EXPENSE data; calendar display; secret memory area; editing; memory status display
Clock:
World Time; SCHEDULE alarm; TO DO alarm; REMINDER alarm; Daily Alarm; accuracy under
normal temperatures: ±3 seconds per day
Calculations:
12-digit arithmetic calculations; arithmetic constants (+/–/× /÷); independent memory; percentages;
square roots; 24-digit approximations; other mixed calculations
General:
Display: 319 × 160 dots
Memory capacity: 1MB (BN-10)
2MB (BN-20)
Main component: LSI
Power supply: Two AA-size alkaline batteries (Type: LR6 (AM3)) or optional
AD-A70140 AC adaptor
Battery life: (Ambient Temperature: 20 °C)
BN-10: •Approximately 100 hours of continuous display only in the CON-
TACTS Mode
•Approximately 80 hours with 55 minutes of continuous display
only and 5 minutes of processing operation per hour in the CONTACTS Mode
•Approximately 500 minutes, continuous connection of optional fax
modem
BN-20: • Approximately 100 hours of continuous display only in the CON-
TACTS Mode
•Approximately 80 hours with 55 minutes of continuous display
only and 5 minutes of processing operation per hour in the CONTACTS Mode
•Approximately 65 hours with 55 minutes of continuous display
only and 5 minutes of processing operation per hour in the CONTACTS Mode, plus 3 minutes of backlight operation per hour during continuous display only period
•Approximately 500 minutes, continuous connection of optional fax
modem
Power consumption: 0.6 W (MAX) 0.4 W (TYP)
— 3 —

Current consumption: at battery voltage = 3 V, at data transmission with MODEM
Typical value Maximum value
146 mA 200 mA
Note: Value measured actually
139 mA (at battery voltage = 3 V, at data transmission with MODEM)
74 mA (at AC Adapter = 5 V, at data transmission with MODEM)
Low power voltage: See to SCHEMATIC DIAGRAMS
• Battery voltage (T651(VCC) – T652(GND))
2.1 V ± 2.0 % – Low battery message appears
1.6 V ± 2.0 % – Forced power off
• AC Adapter voltage (T661(VCC)–T652(GND))
4.5 V ± 2.0 % – Forced power off
Auto power off: Approximately 6 minutes after last key operation
Operating temperature: 0 °C ~ 40 °C (32 °F ~ 104 °F)
Dimensions:
Unfolded: 11H × 167W × 162.5D mm (3/8"H × 6 5/8"W × 6 3/8"D)
Folded: 22H × 167W × 88D mm (7/8"H × 6 5/8"W × 3 1/2"D)
Weight:
BN-10: Approximately 270 g (9.5 oz) including batteries
BN-20: Approximately 275 g (9.7 oz) including batteries
— 4 —
2. GENERAL GUIDE
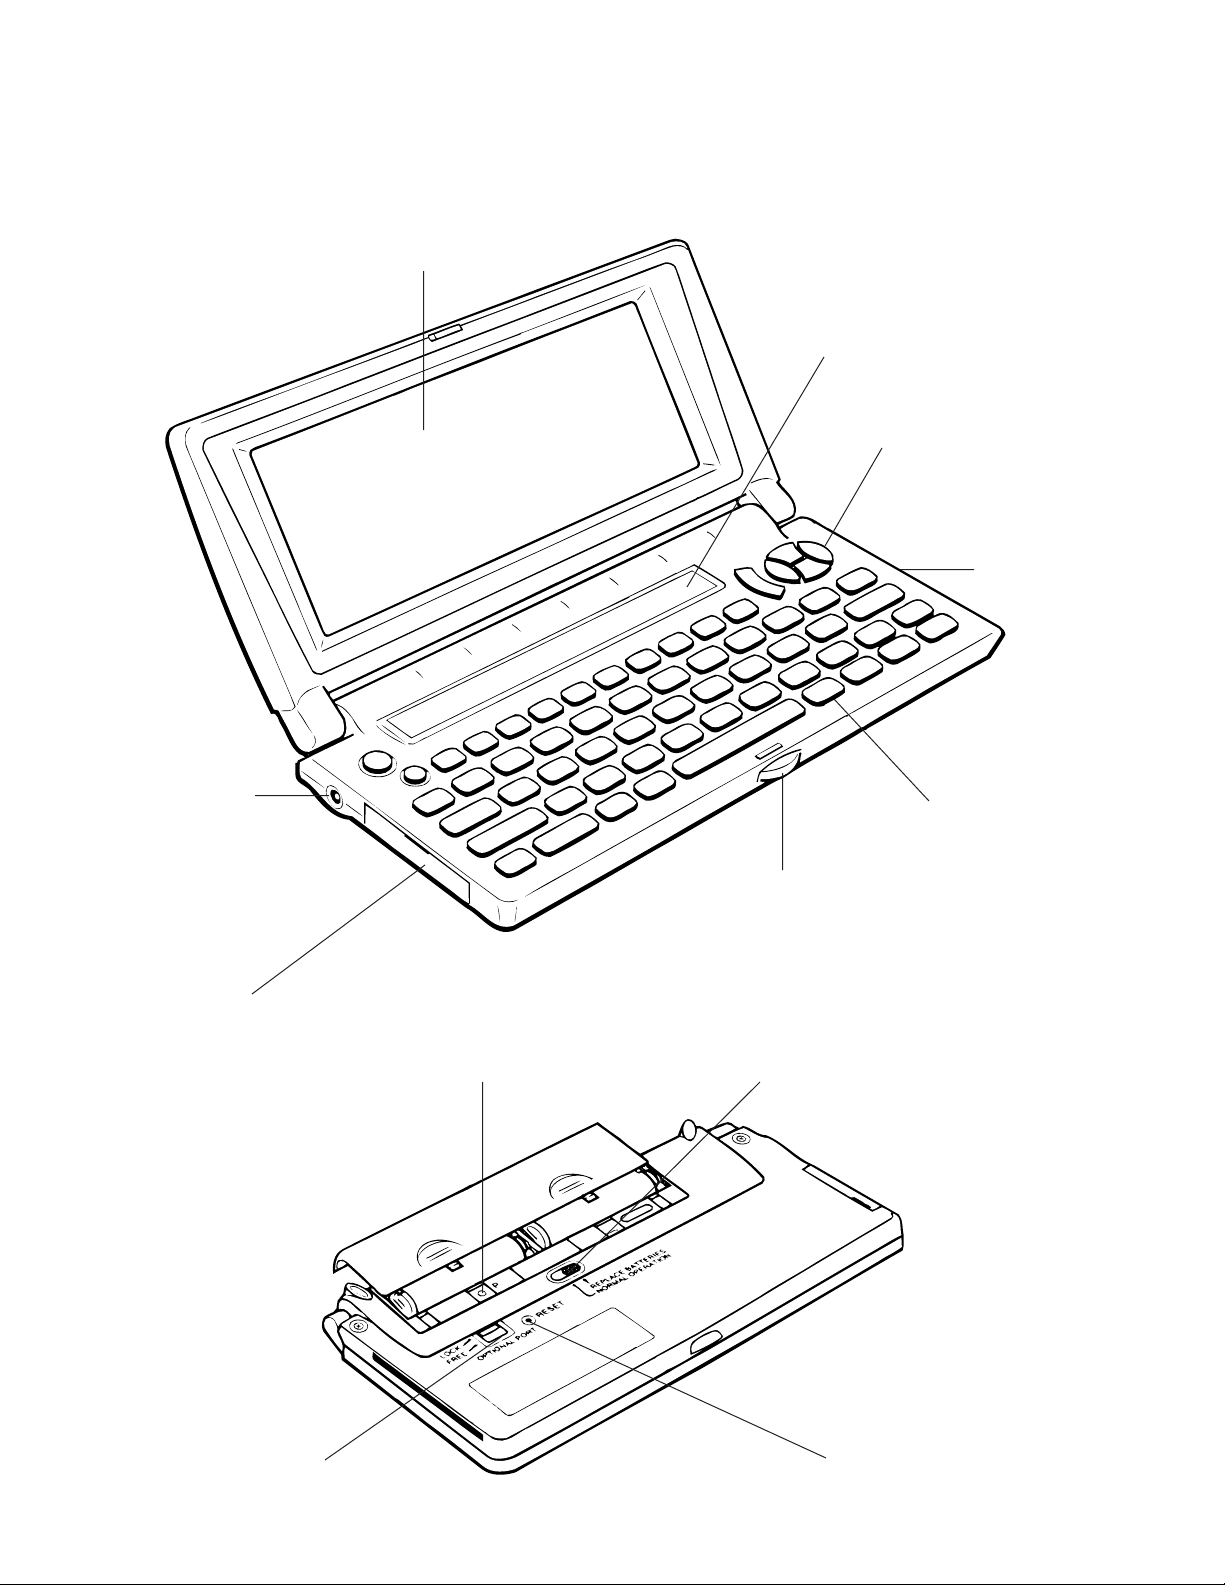
2-1. Appearances and Display Indicators
Display
Mode keys
Cursor keys
Option port
AC adaptor
connector
Mini Cradle port
P button
Keyboard
Lock
Battery switch
Option lock switch
RESET button
— 5 —

■ Display Indicators
The following shows the names of the various indicators that appear on the display and explains what
they mean.
: Data runs off the top of the screen. Scroll displayed data by pressing , , , and .
SHIFT: Keyboard is shifted between upper-case and lower-case input. The punctuation marked
above the keys in blue can also be input while the keyboard is shifted.
CAPS: Keyboard is shift-locked so all text input is upper-case. All text input is lower-case
when this indicator is not on the display.
ACC: Indicates the ACC key was pressed. While this indicator is on the display, pressing Z,
X, C, V, or B inputs the accent marked above the key.
COMMAND: Indicates the COMMAND key was pressed, so the next character will be interpreted
as a command.
SEARCH: Indicates that the displayed data is the result of a search operation.
: Low battery warning
: Indicates you are currently in the secret memory area.
: Data runs off the bottom of the screen. Scroll displayed data by pressing, , ,
and .
■ Fields and Items
In the sections that cover the personal data storage functions of the BN Unit, you will come across the
terms
field
and
item
.
Generally, a
you want to store. Some fields, however, provide you with a set of fixed options from which you can
choose one.
An
item
storage of the data you input. In the CONTACTS Mode, for example, you input data into NAME,
ADDRESS, and PHONE (H) fields. The complete set of data for each person makes up an item.
field
is an area on the screen where you actually input the text, numbers, dates, and times
(which is actually short for
data item
) is a set of specific fields that forms the basic unit for the
— 6 —
2-2. Modes and Cursor Keys etc.
In order to use the powerful features and functions of the BN Unit, you must first enter one of the
following modes.
• SCHEDULER
• CONTACTS
• MEMO
• EXPENSE MANAGER
• SPREADSHEET
• CLOCK
• MAIL/FAX*
You can enter a mode by pressing its mode key, or by using the Mode Menu.
* An optional modem is required to perform the operations in the MAIL/FAX Mode. If a modem is not
connected to the BN Unit, it will not enter the MAIL/FAX Mode when you press the MAIL/FAX key or
when you select MAIL/FAX from the Mode Menu. See the manual that comes with the modem for
operating procedures and other details.
To enter a mode by pressing a mode key
Press one of the mode keys located under the BN Unit’s display to enter the corresponding mode.
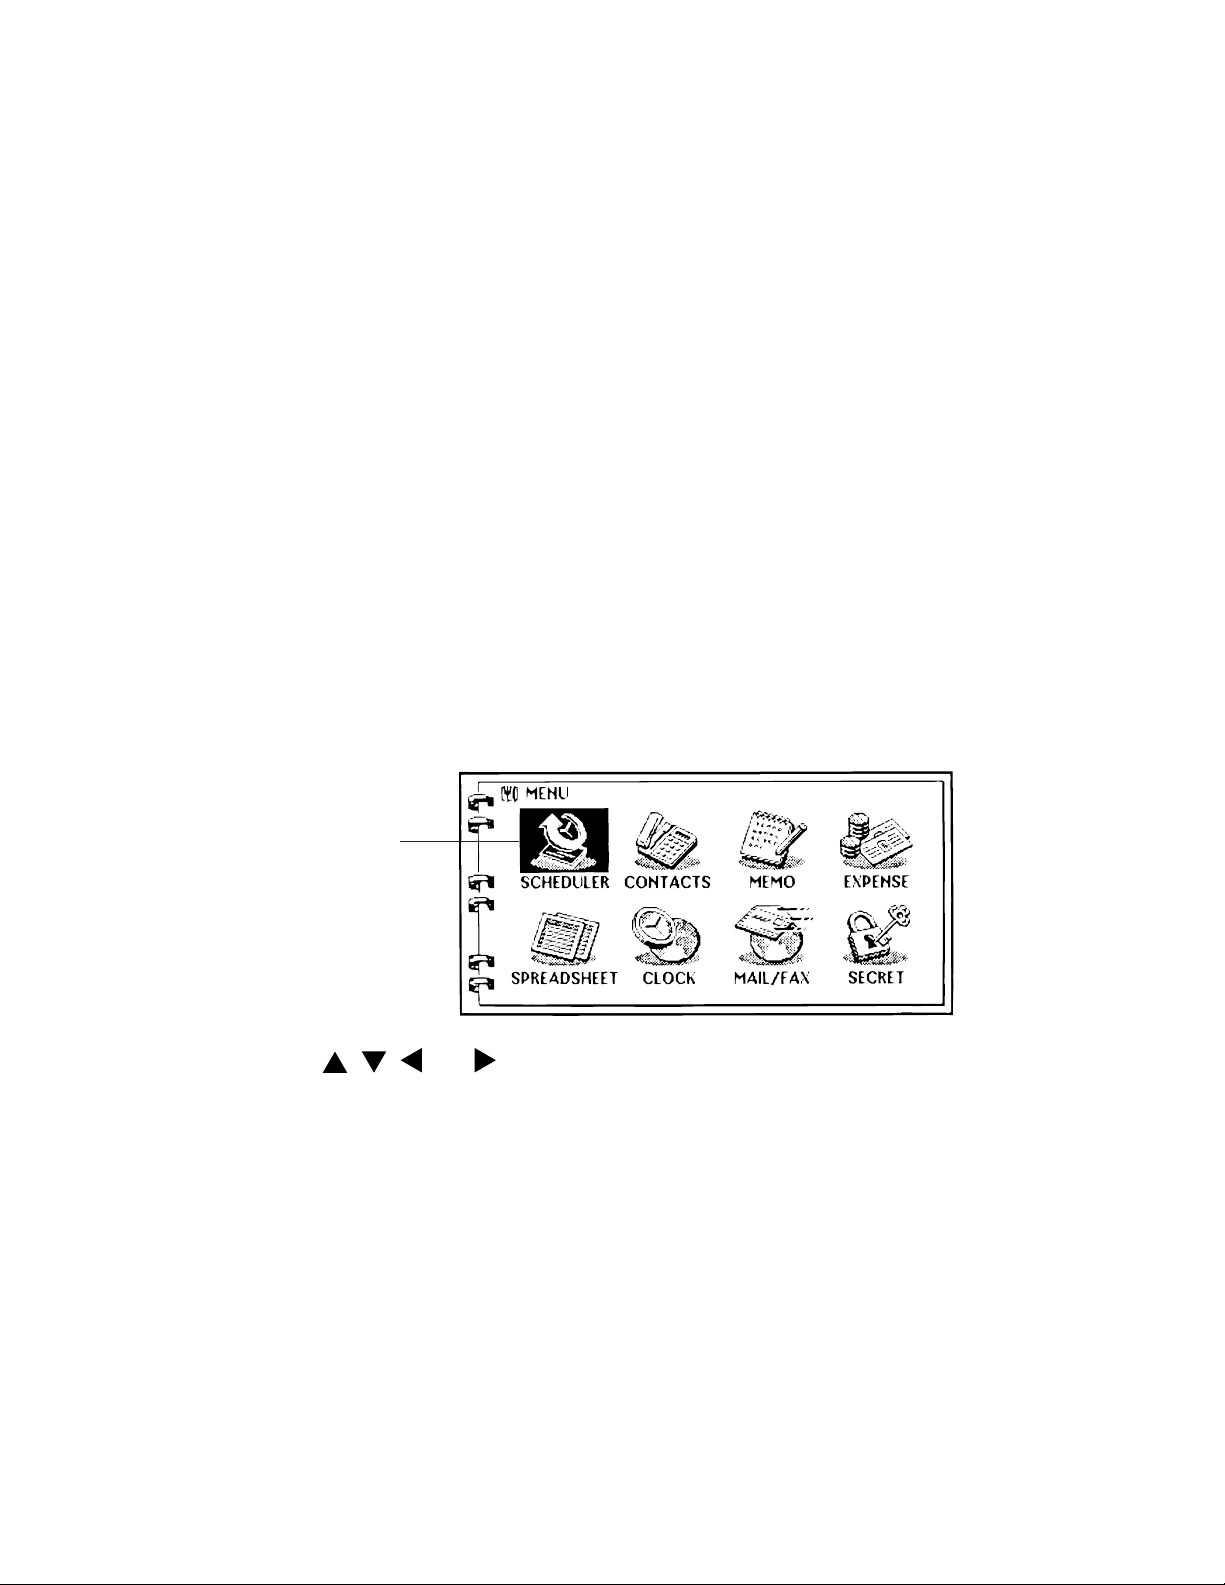
To enter a mode using the Mode Menu
1. Press the MENU key to display the Mode Menu.
Currently selected
mode icon
2. Use the , , , and cursor keys to select the icon you want.
3. Press OK to enter the mode whose icon is selected.
Important!
• All the examples shown in this User’s Guide use the mode keys to enter modes.
— 7 —

■ Using the Cursor Keys
Use the large round cursor key located in the upper right corner of the BN Unit’s keyboard whenever
you have to perform any operation that requires movement up, down, left, or right.
In addition to actually moving the input cursor, the cursor key is also used to select menu bar menus
and the commands inside of a menu.
In the User’s Guide, we will use black arrows to indicate which part of the cursor key you should press
to move the cursor in a given direction, even though the cursor key itself is not marked with such
arrows.
■ Screen Scrolling
Appearance of the
or indicator on the left side of the display indicates that data runs
off the top or bottom. The following describes how to scroll data.
• Use the and cursor keys to scroll line-by-line.
• Use the and keys to scroll a page, day, or week at a time.
• Note that with most screens, not all of the contents scroll. Only the portion of the screen that has
multiple lines scrolls (such as the DESCRIPTION field of a SCHEDULER item), while other parts
(such as TIME and DATA fields) remain unchaged.
■ Using the Menu Bar
The menu bar provides you with a selection of pull-down menus containing commands that are very
similar to those found in many desktop computer applications.
The availability of the menu bar, the type of pull-down menus it contains, and the contents of the pulldown menus depend on the mode you are in and the type of operation you are currently performing.
See the Appendix at the back of the User’s Guide for a full list of commands that appear in each menu.
■ Make backup copies of important data!
Your BN Unit employs flash memory, which makes it possible to store large volumes of data and to
recall data quickly and easily. Data is retained when power is turned off and even when batteries go
dead, but it can be corrupted or lost entirely due to operational mistakes or malfunction. Data contents
can also be corrupted or lost due to strong electrostatic charge, strong impact, or extremes in temperature and humidity. All of this means that you should always keep back-up copies of important data
by transferring it to a personal computer or by writing it down somewhere.
— 8 —
■ Important Precautions
Note the following important precautions whenever using your BN Unit.
• Never expose the BN Unit to fire.
• Avoid temperature extremes. Do not locate the BN Unit in direct sunlight, near a window, near a
heater, etc.
• In very low temperatures display response may slow down or fail entirely. This condition is temporary and operation should resume under normal temperatures.
• Avoid areas subject to excessive moisture, dirt, and dust.
• Avoid dropping the BN Unit and otherwise subjecting it to strong impact.
• Never bend or twist the BN Unit.
• Never try to take the BN Unit apart.
• Do not use a pen, pencil, or other sharp object to press keys.
• To clean the exterior of the BN Unit, wipe it with a soft cloth dampened in a weak solution of a mild
neutral detergent and water. Be sure to wring out any excess moisture from the cloth before wiping
off the BN Unit. Never use benzene, thinner, or any other volatile agent to clean the unit. Doing so
can remove the figures printed on the case or otherwise damage the case finish.
• The contents of this manual are subject to change without notice.
• CASIO COMPUTER CO., LTD. assumes no responsibility for any loss or claims by third parties
that may arise from the use of this product.
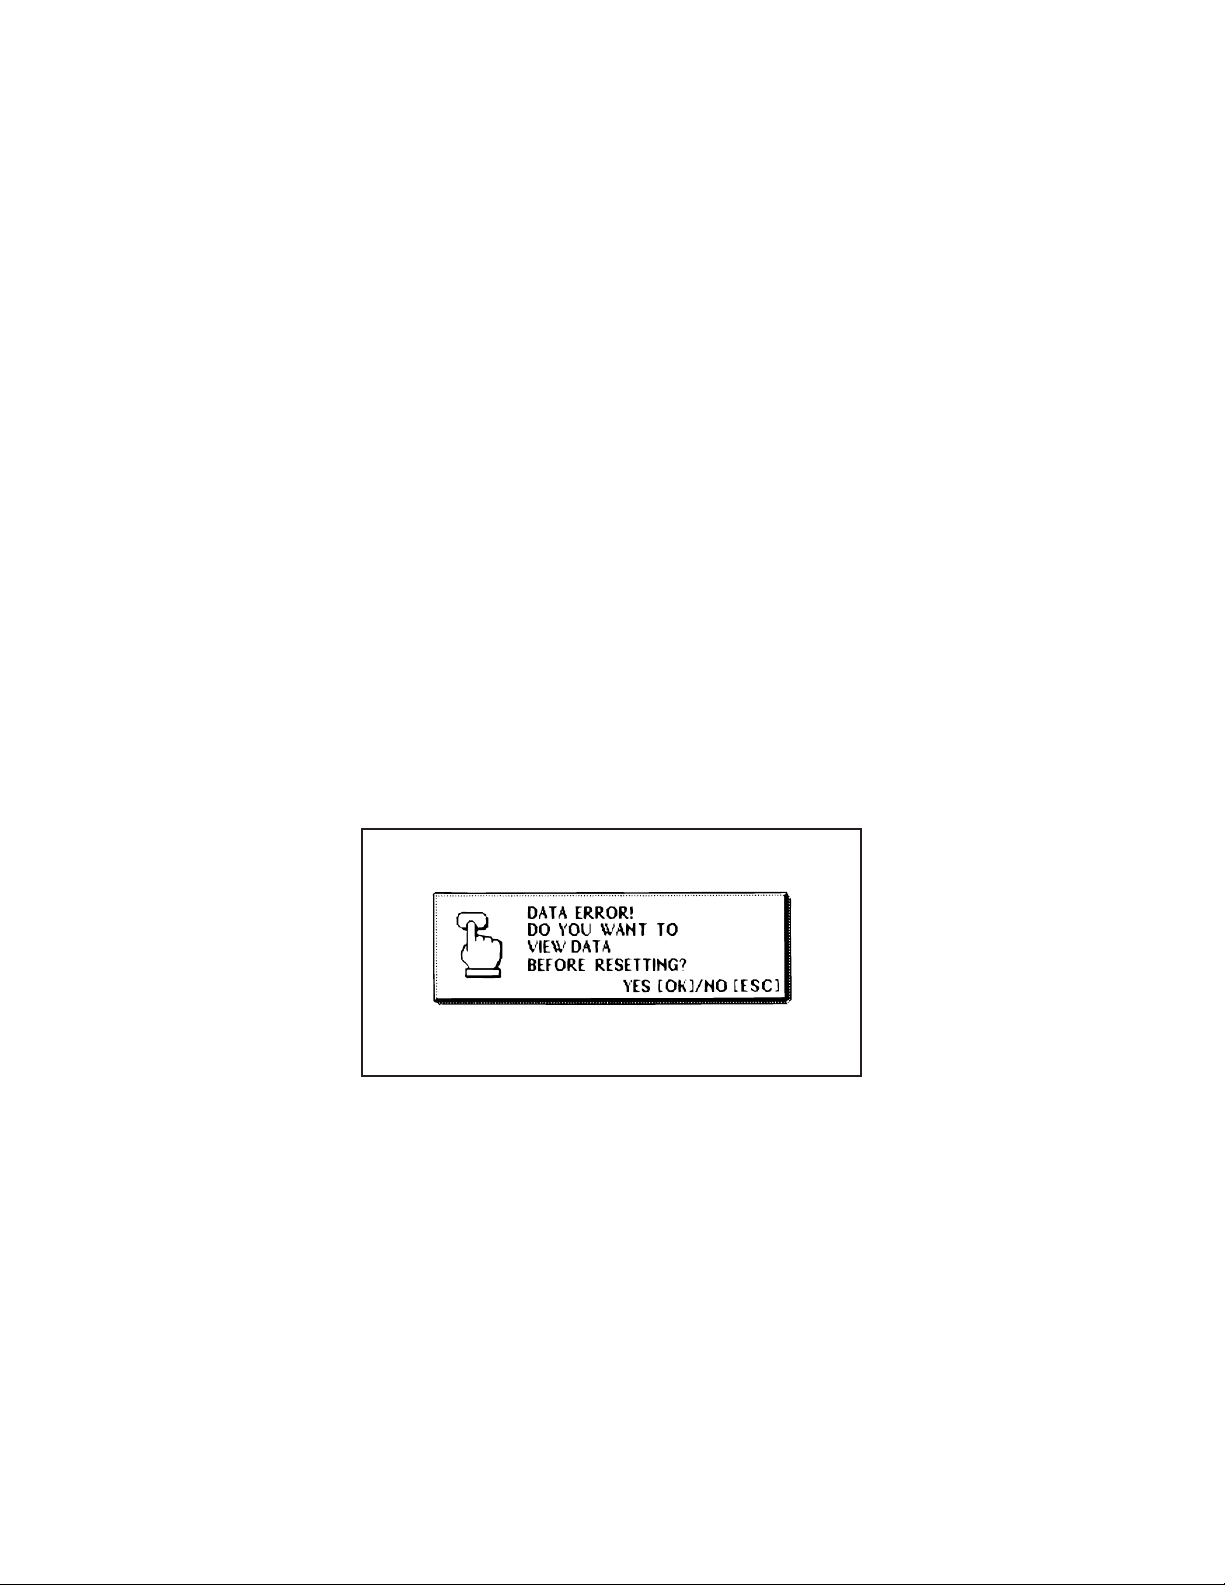
■ Data Errors
The BN Unit performs a self-check routine whenever you turn it on. The message showm below
appears if the BN Unit detects a problem with data stored in its memory.
Once data is lost due to a data error it cannot be recovered. Data errors are generally caused by one
of the following problems.
• Interruption of battery power
• Severe electrostatic charge, strong impact, changes in temperature, or changes in humidity
• Hardware problems
When the above message appears, you can do one of the following:
• Reset after viewing data stored in memory
SPREADSHEET Mode data cannot be recalled after a data error. Also note that in the case of a
severe data error, you may not be able to view other mode data stored in memory.
• Reset immediately
Continued problems after performing the RESET operation can indicate a serious hardware problem.
— 9 —

To reset after viewing data
1. After the DATA ERROR message appears, press OK (Yes).
2. In response to the message that appers (DATA ERROR! CONSULT YOUR USER’S GUIDE
FOR CORRECT PROCEDURE.), press OK.
• This enters the CLOCK Mode.
3. Now you can enter other modes to recall data and make handwritten copies if you want.
4. After recalling tha data you want, perform the RESET operation under “To reset the BN Unit” on
page 16.
To reset immediately
1. After the DATA ERROR message appears, press ESC (No).
2. Continue from step 3 under “To reset the BN Unit” on page 16.
■ Basic Settings
Use the following procedures to configure the hardware features of the BN Unit.
To set the on-screen message language
1. Press MENU BAR to display the menu bar.
2. Use
3. Use
4. In the dialog box that appears, use
to highlight SYSTEM, and then press .
to highlight LANGUAGE, and then press OK.
and to select the language you want to use.
5. Press OK to register your setting and close the dialog box.
• Pressing ESC in the above step closes the dialog box without changing anything.
To turn the key input tone on and off
1. Press MENU BAR to display the menu bar.
2. Use to highlight SYSTEM, and then press .
3. Use to highlight SOUND, and then press OK.
4. In the dialog box that appears, use to select KEY TONE.
• The selected setting is the one whose on or off setting appears as .
5. Use and to turn the key input tone on and off.
6. Press OK to register your setting and close the dialog box.
• Pressing ESC in the above step closes the dialog box without changing anything.
• Turning on the key input tone causes the BN Unit to beep any time one of its keyboard
keys is pressed.
To adjust display contrast
1. Press MENU BAR to display the menu bar.
2. Use to highlight SYSTEM, and then press .
3. Use to highlight CONTRAST, and then press OK.
4. In the dialog box that appears, press to make the screen lighter, and to make it darker.
5. After you are finished making the setting, press OK or ESC to close the dialog box.
— 10 —
■ Memory Status
You can use the following procedure at any time to check the current status of BN Unit
memory.
To check memory status
1. Press MENU BAR to display the menu bar.
2. Use to highlight SYSTEM, and then press .
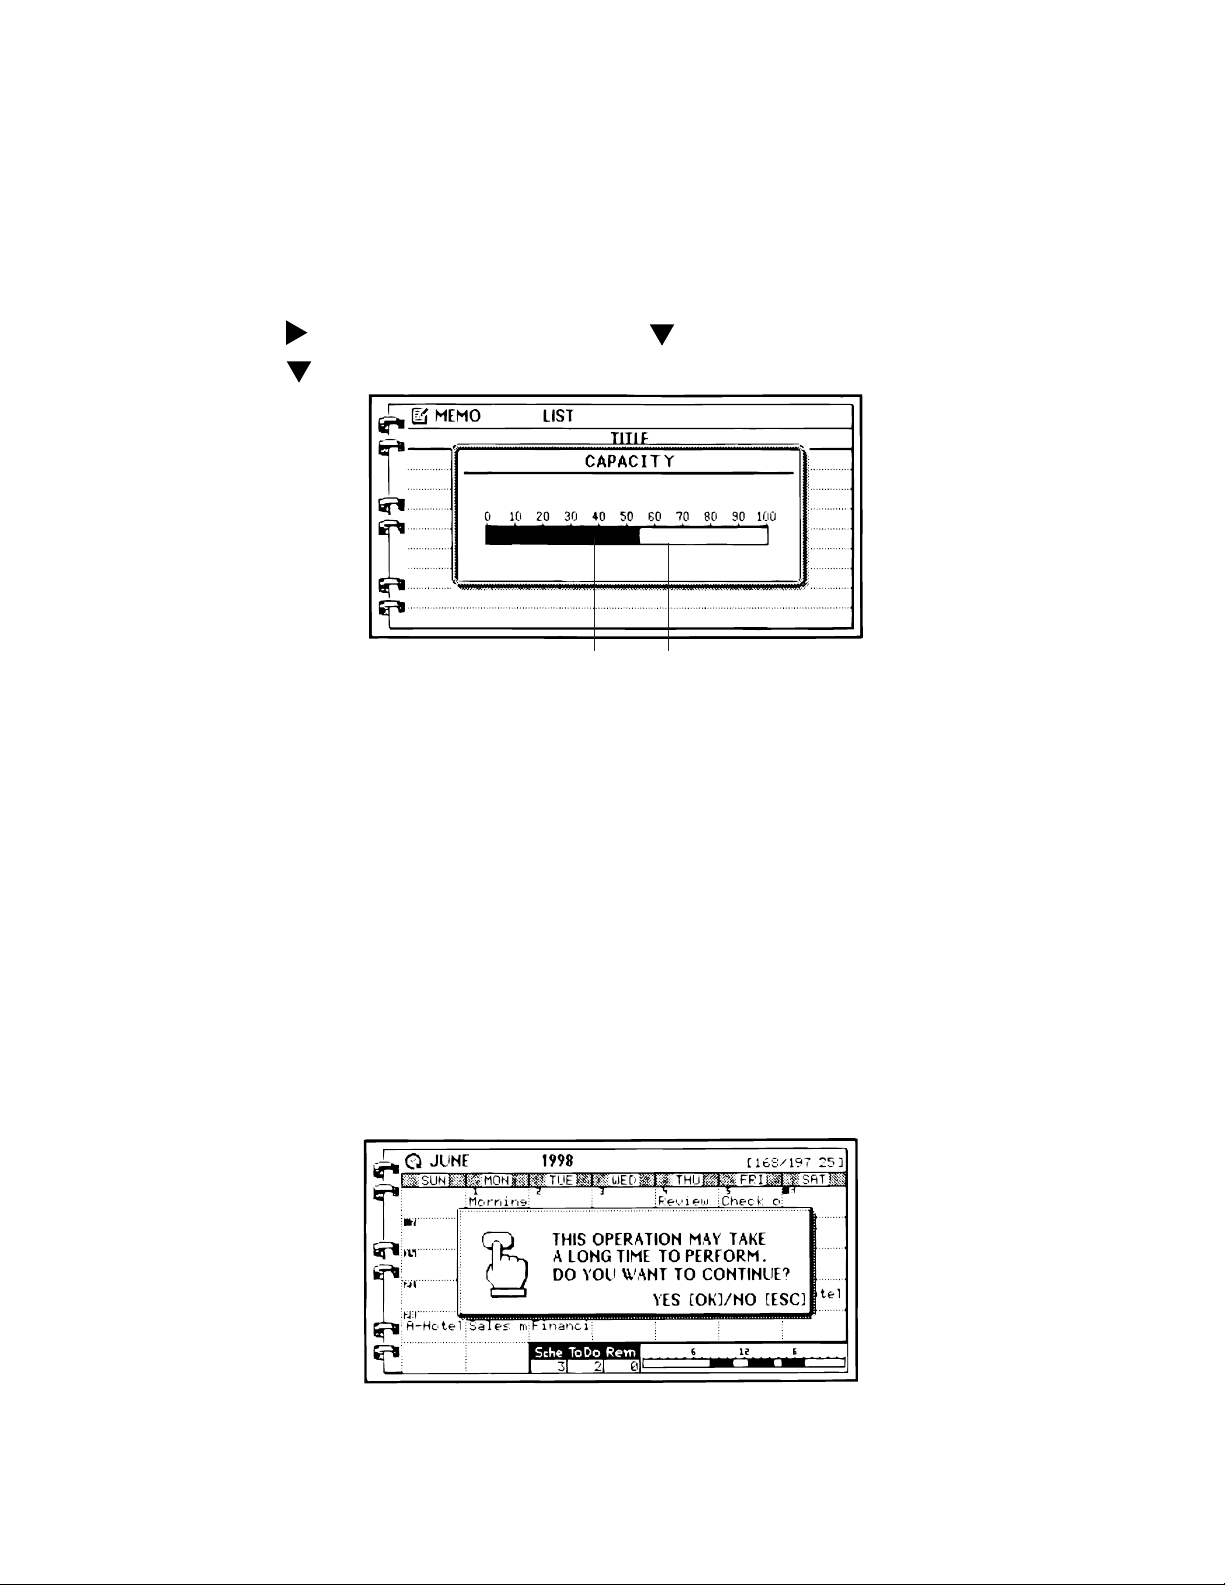
3. Use to highlight CAPACITY, and then press OK.
Memory used Remaining memory
4. Press ESC to close the dialog box.
■ Memory Management
The memory of your BN Unit is designed to make your nomal data input and recall operations as quick
and efficient as possible. After repeated storage and deletion of data, however, you may find that you
are unable to store new data, even after you have deleted some data from memory. When this happens, you need to perform the following “memory management” procedure, which cleans up and
rearranges unused memory to make it available for storage of more data.
Note
• When you need to perform memory management depends entirely how often you delete data from
memory and store new data. The more you delete and store, the sooner you will need to perform
the memory management procedure.
To perform memory management
1. Execute the SYSTEM menu’s MEMORY MANAGEMENT command.
2. In the dialog box that appears, press OK to start memory management or ESC to close the
dialog box without doing anything.
— 11 —

• The following dialog box appears after you press OK to start memory management.
• You can press ESC at any time to stop the memory management procedure.
■ Storage Capacity
The 2-Mbyte memory capacity of the BN-20 (1-Mbyte for the BN-10) includes a 1,499,136-byte user
area (687,104-byte for the BN-10). The following shows examples of what this means for the storage
of data in each mode.
SCHEDULER
Approximately 23,424 items (10,736 for the BN-10) with 20-character description
Approximately 11,712 items (5,368 for the BN-10) with 50-character descriprion
CONTACTS
Approximately 23,424 items (10,736 for the BN-10), under the following conditions.
8-character name
10-character home phone number
10-character home fax number
20-character home address
Approximately 7,808 items (3,578 for the BN-10), under the following conditions.
8-character name
10-character business phone number
10-character business fax number
40-character business address
20-character employer name
20-character department
20-character position
MEMO
Approximately 1,377 items (631 for the BN-10), 1,024-character memos.
EXPENSE MANAGER
Approximately 11,711 items (5,367 for the BN-10), under the following conditions.
One 5-character account name
10-character payee name per transaction
Expense type set
— 12 —
2-3. Backlight Operation (BN-20 only)
■ About the EL backlight (BN-20 only)
• The BN-20 is equipped with an EL backlight that allows easy viewing of display contents in a
theater, or anywhere else where lighting is dim.
• Note, however, that frequent or extended use of the EL backlight shortens battery life.
The following shows how backlight use affects battery life under controlled test conditions*.
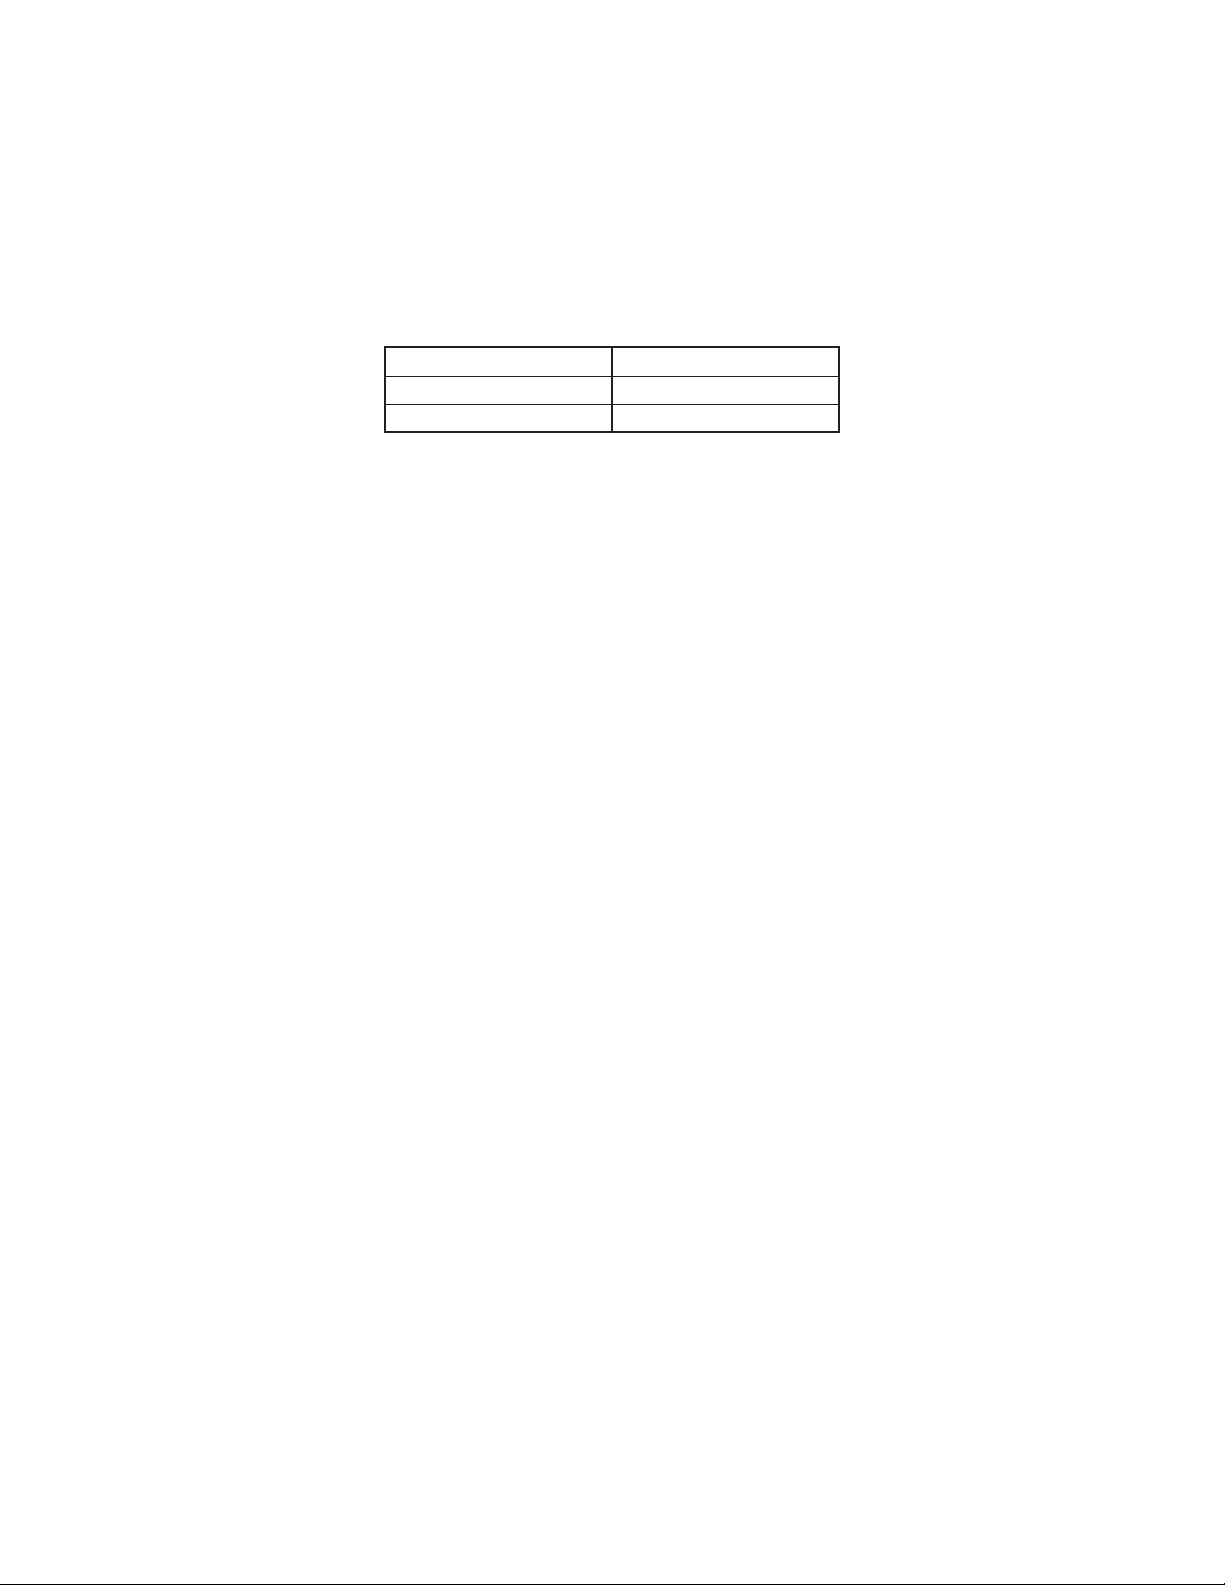
Backlight Operation Battery Life
3 minutes per hour Approximately 65 hours
15 minutes per hour Approximately 35 hours
* Test Conditions
• “Battery Life” is the number of hours before battery failure when the unit is left on with 5 minutes of
a processing operation and 55 minutes of continuous display only (no processing operation) per
hour in the CONTACTS Mode, plus the backlight operation described below. The above values
assume ambient temperature of 20°C, starting with a fresh set of new batteries.
• “Backlight Operation” is the number of minutes backlight is turned on per hour during the display
only (no processing operation) period.
• Be sure to use alkaline batteries. Manganese batteries provide very short battery life.
Important!
• Note that pressing SHIFT and then LIGHT causes the backlight to light and stay lit as long as you
continue to operate the BN Unit, or until you press LIGHT again to turn it off manually.
Leaving the backlight on for long periods greatly reduces battery life!
■ Backlight Operation (BN-20 only)
The electro-luminescent backlight of the BN-20 Unit helps to keep your on-screen data bright and
easy to read at all times. There are two different operations you can use to turn on the backlight. One
turns the backlight on for about 15 seconds, while the other procedure leaves the backlight on as long
as you keep operating the keyboard.
Leaving the backlight on for long periods greatly reduces battery life!
To turn on the backlight for 15 seconds
Press the LIGHT key to turn on the backlight. The backlight will turn off automatically after about 15
seconds.
Pressing LIGHT while the backlight is lit turns it off.
To leave the backlight on as long as you input data
Press SHIFT and then LIGHT to turn on the backlight. In this case the backlight will remain on as long
as you continue to press keys. It turns off automatically if you do not perform any key operation for
about 15 seconds.
Notes
• The backlight will turn off automatically and not turn on when the LIGHT key is pressed while data
communication operation is in progress.
• The backlight may also suddenly turn off and fail to turn back on whenever battery power is low.
— 13 —

2-4. Power Supply
Your BN Unit can be powered by two AA-size alkaline batteries (LR6(AM3)) or the following optional
AC adaptor.
Optional AC Adaptor: AD-A70140
AD-A70140D-OP: for U.S.A. and Canada (AC 100 ~ 120 V)
AD-A70140G-OP: for Europe except U.K. (AC 200 ~ 240 V)
AD-A70140A-OP: for Australia (AC 200 ~ 240 V)
Impotant!
• Normally the flash memory of the BN Unit retains its data when power is turned off and even when
batteries go dead. Misoperation or other problems, however, can cause data to become corrupted
or lost. Always keep separate copies of important data.
■ Low Battery Warning
The message BATTERIES ARE GETTING WEAK! REPLACE THEM AS INSTRUCTED IN THE
USER’S GUIDE. appears whenever battery power drops below a certain level. Replace the batteries
immediately after this message appears.
Important!
• If you continue using the BN Unit after the low battery warning message appears, power may
suddenly turn off or the contrast adjustment screen may suddenly appear. Should this happen,
replace batteries immediately.
• Be sure to use alkaline batteries. Manganese batteries provide very short battery life.
■ Initial Screen
Turning on power displays the last screen that was on the display when you last turned off power.
■ Auto Power Off
The Auto Power Off function automatically turns off power whenever you do not perform any key
operation for about 6 minutes. Use the procedure described under “To turn power on and off” described in the next page to turn power back on.
■ AC Adaptor
Caution!
• Use the AC adaptor only with a power outlet whose voltage matches that marked on the adaptor.
Do not plug the adaptor into an extension shared by other appliances. Doing so creates the danger
of fire and electrical shock.
• Use only the AC adaptor model specified for the BN Unit in this manual. Use of another adaptor
creates the danger of fire and electrical shock.
• Do not allow the electrical cord of the AC adaptor to become damaged or cracked. Never modify,
sharply bend, twist, or pull on the cord. Do not place heavy objects on the cord or expose it to heat.
Use of a damaged electrical cord creates the danger of fire and electrical shock.
• Use of a damaged electrical cord creates the danger of fire and electrical shock.
• Never touch the AC adaptor while your hands are wet. Doing so creates the danger of electrical
shock.
• Never pull on the power cord when unplugging the AC adaptor. Doing so can damage the cord and
create the danger of fire and electrical shock. Always hold onto the AC adaptor unit when unplugging it from the wall outlet.
• Unplug the AC adaptor from the wall outlet whenever you plan to leave the BN Unit unattended for
very long periods.
• After using the BN Unit, turn off power and unplug the AC adaptor from the wall outlet.
— 14 —
Important!
• Use only the following optionally available AC adaptor model with this product:
AD-A70140.
• Use of a AC adaptor model other than that specified above can result in serious damage to the AC
adaptor or the BN Unit, or other serious problems.
• Always turn off the BN Unit before connecting the AC adaptor.
• The AC adaptor may become warm to the touch after very long term use. This is normal and does
not indicate malfunction.
To connect the AC adaptor
Important!
• Be sure to have batteries loaded in the BN Unit, even when using the AC adaptor unit for power.
The BN Unit is designed to disable operation if an attempt is made to operate it under AC adaptor
power, while batteries are not loaded or battery power is low. This is done in order to protect
against corruption of memory contents caused by a sudden drop in power when the AC adaptor is
unplugged from the BN Unit.
• Always unplug the AC adaptor from the BN Unit before replacing batteries.
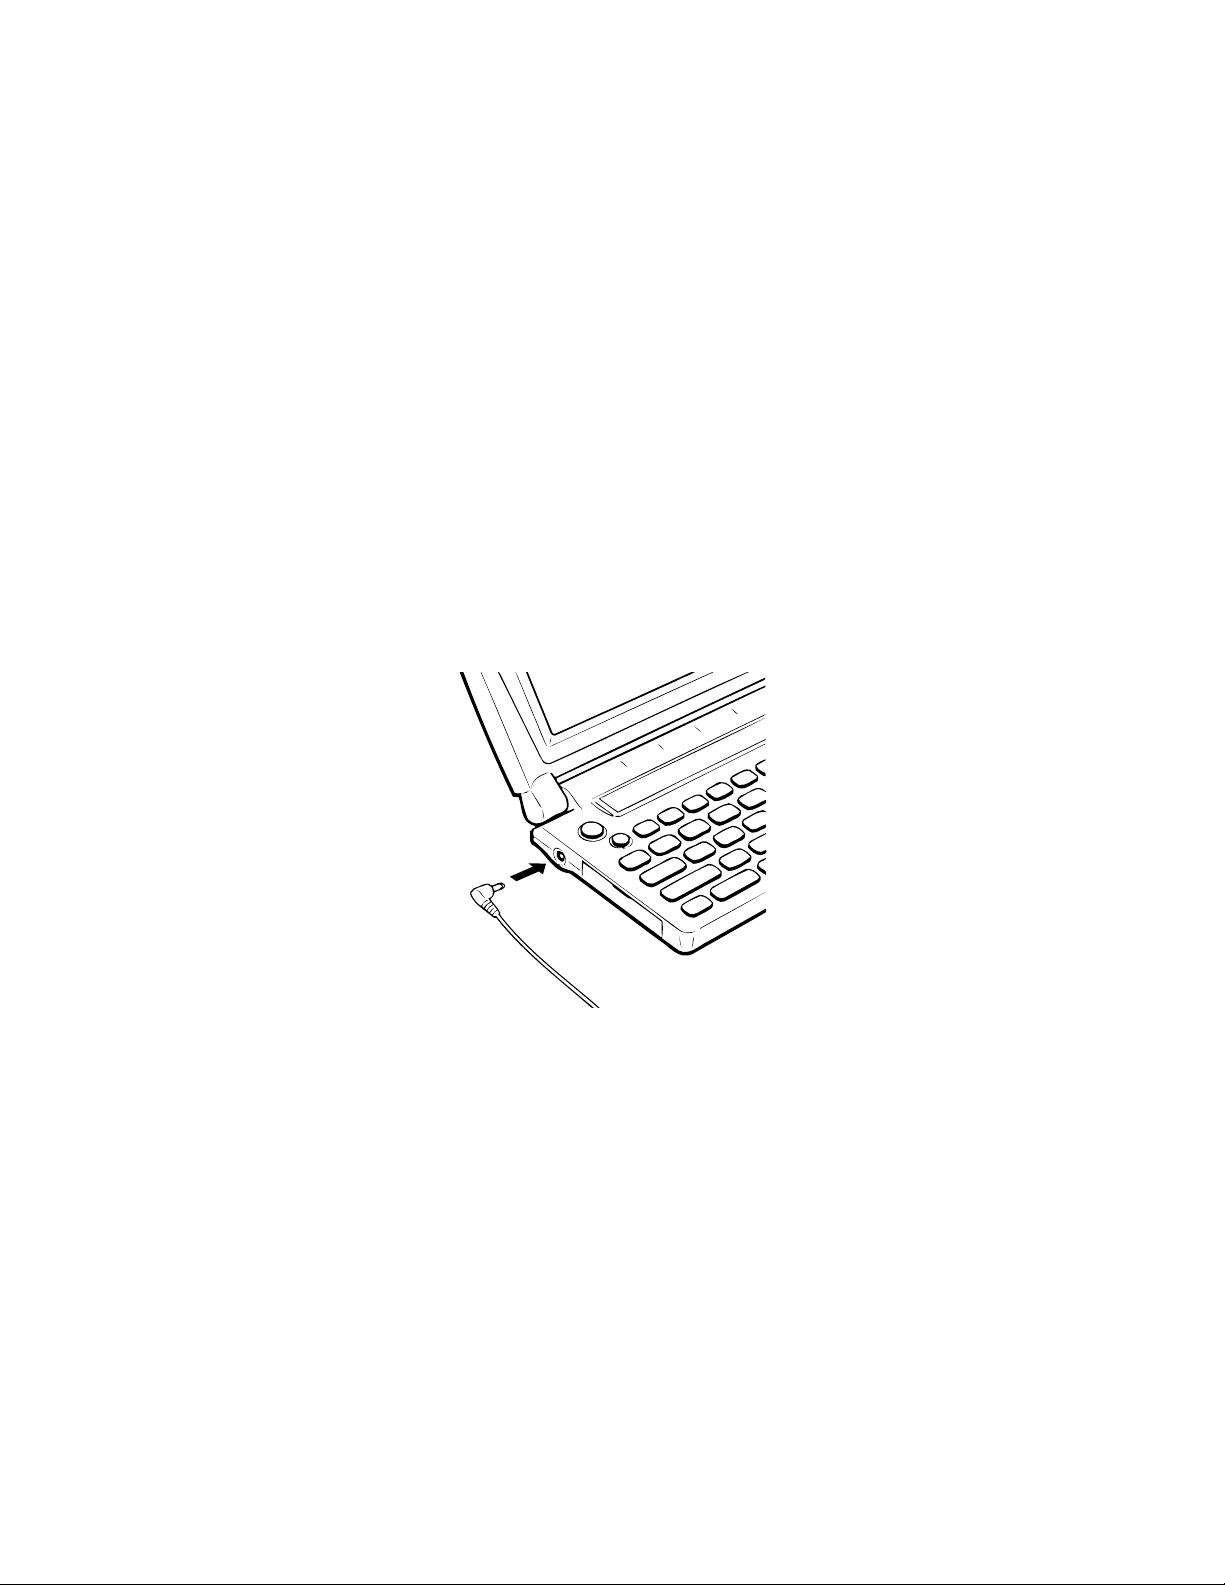
1. Connect the AC adaptor into the jack on the left side of the BN Unit.
2. Plug the AC adaptor into a standard household AC outlet.
■ Turning Power On and Off
After you load batteries, use the following procedure to turn power on and off.
To turn power on and off
1. Press the power on key turn to power on.
• If you are using a BN-10 Unit, press ON.
• If you are using a BN-20 Unit, press ON/OFF.
2. To turn power off, press the power off key.
• If you are using a BN-10 Unit, press OFF.
• If you are using a BN-20 Unit, press ON/OFF.
— 15 —
3. RESET OPERATION and BATTERY REPLACEMENT
3-1. Reset Operation
Warning!
The following procedure erases all data stored in the memory of the BN Unit. Perform this operation
only when you want to delete all data and initialize the settings of the BN Unit.
Remember-you should always keep copies of important data by writing it down, or by transferring it to
a personal computer.
To reset the BN Unit
1. Press the power on key (BN-10: ON, BN-20: ON/OFF) to turn on power.
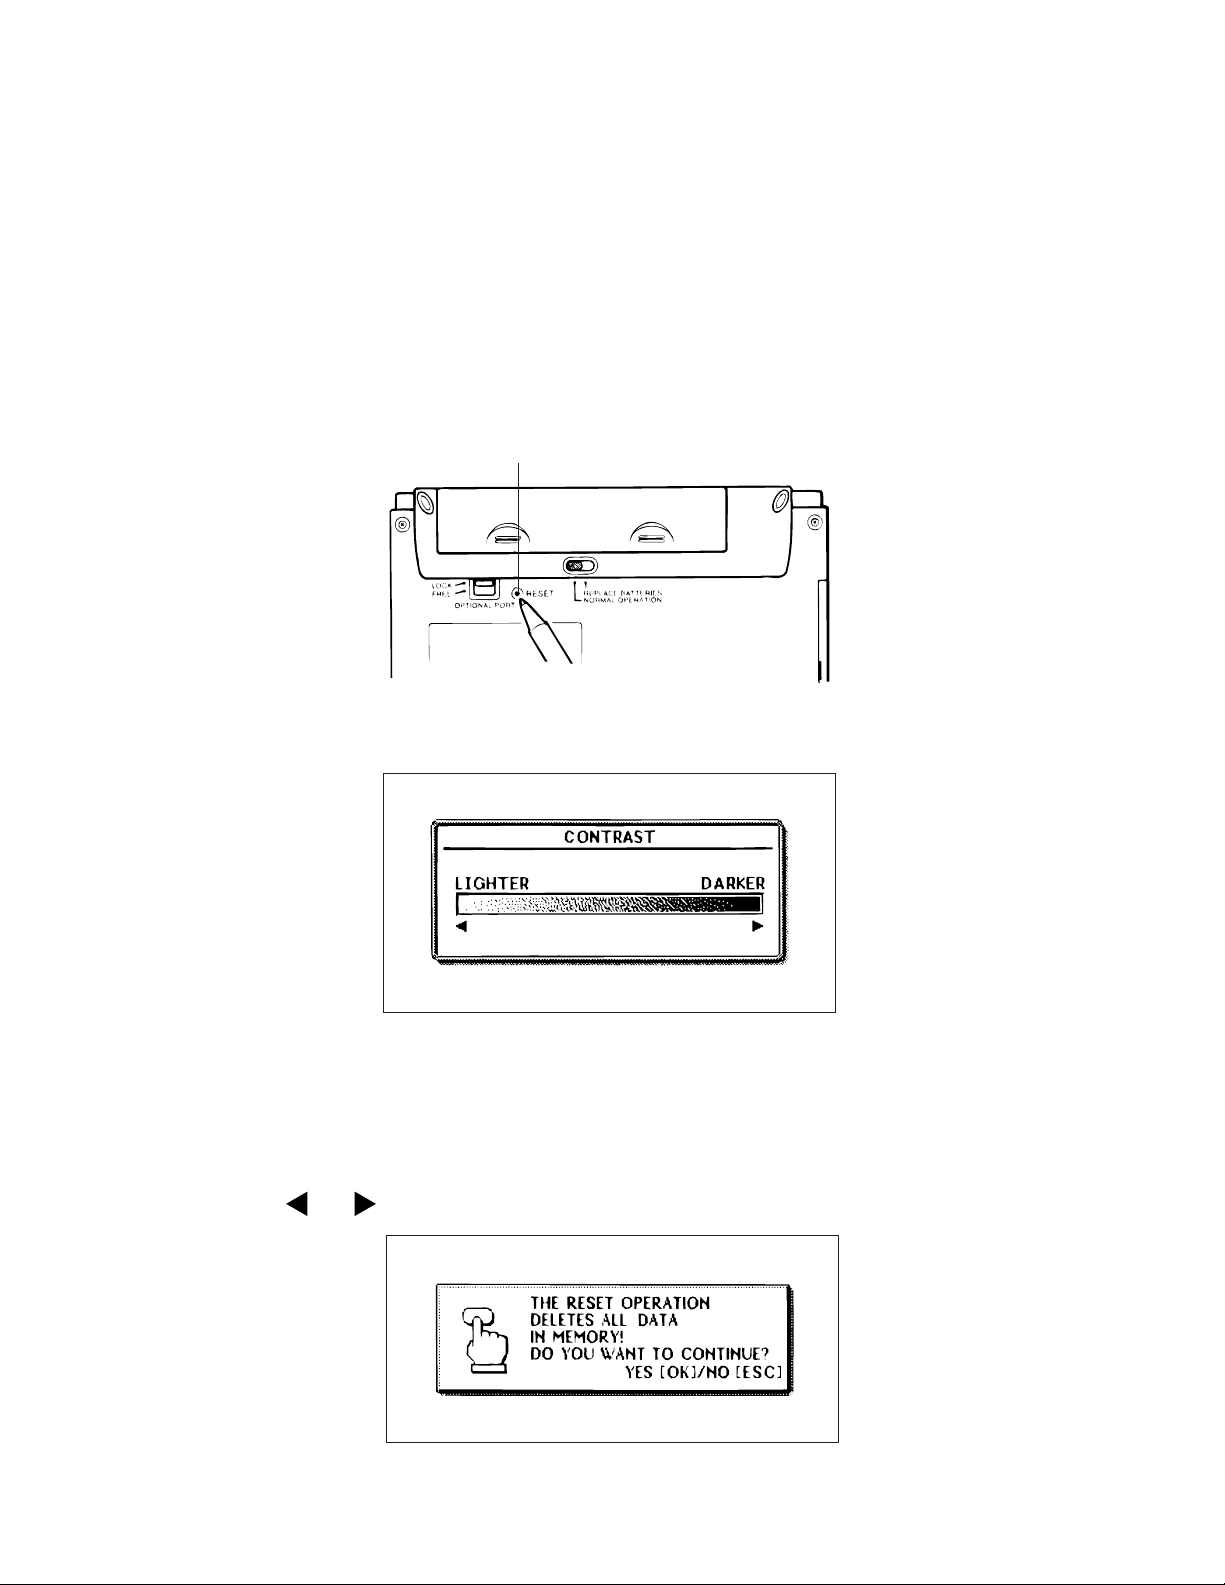
2. Use a thin, pointed object to press the RESET button on the back of the BN Unit.
RESET button
• This causes the contrast adjustment screen to appear.
• If the contrast adjustment screen does not appear when you press the RESET button, slide the
battery switch to the REPLACE BATTERIES position and remove the battery compartment cover.
Use a thin, pointed object to press the P button and then replace the battery compartment cover.
Slide the battery switch back to the NORMAL OPERATION position and then press the RESET
button.
3. Use and to adjust the contrast of the screen, if necessary, and then press OK.
— 16 —

4. In response to the message that appears, press OK to reset the BN Unit and clear all memory
contents, or ESC to abort the reset procedure without doing anything.
5. If you pressed OK in the above step, a second confirmation message appears. Press OK to
reset the BN Unit and clear all memory contents, or ESC to abort the reset procedure without
doing anything.
• Pressing OK in the above step starts the actual reset procedure.
6. After the reset procedure is complete, use the and cursor keys to highlight the display
message language you want to use.
7. Press OK to complete the procedure. This enters the CLOCK Mode.
8. Check the Home Time setting and make changes if necessary (page 19).
• Following are the initial settings of the BN Unit after you perform the RESET operation.
Home Time: London
JAN/1/1998
AM 12:00
12-hour format
World Time: New York
Daily Alarm: PM 12:00
Sound: Daily Alarm off, all others on
Messages: English
Character input: CAPS
— 17 —
3-2. Battery Replacement
Important!
• Always unplug the AC adaptor from the BN Unit before replacing batteries.
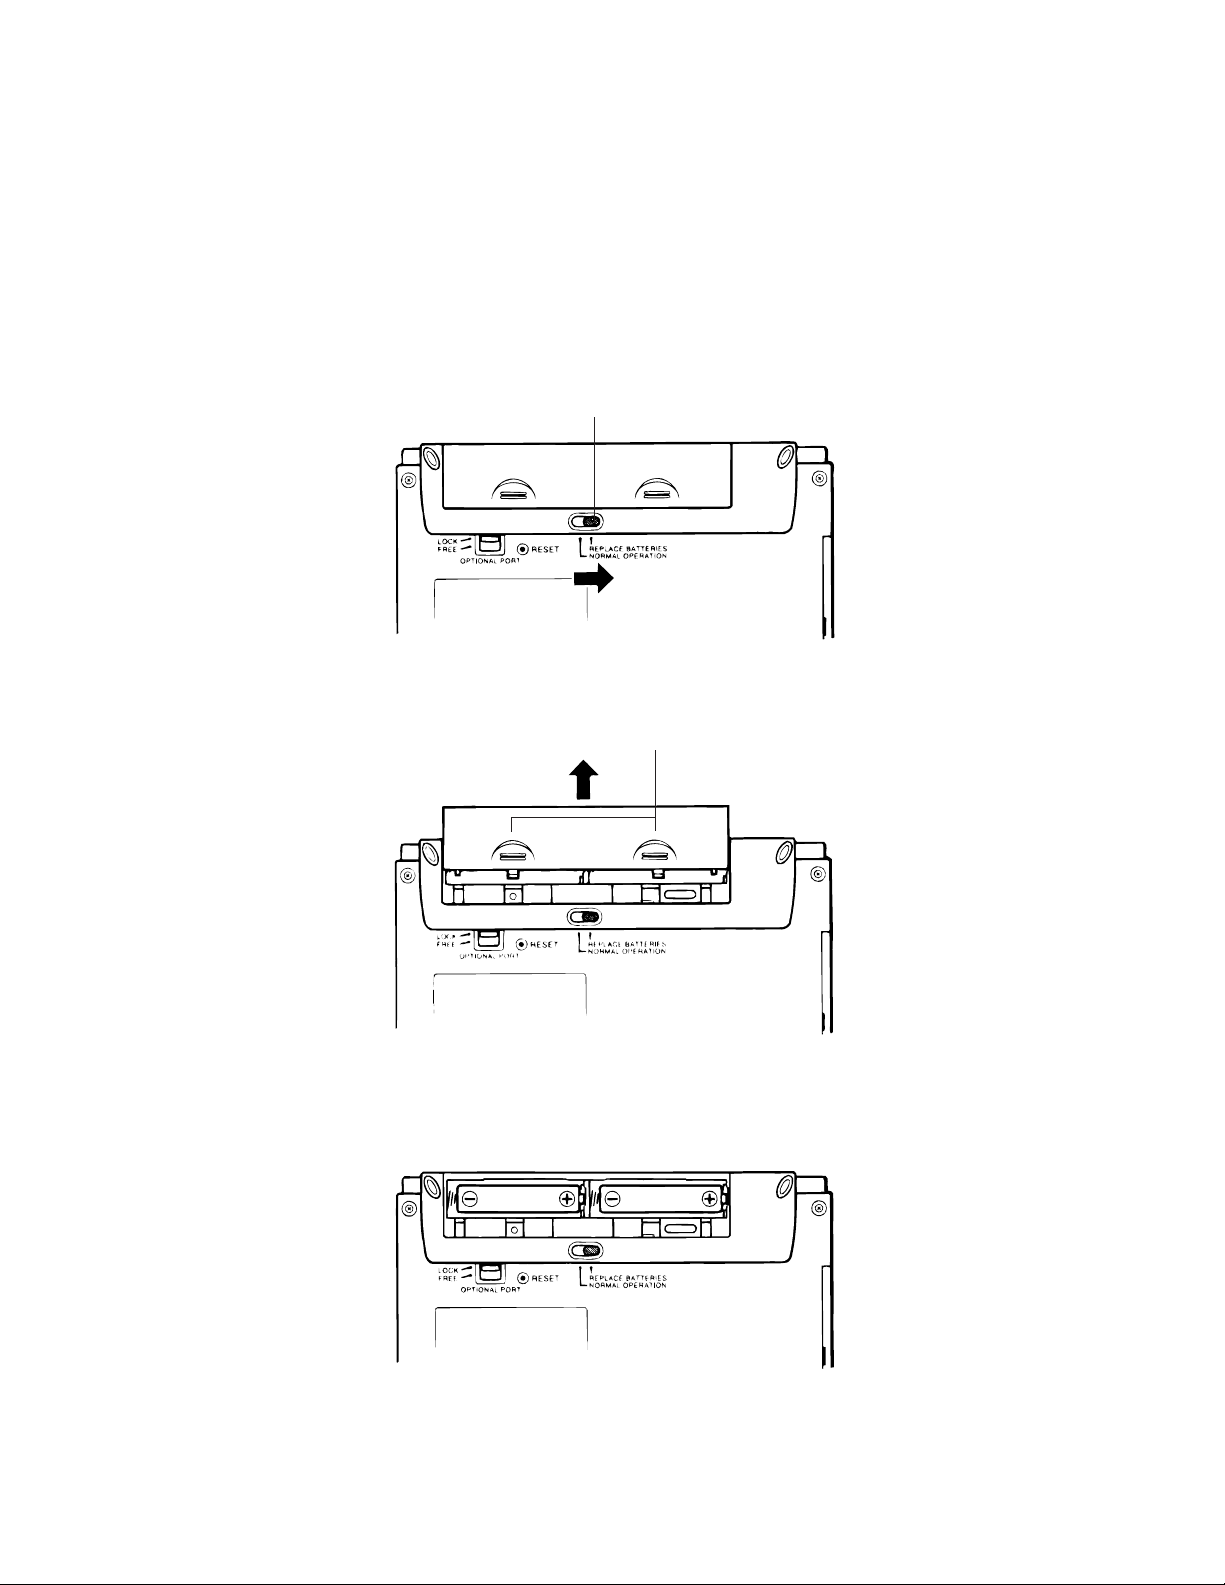
• Always make sure the battery switch is the NORMAL OPERATION at all times, except when replacing batteries.
1. Turn off BN Unit power.
2. Slide the battery switch on the back of the BN Unit to the REPLACE BATTERIES position.
3. While pressing at the points marked (A) in the illustration, slide the battery compartment cover in
the direction indicated by the arrow to remove it.
“REPLACE BATTERIES”
(A)
4. Remove both of the old batteries.
5. Load two new batteries, making sure that their positive (+) and negative (–) ends are facing in the
proper directions.
6. Taking care not to damage its tabs, replace the battery compartment cover back onto the BN
Unit.
— 18 —
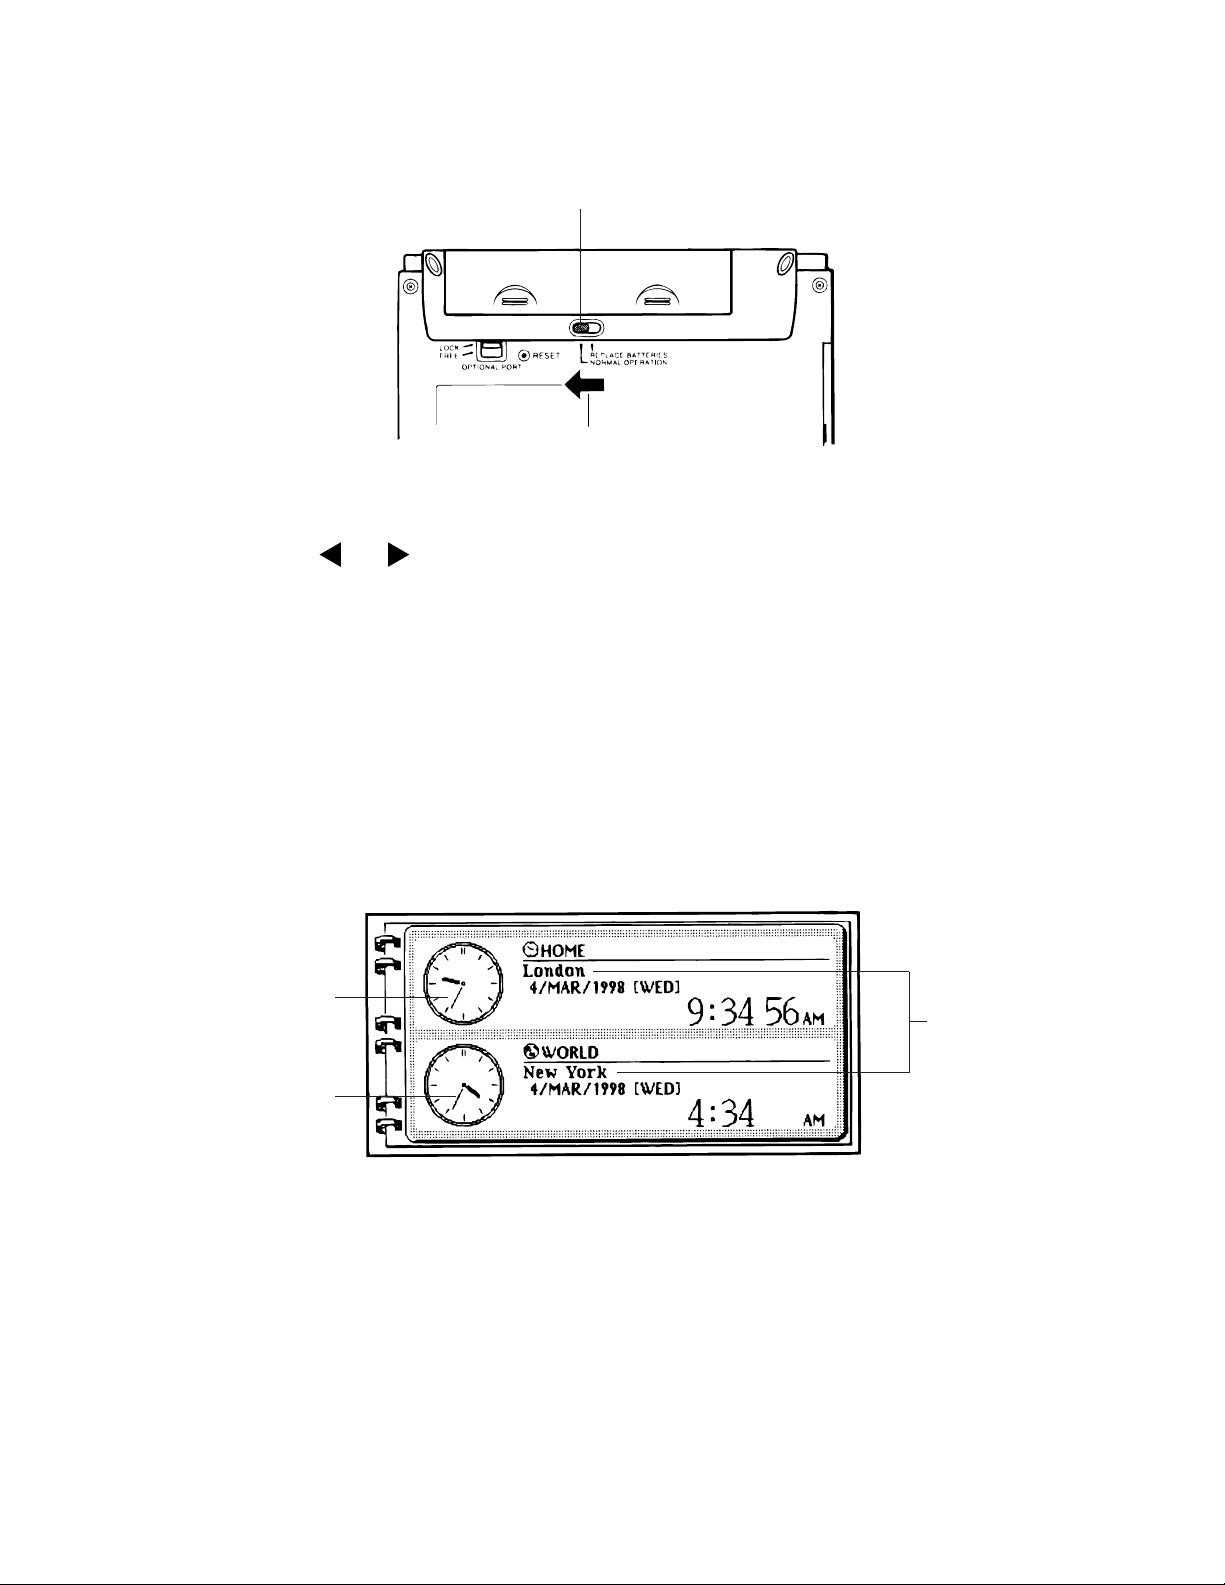
7. Slide the battery switch back to the NORMAL OPERATION position.
“NORMAL OPERATION”
8. Press the power on key (BN-10: ON, BN-20: ON/OFF) to turn on power.
• This causes the contrast adjustment screen to appear.
9. Use the and cursor keys to adjust the contrast of the display, and then press OK.
• If nothing appears on the display after you press the power on key, remove the batteries and then
reload them into the BN Unit, making sure you follow proper procedures.
• If this does not solve the problem, refer to “Troubleshooting” on page 40.
10. In response to the message that appears (CHECK YOUR HOME TIME SETTING AND COR-
RECT IT IF NECESSARY!), press OK. This enters the CLOCK Mode.
11. Check the Home Time setting and make changes if necessary as described below.
12. Perform the procedure under “To set the on-screen message language” on page 10 to specify
the language you want to use.
■ Entering the CLOCK Mode
Press CLOCK to enter the CLOCK Mode. When you do, an initial dual clock screen appears, which
shows the current time in your Home Time zone and a World Time zone.
1
3
2
1 Home Time clock
2 World Time clock
3 City name
— 19 —
■ Selecting a Time Zone
You can select a
World Time
Home Time
zone for the place where you normally work and live, and a second
zone for simultaneous time keeping in two locations on the globe.
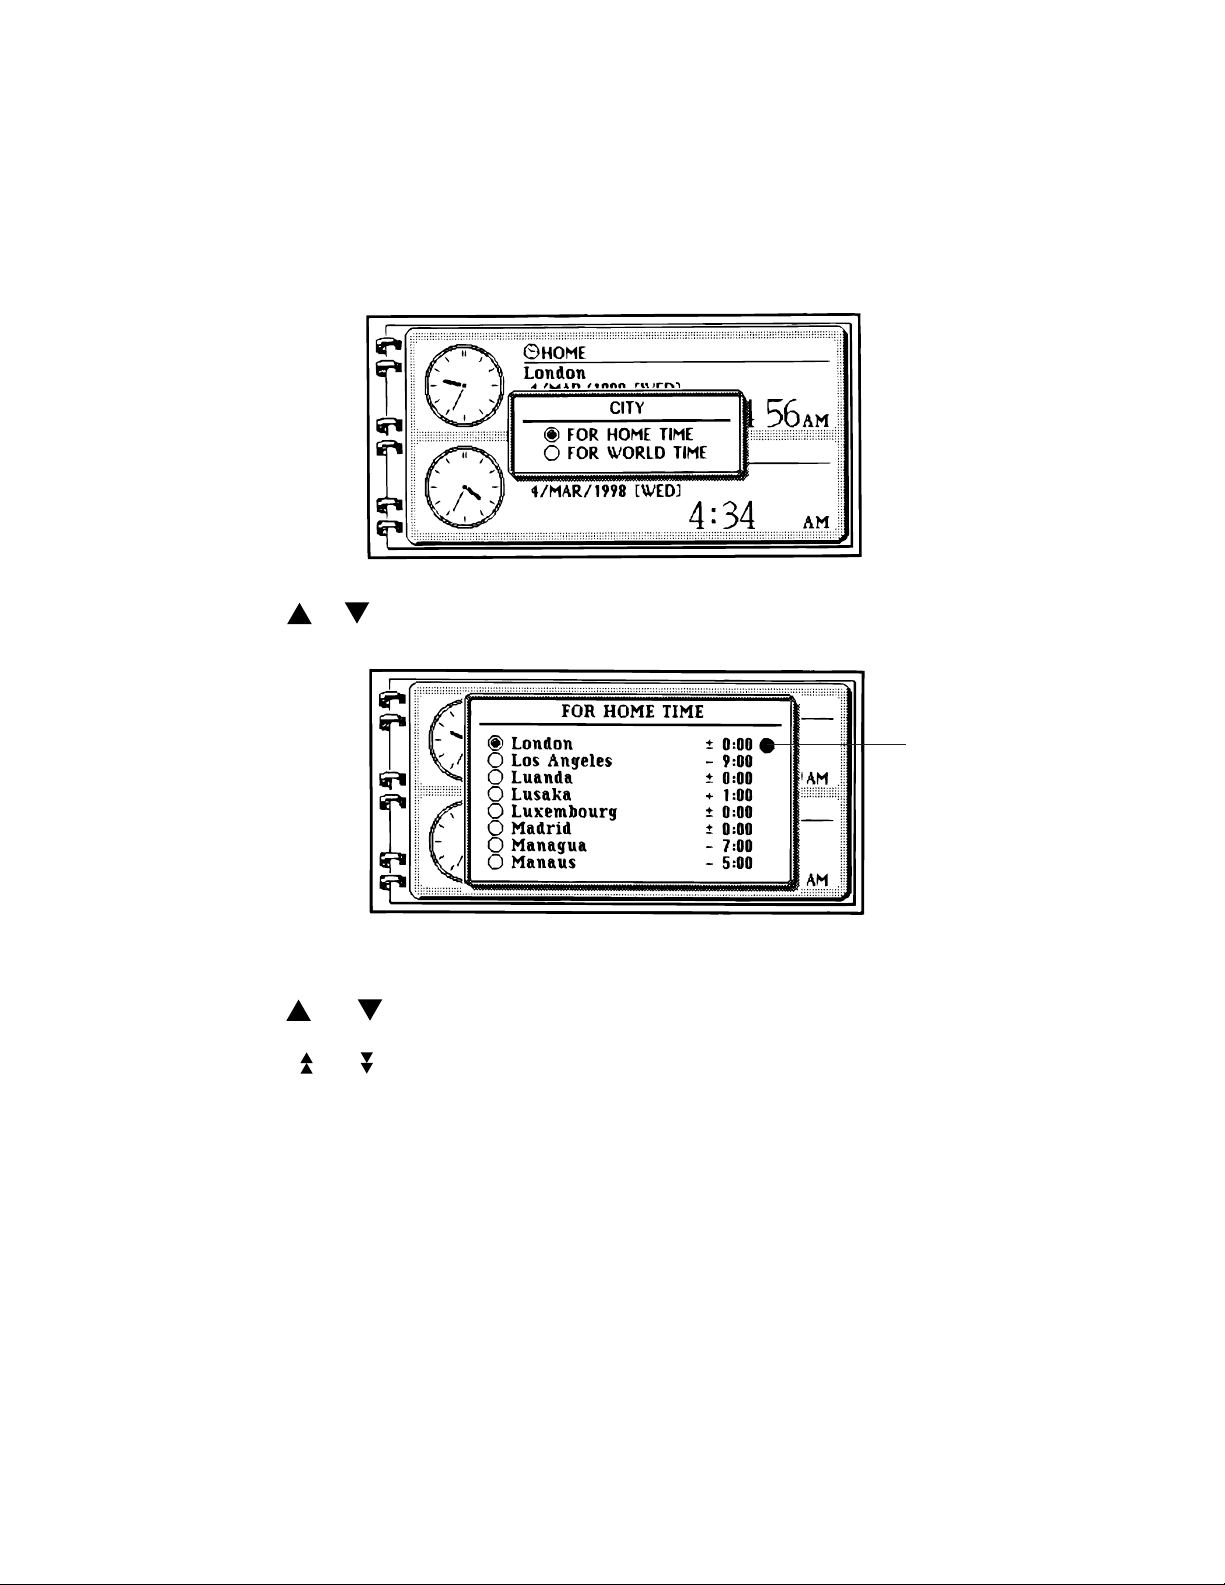
To select a zone
1. In the CLOCK Mode, execute the EDIT menu’s CITY command.
2. Use or to move the highlighting to FOR HOME TIME or FOR WORLD TIME, and then
press OK.
DST indicator
• The DST indicator shows which cities for which daylight saving time is turned on. See page 21 for
details on turning daylight saving time on and off.
3. Use and to select the name of the city you want to use as your Home Time city or World
Time City.
• Press and to scroll the list of city names page by page.
• To jump to a city name, input the letter that the name begins with.
• See the Appendix at the back of the User’s Guide for a complete list of available city names.
4. Press OK to register your selection.
— 20 —
 Loading...