


CDP-130
USER’S GUIDE
Please keep all information for future reference.
Safety Precautions
Before trying to use the Digital Piano, be sure to read the separate “Safety Precautions”.
GUÍA DEL USUARIO
Guarde toda la información para futuras consultas.
Precauciones de seguridad
Antes de intentar usar el piano digital, asegúrese de leer las “Precauciones de seguridad” separadas.
CDP130-ES-1A
EN/ES
English
Español
TO REDUCE THE RISK OF FIRE OR ELECTRIC SHOCK, REFER SERVICING TO QUALIFIED SERVICE PERSONNEL.
IMPORTANT SAFETY INSTRUCTIONS
1.Read these instructions.
2.Keep these instructions.
3.Heed all warnings.
4.Follow all instructions.
5.Do not use this apparatus near water.
6.Clean only with dry cloth.1.0
7.Do not block any ventilation: openings. Install in accordance with the manufacturer’s instructions.
8.Do not install near anyVersionheat sources such as radiators, heat registers, stoves, or other apparatus (including amplifiers) that produce heat.
9.Do not defeat the safety purpose of the polarized or grounding-type plug. A polarized plug has two blades with one wider than the other. A grounding type plug hasRemarkstwo blades and a third grounding prong. The wide blade or the third prong are
10.Protect the power cord from being walked on or pinched particularly at plugs, convenience receptacles, and theselect |
point where |
||||||||||
they exit from the apparatus. |
|
|
|
|
|
|
|
|
Bank |
Modlationu Dataentry uVolme Pan |
|
|
|
|
|
|
|
|
|
|
|
|
|
11.Only use attachments/accessories specified by the manufacturer. |
|
|
|
|
|
|
|
|
|||
12.Use only with the cart, stand, tripod, bracket, or table specified by the manufacturer, or sold with the |
|
|
|
|
|||||||
|
|
|
|
||||||||
apparatus. When a cart is used, use caution when moving the cart/apparatus combination to avoid injury |
|
|
|
|
|||||||
from tip-over. |
|
|
|
|
|
** |
|
|
|
|
|
|
|
|
|
|
|
|
|
|
|
|
|
|
|
|
|
|
|
v= |
|
|
|
|
|
13.Unplug this apparatus during lightning storms or when unused for long periods of time.127 |
|
|
|
|
|
||||||
The apparatus shall not be exposed to drippingRecognized |
or splashing11 |
and that no objects0 |
|
|
|
||||||
filled withO9nH9nHv=liquids, such as vases, shall be |
|||||||||||
damaged in any way, such as power-supply cord16or pl16ug is damaged,3 |
liquid has been=18nHspilled or objects |
|
|
|
|
||||||
|
|
|
|
1 |
- |
|
|
|
|
|
|
14.Refer all servicing to qualified service personnel. Servicing is required when the apparatus has been |
|
|
|
|
|||||||
|
|
|
|
* |
|
|
|
|
|
|
|
|
- - |
Mode |
X |
127127 |
v 0, |
X O |
O |
O O O O |
|||
|
|
|
0- |
|
|
|
(MSBO |
|
|
||
have fallen into the apparatus, the apparatus has been exposed to rain or moisture, does not operate normally, or has been |
|||||||||||
dropped. |
|
|
|
|
|
|
|
|
|
|
|
placed on the apparatus. |
|
|
|
|
|
X |
|
|
|
|
|
Expression
O
The power indicator being unlit does not mean the apparatus is completely disconnected from the MAINS.
When you need to have the apparatus completely disconnected from the MAINS, you must unplug the power cord. For that purpose, locate the apparatus in a way that secures easy access to the power cord.
Declaration of Conformity
Model Number: CDP-130 |
|
1 1 -16 |
Mode3 X |
0 -127 |
9nHv127=1- X 9nH v=0 |
X X |
O |
O X |
O O O |
|||
Trade Name: CASIO COMPUTER CO., LTD. |
||||||||||||
Responsible party: CASIO AMERICA, INC. |
||||||||||||
|
Transmitted |
|||||||||||
Address: 570 MT. PLEASANT AVENUE, DOVER, NEW JERSEY 07801 |
|
O |
|
|
|
|
|
|
|
|||
Telephone number: 973-361-5400 |
|
|
|
|
|
|
|
|
|
|
|
|
|
|
|
|
|
|
|
|
|
|
|
|
|
This device complies with Part 15 of the FCC Rules, Operation is subject to the following two conditions: |
|
|
|
|
|
|
||||||
(1) This device may not cause harmful interference, and (2) this device must accept any interference received, including |
|
|
||||||||||
interference that may cause undesired operation. |
|
|
|
|
|
|
32 |
1 |
38 |
7 |
10 |
|
|
|
|
|
|
|
|
|
|||||
|
|
|
NOTICE |
|
|
|
|
0, |
|
6, |
|
|
|
|
|
|
|
|
|
|
|
|
|
|
|
This equipment has been tested and found to comply with the limits for a Class B digital device, pursuant to Part 15 of the FCC |
||||
uDefalt Changed |
uDefalt Messages Altered |
oicevTr |
ONNote OFFNote |
Key’s Ch’s |
Rules. These limits are designed to provide reasonable protection against harmful interference in a residential installation. This |
|
Function |
ue |
equipment generates, uses and can radiate radio frequency energy and, if not installed and used in accordance with the
instructions, may cause harmful interference to radio communications. However, there is no guarantee that interference will not
occur in a particular installation. If this equipment does cause harmful interference to radio or television reception, which can be |
||||||||
determined by turning the130equipment off and on, the user is encouraged to try to correct the interference by one or more of the |
|
|||||||
|
- |
|
|
Note Number |
Velocity |
After Touch |
PitchBender |
Control |
|
Model: |
|
|
|||||
following |
Basic Channel |
Mode |
|
|
|
|
|
|
• |
Reorient or relocate theCDPreceiving antenna. |
|
|
|
|
|
|
|
• |
Increase the separation between the equipment and receiver. |
|
|
|
|
|
|
|
• |
Connect the equipment into an outlet on a circuit different from that to which the receiver is connected. |
|
|
|||||
• |
Consult the dealer or an experienced radio/TV technician for help. |
|
|
|
|
|
||
FCC WARNING
Changes or modifications not expressly approved by the party responsible for compliance could void the user’s authority to operate the equipment.
X
11
Change
Important!
Please note the following important information before using this product.
• Before using the AD-A12150LW Adaptor to power the product, be sure to check the AC Adaptor for any damage first. Carefully |
|
||
|
check the power cord for breakage, cuts, exposed wire and other serious damage. Never let children use an AC adaptor that is |
|
|
|
seriously damaged. |
English |
|
• |
The product is not intended for children under 3 years. |
||
|
|||
• Use only CASIO AD-A12150LW adaptor. |
|
||
• |
The AC adaptor is not a toy. |
|
|
• |
Be sure to disconnect the AC adaptor before cleaning the product. |
|
|
Declaration of Conformity According to EU Directive
Manufacturer:
CASIO COMPUTER CO., LTD.
6-2, Hon-machi 1-chome, Shibuya-ku, Tokyo 151-8543, Japan
This mark applies in EU countries only.
Responsible within the European Union: CASIO EUROPE GmbH
Casio-Platz 1, 22848 Norderstedt, Germany
●Any reproduction of the contents of this manual, either in part or its entirety, is prohibited. Except for your own, personal use, any other use of the contents of this manual without the consent of CASIO is prohibited under copyright laws.
●IN NO EVENT SHALL CASIO BE LIABLE FOR ANY DAMAGES WHATSOEVER (INCLUDING, WITHOUT LIMITATION, DAMAGES FOR LOSS OF PROFITS, BUSINESS INTERRUPTION, LOSS OF INFORMATION) ARISING OUT OF THE USE OF OR INABILITY TO USE THIS MANUAL OR PRODUCT, EVEN IF CASIO HAS BEEN ADVISED OF THE POSSIBILITY OF SUCH DAMAGES.
●The contents of this manual are subject to change without notice.
●The actual appearance of the product may be different from that shown in the illustrations in this User’s Guide.
●Company and product names used in this manual may be registered trademarks of others.
EN-1

 Contents
General Guide ........................... |
EN-3 |
Getting Ready to Play .............. |
EN-4 |
Preparing the Music Stand .............................. |
EN-4 |
Connecting a Pedal Unit.................................. |
EN-4 |
Power Supply .................................................. |
EN-4 |
Playing the Digital Piano.......... |
EN-5 |
Turning on Power and Playing ........................ |
EN-5 |
Using Headphones.......................................... |
EN-5 |
Using a Damper Pedal .................................... |
EN-6 |
Changing Keyboard Response to |
|
Touch Pressure (Touch Response)................. |
EN-6 |
Selecting and Playing a Tone.......................... |
EN-7 |
Playing Demo Songs....................................... |
EN-7 |
Layering Two Tones........................................ |
EN-8 |
Using Hall ........................................................ |
EN-8 |
Using Reverb................................................... |
EN-8 |
Using Chorus................................................... |
EN-9 |
Changing the Pitch (Transpose, Tuning)......... |
EN-9 |
Using the Metronome .................................... |
EN-10 |
Connecting External |
|
Devices .................................... |
EN-11 |
Connecting to a Computer ............................ |
EN-11 |
MIDI Settings................................................. |
EN-12 |
Outputting Keyboard Notes to |
|
Audio Equipment ........................................... |
EN-12 |
Reference ................................ |
EN-13 |
Troubleshooting............................................. |
EN-13 |
Specifications ................................................ |
EN-14 |
Operating Precautions................................... |
EN-15 |
MIDI Implementation Chart |
|
Included Accessories
●Music Stand
●Pedal
●Leaflets
•Safety Precautions
•Other (Warranty, etc.)
Items included as accessories are subject to change without notice.
Separately Available Accessories
•You can get information about accessories that are separately for this product from the CASIO catalog available from your retailer, and from the CASIO website at the following URL.
http://world.casio.com/
EN-2


 General Guide
• In this manual, the term “Digital Piano” refers to the CDP-130. |
English |
|
|
• In this manual, buttons and other controllers are identified using the numbers shown below. |
|
1
2 3 4 5 6 7 8
9 |
9 |
Back
|
|
|
|
|
|
|
|
|
|
|
|
|
|
|
|
|
|
|
|
|
|
|
|
|
|
|
|
|
|
|
bk |
bl |
bm |
bn |
|||||
1VOLUME knob EN-5 |
|
|
8HALL button EN-5, 8 |
|
|
||||
2P (POWER) button EN-5 |
|
|
9Speakers |
|
|
||||
3DEMO button EN-7 |
|
|
bkUSB port EN-11 |
|
|
||||
4FUNCTION button EN-6, 7, 8, 9, 10, 12 |
|
|
blDAMPER PEDAL jack EN-4 |
||||||
5GRAND PIANO 1 button EN-7, 8 |
|
|
bmDC 12V terminal EN-4 |
|
|
||||
6ELEC PIANO 1 button EN-7 |
|
|
bnPHONES/OUTPUT jack EN-5 |
||||||
7METRONOME button EN-10 |
|
|
|
|
|
|
|||
EN-3

 Getting Ready to Play
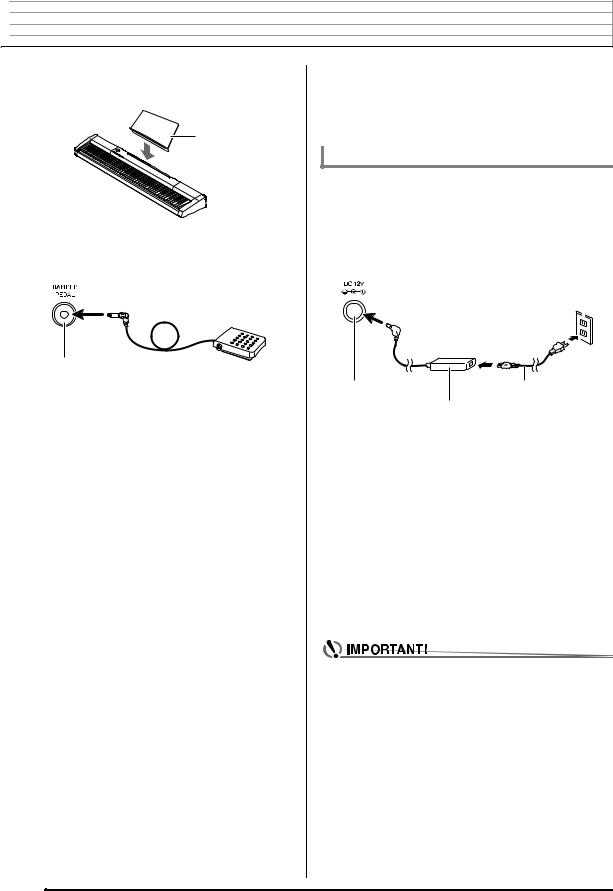
Preparing the Music Stand |
|
Power Supply |
|
|
|
Your Digital Piano runs on standard household power. Be sure to turn off power whenever you are not using the Digital
Piano.
Music stand
Using the AC Adaptor
Use only the AC adaptor (JEITA Standard, with unified polarity plug) that comes with this Digital Piano. Use of a different type of AC adaptor can cause malfunction of the Digital Piano.
|
|
|
|
|
Specified AC Adaptor: AD-A12150LW |
|
Connecting a Pedal Unit |
• Use the supplied power cord to connect the AC adaptor as |
|||||
|
|
|
|
|
shown in the illustration below. |
|
|
|
|
|
|
Household power outlet |
|
|
|
|
|
|
|
|
|
|
|
|
|
|
|
|
|
|
|
|
|
|
DAMPER PEDAL jack
DC 12V terminal |
Power cord |
AC adaptor
• Configuration and type depends on your geographic location.
Note the following important precautions to avoid damage to the power cord.
During Use
• Never pull on the cord with excessive force.
• Never repeatedly pull on the cord.
• Never twist the cord at the base of the plug or connector.
During Movement
• Before moving the Digital Piano, be sure to unplug the AC adaptor from the power outlet.
During Storage
• Loop and bundle the power cord, but never wind it around the AC adaptor.
• Never connect the AC adaptor (JEITA Standard, with unified polarity plug) that comes with this Digital Piano to any other device besides this Digital Piano. Doing so creates the risk of malfunction.
• Make sure the Digital Piano is turned off before plugging in or unplugging the AC adaptor.
• The AC adaptor will become warm to the touch after very long use. This is normal and does not indicate malfunction.
EN-4
 Loading...