


Viewer Software
User’s Manual
Ver. 3.6 |
|
E |
ENGLISH

Contents
Introduction |
|
Important ....................................................................................... |
4 |
Copyright Information ................................................................... |
4 |
Usage Notice of Audio .................................................................. |
4 |
Trademark Information ................................................................. |
4 |
Conventions .................................................................................. |
4 |
WebView Livescope Overview ................................................. |
5 |
Viewer Overview ....................................................................... |
6 |
Viewer for Java ............................................................................. |
6 |
Viewer for PC ................................................................................ |
7 |
Operating Environment ............................................................. |
8 |
Viewer for Java ............................................................................. |
8 |
Viewer for PC ................................................................................ |
8 |
Chapter 1 Viewer for Java |
|
Preparations for Using the Viewer for Java ............................ |
10 |
Using Internet Explorer ............................................................... |
10 |
Using Netscape .......................................................................... |
11 |
Starting Up the Viewer for Java .............................................. |
15 |
Using the Viewer for Java ....................................................... |
16 |
“LiveApplet” Screen .................................................................... |
16 |
Panorama Window ................................................................................ |
17 |
Starting Camera Control ............................................................. |
18 |
Controlling the Camera .............................................................. |
19 |
Changing the Camera Angle ................................................................. |
19 |
Changing the Camera Zoom Ratio ....................................................... |
20 |
Selecting the Camera ............................................................................ |
21 |
Using Presets ........................................................................................ |
21 |
Adjusting Backlight ................................................................................ |
22 |
Taking a Snapshot of the Video ............................................................ |
23 |
“Glimpse” Screen ........................................................................ |
24 |
Chapter 2 Viewer for PC |
|
Preparations for Using the Viewer for PC .............................. |
26 |
Installing the Viewer for PC ........................................................ |
26 |
Using Browsers Other Than the Recommended |
|
Products ................................................................................ |
27 |
Starting Up the Viewer for PC ................................................ |
28 |
Starting Up from the Web Browser ............................................ |
28 |
Starting Up Independently .......................................................... |
28 |
Connecting to the Camera Server .......................................... |
29 |
Specifying a Connection Target and Connecting ....................... |
29 |
Selecting a Registered Camera Server and Connecting ........... |
30 |
Disconnecting ............................................................................. |
30 |
2

Using the Viewer for PC ......................................................... |
31 |
“Viewer for PC” Screen .............................................................. |
31 |
Panorama Window ................................................................................ |
32 |
Starting Camera Control ............................................................. |
33 |
Controlling the Camera .............................................................. |
34 |
Changing the Camera Angle ................................................................. |
34 |
Changing the Camera Zoom Ratio ....................................................... |
35 |
Selecting the Camera ............................................................................ |
36 |
Using Presets ........................................................................................ |
36 |
Changing the Video Source Size .......................................................... |
37 |
Using Full-Screen Mode ........................................................................ |
37 |
Adjusting Backlight ................................................................................ |
38 |
Pausing and Restarting Video Display ................................................. |
38 |
Registering a camera site during connection ....................................... |
39 |
Playing back audio ................................................................................ |
40 |
Saving and Printing Still Pictures ............................................... |
40 |
Saving Still Pictures to Files ................................................................. |
40 |
Printing Still Pictures ............................................................................. |
41 |
Displaying Information ................................................................ |
41 |
Video Information .................................................................................. |
41 |
Connection Information ......................................................................... |
42 |
Camera Information ............................................................................... |
42 |
Network .................................................................................................. |
42 |
Chapter 3 Viewer for PC Settings |
|
Viewer for PC Settings ........................................................... |
44 |
“Starting protocol” Setting ..................................................................... |
44 |
“HTTP protocol” Setting ........................................................................ |
45 |
“Display option” Setting ......................................................................... |
46 |
Registering and Changing the Server .................................... |
47 |
Registering in a Camera Site List .............................................. |
47 |
Adding to a list ....................................................................................... |
47 |
Changing or deleting registration details in the list .............................. |
48 |
Appendix |
|
Error Messages ...................................................................... |
51 |
Index ....................................................................................... |
54 |
3
Introduction
This manual describes how to use the WebView Livescope Ver. 3.6 Viewer Software. There are two types of viewers, Viewer for Java and the Viewer for PC, and the video sender can use one or the other as required. Both types provide the same basic functions for viewing videos, but differ in terms of other features and functions. The preparations for using the two viewer types and the required operating environment also differ depending on the computer hardware and software used to run the viewer.
Read this manual carefully before you use the viewer to ensure that you make the best possible use of this product.
Store this manual in a safe place after you finish reading it.
The latest information on the viewer is available at the following URL. http://www.canon.com/webview
Important
1 Copyright © 2004 by Canon, Inc. All rights reserved. The unauthorized transfer of all or any part of the contents of this manual is forbidden.
2 The contents of this manual are subject to change without notice.
3 Every effort has been made to ensure that content of this manual is free from errors.
If you encounter any errors, omissions or apparent inaccuracies, contact the manufacturer.
4 Notwithstanding the above, Canon accepts no liability for any results arising from the
operation of this product.
Copyright Information
Under copyright law, video or still pictures photographed by the viewer cannot be used for any purpose other than personal enjoyment without prior permission from the copyright holder.
Usage Notice of Audio
1.Audio stream may be interrupted according to the performance of your PC and network environment.
2.If you use a proxy server, the audio may be interrupted.
3.If you use a PC on which anti-virus software is installed, the audio may be delayed or the audio stream may be temporarily interrupted.
Trademark Information
Canon and Canon logo are registered trademarks of Canon Inc.
Microsoft Windows and Microsoft Internet Explorer are registered trademarks of the Microsoft Corporation in the United States and other countries.
Netscape is a trademark of Netscape Communications Corporation.
Java and all Java-based marks are trademarks or registered trademarks of Sun Microsystems, Inc. in the United States and other countries.
All other company or product names used in this document are trademarks or registered trademarks of their respective holders.
* In this document, “Microsoft Windows” is abbreviated as simply “Windows”.
Conventions
c |
Indicates important notes or restrictions that must be observed when using this product. Always |
Note |
read these notes. |
|
|
e |
Indicates additional information or explanations for a procedure. You should read these items. |
Tip |
|
4
WebView Livescope Overview
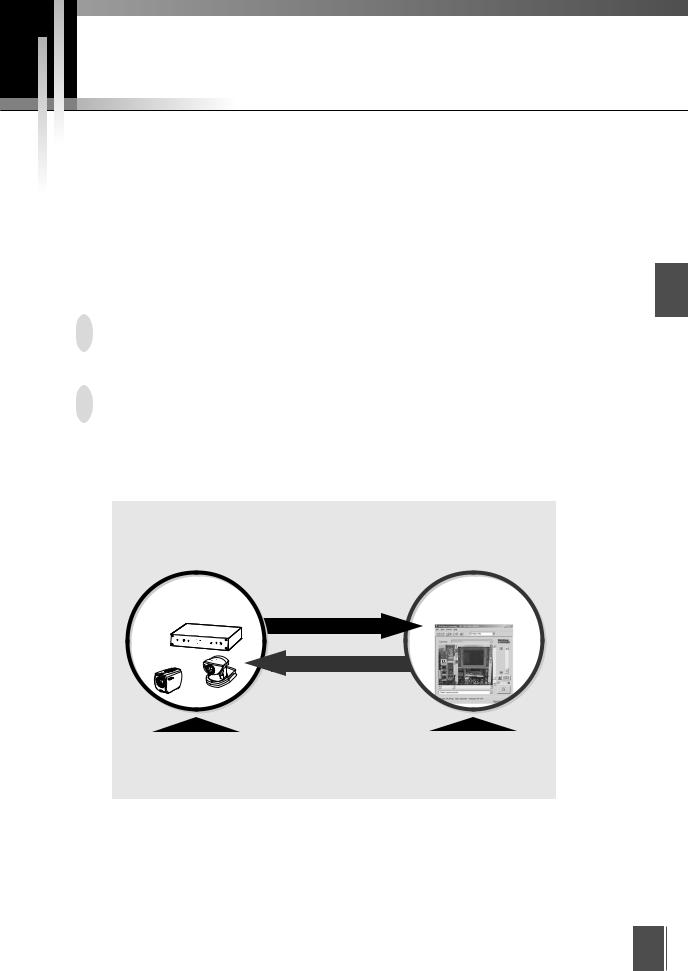
■WebView Livescope is the system that allows camera control and live video distribution from a remote location.
■The system is configured for a camera server and viewer software. The camera server distributes live video taken by the video camera to the Internet or an Intranet. The viewer software can display the video and remotely control the camera.
■The WebView Livescope system can be used in a wide range of applications such as distributing live video from a Web site and monitoring.
The following types of camera servers are available:
•Network Camera Server VB150
•Network Camera VB-C50i/VB-C50iR
•Network Camera VB-C50Fi
The following types of Viewer Software are available:
•Viewer for Java (This manual: provided free of charge with camera server product)
•Viewer for PC (This manual: provided free of charge with camera server product)
•Network Video Recorder VK-64 (Sold separately)
•WebView Livescope MV Ver. 2.1/LE (Sold separately)
WebView Livescope is a video distribution system that enables users to actively (by performing operations by oneself) view live (showing now) video
from Web pages by allowing users to change camera angle and zoom magnification.
Video Sender |
Live |
Video Recipient |
(Camera server) |
||
VB150 |
Sending the current video |
(Viewer software) |
|
||
VB-C50Fi |
Viewing by switching angle and zoom magnification |
|
|
|
Active
VB-C50i
|
|
|
|
|
|
Offers an easy way |
Offers the advantage of |
||||
to provide live information contents. |
being able to actively select desirable |
||||
|
|
|
parts from live video according to |
||
|
|
|
the user’s purposes. |
||
■ The names of the viewers have been changed as follows:
Old Name |
New Name |
|
|
Helper Viewer |
Viewer for PC |
|
|
Java Viewer |
Viewer for Java |
|
|
Introduction
5
Viewer Overview
There are two types of WebView Livescope Viewer Software: the Viewer for Java and the Viewer for PC.
Viewer for Java
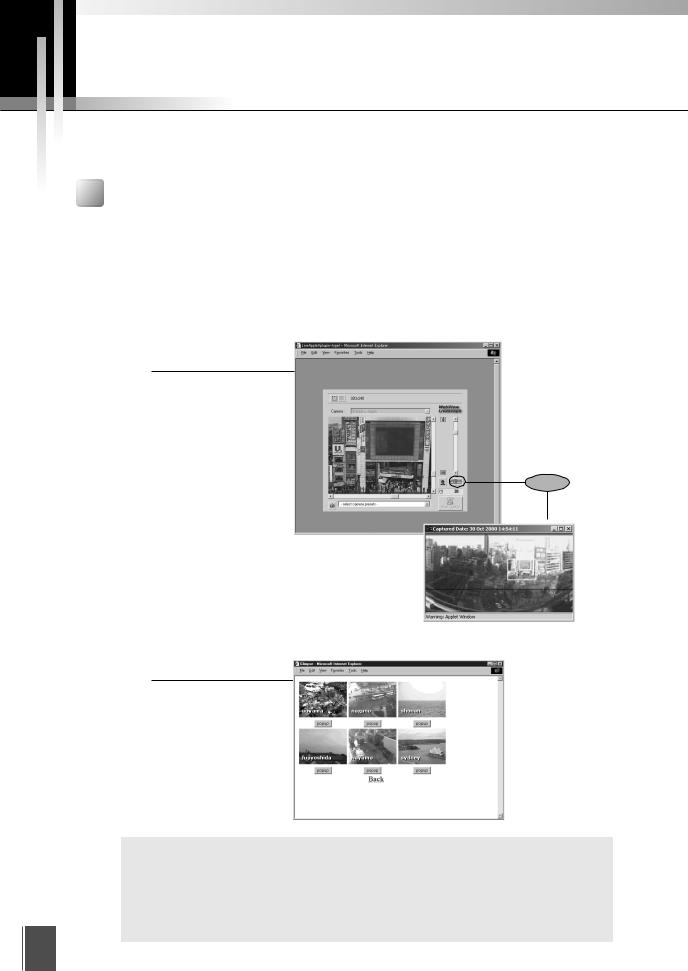
This is a viewer written using Java. This viewer allows the camera server’s videos to be viewed on any computer with a Web browser that runs Java, regardless of the platform. Because the Java applet is downloaded when the viewer starts up, the first video takes some time to appear. The Viewer for Java provides two types of viewers: LiveApplet containing video display and camera control functions, and Glimpse containing a video display function.
LiveApplet
Video display functions
Camera control functions
Click
Panorama picture
Glimpse
Video display functions
c
Note
● To use the Viewer for Java, you need to install Java VM beforehand. See the
web site for more details. |
|
WebView Product web site |
http://www.canon.com/webview |
●Panorama pictures must be registered in advance at the camera server.
* Panorama pictures are not available with the VB-C50Fi.
6

Viewer for PC
This is a viewer that runs as an application. This viewer provides video display and camera control functions and appears in a separate window at startup. While the Viewer for PC has to be pre-installed, it offers the advantage of displaying the first video quickly. At present, only a Windows version of this viewer is available.
Introduction
Click
|
Panorama picture |
|
c |
● The Viewer for PC is provided on the CD-ROMs supplied with the Network |
|
Camera Server VB150, the Network Camera VB-C50i/VB-C50iR and VB- |
||
Note |
C50Fi packages. The viewer can also be downloaded free of charge from |
|
|
||
|
the following web site. |
|
|
URL : http://www.canon.com/webview |
|
|
● The Viewer for PC needs to be pre-installed on your computer. (→ p.26) |
|
|
● Panorama pictures must be registered in advance at the camera server. |
|
|
* Panorama pictures are not available with the VB-C50Fi. |
|
|
● When playing back audio, please read carefully “Usage Notice of Audio” |
|
|
(→ P.4). |
|
|
* Audio input/output is not available with the VB-C50Fi. |
|
|
|
|
e |
● Because the Viewer for Java is downloaded from the camera server every |
|
Tip |
time you access and displays video on the viewer screen, it starts up |
|
slower than the Viewer for PC that is pre-installed on a PC. |
||
|
||
|
● Use the Viewer for Java when you access the camera server and view video |
|
|
for the first time. However, we recommend you to install and use the Viewer |
|
|
for PC if you view video frequently. |
7
Operating Environment
For the latest information, please refer to our WebView Product web page:
http://www.canon.com/webview
Viewer for Java Ver. 3.6
Operating System Windows 2000 (SP4)/ Windows XP (SP1a or SP2)
Netscape 7.1 or 7.2,
Web Browser
or Microsoft Internet Explorer 6.0 (SP1 or SP2)
MSVM Release 5.0.0.3810 (Java VM provided by Microsoft)
Java VM
Java Plug-in 1.4.2 (Java VM provided by Sun Microsystems)
*This viewer is installed in the camera server and automatically downloaded when it is connected to the camera server.
*Operation is unstable when used with an OS or Web browser other than those noted above.
Viewer for PC Ver. 3.6
Operating System Windows 2000 (SP4)/ Windows XP (SP1a or SP2)
Netscape 7.1 or 7.2,
Web Browser
or Microsoft Internet Explorer 6.0 (SP1 or SP2)
* Must be installed in advance from the CD-ROM supplied with the camera server. (→ p.26)
8

Chapter 1
Viewer for Java
This chapter describes the preparations required for using the Viewer for Java and explains how to use the viewer.
Preparations for Using the Viewer for Java
The Viewer for Java is automatically downloaded from the camera server. There is no need to install it in advance. However, depending on the type of Web browser you are using and your software settings, you must change your Web browser settings.
Using Internet Explorer
Internet Explorer has a setting that specifies whether the use of Java is permitted.
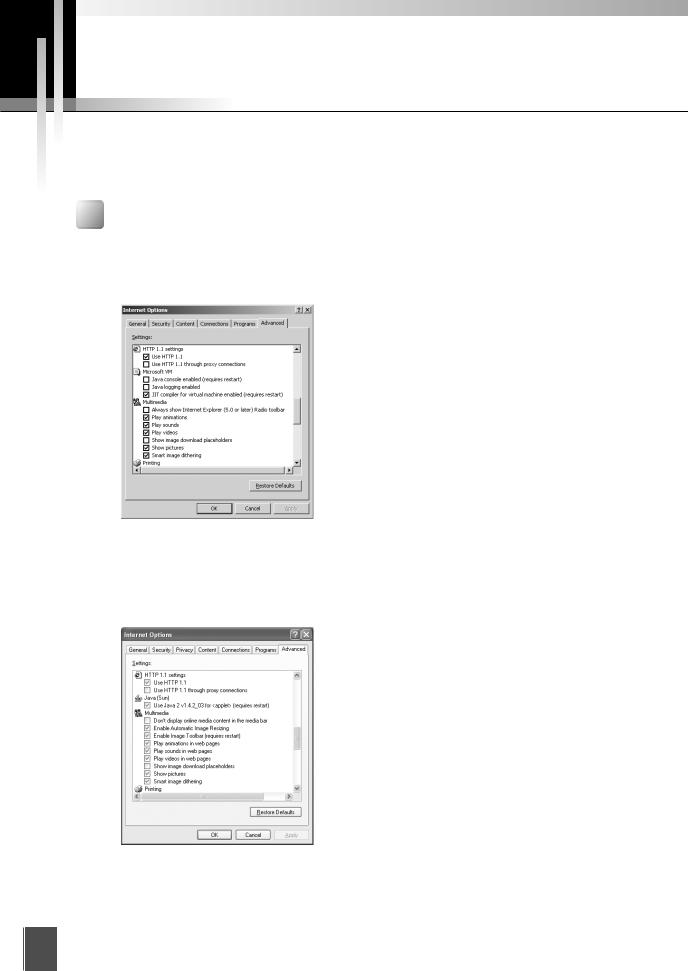
From the “Tools” menu, select “Internet Options” and click the “Advanced” tab. Then set “JIT compiler for virtual machine enabled” as the “Microsoft VM” setting.
* For Internet Explorer 6.0
In Windows XP, Java VM may not be installed. If this is the case, please install it. See the web site for more details.
WebView Product web site http://www.canon.com/webview
Detailed settings below similar to the ones are displayed after settings.
* For Internet Explorer 6.0
10
Using Netscape
Netscape also has a setting that specifies whether the use of Java is permitted.
Select “Preferences” from the “Edit” menu, click “Advanced” and then click in the “Enable Java” checkbox.
* For Netscape 7.1
c The settings for the Web browser vary depending on the version used. Refer
to the settings given here and check your browser version.
Note
1
Java for Viewer
11
e |
When You are Connected to a LAN |
Tip |
If the camera server is used via an Intranet and you specify the Web browser proxy |
|
|
|
setting manually, videos are distributed via the proxy. This can result in a slower |
|
frame rate and proxy server overload. |
|
Use the procedure shown below to set up a “No proxy” connection. Note that if |
|
you are accessing a camera server that is located outside a firewall on the internet, |
|
registration is not required for the camera server. |
|
Setup Examples |
Using Internet Explorer
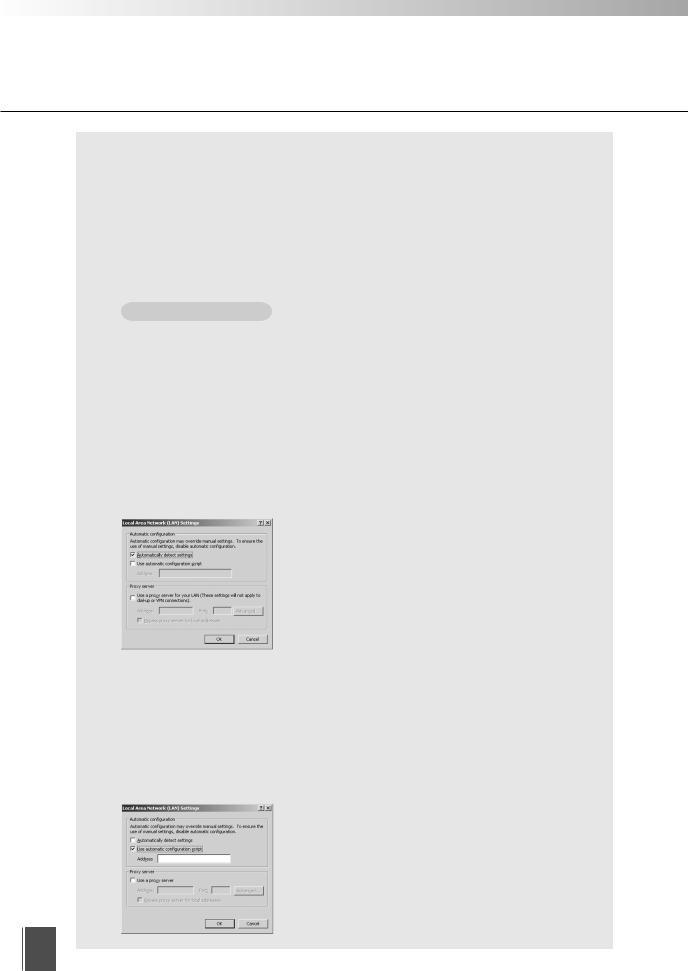
Specify either “Automatically detect settings”, “Use automatic configuration script” or “Use a proxy server for your LAN” below.
● Automatically detect settings
1 From the “Tools” menu, select “Internet Options” and click the “Connections” tab.
2 Click “LAN settings” to open the Local Area Network (LAN) Settings dialog box.
3 Tick “Automatically detect settings” in “Automatic configuration”.
4 Click “OK” to close the Local Area Network (LAN) Settings dialog box and the Internet Options dialog box. Proxy data is automatically detected when you specify this setting.
* For Internet Explorer 6.0
● Use automatic configuration script
1 From the “Tools” menu, select “Internet Options” and click the “Connections” tab.
2 Click “LAN settings” to open the Local Area Network (LAN) Settings dialog box.
3 Tick “Use automatic configuration script” in “Automatic configuration” and enter the URL (e.g. http://192.168.100.10/proxy.pac) of the Settings file.
4 Click “OK” to close the Local Area Network (LAN) Settings dialog box and the Internet Options dialog box.
* For Internet Explorer 6.0
12
Preparations for Using the Viewer for Java
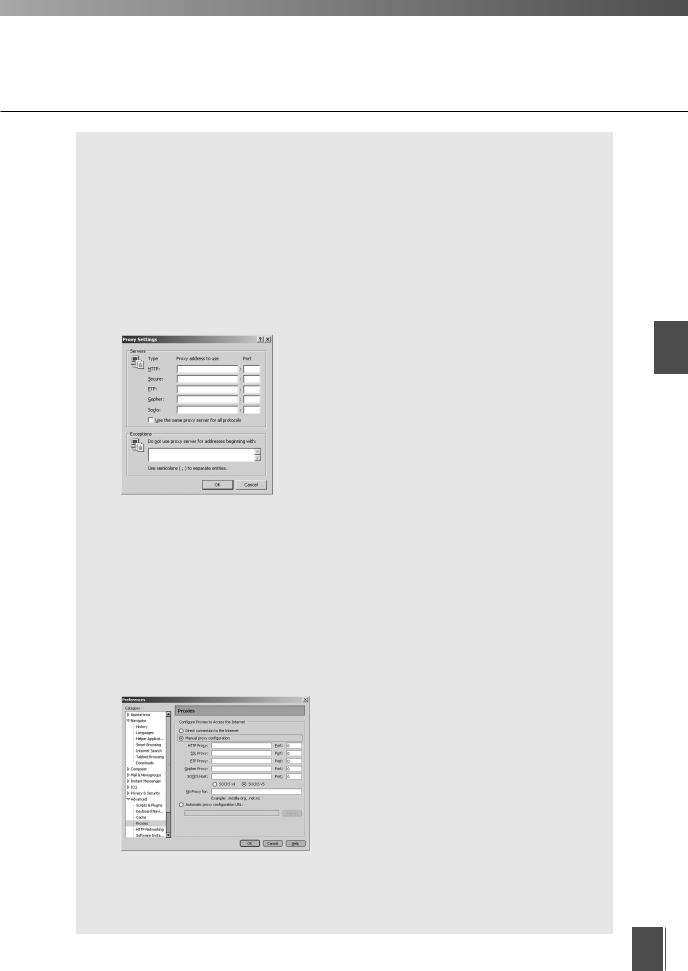
● Use a proxy server for your LAN
1 From the “Tools” menu, select “Internet Options” and click the “Connections” tab.
2 Click “LAN settings” to open the Local Area Network (LAN) Settings dialog box.
3 Tick “Use a proxy server for your LAN” in “Proxy server” and click “Advanced”.
4 In the “Exceptions” field, enter “Camera server IP address: HTTP conversion server service port”. If there are multiple settings, use a semicolon (;) as the separator (e.g. 192.168.100.1:80;192.168.0.20:80).
5 Click “OK” to close the Proxy Settings dialog box, Local Area Network (LAN) Settings dialog box and the Internet Options dialog box.
* For Internet Explorer 6.0
Using Netscape
Specify either “Manual proxy configuration” or “Automatic proxy configuration URL” below.
● Automatic proxy configuration URL
1 From the “Edit” menu, select “Preferences”.
2 Select “Proxies” in “Advanced” and select “Automatic proxy configuration URL”.
3 In the “Automatic proxy configuration URL” field, enter the URL (e.g. http://192.168.100. 10/proxy.pac) of the Settings file.
4 Click “OK” to close the Preferences dialog box.
* For Netscape 7.1
1
Java for Viewer
13
Preparations for Using the Viewer for Java
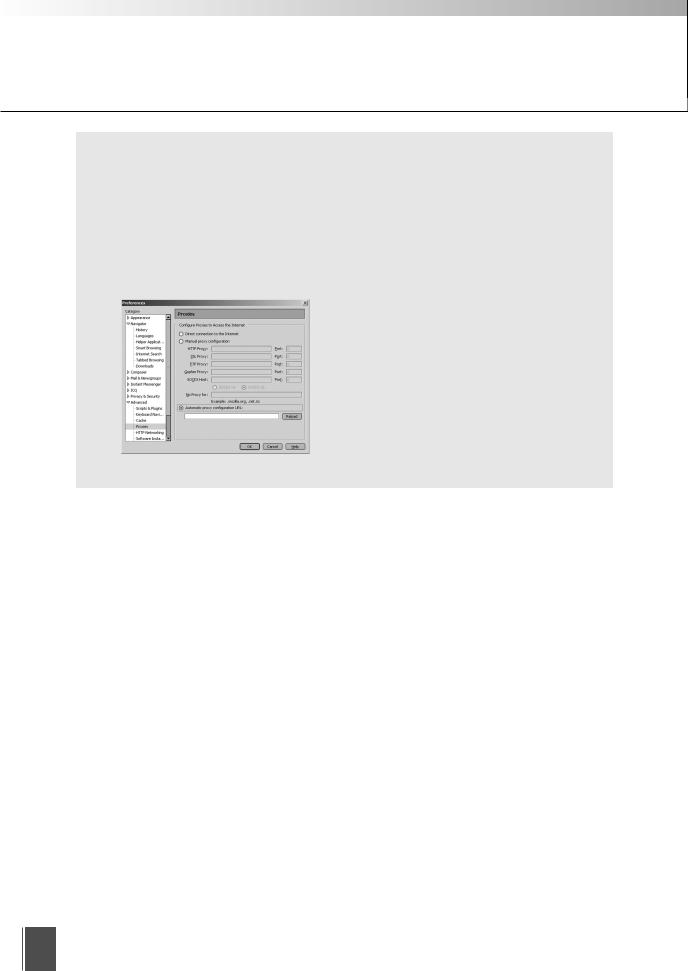
● Manual proxy configuration
1 From the “Edit” menu, select “Preferences”.
2 Select “Proxies” in “Advanced” and select “Manual proxy configuration”.
3 In the “No Proxy for” field, enter “Camera server IP address:HTTP conversion server service port”. If there are multiple settings, use a semicolon (;) as the separator (e.g. 192.168.100.1:80;192.168.0.20:80).
4 Click “OK” to close the Preferences dialog box.
* For Netscape 7.1
14
Starting Up the Viewer for Java
The Viewer for Java is started up from the Web browser that displayed the Web page for distributing videos.
To create a Web page for distributing videos, refer to the user’s manual of the camera server you are using.
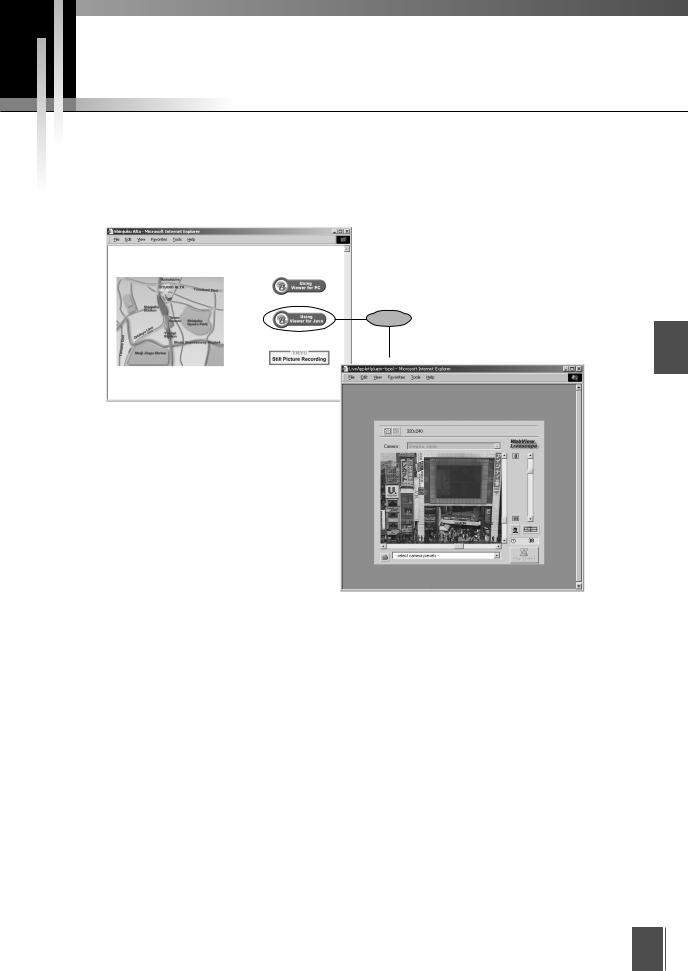
When the “Using Viewer for Java” button in the Web Browser that displayed the Web page for distributing videos is clicked, the Viewer for Java starts up and connects to the camera server.
Click
1
Java for Viewer
15
Using the Viewer for Java
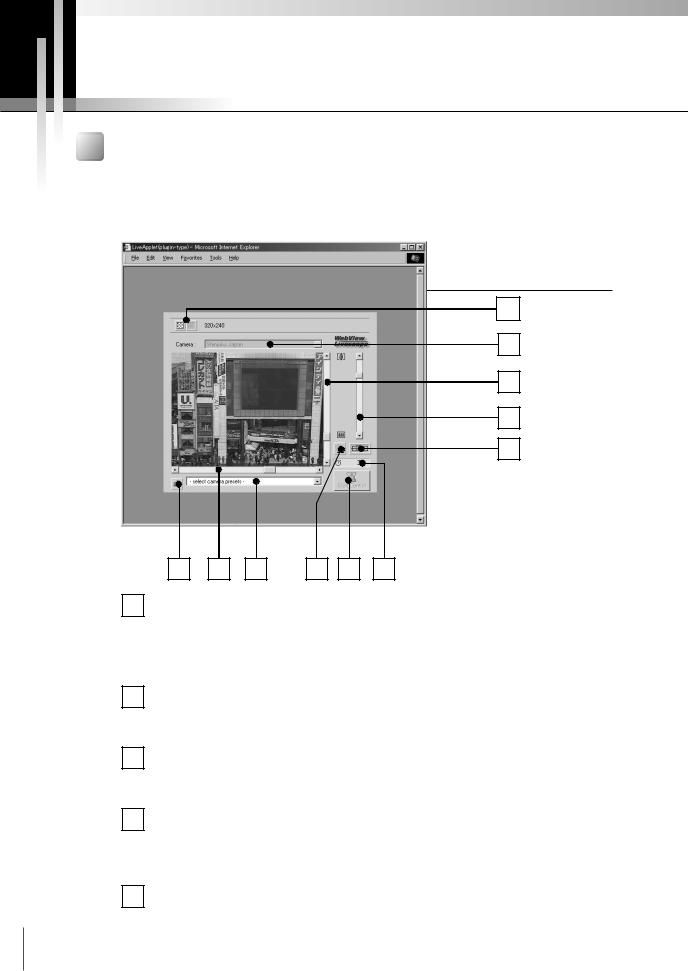
“LiveApplet” Screen
There are two types of Viewer for Java (→ p.6). The following is a description of
“LiveApplet”. “LiveApplet” is a viewer with a GUI that allows the user to change the camera
angle, zoom ratio and backlight adjustment settings.
The functions of the GUI displayed on the Web browser are briefly described below.
Viewer for Java
LiveApplet
1 |
2 |
3 |
4 |
5 |
11 |
10 |
9 |
8 |
7 |
6 |
1
Video Source Size Change Buttons
The right-hand button makes the displayed video source one level smoother, while the left-hand button makes it one level coarser. Making the image coarser increases the frame rate, while making it smoother improves the video quality.
* Depending on the camera server, the video source size change buttons are not displayed.
2Camera Selection Box
When multiple cameras are connected to the camera server, this box can be used to select the camera.
3Tilt Scroll Bar
Used to change the camera tilt angle (up and down movement).
*Not displayed on the VB-C50Fi.
4Zoom Scroll Bar
Used to change the zoom ratio.
Moving the button up zooms in (telephoto) and moving it down zooms out (wideangle).
5Panorama View Button
Displays the pop-up panorama window. Panorama pictures must be saved at the camera server. Panorama pictures will not be displayed if not saved.
16 |
* Not displayed on the VB-C50Fi. |
|
|
|
|
6Camera Control Status Window
Used to display camera control information (“Camera controllable”, “Camera not controllable”, “Awaiting turn”, “Remaining camera control time”).
7Start Control Button
Used to acquire camera control privileges.
8Backlight Adjustment Button
Compensates for backlighting. Useful when the video appears dark due to backlighting. Click the button again to cancel.
9Preset Selection Box
Allows you to control the camera by selecting preset camera positions registered beforehand on the camera server.
10Pan Scroll Bar
Used to change the camera pan angle (left and right movement).
*Not displayed on the VB-C50Fi.
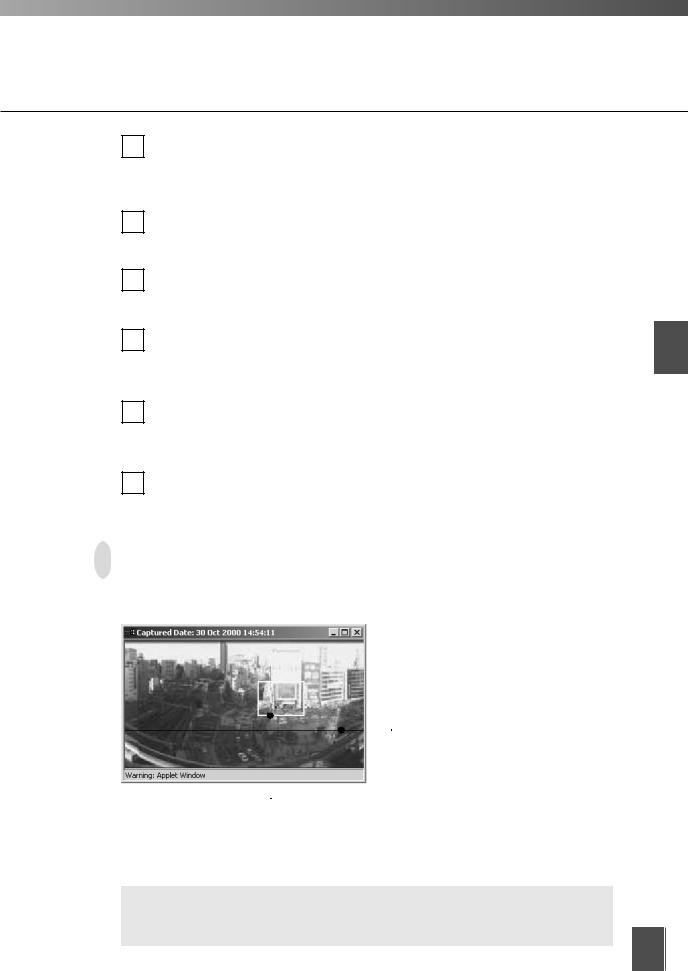
Snapshot Button
11
Shows a snapshot of the currently displayed video frame in a separate window. The snapshot image can then be printed or saved.
Panorama Window * Not available with the VB-C50Fi.
You can control the camera by clicking on the panorama window or dragging the yellow frame on the panorama window.
|
|
|
|
The black frame indicates the range of |
|
|
|
|
|
|
|
|
|
movement for the camera center. The |
|
|
|
|
camera center cannot be moved outside |
|
|
|
|
this frame. |
|
|
|
||
|
The blue frame indicates the area currently being photographed by the camera. |
|||
|
When you are granted control privileges, this changes to a yellow frame. You can |
|||
|
control the camera pan and tilt by dragging this frame and control the camera |
|||
|
zoom by resizing this frame. |
|||
c |
The size of the panorama window may differ from that shown above if field of |
|||
view restrictions have been specified on the camera server. |
||||
Note |
|
|
|
|
1
Java for Viewer
17
 Loading...