


Digital Video Software 


Version 28
Instruction Manual
Y
P
O
C
English

 Contents
Read This First ........................................................................................................... |
|
|
|
4 |
Checking Supplied Accessories |
............................................................................ |
|
4 |
|
System Requirements ............................................................................................... |
|
|
|
5 |
What is Digital Video Software? ............................................................................... |
|
|
6 |
|
Windows ..................................................................................................................... |
|
|
|
7 |
CameraWindow ..................................................................................................... |
|
|
|
7 |
[Acquire Images] Tab ........................................................................................ |
|
|
7 |
|
[Print] Tab .......................................................................................................... |
|
|
|
8 |
[Set to Camera] Tab .......................................................................................... |
|
|
9 |
|
Camera Browser Window ............................................................................... |
|
|
10 |
|
Main Window ........................................................................................................ |
|
|
|
11 |
[Image Viewer] Window ....................................................................................... |
|
|
15 |
|
[Red Eye Correction] Window |
......................................................................... |
|
16 |
|
[Auto Adjustment] Window .............................................................................. |
|
|
17 |
|
[Color/Brightness Adjustment] Window ........................................................... |
|
17 |
||
[Sharpness] Window ....................................................................................... |
|
|
18 |
|
[Trim Image] Window ...................................................................................... |
|
|
18 |
|
|
|
|
Y |
|
[Insert Text] Window ........................................................................................ |
|
|
19 |
|
Installing the Digital Video Software ...................................................................... |
|
20 |
||
Before Downloading Still Images ........................................................................... |
|
|
25 |
|
Connecting the Camcorder to a Computer |
.......................................................... |
25 |
||
Downloading Still Images........................................................................................ |
|
|
27 |
|
|
O |
|
|
|
When Connecting the Camcorder to a Computer................................................ |
28 |
|||
Using the Computer to Download Still Images (CameraWindow) ....................... |
29 |
|||
Auto-Downloading |
........................................................................................... |
P |
29 |
|
C |
|
|
|
|
Auto-Downloading Settings ............................................................................. |
|
|
30 |
|
Downloading the Selected Still Images from the CameraWindow .................. |
33 |
|||
Using the amcorder to Download Still Images (Direct Transfer Function) ........ |
36 |
|||
Setting the Direct Transfer Download Destination Folder ............................... |
36 |
|||
Direct Transfer ................................................................................................ |
|
|
|
37 |
Using a Card Reader/Writer ................................................................................ |
|
|
38 |
|
Using the Computer to Download Still Images (ZoomBrowser EX)..................... |
39 |
|||
Auto-Downloading |
........................................................................................... |
|
|
39 |
Auto-Downloading Settings ............................................................................. |
|
|
39 |
|
Downloading the Selected Still Images from the ZoomBrowser EX ............... |
41 |
|||
Printing Still Images................................................................................................. |
|
|
|
42 |
Printing Still Images Recorded on the Memory Card........................................... |
42 |
|||
Printing Still Images Downloaded to the Computer ............................................. |
47 |
|||
[Photo Print] .................................................................................................... |
|
|
|
47 |
[Index Print] ..................................................................................................... |
|
|
|
49 |
Organizing Images................................................................................................... |
|
|
|
51 |
Applying Star Ratings and Keywords................................................................... |
|
51 |
||
Classifying the Images......................................................................................... |
|
|
52 |
|
Renaming Multiple Files ...................................................................................... |
|
|
54 |
|
Searching for Images........................................................................................... |
|
|
56 |
|
Creating a Movie from the Still Images .................................................................. |
|
59 |
||
Editing Movies ..................................................................................................... |
|
|
|
59 |
Playing Back Movies............................................................................................ |
|
|
|
63 |
2 Contents

Exporting Images..................................................................................................... |
65 |
Changing the File Type and Saving..................................................................... |
65 |
Exporting Movies ................................................................................................. |
69 |
Extracting Still Images from Movies (Windows Vista/Windows XP) .................... |
72 |
Saving on CD-R/RW Disks (Windows Vista/Windows XP).................................. |
75 |
Adding Still Images to the Memory Card ............................................................. |
78 |
Adding Still Images to the Memory Card in the Camcorder ............................ |
78 |
Using Various Functions......................................................................................... |
80 |
Attaching Still Images to E-mail Messages.......................................................... |
80 |
Running a Slide Show ......................................................................................... |
82 |
Adding Sound to a Still Image.............................................................................. |
84 |
Reviewing and Changing the Owner Name of the Camcorder............................ |
85 |
Uninstalling the Software ........................................................................................ |
86 |
Uninstalling ZoomBrowser EX ............................................................................. |
86 |
Uninstalling the TWAIN Driver (Windows 2000 only)........................................... |
87 |
Troubleshooting....................................................................................................... |
88 |
Y
P
O
C
Windows
Contents 3
 Read This First
Disclaimer
• While every effort has been made to ensure that the information contained in this guide is accurate and complete, no liability can be accepted for any errors or omissions. Canon reserves the right to change the specifications of the hardware and software described herein at any time without prior notice.
• No part of this guide may be reproduced, transmitted, transcribed, stored in a retrieval system, or translated into any language in any form, by any means, without the prior written permission of Canon.
• Canon makes no warranties for damages resulting from corrupted or lost data due to mistaken operation or malfunction of the camcorder, the software, memory cards (SD, SDHC and miniSD Cards), personal computers, or peripheral devices, or due to use of a memory card not initialized by a Canon camcorder.
Trademark Acknowledgments
• QuickTime is a trademark of Apple Inc., registered in the U.S. and other countries.
• Microsoft, Windows, Windows Media and Windows Vista are trademarks or
|
registered trademarks of Microsoft Corporation in the United States and/or other |
||
|
countries. |
|
|
• |
, |
and |
are trademarks of SD Card Association. |
• Other names and products not mentioned above may be registered trademarks |
|
or trademarks of their respective companies.Y |
|
© Canon Inc. 2008 All rights reserved. |
|
Safety Precautions |
P |
RO
Do not playCthe supplied D- M(s) in any CD player that does not support data CD-ROMs. Playing the D-R M(s) in an audio CD player (music player) could damage the speakers. It is also possible to suffer from hearing loss from listening with headphones to the loud sounds of a CD-ROM played on a music CD player.
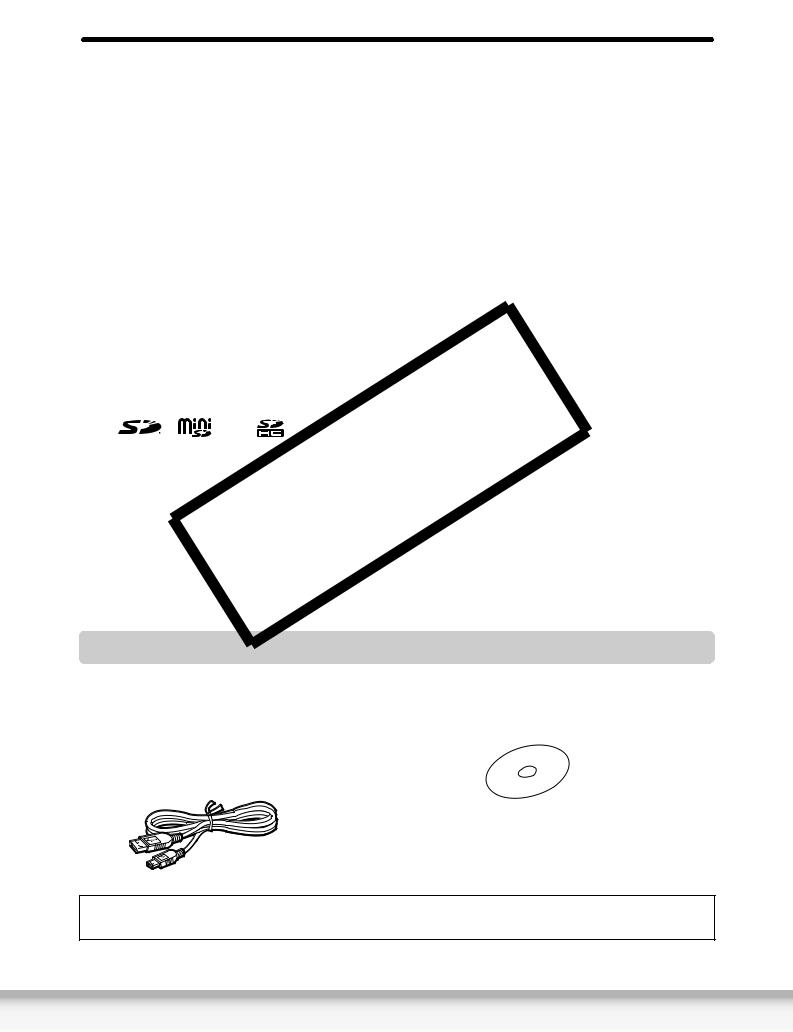
Checking Supplied Accessories
Use the following accessories to download recorded still images from a memory card to your computer.
• Supplied USB cable |
• DIGITAL VIDEO Solution Disk |
||
The cable supplied with your |
|
|
|
|
|
|
|
camcorder may be different from the |
|
|
|
one described in this manual. |
|
|
|
|
|
|
|
The explanations in this manual use mainly Windows XP screen shots. The steps and windows may vary depending on your computer and the version of software.
4 |
|
Read This First |
|
|
|

 System Requirements
Install the software on a computer meeting the following minimum requirements.
OS: |
Windows Vista |
|
|
Windows XP (Service Pack 2) |
|
|
Windows 2000 (Service Pack 4) |
|
|
* Proper operation is not guaranteed on an OS that has |
|
|
been upgraded from a previous version. |
|
Computer Model: |
Computers that come with above OS preinstalled and |
|
|
have built-in USB ports. |
|
CPU: |
Windows Vista: Pentium 1.3 GHz or better |
|
|
Windows XP/Windows 2000: Pentium 500 MHz or better |
|
RAM: |
Windows Vista: 512 MB or more |
|
|
Windows XP/Windows 2000: 256 MB or more |
|
Interface: |
USB: only preinstalled Windows Vista/Windows XP/ |
|
|
Windows 2000 systems with built-in USB ports |
|
Free Hard Disk Space: |
• Canon Utilities |
Y |
|
- ZoomBrowser EX: 200 MB or more |
|
|
• Canon DV TWAIN Driver: 25 MB or more |
|
Display: |
1024 × 768 pixels or better/High Color (16 bit) or better |
|
Proper operation user-built PC.
Proper operation if it meets
the
A is not guaranteedPon a dual CPU PC or on aOis not guaranteed on any particular system, evenrequirements outlined above.CD-ROM drive is required to install the software.
C |
|
In this Instruction Manual, product names are abbreviated as follows: |
|
Microsoft Windows Vista: |
Windows Vista |
Microsoft Windows XP (Service Pack 2): |
Windows XP |
Microsoft Windows 2000 (Service Pack 4): |
Windows 2000 |
Windows
System Requirements |
|
5 |
|
|
|
 What is Digital Video Software?
Digital Video Software allows you to download still images you recorded with the camcorder to a computer and manage, print, and edit them.
ZoomBrowser EX
• Viewing still images as thumbnails
• Managing by shooting date folders with still images
• Categorizing, organizing, and searching large volumes of still images
• Printing still images
• Editing still images
• Changing the data for still images and save them as new files
• Attaching still images to e-mail
• Viewing still images in a slide show
• Adding sound to a still image
CameraWindow
• Downloading still images from a memory card to your computer
• Viewing still images recorded on a memory card
• Printing still images recorded on a memory card without downloading the still
images to the computer |
P |
|
|
|
|
TWAIN Driver (Windows 2000 only) |
||
• Driver software that enables you to downloadYstill images from a memory card to |
||
a computer. |
O |
|
|
|
|
This instruction manual explains how to install the software, what you can do with the main featuresCand how to operate them. For more detailed operational instructions, refer to the Help menu of each software program.
Your camcorder may not support some features of the software.
6 |
|
What is Digital Video Software? |
|
|
|

 Windows
CameraWindow
After you connect the camcorder to your computer, you can use CameraWindow to download still images on the memory card to the computer. Furthermore, you can print still images recorded on the memory card without having the images downloaded to the computer (  42), and you can confirm and change the owner’s name of the camcorder you specify (
  85). Refer to When Connecting the Camcorder to a Computer (
 28) for launching the software. The Remote capture function is not supported by the camcorder.
[Acquire Images] Tab
After you connect the camcorder to your computer, use this tab to download still images on the memory card to the computer.
Camera Control window 
Selects a function in the Camera |
|
|
|
Y |
|||
|
|
|
|
||||
Control window. |
|
|
P |
||||
|
|
|
|
|
|
||
|
O |
||||||
Images will be downloaded to |
|
|
|
|
|||
|
C |
|
|
|
|
||
the computer, and ZoomBrowser EX |
|
|
|
|
|||
starts. |
|
|
|
|
|
|
|
Images in the camcorder are |
|
|
|
|
|
||
|
|
|
|
|
|||
displayed allowing you to select |
|
|
|
|
|||
images. |
|
|
|
|
|
|
|
Placing a check mark here makes  the Camera Control window to open automatically the next time you connect the camcorder.
Specify the image type to be downloaded and the destination folder.
Windows
Windows 7
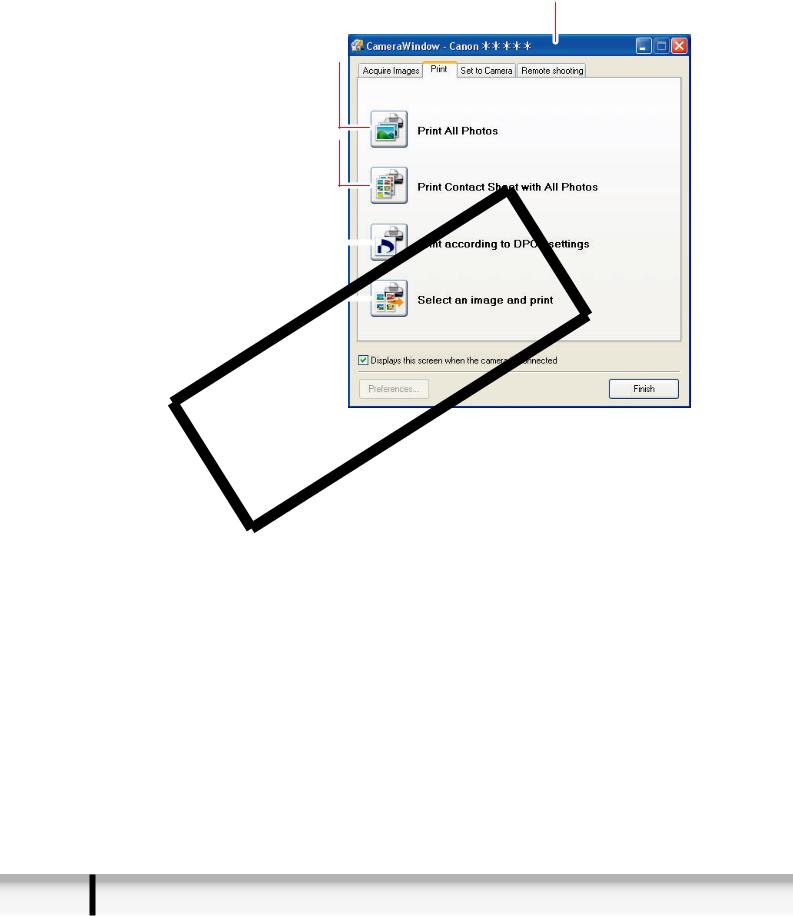
[Print] Tab
After connecting the camcorder to your computer, use this tab to print still images on the memory card without downloading them to the computer first. The window varies depending on the selected printing type. Refer to Printing Still Images Recorded on the Memory Card ( 42).
42).
Camera Control window 
Prints all still images in the card  one image per page.
Prints all still images in the card  as an index page (rows of images with file names and image information).
Prints according to the DPOF print |
|
|
|
Y |
||
|
|
|
||||
settings set by the camcorder to the |
|
|
||||
|
|
|
||||
still images recorded on the card. |
|
|
|
|||
Displays a list of the still images |
|
|
|
P |
||
|
|
|
||||
|
|
|
|
|||
|
O |
|||||
in the card, allowing you to select |
|
|
|
|||
which ones to print. |
|
|
|
|
|
|
C |
|
|
|
|||
8 Windows

[Set to Camera] Tab
This tab is used for confirming and changing the owner’s name of the camcorder you can specify ( 85) and uploading the still images to the card. My Camera function is not supported by the camcorder.
Camera Control window 
Enter or change the name of  the camcorder’s owner.
Uploading the images from the  computer
Y
O enablesCamerayou to create and import My Camera contents (start-up images, start-
Selecting [Manage My Camera] from the [Edit] menu displays the [My Camera] |
|
window. If you click [CreatingPMy Camera data] in the [My Camera] window, |
|
[My |
Maker] will be launched. [My Camera Maker] is a program that |
up sound, shutter sound, operation sound and self timer sound) to camcorders that support this function. Your camcorder does not support the My Camera function.
Windows
Windows 9

Camera Browser Window
 Prints the selected still images.
 Starts ZoomBrowser EX.
 Selects the still image selection method.
 Changes the size of the thumbnail.
Y P
Selects whetherCto showOor hide the image  frame and file name.
Still image information and a histogram  (This will not be displayed when using a card reader/writer.)
If your camcorder supports wide size still image (16:9 such as 1920 x 1080 pixels) recording, the thumbnails that appear in this window will be also 16:9 images. The sample images used on this instruction manual are normal size still images (4:3).
10 Windows
Main Window
ZoomBrowser EX is a software program used for organizing, printing and editing the downloaded still images. If you wish to start ZoomBrowser EX without connecting the camcorder or card reader/writer, double-click the  on the desktop, or click the Windows [start] menu and select [All Programs] [Canon Utilities] [ZoomBrowser EX] and [ZoomBrowser EX]. To exit ZoomBrowser EX, click
  or select [Exit] from the [File] menu.
|
|
6 |
|
|
|
5 |
|
1 |
|
|
|
|
|
4 |
|
|
|
Y |
|
2 |
|
P |
|
|
O |
Windows |
|
C |
|
||
3 |
|
||
1 Task Area |
|
|
|
[Acquire & Camera Settings]: Use this to display the Camera Control window to |
|
||
|
|
download still images, to print still images without |
|
|
|
having them downloaded to the computer and to |
|
[View & Classify]: |
|
configure the camcorder settings. |
|
|
Use this to view and organize still images. |
|
|
[Edit]: |
|
Use this to edit still images. |
|
[Export]: |
|
Use this to change the data for still images and |
|
|
|
save them as new files, extract still images from |
|
|
|
movies, back up to CD-R/RW (Windows Vista/ |
|
|
|
Windows XP), or export shooting properties to a |
|
[Print & Email]: |
|
text file. |
|
|
After you download still images to a computer, |
|
|
|
|
use this to print them or to attach them to e-mail |
|
|
|
messages. |
|
Windows 11

2 Folders Area
You can select a folder to be displayed in the Browser Area. In the [Last Acquired Images] panel, the newly downloaded still images are placed into virtual folders classified by recording date. In the panel below, the folders where the downloaded still images are actually saved in are displayed. Selecting the [Favorite Folders] tab shows only the folders that are registered as favorites. The [All Folders] tab shows all available folders. indicates that newly downloaded still images are in the folder. To register folders as Favorites, follow the instructions below.
When the [Favorite Folders] tab is selected:
Click [Add] and select a folder.
When the [All Folders] tab is selected:
Select a folder and click [Add to Favorites].
To remove the registered folder, select the folder, and click [Remove].
3 Browser Area
This area displays the images contained in the selected folder. If you place the cursor over a thumbnail in the browser area,  will be displayed at the upper right corner. Clicking
  skips over folders to zoom in directly on the intended folder.
|
|
|
|
|
|
|
|
|
|
|
|
|
|
|
|
|
|
|
|
|
|
Y |
|
|
|
|||||
|
|
|
|
|
Clicking on 2 images while holding down the [Shift] key selects also all |
|||||||||||||||||||||||||
|
|
|
|
|
|
|
|
images between the 2 images. |
|
|
|
|
|
|
|
|
|
|
|
|
||||||||||
|
|
|
|
|
|
|
|
|
|
|
|
|
|
|
|
|
P |
|
|
|
|
|
|
|||||||
|
|
|
|
|
Clicking on different images while holding down the [Ctrl] key selects multiple |
|||||||||||||||||||||||||
|
|
|
|
|
|
|
|
images. |
|
|
|
|
|
O |
|
|
|
|
|
|
|
|
|
|||||||
|
4 Image display control panel |
|
|
|
|
|
|
|
|
|
|
|
|
|||||||||||||||||
|
|
|
|
The menu items vary depending on the View Mode. |
|
|
|
|
|
|
||||||||||||||||||||
|
|
|
|
|
|
|
|
C |
|
|
|
|
|
|
|
|
|
8 |
||||||||||||
|
|
|
|
1 |
2 |
3 |
4 |
|
|
5 |
6 |
7 |
||||||||||||||||||
|
|
|
|
|
|
|
|
|
|
|
|
|
|
|
|
|
|
|
|
|
|
|
|
|
|
|
|
|
|
|
|
1 |
|
Previous/Next |
|
|
|
Displays the previous/next image in the current folder. |
|||||||||||||||||||||||
|
|
|
|
|
|
|
|
|
|
|
|
|
|
|
|
|
|
|
|
|
|
|
|
|
||||||
|
2 |
|
Up |
|
|
|
|
|
|
|
|
|
Displays the folder in the upper tiers of the hierarchy. |
|||||||||||||||||
|
|
|
|
|
|
|
|
|
|
|
|
|
|
|
|
|
|
|
|
|
|
|
|
|||||||
|
3 |
|
Select |
|
|
|
|
|
|
Allows you to select all images and deselects images. |
||||||||||||||||||||
|
|
|
|
|
|
|
|
|
|
|
|
|
|
|
|
|
|
|
|
|
|
|
|
|||||||
|
4 |
|
Information |
|
|
|
|
|
|
Allows you to select the information to be shown. You can |
||||||||||||||||||||
|
|
|
|
|
|
|
|
|
|
|
|
|
|
|
|
|
also hide the pop-up window by clearing the check box. |
|||||||||||||
|
|
|
|
|
|
|
|
|
|
|
|
|
|
|
|
|
The pop-up window appears when you move the pointer |
|||||||||||||
|
|
|
|
|
|
|
|
|
|
|
|
|
|
|
|
|
over a thumbnail. |
|
|
|
|
|
|
|
|
|
||||
|
|
|
|
|
|
|
|
|
|
|
|
|
|
|
|
|
|
|
|
|
|
|
|
|
||||||
|
5 |
|
Pan |
|
|
|
|
|
|
|
|
|
Changes the area displayed when you zoom in on a folder |
|||||||||||||||||
|
|
|
|
|
|
|
|
|
|
|
|
|
|
|
|
|
or image in the Browser Area and drags the thumbnail list. |
|||||||||||||
|
|
|
|
|
|
|
|
|
|
|
|
|
|
|
|
|
|
|
|
|
|
|||||||||
|
6 |
|
Restore Display Size |
Changes the size of the thumbnail list to fit the window. |
||||||||||||||||||||||||||
|
|
|
|
|
|
|
|
|
|
|
|
|
|
|
|
|
|
|
|
|
|
|
|
|||||||
|
7 |
|
Zoom Slider |
|
|
|
|
|
|
Enlarges/Reduces the thumbnails in the Browser Area. |
||||||||||||||||||||
|
|
|
|
|
|
|
|
|
|
|
|
|
|
|
|
|
|
|
|
|
|
|
|
|||||||
|
8 |
|
Filter |
|
|
|
|
|
|
Allows you to select which still images to display |
||||||||||||||||||||
|
|
|
|
|
|
|
|
|
|
|
|
|
|
|
|
|
according to the star rating. When you download the |
|||||||||||||
|
|
|
|
|
|
|
|
|
|
|
|
|
|
|
|
|
images, the star rating is set to two stars as a default. To |
|||||||||||||
|
|
|
|
|
|
|
|
|
|
|
|
|
|
|
|
|
change the star rating, refer to Applying Star Ratings and |
|||||||||||||
12 |
|
|
|
|
|
|
|
|
|
|
|
|
|
|
|
|
Keywords ( |
|
51). |
|
|
|
|
|
|
|
|
|||
|
|
|
|
|
|
|
|
|
|
|
|
|
|
|
|
|
|
|
|
|
|
|
|
|
||||||
|
|
|
|
|
|
|
|
|
|
|
|
|
|
|
|
|
|
|
|
|
|
|
|
|
|
|
|
|
|
|
|
|
|
|
Windows |
|
|
|
|
|
|
|
|
|
|
|
|
|
|
|
|
|
|
|
|
||||||
|
|
|
|
|
|
|
|
|
|
|
|
|
|
|
|
|
|
|
|
|
|
|
|
|||||||
|
|
|
|
|
|
|
|
|
|
|
|
|
|
|
|
|
|
|
|
|
|
|
|
|
|
|
|
|
|
|

5 View Mode
You can select the view mode of images in the Browser Area.
[Zoom Mode]: The images in the selected folder are shown as thumbnails.
[Scroll Mode]: Double clicking a folder shows thumbnails of the still images inside.
Y
[Preview Mode]: DoubleOclickingPthe folders at the bottom of the window opens the folder and shows a large still image in the folder along with detailed information. You can changeCfile name and comments. To display another image, click [Previous]/[Next] or select an image shown at the bottom of the window.
Windows
Windows 13

6 Command buttons
1 |
2 |
3 |
4 |
5 |
6 |
1 |
View Image |
Displays a selected image in the [Image Viewer] window. |
2 |
Properties |
Displays properties of the selected still image. When you |
|
|
select a different image while the [Properties] window is |
|
|
open, the information switches to the one of the selected |
|
|
image. The [Properties] window cannot be displayed in |
|
|
[Preview Mode]. |
|
|
|
Y |
|||
|
|
|
P |
|
||
|
|
|
O |
|
||
3 |
Slide Show |
Displays still images in a slide show. |
|
|||
|
|
C |
|
|||
4 |
Search |
Allows you to search for images ( |
|
|
56). |
|
|
||||||
|
||||||
|
|
|
|
|
|
|
5 |
Delete |
|
Deletes selected images. |
|
||
|
|
|
|
|
|
|
6 |
Rotate |
|
Rotates selected still images. A movie cannot be rotated. |
|||
14 Windows

[Image Viewer] Window
The [Image Viewer] window appears when you select an image and click [View Image] or double-click an image.
1 |
2 |
3 |
4 |
5 |
6 |
7 |
8 |
9 |
10 |
11 |
12
13
14
15
|
|
|
|
|
Y |
|
|
|
|
|
P |
|
|
|
O |
||
1 |
|
C |
|||
Previous/Next |
Displays the previous/next image in the current folder. |
||||
2 |
Zoom In/Zoom Out |
Enlarges/Reduces a still image. |
|||
|
|
|
|
|
|
3 |
Pan |
|
When the image is larger than the window, you can move |
||
|
|
|
the image in the desired direction. |
||
4 |
|
Prints the selected still image. Refer to [Photo Print] |
|||
|
|
|
( |
|
47). |
|
|
|
|
||
|
|
|
|
|
|
5 |
Edit |
|
Allows you to perform the following operations: red-eye |
||
|
|
|
correction, auto correct, color and brightness correction, |
||
|
|
|
sharpness adjustment, trimming, inserting text, or |
||
|
|
|
registering external image editing applications. |
||
|
|
|
|
||
6 |
Auto Focus Frame |
This function cannot be used for the images recorded by |
|||
|
|
|
the camcorder. |
||
|
|
|
|
||
7 |
Shooting |
The shooting information of the image will be displayed. |
|||
|
Information |
|
|
|
|
8 |
Show |
|
Allows you to display multiple images at the same time. |
||
|
|
|
|
||
9 |
Synchronize |
Synchronizes the View functions across all displayed |
|||
|
|
|
images. |
||
|
|
|
|
|
|
Windows
Windows 15

10 |
Fit to Window |
Matches the image size to the size of the Image Viewer |
|
|
Window. |
|
|
|
11 |
Restore |
Restores the standard display size. |
|
|
|
12 |
Zoom Slider |
Allows you to enlarge/reduce the displayed image. |
|
|
|
13 |
Show Image Full |
Displays an image in full screen size. |
|
Screen |
|
14 |
Change the Star |
Allows you to change the star rating. |
|
Rating |
|
15 |
Capturing Frames |
Extracts still images from movies. |
|
|
(Windows Vista/Windows XP) |
|
|
|
Windows Vista: The star rating set using ZoomBrowser EX is not related to the “Rating” setting in Windows Photo Gallery and Windows Explorer.
[Red Eye Correction] Window
Select [Red Eye Correction] from the [Edit] menu, or click the  icon and
select [Red Eye Correction]. Use this to correct still images in which people’s eyes |
|||||
appear red. |
Y |
|
|||
|
P |
1 |
|||
O |
|
||||
2 |
|||||
C |
|
|
|
||
|
|
|
|
||
1 |
Auto Mode |
Clicking [Start] corrects the red eye effect automatically. |
|
|
|
2 |
Manual Mode |
Point the cursor on a red eye so that the area is |
|
|
highlighted green, and click the mouse button. |
16 Windows
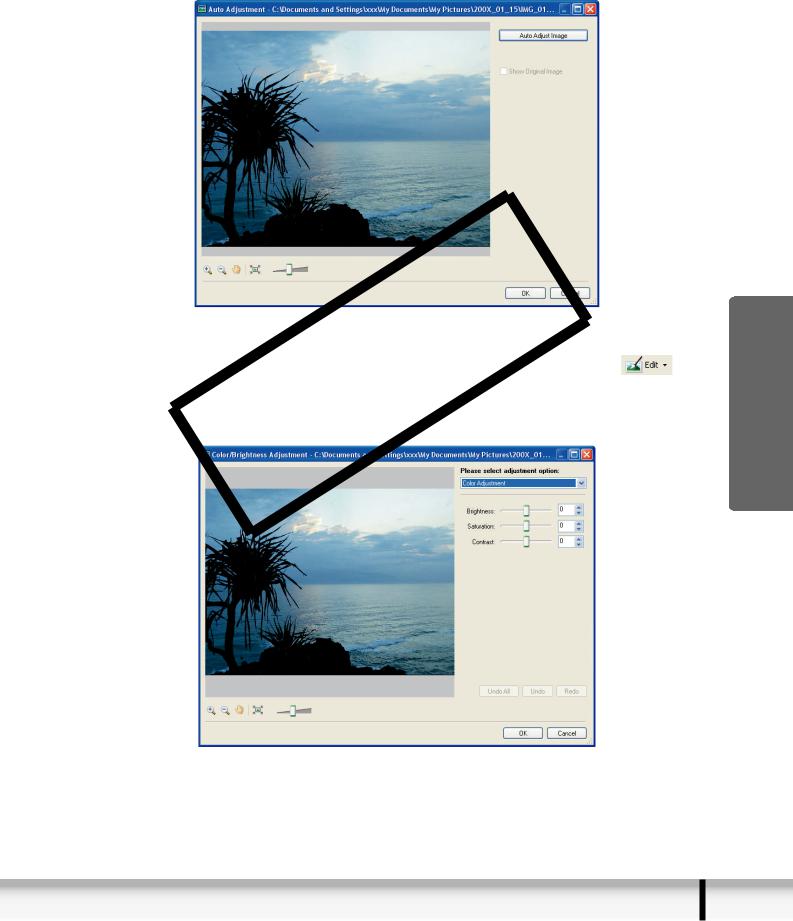
[Auto Adjustment] Window
Select [Auto Adjustment] from the [Edit] menu, or click the  icon and select [Auto Adjustment]. Use this to automatically correct the color balance of the still image.
Y |
|
P |
|
[Color/Brightness Adjustment] Window |
|
O |
icon |
Select [Color/Brightness Adjustment] from the [Edit] menu, or click the |
|
and select [Color/Brightness Adjustment]. Use this to adjust the brightness, |
|
C |
|
saturation, contrast, intensity levels, tone curve and RGB of the still image. |
|
Windows
Windows 17

[Sharpness] Window
Select [Sharpness] from the [Edit] menu, or click the  icon and select [Sharpness]. Use this to emphasize and clarify the outlines of people and objects.
[Trim Image] Window |
Y |
|
|
P |
icon and select [Trim]. |
Select [Trim] from the [Edit] menu, or click the |
||
O |
|
|
Specify the area in the still image to crop and click [Trim Image] to trim the image. |
||
C |
|
|
18 Windows

[Insert Text] Window
Select [Insert Text] from the [Edit] menu, or click the  icon and select [Insert Text]. Use this to write text on still images.
|
Y |
These image correction tools can be selected by clicking [Edit] [Edit Image] |
|
P |
|
in Task Area of the Main Window. |
|
O |
|
C |
|
Windows
Windows 19

 Installing the Digital Video Software
1
2
Be sure to install the Digital Video Software before connecting the camcorder to the computer.
You must have authorization as a Computer System Administrator to install programs.
Windows Vista/Windows XP Users:
Your digital video camcorder is equipped with the standard Picture Transfer Protocol (PTP). This protocol enables you to download still images by simply connecting the camcorder to a computer with the USB cable (applications such as the [Scanner and Camera Wizard] start automatically).
However, note that there are several limitations to downloading still images with this method. To avoid these, install ZoomBrowser EX to download still images.
It may take a few minutes, after connecting the camcorder, until you can download still images.
Still images protected on the camcorder may lose this setting once they are downloaded to the computer.
Check that the camcorder is not connected to the computer.
While a camcorder is connected to the computer, the software cannot be
installed normally. If a camcorder is connected, detach the USB cable from the |
|
computer. |
Y |
|
P |
Set the DIGITAL |
Solution Disk in the computer’s CD- |
ROM drive. |
|
C |
|
• Windows Vista: WhenVIDEOthe [AutoPlay] window appears, click [Run SETUP.EXE]. Follow the instructions in the [User Account Control] window
that appears after a brief period.
• Windows XP/Windows 2000: The installer panel appears automatically.
• If the installer panel does not open automatically, use the following procedures to display it.
- Windows Vista:
1) Select [Computer] from the Start menu.
2) Right-click the CD-ROM icon and select [Open] from the displayed menu.
3) Double-click the [setup.exe] icon.
4) Follow the instructions in the [User Account Control] window that appears.
- Windows XP:
1) Select [My Computer] from the [start] menu.
2) Right-click the CD-ROM icon and select [Open] from the displayed menu.
3) Double-click the [SETUP.EXE] icon. - Windows 2000:
1) Double-click the [My Computer] icon.
2) Right-click the CD-ROM icon and select [Open] from the displayed menu.
3) Double-click the [SETUP.EXE] icon.
20 |
|
Installing the Digital Video Software |
|
|
|
Depending on your computer’s settings, the file extension “.EXE” may not appear.
3 Select your country or region.
4 Select your language.
5 Click [Easy Installation] under Digital Video Software.
To install the software individually, click [Custom Installation].
Installer Panel 
6 |
|
Y |
|
O |
|
If other software is running, close all programs and click |
||
|
[OK]. |
P |
|
|
C |
Windows
Installing the Digital Video Software |
|
21 |
|
|
|

7 Review the installation settings and click [Install].
If you selected [Custom Installation] and are using Windows 2000, select Canon DV TWAIN Driver (USB driver).
When installing the software on Windows XP or 2000 by selecting [Easy Installation], EOS Utility (software for downloading still images from the Canon EOS Digital SLR Cameras) will be installed. This software is used only for compatible Canon EOS Digital SLR Cameras, and the camcorder does not
support this software. |
Y |
|
|
|
P |
O |
|
C |
|
22 |
|
Installing the Digital Video Software |
|
|
|
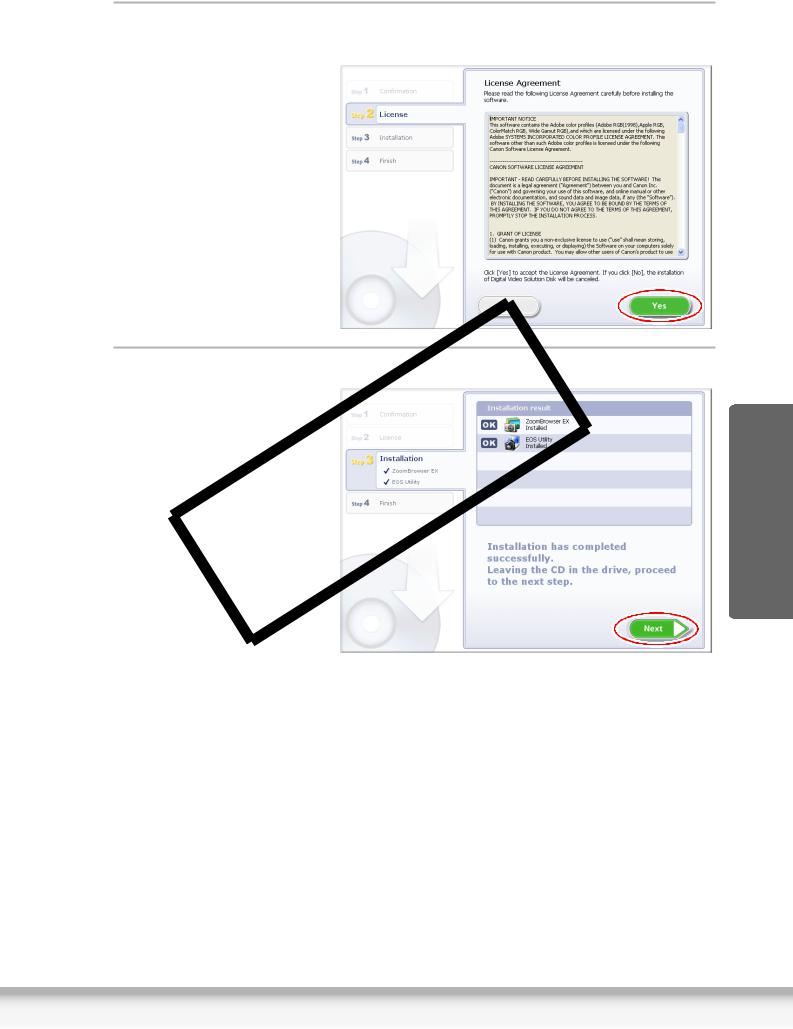
8 Read the license agreement and click [Yes] to accept the terms and to start installation.
9
Click [Next]. |
Y |
|
|
|
P |
|
O |
C |
|
Windows
Installing the Digital Video Software |
|
23 |
|
|
|
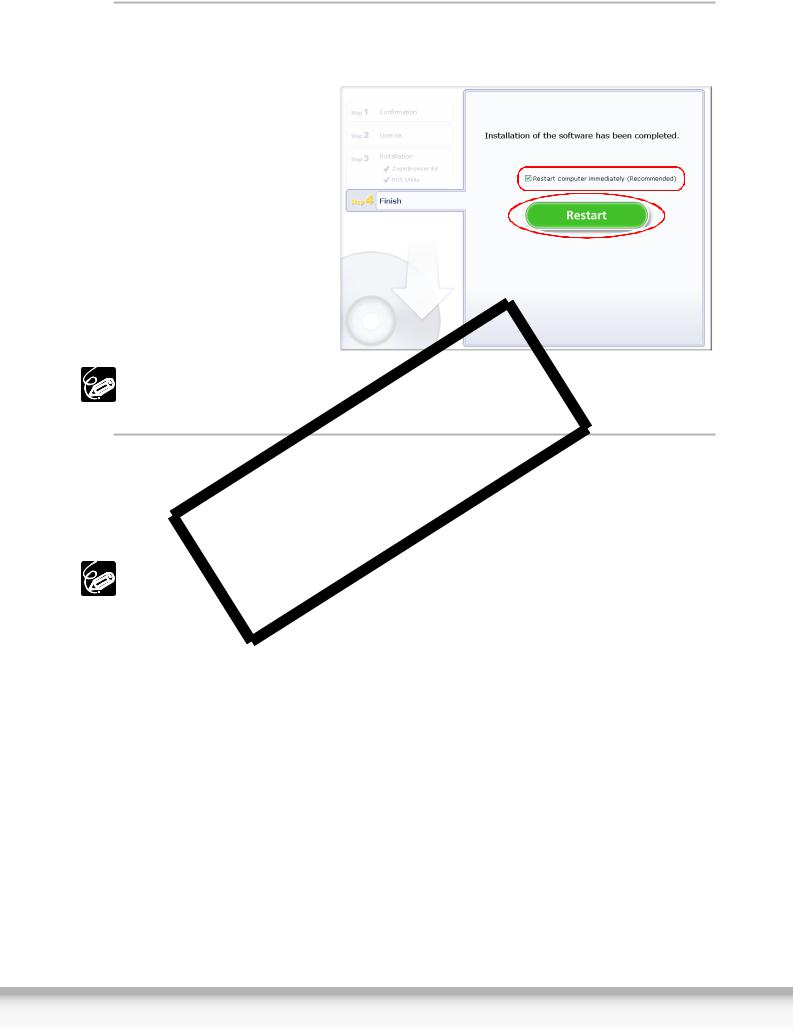
10When the installation is complete, make sure [Restart computer immediately (Recommended)] is selected and then click [Restart].
When you do not need to restart the computer,Ythe [Finish] screen will be
displayed. Click [Finish]; remove the DIGITAL VIDEO Solution Disk from the CD-ROM drive, and proceed to Before Downloading Still Images ( 25).
25).
11When the computer hasPrestarted and the regular desktop screen is displayed,Oremove the DIGITAL VIDEO Solution
Disk from the CD-R M drive.
When installation is complete, remove the DIGITAL VIDEO Solution Disk before you connectCthe camcorder to the computer.
Windows 2000: At this point, the files for the TWAIN Driver have only been copied to your computer. To download images via USB connection, finish
installing the TWAIN Driver. For details, see step 4 ( 25) in Connecting the Camcorder to a Computer.
24 |
|
Installing the Digital Video Software |
|
|
|

 Before Downloading Still Images
Connecting the Camcorder to a Computer
Be sure to install the Digital Video Software before you connect the camcorder to the computer.
Make sure the camcorder is being powered using the power adapter before connecting it to a computer.
Connect the USB cable directly to one of the computer’s main USB ports. The interface may not function correctly if the camcorder is connected via a USB hub.
The connection may not operate correctly if you are using other USB devices, excluding USB mice or keyboards, at the same time. If this occurs, disconnect the other devices from the computer and try reconnecting the camcorder.
Do not connect two or more camcorders to the computer. The camcorders may not operate normally.
Never allow the computer to go into standby (sleep) mode while a camcorder is connected via the USBYinterface.
Refer to your computer manual for the location of the computer’s USB ports.See your camcorder instructionPmanual for connecting instructions.
1 Insert a memory card containing images into the camcorder.
2 Connect the powerOadapter to the camcorder.
3 Set theCcamcorder to still image playback mode.
Wait until the card access indicator stops flashing.
4 Attach the supplied USB cable to the computer’s USB port and the camcorder’s USB Terminal.
•The first time you connect the camcorder to the computer:
-Windows 2000: Installation of the DV TWAIN Driver starts. If the “Digital signature not found” message appears, click [Yes].
-If you are prompted to restart the computer, restart the computer.
•A window appears allowing you to select an application program to start.
Windows
Before Downloading Still Images |
|
25 |
|
|
|

•For instructions on how to start ZoomBrowser EX and download images to the computer, see Downloading Still Images (  27).
27).
USB Terminal USB Cable on the Camcorder
 Camcorder End Computer End
USB Port on the Computer
Y
P
O
C
26 |
|
Before Downloading Still Images |
|
|
|

 Downloading Still Images
Observe the following precautions when the camcorder’s access indicator is flashing. Failure to do so may cause memory card data to become corrupted.
- Do not remove the memory card or detach the USB cable. - Do not turn off the camcorder or the computer.
- Do not change the position of the POWER or the TAPE/CARD switches.Images recorded onto memory card or downloaded to the hard disk are
important original data files. Create a copy of the file first before working on it on your computer.
Do not rotate the image using programs other than ZoomBrowser EX. The data for the original image will be changed and the image can no longer be displayed in ZoomBrowser EX or on the camcorder.
If the Server Busy window appears when you connect the camcorder to the computer, click [Retry].
You cannot connect the camcorder to a computer if the memory card contains 1800 images or more. In this case, use a card reader/writer to
download images. |
|
|
Y |
- For instructions on how to connect a card reader/writer, see Using a Card |
|||
Reader/Writer ( |
|
38). |
P |
|
|||
|
|
|
|
O |
|||
C |
|
||
Windows
Downloading Still Images |
|
27 |
|
|
|

When Connecting the Camcorder to a Computer
1
2
Connect the camcorder to the computer ( 25).
25).
Select [Canon CameraWindow] and click [OK].
•Windows Vista: When the [AutoPlay] window appears, click [Downloads Images From Canon Camera using Canon CameraWindow].
•If a camcorder and card reader are connected at the same time, a dialog appears allowing you to select the camcorder model. Confirm that [Canon Camera] or your camcorder model name is displayed and click [OK].
|
Y |
P |
|
O |
|
• The Camera Control window opens. |
|
C |
|
If the camcorder is already connected to the computer, you can start the CameraWindow and display the Camera Control window by clicking [Acquire & Camera Settings] followed by [Connect to Camera] in the ZoomBrowser EX Main Window.
The Remote shooting function is not supported by your camcorder.
28 |
|
Downloading Still Images |
|
|
|
 Loading...