


DVD142TV
14" DVD/TV COMBI
WITH REMOTE CONTROL

14" DVD/TV Combi with Remote Control
Introduction
Thank you for buying this DVD142TV 14" DVD/TV Combi which is designed to give you many years of trouble-free service.
You may already be familiar with using a television and DVD but do please take time to read these instructions. They are designed to familiarise you with the unit’s many new features and to ensure you get the very best out of your purchase.
Safety is Important
Your safety and the safety of others is important. Please, therefore, ensure you read the Safety instructions on page 4 before you operate this DVD142TV 14" DVD/TV Combi.
NOTE: This 14" DVD/TV Combi is referred to throughout this user guide as DVD/TV.
2 |
Customer Helpline: 0870 873 0079 |

DVD142TV
Contents |
|
Introduction ........................................................................ |
2 |
Safety is Important............................................................. |
2 |
Safety Precautions............................................................. |
4 |
Laser Safety........................................................................ |
5 |
Electrical Information ........................................................ |
6 |
Wiring Instructions.......................................................... |
6 |
Getting Started ................................................................... |
7 |
Compatible Discs ........................................................... |
7 |
Quick Setup ........................................................................ |
8 |
Connecting External Equipment..................................... |
11 |
Switching On .................................................................... |
12 |
The Remote Control ..................................................... |
12 |
Mains Power................................................................. |
12 |
Identification of Controls................................................. |
13 |
Setting Up the TV ............................................................. |
17 |
Menu Navigation .......................................................... |
17 |
Autostore ...................................................................... |
18 |
Using the TV ..................................................................... |
19 |
TV Controls .................................................................. |
19 |
Previous Programme.................................................... |
20 |
Input Source Selection ................................................. |
20 |
Using Teletext .................................................................. |
21 |
On-screen Menus............................................................. |
24 |
Sound Menu ................................................................. |
24 |
Picture Menu ................................................................ |
26 |
Feature Menu ............................................................... |
28 |
Install Menu .................................................................. |
30 |
Program Menu.............................................................. |
33 |
Using the DVD .................................................................. |
36 |
Playing Discs................................................................. |
36 |
Zoom............................................................................. |
39 |
Subtitle .......................................................................... |
40 |
Audio............................................................................. |
40 |
Angle............................................................................. |
40 |
Search........................................................................... |
41 |
Display .......................................................................... |
43 |
Time Information ........................................................... |
43 |
Title ............................................................................... |
44 |
Menu ............................................................................. |
44 |
The DVD On-Screen Menus ............................................. |
45 |
Video Setup Menu ........................................................ |
45 |
Language Setup Menu.................................................. |
47 |
Preference Setup Menu ................................................ |
49 |
Troubleshooting ............................................................... |
53 |
Care and Maintenance...................................................... |
55 |
Handling Discs .............................................................. |
55 |
Cleaning........................................................................ |
55 |
How Do I Dispose of this Product? ............................... |
55 |
Technical Specification.................................................... |
56 |
Guarantee .......................................................................... |
57 |
www.bush-radio.co.uk |
3 |

14" DVD/TV Combi with Remote Control
Safety Precautions
Please read all the safety information before use.
Safety Considerations
•Position the power supply lead so that it cannot be walked on or pinched by items placed on or against it.
•Do not use the DVD/TV in humid or damp conditions.
•Do not allow the DVD/TV to get wet.
•Do not expose the DVD/TV to splashing or dripping.
•Do not expose the DVD/TV to naked flames.
Power Source
You should only plug the DVD/TV into a 220V to 240V AC, 50/60Hz supply.
High Voltage
•Do not remove the rear cover as high voltage components are accessible.
•Disconnect the DVD/TV from the power supply when the DVD/TV is not to be used for a prolonged period of time.
Cleaning
•Disconnect the DVD/TV from the power supply before you clean it.
•Do not use liquid or aerosol cleaners.
•Clean your DVD/TV with a soft, damp (not wet) cloth.
Ventilation
•The slots and openings on the DVD/TV are for ventilation. Do not cover or block them as it may cause overheating.
•NEVER let children push anything into the holes or slots on the case.
Servicing
•There are no user serviceable parts in this DVD/TV.
•When servicing, refer to qualified service personnel.
•Consult your dealer if you are ever in doubt about the installation, operation or safety of this DVD/TV.
4 |
Customer Helpline: 0870 873 0079 |

DVD142TV
Laser Safety
WARNING: THIS DVD/TV USES A CLASS 1
LASER. ONLY QUALIFIED SERVICE
PERSONNEL SHOULD ATTEMPT REPAIR.
Exposure to the laser beam can damage your eyesight. Under normal working conditions the DVD/TV is safe. If, however, the DVD/TV drawer interlock is broken or defeated in some way or if the enclosure is removed, there is a danger of invisible laser radiation. In these circumstances avoid direct exposure to the beam and return the DVD/TV for repair by qualified personnel.
www.bush-radio.co.uk |
5 |
14" DVD/TV Combi with Remote Control
Electrical Information
This appliance is fitted with a BS1363/A 13 amp plug. If it is not suitable for your supply sockets it must be removed and replaced with an appropriate plug. If the plug becomes damaged and/or needs to be replaced please follow the wiring instructions below. The plug removed must be disposed of immediately. It must not be plugged into a supply socket as this will be an electrical hazard.
If the fuse needs to be replaced it must be of the same rating and ASTA approved to BS1362. If the plug is changed, a fuse of the appropriate rating must be fitted in the plug, adapter or at the distribution board. If the fuse in a moulded plug is replaced, the fuse cover must be refitted before the appliance can be used.
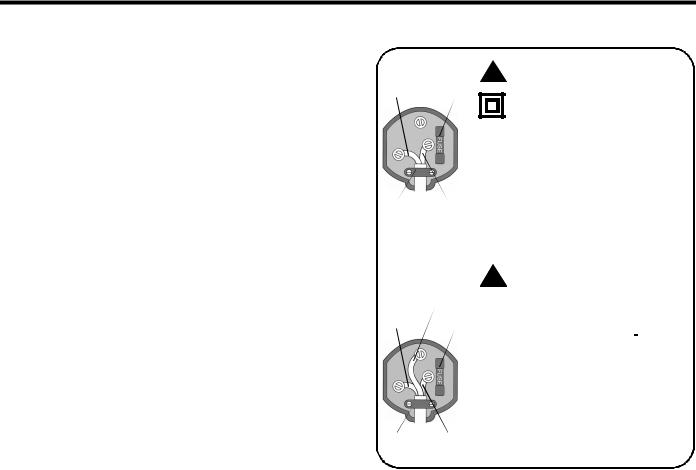
Wiring Instructions
The supply cable will be either 2-core or 3-core. Follow the appropriate wiring instructions given opposite. In both cases ensure that the outer sheath of the cable is firmly held by the cable clamp.
2 - CORE
BLUE
(Neutral) Fuse
Cable BROWN clamp (Live)
WARNING! Do not connect either ! wire to the earth terminal.
This symbol indicates that this 2-core appliance is Class ll and does not require an earth connection.
The wire coloured blue must be connected to the terminal marked with the letter N or coloured black.
The wire coloured brown must be connected to the terminal marked with the letter L or coloured red.
3 - CORE
GREEN and
YELLOW (Earth)
BLUE
(Neutral) Fuse
Cable BROWN clamp (Live)
!WARNING!earthed. This appliance must be
The wire coloured green and yellow must be connected to the terminal marked with the letter E, or by the earth symbol,  , or coloured green or green and yellow.
The wire coloured blue must be connected to the terminal marked with the letter N or coloured black.
The wire coloured brown must be connected to the terminal marked with the letter L or coloured red.
6 |
Customer Helpline: 0870 873 0079 |

DVD142TV
Getting Started
Remove your DVD/TV carefully from the box. You may wish to store the packaging for future use.
If any items are missing, please contact Product Support
Telephone: 0870 873 0079
Internet: www.bush-radio.co.uk
Compatible Discs
8cm/12cm DVD Video Discs.
8cm/12cm Compact Disc Audio Discs.
8cm/12cm Photo Compact Discs including JPEG and Kodak picture CDs.
www.bush-radio.co.uk |
7 |

14" DVD/TV Combi with Remote Control
Quick Setup
|
|
|
|
|
|
8 |
Customer Helpline: 0870 873 0079 |
|
DVD142TV
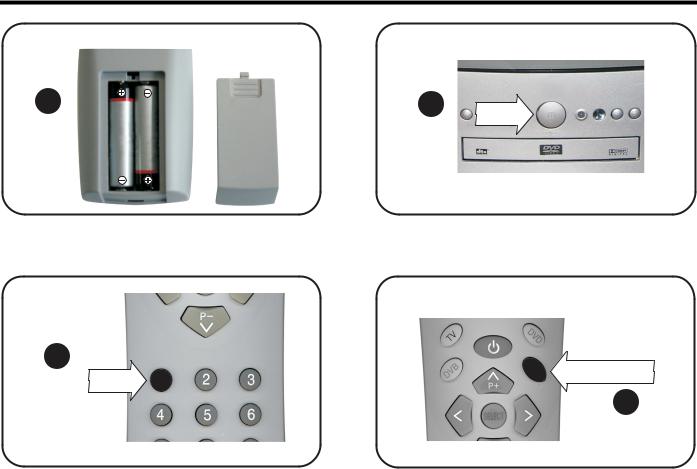
Insert remote control batteries Turn on
4 |
5 |
Press |
|
|
Turn on |
Open TV menu for autostore |
6
MENU Press Menu
Press 1
7
www.bush-radio.co.uk |
9 |
14" DVD/TV Combi with Remote Control
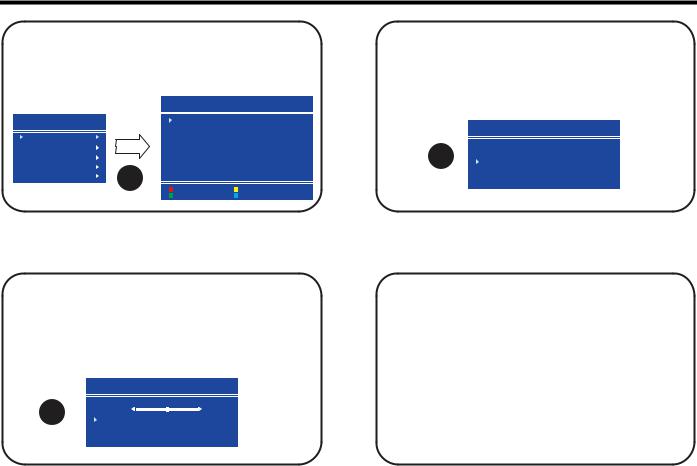
Auto Store
Use the UP or DOWN buttons to select PROGRAM. Press the RIGHT ARROW button to open the program menu.
|
|
PROGRAM. |
|
|
|
MENU |
|
01 |
BBC1 |
11 - - - |
21- - - - - - - - - |
|
|
02 |
BBC2 |
12 - - - - |
- - 22 - - - - - - |
SOUND |
|
03 |
ITV |
13 - - - - |
- - 23 - - - - - - |
|
04 |
CH 4 |
14 |
24 |
|
|
|
||||
PICTURE |
|
05 |
CH 5 |
15 - - - - |
- - 25 - - - - - - |
|
06 |
ITV |
16 |
26 |
|
|
|
||||
FEATURE |
|
07 |
PR11 |
17 - - - - |
- - 27 - - - - - - |
INSTALL. |
|
08 |
BBC1 |
18 - - - - |
- - 28 - - - - - - |
|
09 |
CH 4 |
19 |
29 |
|
|
8 |
||||
PROGRAM. |
10 |
PR11 |
20 - - - - |
30- - - - - - - - |
|
|
|
NAME |
|
DELETE |
|
|
|
INSERT |
|
AUTOSTORE |
|
Auto Store
Use the UP or DOWN arrow buttons to select Start.
Press the RIGHT ARROW button to begin the auto store process.
A.P. S.
A.P. S. IS RUNNING
10 |
P 01 VHF1 |
CANCEL |
Auto Store
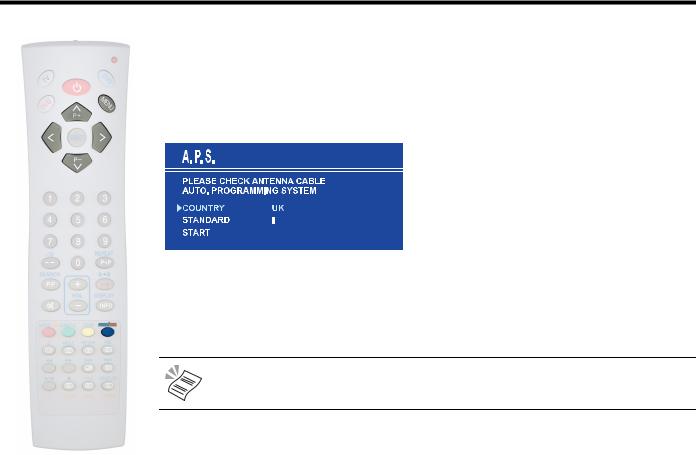
Press the BLUE button to Access the A.P.S. menu. Use the LEFT or RIGHT arrow buttons to select your country.
|
A. P. S. |
|
|
PLEASE CHECK ANTENNA CABLE |
|
9 |
AUTO. PROGRAMMING SYSTEM |
|
COUNTRY |
UK |
|
|
STANDARD |
I |
|
START |
|
Once the AUTO STORE PROCESS is complete,the PROGRAM menu is displayed.
To rename and edit the saved channels, please refer to the instructions on page 33. Alternatively press the MENU button twice to begin watching TV.
10 |
Customer Helpline: 0870 873 0079 |
DVD142TV
Connecting External Equipment
You can connect a wide range of audio and video equipment to your DVD/TV.
NOTE: Refer to the manufacturer’s guide for further instructions on how to connect the equipment.
The following table lists a range of the available connectors on the DVD/TV.
Connector |
|
Purpose |
|
ANT |
Receives TV signals from an |
|
|
external aerial. |
|
Headphone |
Transmits audio signals to a |
|
|
set of personal headphones. |
|
Euro AV |
Receives a complete AV |
|
(SCART) |
(Audio Visual) signal. |
|
AV Video |
Receives video signal only (no |
(Yellow) |
|
audio). |
|
|
|
|
AV Audio |
Receives audio signal only (no |
(White) |
(Right) |
video). |
|
|
|
|
AV Audio |
Receives audio signal only (no |
(Red) |
(Left) |
video). |
|
|
|
|
Digital Audio |
Receives digital audio signal |
(Orange) |
|
only (no video). |
|
|
www.bush-radio.co.uk |
11 |
14" DVD/TV Combi with Remote Control
Switching On
The Remote Control
Inserting Remote Control Batteries
1.On the back of the remote control, slide the battery compartment cover downwards to remove.
2.Insert the two AAA batteries, ensuring that you follow the polarity diagram inside the battery compartment.
3.Refit the cover.
We recommend the use of
Ever Ready Energizer batteries.
Battery Disposal
Please ensure batteries are disposed of safely. Never dispose of batteries in the fire or with household waste. Check with your local authority for disposal regulations.
Mains Power
Plug the mains plug into a mains socket and switch on.
NOTE: When not in use, disconnect the mains plug from the mains power supply.
1.Press the POWER button on the front of the DVD/TV to turn the DVD/TV on. The DVD/TV will be in Standby mode.
2.Press the NUMERIC buttons or the UP and DOWN buttons on the remote control or the DVD/TV to switch the DVD/TV on. The picture will appear after a few seconds.
NOTE: All buttons referred to are on the remote control unless otherwise stated.
12 |
Customer Helpline: 0870 873 0079 |

DVD142TV
Setting Up the TV
If this is the first time the DVD/TV has been switched on, you should see a snowy screen. No signal will be received.
To tune the DVD/TV in to receive a signal, follow the Autostore instructions below.
Menu Navigation
The basic controls needed to go through the menu screens are as follows:
1.Press the MENU button to activate the On-screen menus.
2.Press the UP or DOWN ARROW buttons to move up and down when navigating the On-screen menus.
3.Press the LEFT or RIGHT ARROW buttons to access an On-screen menu or Sub menu.
4.Press the LEFT or RIGHT ARROW buttons to adjust a selected option.
5.Press the MENU button to return to the previous menu screen or to exit the on-screen menus.
www.bush-radio.co.uk |
17 |
14" DVD/TV Combi with Remote Control
Autostore
1.Press the MENU button to activate the On-screen menus.
2.Press the UP or DOWN ARROW buttons to highlight Program.
3.Press the LEFT or RIGHT ARROW buttons to access the PROGRAM menu.
4.Press the BLUE button to select Autostore. The A.P.S menu will appear as shown below.
5.Use the LEFT or RIGHT ARROW buttons to select your country.
6.Use the UP or DOWN ARROW buttons to highlight Start.
7.Press the LEFT or RIGHT ARROW buttons to begin the Autostore function. This may take several minutes to complete.
NOTE: To receive a TV signal, you can use an outdoor or indoor aerial. However, if you live in a poor reception area or use an indoor aerial you may experience loss or corruption of teletext transmissions.
8.Once the Autostore process is complete, the PROGRAM. menu is displayed. To rename and edit the saved channels, follow the instructions as described on page 33. Alternatively press the MENU button twice to begin watching TV.
18 |
Customer Helpline: 0870 873 0079 |
DVD142TV
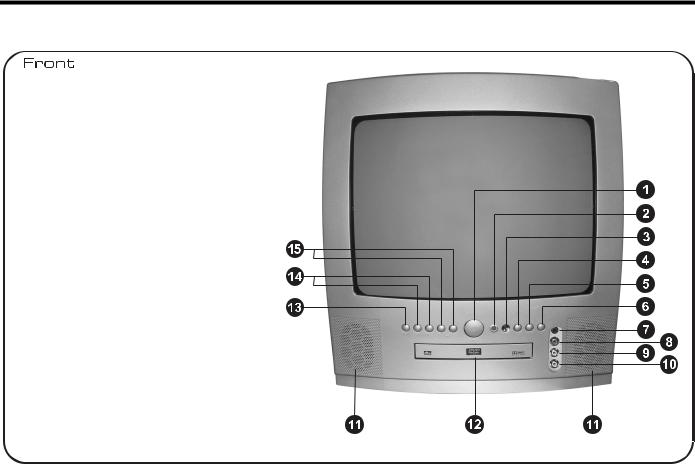
Identification of Controls
1.Power
Switches the DVD/TV on and off.
2.Standby Indicator
3.Remote Control Sensor
4.Play
Play button. Used to start playback of a DVD.
5.Stop
Stop button. Stops playback while playing a DVD.
6.Open/Close
Open and closes the DVD drawer.
7.Headphones
Audio socket for connecting a pair of headphones.
8.AV Audio (Right)
Right audio input socket for connecting an audio output from an external device.
9.AV Audio (Left)
Left audio input socket for connecting an audio output from an external device.
10. AV Video
Video input socket for connecting a video output
from an external device.
11. Speakers
12. DVD Drawer
13.Menu
Activates the On-screen menus.
14.P/CH
Channel select buttons. Also used to move up and down while navigating On-screen menus.
15.Vol Up/Down
Volume adjust buttons. Also used to move up and down while navigating On-screen menus.
www.bush-radio.co.uk |
13 |

14" DVD/TV Combi with Remote Control
|
|
|
|
|
|
|
|
|
|
|
|
|
|
|
|
|
|
|
|
|
|
|
|
|
|
|
|
|
|
|
|
|
|
|
|
|
|
|
|
|
|
|
|
|
|
|
|
|
|
|
|
|
|
|
|
|
|
|
|
|
|
|
|
|
|
|
|
|
|
|
|
|
|
|
|
|
|
|
|
|
|
|
|
|
|
|
|
|
|
|
|
|
|
|
|
|
|
|
|
|
|
|
|
|
|
|
|
|
|
|
|
|
|
|
|
|
|
|
|
|
|
|
|
|
|
|
|
|
|
|
|
|
|
|
|
|
|
|
|
|
|
|
|
|
|
|
|
|
|
|
|
|
|
|
|
|
|
|
|
|
|
|
|
|
|
|
|
|
|
|
|
|
|
|
|
|
|
|
|
|
|
|
|
|
|
|
|
|
|
|
|
|
|
|
|
|
|
|
|
|
|
|
|
|
|
|
|
|
|
|
|
|
|
|
|
|
|
|
|
|
|
|
|
|
|
|
|
|
|
|
|
|
|
|
|
|
|
|
|
|
|
|
|
|
|
|
|
|
|
|
|
|
|
|
|
|
|
|
|
|
|
|
|
|
|
|
|
|
|
|
|
|
|
|
|
|
|
|
|
|
|
|
|
|
|
|
|
|
|
|
|
|
|
|
|
|
|
|
|
|
|
|
|
|
|
|
|
|
|
|
|
|
|
|
|
|
|
|
|
|
|
|
|
|
|
|
|
|
|
|
|
|
|
|
|
|
|
|
|
|
|
|
|
|
|
|
|
|
|
|
|
|
|
|
|
|
|
|
|
|
|
|
|
|
|
|
|
|
|
|
|
|
|
|
|
|
|
|
|
|
|
|
|
|
|
|
|
|
|
|
|
|
|
|
|
|
|
|
|
|
|
|
|
|
|
|
|
|
|
|
|
|
|
|
|
|
|
|
|
|
|
|
|
|
|
|
|
|
|
|
|
|
|
|
|
|
|
|
|
|
|
|
|
|
|
|
|
|
|
|
|
|
|
|
|
|
|
|
|
|
|
|
|
|
|
|
|
|
|
|
|
|
|
|
|
|
|
|
|
|
|
|
|
|
|
|
|
|
|
|
|
|
|
|
|
|
|
|
|
|
|
|
|
|
|
|
|
|
|
|
|
|
|
|
|
|
|
|
|
|
|
|
|
|
|
|
|
|
|
|
|
|
|
|
|
|
|
|
|
|
|
|
|
|
|
|
|
|
|
|
|
|
|
|
|
|
|
|
|
|
|
|
|
|
|
|
|
|
|
|
|
|
|
|
|
|
|
|
|
|
|
|
|
|
|
|
|
|
|
|
|
|
|
|
|
|
|
|
|
|
|
|
|
|
|
|
|
|
|
|
|
|
|
|
|
|
|
|
|
|
|
|
|
|
|
|
|
|
|
|
|
|
|
|
|
|
|
|
|
|
|
|
|
|
|
|
|
14 |
|
|
|
|
|
|
|
|
|
|
|
|
|
|
|
|
Customer Helpline: 0870 873 0079 |
|||||||||
DVD142TV
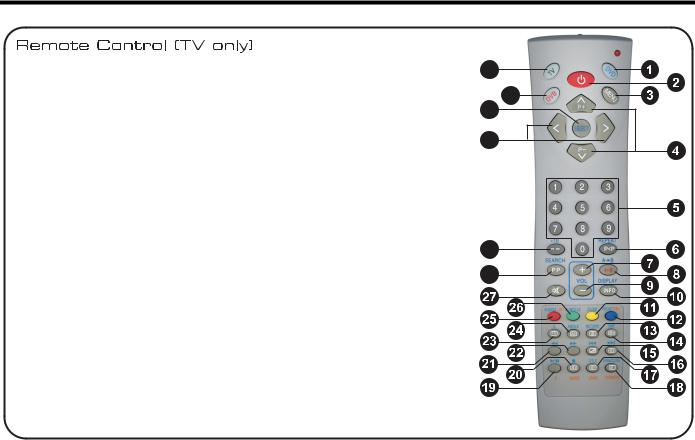
1.DVD
Switches the remote control to DVD mode.
2.Standby
Switches the DVD/TV into standby and on again.
3.Menu
Activates on-screen TV menus.
4.Up/Down Arrow Buttons
Channel select buttons. Also used to move up and down while navigating onscreen menus.
5.Numeric Buttons
6.P<P
Swap between channel numbers.
7.Vol+
Increases the volume.
8.No Function
9.Vol-
Decreases the volume.
10.Info
Activates the Program menu.
11.Yellow Button
Activates the Feature menu. Also used to access Fast Text options.
12.Blue Button
Activates the Install menu. Also used to access Fast Text options.
13.Teletext
Turn teletext on.
14.Sub-Page
Select teletext sub pages.
15.Mix
Mix TV and teletext.
16.Cancel
Interrupt teletext.
17.Reveal
Reveal hidden information.
18.Index
Go to teletext index page.
19.No Function
20.Size
Increase teletext size.
21.No Function
22.No Function
23.TV
Turn teletext off.
24.AV
Scrolls through the available input sources.
25.Red Button
Activates the Sound menu. Also used to access Fast Text options.
26.Green Button
Activates the Picture menu. Also used to access Fast Text options.
27.Mute
Turn sound on/off.
28.PP
Returns the picture and sound to the latest saved settings.
29.--
Select channel numbers above 9.
30.Left/Right Arrow Buttons
Used to move left and right while navigating on-screen menus.
31.No Function
32.No Function
33.TV
Switches the remote control to TV mode.
33
32
31
30
29
28
www.bush-radio.co.uk |
15 |
14" DVD/TV Combi with Remote Control
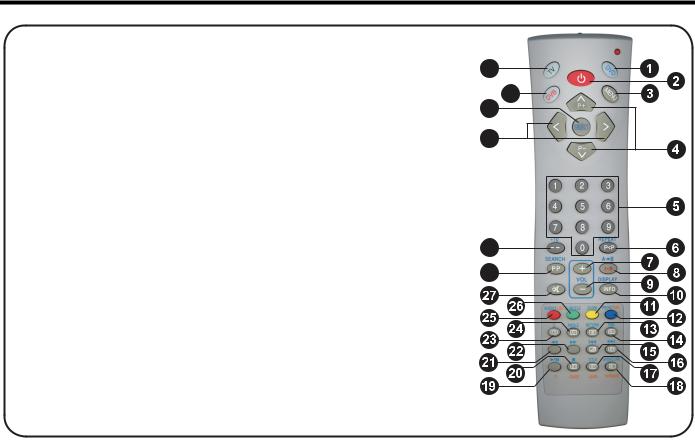
Remote Control (DVD only)
1.DVD
Switches the remote control to DVD mode.
2.Standby
Switches the DVD/TV into standby and on again.
3.Menu
Returns to the root menu.
4.Up/Down Arrow Buttons
Used to move up and down while navigating the DVD and on-screen menus.
5.Numeric Buttons
6.Repeat
Scrolls through the available DVD repeat options.
7.Vol+
Increases the volume.
8.A-B
Used to control the A-B repeat function.
9.Vol-
Decreases the volume.
10.Display
Access the DVD setup menus. Also used to display current information about the DVD.
11.Zoom
Scrolls through the available DVD zoom options.
12.No Function
13.No Function
14.Time
Scrolls through the available DVD time options.
15.Previous
Skip to the previous chapter.
16.Next
Skip to the next chapter.
17.Title
Displays the DVD title menu.
18.Open/Close
Open and close the DVD drawer.
19.Play/Pause
Play or pause the DVD.
20.Stop
Stop the DVD.
21.Rev
Fast reverse within a chapter.
22.Fwd
Fast forward within a chapter.
23.No Function
24.Angle
Scrolls through the available DVD angle options.
25.Audio
Scrolls through the available DVD audio options.
26.Subtitle
Scrolls through the available DVD subtitle options.
27.Mute
Turn sound on/off.
28.Search
Access the DVD search options.
29.+10
Used to access chapter numbers above 10. See page 19.
30.Left/Right Arrow Buttons
Used to move left and right while navigating on-screen menus.
31.Select
Select an option in the DVD root and title menus. Also used to select an option in the On-screen menus.
32.No Function
33.TV
Switches the remote control to TV mode.
33
32
31
30
29
28
16 |
Customer Helpline: 0870 873 0079 |
 Loading...