


22” Combination LED TV/DVD
Installation & Operating Instructions - Please keep for future reference
529/9153
LED22982DVDFHDS
 IMPORTANT - Please read these instructions fully before installing or operating
These instructions contain important information which will help you get the best from your television and ensure safe and correct installation and operation.
For any help concerning set up and use of your TV please call the
Customer Helpline: 0044 845 604 0105
Lines open: 9am - 8pm Monday to Saturday and 10am - 4pm Sunday
For any help concerning set up and use of your TV please call the Customer Helpline: 0044 845 604 0105
Issue 1 - 9/2/11

Contents
Contents |
2 |
Contents |
3 |
Preparation |
4 |
Intended Use |
4 |
Power source |
4 |
Positioning the TV |
4 |
Power cord and plug |
4 |
Moisture and Water |
5 |
Ventilation |
5 |
Heat sources and Flames |
5 |
Headphone Volume |
5 |
Wall Mounting (optional) |
5 |
LCD Screen |
5 |
Cleaning |
5 |
Handling Discs |
5 |
Cleaning Discs |
5 |
Batteries |
5 |
Replacement Parts |
6 |
Servicing |
6 |
Taking out of service and storing |
6 |
Connection to a Television Distribution System |
|
(Cable TV etc.) from Tuner |
6 |
Symbols in this Instruction Book |
6 |
Getting Started |
7 |
TV - Features |
8 |
DVD - Features |
8 |
Viewing remote control - TV |
9 |
Viewing remote control - DVD |
10 |
Getting Started |
11 |
Attaching the Stand |
11 |
Getting Started |
12 |
TV - Control buttons (left side) |
12 |
DVD - Control buttons (right side) |
12 |
Aerial connection |
13 |
Power connection |
13 |
Remote control - Inserting batteries |
13 |
Wall Mounting |
13 |
Switching the TV On and Off |
13 |
Switching the TV On  |
13 |
Switching the TV Off |
13 |
Operation using TV control buttons |
14 |
Operation using Remote control buttons |
14 |
How to watch a DVD |
15 |
Notes on DVD Playback |
15 |
Getting Started |
16 |
DVD Controls |
16 |
Initial set up |
17 |
General operation |
17 |
Information Banner |
17 |
Connections |
18 |
Back connections explained |
18 |
Left side connections explained |
19 |
HDMI Connections |
20 |
SCART Connections |
20 |
VGA Connections |
20 |
Side AV Connections |
21 |
Using a Conditional Access Module |
21 |
USB Connections |
22 |
Basic Features |
23 |
How to navigate menus - Selecting source |
23 |
Electronic programme guide (EPG) |
23 |
General Operation |
24 |
Displaying Subtitles |
24 |
Zoom Modes |
24 |
Using Main Menu Screen |
24 |
Configuring Date/Time Settings |
24 |
Source Settings |
24 |
Audio Language |
24 |
Basic Features |
25 |
Navigating Channel List |
25 |
Moving a Channel |
25 |
Deleting a Channel |
25 |
Renaming a Channel |
25 |
Locking a Channel |
25 |
Sorting Channel List |
25 |
DVD Mode Disc Playback |
26 |
Environmental Information |
26 |
Language Settings |
27 |
Language Settings |
27 |
Other Functions and Features |
28 |
Favourite Mode |
28 |
Conditional Access |
28 |
Setting Sleep Timer |
28 |
Setting Programme Timers |
28 |
Editing a Timer |
28 |
Deleting a Timer |
28 |
Picture Controls |
29 |
Configuring Picture Settings |
29 |
Operating Picture Settings Menu Items |
29 |
Picture Settings Menu Items |
29 |
PC Picture Settings Operation |
29 |
Sound and Source Settings |
30 |
Configuring Sound Settings |
30 |
Sound Settings Menu Items |
30 |
Configuring Source Settings |
30 |
Other Controls |
31 |
Operation |
31 |
Other Settings Menu Items |
31 |
2 |
For any help concerning set up and use of your TV please call the Customer Helpline: 0044 845 604 0105 |

Contents
|
|
|
|
|
|
|
|
Digital Teletext (for the UK only) |
37 |
|
Advanced Features |
32 |
||
|
Media Browser |
32 |
Specifications |
38 |
|
Starting Media Browser |
32 |
Other Information |
39 |
|
Plug replacement - UK and Ireland only |
39 |
||
|
Media Browser Configuration |
32 |
||
|
Operation |
32 |
Other Information |
40 |
|
View Style |
32 |
Product Support |
41 |
|
Slide Show Interval |
32 |
Trouble shooting |
41 |
|
Show Subtitle |
32 |
DVD Mode Supported file formats |
42 |
|
Subtitle Language |
32 |
Disposal information |
42 |
|
Subtitle Position |
32 |
Compatible disc types |
43 |
|
Subtitle Font Size |
32 |
Supported DVI Resolutions |
43 |
|
Loop / Shuffle during Playback |
32 |
Supported File Formats for USB Mode |
44 |
|
Media Browser - continued |
33 |
AV and HDMI Signal Compatibility (Input Signal |
|
|
Viewing Videos via USB |
33 |
Types) |
44 |
|
PC Input Typical Display Modes |
45 |
||
|
Video Playback Screen |
33 |
||
|
Definition of important terms - DVD |
46 |
||
|
Subtitle Time Correction |
33 |
||
|
Viewing Photos via USB |
33 |
Definition of important terms - TV |
47 |
|
Displaying Photos in Slideshow Mode |
33 |
Software Upgrade |
48 |
|
Playing Music via USB |
33 |
Licence Notifications |
48 |
|
Setting the channels |
34 |
Guarantee |
49 |
|
Accessing Installation Menu |
34 |
|
|
|
Automatic Channel Scan (Retune) |
34 |
|
|
|
Manual Channel Scan |
34 |
|
|
|
Analogue Fine Tune |
34 |
|
|
|
First Time Installation |
34 |
|
|
|
Clear Service List |
34 |
|
|
|
Parental Control |
35 |
|
|
|
DVD Mode Configuration |
36 |
|
|
|
TV Type |
36 |
|
|
|
Language Setup |
36 |
|
|
|
OSD LANG |
36 |
|
|
|
AUDIO |
36 |
|
|
|
DISC MENU |
36 |
|
|
|
SUBTITLE |
36 |
|
|
|
DEFAULT |
36 |
|
|
|
DOWNMIX |
36 |
|
|
|
SURROUND |
36 |
|
|
|
STEREO |
36 |
|
|
|
PARENTAL |
36 |
|
|
|
PASSWORD |
36 |
|
|
|
SPDIF OUTPUT |
36 |
|
|
|
Other Information |
37 |
|
|
|
Teletext |
37 |
|
|
|
Analogue Teletext |
37 |
|
|
Model number
BUSH DVB-T LED22982DVDFHDS
For any help concerning set up and use of your TV please call the Customer Helpline: 0044 845 604 0105 |
3 |


 Safety Information
 IMPORTANT - Please read these instructions fully before installing or operating
CAUTION
RISK OF ELECTRIC SHOCK
DO NOT OPEN
CAUTION: TO REDUCE THE RISK OF ELECTRIC SHOCK, DO NOT REMOVE COVER (OR BACK).
NO USER-SERVICEABLE PARTS INSIDE. REFER SERVICING TO QUALIFIED SERVICE PERSONNEL.
The lightning flash with arrowhead symbol, within an equilateral triangle, is intended to alert the user to the presence of uninsulated “dangerous voltage” within the product’s enclosure that may be of sufficient magnitude to constitute a risk of electric shock of persons.
The exclamation point within an equilateral triangle is intended to alert the user to the presence of important operating and maintenance (servicing) instructions in the literature accompanying the appliance.
Preparation
Place the device on a solid even surface. For ventilation, leave a free space of at least 10 cm all around the set. To prevent any fault and unsafe situations, do not place any objects on top of the set. Use this device in moderate climates.
Operation temperature and operation humidity: 5ºC up to 45ºC, 85% rel. humidity max. (not blocking ventilation openings).
Intended Use
This device is used to receive and display TV programmmes, as well as to play CDs and DVDs (see “This device compatible disc types”).The different connection options make an additional expansion of the reception and display sources possible (various external devices). This device is only suitable for dry interior use. This appliance is intended solely for private domestic use and may not be used for industrial and commercial purposes. We exclude liability in principle, if the device is not used as intended, or unauthorized modifications have been made.To operate your LCDTV in extreme ambient conditions may cause the damage of the device.
 WARNING: Never let people (including children) with physical, sensory or mental abilities or lack of experience and / or knowledge unsupervised use electrical device!
Children may not recognize dangers right! The swallowing of batteries can be fatal. Keep batteries always out of reach of small children. If a battery is swallowed, seek immediate medical attention. Keep the packaging films out of reach of children, there is a risk of suffocation.
Power source
•The TV should be operated only from a 220-240V AC, 50 Hz outlet.
• Warning: Do not leave your TV in standby or operating mode when you leave your house.
Positioning the TV
•For ventilation, please leave a clear space of at least 10cm all around the TV.
•Do not block the ventilation openings.
•Do not place the TV on sloping or unstable surfaces, the TV may tip over.
•To prevent damage to the TV, do not place any objects on top of the TV.
•Only use the TV in moderate climates.
Power cord and plug
•The power cord plug should be easily accessible. In case of storms and lightning, when going on holiday, or when the TV is not used for a long period of time disconnect the power cord from the mains power socket.
•The mains plug is used to disconnect TV set from the mains and therefore it must remain readily accessible.
•Do not place the TV, furniture, etc. on the power cord or pinch the cord.
•Handle the power cord by the plug, do not unplug the TV by pulling the power cord.
•Never touch the power cord/plug with wet hands as this could cause a short circuit or electric shock.
•Never make a knot in the power cord or tie it with other cords.
•Power cords should be placed in such a way that they are not likely to be stepped on or driven over.
•Adamaged power cord/plug can cause fire or give you an electric shock. When damaged it must be replaced, this should only be done by qualified personnel.
4 |
For any help concerning set up and use of your TV please call the Customer Helpline: 0044 845 604 0105 |


 Safety Information
 IMPORTANT - Please read these instructions fully before installing or operating
Moisture and Water |
Handling Discs |
•Do not use this TV in a humid or damp place (avoid bathrooms, the sink in the kitchen, etc.
•Do not expose this TV to rain or water, as this may be dangerous.
•Do not place objects filled with liquids, such as flower vases, on top of the TV.Avoid from dripping or splashing.
•If any solid object or liquid falls into the cabinet, unplug the TV and have it checked by qualified personnel before operating it any further.
Ventilation
•The slots and openings on the TV set are intended for ventilation and to ensure reliable operation.
•To prevent overheating, these openings must not be blocked or covered in anyway.
Heat sources and Flames
•Do not expose the TV to direct sunlight or other heat sources.
•The TV should not be placed near to open flames and sources of intense heat such as an electric heater.
•Ensure that no open flame sources,
such as lighted candles, are placed on top of the TV.
Headphone Volume
•Excessive sound pressure from earphones and headphones can cause hearing loss, please take care.
Wall Mounting (optional)
•To prevent injury, this TV must be securely attached to the wall in accordance with the installation instructions (if the option is available).
LCD Screen
•Occasionally, a few non-active pixels may appear on the screen as a fixed blue, green or red point. Please note that this does not affect the performance of your product.
•Take care not to scratch the screen with fingernails or other hard objects.
Cleaning
•Before cleaning, unplug the TV from the wall socket.
•Do not use liquid or aerosol cleaners. Only use a soft, dry cloth.
•To keep the disc clean, only handle the disc by its edge. Do not touch the surface.
•Do not stick paper or tape on the disc.
•If the disc is contaminated with any substance like glue, remove before using it.
•Do not expose the disc to direct sunlight or heat sources such as hot air ducts, or leave it in a car parked in direct sunlight as the temperature can rise quickly and damage the disc.
•After playing, store the disc in its case.
Cleaning Discs
•Before playing, clean the disc with a cleaning cloth. Wipe the disc from the centre out.
•Do not use solvents such as benzine, thinner, commercially
available cleaners or anti-static spray intended for vinyl LPs.
Batteries
• Warning: Incorrect installation of batteries may cause battery leakage and corrosion, resulting in damage to  the remote control.
•Do not mix old and new batteries, or batteries of different types.
•Do not dispose of batteries in a fire.
•Do not dispose of batteries with normal household waste, take to a local recycling centre.
 CAUTION: Insert the batteries / rechargeable batteries in the correct polarity. Don´t try to recharge non rechargeable batteries and under no circumstances throw them into fire. Danger of explosion. Do not use unequal batteries (old and new, Alkaline and carbon, etc.) simultaneously. If you will not use the device for a long time, remove the batteries and store the device in a dry and dust free place. Improper use of batteries may cause an explosion or leakage. If the batteries have leaked, use gloves and clean the appliance thoroughly with a dry cloth! Batteries should not be exposed to heat, such as sunshine, fire or the like.
For any help concerning set up and use of your TV please call the Customer Helpline: 0044 845 604 0105 |
5 |
 Safety Information
 IMPORTANT - Please read these instructions fully before installing or operating
Replacement Parts
When replacement parts are required, make sure that the service technician has used replacement parts, which are specified by the manufacturer or have the same specifications as the original one. Unauthorised substitutions may result in fire, electrical shock or other hazards.
Servicing
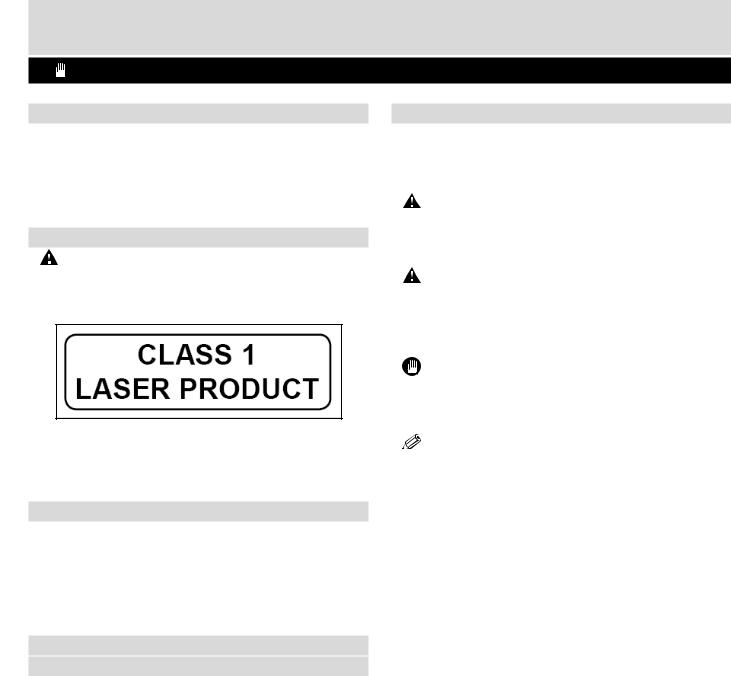
• Warning: Risk of exposure to radiation from class 1/class 3b visible and invisible laser beams. Do not open the TV and stare directly into beam.
• Warning: Risk of electric shock, do not attempt to repair, service or modify this TV yourself. Contact the manufacturer, their approved service agent or the Customer Helpline: 0845 604 0105.
Taking out of service and storing
Unplug the TV from the mains and pack the TV in an appropriate cardboard box. Remove the batteries from the remote control and pack the remote control to the TV set.
 NOTE: The TV set should be stored in a dry and dust-free room.
Connection to a Television Distribution System (Cable TV etc.) from Tuner
Device connected to the protective earthing of the building installation through the mains connection or through other apparatus with a connection to protective earthing-and to a television distribution system using coaxial cable, may in some circumstances create a fire hazard.
Connection to a cable distribution system has therefore to be provided through a device providing electrical isolation below a certain frequency range (galvanic isolator, see EN 60728-11).
Symbols in this Instruction Book
The following symbols are used in the Instruction Book as a marker for restrictions and precautions and safety instructions. Note such information for security reasons.
 WARNING
If you do not pay attention to such a marked warning, it can cause serious injury or death. Note these warnings strictly, in order to ensure a safe operation.
 CAUTION
Such a precaution is marked, you should take up or note, to avoid injury or property damage. Note these instructions strictly, in order to ensure a safe
.
IMPORTANT
Warnings on the appliance and restrictions are displayed like this. Read this information strictly in order to operate
system correctly and avoid damage.
NOTE: Information about the operation and additional explanations are marked like this. To be aware of such information is recommended to ensure that the functions can be used optimally.
6 |
For any help concerning set up and use of your TV please call the Customer Helpline: 0044 845 604 0105 |

Getting Started
The Argos Technical Helpline is here to help
Technical experts are available 7 days a week
•Simple help and advice on setting up your digital equipment (image).
•Guidance on connecting other devices to your television such as a DVD player, Sky, home cinema system or a games console.
•Order spare parts, including that lost remote control.
•Any other technical issues you may need assistance with.
Call us today: 0044 845 604 0105
Local call rates applies*
Lines open 9am-8pm Monday to Saturday and 10am-4pm Sunday.
*Calls to Argos enquiry lines may attract a charge and set up fee from residential lines depending on your call plan/tariff. Mobile and other providers costs may vary, see www.bt.com/pricing for details.
For Security and training purposes, telephone calls to and from customer service centres maybe recorded and monitored. Calls from Republic of Ireland will attract international call charges.
For any help concerning set up and use of your TV please call the Customer Helpline: 0044 845 604 0105 |
7 |

Getting Started
TV - Features
•Remote controlled colour LCD TV.
•Fully integrated Terrestrial digital TV (MPEG4)
•HDMI connectors for digital video and audio. This connection is also designed to accept high definition signals.
•USB input.
•1000 programmes (analogue+digital).
•OSD menu system.
•Integrated tuner MPEG 4 compatible.
•Scart socket for external devices (such as video, video games, audio set, etc.).
•Stereo sound system. (German+Nicam)
•Teletext, fastext, TOP text.
•Headphone connection.
•Automatic programming system.
•Forward or backward manual tuning.
•Sleep timer / Child lock.
•Automatic sound mute when no transmission.
•NTSC playback.
•AVL (Automatic Volume Limiting).
•Auto power down.
•PLL (Frequency Search).
•PC input.
•Plug&Play for Windows 98, ME, 2000, XP, Vista, Windos 7.
•Game Mode
DVD - Features
•DVD / CD / CD-R / CD-RW / MP3 / JPEG / MPEG playback.
•NTSC / PAL playback (according to disc content).
•LPCM audio via coaxial and optical digital audio outputs (optional).
•Multi-Audio (up to 8) support (according to disc content).
•Multi-Subtitle (up to 32) support (according to disc content).
•Multi-Angle (up to 9) support (according to disc content).
•8 level parental control.
•Fast forward and rewind - 5 different speeds:
2x, 4x, 8x, 16x, 32x.
•Slow motion playback - 4 different speeds:
1/2x, 1/4x, 1/8x, 1/16x forward.
•Frame by frame forward playback.
•Search Mode
•Repeat
•Coaxial audio output (optional).
•Copied disks may be incompatible.
Accessories included
Remote Control
Batteries: 2 x AAA
Instruction Book
Quick Start Guide
Side AV Connection Cable
Optional Accessories mount bracket
NOTE:You should check the accessories after purchasing. Make sure that each accessory is included.
8 |
For any help concerning set up and use of your TV please call the Customer Helpline: 0044 845 604 0105 |

Getting Started - TV
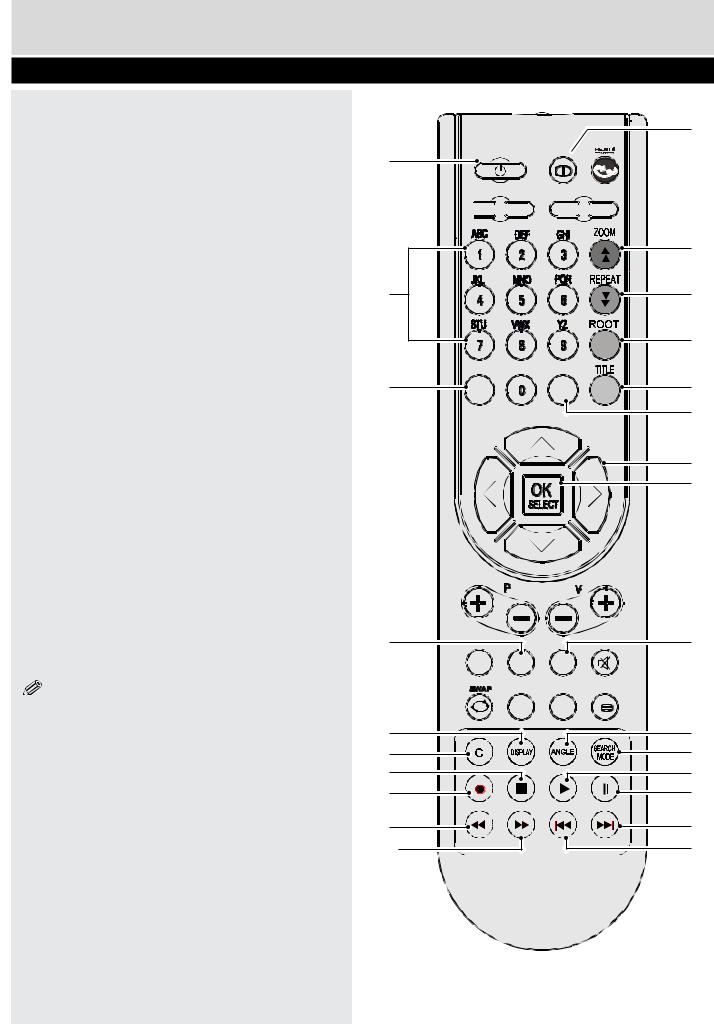
Viewing remote control - TV
1.Standby
2.Image size
3.Sleep timer
4.Number buttons
5.Return / Exit / TXT Index
6.Cursor up / TXT up page
7.Cursor left
8.Programme up / Page down (in DTV
mode)
9.Programme down / Page up (in DTV
mode)
10.Mono-Stereo / Dual I-II
11.Swap
12.Electronic programme guide
(in DTV mode)
13.Info / TXT reveal
14.Source selection
15.Picture mode selection
16.Red / Sound
17.Green / Picture
18.Yellow / Feature / Current language
19.Blue/Install
20.Menu
21.Cursor right / TXT Sub page
22.OK / Select
23.Cursor down / TXT Down page
24.Volume up
25.Volume down
26.Subtitle (in DTV mode) / TXT Subtitle
27.Mute
28.Teletext / Mix
29.FAV (Favourite Selection) (in DTV mode)
30.Media Player buttons
NOTE: Remote Control buttons that are not indicated with a number can not be used in TV mode.
The Remote Control range is approximately 7m / 23ft.
1
2
3
4
5
6
7
8
9
10
29
11
12

 SLEEP
SLEEP 
 SCREEN
INFO

SOURCE |
PRESETS |
13
14
15
16
17
18
RETURN |
MENU |
19 |
|
|
20
21
22
23
FAV LANG.
EPG
SUBTITLE |
 /
/
24
25
26
27
28
30
For any help concerning set up and use of your TV please call the Customer Helpline: 0044 845 604 0105 |
9 |
Getting Started
Viewing remote control - DVD
1.Standby
2.Number buttons
3.Return back
4.Language selection (Set language)
5.Display time / DVD menu
6.Clear
7.Stop
8.No function
9.Rapid Reverse
10.Rapid advance
11.Info
12.Zoom
13.Repeat
14.Root
15.Title
16.Menu
17.Navigation Buttons
18.OK / Select
19.Subtitle
20.Angle
21.Search mode
22.Play
23.Pause
24.Skip next
25.Skip previous
NOTE: Remote Control buttons that are not indicated with a number can not be used in DVD mode.
The Remote Control range is approximately 7m / 23ft.
1
2
3
4
5
6
7
8
9
10
11
INFO
 SLEEP
SLEEP 
 SCREEN SOURCE
 PRESETS
12
13
14
RETURN |
MENU |
15 |
16
17
18
19
FAV LANG. SUBTITLE
EPG  /
/
20
21
22
23
24
25
10 |
For any help concerning set up and use of your TV please call the Customer Helpline: 0044 845 604 0105 |
Getting Started
Attaching the Stand
1. Stand is placed on a flat surface (fig.1).
2. The product is held over the stand so that it coincides with the stand mounting point and then it is left to be mounted with its own weight (fig.2).
fig.1
fig.2
For any help concerning set up and use of your TV please call the Customer Helpline: 0044 845 604 0105 |
11 |
Getting Started
TV - Control buttons (left side)
1.Up direction
2.Down direction
3.Programme/Volume / AV / Standby-On selection switch
The Control switch allows you to control the Volume/ Programme/ Source and Standby-On functions of the TV.
To change volume: Increase the volume by pushing the button up. Decrease the volume by pushing the button down.
To change channel: Press the middle of the button, the channel information banner will appear on screen. Scroll through the stored channels by pushing the button up or down
To change source: Press the middle of the button twice, the source list will appear on screen. Scroll through the available sources by pushing the button up or down.
To turn the TV off: Press the middle of the button down and hold it down for a few seconds, the TV will turn into standby mode.
NOTE: You can move the switch, upward or downward to change the volume. If you want to change the channel, press the middle of the switch once (Position 3) and then move upward or downward. If you press the middle of the switch once more, the source OSD will be displayed. To select desired source, move the switch upward or downward and release. If you press the middle of the switch and hold for a few seconds, the TV will switch to standby mode. The Main menu OSD cannot be displayed via the control buttons on the TV.
DVD - Control buttons (right side)
4. |
Disc loader |
||||
5. |
Play / Pause ( / |
|
|
|
) button |
|
|
||||
|
|
||||
Plays / pauses the disc. When DVD menu (root menu) is active, this button functions as “button select” (selects the highlighted item in menu) if this
is not prohibited |
|
the disc). |
|
6. Stop / Eject ( |
|
|
) button |
|
|
||
|
|
||
Stops the disc playing / Ejects or Loads the disc.
NOTE: You cannot eject the disc via the remote control. To eject while a file; you should press the STOP button “  / ” (on the TV) three times.
Standby-LED
4
5
6
12 |
For any help concerning set up and use of your TV please call the Customer Helpline: 0044 845 604 0105 |

Getting Started
Aerial connection
Connect the “aerial” or “cable TV” plug to AERIAL INPUT (ANT.) socket located on the back of the
TV (fig.1).
Power connection
 IMPORTANT :The TV set is designed to operate on 220-240V AC, 50 Hz.
Please note: After unpacking, allow the TV to reach ambient room temperature before connecting the TV to the mains power socket.
Connect the power cord plug to the mains power socket.
The LED on the front of the TV then lights up, this indicates that the TV is in ‘Standby’ mode.
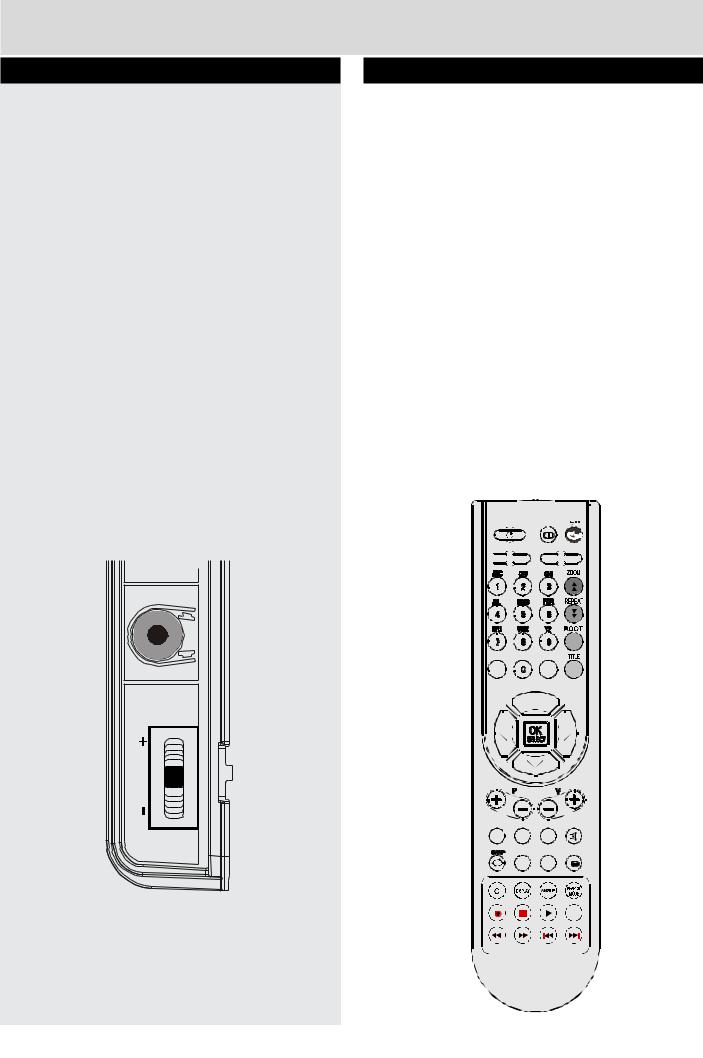
Remote control - Inserting batteries
Remove the battery cover on the back of the remote control, gently push down and pull backwards at the same time as shown.
Insert two AAA/R3 or equivalent type batteries. Ensure the batteries are inserted the correct way and replace
battery cover (fig.2).
NOTE: When the remote control is not going to be used for long periods of time, the batteries should be removed. Otherwise the remote control may be damaged, caused by battery leakage and corrosion.
Wall Mounting
When wall mounting please ensure you use a compatible wall mount (not supplied). This TV conforms to the VESA mounting specifications and is 75 x 75mm.
2DMI H |
1DMI H |
SPDIF |
|
Coax.OUT |
|
fig.1
AAA/R3 x 2 |
fig.2 |
Batteries
Switching the TV On and Off
Switching the TV On
With power cord plug connected to the mains power socket, the TV is in ‘Standby’ mode.
To switch the TV on from standby mode:
Press the “  ” button and the TV will switch to standby mode. Then the standby LED lights up.
To switch on the TV from standby mode either:
a.Press the “

 ” button, P+ / P- or a numeric button on the remote control.
b.Press the middle of the “  ” button on the TV..
By either method the TV will switch on.
Switching the TV Off
Press the “

 ” button on the remote control or press the standby “
  ” button, so the TV will switch to standby mode.
To turn off the TV completely, remove the power cord plug from the mains power socket.
 NOTE: When the TV is in standby mode, the standby LED can blink to indicate that features such as Standby Search, Over Air Download or Timer is active.
 NOTE: If you switch on your TV via P +/- buttons on the remote control or +/- on the TV set, the programme that you were watching last will be reselected.
For any help concerning set up and use of your TV please call the Customer Helpline: 0044 845 604 0105 |
13 |
Getting Started
Operation using TV control buttons
The main menu OSD (On Screen Display) cannot be displayed using the TV control buttons.
The Control switch allows you to control the Volume/ Programme/ Source and Standby-On functions of the TV.
To change volume: Increase the volume by pushing the button up. Decrease the volume by pushing the button down.
To change channel: Press the middle of the button, the channel information banner will appear on screen. Scroll through the stored channels by pushing the button up or down
To change source: Press the middle of the button twice, the source list will appear on screen. Scroll through the available sources by pushing the button up or down.
To turn the TV off: Press the middle of the button down and hold it down for a few seconds, the TV will turn into standby mode.
o |
MODE |
Operation using Remote control buttons
The remote control is designed to control all the functions of the model you selected.
Volume Setting
Press “V +” button to increase the volume. Press “V -” button to decrease the volume. A volume level scale (slider) will be displayed on the screen.
Programme Selection (Previous or Next Programme)
Press P- button to select the previous programme. Press P+ button to select the next programme.
Programme Selection (Direct Access)
Press number buttons on the remote control to select programmes between 0 and 9. The TV will switch to the selected programme.
To select programmes between 10-500 (IDTV) or 10-199 (analogue), press the number buttons consecutively.
INFO

 SLEEP
SLEEP 
 SCREEN SOURCE
 PRESETS
RETURN  MENU
MENU
FAV |
LANG. |
SUBTITLE |
EPG  /
/
14 |
|
|
|
|
|
|
|
|
|
|
|
|
|
|
|
|
|
|
|
|
For any help concerning set up and use of your TV please call the Customer Helpline: 0044 845 604 0105 |
||||||
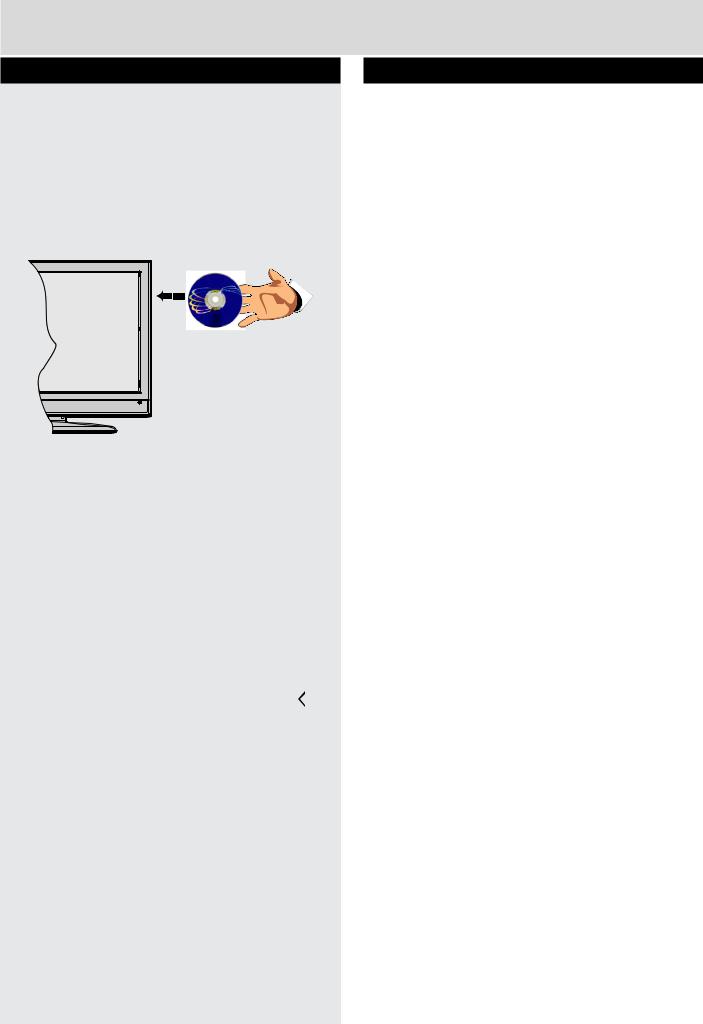
Getting Started
How to watch a DVD
1.Press the Power Button “” on the TV or remote control.
2.Switch to DVD source using the “SOURCE” button on the remote control.
3.Insert a disc into the loader.
The disc MUST be facing you when looking at the
TV screen (fig.3).
Most discs will be automatically loaded and play will start automatically if the disc does not have any menus recorded on it.
If play does not start automatically, press the play button “ ” on the remote control, or the play button “
 /
/ 
 ” on the right side of the TV.
A menu may appear on the TV screen after a few moments or the film may start immediately after the
Film/TV Company introduction. This will depend on the disc content and may differ on each disc.
 NOTE: Steps 4 and 5 are only available when a menu is recorded on the disc.
4.Press the navigation buttons “ ” , “
” , “ ” ,“ ” or
“  ” or the number button/s to select the required title.
5.Press the OK button. The selected item starts to play.
Notes on DVD Playback
a.No sound will be heard during Rapid advance or Rapid reverse.
b.No sound will be heard during Slow motion play.
c.Reverse Slow motion play is not available.
d.In some cases, the subtitle language will not be changed immediately to the selected one.
e.When the preferred language will not select, even after pressing the button several times, it means the language is not available on the disc.
f.When the DVD player is restarted or the disc is changed, the subtitle selection is automatically changed back to the initial settings.
g.If a language is selected that is not supported by the disc, the subtitle language will automatically be set to the disc’s priority (default) language.
h.Usually a ‘circulation’ will happen while switching to another language, this means you can cancel the subtitle by pressing the same button a number of times until “Subtitle Off” appears on the screen.
i.When the power is turned on or the disc is removed, the language heard will be the one selected at the initial settings.
j.Some DVDs may not contain root and/or title menus.
k.Reverse stepping is not available.
l.For reference: If you attempt to enter a number greater than the total time of the current title, the
time search box disappears and “Input Invalid ” message appears on top-left corner of screen.
m.The slide show is disabled when the ZOOM mode is on.
For any help concerning set up and use of your TV please call the Customer Helpline: 0044 845 604 0105 |
15 |
 Loading...