


NE-2059
NE-2059

2
If you require any technical guidance or find that your product is not
operating as intended, a simple solution can often be found in the
Troubleshooting
You’ll soon be enjoying your new DAB/FM Radio.
It all begins here, with your instructions. Don’t worry,
there’s nothing too technical coming up. Just simple,
step-by-step guidance to get you up and running
quickly. Sound good? Then let’s get started.
Help and Guidance
We’re here to help you get the most from your DAB/
FM Digital Radio. Should you require any guidance, a
simple solution can often be found online at:
www.bush-support.com
If you still require further assistance, call one of our
experts on 0345 604 0105.

3
Contents
1
2
3
4
5
Safety information
Safety information 6
Getting to know your DAB/FM Radio
Ready? Let’s begin 12
Product Overview 12
First Charge / Recharge The Battery 14
Using your DAB/FM Radio
POWER SOURCE 18
Basic Operation 20
DAB Operation 23
FM Operation 29
Sleep Function 33
Backlight Function 34
Factory Reset 35
Software Version 36
Using Earphones 36
Reset Function 37
Other information
Specifications 40
Product support
Help and assistance 43
Disposal 45
Guarantee 47
section of these instructions, or online at www.bush-support.
com If you still require further assistance, call one of our experts
on 0345 604 0105


Safety information
1

6
Safety information
Important - Please read these instructions fully
before installing or operating
SAFETY PRECAUTIONS
- Read all the instructions carefully before using the
unit and keep them for future reference.
- Check that the voltage marked on the rating label
matches your mains voltage.
- The unit must be placed on a flat stable surface
and should not be subjected to vibrations.
- Do not place the unit on sloped or unstable
surfaces as the unit may fall off or tip over.
- The mains socket must be located near the unit
and should be easily accessible.
- Avoid extreme degrees of temperature, either
hot or cold. Place the unit well away from heat
sources such as radiators or gas/electric fires.
Avoid exposure to direct sunlight and other
sources of heat.
- Never place any type of candle or naked flame on
the top of or near the unit.
- To reduce the risk of fire, electric shock or product
damage, do not expose this unit to rain, moisture,
dripping or splashing. No objects filled with liquids,
such as vases, should be placed on the unit.
- If you spill any liquid into the unit, it can cause
serious damage. Switch it off at the mains
immediately. Withdraw the mains plug and consult
your dealer.

7
Safety information
Important - Please read these instructions fully
before installing or operating
- To prevent the risk of electric shock or fire hazard
due to overheating, ensure that curtains and other
materials do not obstruct the ventilation vents.
- Do not install or place this unit in a bookcase,
built-in cabinet or in another confined space,
ensure that a minimum of 10cm should be kept
around the apparatus for ventilation.
Safety
- Always disconnect the unit from the mains supply
before connecting/disconnecting other devices or
moving the unit.
- Unplug the unit from the mains socket during a
lightning storm.
- This unit will become warm when used for a
long period of time. This is normal and does not
indicate a problem with the unit.
8
CAUTION
RISK OF ELECTRIC SHOCK
DO NOT OPEN
The lightning flash with arrowhead symbol,
within an equilateral triangle, is intended to
alert the user to the presence of uninsulated
“dangerous voltage” within the unit’s
enclosure that may be of sufficient
magnitude to constitute a risk of electric
shock.
The exclamation point within an equilateral
triangle is intended to
alert the user to the presence of important
operating and maintenance (servicing)
instructions in the manual accompanying
the unit.
Interference
- Do not place the unit on or near appliances which
may cause electromagnetic interference. If you do,
it may adversely affect the operating performance
of the unit, and cause a distorted sound.
Safety information
Important - Please read these instructions fully
before installing or operating

9
Supervision
- Children should be supervised to ensure that they
do not play with the unit.
- Never let anyone especially children push anything
into the holes, slots or any other openings in the
case - this could result in a fatal electric shock.
Service/Maintenance
- To reduce the risk of electric shock, do not
remove screws. The unit does not contain any user
serviceable parts. Please leave all maintenance
work to qualified personnel.
- Do not open any fixed covers as this may expose
dangerous voltages.
- Ensure to unplug the unit from the mains socket
before cleaning.
- Do not use any type of abrasive pad or abrasive
cleaning solutions as these may damage the unit's
surface.
- Do not use liquids to clean the unit.
Safety information
Important - Please read these instructions fully
before installing or operating


Getting to know your
DAB/FM Digital Radio
2
12
Getting to know your DAB/FM Radio
You’ll be up and running in no time
Ready? Let’s begin...
Please read these instructions carefully. They contain
important information which will help you get the
best from your product and ensure safe and correct
installation and operation.
If you require any further assistance, our technical
experts are happy to help. For full details, refer to
the product support section at the end of these
instructions.
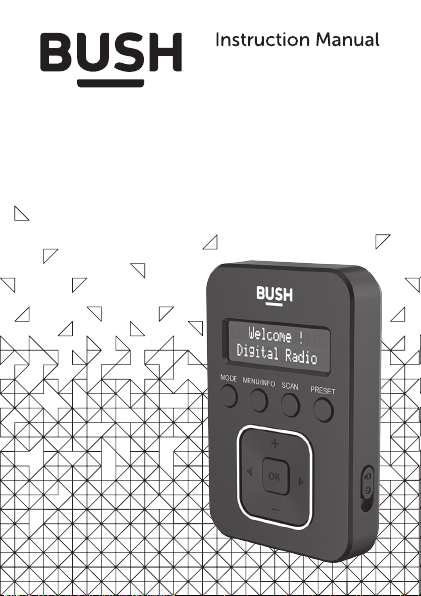
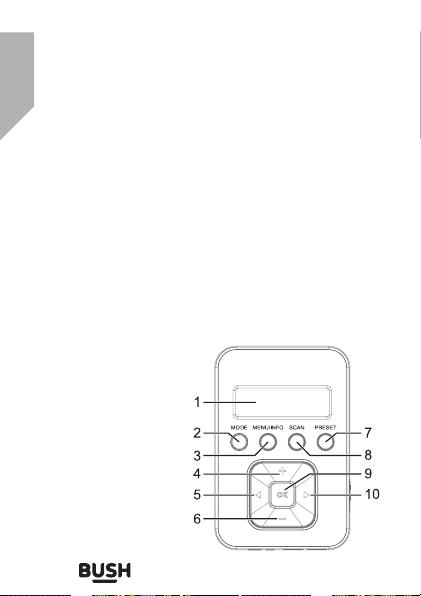
Product Overview
Front view
1. DISPLAY
2. MODE BUTTON
3. MENU/INFO
BUTTON
4. VOL+ BUTTON
5.
◄
BUTTON
6. VOL- BUTTON
7. PRESET BUTTON
8. SCAN BUTTON
9. ENTER BUTTON
10.
►
BUTTON
13
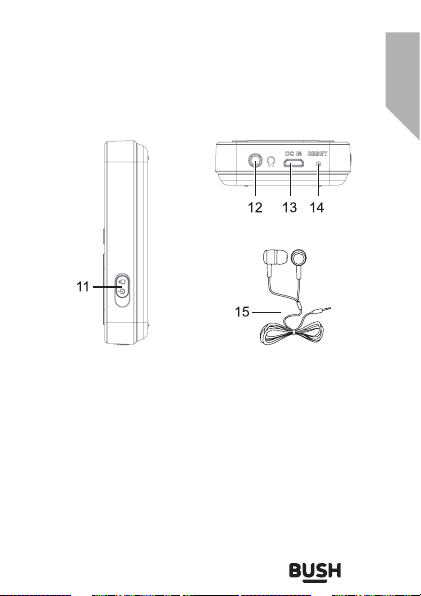
Getting to know your DAB/FM Radio
You’ll be up and running in no time
Bottom viewRight view
11. POWER/HOLD BUTTON
12. HEADPHONE JACK
13. DC INPUT JACK
14. RESET BUTTON
15. Earphones
14
Getting to know your DAB/FM Radio
You’ll be up and running in no time
FIRST CHARGE / RECHARGE THE
BATTERY
The unit has a built-in rechargeable Lithium (Li)
battery. The battery is charged automatically
whenever the unit is connected to a computer
or USB charging device with the USB cable (USB
charging device & USB cable are not included). When
the unit is switched on, the screen display will show
a charging symbol to indicate the unit is in charging.
The charging symbol will appear full when finished.
- Do not put the unit under high temperature
or heat sources.
- During battery operation, if the battery
becomes flat, the display will show Battery
Low, you should recharge the battery for
operation.
- The unit support computer charging and
5V 1A charging device (not included),
connecting the unit to any other power
source may cause damage the unit.
15
Getting to know your DAB/FM Radio
You’ll be up and running in no time
- During battery operation, the POWER
button will work as a POWER ON/OFF
button. The display will be totally off when
the radio is powered off. The display
backlight will be full brightness after radio
power on, and it will turn to dim after a few
seconds.
- It takes 3 hours (approx.) to fully charge the
battery.
- A fully charged unit has up to 10 hours
(approx.) of playback time at 1/2 volume
level.
 Loading...