


20" HD Ready LED TV with DVD Player
Installation & Operating Instructions - Please keep for future reference |
|
267/7503 |
LE-20GTG01+DVD
HIGH-DEFINITION MULTIMEDIA INTERFACE
Important - Please read these instructions fully before installing or operating
These instructions contain important information which will help you get the best from your television and ensure safe and correct installation and operation.
For any help concerning set up and use of your TV please call the
Customer Helpline: 0345 604 0105
Lines open: 9am - 8pm Monday to Saturday and 10am - 4pm Sunday
Issue 1 - 10/05/13

Contents
Safety Information |
2 - 3 |
|
|
Getting Started |
4 - 15 |
Support |
4 |
TV Features |
5 |
Accessories included |
5 |
Base Stand Assembly Instruction |
6 |
Viewing remote control - TV |
7-9 |
TV - Control buttons (Right side) |
10 |
Aerial connection |
10 |
Power connection |
10 |
Remote control - Inserting batteries |
11 |
Switching the TV On and Off |
11 |
Operation using TV control buttons |
12 |
Operation using remote control |
12 |
How to watch a DVD |
13 |
Notes on DVD playback |
13 |
DVD Controls |
14 |
Initial setup |
15 |
General operation |
15 |
Connections |
16 - 18 |
Left side connections explained |
16-17 |
HDMI Connections |
18 |
SCART Connections |
18 |
VGA Connections |
18 |
Basic Features |
19 - 34 |
How to navigate menus |
19 |
Electronic programme guide (EPG) (DTV |
|
mode) |
19 |
Teletext (ATV mode) |
20 |
Digital Teletext (DTV mode) |
21 |
Time Shift Function (DTV mode) |
21-22 |
Recording DTV Programme onto a USB |
|
Storage Device |
22 |
Timer Programming |
23 |
Play Recorded Programme |
24 |
Picture management |
24-25 |
Sound management |
25-26 |
Channel management (ATV / DTV Mode)
|
|
26-29 |
Lock System management |
|
30 |
Setup management |
|
30-34 |
|
|
|
Entertainment |
35 - 37 |
|
Viewing Photo |
|
35-36 |
Listening to Music |
|
36 |
Viewing Movies |
|
36-37 |
My Text |
|
37 |
|
|
|
Using the DVD Features |
38 - 44 |
|
Using the Bulit-in DVD Player |
|
38 |
Compatible Disc Types |
|
38 |
Basic DVD Playback Functions |
|
39-40 |
Playing Multimedia Discs |
|
41 |
Using the DVD Language Setup Page |
||
|
|
41-42 |
Using the DVD Screen Setup Page |
||
|
|
42-43 |
Using the DVD Audio Setup Page |
|
43 |
Using the DVD Custom Setup Page |
||
|
|
43-44 |
Using the DVD Exit Setup Mode Page |
44 |
|
|
|
|
Other information |
45 - 46 |
|
Digital reception |
|
45 |
Energy label |
|
46 |
Trouble shooting |
|
45 |
Disposal information |
|
49 |
For any help concerning set up and use of your TV please call the Customer Helpline: 0345 604 0105 |
1 |

 Safety Information
Important - Please read these instructions fully before installing or operating
CAUTION
RISK OF ELECTRIC SHOCK
DO NOT OPEN
CAUTION: TO REDUCE THE RISK OF ELECTRIC SHOCK, DO NOT REMOVE COVER (OR BACK).
NO USER-SERVICEABLE PARTS INSIDE. REFER SERVICING TO QUALIFIED SERVICE PERSONNEL.
Power source
The TV should be operated only from a 100-240V AC, 50/60 Hz outlet.
Warning: Do not leave your TV in standby or operating mode when you leave your house.
Positioning the TV
For ventilation, please leave a clear space of at least 10cm all around the TV.
|
10cm |
10cm |
10cm |
Do not block the ventilation openings.
Do not place the TV on sloping or unstable surfaces, the TV may tip over.
To prevent damage to the TV, do not place any objects on top of the TV.
Only use the TV in moderate climates.
Power cord and plug
The power cord plug should be easily accessible. In case of storms and lightning, when going on holiday, or when the TV is not used for a long period of time
disconnect the power cord from the mains power socket.
Mains plug is used as the disconnect device, shall be readily operable.
Do not place the TV, furniture, etc. on the power cord or pinch the cord.
Handle the power cord by the plug, do not unplug the
within an equilateral triangle, is intended to alert the user to the presence of uninsulated “dangerous voltage” within the product’s
to constitute a risk of electric shock of persons.
The exclamation point within an equilateral triangle is intended to alert the user to
the presence of important operating and maintenance (servicing) instructions in the literature accompanying the appliance.
TV by pulling the power cord.
Never touch the power cord/plug with wet hands as this could cause a short circuit or electric shock.
Never make a knot in the power cord or tie it with other cords.
Power cords should be placed in such away that they are not likely to be stepped on or driven over.
an electric shock. When damaged it must be replaced,
Moisture and Water
Do not use this TV in a humid or damp place (avoid bathrooms, the sink in the kitchen, and near the washing machine).
Do not expose this TV to rain or water, as this may be dangerous.
Do not
splashing.
If any solid object or liquid falls into the cabinet, unplug before operating it any further.
Ventilation
The slots and openings on the TV set are intended for ventilation and to ensure reliable operation.
To prevent overheating, these openings must not be blocked or covered in anyway.
Heat sources and Flames
Do not expose the TV to direct sunlight or other heat sources.
sources of intense heat such as an electric heater.
candles, are placed on top of the TV.
2For any help concerning set up and use of your TV please call the Customer Helpline: 0345 604 0105
 Safety Information
Important - Please read these instructions fully before installing or operating
Headphone volume |
|
Handling discs |
|
|
|
Excessive sound pressure from earphones and headphones can cause hearing loss, please take care.
Wall mounting (optional)
To prevent injury, this TV must be securely attached to the wall in accordance with the installation instructions (if the option is available).
LCD Screen
The LCD screen is a very high technology product picture details. Occasionally, a few non-active pixels
red point. Please note that this does not affect the performance of your product.
other hard objects.
Cleaning
Before cleaning, unplug the TV from the wall socket.
Do not use liquid or aerosol cleaners. Only use a soft, dry cloth.
Batteries
Warning: Incorrect installation of batteries may cause battery leakage and corrosion, resulting in damage to the remote control.
WARNING: the battery (battery or batteries or battery pack) shall not be exposed to excessive heat such as
Do not mix old and new batteries, or batteries of different types.
Do not
Do not dispose of batteries with normal household waste, take to a local recycling centre.
Replacement parts
When replacement parts are required, make sure that the service technician has used replacement parts,
hazards.
To keep the disc clean, only handle the disc by its edge. Do not touch the surface.
Do not stick paper or tape on the disc.
If the disc is contaminated with any substance like glue, remove before using it.
Do not expose the disc to direct sunlight or heat sources such as hot air ducts, or leave it in a car parked in direct sunlight as the temperature can rise quickly and damage the disc.
After playing, store the disc in its case.
Cleaning discs
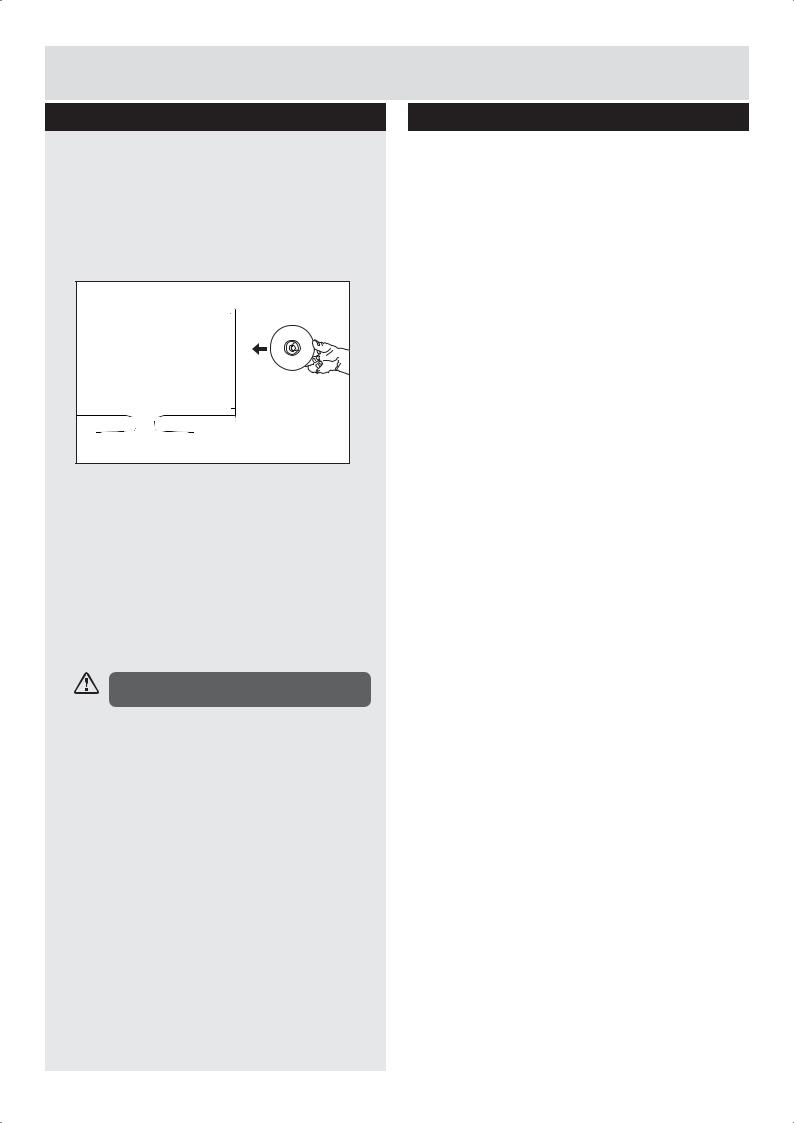
Before playing, clean the disc with a cleaning cloth. Wipe the disc from the centre out.
Do not use solvents such as benzine, thinner, commercially available cleaners or anti-static spray intended for vinyl LPs.
Servicing
Warning: Risk of exposure to radiation from class 1/ class 3b visible and invisible laser beams. Do not open the TV and stare directly into beam.
Warning: Risk of electric shock, do not attempt to repair, service or modify this TV yourself. Contact the manufacturer, their approved service agent or the
Customer Helpline: 0345 604 0105.


 This equipment is a Class II or double insulated electrical appliance. It has been designed in such a way that it does not require a safety connection to electrical earth.
 Warning: To prevent the spread of keep candles or other open
 away from this product at all times.
For any help concerning set up and use of your TV please call the Customer Helpline: 0345 604 0105 |
3 |

Getting Started
The Argos Technical Helpline is here to help
Technical experts are available 7 days a week
Simple help and advice on setting up your digital equipment (image).
Guidance on connecting other devices to your television such as a DVD player, Sky, home cinema system or a games console.
Order spare parts, including that lost remote control.
Any other technical issues you may need assistance with.
Call us today: 0345 604 0105
Local call rates applies*
Lines open 9am-8pm Monday to Saturday and 10am-4pm Sunday.
*Calls to Argos enquiry lines may attract a charge and set up fee from residential lines depending on your call plan/tariff. Mobile and other providers costs may vary, see www.bt.com/pricing for details.
For Security and training purposes, telephone calls to and from customer service centres maybe recorded and monitored. Calls from Republic of Ireland will attract international call charges.
4For any help concerning set up and use of your TV please call the Customer Helpline: 0345 604 0105

Getting Started
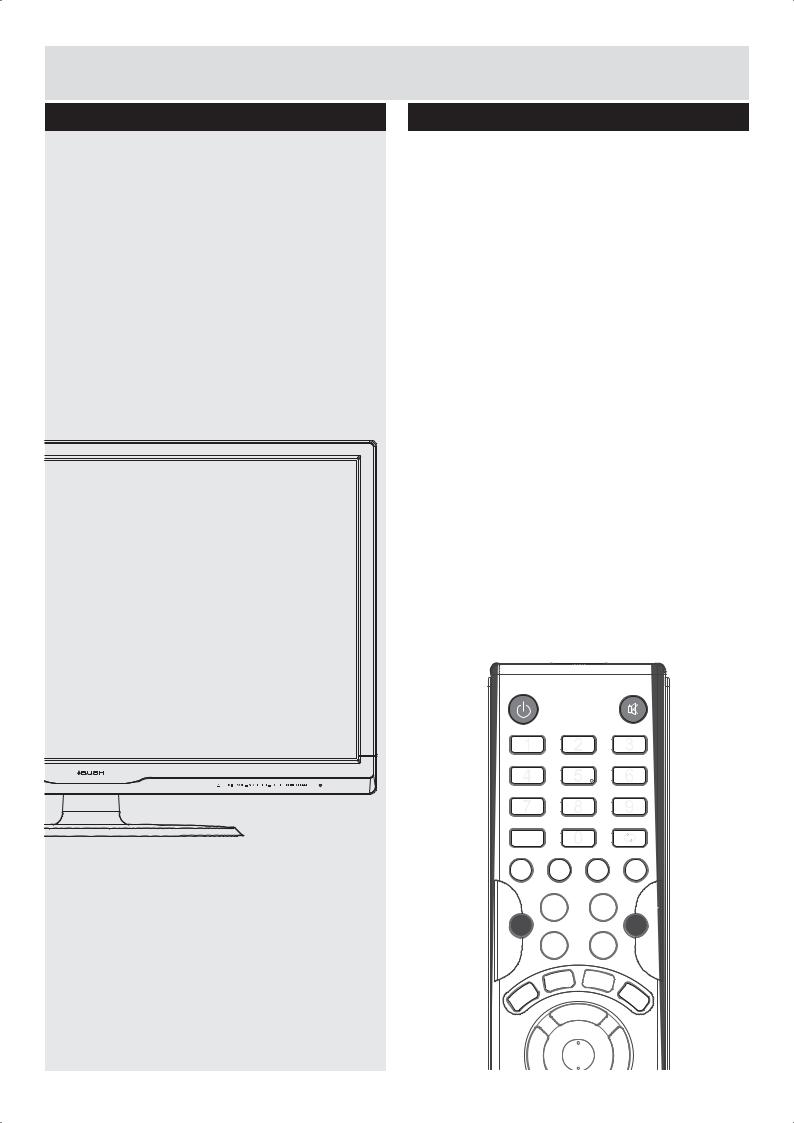
TV - Features
Remote controlled colour LCD TV.
Fully integrated digital TV (DVB-T).
HDMI connectors for digital video and audio. This connection is also designed to accept high de nition signals.
USB input.
100 programmes from VHF, UHF (analogue).
400 programmes for digital mode (DTV).
OSD menu system.
Scart socket for external devices (such as video, video games, audio set, etc.).
Stereo sound system.
Teletext, fastext, TOP text.
Headphone connection.
Automatic programming system.
Forward or backward manual tuning.
Sleep timer.
Child lock.
AVL (Automatic Volume Limiting).
PLL (Frequency Search).
PC input.
Plug & Play for Windows 98, ME, 2000, XP, Vista.
DVD - Features
DVD / CD / CD-R / CD-RW / MP3 / JPEG / MPEG playback.
NTSC / PAL playback (according to disc content).
LPCM audio via coaxial and optical digital audio outputs (optional).
Multi-Audio (up to 8) support (according to disc content).
Multi-Subtitle (up to 32) support (according to disc content).
Multi-Angle (up to 9) support (according to disc content).
8 level parental control.
Fast forward and rewind - 5 different speeds: 2x, 4x, 8x, 16x, 32x.
Slow motion playback - 4 different speeds: 1/2x, 1/4x, 1/8x, 1/16x forward.
Frame by frame forward playback.
Search Mode.
Repeat.
Coaxial audio output (optional).
Copied disks may be incompatible.
Accessories included
CH.LIST |
|
|
|
10+ |
|
|
|
P.MODE |
S.MODE |
TV.RD |
LANG |
|
/FAV |
|
DVD.SETUP |
|
|
|
TIME SHIFT |
/TTX |
/CANCEL |
TITLE/SIZE |
SUBTITLE |
/HOLD |
/REVEAL |
MENU/SUBPAGE AUDIO/INDEX |
|
GOTO |
SLOW |
REPEAT |
A-B |
|
|
|
|
Remote Control |
TV |
MINI YPBPR Cable |
MINI AV Cable |
Batteries: 2 x AAA |
|
|
|
Long Screws (3PCS) |
|
|
Stand Support |
Stand Base |
Short Screws (4PCS) |
Instruction Book |
|
For any help concerning set up and use of your TV please call the Customer Helpline: 0345 604 0105 |
5 |
Getting Started
Installing / Removing the Base Stand
Base Stand Assembly Instruction
1.Place the TV with the display side down on a flat surface.Use a cloth to protect. Locate the bottom at the stand.
2.Fix the bottom with turning the screw (4PCS) tightly on the stand.
3.Fix the stand support to the stand base with the provided long screws (3PCS).
INSTALLATION NOTES
This TV can be connected to an AC 100-240 Volts, 50/60 Hz power supply. Never connect straight to a DC power supply.
Locate the TV in a room where light does not strike the screen directly. Total darkness or a r ction on the screen can cause eyestrain. Soft and indirect lighting is recommended for comfortable viewing.
Allow enough space between the TV and the wall to permit ventilation.
Avoid excessively warm locations to prevent possible damage to the cabinet or premature component failure.
WALL MOUNTING INSTALLATION
GUIDELINES
This television can be wall mounted as follows:
1.Place the LED LCD Television onto a solid surface. Please place some soft material over the front of the screen to protect it from any damage.
2.Remove the screws (3PCS) from the lower part of the television, where the base joins to the TV, and take away the stand (put the stand somewhere safe for future use).
3.Use the four screws provided to fix the TV onto a wall mounting bracket (not included) via the four VESA standard holes on the back of the television.
 100mm
100mm 
100mm
100 x 100mm VESA mount
6For any help concerning set up and use of your TV please call the Customer Helpline: 0345 604 0105
Getting Started
Viewing remote control - TV
1. |
|
|
|
|
|
|
|
|
Switches the TV between on and standby |
|
|
|
|
|
|
|
mode. |
1 |
|
|
|
|
2 |
2. |
MUTE |
|
|
|
|
||
|
|
|
|
|
|
||
|
Mutes and restores your TV sound. |
|
|
|
|
|
|
3. |
0-9 Number Button |
3 |
|
|
|
|
|
|
Press to select a programme. (ATV / DTV |
|
|
|
|
|
|
|
mode) |
|
CH.LIST |
|
|
|
|
4. |
CH.LIST |
|
|
|
|
5 |
|
4 |
10+ |
|
|
|
|||
|
Display channel list. (ATV / DTV mode) |
6 |
P.MODE |
S.MODE |
TV.RD |
LANG |
9 |
|
10+ |
||||||
|
|
|
|||||
|
7 |
|
|
|
|
8 |
|
|
Press to select a programme, used when the |
|
|
|
|
|
|
|
programme number is 10 or greater than 10. |
10 |
|
|
|
|
11 |
5. |
|
|
|
|
|
||
|
12 |
|
|
|
|
13 |
|
|
Return to the previous viewing channel. (ATV |
|
|
|
|
||
|
14 |
|
|
|
|
|
|
|
/ DTV mode) |
|
|
|
|
|
|
|
|
|
|
|
|
|
|
6. |
P.MODE |
|
|
|
|
|
|
|
Select picture mode: Dynamic / Standard / |
|
|
|
|
|
|
|
Mild / Personal. |
|
|
|
|
|
|
7. |
S.MODE |
|
|
|
|
|
|
|
Select sound mode: Standard / Music / Movie |
|
|
|
|
|
|
|
/ Personal. |
|
|
|
|
|
|
8. |
TV.RD |
|
|
/FAV |
|
DVD.SETUP |
|
|
|
|
|
TIME SHIFT |
|
||
|
Select TV program or Radio program. (DTV |
|
|
|
|
|
|
|
|
/TTX |
/CANCEL TITLE/SIZE |
SUBTITLE |
|
||
|
mode). |
|
|
X |
|
|
|
9. |
LANG |
|
/HOLD |
/REVEAL MENU/SUBPAGE AUDIO/INDEX |
|
||
|
|
|
|
|
|
||
|
Select DTV audio language. (DTV mode) |
|
GOTO |
SLOW |
REPEAT |
A-B |
|
|
|
|
|
||||
10.SOURCE |
|
|
|
|
|
|
|
|
Select among the different input signal |
|
|
|
|
|
|
|
sources: DTV / ATV / AV / SCART / YPbPr |
|
|
|
|
|
|
|
/ DVD / HDMI / PC / USB. |
|
|
|
|
|
|
11.DISPLAY |
|
|
|
|
|
|
|
Display the present screen information such as the current channel and the input source.
12.CH+/-
Select a channel.
13.VOL+/-
Adjust the volume.
14.NICAM
Switch between different audio channels (only applicable when the TV programme has this feature).
For any help concerning set up and use of your TV please call the Customer Helpline: 0345 604 0105 |
7 |

Getting Started
Viewing remote control - TV
15. ASPECT
Select from the following mode settings: 16:9
/Zoom1 / Zoom2 / Auto / 4:3.
16.SLEEP
Set the TV sleep timer.
17.EPG
Display the EPG (Electronic Program Guide). (DTV mode)
18.


Allows you to navigate the OSD menus and adjust the system settings to your preference.
OK
Confirm the selection in the OSD menus.
Display a list of channels saved in the TV tuner memory.
19.MENU
Display the OSD (On Screen Display) menu.
20.EXIT
Exit the OSD (On Screen Display) menu.
21.
Press once to stop. (USB / DVD mode)
FAV
Display the Favourite Channel list. ( ATV / DTV mode)
22.
Record the current programme. (DTV mode)
Ejects a disc. (DVD mode)
23.

To start the timeshift playback. (DTV mode)
To start playback or pause. (USB / DVD mode)
24.TIMESHIFT
Start the time-shift function. (DTV mode)
DVD.SETUP
Displays the DVD OSD menu. (DVD mode)
25.  TTX
TTX
Turn on and off the Teletext function. (ATV / DTV mode)
To skip to the beginning of the previous chapter / track / photo. (USB / DVD mode)
CH.LIST

 10+
10+ 

P.MODE |
S.MODE |
TV.RD |
LANG |


 15 16
15 16 


 17
17
18
19 |
|
|
|
20 |
21 |
/FAV |
|
DVD.SETUP |
22 |
23 |
|
24 |
||
|
|
TIME SHIFT |
||
|
|
|
|
|
/TTX |
/CANCEL |
TITLE/SIZE |
SUBTITLE |
|
25 |
X |
|
|
|
/HOLD |
/REVEAL |
MENU/SUBPAGE AUDIO/INDEX |
|
|
GOTO |
SLOW |
REPEAT |
A-B |
|
8For any help concerning set up and use of your TV please call the Customer Helpline: 0345 604 0105
Getting Started
Viewing remote control - TV
26. SUBTITLE
Display the subtitle which is broadcast with the program. (DTV mode)
27. CANCEL
To exit the teletext mode. (ATV / DTV mode)
To reverse playback rapidly. (USB / DVD mode)
28. SIZE
SIZE
To enlarge the picture on the TV in teletext. (ATV / DTV mode)
TITLE
Display disc menu (if available). (DVD mode)
29. HOLD
HOLD
Freezes a multi-page passage on screen in teletext. (ATV / DTV mode)
To skip to the beginning of the next chapter / track / photo. (USB / DVD mode)
30. INDEX
INDEX
To select the page number of the index from teletext. (ATV / DTV mode)
AUDIO
Press repeatedly to switch amony audio option (if available). (DVD mode)
31.  REVEAL
Reveals hidden information such as the answer to a quiz in teletext. (ATV / DTV mode).
To advance playback rapidly. (USB / DVD mode)
32.  SUBPAGE
CH.LIST

 10+
10+ 

P.MODE |
S.MODE |
TV.RD |
LANG |
|
|
/FAV |
|
DVD.SETUP |
|
|
|
|
|
TIME SHIFT |
|
|
/TTX |
/CANCEL |
TITLE/SIZE |
SUBTITLE |
26 |
27 |
|
X |
|
|
|
/HOLD |
/REVEAL |
MENU/SUBPAGE AUDIO/INDEX |
28 |
||
29 |
|
|
|
|
30 |
31 |
GOTO |
SLOW |
REPEAT |
A-B |
32 |
33 |
|
|
|
|
|
Displays the subpage on the teletext screen. (ATV / DTV mode)
MENU
Return to the main menu of a loaded DVD (if available). (DVD Mode)
33. Coloured buttons
Accesses the TELETEXT items or channel edit when using Digital / Freeview TV Channels. (ATV / DTV mode)
GOTO (RED)
Skips to a specific location on a DVD / CD. (DVD mode)
SLOW (GREEN)
Plays video slow. (DVD mode)
REPEAT (YELLOW)
Selects between different repeat modes. (DVD mode)
A–B (BLUE)
Repeats a segment between A and B. (DVD mode)
For any help concerning set up and use of your TV please call the Customer Helpline: 0345 604 0105 |
9 |

Getting Started
TV - Control buttons (Bottom side)
1. 
Press to eject disc. (DVD mode)
2. 

Press to start playback or pause.(DVD mode)
3. VOLbutton
Decreases the volume.
4. VOL+button
Increases the volume.
5. CHbutton
Moves down a channel.
6.CH+button
Moves up a channel.
7.MENU button
Displays the OSD (on screen display) menu.
8. SOURCE button
Press to select among different input signal sources: DTV / ATV / AV / SCART / YPbPr / /DVD/HDMI/ PC / USB.Confirmed the selection on OSD menu.
9. ( ) button
Turns the TV on when in standby mode or turns the TV off into standby mode.
Aerial connection
Connect the “aerial” or “cable TV” plug to AERIAL INPUT (ANT.) socket located on the back of the TV.
Power connection
Please note: After unpacking, allow the TV to reach ambient room temperature before connecting the TV to the mains power socket.
Connect the power cord plug to the mains power socket.
1 |
2 |
3 |
4 |
5 |
6 |
7 |
8 |
9 |
|
|
|
|
|
|
|
|
|
|
|
|
|
|
|
|
|
|
10 |
For any help concerning set up and use of your TV please call the Customer Helpline: 0345 604 0105 |
Getting Started
Remote control - Inserting batteries
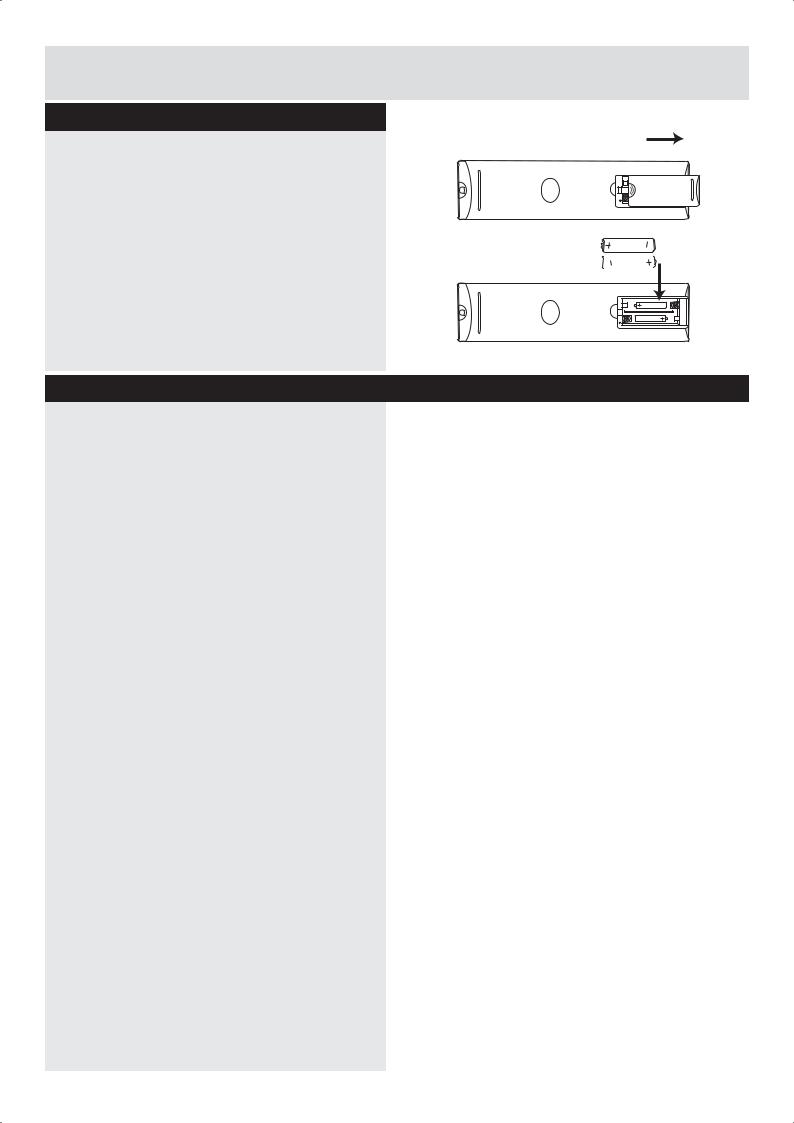
Remove the battery cover on the back of the remote control, gently push down and pull backwards at the same time as shown.
Insert two AAA/R3 or equivalent type batteries. Ensure the batteries are inserted the correct way and replace the battery cover.
Note: When the remote control is not going to be used for long periods of time, the batteries should be removed. Otherwise the remote control may be damaged, caused by battery leakage and corrosion.
Switching the TV On and Off
Switching the TV On
With power cord plug connected to the mains power socket and TV in ‘Standby’ mode.
To switch the TV on from standby mode, either:
a:The Remote control; Press the “  ” button.
b:The TV; Press the “  ” button at the rear left of the TV.
AAA/R3 X2
 Batteries
Switching the TV Off
Either press the “  ” button on the remote control or press the “
  ” button at the right of the TV, the TV will then switch to standby mode.
For any help concerning set up and use of your TV please call the Customer Helpline: 0345 604 0105 |
11 |
Getting Started
Operation using TV control buttons
The VOL+/VOL- buttons will function as volume up/down as default. Even if you set other functions for these buttons, the VOL+/VOL- buttons will return to volume control after a short while.
Volume Setting
Press VOL+/VOL- buttons to increase or decrease volume.
Programme Selection
Press CH+/CH- buttons to select the next or previous programme.
Operation using remote control
The remote control is designed to control all the functions of the model you selected.
Volume Setting
Press VOL+ button to increase the volume. Press VOL- button to decrease the volume. A volume level scale (slider) will be displayed on the screen.
Programme Selection (Previous or Next Programme)
Press CH- button to select the previous programme.
Press CH+ button to select the next programme.
Programme Selection (Direct Access)
Press number buttons on the remote control to select programmes between 0 and 9. The TV will switch to the selected programme.
CH.LIST |
|
|
|
10+ |
|
|
|
P.MODE |
S.MODE |
TV.RD |
LANG |
12 |
For any help concerning set up and use of your TV please call the Customer Helpline: 0345 604 0105 |
Getting Started
How to watch a DVD
1.Press the “  ” button on the TV or remote control.
2.Switch to DVD source using the “SOURCE” button on the remote control.
3.Insert a disc into the loader.
The content side of the disc MUST be facing you when looking at the TV screen.
Most discs will be automatically loaded and play will start automatically if the disc does not have any menus recorded on it.
If play does not start automatically, press the “ 
 ” button on the remote control, or the “
 ” button at the right of the TV.
A menu may appear on the TV screen after a few moments or the film may start immediately after the Film/TV Company introduction. This will depend on the disc content and may differ on each disc.
Steps 4 and 5 are only available when a menu is recorded on the disc.
4.Press the navigation buttons “  ”, “
”, “  ”, “
”, “  ” or “
  ” or the number button/s to select the required title.
5.Press the OK button. The selected item starts to play.
Notes on DVD playback
No sound will be heard during Rapid advance or Rapid reverse.
No sound will be heard during Slow motion play.
Reverse Slow motion play is not available.
In some cases, the subtitle language will not be changed immediately to the selected one.
When the preferred language will not select, even after pressing the button several times, it means the language is not available on the disc.
When the DVD player is restarted or the disc is changed, the subtitle selection is automatically changed back to the initial settings.
If a language is selected that is not supported by the disc, the subtitle language will automatically be set to the disc’s priority (default) language.
Usually a ‘circulation’ will happen while switching to another language, this means you can cancel the subtitle by pressing the same button a number of times until “Subtitle Off” appears on the screen.
When the power is turned on or the disc is removed, the language heard will be the one selected at the initial settings.
Some DVDs may not contain root and/or title menus.
Reverse stepping is not available.
For reference: If you attempt to enter a number greater than the total time of the current title, the time search box disappears and “Input Invalid  ” message appears on top-left corner of screen.
The slide show is disabled when the ZOOM mode is on.
For any help concerning set up and use of your TV please call the Customer Helpline: 0345 604 0105 |
13 |

Getting Started
DVD Controls
You can operate DVD, movie CD, music or picture CD’s content by using the correct buttons on your remote control. Below are main functions of commonly used remote control buttons.
Buttons on
DVD Playback Movie Playback Picture Playback Music Playback
Remote Control
 /FAV
/FAV
DVD.SETUP
 /TTX
/TTX
 /CANCEL
TITLE/SIZE
SUBTITLE

 /HOLD
/HOLD
 /REVEAL
MENU/SUBPAGE
AUDIO/INDEX
GOTO
SLOW
REPEAT
A-B
Play/Pause |
Play/Pause |
Play/Pause |
Play/Pause |
|
|
|
|
|
|
Stop |
Stop |
Return to the picture list |
Stop |
|
|
|
|
|
|
Open or close the dics |
Open or close the dics |
Open or close the dics |
Open or close the dics |
|
tray |
tray |
tray |
tray |
|
Displays the DVD OSD |
Displays the DVD OSD |
Displays the DVD OSD |
Displays the DVD OSD |
|
menu |
menu |
menu |
menu |
|
Skip backward |
Skip backward |
Skip backward |
Skip backward |
|
|
|
|
|
|
Rapid reverse |
Rapid reverse |
X |
Rapid reverse |
|
|
|
|
|
|
Display disc menu (if |
Display disc menu (if |
X |
X |
|
available) |
available) |
|||
|
|
|||
Subtitle on-off. Press |
Subtitle on-off. Press |
|
|
|
repeatedly to switch |
repeatedly to switch |
X |
X |
|
between subtitle option |
between subtitle option |
|
|
|
Skip forward |
Skip forward |
Skip forward |
Skip forward |
|
|
|
|
|
|
Rapid advance |
Rapid advance |
X |
Rapid advance |
|
|
|
|
|
|
Return to the main menu |
Return to the main menu |
Return to the main menu |
|
|
of a loaded DVD (if |
of a loaded DVD (if |
of a loaded DVD (if |
X |
|
available) |
available) |
available) |
|
|
Press repeatedly to |
Press repeatedly to |
|
Press repeatedly to |
|
switch amony audio |
switch amony audio |
X |
switch amony audio |
|
option (if available) |
option (if available) |
|
option (if available) |
|
or time on a loaded disc |
or time on a loaded disc |
X |
X |
|
|
|
|||
Slow down playback |
Slow down playback |
X |
X |
|
speed |
speed |
|||
|
|
|||
Displays repeat options |
Displays repeat options |
Displays repeat options |
Displays repeat options |
|
|
|
|
|
|
Reprat a selected section |
Reprat a selected section |
X |
Reprat a selected section |
14 |
For any help concerning set up and use of your TV please call the Customer Helpline: 0345 604 0105 |
Getting Started
Initial setup
1.Connect one end of the RF coaxial cable to the aerial socket on the wall and the other end of the cable to the RF socket at the right side of your TV.
2.Connect the mains cable to the mains socket after you have completed all the connections.
3.With power cord plug connected to the mains
power socket and TV in ‘Standby’ mode.At this stage, the TV switches to standby mode. The red LED indicator will illuminate on the front panel of the TV.
4.In standby mode, press the  button at the bottom of the TV or the
  button on the remote control to turn the TV on. The red LED indicator will turn blue.
5.The first time you turn the TV on, it will go straight into First Time Setup menu. Press
the 

 buttons to navigate the menu and change the settings.
First Time Setup
OSD Language |
English |
|
Mode Setting |
|
Home Mode |
Country |
|
UK |
Auto Scan |
|
DTV+ATV |
|
|
Start |
|
|
|
Move |
Adjust |
MENU: Return EXIT: Exit |
OSD Language
Selects your desired language to be displayed on the menu. The default on-screen menu language is set as English.
Mode Setting
Selects your desired mode setting.
Home Mode: Viewing at home.
Store Mode: For store demo, the brightness is higher than home mode.
Country
Selects the country where you will operate the TV. The default country is set as UK.
Auto Scan
Selects the auto scan type: DTV+ATV / DTV / ATV.
Start
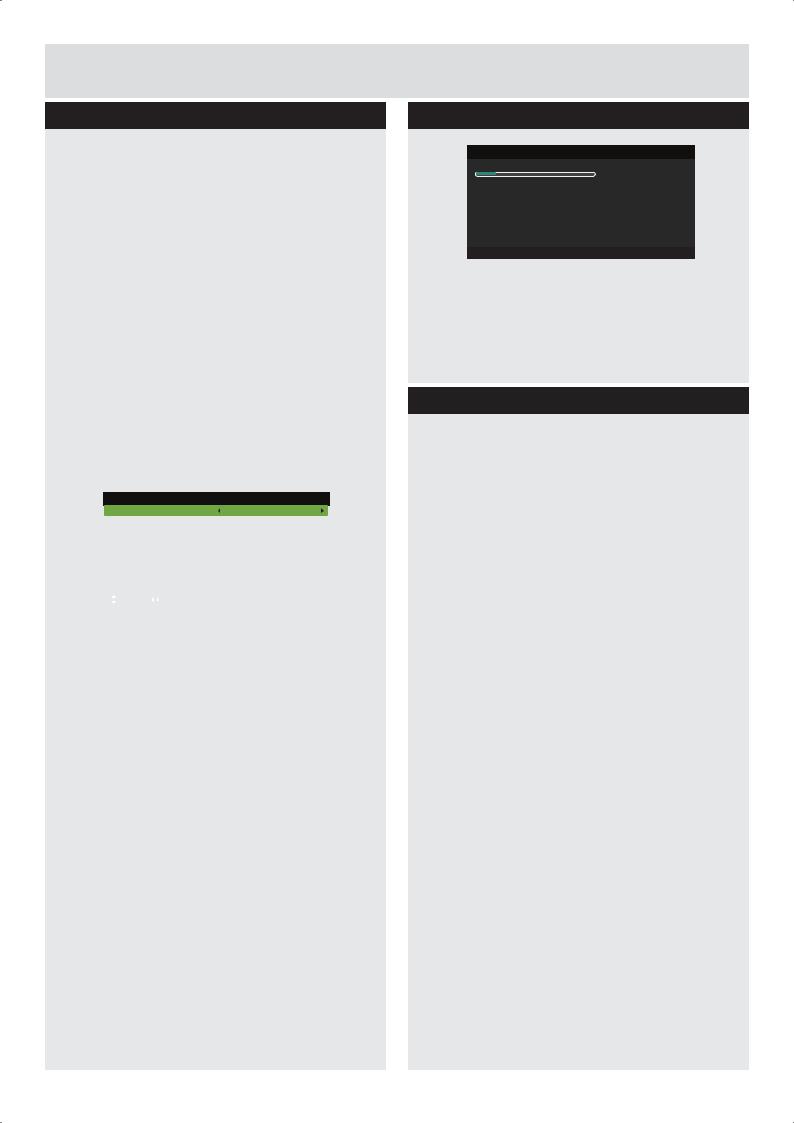
Press the OK button to start auto tuning. Auto Scan will commence. The display will show the progress of the tuning and the number of channels found.
Initial setup
Auto Scan
Scanning 158.25 MHz
Digital Channels Found:
DTV :0 Radio :0 Data:0
Analog Channels Found: 0
MENU: Skip EXIT: Exit
6.If you want to skip the DTV tuning, press the MENU button to interrupt the tuning half way. You will then go straight to ATV tuning. You may repeat the above step if you also want to skip the ATV tuning.
General operation
Press the SOURCE button on the remote control and select DTV to switch the TV to Digital Terrestrial Television Broadcasting.
Information Banner
Whenever you change channel using the CH+/ CH- buttons or the number buttons, the TV displays the broadcast picture along with an information banner on the top left of the screen (available only in DTV/ATV
The information banner can be displayed at any time while watching TV by pressing the DISPLAY button on the remote control.
For any help concerning set up and use of your TV please call the Customer Helpline: 0345 604 0105 |
15 |
 Loading...