


Instruction manual
CDVBT2 Set top box
You’ll soon be enjoying your new Set top box.
It all begins here, with your instructions. Don’t worry, there’s nothing too technical coming up. Just simple, step-by-step guidance to get you up and running quickly. Sound good? Then let’s get started.
Help and Guidance
We’re here to help you get the most from your Set top box. Should you require any guidance, a simple solution can often be found online at:
www.argos-support.co.uk
If you still require further assistance, call one of our experts on 0345 604 0105.
If you require any technical guidance or find that your product is not operating as intended, a simple solution can often be found in the Troubleshooting

Contents
1Safety information
|
Safety information |
6 |
2 |
Getting to know your Set top |
|
|
box |
|
|
Ready? Let’s begin |
8 |
|
Accessories |
8 |
|
Functions and features |
9 |
|
Preperations |
11 |
|
Connecting a HD TV |
11 |
|
Connecting a non-HD TV |
12 |
|
Fitting the remote batteries |
12 |
3 Using your Set top box |
|
|
|
First time installation |
15 |
|
Turning on the set top box |
15 |
|
Switching between TV and radio |
15 |
|
Changing channels |
15 |
|
Using the channel list |
16 |
|
Channel search |
16 |
|
Channel banner |
16 |
|
Adjusting the volume |
17 |
|
Mute |
17 |
|
Subtitles and audio descriptions |
17 |
|
Using the electronic program guide |
17 |
|
Favourites list |
18 |
|
Using the favourites list |
18 |
|
Channel organiser |
19 |
|
Teletext display |
19 |
|
Aspect ratio adjustment |
19 |
|
Audio adjustment |
19 |
3 Using your Set top box |
|
Changing resolution (HDMI only) |
19 |
Advanced menu options |
20 |
System settings |
20 |
language settings |
20 |
Video settings |
20 |
Audio settings |
20 |
Advanced settings |
21 |
Software upgrade |
21 |
System configuration |
21 |
Installation |
22 |
4 |
Other information |
|
|
Technical specification |
25 |
|
Care & maintenance |
25 |
5 |
Product support |
|
|
Troubleshooting |
28 |
|
Help and assistance |
30 |
|
Disposal |
31 |
|
Guarantee |
32 |
section of these instructions, or online at www.argos-support.co.uk If you still require further assistance, call one of our experts on 0345 604 0105.
3
This page is left intentionally blank

Safety information 1

Safety information
Important - Please read these instructions fully before installing or operating
Power source |
Heat build up |
•This symbol means that this unit is double insulated. An earth connection is not required.
•The appliance must be connected to a 100-240 volt 50/60Hz AC supply by means of a three pin socket.
•Unplug this apparatus during lightning storms or when unused for long periods of time - to prevent damage to this product.
•Opening or removing covers may expose you to dangerous voltages or other hazards.
•To prevent risk of fire or electric shock, avoid overloading wall outlets, extension cords, or integral convenience receptacles.
•Use suitable power sources - Plug the product into a suitable power source, as described in the operating instructions or as marked on the product.
•The supply voltage should be the same as that indicated in the technical specifications and the appliance rating plate.
•If the socket outlets in your home are not suitable for the mains adapter supplied with this unit check with a qualified electrician for replacement.
•In order to disconnect the apparatus from the mains completely, switch off the outlet and remove the mains plug completely.
•Do not bend, stretch or pull the supply cable in order to avoid electric shock.
•When installed, the power socket must be within easy reach.
•Do not install the unit in a confined space. Allow adequate ventilation to prevent heat build-up.
•For indoor use only.
•During use the unit will heat up, this is not a malfunction. If the unit is used continuously at high volume levels, the unit temperature will rise considerably. Do not touch the unit to avoid potential burns.
Moisture and water
•Do not use this apparatus near water or moisture.
•Do not use this product near a bathtub, washbowl, kitchen sink, and laundry tub, in a wet basement, near a swimming pool, or anywhere else that water or moisture is present.
Heat sources and flames
•Batteries shall not be exposed to excessive heat such as sun, fire or the like
•To prevent risk of fire or electric shock, avoid overloading wall outlets, extension cords, or integral convenience receptacles.
Servicing and repairs
•Refer all servicing to qualified service personnel
•Servicing is required when the apparatus has been damaged in any way: such as liquid has been spilled or objects have fallen into the apparatus; the apparatus has been exposed to rain or moisture, does not operate normally, or has been dropped.
If you require any technical guidance or find that your product is not operating as intended, a simple solution can often be found in the Troubleshooting
6 |
Safety information |

Getting to know your Set top box 2

Getting to know your Set top box
You’ll be up and running in no time
Ready? Let’s begin...
Please read these instructions carefully. They contain important information which will help you get the best from your Set top box and ensure safe and correct installation and operation.
If you require any further assistance, our technical experts are happy to help. For full details, refer to the product support section at the end of these instructions.
Accessories
1.CDVBT2 Set top box
2.Remote control
3.Mains power adapter
4.2 x AAA batteries
5.Instruction manual
6.Quick setup guide
STANDBY |
CDVBT2 set top box |
Remote control |
Mains adapter |
2 x AAA batteries |
If you require any technical guidance or find that your product is not operating as intended, a simple solution can often be found in the Troubleshooting
8 |
Getting to know your Set top box |
Getting to know your Set top box
You’ll be up and running in no time
23
1
STANDBY
|
|
6 |
7 |
8 |
9 |
4 |
|
|
|
Use on power supply listed |
|
|
|
|
|
inn the user instructions |
|
5 |
|
|
|
|
|
RF OUT |
RF IN |
ETHERNET |
|
SCART |
DC IN |
|
12V 1A |
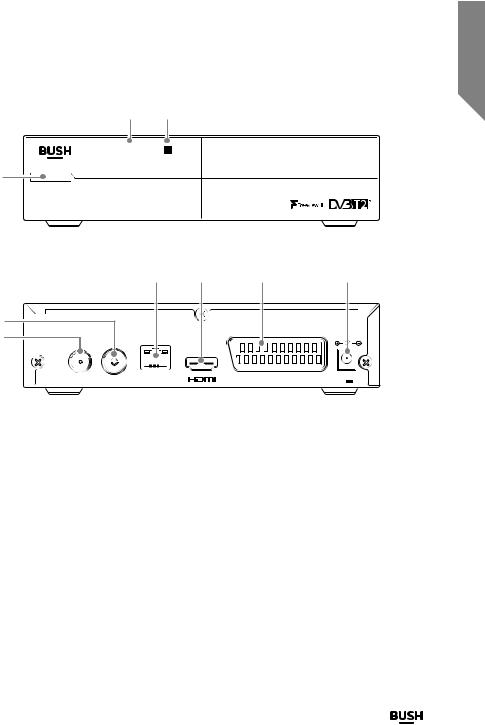
1.STANDBY button: Press to switch the Set top box ON or OFF.
2.LED POWER indicator: Red: OFF, Green: ON.
3.IR sensor: Remote control sensor.
4.RF IN: Coaxial cable from your aerial.
5.RF OUT: Coaxial cable to your TV RF input.
6.ETHERNET socket: For service use only.
7.HDMI: Output to a HD ready TV.
8.SCART: Connection to a non-HD ready TV.
9.DC input: Mains adapter input socket.
section of these instructions, or online at www.argos-support.co.uk If you still require further assistance, call one of our experts on 0345 604 0105.
Getting to know your Set top box |
9 |
Getting to know your Set top box
You’ll be up and running in no time
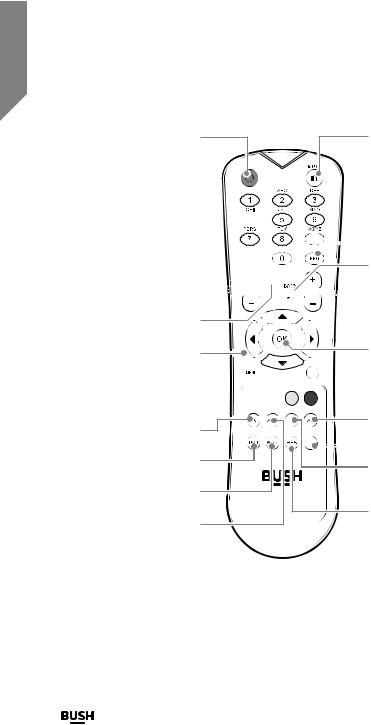
 Standby: Switches the set top box ON or OFF
Numeric buttons: Enables channels to be selected directly by
entering the channel number 
Info: Press to display the
information banner 
Volume +/-: Press to increase or 

 decrease the volume level

 TV/Radio: Press switch between TV and Radio modes

 : Navigation buttons to browse menus and channels
Menu : Press for settings menu 
Mute: Press to silence the audio output.
EPG: Displays the on-screen
 programme guide
Back: Exits a menu and returns to the main menu

 CH+/-: Switches to the previous or next channel. Skips to the next or previous page when viewing the EPG or channel list
OK: Selects an option in a menu

 Exit: Exits a menu and returns to normal Tv viewing
Red, Green, Yellow & Blue : Press 


for various options within menus
List : Press to display a channel list |
for quick selection |
Text : Displays teletext function |
(when available) |
Wide : Press to adjust display |
aspect ratio settings |
Aud : Press to adjust audio settings |
UB |
AD: Displays the audio description |
|
menu |
||
|
||
FAAV |
Fav: Displays the favourites menu |
|
|
||
|
Sub: Displays the subtitles menu |
|
|
Res: Displays TV resolution option |
|
|
menu for quick adjustments |
If you require any technical guidance or find that your product is not operating as intended, a simple solution can often be found in the Troubleshooting
10 |
Getting to know your Set top box |
Getting to know your Set top box
You’ll be up and running in no time
Preperations
To receive Freeview you must have an appropriate TV aerial installed.
If your current aerial is unable to provide an adequate signal, it may need to be realigned or replaced for a Freeview compatible aerial. Please consult a professional.
Connecting a HD TV
Follow the below connection guide to connect the Set top box to a TV with an HDMI input.
Use only power supply listed in the user instructions
RF OUT |
RF IN |
ETHERNET |
SCART |
DC IN |
12V 1A |
Ensure all devices are switched OFF before attempting any connections.
1.Connect the coaxial cable from your aerial to the RF IN socket on the rear of the set top box.
2.Connect an HDMI cable (not supplied) to the HDMI output on the rear of the set top box. Connect the other end to a HDMI input on the TV. Refer to the TV manual for details on selecting and viewing the HDMI input.
3.Plug the mains adapter into a wall outlet (DO NOT SWITCH ON YET) and insert the jack into the DC INPUT on the rear of the set top box.
4.When all the connections are made you can switch the power on for all devices.
section of these instructions, or online at www.argos-support.co.uk If you still require further assistance, call one of our experts on 0345 604 0105.
Getting to know your Set top box |
11 |
 Loading...