


FM Classic Radio with Bluetooth
Installation & Operating Instructions - Please keep for future reference
BT-201
Real Life Technology
Important - Please read these instructions fully before installing or operating
These instructions contain important information which will help you get the best from your speaker and ensure safe and correct installation and operation.

Contents and Features |
|
Page Contents |
|
Box contents and features ............................................................................................... |
2 |
Controls, displays and sockets........................................................................................ |
3 |
Power connection................................................................................................................ |
4 |
Clock and alarm setup and operation ......................................................................... |
4 |
Alarm duration and snooze ............................................................................................. |
5 |
Radio tuning and presets ................................................................................................. |
5 |
Bluetooth Pairing............................................................................................................. |
6-7 |
Line in (AUX IN) connections .......................................................................................... |
7 |
USB charging socket........................................................................................................... |
7 |
Specifications........................................................................................................................ |
7 |
Resetting................................................................................................................................. |
7 |
Warnings ................................................................................................................................ |
8 |
Guarantee............................................................................................................................. |
10 |
Box Contents |
|
1 x BT-201 FM Classic radio with Bluetooth
1 x 3 Pin mains to 5VDC plug-in power adaptor with micro USB connector 1 x User guide
Features
PLL Auto FM tuning and scan with up to 10 station presets available
Dual alarm, bleep or radio with snooze function
4W RMS built in speaker
10m wireless range.
Compatible with most makes and models of smartphone and tablet.
Mains or backup battery powered (batteries not included)
1A USB socket for charging smartphone or tablet
AUX IN socket for in line playback
2
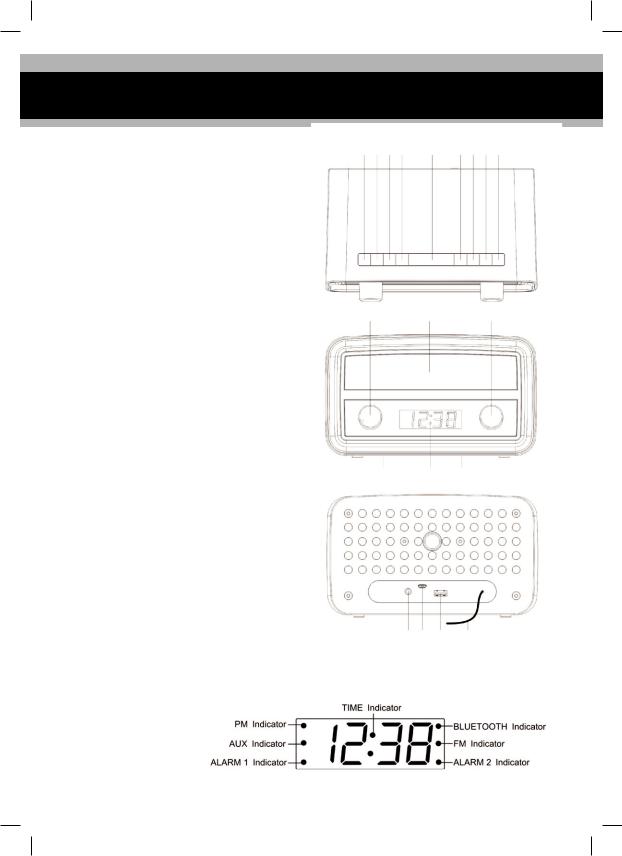
Controls and Indicators / LED Display
Controls and Indicators |
1 2 3 4 |
5 |
6 7 8 9 |
|
1.POWER ON-OFF/ALARM OFF BUTTON
2.SOURCE BUTTON
3.MEMORY/ SET CLOCK BUTTON
4.ALARM 1 ON-OFF SET BUTTON
5.SNOOZE / SLEEP / DIMMER BUTTON
6.ALARM 2 ON-OFF SET BUTTON
7.SKIP BACK BUTTON
8.MEMORY UP/PLAY/PAUSE BUTTON/ PAIR BUTTON
9.SKIP FORWARD BUTTON
10 11 12
10.VOLUME KNOB
11.SPEAKER
12.SET KNOB
13.BATTERY COMPARTMENT (BOTTOM OF UNIT)
14.DISPLAY
15.RATING LABEL (BOTTOM OF UNIT)
13 14 15
16.LINE IN JACK
17.DC POWER INPUT
18.USB CHARGING SOCKET
19.FM ANTENNA
16 17 18 |
19 |
LED Display
3

Power Connection / Setting Clock and Alarm
Power connection
The FM Classic Radio is powered by the external DC 5V 1.5A output AC-DC adaptor supplied. Plug the adaptor in to a mains socket, connect the adaptor’s micro USB plug into the socket on the back of the radio marked DC 5V. This unit is also equipped with a battery back up system requiring 2 x “AAA” batteries (not included). Insert the batteries into the battery compartment, making certain that the positive and negative (+ and -) battery terminals are aligned with the corresponding terminals in the battery compartment.
If an AC power failure/disconnection occurs, the clock automatically switches to the battery power supply, the clock and timer memory continue running. When the AC power resumes, the clock switches back to AC again.
Setting the clock
Make sure the radio is in Standby mode.
1)Press and hold down the SET CLOCK button (3) until the display flashes “24 Hr”.
2)Turn the SET KNOB (12) to change the “24 Hr” mode to “12 Hr” mode.
3)Press the SET CLOCK button (3) to set mode. The time display will flash.
4)Turn the SET KNOB (12) to fine adjust the clock time and the Backwards and Forwards buttons (as described below) for faster time setting. When the correct time is displayed press the SET CLOCK button (3) to set.
Note:
-Press the REWIND button (7) to turn clock backward.
-Press FORWARD button (9) to turn clock forward.
-Hold the buttons down to FAST REWIND (7) or FAST FORWARD (9) .
Setting the alarms
Make sure the radio is in Standby mode.
1)Press and hold down the Alarm 1 button (4) or the Alarm 2 button (6) until the time flashes.
2)Turn the SET KNOB (12) to fine adjust the clock time and the Backwards/Forwards buttons (see note below) for faster time setting. When the correct alarm time is displayed press the appropriate alarm button a radio preset frequency will flash use the Set Knob to select the preferred preset frequency or Beep alarm then press the alarm button again .
Note:
-Press the REWIND button (7) to turn clock backward.
-Press FORWARD button (9) to turn clock forward.
-Hold the buttons down to FAST REWIND (7) or FAST FORWARD (9) .
Enable / disable the Alarm
Press and hold the “ALARM 1” (4) / “ALARM 2” (6) button to enable or disable the alarm. Once the alarm is activated, the bell symbol will be lit on the display.
When the alarm has been activated it will continue for 30 minutes unless the ON/OFF button (1) or the Source button (2) ) is pressed.
4
 Loading...