


Instruction Manual
CMP41DS
CMP41DP

Table of contents
|
|
|
|
|
|
|
|
|
|
|
|
Product Code |
|
|
|
|
|
|
CMP41D |
|
|
|
|
|
|
|
|
|
|
|
|
|
|
|
Care & maintenance ............................ |
2 |
Slide show ........................................ |
8 |
|||
Disposal information ........................... |
2 |
FM radio........................................ |
9 |
|||
Rechargeable battery disposal.................. |
2 |
Auto scan ......................................... |
9 |
|||
Accessories included.............................. |
3 |
Storing/ removing preset stations................. |
9 |
|||
Overview of controls............................... |
3 |
Recalling preset stations.......................... |
9 |
|||
Getting started ................................. |
3 |
Delete a preset station ............................ |
9 |
|||
Button functions ............................... |
4 |
FM record function................................ |
9 |
|||
Connecting to a PC.............................. |
4 |
Record quality..................................... |
9 |
|||
Connecting to a PC (cont) ....................... |
5 |
Record gain ....................................... |
9 |
|||
Earphone connection........................... |
5 |
FM Sensitivity..................................... |
9 |
|||
Music playback................................. |
5 |
Tuner region...................................... |
10 |
|||
Audio function menu ........................... |
5 |
Mute ............................................. |
10 |
|||
EQ modes ......................................... |
5 |
Camera........................................ |
10 |
|||
Play mode......................................... |
6 |
Basic camera controls ........................... |
10 |
|||
Add to my playlist ................................. |
6 |
Camera function menu........................... |
10 |
|||
Set rating ......................................... |
6 |
Video camera.................................. |
10 |
|||
Add a tag.......................................... |
6 |
Basic video camera controls ..................... |
10 |
|||
A-B repeat ........................................ |
6 |
Video camera function menu..................... |
11 |
|||
Delete a track ..................................... |
6 |
EBook......................................... |
11 |
|||
Advanced audio menu ............................ |
6 |
Ebook function menu ............................ |
11 |
|||
User EQ ........................................... |
6 |
Audio recorder................................. |
12 |
|||
Information ....................................... |
7 |
Audio recorder function menu.................... |
12 |
|||
Video playback ................................. |
7 |
Stopwatch .................................... |
12 |
|||
Video function menu............................ |
7 |
Calculator ..................................... |
12 |
|||
Playback mode.................................... |
7 |
Calendar ...................................... |
13 |
|||
Scan speed ....................................... |
7 |
Settings ....................................... |
13 |
|||
Add a tag.......................................... |
7 |
Display........................................... |
13 |
|||
Screen size........................................ |
7 |
Power saving..................................... |
13 |
|||
Video resume ..................................... |
7 |
Date & time ...................................... |
13 |
|||
Delete a video ..................................... |
7 |
Language ........................................ |
13 |
|||
Information ....................................... |
7 |
Advanced ........................................ |
13 |
|||
Photo browser.................................. |
8 |
Technical specifications ....................... |
14 |
|||
Photo function menu.............................. |
8 |
Troubleshooting ............................... |
14 |
|||
Thumbnail/ List view .............................. |
8 |
|
|
|
||
|
|
|
|
|
|
|
Page 1
Safety information
Important – Please read these instructions fully before using
CAUTION: TO REDUCETHE RISK OFELECTRIC SHOCK,DO NOTREMOVE ANYCOVER.NO USER-SERVICEABLE PARTS INSIDE,REFER ANYSERVICINGTO QUALIFIED SERVICE PERSONNEL.
•Please read this owner’s guide
•Please take the time to follow the instructions in this owner’s guide carefully.It will help you set up and operate your system properly and enjoy all of its advanced features.
•Please save this owner’s guide for future reference.
•The product label is located on the back of the product.
•Heed all warnings - on the product and in the owner’s guide.
•Do not use this apparatus near water or moisture.
•Do not use this product near a bathtub,washbowl, kitchen sink,and laundry tub,in a wet basement, near a swimming pool,or anywhere else that water or moisture is present.
•Only use attachments/accessories specified by the manufacturer.
•Unplug this apparatus during lightning storms or when unused for long periods of time - to prevent damage to this product.
•Refer all servicing to qualified service personnel
•Servicing is required when the apparatus has been damaged in any way:such as liquid has been spilled or objects have fallen into the apparatus;the
apparatus has been exposed to rain or moisture,does not operate normally,or has been dropped -
•Do not attempt to service this product yourself.
•Opening or removing covers may expose you to dangerous voltages or other hazards.
•To prevent risk of fire or electric shock,avoid overloading wall outlets,extension cords,or integral convenience receptacles.
•Use suitable power sources - Plug the product into a suitable power source,as described in the operating instructions or as marked on the product.
Before making any electrical connections,ensure the following:
•Do not bend,stretch or pull the supply cable in order to avoid electric shock.
•The supply voltage should be the same as that indicated in the technical specifications and the appliance rating plate.
This product complies with European low voltage (2006/95/EC) and electromagnetic compatibility (2004/108/EC) directives.
Care & maintenance
Care and cleaning
•Allcareandcleaningoperationsshouldbecarriedout withtheunitunpluggedfromthemainspower.
•Occasionallywipethecabinetwithalintfreeduster. Nevercleantheunitwithliquidsorsolvents.
Disposal information
WEEE marking“Information for the consumer”
Disposal of your old product Your product is designed and manufactured with high quality materials and components,which can be
recycled and reused.When this crossed out wheeled bin symbol is attached to a product it means the product is covered by the European Directive 2002/96/EC.Please make yourself aware of the local collection system for electrical and electronic products.Please act according to your local rules and do not dispose of your old products with your normal household waste.The correct disposal of your old product will help prevent potential negative consequences for the environment and human health.
Rechargeable battery disposal
Your product contains a built-in rechargeable battery covered by the European Directive 2006/66/EC.To safeguard the functionality and safety of your product, always take your product to an official collection point or service centre where a professional can remove the battery.
Please inform yourself about the local rules on separate collection of batteries because the correct disposal will help prevent negative consequences for the environmental and human health.Please do not dispose of your batteries with your normal household waste.Always bring your product to a professional to remove the battery.
This product complies with Electromagnetic compatibility (2004/108/EC) directives.
Page 2
Functions & controls
Please familiarize yourself with the parts and accessories listed below
Accessories included
• 1 x CMP41D |
• 1 x Instruction manual |
• 1 x USB charging cable • 1 x earphones |
|
||||||||
|
|
|
|
|
|
|
|
|
|
|
|
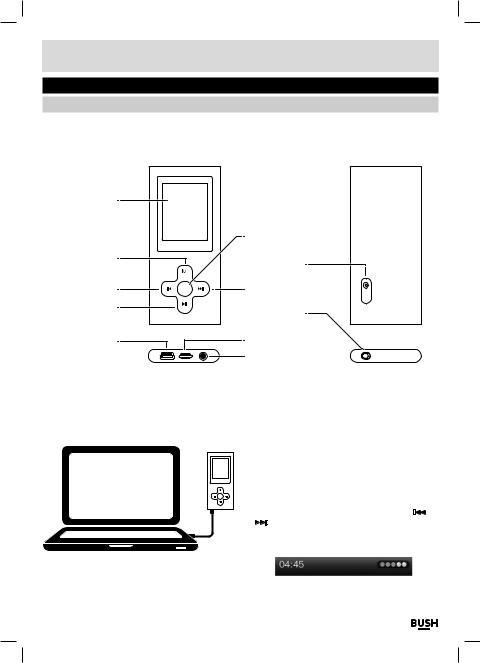
Overview of controls |
|
|
|
|
|
|
|
|
|
|
|
LCD display |
|
|
|
|
|
|
|
|
|
|
|
|
|
|
|
|
|
|
|
|
|
|
|
|
|
|
|
|
Select button |
|
|
|
|||
M button |
|
|
|
|
Camera lens |
|
|
|
|
|
|
|
|
|
|
|
|
|
|
||||
Previous button |
|
|
|
|
Next button |
|
|
|
|||
Play/Pause |
|
|
|
|
ON/OFF switch |
|
|
|
|
|
|
button |
|
|
|
|
|
|
|
||||
|
|
|
|
|
|
|
|
|
|
|
|
USB port |
|
|
|
|
Lanyard loop |
|
|||||
|
|
|
|
|
Earphone jack |
|
|||||
|
|
|
|
|
|
|
|
|
|
|
|
Getting started |
|
|
|
|
|
|
|
|
|
|
|
Before use your player will require charging fully. |
1: Set the ON/ Off switch to the ‘ON’ position. |
|
|||||||||
Follow the below instructions to charge. |
2: Using the usb charging cable connect the mini usb |
||||||||||
|
|
|
|
|
plug into the usb charge socket on the bottom of the |
||||||
|
|
|
|
|
unit.Connect the other end of the cable to a laptop/ |
||||||
|
|
|
|
|
pc usb input & power on the pc/laptop. |
|
|||||
|
|
|
|
|
3: Once connected the player will power up and present |
||||||
|
|
|
|
|
you with three options:- Power & Data (Charge |
|
|||||
|
|
|
|
|
the device & connect to a pc/ laptop) ,Charge |
|
|||||
|
|
|
|
|
(Charge only) & Charge & Play (Use the device while |
||||||
|
|
|
|
|
charging).Select the ‘Charge’ option using the |
|
|
|
/ |
||
|
|
|
|
|
|
||||||
|
|
|
|
|
|
buttons and select by pressing the ‘M’ button. |
|
||||
|
|
|
|
|
|
|
|||||
|
|
|
|
|
|
|
|||||
|
|
|
|
|
4: During charging you will see the charge animation in |
||||||
|
|
|
|
|
the top right corner of the display. |
|
|||||
When the charge is at maximum the dots no longer animate.
Page 3
User instructions
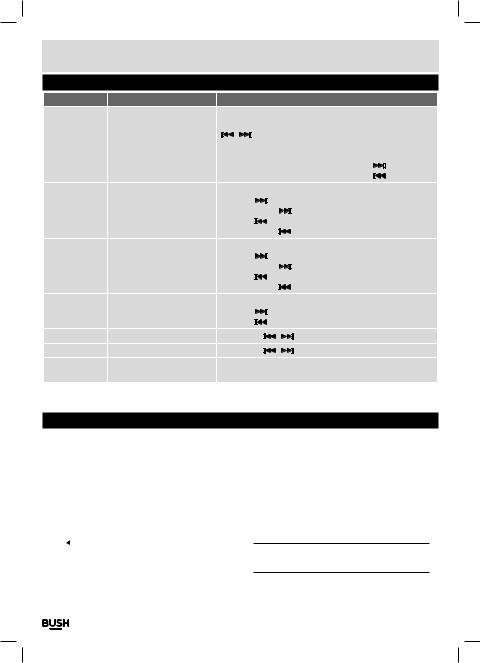
Button functions
|
To |
Press |
|
|
|
|
|
|
|
|
|
|
|
|
|
|
|
|
|
General |
Power On/ Off |
Switch the On/ Off switch |
|
|
|||||||||||||||
|
Turn On/ Off |
Hold the Play/Pause button for 3 second |
|
|
|||||||||||||||
|
Scroll through lists |
|
/ |
|
buttons |
|
|
|
|
|
|||||||||
|
|
|
|
|
|
|
|
||||||||||||
|
Select option |
Select button |
|
|
|
|
|
|
|
|
|
|
|||||||
|
Return to previous menu |
M button |
|
|
|
|
|
|
|
|
|
|
|||||||
|
Volume up |
During playback press Select then press the |
|
button |
|||||||||||||||
|
|
||||||||||||||||||
|
|
||||||||||||||||||
Music |
Volume down |
During playback press Select then press the |
|
|
|
button |
|||||||||||||
|
|
||||||||||||||||||
|
|
||||||||||||||||||
Play/ Pause tracks |
Press the Play / Pause button |
|
|
||||||||||||||||
|
Skip to the next track |
Press the |
|
button |
|
|
|
|
|
||||||||||
|
|
|
|
|
|
|
|||||||||||||
|
|
|
|
|
|
|
|||||||||||||
|
Fast forward |
Press & hold the |
|
|
button |
|
|
||||||||||||
|
|
|
|
||||||||||||||||
|
|
|
|
||||||||||||||||
|
Skip back to previous track |
Press the |
|
|
|
|
button |
|
|
|
|
|
|||||||
|
|
|
|
|
|
|
|||||||||||||
|
|
|
|
|
|
|
|||||||||||||
Movie |
Fast rewind |
Press & hold the |
|
|
button |
|
|
||||||||||||
|
|
|
|||||||||||||||||
|
|
|
|||||||||||||||||
Play/ Pause a movie |
Press the Play / Pause button |
|
|
||||||||||||||||
|
Skip to next movie |
Press the |
|
button |
|
|
|
|
|
||||||||||
|
|
|
|
|
|
|
|||||||||||||
|
|
|
|
|
|
|
|||||||||||||
|
Fast forward |
Press & hold the |
|
|
button |
|
|
||||||||||||
|
|
|
|
||||||||||||||||
|
|
|
|
||||||||||||||||
|
Skip back to previous movie |
Press the |
|
|
|
|
button |
|
|
|
|
|
|||||||
|
|
|
|
|
|
|
|||||||||||||
|
|
|
|
|
|
|
|||||||||||||
Images |
Fast rewind |
Press & hold the |
|
|
button |
|
|
||||||||||||
|
|
|
|||||||||||||||||
|
|
|
|||||||||||||||||
Select image |
Select button |
|
|
|
|
|
|
|
|
|
|
||||||||
|
Skip to next image |
Press the |
|
button |
|
|
|
|
|
||||||||||
|
|
|
|
|
|
|
|||||||||||||
|
|
|
|
|
|
|
|||||||||||||
FM Radio |
Skip to previous image |
Press the |
|
|
|
|
button |
|
|
|
|
|
|||||||
|
|
|
|
|
|
||||||||||||||
|
|
|
|
|
|
||||||||||||||
Skip 0.05MHz |
Press either |
|
|
/ |
|
|
button |
|
|
||||||||||
|
|
|
|
|
|
||||||||||||||
Camera |
Zoom |
Press either |
|
|
/ |
|
|
button to increase/ decrease zoom |
|||||||||||
|
|
|
|
||||||||||||||||
|
|
|
|
||||||||||||||||
Video Camera |
Record/ Pause |
Select button |
|
|
|
|
|
|
|
|
|
|
|||||||
|
Save recording |
Press the‘M’button |
|
|
|
|
|
||||||||||||
Connecting to a PC
Once the unit is charged or during charging you can copy files to the player.
1:Follow steps 1-2 of ‘Getting started’ to connect the player to a pc/ laptop.
2:Once connected the player will power up and present you with three options:- Power & Data (Charge
the device & connect to a pc/ laptop) ,Charge (Charge only) & Charge & Play (Use the device while charging).Select the ‘Power & Data’ option using the 
 /
/

 buttons and select by pressing the ‘M’ button.
3:When the unit is connected a hardware driver is automatically installed and the device is then
available in the list of devices (Named CMP41_8G). On some operating systems an auto play window will appear.Choose to take no action and click OK to close the window.
4:Double click ‘My Computer’ Or ‘Computer’ on some operating systems.Look for ‘Removable disks
or storage’ option and locate the device named ‘CMP41_8G’ and double click.
NOTE:Do not disconnect the USB cable at any time when copying data to or from the device.
Page 4
 Loading...