


Innov-is XV8500D
Operation Manual
Embroidery and Sewing Machine
Product Code: 882-W20/W22
Be sure to read this document before using the machine.
We recommend that you keep this document nearby for future reference.


INTRODUCTION
1
Thank you for purchasing this embroidery and sewing machine. Before using this machine, carefully read
the “IMPORTANT SAFETY INSTRUCTIONS”, and then study this manual for the correct operation of the
various functions.
In addition, after you have finished reading this manual, store it where it can quickly be accessed for
future reference.
Please read these safety instructions before attempting to use the machine.
DANGER - To reduce the risk of electric shock
1Always unplug the machine from the electrical outlet immediately after using, when cleaning, when making any
user servicing adjustments mentioned in this manual, or if you are leaving the machine unattended.
WARNING - To reduce the risk of burns, fire, electric shock, or injury to
persons.
2Always unplug the machine from the electrical outlet when removing covers, or when making any adjustments
mentioned in the instruction manual.
• To unplug the machine, switch the machine to the symbol “O” position to turn it off, then grasp the plug and pull
it out of the electrical outlet. Do not pull on the cord.
• Plug the machine directly into the electrical outlet. Do not use an extension cord.
• Always unplug your machine if the power is cut.
3Electrical Hazards:
• This machine should be connected to an AC power source within the range indicated on the rating label. Do not
connect it to a DC power source or inverter. If you are not sure what kind of power source you have, contact a
qualified electrician.
• This machine is approved for use in the country of purchase only.
4Never operate this machine if it has a damaged cord or plug, if it is not working properly, if it has been dropped
or damaged, or water is spilled on the unit. Return the machine to the nearest authorized Brother dealer for
examination, repair, electrical or mechanical adjustment.
• While the machine is stored or in use if you notice anything unusual, such as an odor, heat, discoloration or
deformation, stop using the machine immediately and unplug the power cord.
• When transporting the sewing machine, be sure to carry it by its handle. Lifting the sewing machine by any other
part may damage the machine or result in the machine falling, which could cause injuries.
• When lifting the sewing machine, be careful not to make any sudden or careless movements, otherwise you may
injure your back or knees.
INTRODUCTION
IMPORTANT SAFETY INSTRUCTIONS

IMPORTANT SAFETY INSTRUCTIONS
2
5Always keep your work area clear:
• Never operate the machine with any air openings blocked. Keep ventilation openings of the sewing machine and
foot control free from the build up of lint, dust, and loose cloth.
• Do not store objects on the foot controller.
• Do not use extension cords. Plug the machine directly into the electrical outlet.
• Never drop or insert any object into any opening.
• Do not operate where aerosol (spray) products are being used or where oxygen is being administered.
• Do not use the machine near a heat source, such as a stove or iron; otherwise, the machine, power cord or
garment being sewn may ignite, resulting in fire or an electric shock.
• Do not place this sewing machine on an unstable surface, such as an unsteady or slanted table, otherwise the
sewing machine may fall, resulting in injuries.
6Special care is required when sewing:
• Always pay close attention to the needle. Do not use bent or damaged needles.
• Keep fingers away from all moving parts. Special care is required around the machine needle.
• Switch the sewing machine to the symbol “O” position to turn it off when making any adjustments in the needle
area.
• Do not use a damaged or incorrect needle plate, as it could cause the needle to break.
• Do not push or pull the fabric when sewing, and follow careful instruction when free motion stitching so that
you do not deflect the needle and cause it to break.
7This machine is not a toy:
• Your close attention is necessary when the machine is used by or near children.
• The plastic bag that this sewing machine was supplied in should be kept out of the reach of children or disposed
of. Never allow children to play with the bag due to the danger of suffocation.
• Do not use outdoors.
8For a longer service life:
• When storing this machine, avoid direct sunlight and high humidity locations. Do not use or store the machine
near a space heater, iron, halogen lamp, or other hot objects.
• Use only neutral soaps or detergents to clean the case. Benzene, thinner, and scouring powders can damage the
case and machine, and should never be used.
• Always consult the operation manual when replacing or installing any assemblies, the presser feet, needle, or
other parts to assure correct installation.
9For repair or adjustment:
• If the light unit is damaged, it must be replaced by an authorized Brother dealer.
• In the event a malfunction occurs or adjustment is required, first follow the troubleshooting table in the back of
the operation manual to inspect and adjust the machine yourself. If the problem persists, please consult your
local authorized Brother dealer.

IMPORTANT SAFETY INSTRUCTIONS
3
Use this machine only for its intended use as described in the manual.
Use accessories recommended by the manufacturer as contained in this manual.
Use only the interface cable (USB cable) included with this machine.
Use only the mouse designed specifically for this machine.
Use only the sensor pen included with this machine.
The contents of this manual and specifications of this product are subject to change without notice.
For additional product information and updates, visit our website at www.brother.com
SAVE THESE INSTRUCTIONS
This machine is intended for household use.
FOR USERS IN COUNTRIES EXCEPT EUROPEAN COUNTRIES
This appliance is not intended for use by persons (including children) with reduced
physical, sensory or mental capabilities, or lack of experience and knowledge,
unless they have been given supervision or instruction concerning use of the
appliance by a person responsible for their safety. Children should be supervised
to ensure that they do not play with the appliance.
FOR USERS IN EUROPEAN COUNTRIES
This appliance can be used by children aged from 8 years and above and persons
with reduced physical, sensory or mental capabilities or lack of experience and
knowledge if they have been given supervision or instruction concerning use of the
appliance in a safe way and understand the hazards involved. Children shall not
play with the appliance. Cleaning and user maintenance shall not be made by
children without supervision.
FOR USERS IN THE UK, EIRE, MALTA
AND CYPRUS ONLY
IMPORTANT
• In the event of replacing the plug fuse, use a fuse approved by ASTA to BS 1362, i.e. carrying the mark,
rating as marked on plug.
• Always replace the fuse cover. Never use plugs with the fuse cover omitted.
• If the available electrical outlet is not suitable for the plug supplied with this equipment, you should contact your
authorized Brother dealer to obtain the correct lead.

IMPORTANT SAFETY INSTRUCTIONS
4
Trademarks
IMPORTANT:
READ BEFORE DOWNLOADING, COPYING, INSTALLING OR USING.
By downloading, copying, installing or using the software you agree to this license. If you do not agree
to this license, do not download, install, copy or use the software.
Intel License Agreement For Open Source Computer Vision Library
Copyright © 2000, Intel Corporation, all rights reserved. Third party copyrights are property of their respective owners.
Redistribution and use in source and binary forms, with or without modification, are permitted provided that the
following conditions are met:
• Redistribution’s of source code must retain the above copyright notice, this list of conditions and the following
disclaimer.
• Redistribution’s in binary form must reproduce the above copyright notice, this list of conditions and the
following disclaimer in the documentation and/or other materials provided with the distribution.
• The name of Intel Corporation may not be used to endorse or promote products derived from this software
without specific prior written permission.
This software is provided by the copyright holders and contributors “as is” and any express or implied warranties,
including, but not limited to, the implied warranties of merchantability and fitness for a particular purpose are
disclaimed. In no event shall Intel or contributors be liable for any direct, indirect, incidental, special, exemplary,
or consequential damages (including, but not limited to, procurement of substitute goods or services; loss of use,
data, or profits; or business interruption) however caused and on any theory of liability, whether in contract, strict
liability, or tort (including negligence or otherwise) arising in any way out of the use of this software, even if
advised of the possibility of such damage.
All information provided related to future Intel products and plans is preliminary and subject to change at any time, without notice.
Secure Digital (SD) Card is a registered trademark or a trademark of SD-3C, LLC.
CompactFlash is a registered trademark or a trademark of Sandisk Corporation.
Memory Stick is a registered trademark or a trademark of Sony Corporation.
SmartMedia is a registered trademark or a trademark of Toshiba Corporation.
MultiMediaCard (MMC) is a registered trademark or a trademark of Infineon Technologies AG.
xD-Picture Card is a registered trademark or a trademark of Fuji Photo Film Co. Ltd.
IBM is a registered trademark or a trademark of International Business Machines Corporation.
Microsoft, Windows and Windows Vista are registered trademarks or trademarks of Microsoft Corporation.
“Adobe” and “Adobe Reader” are either registered trademarks or trademarks of Adobe Systems Incorporated in the
United States and/or other countries.
This software is based in part on the work of the Independent JPEG Group.
Each company whose software title is mentioned in this manual has a Software License Agreement specific to its proprietary programs.
All other brands and product names mentioned in this manual are registered trademarks of their respective companies. However, the
explanations for markings such as ® and ™ are not clearly described within the text.

IMPORTANT SAFETY INSTRUCTIONS
5
Federal Communications Commission (FCC)
Declaration of Conformity (For U.S.A. Only)
This device complies with Part 15 of the FCC Rules. Operation is subject to the following two conditions: (1) this
device may not cause harmful interference, and (2) this device must accept any interference received, including
interference that may cause undesired operation.
This equipment has been tested and found to comply with the limits for a Class B digital device, pursuant to Part 15
of the FCC Rules. These limits are designed to provide reasonable protection against harmful interference in a
residential installation. This equipment generates, uses, and can radiate radio frequency energy and, if not installed
and used in accordance with the instructions, may cause harmful interference to radio communications. However,
there is no guarantee that interference will not occur in a particular installation. If this equipment does cause
harmful interference to radio or television reception, which can be determined by turning the equipment off and on,
the user is encouraged to try to correct the interference by one or more of the following measures:
• Reorient or relocate the receiving antenna.
• Increase the separation between the equipment and receiver.
• Connect the equipment into an outlet on a circuit different from that to which the receiver is connected.
• Consult the authorized Brother dealer or an experienced radio/TV technician for help.
• The included interface cable should be used in order to ensure compliance with the limits for a Class B digital
device.
• Changes or modifications not expressly approved by Brother Industries, Ltd. could void the user’s authority to
operate the equipment.
Responsible Party: Brother International Corporation
200 Crossing Boulevard
P.O. Box 6911
Bridgewater, NJ 08807-0911 USA
TEL : (908) 704-1700
declares that the product
Product Name:
Model Number:
Brother Sewing Machine
XV8500D
IMPORTANT SAFETY INSTRUCTIONS
6
Laser Notices (For U.S.A. only)
Laser Safety
This sewing machine is certified as a Class 1 laser product under the U.S. Department of Health and Human Services (DHHS)
Radiation Performance Standard according to the Radiation Control for Health and Safety Act of 1968. This means that the
sewing machine does not produce hazardous laser radiation.
IEC 60825-1 Specification
This sewing machine is a Class 1 laser product as defined in IEC 60825-1:2007 specifications.
The laser beam emitted by the laser unit installed in this machine is restricted to an output at a safe level. However, the machine
contains 6-milliwat, 630-640nanometer wavelength, 6-12 degree at parallel divergence angle, 24-34 degree at perpendicular
divergence angle, InGaAlP laser diodes. Therefore, eye damage may result from disassembling or altering this machine.
Safety precautions have been designed to prevent any possible laser beam exposure to the operator.
FDA Regulations
U.S. Food and Drug Administration (FDA) has implemented regulations for laser products manufactured on and after August 2,
1976. Compliance is mandatory for products marketed in the United States. The label shown on the back of the sewing machine
indicates compliance with the FDA regulations and must be attached to laser products marketed in the United States.
Brother Industries, Ltd.
15-1, Naeshiro-cho, Mizuho-ku, Nagoya 467-8561, JAPAN
This product complies with FDA performance standards for laser
products except for deviations pursuant to Laser Notice No. 50,
dated June 24, 2007.
CAUTION
• Use of controls, adjustments or the performance of procedures other than those specified in this manual
may result in hazardous radiation exposure.

IMPORTANT SAFETY INSTRUCTIONS
7
Laser Notices (For countries except U.S.A.)
IEC 60825-1 Specification
This sewing machine is a Class 1 laser product as defined in IEC 60825-1:2007 specifications.
The laser beam emitted by the laser unit installed in this machine is restricted to an output at a safe level. However, the machine
contains 6-milliwat, 630-640nanometer wavelength, 6-12 degree at parallel divergence angle, 24-34 degree at perpendicular
divergence angle, InGaAlP laser diodes. Therefore, eye damage may result from disassembling or altering this machine.
Safety precautions have been designed to prevent any possible laser beam exposure to the operator.
CAUTION
• This sewing machine has a Class 3B Laser Diode in the Laser Unit. The Laser Unit should not be opened
under any circumstances.
• Use of controls, adjustments or the performance of procedures other than those specified in this manual
may result in hazardous radiation exposure.
8
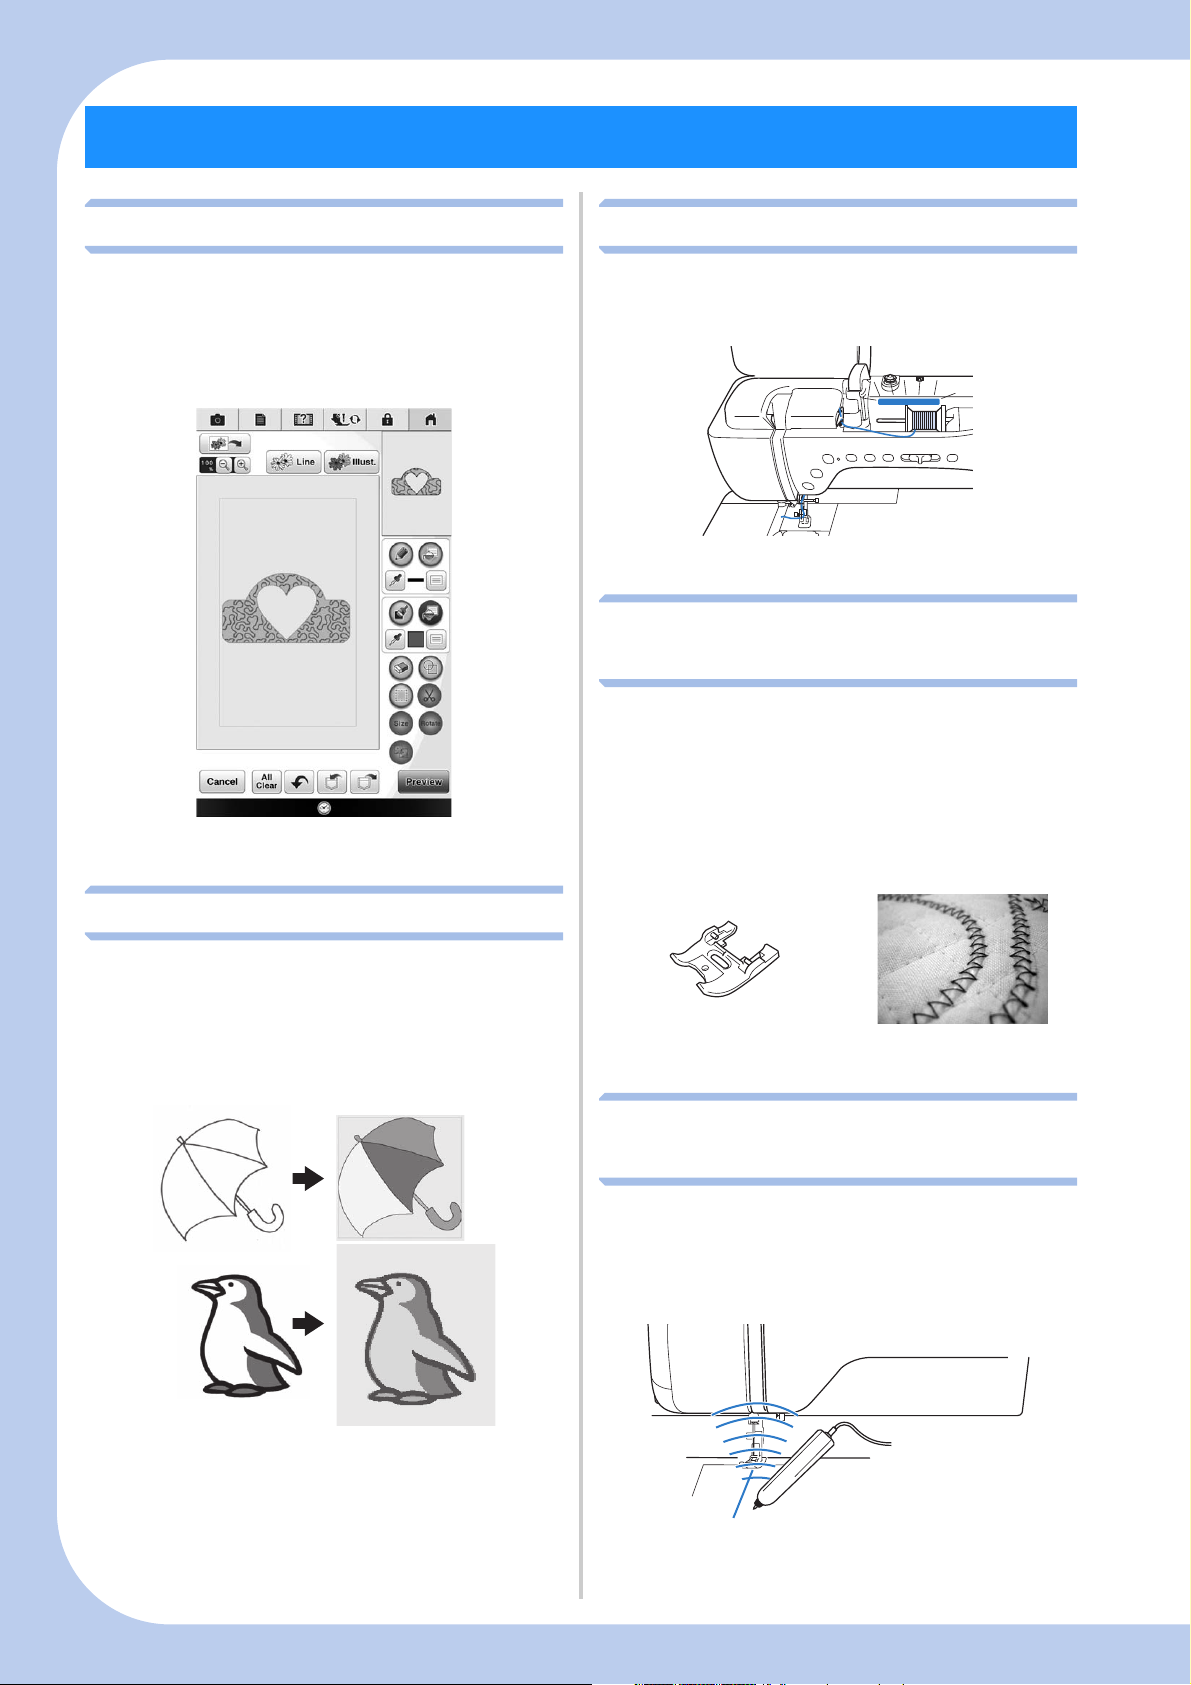
My Design Center
Draw your own shape or lines to design original
embroidery patterns. You can specify colors, line
type and fill stitch type. Try the stipple-like
embroidery pattern. It’s very easy and fun!
Line Scan / Fill Scan
You don’t need a computer to create line art
anymore. Scan your favorite drawing or illustration
or import a JPEG format data to make your original
embroidery pattern. Embroider your unforgettable
memories!
Spool Stand LED Lighting
Now, your sewing machine shows you the thread
color you are going to embroider next.
Couching Dual Feed Foot with
Dual Feed
Couching gains more popularity everyday. The
powerful dual feed foot helps you add
embellishment securely with an attractive result to
your favorite materials. Enjoy creating many types
of couching embellishment projects with this dual
feed foot.
Improved Laser Guideline
Marker
It’s easy and accurate to specify the stitch position
using the improved laser guideline marker. You
can use this function easily without any
preparation.
OUTSTANDING FEATURES

9
Improved Camera Function
Can you imagine a sewing machine with a built-in
camera? Not only viewing the close up view of the
needle position, but also you can align the
embroidery position, connect the embroidery
patterns and place the pattern position while
checking the fabric image. The camera functions
become clearer and more accurate.
Playing MPEG-4 (MP4) Videos
Your MPEG-4 (MP4) videos can be played and
saved from USB media. It’s going to be easier to
create your project watching the tutorial video on
the machine.
Original tutorial videos are installed in this
machine. When you find this icon on the
title in this manual, you can find the tutorial video
of the procedure in your machine.

10
WHAT YOU CAN DO WITH THIS MACHINE
Getting Ready
To learn the operation of the principal parts and the
screens
Sewing Basics
To learn how to prepare for sewing and basic sewing
operations
Chapter 1
Page 29
Chapter 2
Page 81
Utility Stitches
Pre-programmed with more than 100 frequently used
stitches
Character/Decorative
Stitches
The variety of stitches widen your creativity
Chapter 3
Page 109
Chapter 4
Page 169
MY CUSTOM STITCH
Create original decorative stitches
Basic Embroidery
Maximum 36 cm × 24 cm (approx. 14 × 9-1/2 inches) for
large embroidery designs
Chapter 5
Page 197
Chapter 6
Page 209
Advanced Embroidery
To create the variety of embroidery designs
My Design Center
Create original embroidery pattern
Chapter 7
Page 285
Chapter 8
Page 337
How to Create Bobbin
Work
To learn how to create bobbin work
Appendix
Caring for your machine and dealing with errors and
malfunctions
Chapter 9
Page 371
Chapter 10
Page 387
11
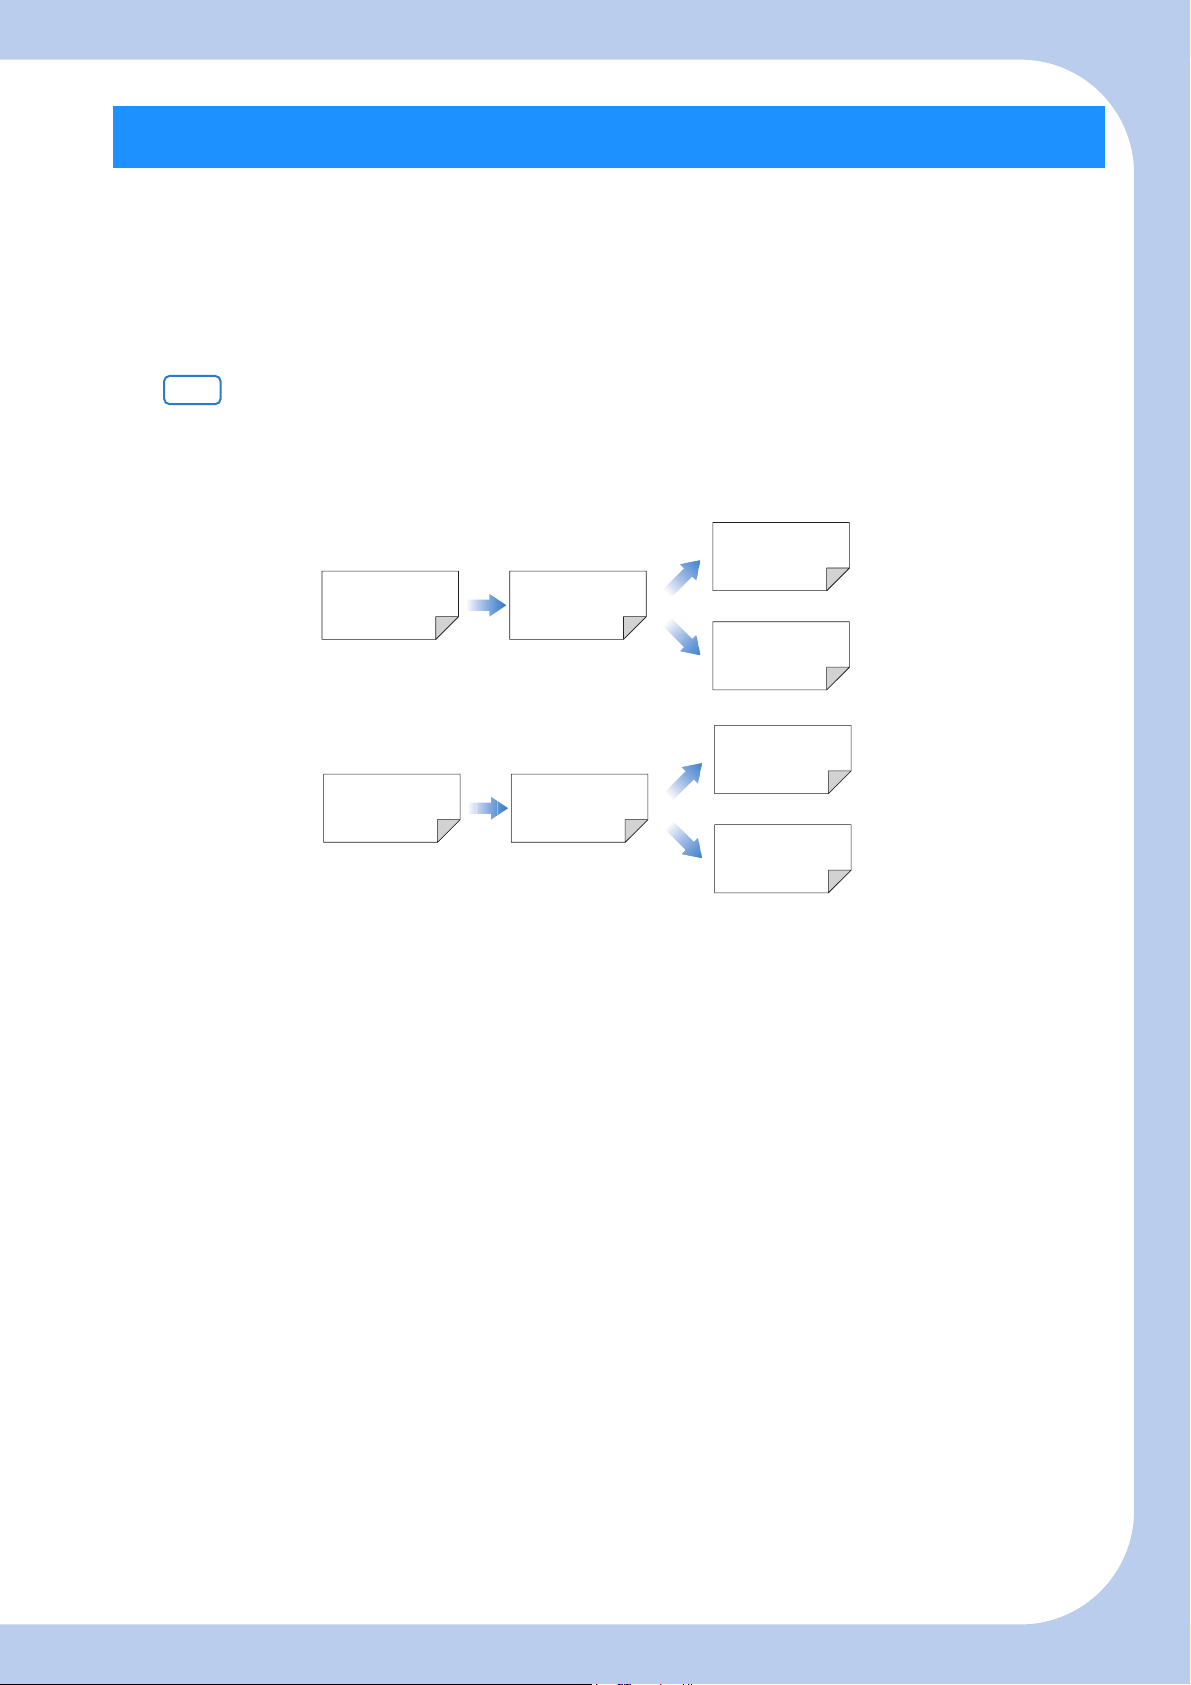
Chapter 1 and Chapter 2 explain your sewing machine’s basic operation procedures for someone who is
using the sewing machine for the first time. If you want to sew utility stitches or character/ decorative
stitches, read Chapter 1 and Chapter 2, then go on to Chapter 3 (Utility Stitches) or Chapter 4 (Character/
Decorative Stitches).
When you are ready to begin using the embroidery function after reading Chapter 1 and Chapter 2,
proceed to Chapter 6 (Basic Embroidery) and Chapter 7 (Advanced Embroidery).
In the screens appearing in the step-by-step instructions, the parts referred to in the operations are marked
with . Compare the screen in the directions with the actual screen, and carry out the operation.
If, while using the machine, you experience something you do not understand, or there is a function you
would like to know more about, refer to the index at the back of the operation manual in conjunction
with the table of contents to find the section of the manual you should refer to.
HOW TO USE THIS MANUAL
To sew utility stitches
To sew character or
decorative stitches
To do machine
embroidery
Chapter 1 Chapter 2
Chapter 3
Chapter 4
Chapter 1 Chapter 2
Chapter 6
Chapter 7

CONTENTS
12
CONTENTS
INTRODUCTION ................................................. 1
IMPORTANT SAFETY INSTRUCTIONS ................ 1
Trademarks ............................................................................ 4
OUTSTANDING FEATURES ................................. 8
WHAT YOU CAN DO WITH THIS MACHINE ... 10
HOW TO USE THIS MANUAL ........................... 11
NAMES OF MACHINE PARTS AND THEIR
FUNCTIONS........................................................ 15
Machine............................................................................... 15
Needle and Presser Foot Section .......................................... 16
Embroidery Unit................................................................... 17
Operation Buttons................................................................ 17
Using the Flat Bed Attachment............................................. 18
Using the Accessory Case..................................................... 18
Storing Bobbin Clips............................................................. 19
Included Accessories............................................................ 20
Accessories that are Included in Some Countries or Regions
..... 22
Options................................................................................ 22
Using the Multi-purpose Screwdriver .................................. 24
Using the Spool Stand .......................................................... 24
Using the Multi-function Foot Controller
(Only for supplied models) .................................................. 26
Assembling the Controller .................................................... 26
Chapter 1 Getting Ready 29
TURNING THE MACHINE ON/OFF................... 30
Setting Your Machine for the First Time................................ 31
LCD SCREEN ...................................................... 32
Using the Machine Setting Mode Key .................................. 33
Using the Sewing Machine Help Key .................................. 42
Using the Operation Guide Function.................................... 43
Using the Sewing Guide Function ........................................ 44
Playing a Tutorial Video....................................................... 45
Playing MPEG-4 (MP4) Videos............................................. 46
Using the Pattern Explanation Function................................ 47
CONNECTING THE ACCESSORY TO THE
MACHINE........................................................... 48
Using USB Media................................................................. 48
Connecting the Machine to the Computer ............................ 48
Using a USB Mouse (Sold Separately)................................... 49
USING THE SENSOR PEN .................................. 50
Convenient Sewing Features by Using the Sensor Pen ......... 50
Connecting the Sensor Pen .................................................. 50
Using the Sensor Pen Holder ............................................... 51
Using the Sensor Pen............................................................ 51
Important Information about Sensor Pen............................... 52
Calibrating the Sensor Pen ................................................... 52
LOWER THREADING ......................................... 54
Winding the Bobbin ............................................................ 54
Setting the Bobbin ............................................................... 59
Pulling Up the Bobbin Thread .............................................. 61
UPPER THREADING........................................... 62
Upper Threading ................................................................. 62
Using the Twin Needle Mode............................................... 65
Using the Spool Stand .......................................................... 67
Using Threads that Unwind Quickly .................................... 69
CHANGING THE PRESSER FOOT ...................... 70
Removing the Presser Foot .................................................. 70
Attaching the Presser Foot ................................................... 70
Attaching the Presser Foot with the Included Adapter .......... 71
Using the Dual Feed Foot .................................................... 72
CHANGING THE NEEDLE ................................. 75
About the Needle ................................................................. 77
Fabric/Thread/Needle Combinations .................................... 77
NEEDLE CALIBRATION USING THE BUILT IN
CAMERA ............................................................ 78
Chapter 2 Sewing Basics 81
SEWING............................................................. 82
Sewing a Stitch .................................................................... 82
Specifying the Multi-Function Foot Controller
(Only for supplied models) .................................................. 84
Sewing Reinforcement Stitches ............................................ 85
Automatic Reinforcement Stitching...................................... 85
Sewing Curves..................................................................... 87
Changing Sewing Direction ................................................. 87
Sewing Heavyweight Fabrics ............................................... 87
Sewing Hook-and-Loop Fastener Tape................................. 88
Sewing Lightweight Fabrics.................................................. 89
Sewing Stretch Fabrics......................................................... 89
STITCH SETTINGS ............................................. 90
Setting the Stitch Width ....................................................... 90
Setting the Stitch Length....................................................... 91
Setting the “L/R Shift”........................................................... 91
Setting the Thread Tension................................................... 92
USEFUL FUNCTIONS ........................................ 93
Automatic Thread Cutting.................................................... 93
Adjusting the Needle Drop Position with the Guideline Marker
...... 94
Pivoting .............................................................................. 95
Using the Knee Lifter .......................................................... 96
Automatic Fabric Sensor System (Automatic Presser Foot
Pressure) ............................................................................. 97
Needle Position - Stitch Placement ...................................... 98
Checking the Needle Location in the Screen ....................... 98
USING SENSOR FUNCTIONS WITH SEWING
STITCH ............................................................ 100
Sensor Function Area......................................................... 100
Specifying the Guideline Marker Position
With the Sensor Pen ......................................................... 100
Specifying the Needle Drop Position With the Sensor Pen
..... 102
Using the Sensor Pen to Specify the Stitching Width
and Stitch Position ............................................................ 103
Using the Sensor Pen to Specify the Sewing End Point ...... 105
Chapter 3 Utility Stitches 109
SELECTING UTILITY STITCHES ....................... 110
Selecting a Stitch ............................................................... 113
Saving Your Stitch Settings................................................. 115
SEWING THE STITCHES .................................. 116
Straight Stitches ................................................................. 116
Dart Seam.......................................................................... 121
Gathering .......................................................................... 121
Flat Fell Seam .................................................................... 122
Pintuck .............................................................................. 123
Zigzag Stitches .................................................................. 124
Elastic Zigzag Stitches........................................................ 125
Overcasting ....................................................................... 126
Quilting............................................................................. 129
Blind Hem Stitches ............................................................ 138
Appliqué............................................................................ 141
Shelltuck Stitches............................................................... 142
Scallop Stitches.................................................................. 142
Crazy Quilting................................................................... 143
Smocking Stitches.............................................................. 143
Fagoting............................................................................. 144
Tape or Elastic Attaching ................................................... 145
Heirloom........................................................................... 146
Zigzag Couching .............................................................. 147
One-step Buttonholes ........................................................ 149
Four-step Buttonholes........................................................ 153
Bar Tacks........................................................................... 155
Button Sewing ................................................................... 156
Eyelet................................................................................. 157
Multi-directional Sewing (Straight Stitch and Zigzag Stitch)
.... 158
Zipper Insertion................................................................. 159

CONTENTS
13
1
2
3
4
5
6
7
8
9
10
Edge Sewing ..................................................................... 162
Chapter 4
Character/Decorative Stitches
169
SELECTING STITCH PATTERNS ....................... 170
Selecting Decorative Stitch Patterns/7mm Decorative Stitch
Patterns/Satin Stitch Patterns/7mm Satin Stitch Patterns/
Cross Stitch/Utility Decorative Stitch Patterns..................... 172
Alphabet Characters/Japanese characters ........................... 172
SEWING STITCH PATTERNS ............................ 175
Sewing Attractive Finishes.................................................. 175
Basic Sewing...................................................................... 175
Making Adjustments .......................................................... 176
EDITING STITCH PATTERNS ........................... 178
Changing the Size .............................................................. 180
Changing the Length (for 7mm Satin Stitch Patterns Only)
.... 180
Creating a Vertical Mirror Image ........................................ 180
Creating a Horizontal Mirror Image ................................... 180
Sewing a Pattern Continuously........................................... 180
Changing Thread Density (for Satin Stitch Patterns Only) ... 181
Returning to the Beginning of the Pattern ........................... 181
Checking the Image ........................................................... 182
COMBINING STITCH PATTERNS .................... 183
Before Combining.............................................................. 183
Combining Various Stitch Patterns ..................................... 183
Combining Large and Small Stitch Patterns ........................ 184
Combining Horizontal Mirror Image Stitch Patterns ........... 185
Combining Stitch Patterns of Different Length .................... 186
Making Step Stitch Patterns
(for 7mm Satin Stitch Patterns Only)................................... 186
USING THE MEMORY FUNCTION.................. 189
Stitch Data Precautions ...................................................... 189
Saving Stitch Patterns in the Machine’s Memory ................ 190
Saving Stitch Patterns to USB Media .................................. 190
Saving Stitch Patterns in the Computer ............................... 191
Retrieving Stitch Patterns from the Machine’s Memory....... 192
Recalling from USB Media................................................. 193
Recalling from the Computer ............................................. 194
Chapter 5 MY CUSTOM STITCH 197
DESIGNING A STITCH .................................... 198
ENTERING STITCH DATA ................................ 200
Editing Stitch Stored in the Machine................................... 204
USING STORED CUSTOM STITCHES .............. 206
Storing Custom Stitches in Your List ................................... 206
Retrieving Stored Stitches................................................... 206
Chapter 6 Basic Embroidery 209
BEFORE EMBROIDERING ................................ 210
Embroidery Step by Step .................................................... 210
Attaching Embroidery Foot “W+” with LED pointer ........... 211
Attaching the Embroidery Unit .......................................... 211
SELECTING PATTERNS..................................... 214
Selecting Embroidery Patterns/Decorative Alphabet Patterns/
Utility Embroidery Patterns/Bobbin Work Patterns.............. 216
Selecting Alphabet Character Patterns................................ 217
Selecting Frame Patterns .................................................... 219
Selecting Patterns from Embroidery Cards .......................... 219
Recalling from USB Media................................................. 221
Recalling from the Computer ............................................. 222
EDITING PATTERNS ........................................ 224
Previewing the Pattern ....................................................... 226
Moving the Pattern............................................................. 226
Rotating the Pattern............................................................ 227
Changing the Size of the Pattern ........................................ 228
Creating a Horizontal Mirror Image ................................... 229
Changing Font Type........................................................... 230
Editing Letters (Size/Font Type)........................................... 230
Changing the Density (Alphabet Character and Frame
Patterns Only) .................................................................... 231
Changing the Colors of Alphabet Character Patterns .......... 232
Changing the Configuration of Alphabet Character Patterns
.... 233
Deleting the Pattern............................................................ 233
Displaying Patterns in the Screen Magnified....................... 234
Changing Alphabet Character Spacing ............................... 235
Separating Combined Character Patterns............................ 235
Changing the Thread Color ................................................ 236
Creating a Custom Thread Table ........................................ 237
Choosing a Color from the Custom Thread Table ............... 240
Find New Color Schemes With
the Color Shuffling Function............................................... 241
Designing Repeated Patterns .............................................. 243
Embroidering the Pattern Repeatedly.................................. 247
Duplicating a Pattern.......................................................... 249
After Editing ....................................................................... 249
VIEWING THE EMBROIDERY SCREEN............ 250
COMBINING PATTERNS ................................. 252
Editing Combined Patterns ................................................. 252
Sewing Combined Patterns................................................. 255
PREPARING THE FABRIC ................................ 256
Attaching Iron-on Stabilizers (Backing) to the Fabric .......... 256
Hooping the Fabric in the Embroidery Frame .................... 257
Embroidering Small Fabrics or Fabric Edges ....................... 259
ATTACHING THE EMBROIDERY FRAME ....... 261
CONFIRMING THE PATTERN POSITION ....... 263
Checking the Needle Drop Point With the Embroidery Foot
“W+” with LED Pointer ...................................................... 263
Aligning the Embroidering Position
Using the Built-In Camera ................................................. 264
Using the Built-In Camera to Align
the Embroidering Position ................................................. 266
Specifying the Embroidering Position With the Sensor Pen
..... 268
Checking the Pattern Position............................................. 271
EMBROIDERING AN PATTERN ....................... 273
Embroidering Attractive Finishes ........................................ 273
Embroidering Patterns ........................................................ 274
Spool Stand LED................................................................. 276
Using Appliqués................................................................. 276
ADJUSTMENTS DURING THE EMBROIDERY
PROCESS........................................................... 280
If the Bobbin Runs Out of Thread ....................................... 280
If the Thread Breaks During Sewing.................................... 281
Restarting from the Beginning............................................. 282
Resuming Embroidery After Turning Off the Power ............ 282
Chapter 7 Advanced Embroidery 285
VARIOUS EMBROIDERING FUNCTIONS ....... 286
Uninterrupted Embroidering (Using a Single Color :
Monochrome) .................................................................... 286
Display the Fabric While Aligning
the Embroidering Position ................................................. 286
Basting Embroidery ............................................................ 290
Creating an Appliqué Piece ................................................ 291
PRINT AND STITCH (COMBINING EMBROIDERY
PATTERNS AND PRINTED DESIGNS)
.................. 296
Selecting a Pattern.............................................................. 297
Outputting the Background Image and Positioning Image
.... 297
Printing the Background and Embroidery Position Sheet..... 299
Sewing Embroidery Patterns ............................................... 300
MAKING EMBROIDERY ADJUSTMENTS......... 301
Adjusting Thread Tension................................................... 301
Adjusting the Alternate Bobbin Case
(with No Color on the Screw) ............................................. 303
Using the Automatic Thread Cutting Function
(End Color Trim)................................................................. 304
Using the Thread Trimming Function (Jump Stitch Trim) .... 304
Adjusting the Embroidery Speed......................................... 305
Changing the Thread Color Display.................................... 305
Changing the Embroidery Frame Display............................ 306
Aligning the Pattern and the Needle ................................... 307
Embroidering Linked Characters......................................... 308
USING THE MEMORY FUNCTION ................. 311
Embroidery Data Precautions ............................................. 311
Saving Embroidery Patterns in the Machine’s Memory ....... 313

CONTENTS
14
Saving Embroidery Patterns to USB Media.......................... 313
Saving Embroidery Patterns in the Computer ...................... 314
Retrieving Patterns from the Machine’s Memory................. 315
EMBROIDERY APPLICATIONS......................... 317
Using a Frame Pattern to Make an Appliqué (1).................. 317
Using a Frame Pattern to Make an Appliqué (2).................. 318
Sewing Split Embroidery Patterns ....................................... 319
USING THE CAMERA TO
CONNECT PATTERNS ...................................... 321
Connecting Three Patterns.................................................. 321
Changing the Position of a Sticker ...................................... 327
CONNECTING ROTATED PATTERNS.............. 330
Connecting Patterns to be Joined Along an Edge ................ 332
RESUME FEATURE............................................ 335
Chapter 8 My Design Center 337
ABOUT MY DESIGN CENTER .......................... 338
Basics: Creating a Pattern ................................................... 338
PATTERN DRAWING SCREEN ......................... 340
Before Creating Designs ..................................................... 341
Drawing Lines.................................................................... 342
Drawing Regions................................................................ 343
Using the stamp key........................................................... 344
Using the erase key ............................................................ 345
Using the select key ........................................................... 346
After Editing the Design...................................................... 346
STITCH SETTINGS SCREEN .............................. 347
EMBROIDERY IMAGE PREVIEW SCREEN ........ 349
MY DESIGN CENTER WITH SCAN .................. 350
Using the Scanning Frame.................................................. 350
Scanning to Trace Background Image................................. 351
LINE SCAN ...................................................... 354
Using the Scanning Frame to Create a Pattern
with Line Scan.................................................................... 354
ILLUSTRATION SCAN ..................................... 357
Using the Scanning Frame to Create a Pattern
with Illustration Scan.......................................................... 357
STIPPLING........................................................ 360
Basic Stippling with My Design Center............................... 360
Scanning Drawing to Create Stippling Pattern .................... 363
Scanning Fabric and Stippling ............................................ 367
Chapter 9 How to Create Bobbin Work 371
ABOUT BOBBIN WORK .................................. 372
PREPARING FOR BOBBIN WORK ................... 373
Required Materials ............................................................. 373
Upper Threading................................................................ 374
Preparing the Bobbin Thread ............................................. 374
CREATING BOBBIN WORK (SEWING) ........... 378
Positioning the Fabric and Sewing...................................... 378
Bobbin Work Free Motion Sewing...................................... 380
CREATING BOBBIN WORK (EMBROIDERY)
..... 381
Selecting the Pattern........................................................... 381
Start Embroidering.............................................................. 382
ADJUSTING BOBBIN WORK
THREAD TENSION........................................... 385
TROUBLESHOOTING ...................................... 386
Chapter 10 Appendix 387
CARE AND MAINTENANCE............................. 388
Restrictions on oiling.......................................................... 388
Precautions on storing the machine.................................... 388
Cleaning the LCD Screen ................................................... 388
Cleaning the Machine Casing............................................. 388
Cleaning the Race ............................................................ 388
Cleaning the Cutter in the Bobbin Case Area...................... 390
About the Maintenance Message ........................................ 390
ADJUSTING THE SCREEN ................................ 391
Adjusting the Brightness of the Screen Display ................... 391
Touch Panel is Malfunctioning .......................................... 391
TROUBLESHOOTING ..................................... 392
Frequent Troubleshooting Topics....................................... 392
Upper Thread is Too Tight ................................................. 392
Tangled Thread on Wrong Side of Fabric........................... 393
Incorrect Thread Tension ................................................... 395
Fabric is Caught in the Machine and Cannot be Removed
...... 396
List of Symptoms................................................................ 399
ERROR MESSAGES........................................... 405
SPECIFICATIONS............................................. 411
UPGRADING YOUR MACHINE’S SOFTWARE
..... 412
Upgrade Procedure Using USB Media............................... 412
Upgrade Procedure Using Computer ................................. 413
STITCH SETTING CHART ................................ 414
INDEX.............................................................. 423
NAMES OF MACHINE PARTS AND THEIR FUNCTIONS
15
The names of the various parts of the sewing machine and their functions are described below. Before
using the sewing machine, carefully read these descriptions to learn the names of the machine parts.
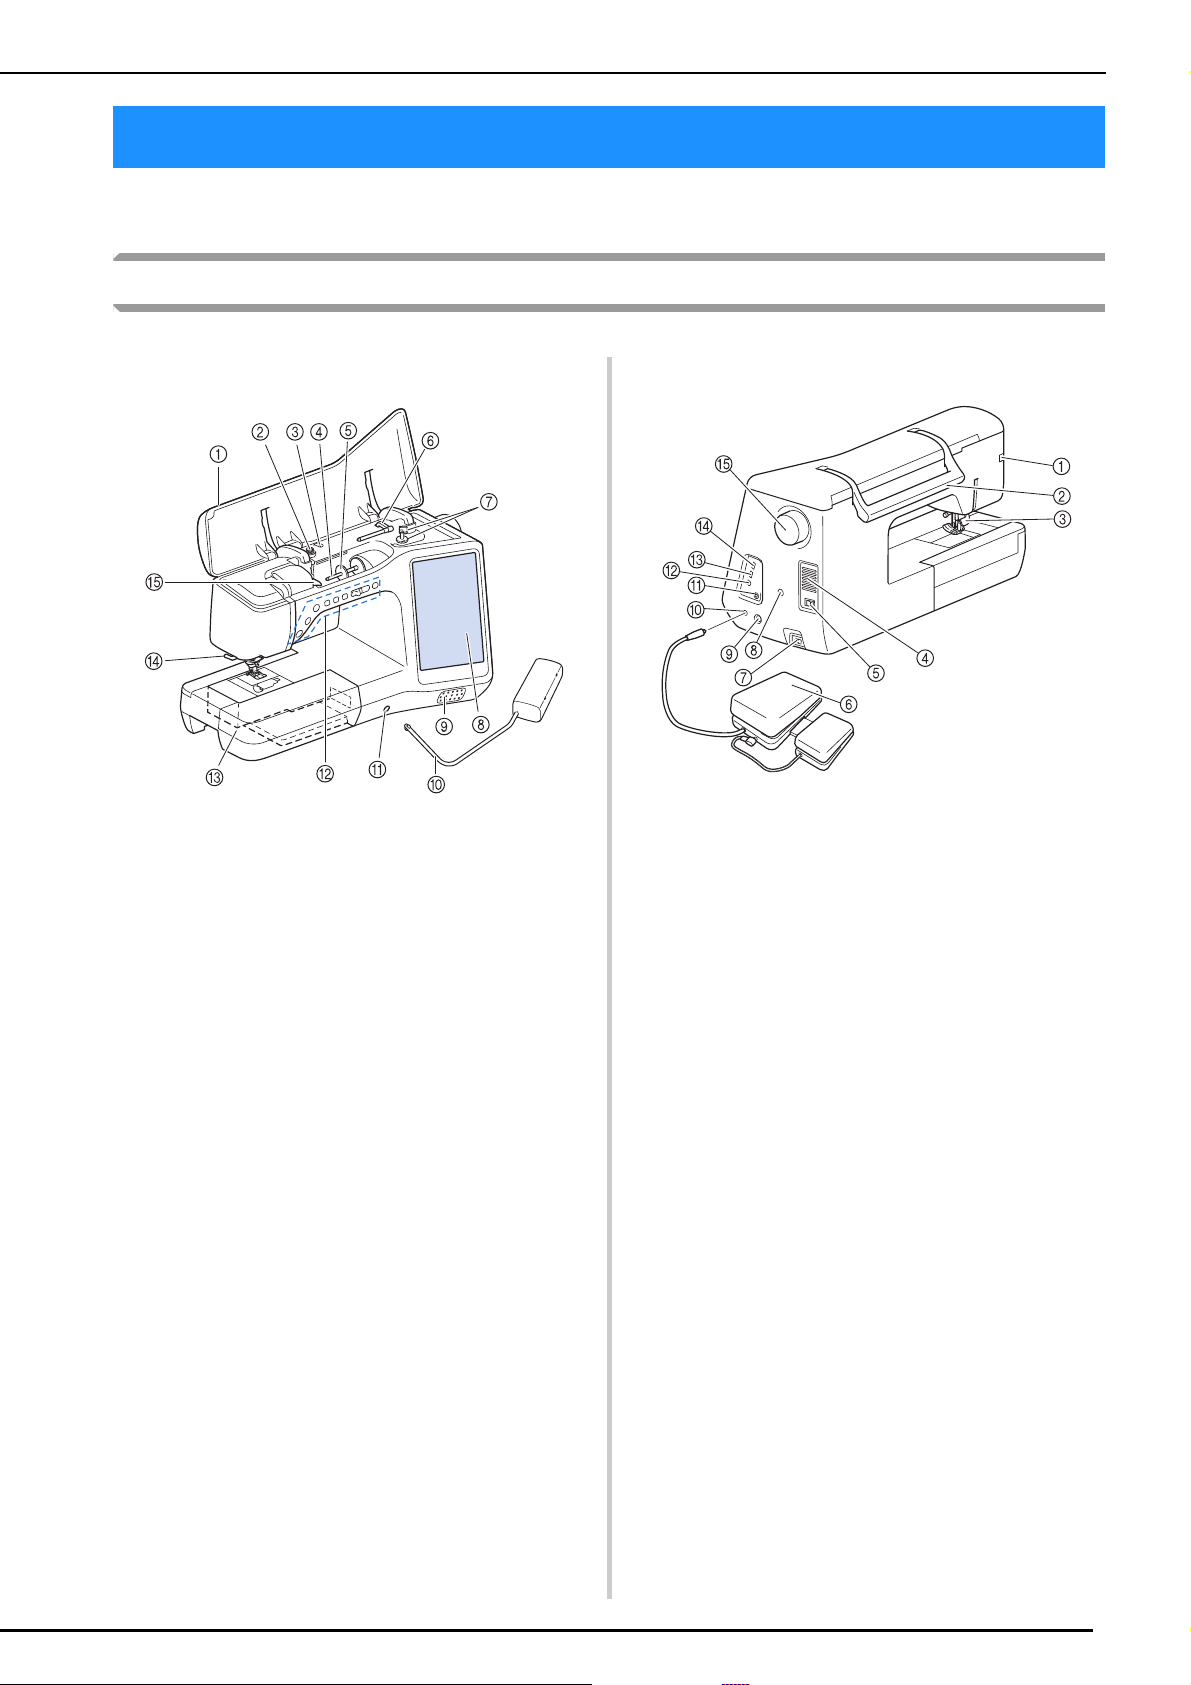
Machine
■ Front View
a Top cover
Open the top cover when threading the machine or winding the
bobbin.
b Pre-tension disk
Pass the thread around the pre-tension disk when winding the
bobbin thread. (page 54)
c Thread guide for bobbin winding
Pass the thread through this thread guide when winding the
bobbin thread. (page 54)
d Spool pin
Place a spool of thread on the spool pin. (page 62)
e Spool cap
Use the spool cap to hold the spool of thread in place. (page
62)
f Supplemental spool pin
Use this spool pin to wind the bobbin thread, or to sew with the
twin needle. (page 54, 65)
g Bobbin winder
Use the bobbin winder when winding the bobbin. (page 54)
h LCD (liquid crystal display)
Settings for the selected stitch and error messages appear in
the LCD. (page 32)
i Speaker
j Knee lifter
Use the knee lifter to raise and lower the presser foot. (page 96)
k Knee lifter slot
Insert the knee lifter into the slot. (page 96)
l Operation buttons (7 buttons) and sewing speed
controller
Use these buttons and the slide to operate the sewing
machine. (page 17)
m Flat bed attachment with accessory compartment
Store presser feet and bobbins in the accessory compartment
of the flat bed attachment. When sewing cylindrical pieces,
remove the flat bed attachment. (page 18)
n Thread cutter
Pass the threads through the thread cutter to cut them. (page
64)
o Thread guide plate
Pass the thread around the thread guide plate when threading
upper thread. (page 62)
■ Right-side/Rear View
a Connector for the presser foot
Connect the dual feed foot or embroidery foot with LED
pointer. (page 72, 211)
b Handle
Carry the sewing machine by its handle when transporting the
machine.
c Presser foot lever
Raise and lower the presser foot lever to raise and lower the
presser foot. (page 70)
d Air vent
The air vent allows the air surrounding the motor to circulate.
Do not cover the air vent while the sewing machine is being
used.
e Main power switch
Use the main power switch to turn the sewing machine ON and
OFF. (page 30)
f Multi-function foot controller
Various sewing machine operations can be programmed into
the multi-function foot controller. For some countries and
areas, normal foot controller is included with the machine.
g Power cord receptacle
Insert the power cord into the machine receptacle. (page 30)
h Sensor pen holder connector
Connect the included sensor pen holder. (page 51)
i Sensor pen jack
Connect the sensor pen. (page 50)
j Foot controller jack
Insert the foot controller plug into its jack on the machine.
(page 83)
k Headphones or external speaker jack
Connect the headphone.
l USB port for computer
In order to import/export patterns between a computer and the
machine, plug the USB cable into the USB port. (page 48, 189,
191, 194, 222, 298, 314, 413)
m USB port for mouse (page 48)
n USB port
In order to send patterns from/to USB media, plug the USB
media directly into the USB port. (page 36, 48,189,190, 193,
221, 239, 288, 298, 313, 412)
o Handwheel
Rotate the handwheel toward you (counterclockwise) to raise
and lower the needle. The wheel should be turned toward the
front of the machine.
NAMES OF MACHINE PARTS AND THEIR FUNCTIONS
NAMES OF MACHINE PARTS AND THEIR FUNCTIONS
16
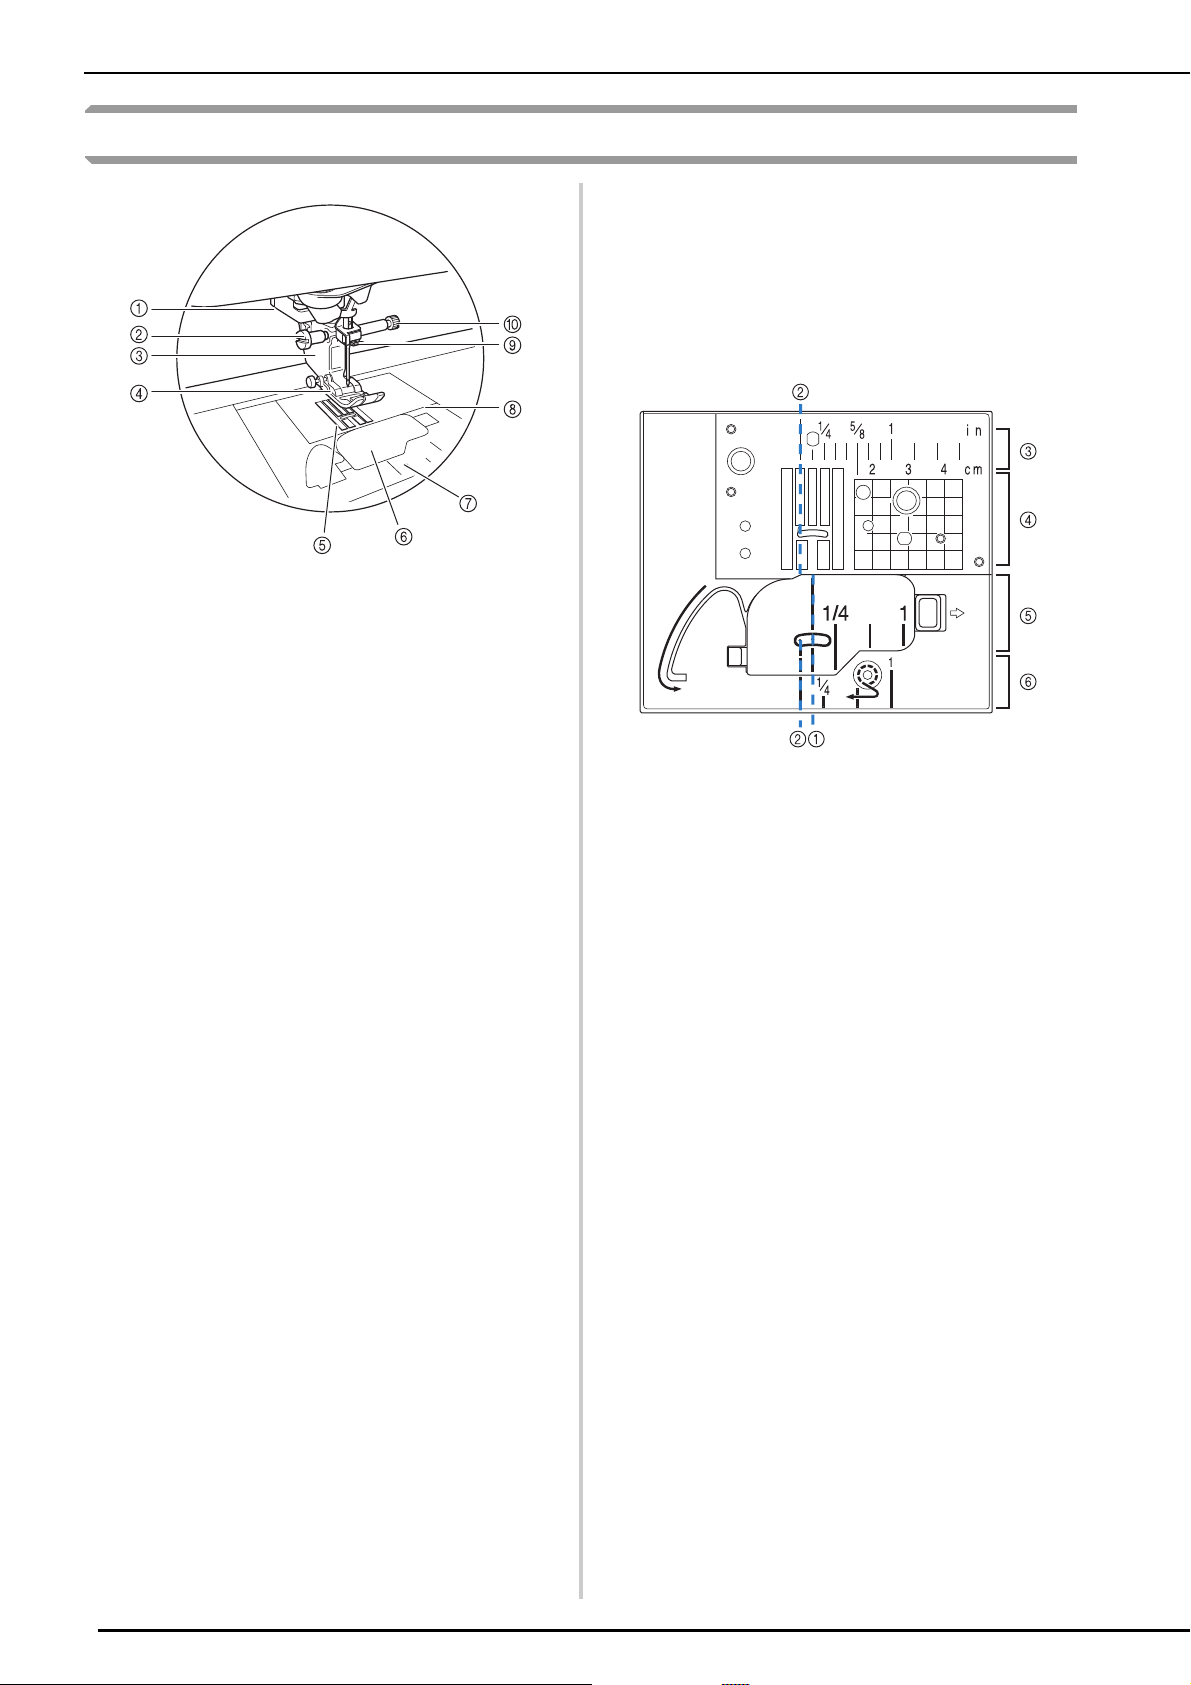
Needle and Presser Foot Section
a Buttonhole lever
The buttonhole lever is used with the one-step buttonhole foot
to create buttonholes. (page 149)
b Presser foot holder screw
Use the presser foot holder screw to hold the presser foot in
place. (page 71)
c Presser foot holder
The presser foot is attached to the presser foot holder. (page
70)
d Presser foot
The presser foot consistently applies pressure to the fabric as
sewing takes place. Attach the appropriate presser foot for the
selected stitch. (page 70)
e Feed dogs
The feed dogs feed the fabric in the sewing direction.
f Bobbin cover
Open the bobbin cover to set the bobbin. (page 59, 125)
g Needle plate cover
Remove the needle plate cover to clean the race. (page 119,
274)
h Needle plate
The needle plate is marked with guides to help sew straight
seams. (page 118)
i Needle bar thread guide
Pass the upper thread through the needle bar thread guide.
(page 62)
j Needle clamp screw
Use the needle clamp screw to hold the needle in place. (page
71)
Measurements on the needle plate, bobbin cover
(with mark) and needle plate cover
The measurements on the bobbin cover are
references for patterns with a middle (center)
needle position. The measurements on the needle
plate and the needle plate cover are references for
stitches with a left needle position.
a For stitches with a middle (center) needle position
b For stitches with a left needle position
c Left needle position on the needle plate <inch>
d Left needle position on the needle plate <cm>
e Middle (center) needle position on the bobbin cover
(with mark) <inch>
f Left needle position on the needle plate cover
<inch>

NAMES OF MACHINE PARTS AND THEIR FUNCTIONS
17
Embroidery Unit
a Carriage
The carriage moves the embroidery frame automatically when
embroidering. (page 211)
b Release lever (located under the embroidery unit)
Press the release lever to remove the embroidery unit. (page
212)
c Embroidery frame holder
Insert the embroidery frame into the embroidery frame holder
to hold the frame in place. (page 261)
d Frame-securing lever
Press the frame-securing lever down to secure the embroidery
frame. (page 261)
e Embroidery unit connection
Insert the embroidery unit connection into the connection port
when attaching the embroidery unit. (page 211)
Operation Buttons
a “Start/Stop” button
Press this button and the machine will sew a few stitches at a
slow speed and then begin sewing at the speed set by the
sewing speed controller. Press the button again to stop the
machine. Hold the button in to sew at the machine’s slowest
speed. The button changes color according to the machine’s
operation mode.
b “Reverse Stitch” button
For straight, zigzag, and elastic zigzag stitch patterns that take
reverse stitches, the machine will sew reverse stitches at low
speed only while holding down the “Reverse Stitch” button.
The stitches are sewn in the opposite position.
For other stitches, use this button to sew reinforcement
stitches at the beginning and end of sewing. Press and hold
this button, and the machine sews 3 stitches in the same spot
and stops automatically. (page 85)
c “Reinforcement Stitch” button
Use this button to sew a single stitch repeatedly and tie-off.
For character/decorative stitches, press this button to end with
a full stitch instead of at a mid-point. The LED light beside this
button lights up while the machine is sewing a full motif, and
automatically turns off when the sewing is stopped. (page 85)
d “Needle Position” button
Use this button when changing sewing direction or for detailed
sewing in small areas. Press this button to raise or lower the
needle position. With this button, you can lower and raise the
needle to sew a single stitch.
e “Thread Cutter” button
Press this button after sewing to automatically trim the excess
thread.
f “Presser Foot Lifter” button
Press this button to lower the presser foot and apply pressure
to the fabric. Press this button again to raise the presser foot.
g Sewing Speed controller
Use this controller to adjust the sewing speed. Move the slide
to the left to sew at slower speeds. Move the slide to the right
to sew at higher speeds. Beginners should sew at a slow
speed.
h “Automatic Threading” button
Use this button to automatically thread the needle.
CAUTION
• Before inserting or removing the embroidery
unit, turn the main power to off.
• After the embroidery frame is set in the frame
holder, be sure the frame-securing lever is
correctly lowered.
Green: The machine is ready to sew or is sewing.
Red: The machine cannot sew.
CAUTION
• Do not press the thread cutter button after the
threads have been cut. The needle may break
and threads may become tangled, or damage
to the machine may occur.
NAMES OF MACHINE PARTS AND THEIR FUNCTIONS
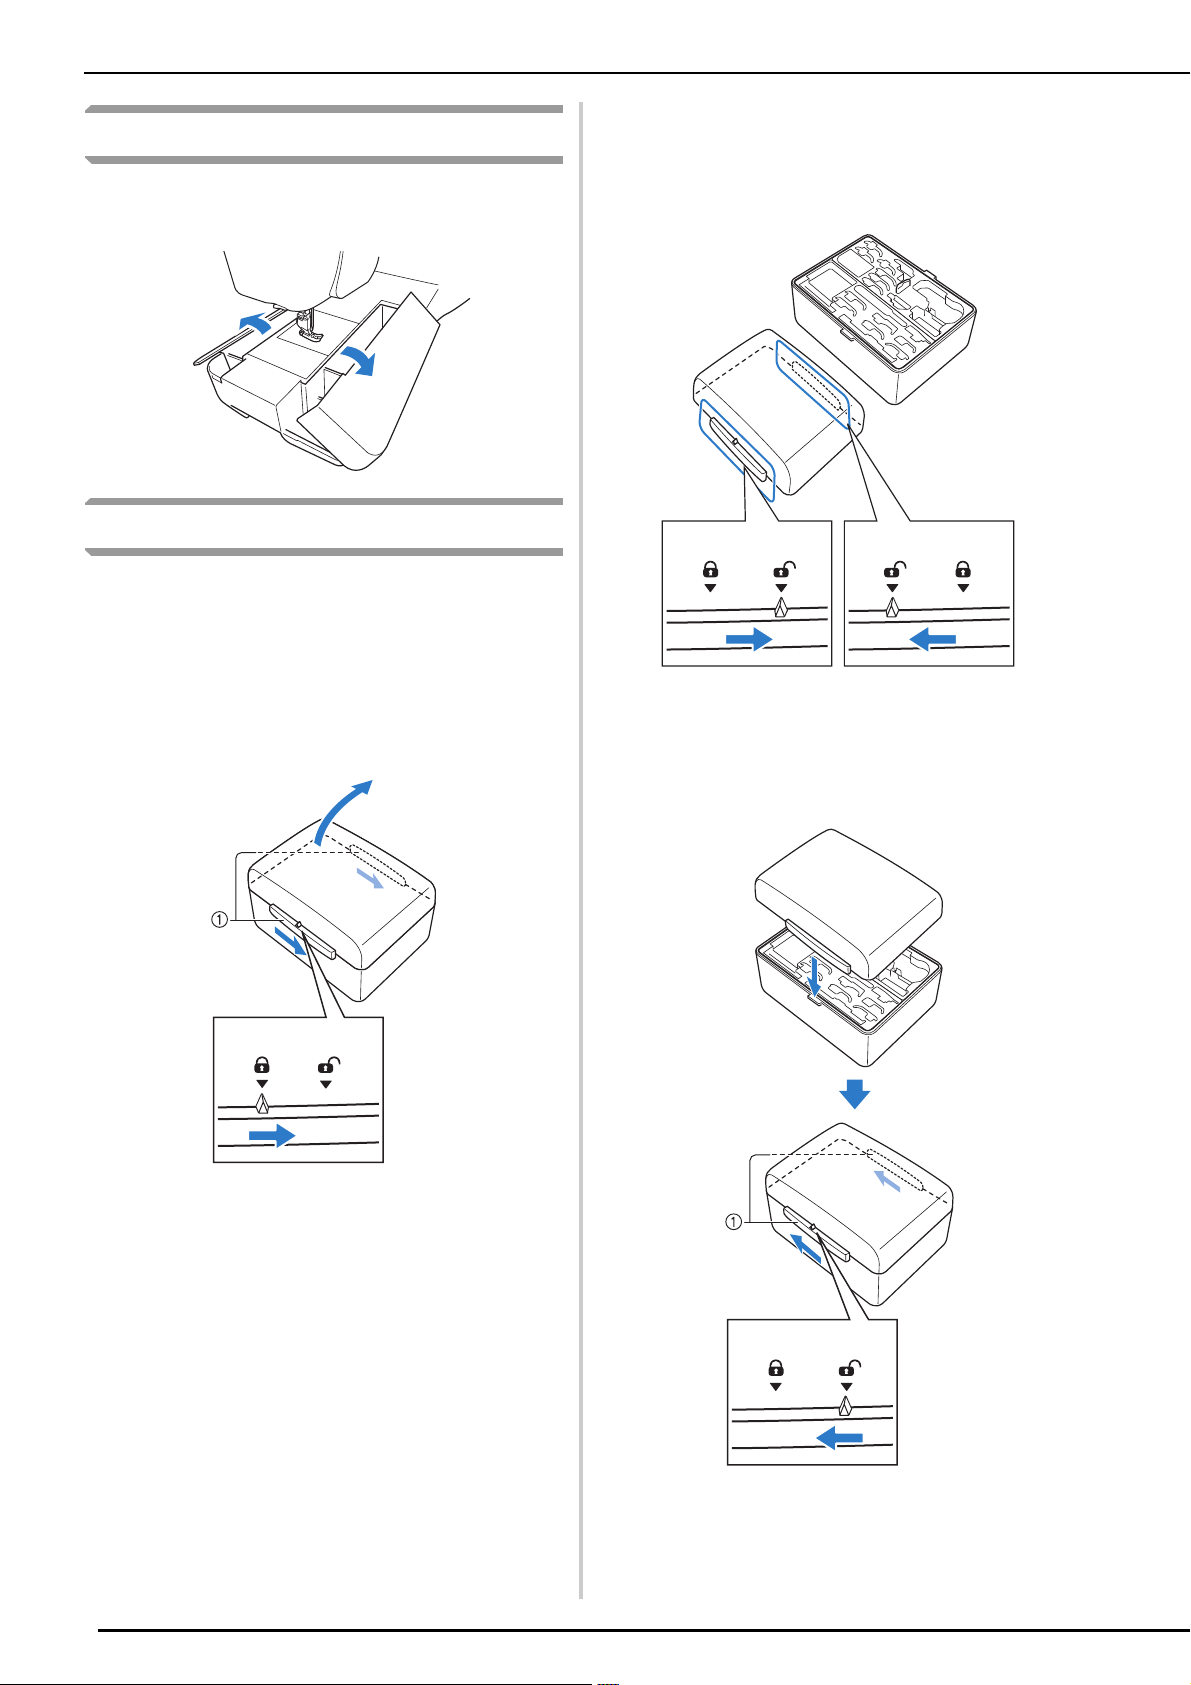
18
Using the Flat Bed Attachment
Pull the top of the flat bed attachment to open the
accessory compartment.
Using the Accessory Case
■ Opening the Accessory Case
Fully slide the bar on each side of the accessory case
to the unlocked position, and then lift off the lid to
open the case.
The case can only be opened or locked correctly if
both bars are slid in the same direction.
a Bars
■ Closing the Accessory Case
a
Fully slide the bar on each side of the
accessory case lid to the unlocked position.
b
Place the lid on top of the case so that the
notches in the lid align with the tabs on the
case, and then slide the bar on each side
back to the locked position.
a Bars
NAMES OF MACHINE PARTS AND THEIR FUNCTIONS
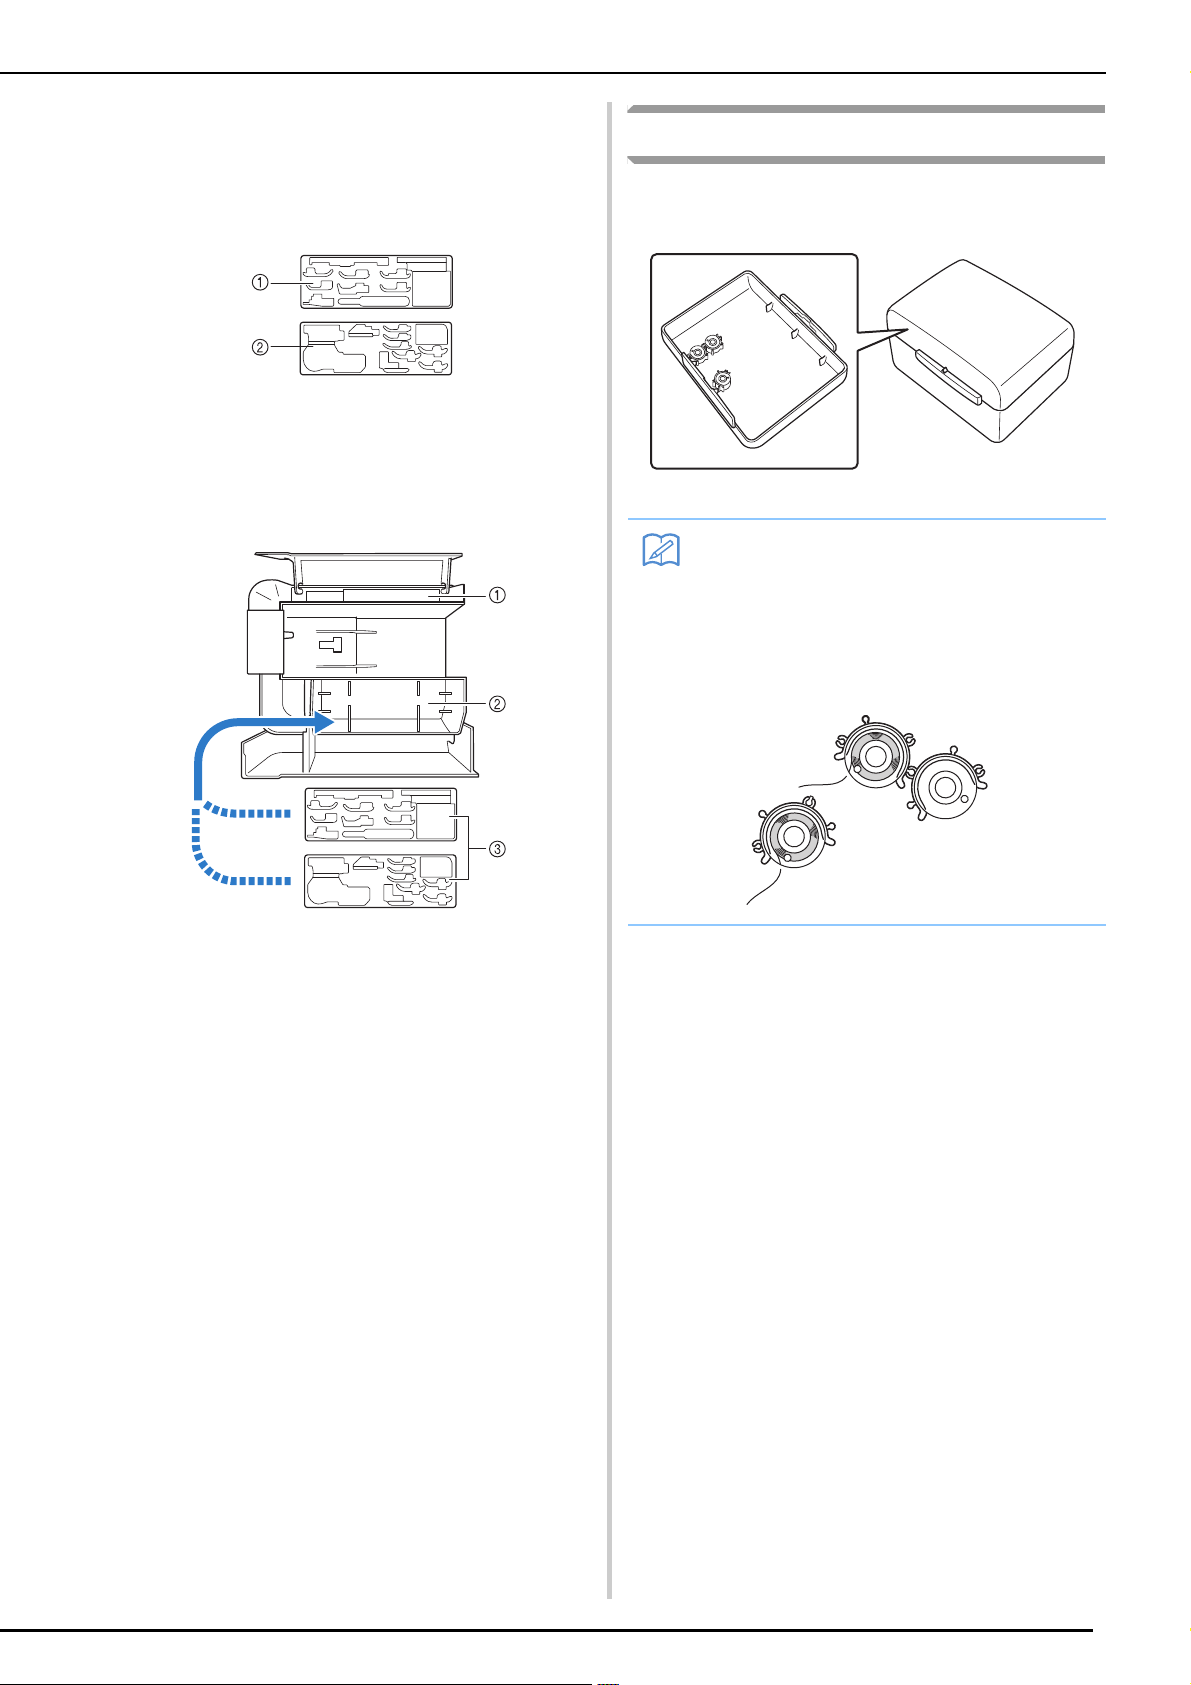
19
■ Using the Accessory Trays
Two presser foot storage trays are stored in the
included accessory case. One is for presser feet for
utility sewing, and the other is for presser feet for
embroidery and machine quilting.
a For presser feet for utility sewing
b For presser feet for embroidery and machine
quilting
For your convenience, a presser foot storage tray
can be stored in the accessory compartment of the
flat bed attachment.
a Additional storage space of the flat bed
attachment
b Presser foot storage space of the flat bed
attachment
c Presser foot storage trays
Storing Bobbin Clips
Bobbin clips can be stored inside of the accessory
case cover.
Memo
• Placing bobbin clips on bobbins helps
prevent the thread from unwinding from the
bobbin. In addition, snapping bobbin clips
together allows the bobbins to be
conveniently stored and prevents them from
rolling around if they are dropped.

NAMES OF MACHINE PARTS AND THEIR FUNCTIONS
20
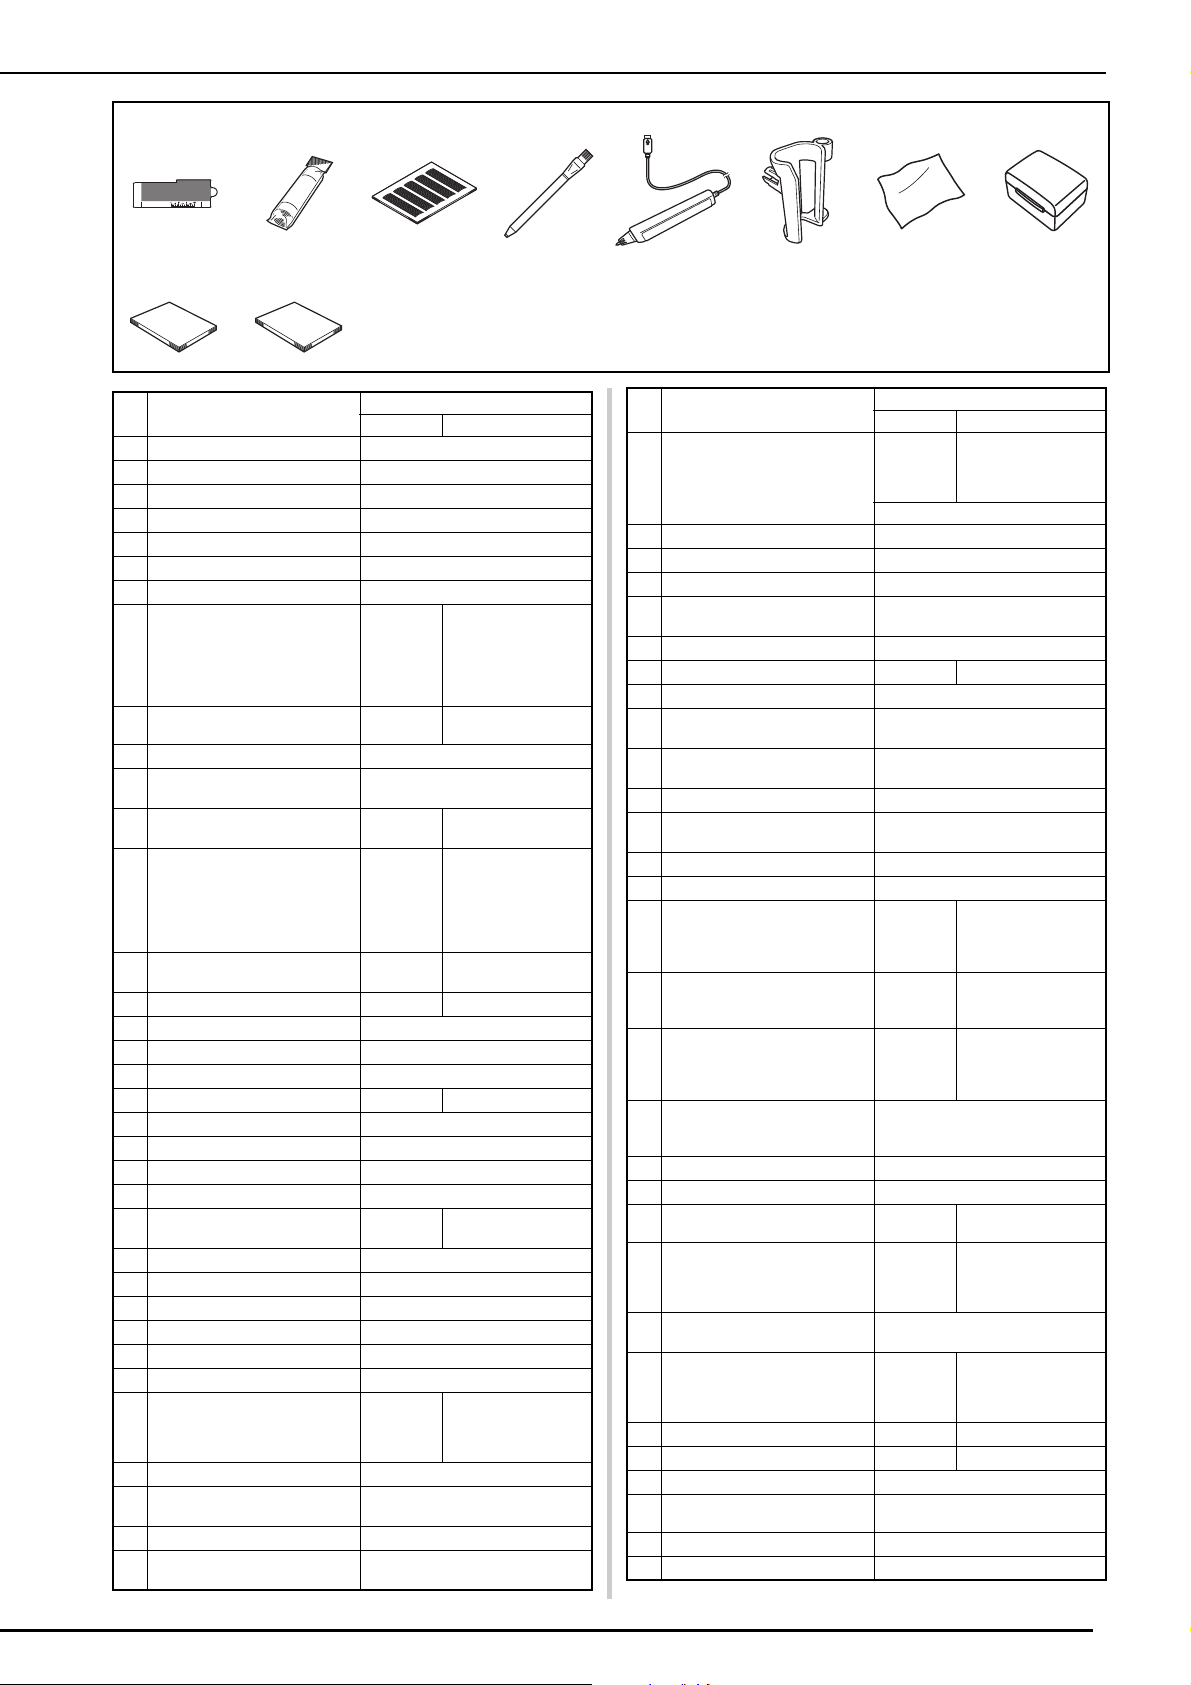
Included Accessories
12345678
9 10111213141516
17 18 19 20 21 22 23
75/11 2 needles
90/14 2 needles
90/14 2 needles:
Ball point needle (gold colored)
2.0/11 needle 75/11
2 needles
24 25 26 27 28 29 30 31
32 33 34 35 36 37 38
39 40 41 42 43 44 45 46
47 48 49 50 51 52
53 54 55 56 57 58
J
N
G
I
A
R
M
C
C
E
E
O
O
W+
V
NAMES OF MACHINE PARTS AND THEIR FUNCTIONS
21
59 60 61 62 63 64 65 66
67 68
No. Part Name
Part Code
Americas Others
1
Zigzag foot “J” (on machine)
XC3022-001
2
Monogramming foot “N”
X53840-351
3
Overcasting foot “G”
XC3098-051
4
Zipper foot “I”
X59370-051
5
Buttonhole foot “A”
X57789-351
6
Blind stitch foot “R”
X56409-051
7
Button fitting foot “M”
130489-001
8
Dual feed foot
SA196
(U.S.A.)
SA196C
(Canada)
DF1: XF4166-001
(EU area)
DF1AP: XF6843-001
(Asia/Oceania)
XF3165-001
(other area)
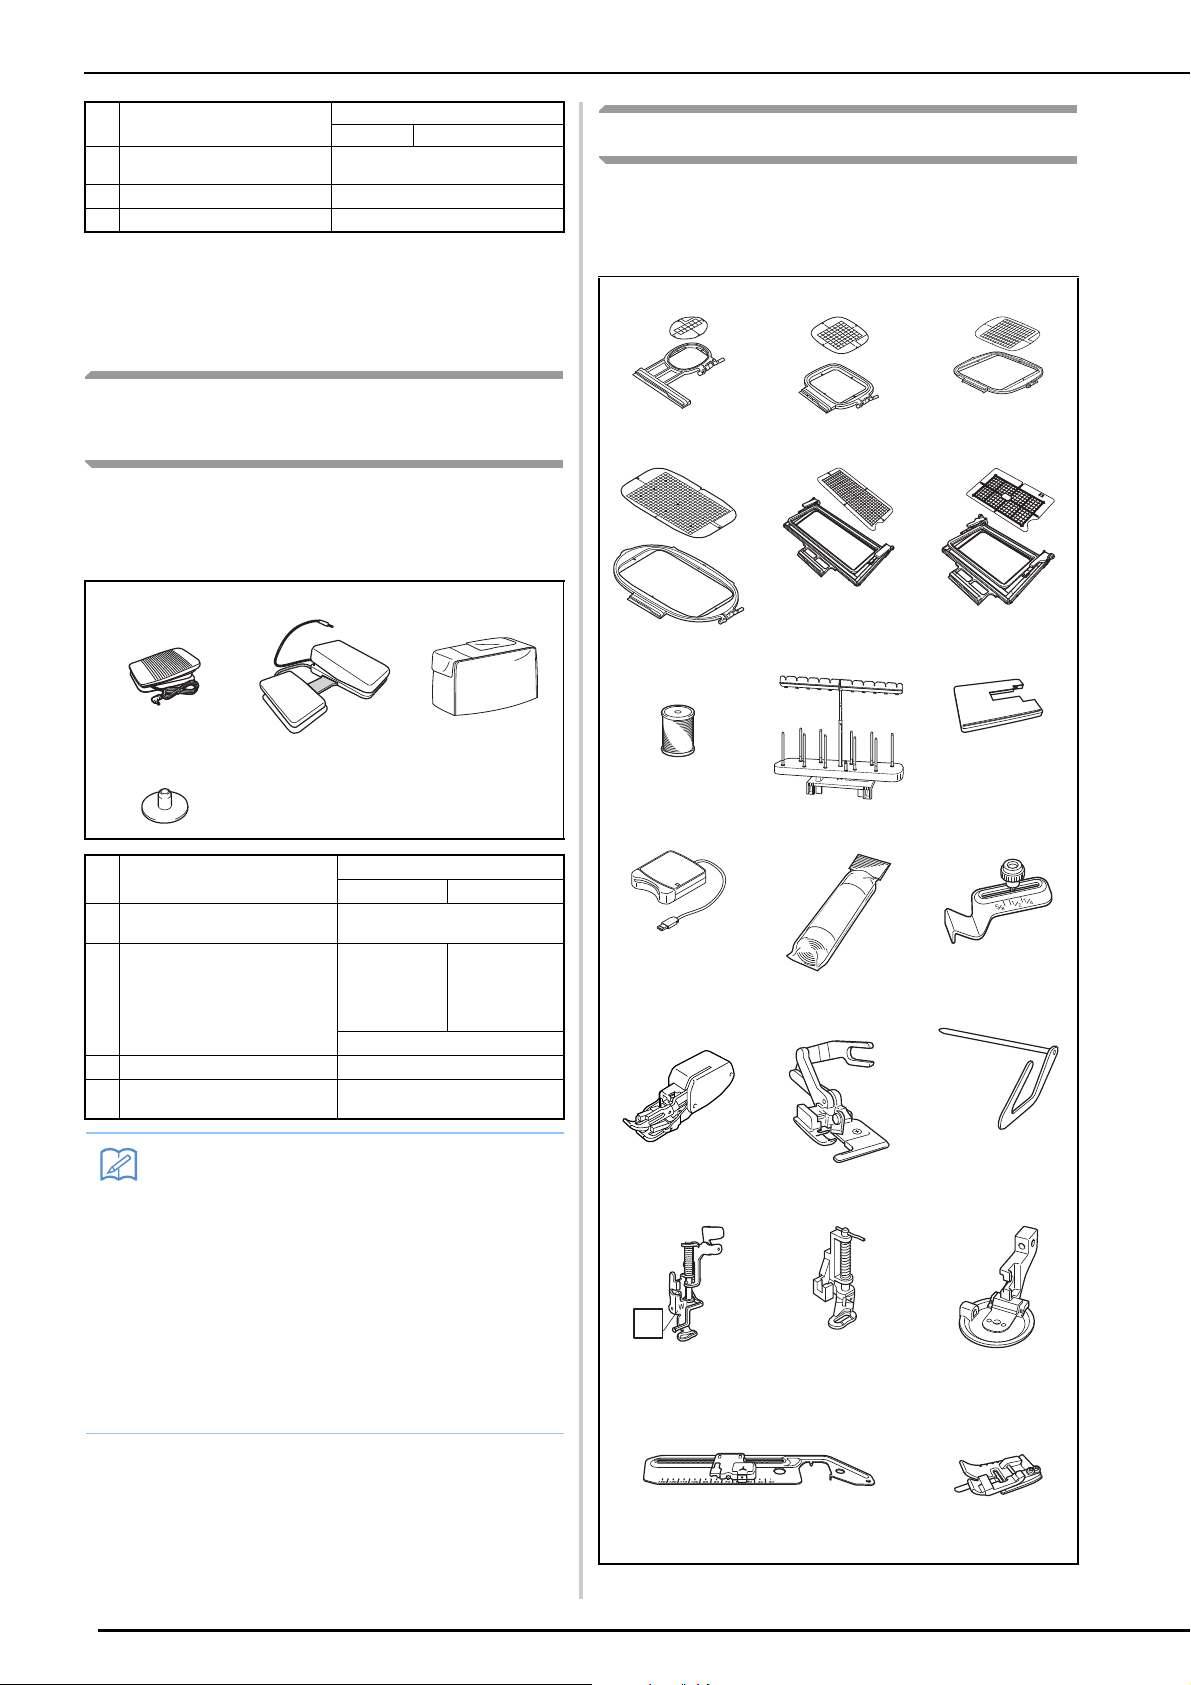
9
Straight stitch foot
SA167 F042N:
XC1973-052
10
Free motion quilting foot “C”
XF4737-001
11
Free motion echo quilting
foot “E”
XE0766-001
12
Free motion open toe
quilting foot “O”
SA187 F061:
XE1097-001
13
Embroidery foot “W+” with
LED pointer
SA197
(U.S.A.)
SA197C
(Canada)
FLED1: XF4168-001
(EU area)
FLED1AP: XF6845-001
(Asia/Oceania)
XF3124-001
(other area)
14
Vertical stitch alignment foot
“V”
SA189 F063: XE5224-001
15
1/4 quilting foot with guide SA185 F057:XC7416-252
16
Couching dual feed foot XF9332-001
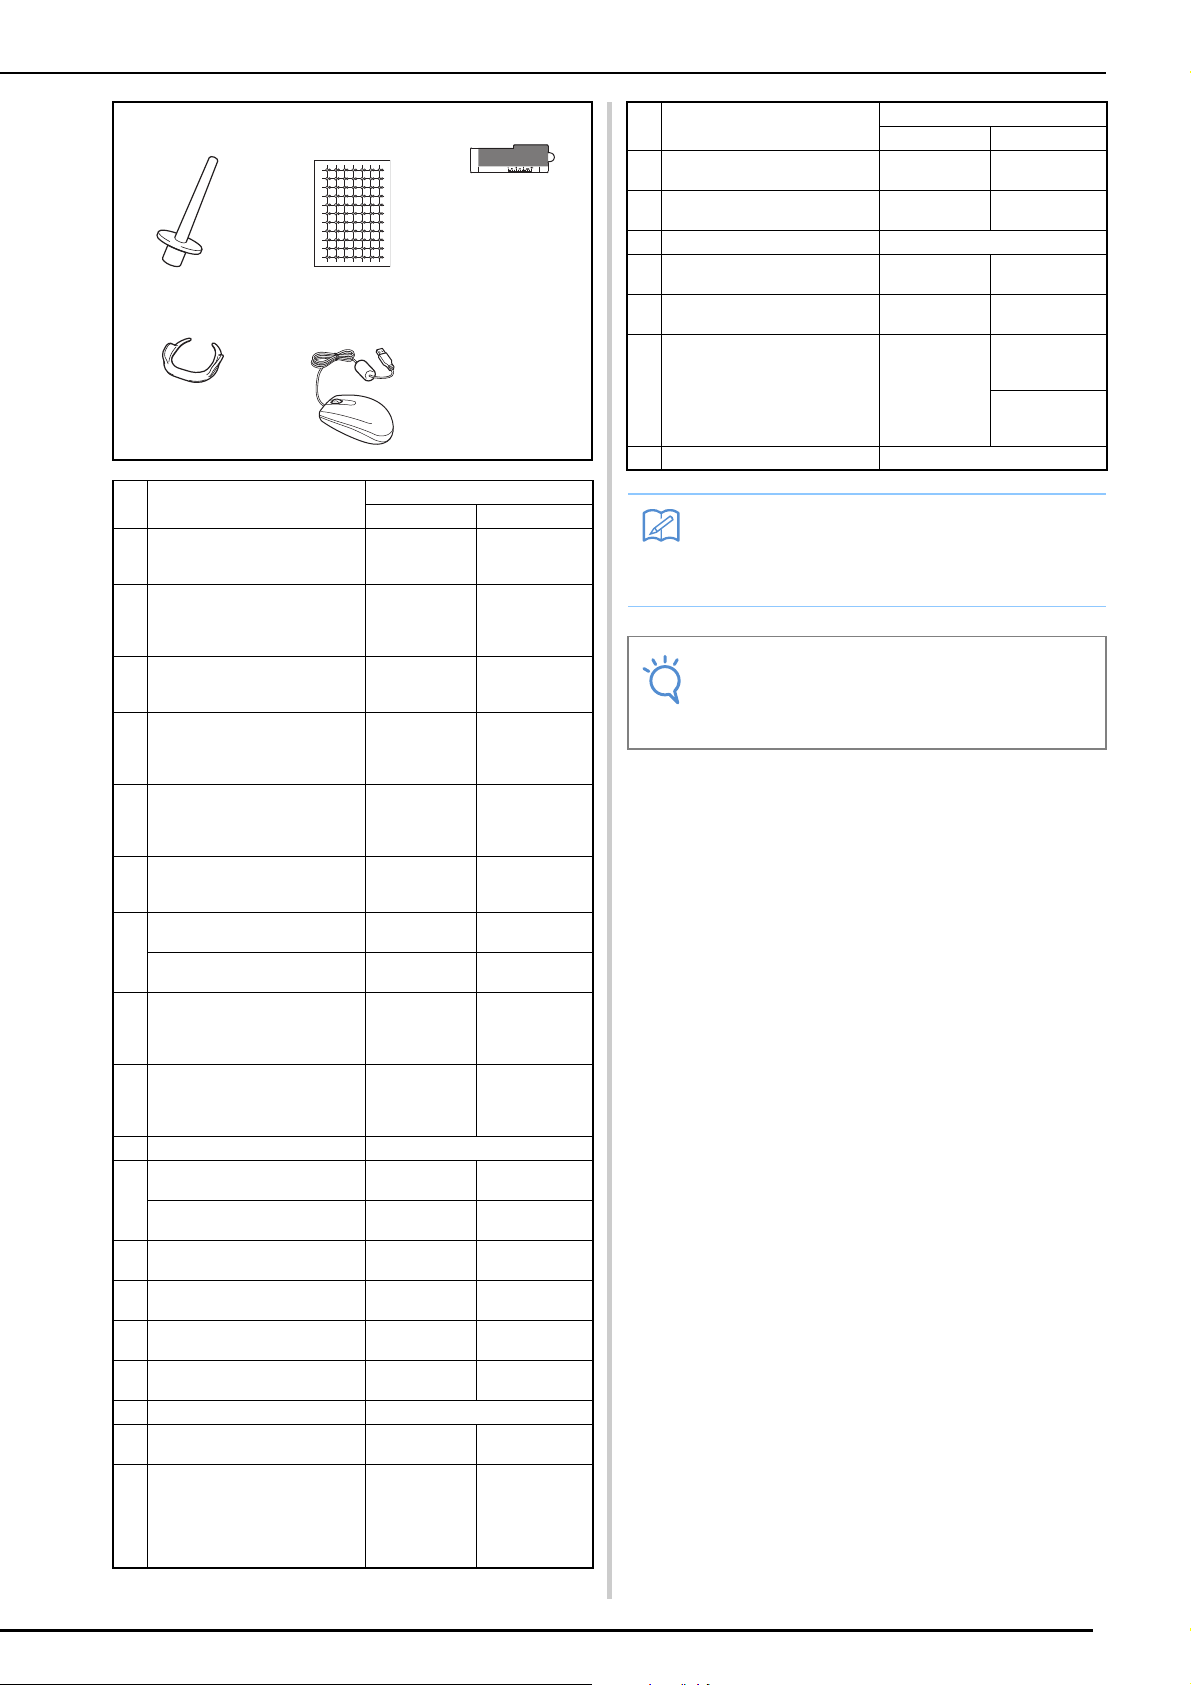
17
Top-left yarn guide
XG0786-001
18
Yarn threader
XF7187-001
19
Adapter
SA131 F010N:XF3613-001
20
Screw (small)
XA4813-051
21
Needle set *1
XE4962-001
22
Twin needle *2
XE4963-001
23
Ball point needle set *3
XD0705-151
24
Bobbin × 10
(One is on machine.)
SA156 SFB: XA5539-151
25
Seam ripper
XF4967-001
26
Scissors
XC1807-121
27
Cleaning brush
X59476-051
28
Eyelet punch
XZ5051-001
29
Screwdriver (small)
X55468-051
30
Screwdriver (large)
XC4237-021
31
Multi-purpose screwdriver
SAMDRIVER1
(U.S.A)
SAMDRIVER1C
(Canada)
MDRIVER1
(EU area)
MDRIVER1AP
(other area)
32
Spool cap (small)
130013-154
33
Spool cap (medium) × 2
(One is on machine.)
X55260-153
34
Spool cap (large)
130012-054
35
Thread spool insert
(mini king thread spool)
XA5752-121
36
Spool stand
SA562
(U.S.A.)
SA562C
(Canada)
TS6: XF4180-001
See page 24
37
Bobbin clip × 10
XE3060-001
38
Spool felt (on machine)
X57045-051
39
Spool net × 2
XA5523-050
40
Embroidery needle plate
cover
XE5131-001
41
Touch pen (stylus)
XA9940-051
42
Knee lifter
SA599 KL1: XE5902-001
43
USB cable
XD0745-051
44
Alternate bobbin case
(no color on the screw)
XC8167-551
45
Bobbin case
(gray, for bobbin work)
XE8298-001
46
Straight stitch needle plate
XF3076-001
47
Cord guide bobbin cover
(with single hole)
XE8991-101
48
Bobbin cover (with mark)
XF0750-101
49
Bobbin cover (on machine)
XE8992-101
50
Embroidery frame set
(medium) H 10 cm × W 10
cm (H 4 inches × W 4
inches)
SA438 EF74: XC8480-152
51
Embroidery frame set (large)
H 18 cm × W 13 cm
(H 7 inches × W 5 inches)
SA439 EF75: XC8481-152
52
Embroidery frame set
(extra large)
H 30 cm × W 20 cm
(H 12 inches × W 8 inches)
SA447 EF92: XE5071-001
53
Embroidery frame set (super
large) H 36 cm × W 24 cm (H
14 inches × W 9-1/2 inches)
XF9309-001
54
Scanning frame
XF9321-001
55
Magnet × 6
XF9325-001
56
Embroidery bobbin thread
SA-EBT EBT-CEN:
X81164-001
57
Embroidery positioning
sticker sheets × 4
SAEPS2
(U.S.A.)
SAEPS2C
(Canada)
EPS2: XF0763-001
58
White calibration stickers
(solid)
XE7916-001
59
Edge sewing sheet × 6
SAESS1
(U.S.A.)
SAESS1C
(Canada)
ESS1: XE5094-001
60
Stabilizer material
SA519 BM3: XE0806-001
61
Grid sheet set
SA507 GS3: X81277-151
62
Chalk pencil
XE8568-001
63
Sensor pen
XF4992-001 (EU area)
XF3116-001 (other area)
64
Pen holder XF2973-001
65
LCD cleaning cloth
XE4913-001
No. Part Name
Part Code
Americas Others
NAMES OF MACHINE PARTS AND THEIR FUNCTIONS
22
*1 75/11 2 needles
90/14 2 needles
90/14 2 needles: Ball point needle (gold colored)
*2 2.0/11 needle
*3 75/11 2 needles:
Ball point needle for embroidery
HAX130EBBR
Accessories that are Included in
Some Countries or Regions
If these accessories are not included with your
machine, these are available as optional
accessories.
Options
The following are available as optional accessories
to be purchased separately from your authorized
Brother dealer.
66
Accessory case
XG0629-001 (EU area)
XF9159-001 (other area)
67
Operation manual
This manual
68
Quick reference guide
XF9337-001
123
4
No. Part Name
Part Code
Americas Others
1 Foot controller XD0501-151 (EU area)
XC8816-051 (other area)
2 Multi-function foot controller SAMFFC
(U.S.A.)
SAMFFCC
(Canada)
MFFC1:
XF4159-001
MFFC10C:
XF4471-001
(Australia)
See page 26
3 Dust Cover XG1096-001
4 Bobbin center pin and
instruction sheet
XF5048-001
Memo
• (For U.S.A. only)
Foot controller: Model U
This foot controller can be used on the
machine with product code 882-W20/W22.
The product code is mentioned on the
machine rating plate.
• Always use accessories recommended for
this machine.
• The screw for the presser foot holder is
available through your authorized Brother
dealer (Part code XA4813-051).
No. Part Name
Part Code
Americas Others
123
456
789
10 11 12
13 14 15
16 17 18
19 20
W
NAMES OF MACHINE PARTS AND THEIR FUNCTIONS
23
21 22 23
24 25
No. Part Name
Part Code
Americas Others
1 Embroidery frame set (small)
H 2 cm × W 6 cm
(H 1 inch × W 2-1/2 inches)
SA437 EF73:
XC8479-152
2 Square embroidery frame
H 15 cm × W 15 cm
(H 6 inches × W 6 inches)
SA448
(U.S.A.)
SA448C
(Canada)
SEF150:
XF4163-001
3 Embroidery frame set (quilt)
H 20 cm × W 20 cm
(H 8 inches × W 8 inches)
SA446 EF91:
XE5068-101
4 Embroidery frame set (extra
large) H 26 cm × W 16 cm
(H 10-1/4 inches × W 6-1/4
inches)
SA441 EF81:
XC9763-151
5 Border embroidery frame H
30 cm × W 10 cm
(H 12 inches × W 4 inches)
SABF6200D1
(U.S.A.)
SABF6200D1
C (Canada)
BF3:
XF4170-001
6 Border embroidery frame set
H 18 cm × W 10 cm
(H 7 inches × W 4 inches)
SABF6000D BF2:
XE5059-001
7 Embroidery bobbin thread
(white)
SAEBT EBT-CEN:
X81164-001
Embroidery bobbin thread
(black)
SAEBT999 EBT-CEBN:
XC5520-001
8 10 spool stand SA561
(U.S.A.)
SA561C
(Canada)
TS5:
XF4175-001
9 Wide table SAWT6200D
(U.S.A.)
SAWT6200D
C (Canada)
WT10:
XF4184-001
10 Embroidery card reader SAECRI
11 Stabilizer material SA519 BM3:
XE0806-001
Water soluble stabilizer SA520 BM5:
XE0615-001
12 Seam guide SA538 SG1:
XC8483-052
13 Walking foot SA140 F033N:
XC2214-052
14 Side cutter foot SA177 F054:
XC3879-152
15 Quilting guide SA132 F016N:
XC2215-002
16 Embroidery foot “W” XF4012-001
17 Free-motion quilting foot SA129 F005N:
XC1948-052
18 Couching foot SA199V
(U.S.A)
SA199VC
(Canada)
F073:
XF8185-001
(EU area)
F073AP:
XF8188-001
(other area)
19 Circular attachment SACIRC1 CIRC1:
XE3527-001
20 Stitch in the ditch foot SA191 F065:
XF2339-001
21 Vertical spool pin XC8619-052
22 Embroidery positioning
sticker sheets × 8
SAEPS2 EPS2:
XF0763-001
23 Edge sewing sheet × 5 SAESS1 ESS1:
XE5094-001
24 Free motion guide grip SAFMGRIP FMG2:
XF6266-001
(EU area)
FMG2AP:
XF6267-001
(other area)
25 USB mouse XE5334-101
Memo
• All specifications are correct at the time of
printing. Please be aware that some
specifications may change without notice.
Note
• Visit your nearest authorized Brother dealer
for a complete listing of optional
accessories for your machine.
No. Part Name
Part Code
Americas Others
NAMES OF MACHINE PARTS AND THEIR FUNCTIONS
24
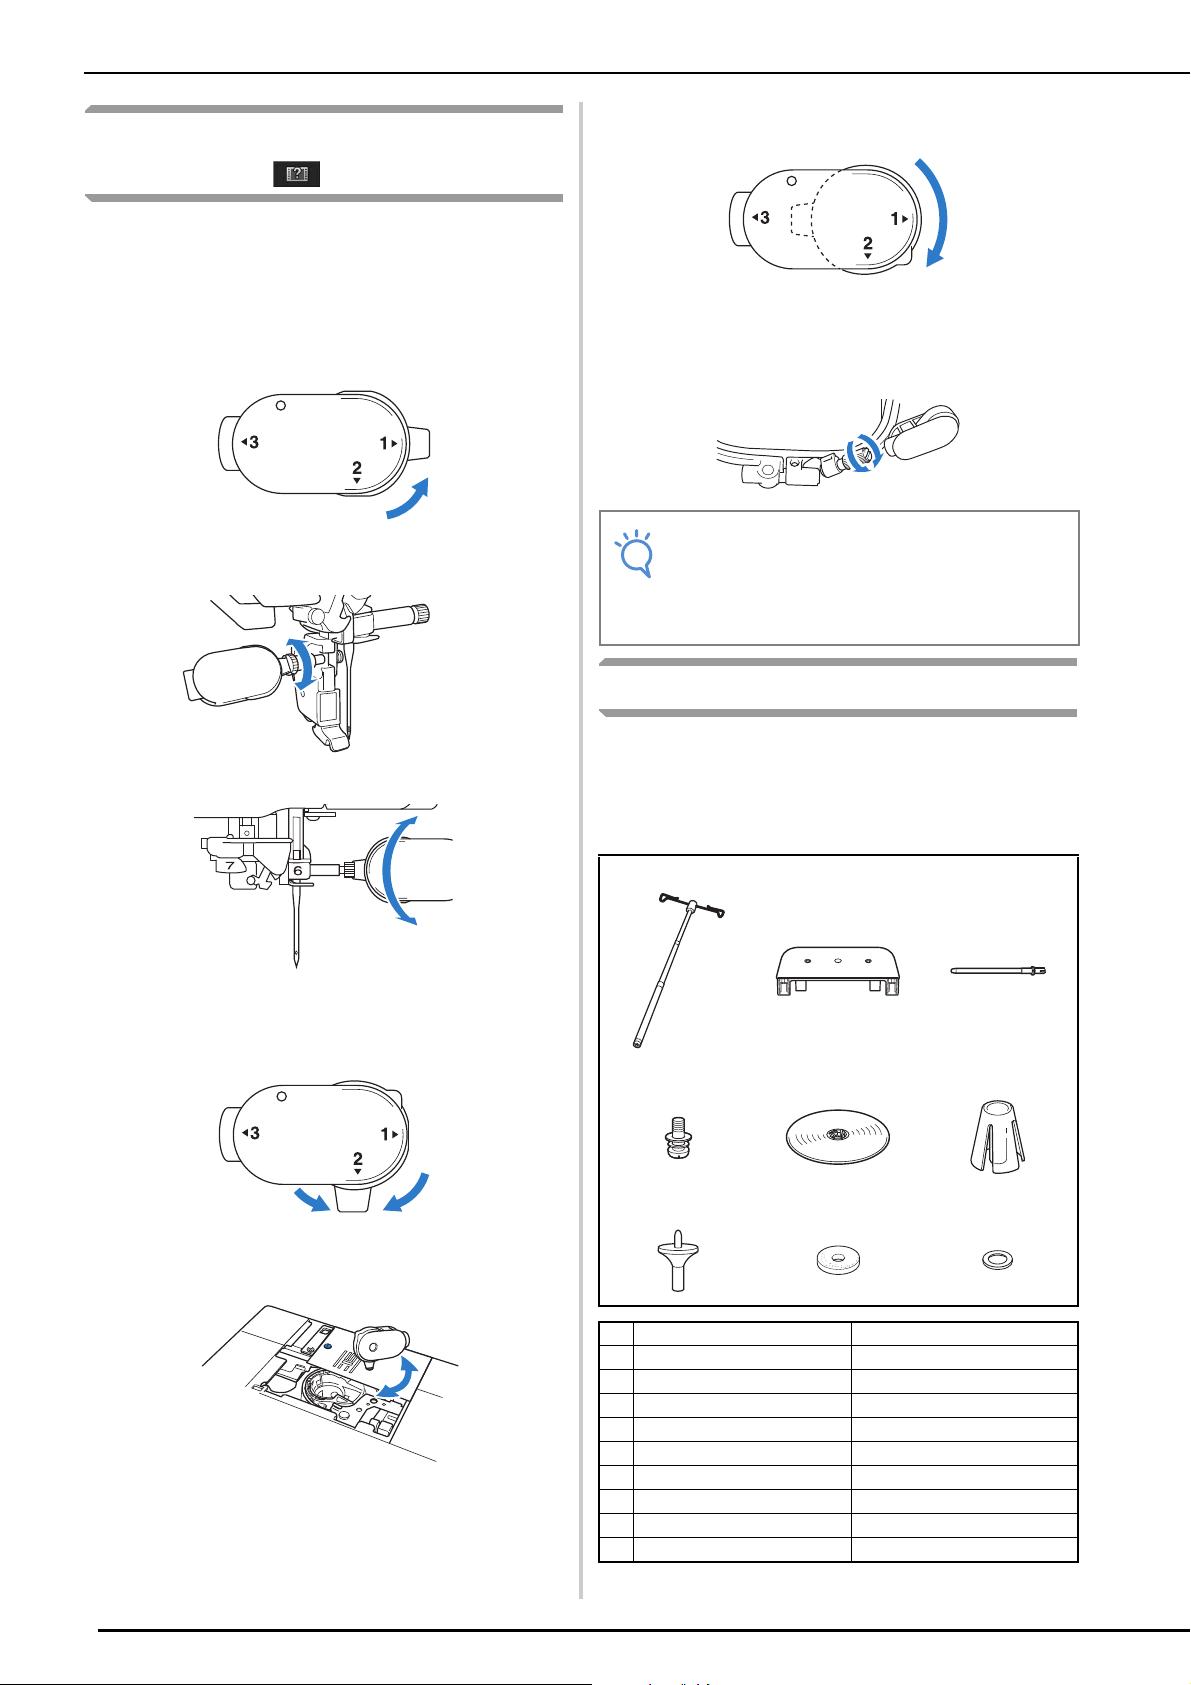
Using the Multi-purpose
Screwdriver
Since the screwdriver can be changed to three
different positions, it can be extremely useful for
the various machine preparations.
■ Position “1”
You can install/remove the presser foot holder,
needle clamp screw.
■ Position “2”
You can install/remove the needle plate.
■ Position “3”
The multi-purpose screwdriver can be positioned
over the screw on the embroidery frame to tighten
the screw after hooping the fabric or when removing
the fabric.
Using the Spool Stand
The included spool stand is useful when using
thread spools with a large diameter (cross-wound
thread). The spool stand can hold two spools of
thread.
Note
• When rotating the multi-purpose
screwdriver, do not forcefully rotate it in the
direction that it does not rotate; otherwise, it
may break.
123
456
789
No. Part Name Part Code
1 Telescopic thread guide XE0776-001
2 Spool support XE4637-001
3 Spool pin × 2 XA6313-051
4 Screw and washer XC7568-051
5 Spool cap (XL) × 2 XE0779-001
6 Spool holder × 2 XA0679-050
7 Spool cap base × 2 XE0780-001
8 Spool felt × 2 XC7134-051
9 Ring × 4 026030-136
NAMES OF MACHINE PARTS AND THEIR FUNCTIONS
25
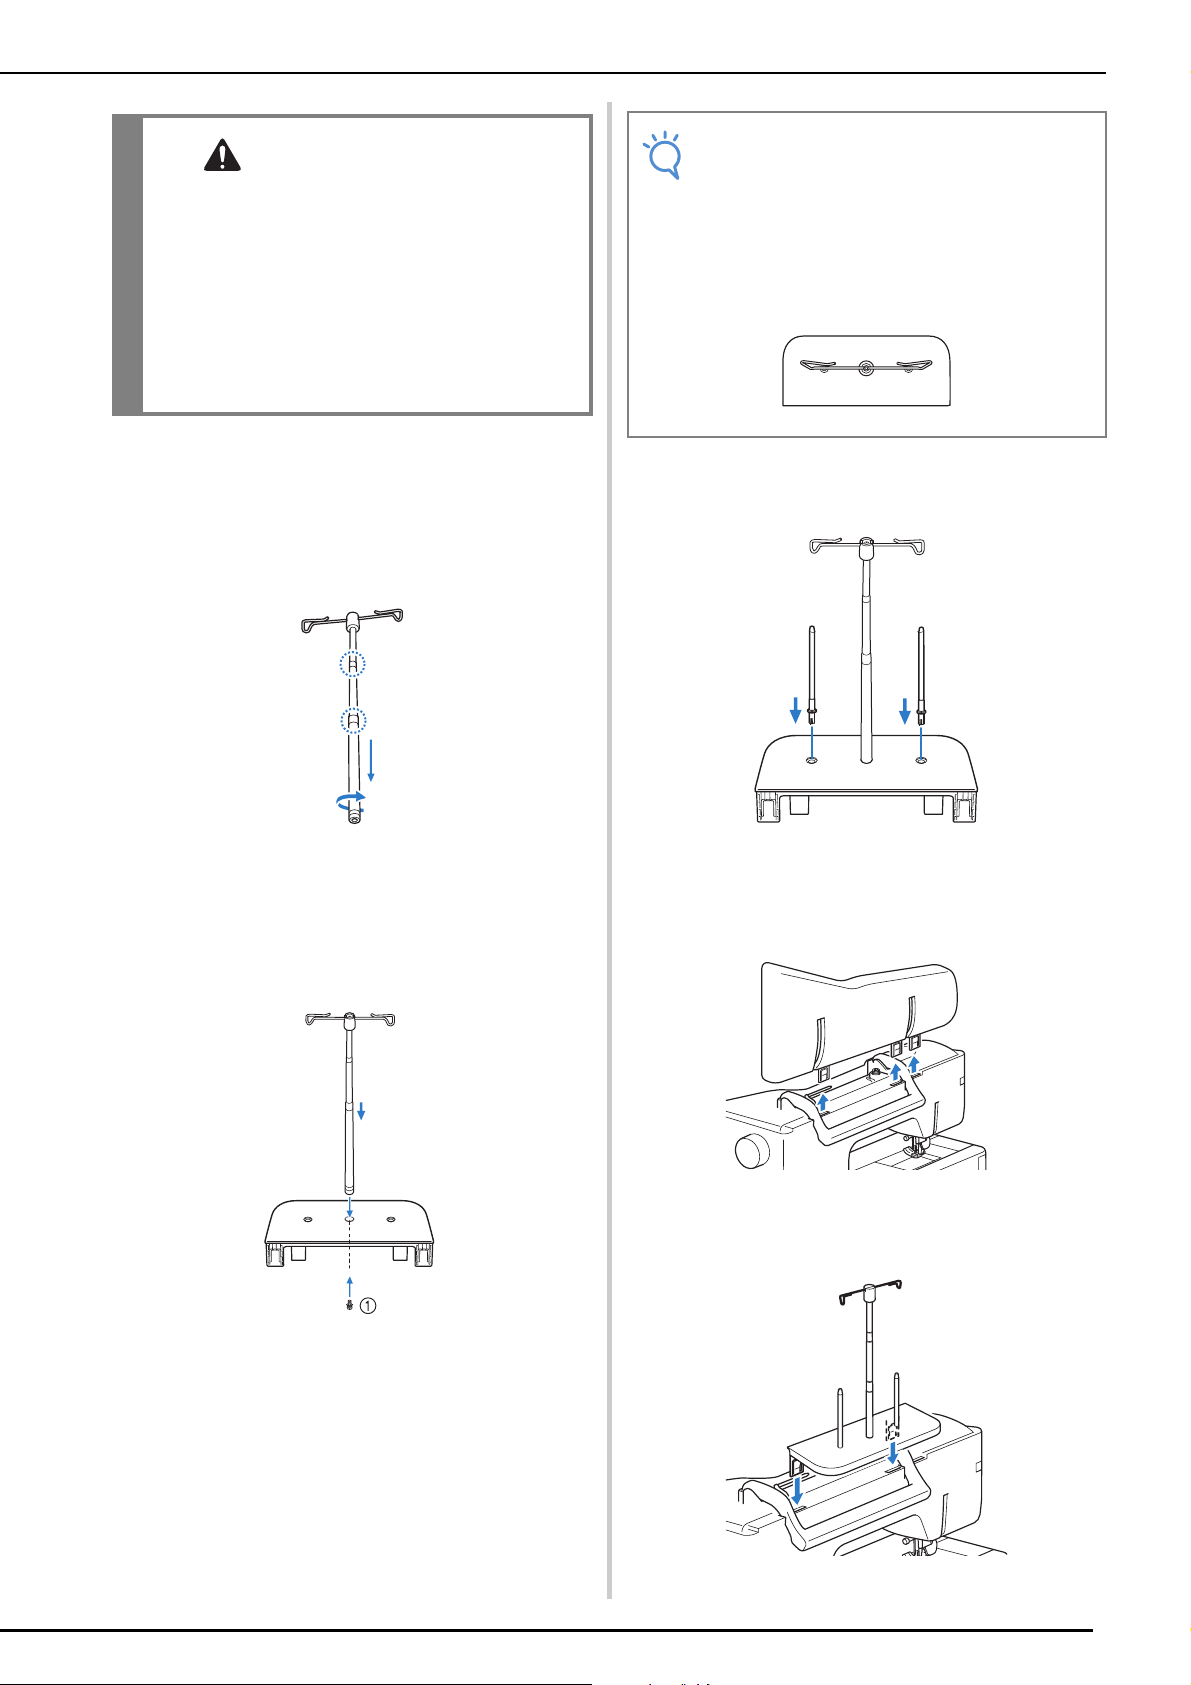
■ How to assemble the spool stand
a
Fully extend the telescopic thread guide
shaft, and then rotate the shaft until the two
internal stoppers click into place.
b
Insert the telescopic thread guide into the
round hole at the center of the spool
support, and then use a screwdriver to
securely tighten the screw (a) from the
reverse side.
a Screw
c
Firmly insert the two spool pins into the two
holes in the spool support.
d
Open the upper cover of the machine, and
then pull the upper cover up to remove it
from the machine.
e
Insert the spool stand onto the notches of
the machine.
CAUTION
• Do not lift the handle of the machine while the
spool stand is installed.
• Do not push or pull the telescopic thread
guide or spool pins with extreme force,
otherwise damage may result.
• Do not place any object other than spools of
thread on the spool support.
• Do not try to wind thread on the bobbin while
sewing using the spool stand.
Note
• Make sure that the stoppers on the
telescopic thread guide shaft are firmly in
place and that the thread guide openings
are directly above the two holes for spool
pins in the spool support. In addition, check
that the shaft is securely tightened in the
spool support.

NAMES OF MACHINE PARTS AND THEIR FUNCTIONS
26
■ How to remove
a
Pull the spool stand up to remove it from
the machine.
b
Attach the upper cover to the machine.
Using the Multi-function Foot
Controller (Only for supplied
models)
Refer to see “Specifying the Multi-Function Foot
Controller (Only for supplied models)” on page
84, before using this foot controller.
Assembling the Controller
a
Align the wide side of the mounting plate
with the notch in the bottom of the main
foot controller, and then secure them
together with a screw.
Feed the other side of the mounting plate into the
notch on the bottom of the side pedal, and then secure
them together with a screw.
Memo
• See page 58 about the bobbin winding
using the spool stand.
• See page 67 about the upper threading
using the spool stand.
12
34
No. Part Name Part Code
1 Main foot controller XF6708-201 (U.S.A.)
XF6710-201 (other area)
2 Side pedal XF3217-001
3 Mounting plate XF3222-001
4 Mounting screw × 2 XF3223-001

NAMES OF MACHINE PARTS AND THEIR FUNCTIONS
27
b
Insert the plug for the side pedal into the
jack at the back of the main foot controller.
c
Insert the plug for the main foot controller
into the foot controller jack on the right
side of the machine.
a Multi-function foot controller
b Foot controller jack
■ Adjusting the Pedal Positions
The pedal spacing can be adjusted depending on
the screw holes used in the mounting plate. The
pedal spacing is the widest when the pedals are
attached using the outermost screw holes
a; the
pedal spacing is the narrowest when they are
attached using the innermost screw holes
b.
Note
• The side pedal may be attached on the right
or left side of the main foot controller.
• For greater distance you always have the
option of not connecting the side pedal and
main foot controller using the mounting
plate, making sure that both pedals are
connected using the jack from the side
pedal to the main foot controller.

NAMES OF MACHINE PARTS AND THEIR FUNCTIONS
28
 Loading...