


Innov-is VM6200D
KIT
I
Installation Guide
Installationsanleitung
ENGLISH
DEUTSCH
für KIT
I
Guide d’installation
KIT
I
I
du KIT
Installatie handleiding
Guida all’installazione
del
KIT
I
Guía de instalación
FRANÇAIS
NEDERLANDS
ITALIANO
ESPAÑOL
• Read this guide before installing.
•
Lesen Sie diese Anleitung vor der Installation durch.
•
Lisez ce guide avant de procéder à l'installation.
• Lees deze handleiding alvorens te installeren.
•
Leggere la presente guida prima dell'installazione.
Antes de instalar, lea este guía.
•
Leia este guia antes da instalação.
•
Перед началом установки прочитайте данное руководство.
•
Руководство по установке
KIT
I
I
del KIT
Guia de Instalação
КОМПЛЕКТ
I
PORTUGUÊS
РУССКИЙ

Thank you for choosing our product.
For additional product information and updates, visit our website at www.brother.com.
Information found in this guide is current at the time of printing.
Please be aware that some contents of this manual and product specifications are subject to change without
notice.
The examples used throughout this guide are screens shots taken from Windows 8.1.
Read this guide before installing.
Vielen Dank, dass Sie sich für unser Produkt entschieden haben.
Weitere Produktinformationen und Aktualisierungen finden Sie auf unserer Website unter www.brother.com.
Die Informationen in dieser Anleitung sind zum Zeitpunkt der Drucklegung aktuell.
Beachten Sie bitte, dass Änderungen am Inhalt dieser Bedienungsanleitung und den Produktspezifikationen
vorbehalten sind.
Für die Beispiele in dieser Anleitung wurden Bildschirmdarstellungen von Windows 8.1 verwendet.
Lesen Sie diese Anleitung vor der Installation.
Nous vous remercions d’avoir choisi notre produit.
Pour plus d’informations sur les produits et les mises à jour, visitez notre site Web à l’adresse www.brother.com.
Les informations contenues dans de ce guide sont à jour au moment de l’impression.
Le contenu de ce guide et les spécifications de ce produit peuvent être modifiés sans avis préalable.
Les exemples utilisés dans ce guide sont des copies d’écran de Windows 8.1.
Lisez ce guide avant de procéder à l’installation.
Gefeliciteerd met de aanschaf van dit product.
Meer informatie over onze producten en updates vindt u op onze website www.brother.com.
De informatie in deze handleiding was actueel op het moment van afdrukken.
De inhoud van deze handleiding en de specificaties van dit product kunnen zonder kennisgeving worden
gewijzigd.
Gebruikte voorbeelden van schermafbeeldingen in deze handleiding zijn gemaakt met Windows 8.1.
Lees deze handleiding voordat u begint met installeren.
Grazie per aver acquistato il nostro prodotto.
Per ulteriori informazioni sui prodotti e sugli aggiornamenti, visitare il nostro sito Web all’indirizzo
www.brother.com.
Le informazioni contenute in questa guida sono aggiornate alla data di stampa.
Il contenuto della guida e le specifiche del prodotto sono soggetti a modifiche senza preavviso.
Gli esempi riportati all’interno della presente guida sono screenshot ricavati da Windows 8.1.
Leggere la presente guida prima dell’installazione.
Gracias por elegir nuestro producto.
Si desea obtener actualizaciones o información adicional acerca del producto, visite nuestro sitio web
www.brother.com.
La información que se encuentra en esta guía está actualizada al momento de la impresión.
Tenga en cuenta que parte del contenido de este manual y las especificaciones del producto están sujetas a
cambios sin previo aviso.
Los ejemplos utilizados en esta guía son capturas de pantalla de Windows 8.1.
Lea esta guía antes de la instalación.
Obrigado por escolher este produto.
Para atualizações e informações adicionais do produto, visite o nosso site na web: www.brother.com.
As informações disponibilizadas neste manual são as atuais no momento da impressão.
Esteja ciente de que alguns conteúdos deste manual e as especificações do produto estão sujeitos a alterações
sem aviso prévio.
Os exemplos utilizados neste guia são capturas de tela do Windows 8.1.
Leia este guia antes da instalação.
Благодарим за выбор нашей продукции!
Для получения дополнительной информации и обновлений посетите наш веб-сайт www.brother.com.
Информация, приведенная в настоящем руководстве, действительна на момент печати.
Обратите внимание, что содержимое настоящего руководства и
изменены без предварительного уведомления.
В качестве примеров в тексте настоящего руководства показаны снимки экранов для операционной системы Windows 8.1.
Перед началом установки прочитайте данное руководство.
характеристики изделия могут быть

CONTENTS
Accessories ................................................................................ 2
Using the Manuals ..................................................................... 2
Installation Overview ................................................................. 3
Computer Requirements............................................................. 3
Installation Procedure................................................................. 4
ENGLISH
1
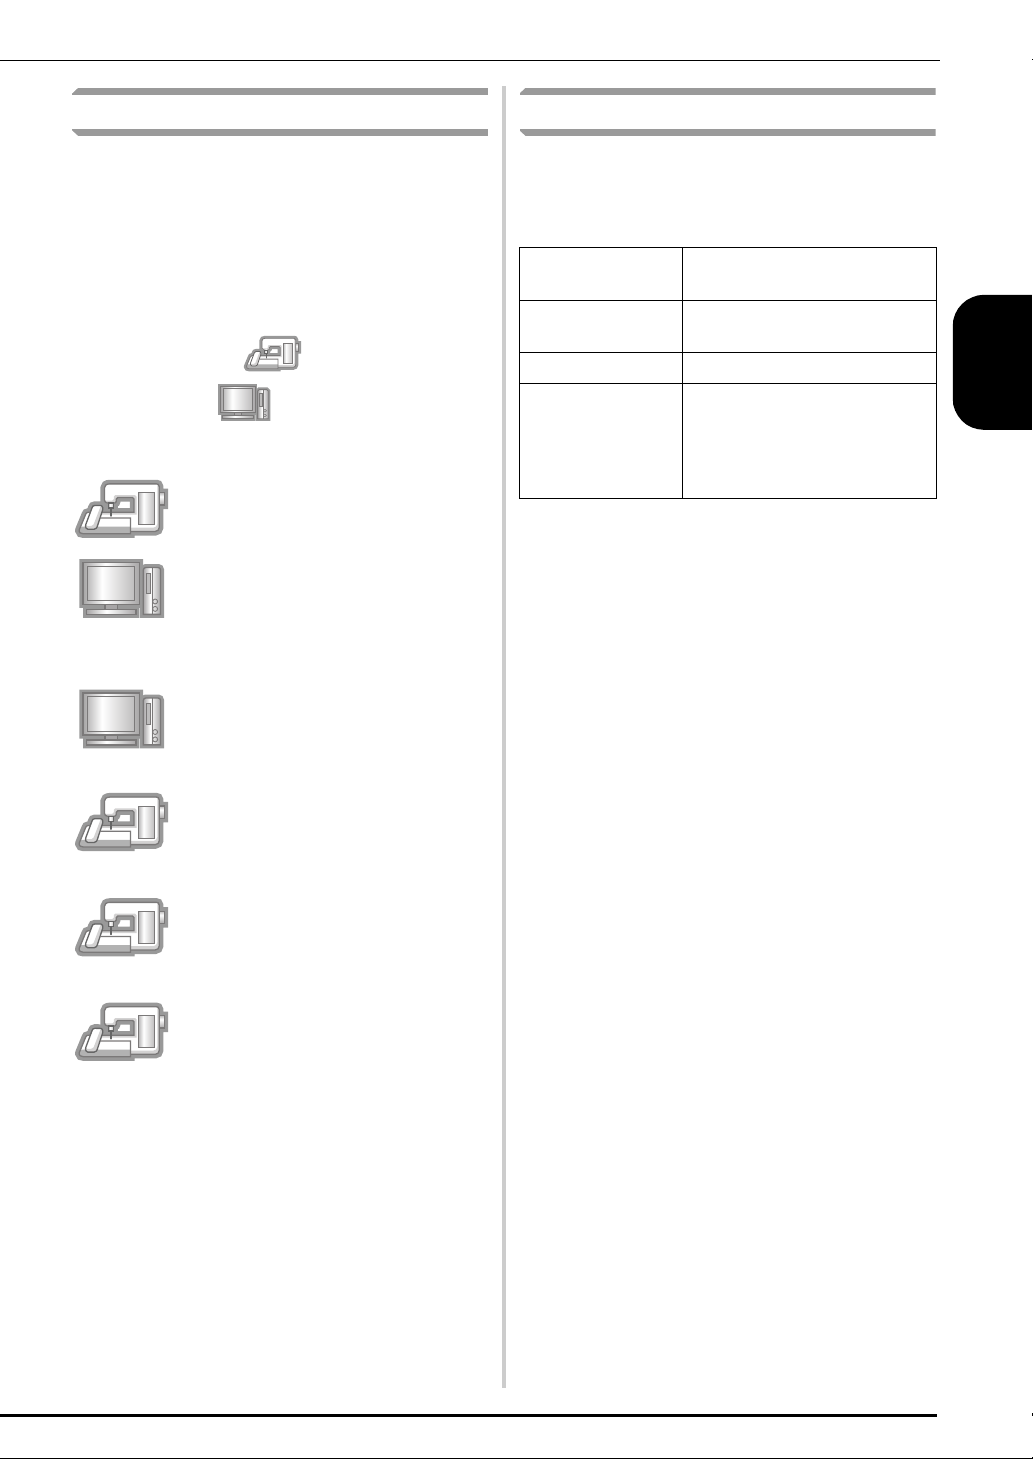
Accessories
Note
Using the Manuals
The following items are included with your purchase.
Please verify all contents and if anything is missing or
damaged, contact your authorized dealer.
•CD-ROM
The CD-ROM contains the following files.
• The Certification Key Issuing Wizard
Follow the procedure on this Installation
Guide to upgrade your machine.
• 30 embroidery patterns
• Embroidery design guide (PDF version)
• Installation Guide (this guide)
• Embroidery frame set
H 30 cm × W 20 cm (H 12 inches × W 8 inches)
After the KIT is activated, this embroidery frame
can be used, and the maximum embroidering
area becomes wider than on previous frames
included with your machine. Several patterns
saved on the included CD-ROM can be
embroidered using this embroidery frame.
• Installation Guide (this manual)
This guide contains descriptions of the
accessories, and procedures for upgrading the
machine.
• Operation Manual (PDF version)
The Operation Manual provides descriptions for
using the machine with the added functions and
accessories.
Be sure to use the machine and the included
accessories according to the descriptions in the
Operation Manual.
Adobe Reader is required for viewing and
printing the Operation Manual.
• Download a copy of the Operation Manual using the
Certification Key Issuing Wizard in step
5.
g on page
2
• Embroidery frame set
H 20 cm × W 20 cm (H 8 inches × W 8 inches)
This embroidery frame is perfect for quilting.
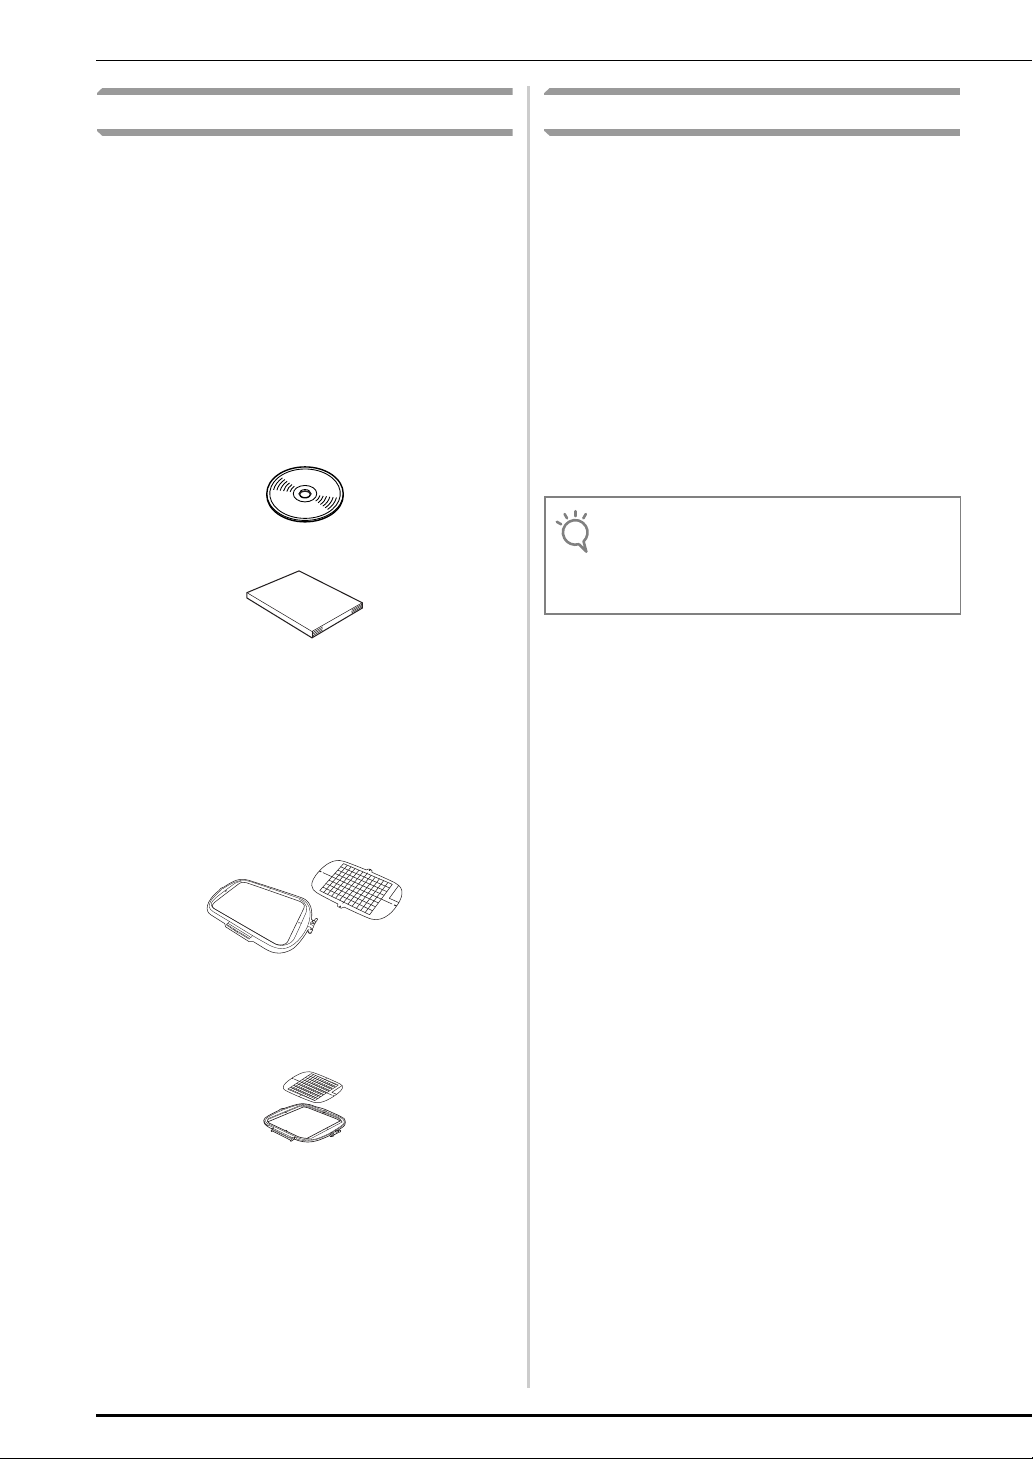
Installation Overview
Computer Requirements
First, use the Certification Key Issuing Wizard on the
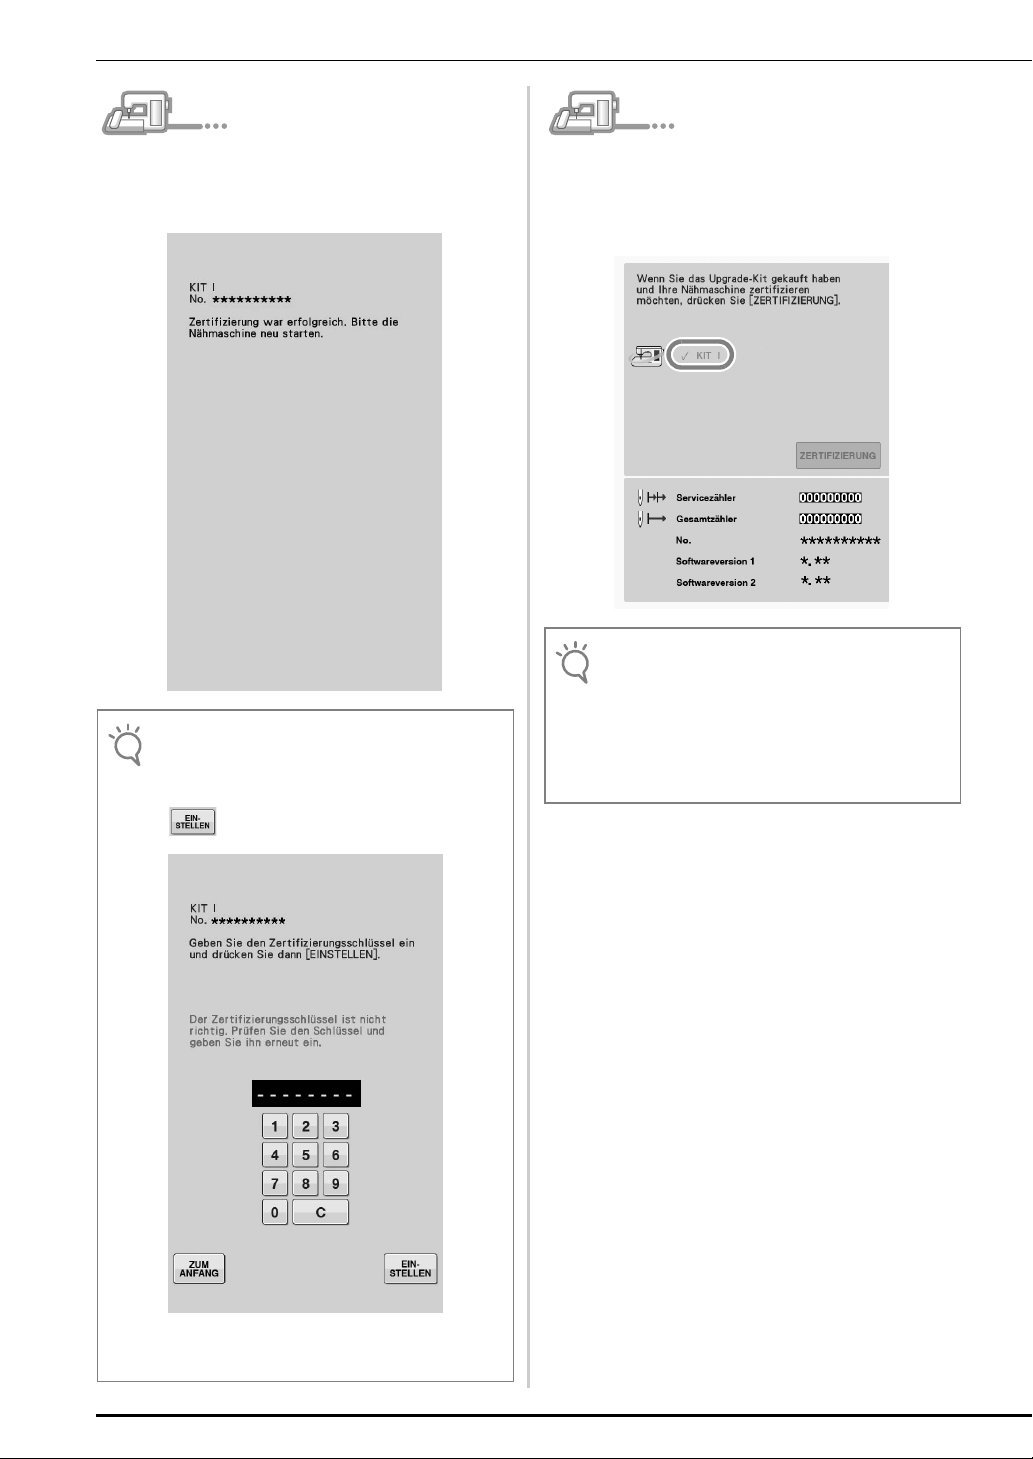
enclosed CD-ROM to obtain a Certification Key. Then,
use the CERTIFICATION key within the Settings screen,
page 4 or 7, to activate the upgrade application for KIT
on the sewing machine.
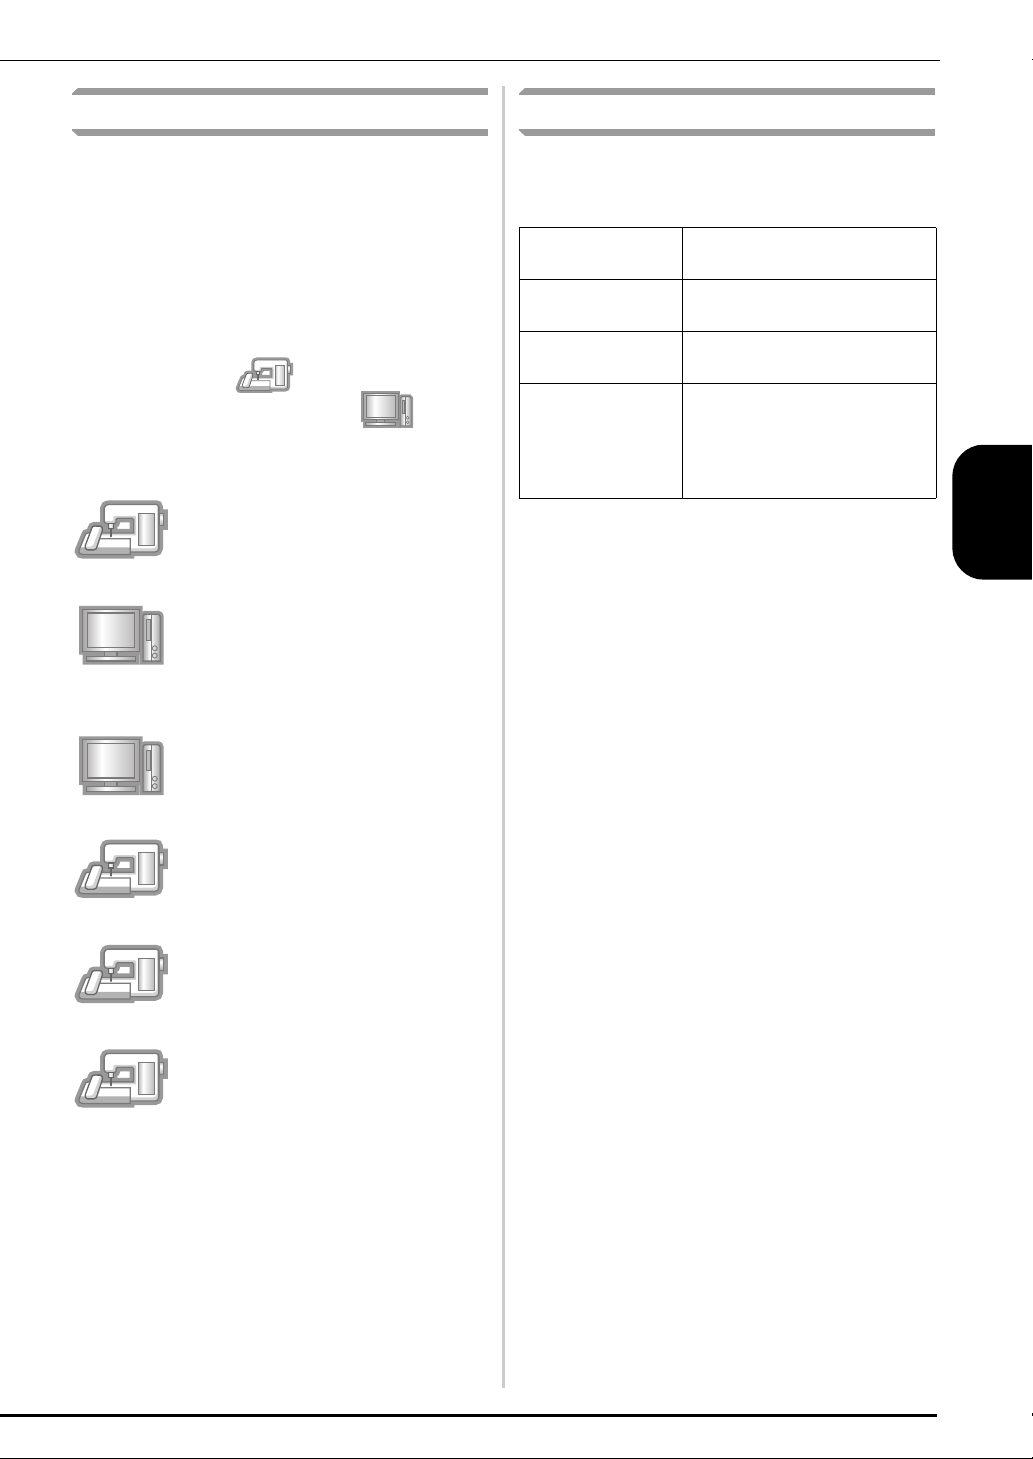
In the procedures section, indicates operations
performed with the sewing machine and
indicates operations performed with the computer.
[Step 1] Make a note of the internal
machine identification number (No.).
[Step 2] Insert the CD-ROM into the
computer’s CD-ROM drive, and then
start the Certification Key Issuing
Wizard.
[Step 3] Follow the wizard instructions
for obtaining the Certification Key.
Before starting the Certification Key Issuing Wizard,
check that the computer to be connected meets the
following operating conditions.
Computer IBM-PC or compatible computer
I
Operating System Windows Vista, Windows 7, 8,
8.1 (32 or 64bit)
CD-ROM drive Required for installation
Others Internet connection available
and one available USB port
(required to upgrade the sewing
machine) when using computer
* “IBM” is a registered trademark of IBM Corporation in the United
States and other countries.
* “Windows” and “Windows Vista” are registered trademarks of
Microsoft Corporation in the United States and other countries.
* “Adobe” and “Adobe Reader” are either registered trademarks or
trademarks of Adobe Systems Incorporated in the United States
and/or other countries.
* Each company whose software title is mentioned in this guide has a
Software License Agreement specific to its proprietary programs.
All other brands and product names mentioned in this guide are
registered trademarks of their respective companies. However, the
explanations for markings such as
clearly within the text.
®
and ™ are not exhibited
ENGLISH
[Step 4] Install the upgrade application
I on the sewing machine.
for KIT
[Step 5] Turn the machine off, remove
the USB media device and then turn the
machine back on.
[Step 6] After the upgrade has been
successfully installed, certify the “KIT
I”
in the Settings screen of the sewing
machine.
3
Installation Procedure
Note
Memo
Note
Memo
Memo
The following procedure describes how to upgrade
your sewing machine to KIT
• If the procedure described below is not fully
completed, your sewing machine cannot be
upgraded to KIT
• Access to the internet is required in order to
download the upgrade program and to obtain a
Certification Key.
Make a note of the 10-digit number (internal
a
machine identification number) displayed
I.
I.
beside “No.” on page 4 or 7 of the Settings
screen.
• Make sure the internal machine identification
number (No.) is recorded accurately as these
numbers need to be entered within the Certification
Key Issuing Wizard in order to obtain the
Certification Key.
Internal
machine
identification
number (No.)
Version
number
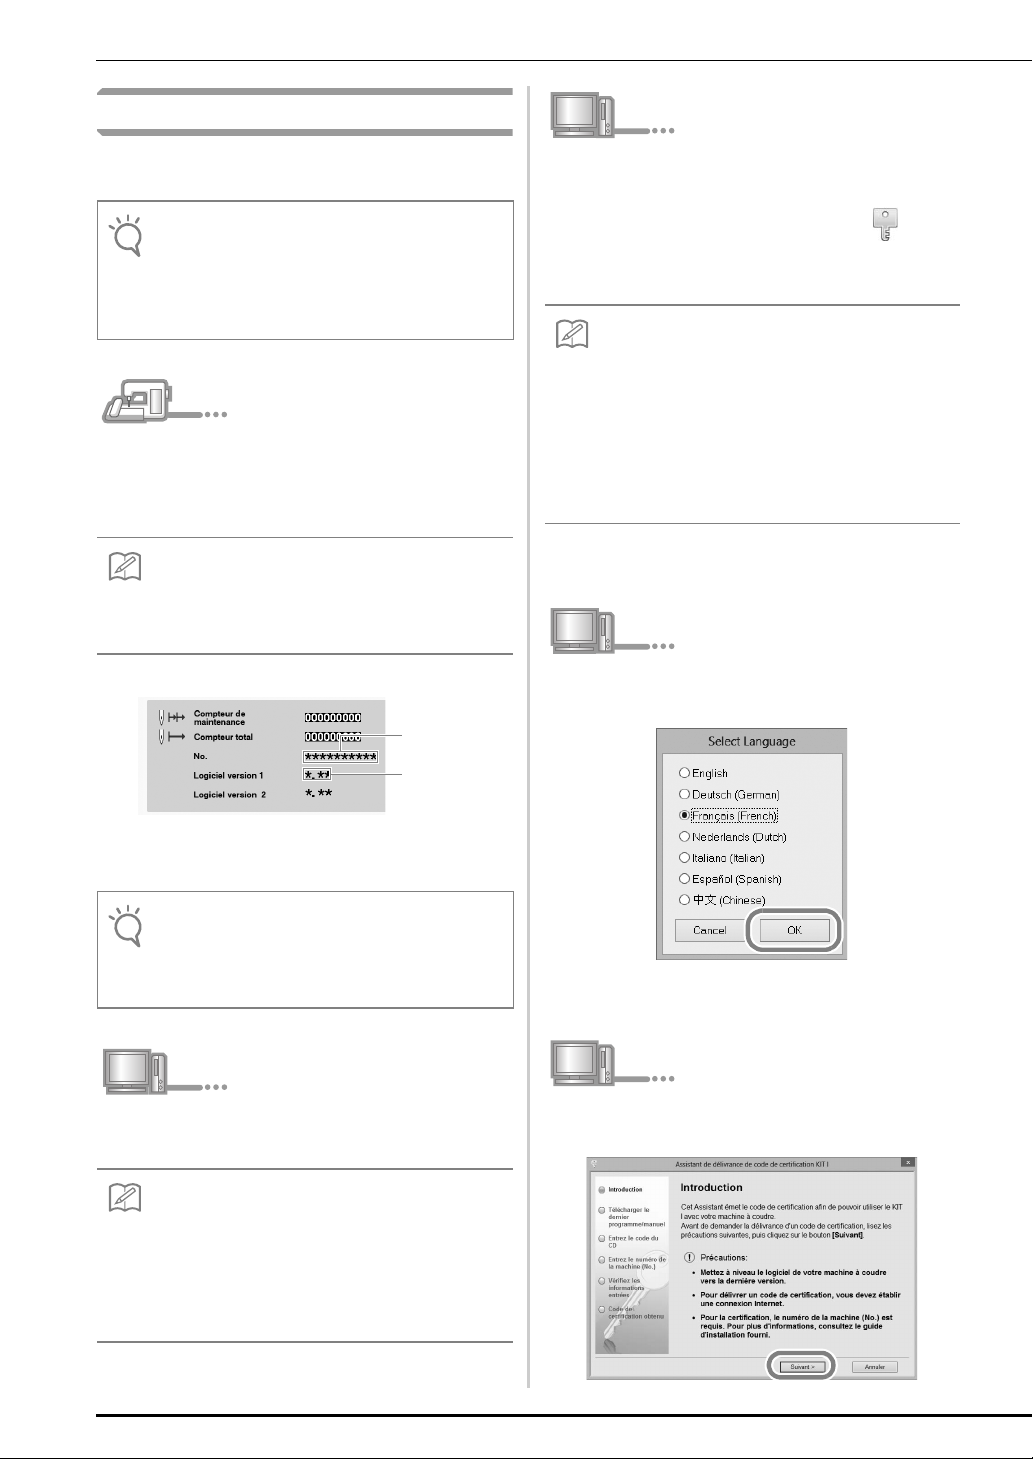
Open the designated drive for your CD-ROM
c
(usually the “D” drive) on Computer (My
Computer), double-click to start the
Certification Key Issuing Wizard.
• The following procedure can be used to start the
Certification Key Issuing Wizard.
1. Click Start.
2. Click Run or in the search box, type run, and
then, in the list of results, click Run.
→ The Run dialog box appears.
3. Type the path to the application file
(D:\KeyWizard_KITI.exe), and then click OK.
→ The Select Language dialog box automatically
appears.
Select the desired language, and then click
d
“OK”.
* The number of pages in the Settings screen may differ depending
on the version.
• The internal machine identification number that
appears beside “No.” is different from the machine
serial number (SER. NO.) located on the label
attached to the back of the sewing machine.
Insert the CD-ROM into the computer’s CD-
b
ROM drive.
• In Windows 7 or Windows Vista, when the AutoPlay
dialog box appears, click Open folder to view files.
• In Windows 8 or 8.1, click on the message Tap to
choose what happens with this disc. appears on
the screen.
4
→ KIT I Certification Key Issuing Wizard appears.
Carefully read the information that appears,
e
and then click “Next”.
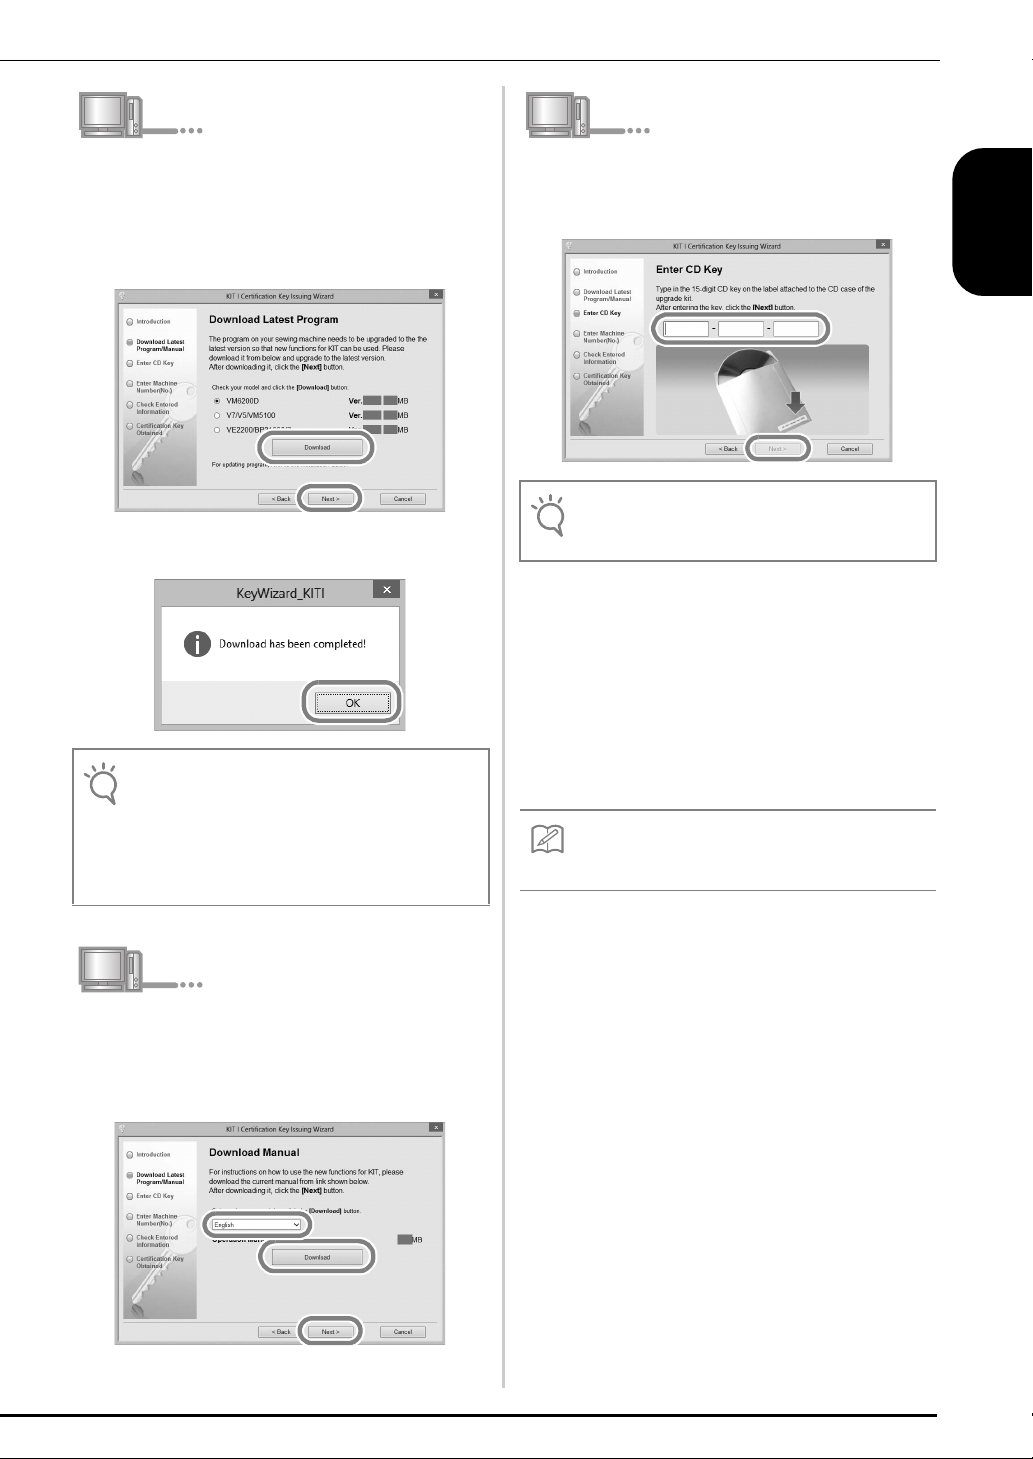
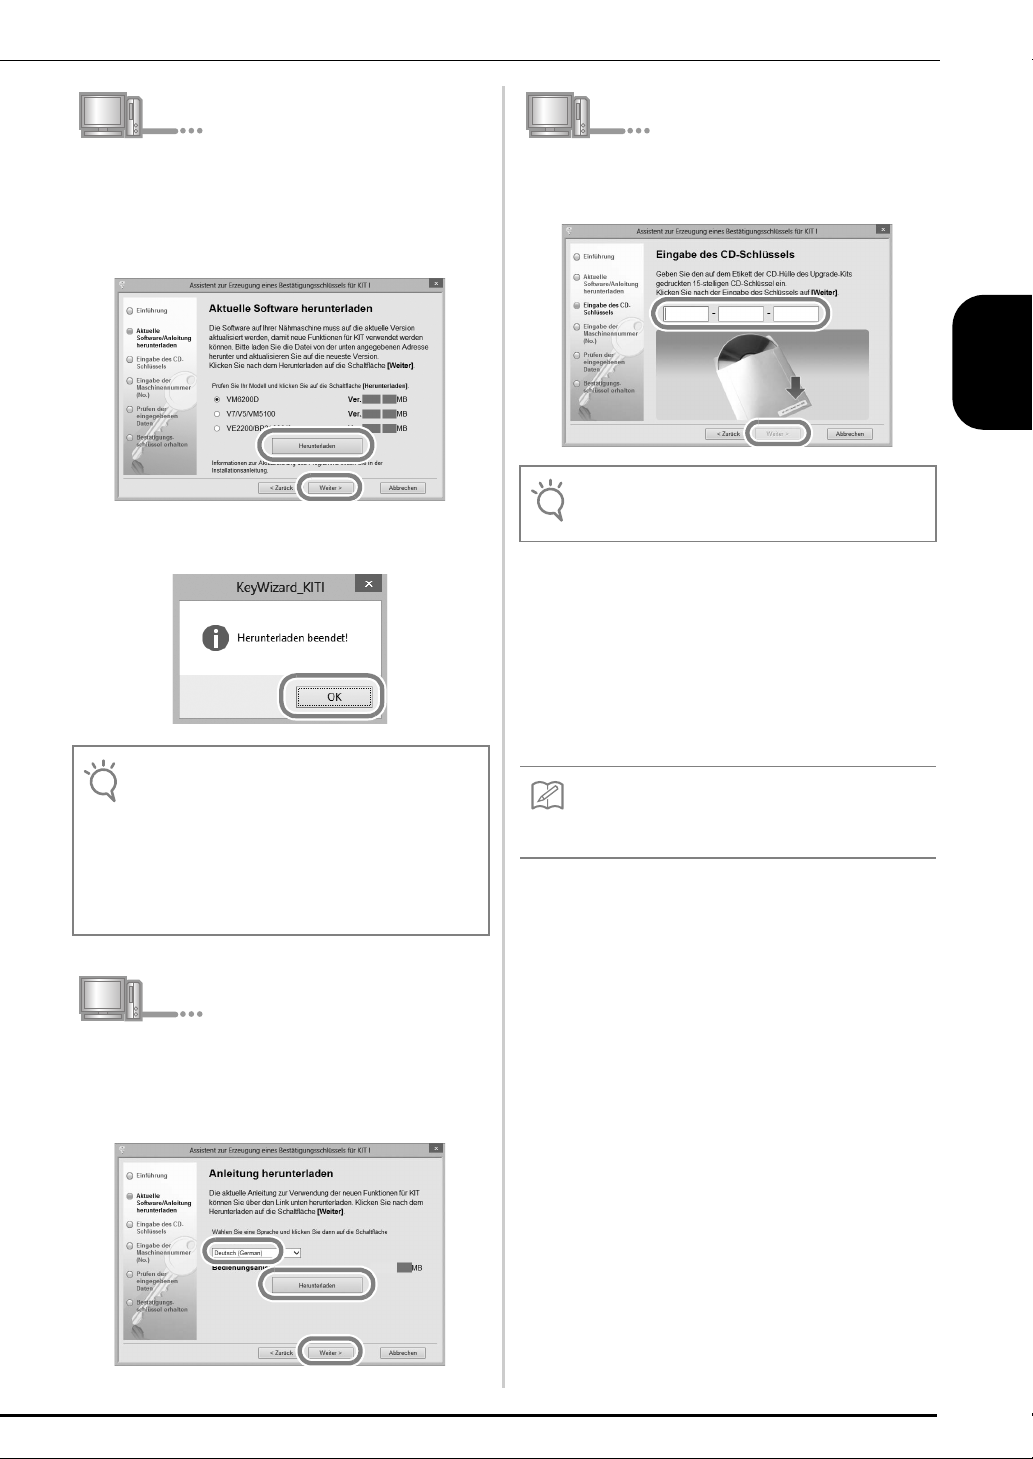
Download the latest upgrade program.
Note
Note
Memo
f
Confirm the model of your machine, click
“Download”, then save the upgrade program
(************.upf) to your computer. Click
“Next”.
Click “OK” to close the message below.
• If the displayed version or later has already been
installed in the machine (see step
click “Next” to continue with the procedure without
downloading the latest file. Follow step
and skip step
from step
m to r, then start the procedure
s on page 9.
a on page 4),
h to l,
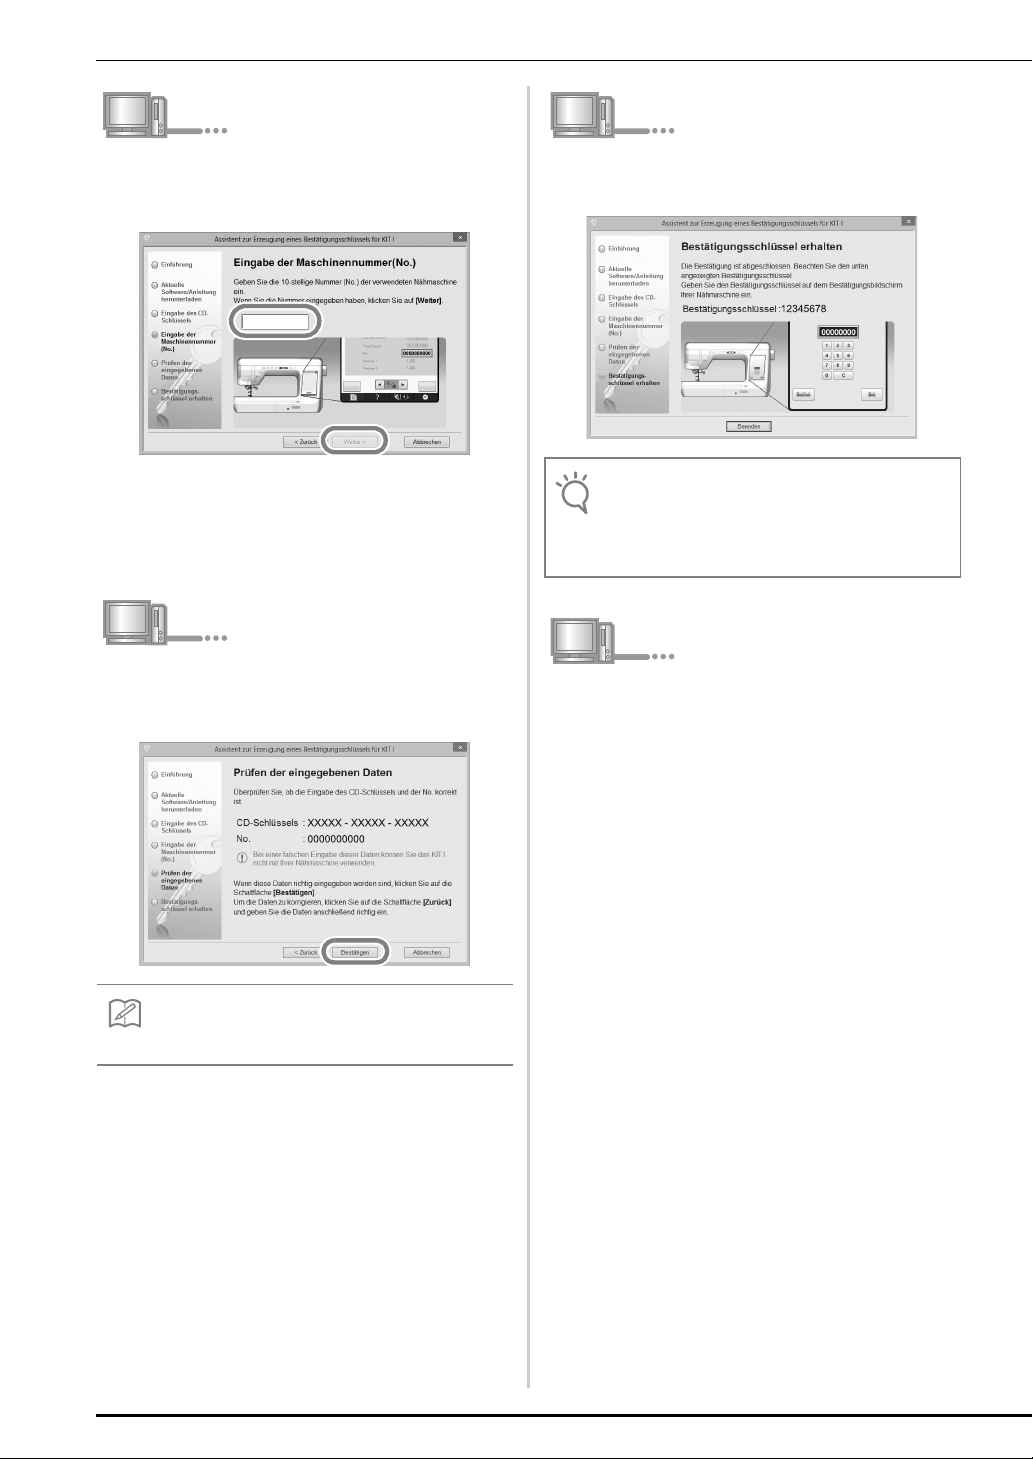
Type in the 15-digit CD key found on the label
h
attached to the CD-ROM envelope of the
upgrade kit, and then click “Next”
• Type in the CD key on the label attached to the CDROM envelope for machines.
If an error message appears
Check below list for possible entry error(s). To
close the message, click “OK”.
• Are symbols or characters other than letters and
numbers entered?
• Has the uppercase letter “I” been entered in place of
the number “1”?
• Has the uppercase letter “O” been entered in place
of the number “0”?
• The uppercase letter “O” and “I” are not used in the
CD Key. Also, no symbols are used in the CD key.
ENGLISH
g
Download the manual.
Select your preferred language and click
“Download” to save the file to your computer,
then click “Next”.
5

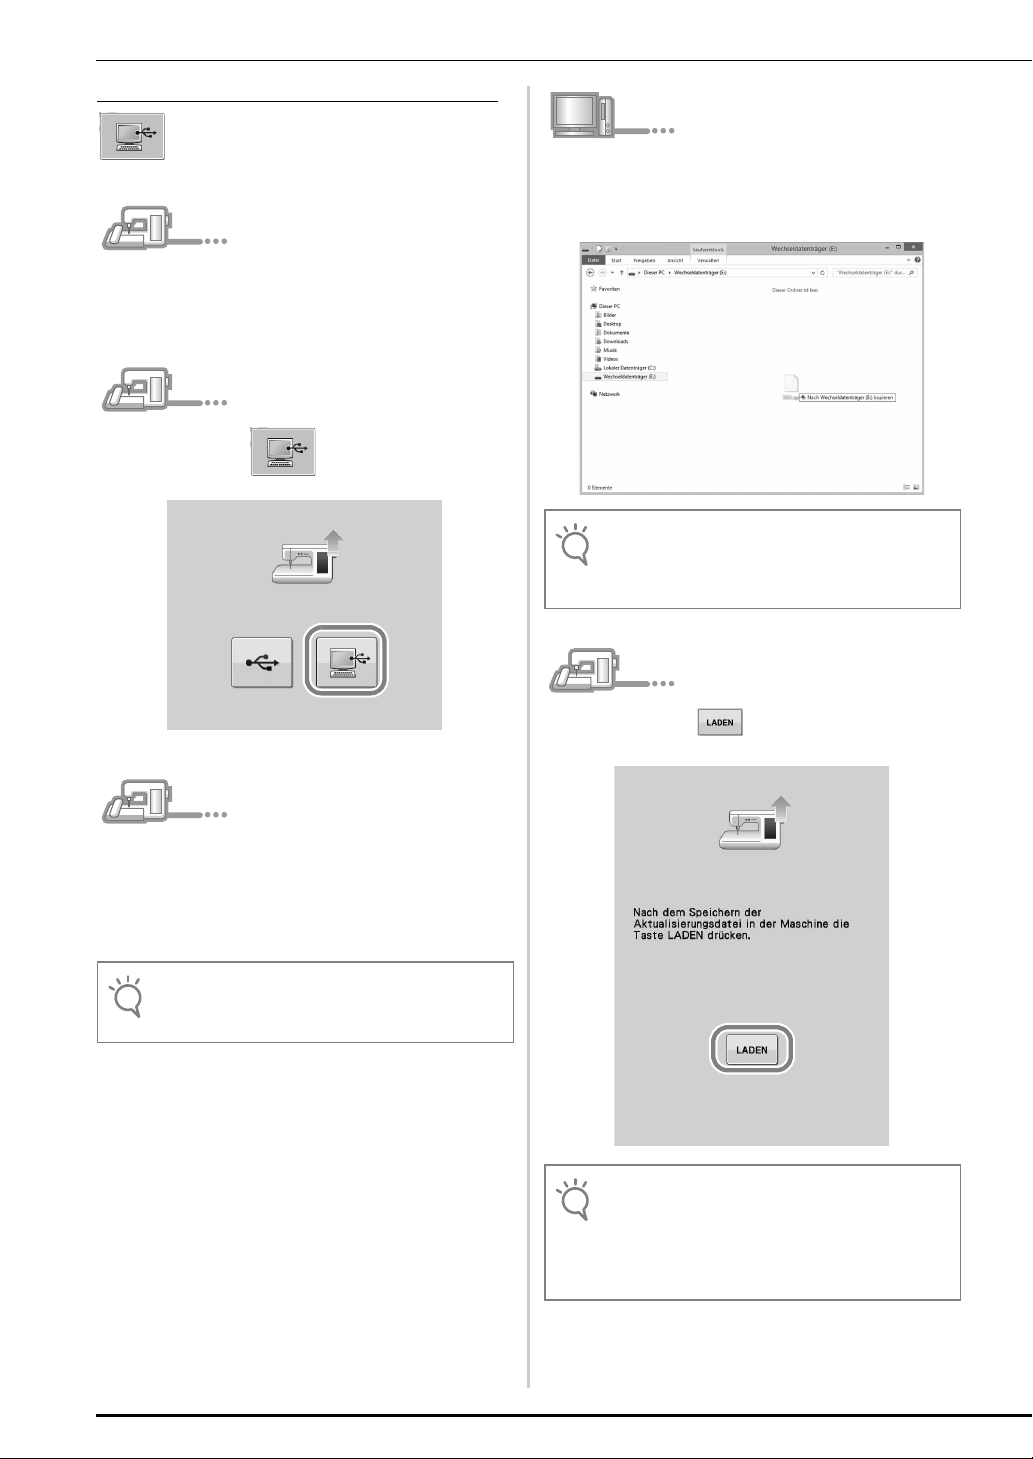
Type in the internal machine identification
Memo
Note
i
number (No.) written down in step
then click “Next”.
If an error message appears
Check that symbols or characters other than
numbers have not been entered. To close the
message, click “OK”.
a, and
Write down the 8-digit Certification Key that
k
appears.
• After upgrading the sewing machine to KIT I, the
Certification Key must be entered in the sewing
machine Settings screen.
Carefully verify that the information has been
j
entered correctly and then click “Certify”.
• To change the entered information, click “Back”.
If an error message appears
Check below list for possible error(s). To close
the message, click “OK”.
• Verify that the CD key and internal machine
identification number (No.) have been entered
correctly, and then repeat the procedure from step
c.
• The CD Key is valid for use with only one
designated internal machine identification number
(No.). Check that the CD key has been entered
correctly, and then repeat the procedure from step
c.
• Check the Internet connection, and then click
“Certify” again.
Click “Finish”.
l
The certification key has been successfully obtained.
Now proceed to installing the upgrade application for
I on the sewing machine.
KIT
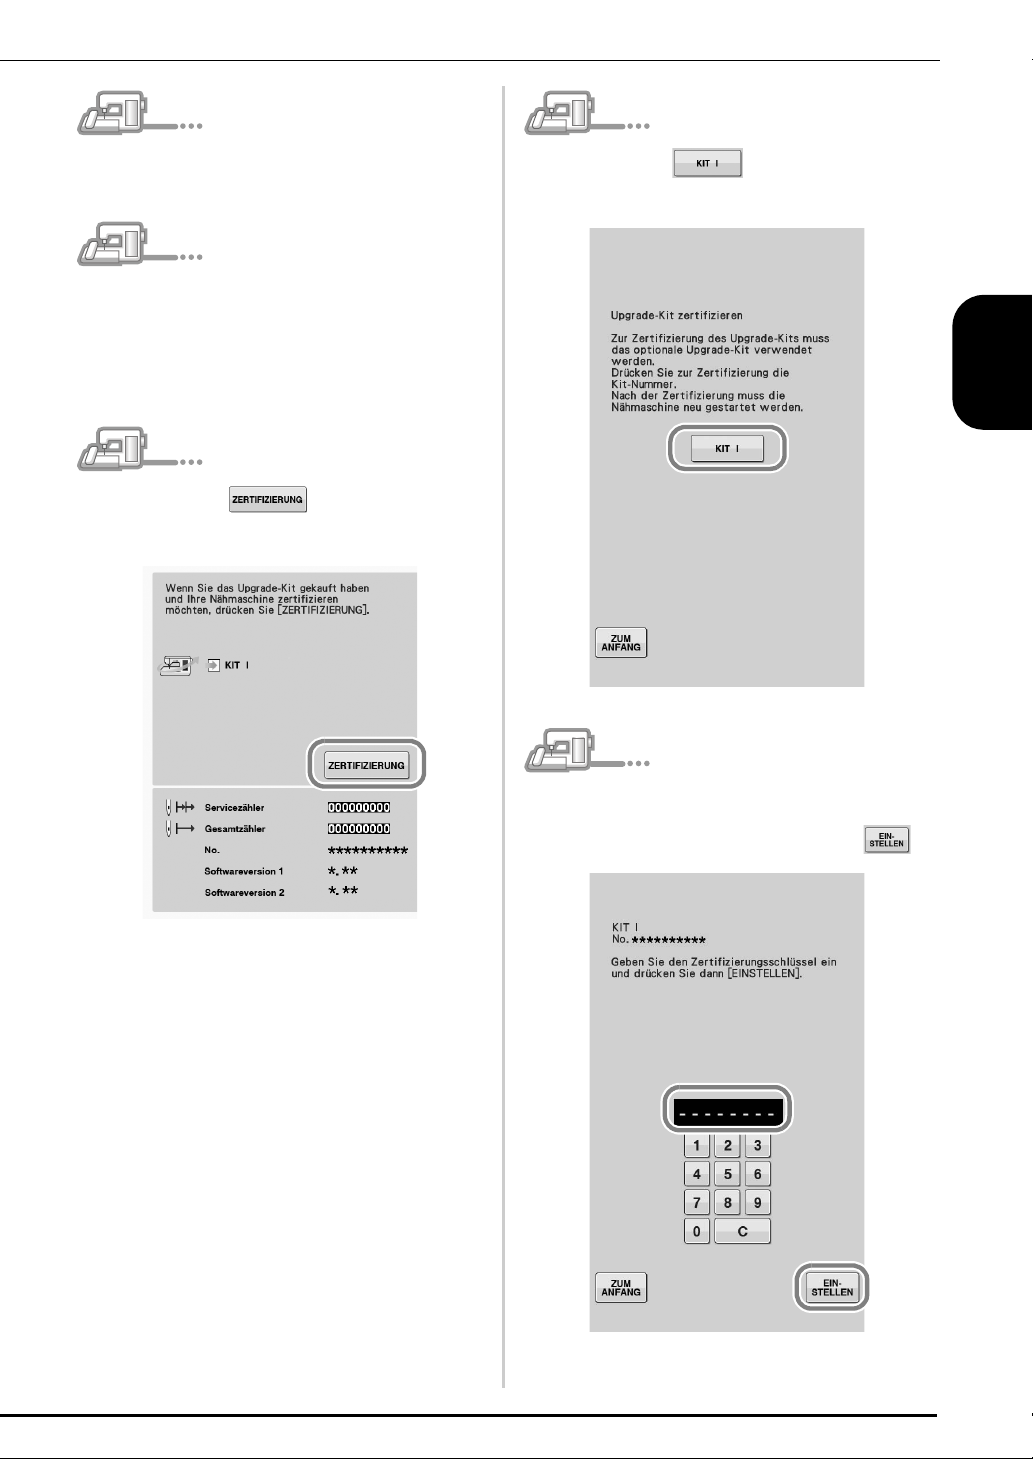
Use USB media or a computer to install the upgrade
application.
USB media is to be used, refer to the instructions that
If
follow.
If a
computer is to be used, refer to the procedure
described on page 8.
6
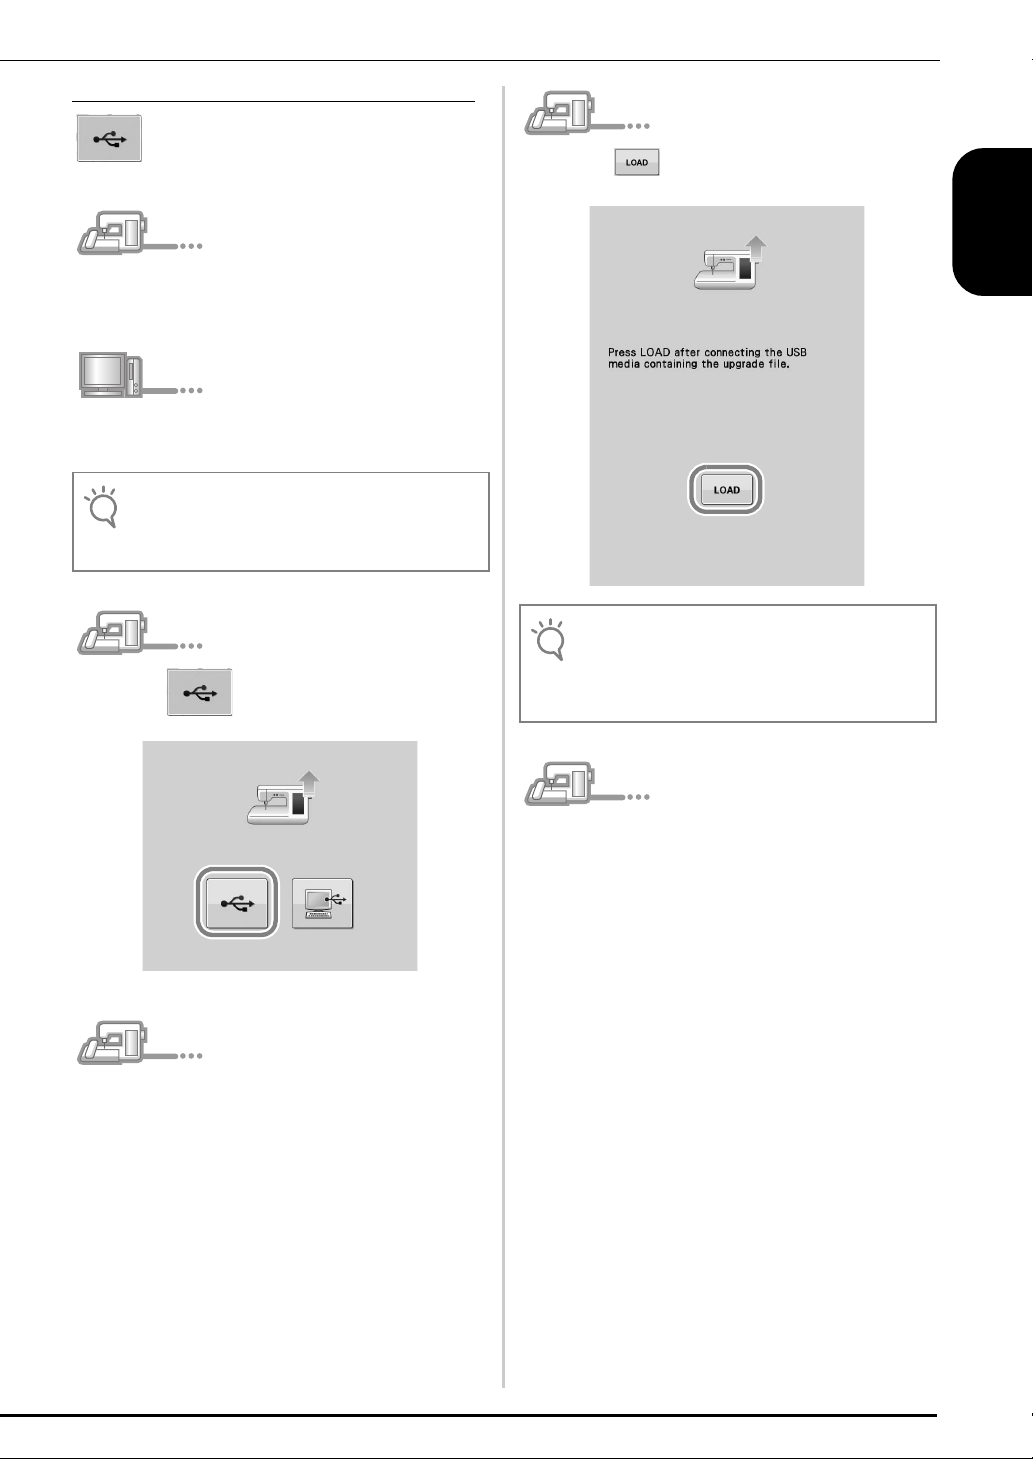
When using USB media to perform the installation
Note
Note
While pressing the “Automatic Threading”
m
button, turn the sewing machine on.
Copy the upgrade program downloaded in
n
o
f to the USB media.
step
• Copy only the upgrade program to a clean reformatted USB media; no other files should be on
this media.
Press .
Press .
q
When the message “Upgrade complete.” appears,
installation of the upgrade application has been
completed.
(If an error occurs, a message will appear in red.)
ENGLISH
Insert the USB media into the primary (top)
p
USB port connector on the right side of the
machine. It will take a few seconds until the
machine recognizes that the USB media has
been inserted into the port.
Remove the USB media.
r
Continue with step s on page 9.
7
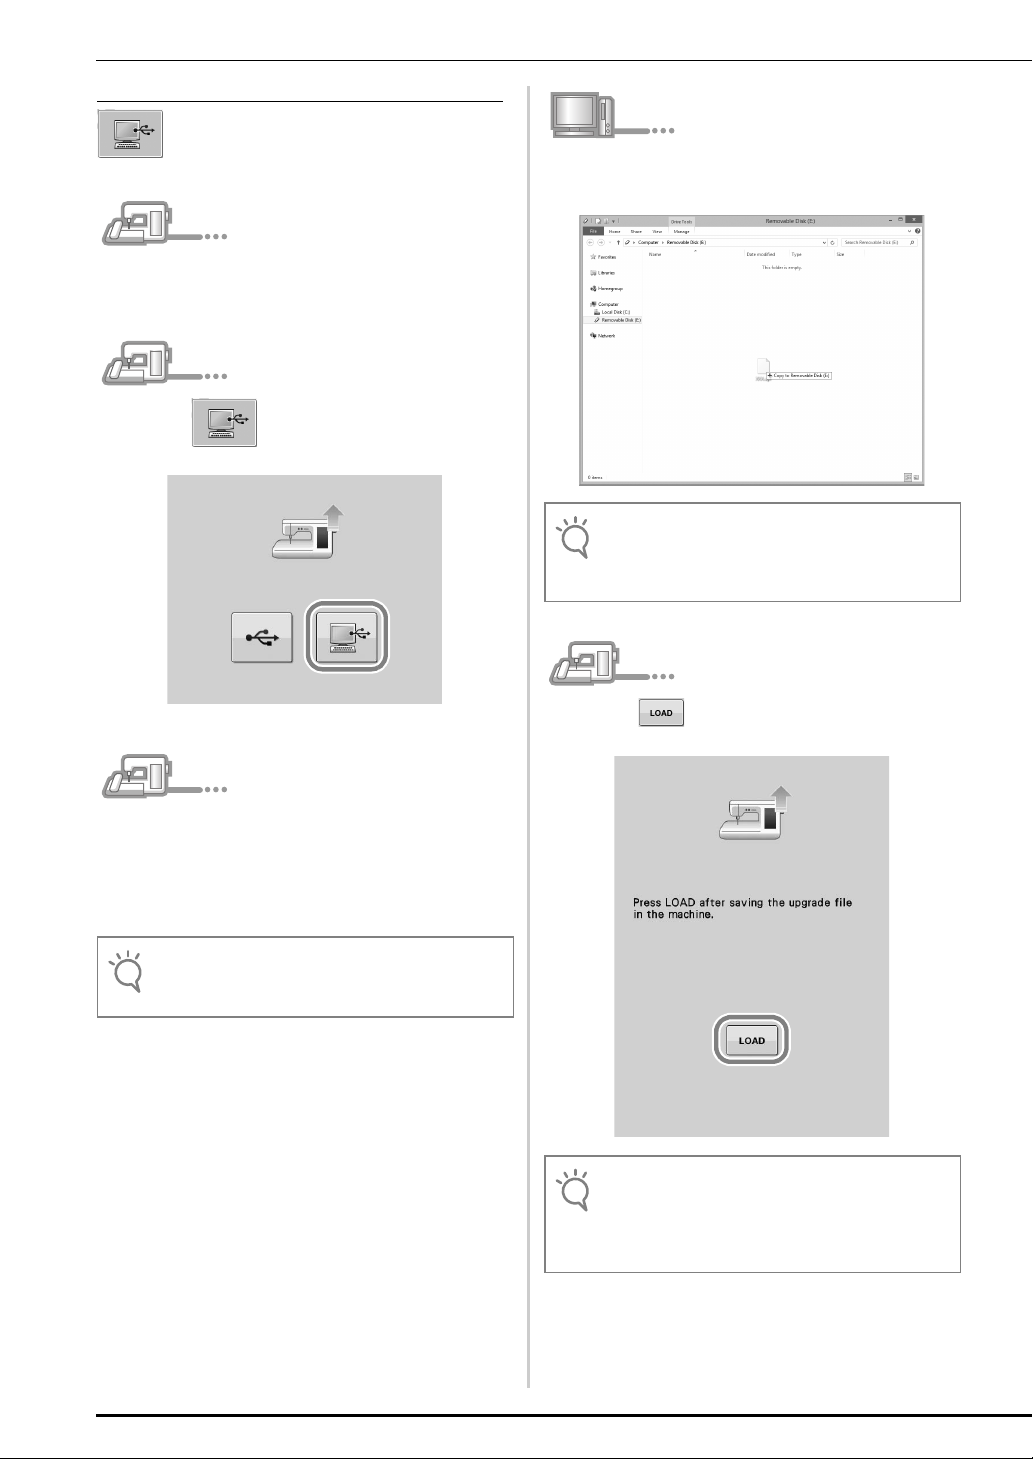
When using a computer to perform the installation
Note
Note
Note
While pressing the “Automatic Threading”
m
button, turn the sewing machine on.
Press .
n
Copy the upgrade program downloaded in
p
step
f to the Removable Disk.
• The “Connected to PC. Do not disconnect the
USB cable”. message appears on the sewing
machine LCD screen.
Plug the USB cable connectors into the
o
corresponding USB port connectors for the
computer and for the machine.
→ Removable Disk appears in Computer (My
Computer).
• Do not connect any additional USB media devices to
your computer when using the USB cable.
Press .
q
• When the message “Upgrade complete.” appears,
installation of the upgrade application has been
completed.
(If an error occurs, a message will appear in red.)
8
Unplug the USB cable.
r
Turn the sewing machine off, then on again.
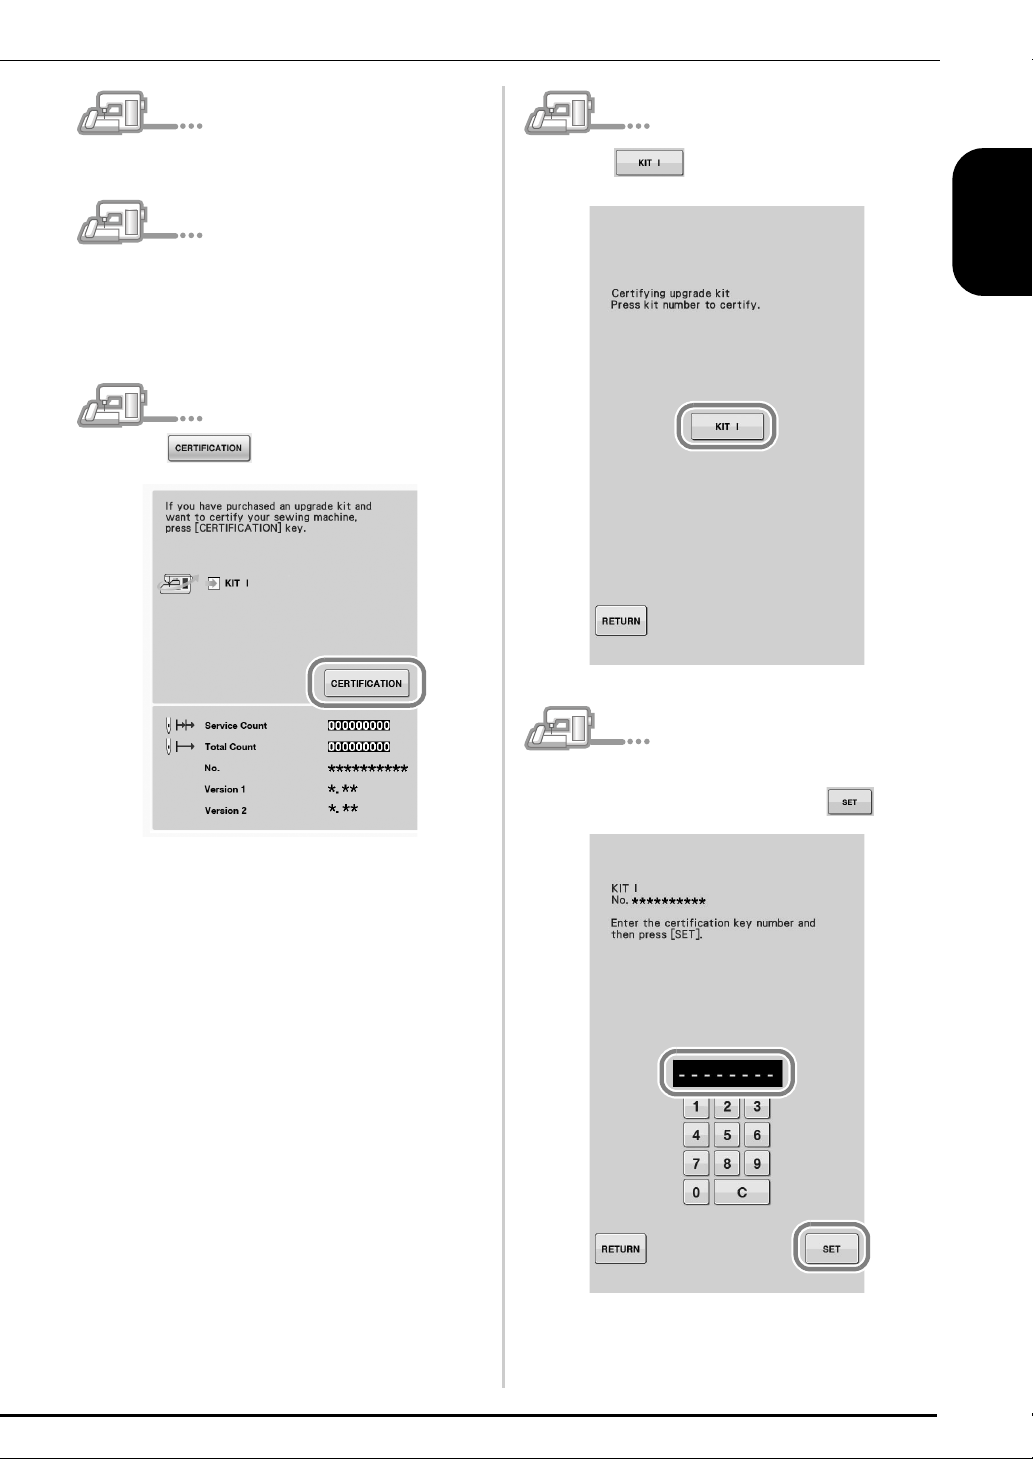
s
Display page 4 or 7 of the Settings screen.
t
Press in the Settings screen.
u
Press in the following screen.
v
ENGLISH
Type in the 8-digit Certification Key written
w
down in step
k, and then press .
9
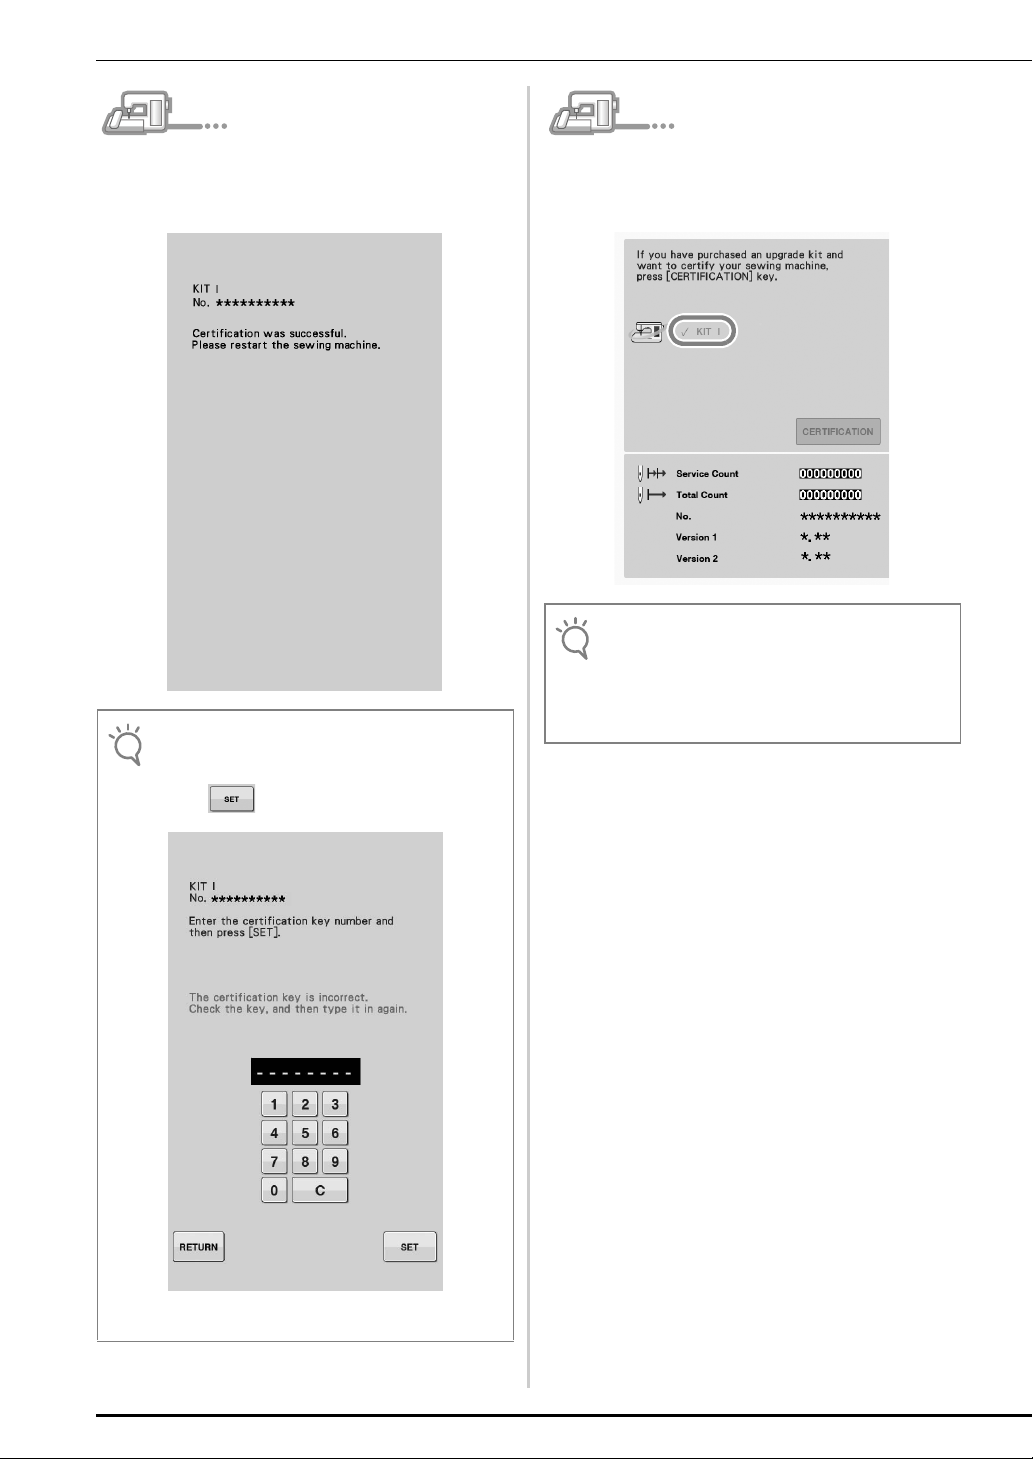
Certification has been completed when the
Note
Note
x
following screen appears. Turn off the sewing
machine and then turn on again.
• If the following screen appears, type in the 8-digit
Certification Key written down in step
press .
k, and then
Confirm that there is a check mark beside “KIT
y
I” in the Settings screen.
• The “KIT I” has been successfully certified.
• For details of the upgraded functions, see the
Operation Manual (PDF version) downloaded using
the Certification Key Issuing Wizard.
Please refer to page 5 for Operation Manual
download information.
10
• If the Certification Key is lost, repeat steps
through
l to attain the Certification Key.
b

INHALT
Zubehör ..................................................................................... 2
Verwendung der Anleitungen ..................................................... 2
Installationsübersicht.................................................................. 3
Computer-Systemvoraussetzungen ............................................. 3
Installation ................................................................................. 4
DEUTSCH
1
Zubehör
Hinweis
Verwendung der Anleitungen
Die folgenden Teile gehören zum Lieferumfang. Prüfen
Sie die Lieferung auf Vollständigkeit und wenden Sie
sich an Ihren Vertragshändler, wenn etwas fehlen oder
beschädigt sein sollte.
•CD-ROM
Die CD-ROM enthält die folgenden Dateien.
• Assistent zur Erzeugung eines
Bestätigungsschlüssels
Folgen Sie zur Aktualisierung der
Maschine der Prozedur in dieser
Installationsanleitung.
• 30 Stickdesigns
• Stickmuster-Katalog (PDF-Version)
• Installationsanleitung (diese Anleitung)
• Stickrahmenset
H 30 cm × B 20 cm (H 12 Zoll × B 8 Zoll)
Nach der KIT-Aktivierung kann dieses
Stickrahmenset verwendet werden und der
maximale Stickbereich wird größer als mit den
im Lieferumfang der Maschine enthaltenen
Stickrahmen. Mit diesem Stickrahmen können
mehrere auf der CD-ROM enthaltene
Stickmuster gestickt werden.
• Installationsanleitung (diese Anleitung)
Diese Anleitung beschreibt das Zubehör und die
Verfahren zur Aktualisierung der Maschine.
• Bedienungsanleitung (PDF-Version)
Die Bedienungsanleitung beinhaltet
Beschreibungen zur Verwendung der Maschine,
einschließlich den zusätzlichen Funktionen und
des Zubehörs.
Verwenden Sie die Maschine und das
mitgelieferte Zubehör ausschließlich
entsprechend den Beschreibungen in der
Bedienungsanleitung.
Für die Anzeige und zum Ausdrucken der
Bedienungsanleitung ist der Adobe Reader
erforderlich.
• Laden Sie mit dem Assistenten zur Erzeugung eines
Bestätigungsschlüssels eine Kopie der
Bedienungsanleitung herunter (siehe Schritt
Seite 5).
g auf
2
• Stickrahmenset
H 20 cm × B 20 cm (H 8 Zoll × B 8 Zoll)
Dieser Stickrahmen eignet sich perfekt zum
Quilten.
Installationsübersicht
Computer-Systemvoraussetzungen
Verwenden Sie zuerst den Assistenten zur Erzeugung
eines Bestätigungsschlüssels auf der mitgelieferten
CD-ROM, um den Bestätigungsschlüssel zu erhalten.
Verwenden Sie dann im Einstellungsbildschirm,
Seite 4 oder 7, den ZERTIFIZIERUNG um das
Aktualisierungsprogramm für KIT I in der Nähmaschine
zu aktivieren.
In der Anleitung weist auf Handlungen an der
Nähmaschine und auf Handlungen am
Computer hin.
[Schritt 1] Notieren Sie die interne
Maschinennummer (No.).
[Schritt 2] Legen Sie die CD-ROM in das
CD-ROM-Laufwerk des Computers ein
und starten Sie den Assistenten zur
Erzeugung eines Bestätigungsschlüssels.
[Schritt 3] Folgen Sie den Hinweisen des
Assistenten, um den
Bestätigungsschlüssel zu erhalten.
[Schritt 4] Installieren Sie das
Aktualisierungsprogramm für KIT
I auf
der Nähmaschine.
Bevor Sie den Assistenten zur Erzeugung eines
Bestätigungsschlüssels starten, prüfen Sie, dass der
anzuschließende Computer die folgenden
Systemvoraussetzungen erfüllt.
Computer IBM-PC oder ein kompatibler
Computer
Betriebssystem Windows Vista, Windows 7, 8,
8.1 (32 oder 64 Bit)
CD-ROM-Laufwerk Für die Installation erforderlich
Sonstige Eine verfügbare
Internetverbindung und ein
freier USB-Port sind für das
Upgrade der Nähmaschine
erforderlich.
* „IBM“ ist ein eingetragenes Warenzeichen der IBM Corporation in
den USA und anderen Ländern.
* „Windows“ und „Windows Vista“ sind eingetragene
Warenzeichen der Microsoft Corporation in den USA und in
anderen Ländern.
* „Adobe“ und „Adobe Reader“ sind eingetragene Warenzeichen
oder Warenzeichen der Adobe Systems Incorporated in den USA
und/oder anderen Ländern.
* Jedes Unternehmen, dessen Software in dieser Anleitung erwähnt
wird, hat eine seinen eigenen Programmen entsprechende
Softwarelizenzvereinbarung.
Alle anderen in dieser Anleitung erwähnten Marken- und
Produktnamen sind Warenzeichen der jeweiligen Unternehmen.
Kennzeichen, wie z. B.
extra hervorgehoben.
®
und ™, werden im Text jedoch nicht
DEUTSCH
[Schritt 5] Schalten Sie die Maschine
aus, entfernen Sie das USB-Medium und
schalten Sie die Maschine wieder ein.
[Schritt 6] Wenn die Aktualisierung
erfolgreich installiert ist, bestätigen Sie
das „KIT
I“ im Einstellungsbildschirm der
Nähmaschine.
3
Installation
Hinweis
Anmerkung
Hinweis
Anmerkung
Anmerkung
Nachfolgend wird die Aktualisierung der Nähmaschine
auf KIT
I beschrieben.
• Wenn Sie den unten beschriebenen Vorgang nicht
abschließen, kann die Nähmaschine nicht mit dem
KIT
I aktualisiert werden.
• Damit Sie das Aktualisierungsprogramm
herunterladen und den Bestätigungsschlüssel
erhalten können, ist ein Internetzugang erforderlich.
Notieren Sie sich die 10-stellige Nummer (interne
a
Maschinennummer), die neben „No.“ auf Seite 4
oder 7 des Einstellungsbildschirms angezeigt
wird.
• Achten Sie darauf, dass Sie die interne Maschinennummer
(No.) fehlerfrei notieren, da diese Nummer im Assistenten
zur Erzeugung eines Bestätigungsschlüssels eingegeben
werden muss, um einen Bestätigungsschlüssel zu erhalten.
Interne
Maschinennummer
(No.)
Öffnen Sie das der CD-ROM zugewiesene Laufwerk (in
c
der Regel Laufwerk „D“) unter
Computer (Arbeitsplatz)
und doppelklicken Sie auf , um den
zur Erzeugung eines Bestätigungsschlüssels
• Der Assistent zur Erzeugung eines
Bestätigungsschlüssels kann wie folgt geöffnet werden.
1. Klicken Sie auf
2. Klicken Sie auf
„Ausführen“ im Suchfeld ein und klicken Sie in der
Ergebnisliste auf
→ Das Dialogfeld Ausführen wird angezeigt.
3. Geben Sie den Pfad (D:\KeyWizard_KITI.exe)
der Programmdatei ein und klicken Sie auf OK.
→ Das Dialogfenster Select Language (Sprache
auswählen) wird automatisch angezeigt.
Wählen Sie die gewünschte Sprache aus und
d
klicken Sie auf „OK“.
Starten (Start)
Ausführen
„Ausführen“
.
oder geben Sie
.
Assistenten
zu starten.
Versionsnummer
* Die Seitenzahl im Einstellungsbildschirm kann je nach Version variieren.
• Die interne Maschinennummer neben „No.“ unterscheidet
sich von der Seriennummer (SER. NO.) auf dem
Typenschild auf der Rückseite der Nähmaschine.
Legen Sie die CD-ROM in das CD-ROM-
b
Laufwerk des Computers ein.
• Wenn in Windows 7 oder Windows Vista das
Dialogfeld AutoPlay angezeigt wird, klicken Sie auf
Ordner zur Anzeige der Dateien öffnen.
• Klicken Sie unter Windows 8 oder 8.1 auf die Meldung
Tippen Sie hier, um eine Aktion für diese Disc
auszuwählen.
wird.
, wenn sie am Bildschirm angezeigt
→ KIT I Assistent zur Erzeugung eines
Bestätigungsschlüssels wird angezeigt.
Lesen Sie die angezeigten Informationen
e
aufmerksam und klicken Sie dann auf
„Weiter“
.
4
Laden Sie die aktuelle Version des
Hinweis
Hinweis
Anmerkung
f
Aktualisierungsprogramms herunter.
Bestätigen Sie Ihr Maschinenmodell, klicken
Sie auf „Herunterladen“ und speichern Sie das
Aktualisierungsprogramm (************.upf)
auf dem Computer. Klicken Sie auf „Weiter“.
Klicken Sie auf „OK“, um die Meldung unten
zu schließen.
Geben Sie den auf dem Etikett der CD-ROM-
h
Hülle des Upgrade-Kits gedruckten 15-stelligen
CD-Schlüssel ein und klicken Sie auf
• Geben Sie den CD-Schlüssel auf dem Hüllenetikett
der CD-ROM für Maschinen ein.
Wenn eine Fehlermeldung angezeigt wird
Prüfen Sie die folgende Liste auf mögliche
Eingabefehler. Zum Schließen der Meldung,
klicken Sie auf „OK“.
• Wurden Symbole oder Zeichen eingegeben, die
keine Buchstaben und Zahlen sind?
• Wurde anstelle der Zahl „1“ der Großbuchstabe „I“
eingegeben?
• Wurde anstelle der Zahl „0“ der Großbuchstabe „O“
eingegeben?
„Weiter“
.
DEUTSCH
• Wenn die angezeigte oder eine neuere Version
bereits auf der Maschine installiert ist (siehe Schritt
a
auf Seite 4), klicken Sie auf „
Installation ohne Herunterladen der neuesten Datei
fortzufahren. Führen Sie die Schritte
überspringen Sie die Schritte
beginnen Sie den Vorgang ab Schritt
Laden Sie das Handbuch herunter.
g
Wählen Sie die gewünschte Sprache aus und
Weiter
m
bis r und
klicken Sie dann auf „Herunterladen“, um die
Datei auf dem Computer zu speichern, und
klicken Sie anschließend auf „Weiter“.
“, um mit der
h
bis l aus,
s
auf Seite 9.
• Die Großbuchstaben „O“ und „I“ werden im CDSchlüssel nicht verwendet. Im CD-Schlüssel werden
außerdem keine Symbole verwendet.
5
Geben Sie die interne Maschinennummer
Anmerkung
Hinweis
i
(No.) ein, die Sie in Schritt
a notiert haben
und klicken Sie auf „Weiter“.
Wenn eine Fehlermeldung angezeigt wird
Stellen Sie sicher, dass Sie nur Ziffern und
Buchstaben eingegeben haben. Zum
Schließen der Meldung, klicken Sie auf „OK“.
Prüfen Sie sorgfältig, dass die Informationen
j
richtig eingegeben worden sind, und klicken
Sie dann auf „Bestätigen“.
Notieren Sie den angezeigten 8-stelligen
k
Bestätigungsschlüssel.
• Nach der Aktualisierung der Nähmaschine mit KIT I
muss der Bestätigungsschlüssel im
Einstellungsbildschirm der Nähmaschine
eingegeben werden.
Klicken Sie auf „Beenden“.
l
Der Bestätigungsschlüssel wurde erfolgreich bezogen.
Fahren Sie jetzt mit der Installation des
Aktualisierungsprogramms für KIT I auf der
Nähmaschine fort.
6
• Um die eingegebenen Informationen zu ändern,
klicken Sie auf „Zurück“.
Wenn eine Fehlermeldung angezeigt wird
Prüfen Sie die folgende Liste auf mögliche
Fehler. Zum Schließen der Meldung, klicken
Sie auf „OK“.
• Prüfen Sie, ob der CD-Schlüssel und die interne
Maschinennummer (No.) richtig eingegeben worden
sind und wiederholen Sie den Vorgang ab
c.
Schritt
• Der CD-Schlüssel gilt nur für die Verwendung mit
einer bestimmten internen Maschinennummer
(No.). Prüfen Sie, dass der CD-Schlüssel richtig
eingegeben worden ist und wiederholen Sie den
Vorgang ab Schritt
• Überprüfen Sie die Internetverbindung und klicken
Sie anschließend erneut auf „Bestätigen“.
c.
Verwenden Sie zur Installation des
Aktualisierungsprogramms ein USB-Medium oder einen
Computer mit Kabelverbindung zur Maschine.
Wenn ein
USB-Medium benutzt wird, folgen Sie den
nachstehenden Anweisungen.
Wenn Sie einen
Computer verwenden, siehe
Prozedurbeschreibung auf Seite 8.

Wenn ein USB-Medium für die Installation benutzt wird
Hinweis
Hinweis
Halten Sie die Taste „Automatisches
m
Einfädeln“ gedrückt und schalten Sie die
Nähmaschine ein.
Kopieren Sie das in Schritt f
n
heruntergeladene Aktualisierungsprogramm
auf das USB-Medium.
• Kopieren Sie ausschließlich das
Aktualisierungsprogramm auf ein neu formatiertes
USB-Medium; es dürfen keine anderen Dateien auf
diesem Medium enthalten sein.
Drücken Sie .
o
Drücken Sie .
q
DEUTSCH
Wenn die Meldung „Aktualisierung
abgeschlossen.“ erscheint, ist die Installation des
Aktualisierungsprogramms abgeschlossen.
(Wenn ein Fehler aufgetreten ist, wird eine rote
Fehlermeldung angezeigt.)
p
Setzen Sie das USB-Medium in den Primär-USBAnschluss (oben) rechts an der Maschine ein. Es dauert
ein paar Sekunden, bis die Maschine erkennt, dass ein
USB-Medium in den Anschluss eingesetzt ist.
Entfernen Sie das USB-Medium.
r
Weiter mit Schritt s auf Seite 9.
7
Wenn ein Computer zur Installation benutzt wird
Hinweis
Hinweis
Hinweis
Halten Sie die Taste „Automatisches
m
Einfädeln“ gedrückt und schalten Sie die
Nähmaschine ein.
Drücken Sie .
n
Kopieren Sie das in Schritt f
p
heruntergeladene Aktualisierungsprogramm
auf den Wechseldatenträger.
• Die Meldung „Aktive PC-Verbindung. Das USBKabel nicht trennen.“ erscheint auf dem LCD-
Bildschirm der Nähmaschine.
Stecken Sie das USB-Kabel in die
o
entsprechenden USB-Anschlussbuchsen am
Computer und an der Maschine ein.
→ Wechseldatenträger erscheint unter Computer
(Arbeitsplatz).
• Verbinden Sie kein weiteres USB-Medium mit dem
Computer, wenn Sie ein USB-Kabel verwenden.
Drücken Sie .
q
• Wenn die Meldung „Aktualisierung
abgeschlossen.“ erscheint, ist die Installation des
Aktualisierungsprogramms abgeschlossen.
(Wenn ein Fehler aufgetreten ist, wird eine rote
Fehlermeldung angezeigt.)
8
Ziehen Sie das USB-Kabel aus der USB-
r
Anschlussbuchse.
Drücken Sie auf dem folgenden
v
Bildschirm.
Schalten Sie die Maschine aus und wieder ein.
s
Rufen Sie Seite 4 oder 7 des Einstellungsbildschirms
t
auf.
Drücken Sie im
u
Einstellungsbildschirm.
Geben Sie den 8-stelligen
w
Bestätigungsschlüssel ein, den Sie in Schritt
notiert haben, und drücken Sie dann .
DEUTSCH
k
9
Die Bestätigung ist abgeschlossen, wenn der
Hinweis
Hinweis
x
folgende Bildschirm angezeigt wird. Schalten
Sie die Nähmaschine aus und dann wieder ein.
• Wenn der folgende Bildschirm erscheint, geben Sie
den 8-stelligen Bestätigungsschlüssel ein, den Sie
in Schritt
k notiert haben, und drücken Sie dann
.
Prüfen Sie, dass „KIT I“ im
y
Einstellungsbildschirm mit einem Häkchen
gekennzeichnet ist.
• Das „KIT I“ wurde erfolgreich bestätigt.
• Ausführliche Informationen zu den aktualisierten
Funktionen finden Sie in der mit dem Assistenten
zur Erzeugung eines Bestätigungsschlüssels
heruntergeladenen Bedienungsanleitung (PDFVersion).
Informationen zum Herunterladen der
Bedienungsanleitung finden Sie auf Seite 5.
10
• Wenn Sie den Bestätigungsschlüssel verlieren,
wiederholen Sie die Schritte
Bestätigungsschlüssel wieder zu erhalten.
b bis l, um den

TABLE DES MATIÈRES
Accessoires ................................................................................ 2
Utilisation des manuels .............................................................. 2
Vue d’ensemble de l’installation................................................. 3
Configuration requise de l’ordinateur ......................................... 3
Procédure d’installation.............................................................. 4
FRANÇAIS
1
Accessoires
Remarque
Utilisation des manuels
Les accessoires suivants sont inclus à l’achat. Vérifiez
que tous les éléments sont fournis. Si un élément est
manquant ou endommagé, contactez votre revendeur
agréé.
•CD-ROM
Le CD-ROM contient les fichiers suivants.
• L’Assistant de délivrance de code de
certification
Respectez la procédure de ce guide
d’installation pour mettre votre machine à
niveau.
• 30 motifs de broderie
• Guide de motifs de broderie (version PDF)
• Guide d’installation (le présent guide)
• Jeu de cadre de broderie
H 30 cm × L 20 cm (H 12 pouces × L 8 pouces)
Une fois le KIT activé, vous pouvez utiliser ce
cadre de broderie et la zone de broderie
maximale devient plus large que sur les cadres
précédents fournis avec votre machine. Vous
pouvez utiliser ce cadre de broderie pour broder
plusieurs motifs enregistrés sur le CD-ROM
fourni.
• Guide d’installation (le présent manuel)
Ce guide présente les accessoires et les
procédures de mise à niveau de la machine.
• Manuel d’instructions (version PDF)
Ce manuel fournit des instructions sur
l’utilisation de la machine avec les fonctions et
accessoires ajoutés.
Veillez à utiliser la machine et les accessoires
fournis tel que décrit dans le manuel
d’instructions.
Adobe Reader est requis pour afficher et
imprimer le manuel d’instructions.
• Téléchargez une copie du manuel d’instructions à
l’aide de l’Assistant de délivrance de code de
certification à l’étape
g de la page 5.
2
• Jeu de cadre de broderie
H 20 cm × L 20 cm (H 8 pouces × L 8 pouces)
Ce cadre de broderie est idéal pour le quilting
(courtepointe).
Vue d’ensemble de l’installation
Configuration requise de l’ordinateur
Obtenez un code de certification à l’aide de l’Assistant
de délivrance de code de certification inclus sur le CD-
ROM. Utilisez ensuite le code de CERTIFICATION sur
l’écran des réglages, à la page 4 ou 7, pour activer
l’application de mise à niveau pour le KIT I de la
machine à coudre.
Dans les procédures, indique des opérations
réalisées avec la machine à coudre et des
opérations effectuées avec un ordinateur.
[Étape 1] Notez le numéro
d’identification interne de la machine
(No.).
[Étape 2] Insérez le CD-ROM dans le
lecteur correspondant de l’ordinateur,
puis démarrez l’Assistant de délivrance
de code de certification.
[Étape 3] Suivez les instructions de
l’Assistant pour obtenir le code de
certification.
Avant de lancer l’Assistant de délivrance de code de
certification, vérifiez que l’ordinateur à connecter
répond aux conditions d’utilisation suivantes.
Ordinateur Ordinateur IBM ou ordinateur
compatible
Système
d’exploitation
Lecteur de
Windows Vista, Windows 7, 8,
8.1 (32 ou 64 bits)
Requis pour l’installation
CD-ROM
Autres Connexion Internet et un port
USB disponible (requis pour la
mise à niveau de la machine à
coudre) lorsque vous utilisez un
ordinateur
* « IBM » est une marque déposée d’IBM Corporation aux États-Unis
et dans d’autres pays.
* « Windows » et « Windows Vista » sont des marques déposées de
Microsoft Corporation aux États-Unis et dans d’autres pays.
* « Adobe » et « Adobe Reader » sont des marques de commerce ou
des marques déposées d’Adobe Systems Incorporated aux ÉtatsUnis et/ou dans d’autres pays.
* Chaque société dont le nom de logiciel est mentionné dans ce
guide dispose d’un contrat de licence de logiciel spécifique à ses
programmes propriétaires.
Tous les autres noms de produit et marques cités dans ce guide
sont des marques déposées de leurs entreprises respectives.
Toutefois, les explications relatives aux marquages
figurent pas clairement dans le texte.
®
et ™ ne
FRANÇAIS
[Étape 4] Installez l’application de mise
à niveau pour le KIT
I sur la machine à
coudre.
[Étape 5] Mettez la machine hors
tension, retirez le support USB, puis
remettez la machine sous tension.
[Étape 6] Une fois la mise à niveau
correctement installée, certifiez le
I » dans l’écran des réglages de la
«KIT
machine à coudre.
3
Procédure d’installation
Remarque
Mémo
Remarque
Mémo
Mémo
La procédure suivante décrit comment mettre à niveau
votre machine à coudre pour le KIT
• Si la procédure décrite ci-dessous n'est pas
complètement terminée, votre machine à coudre ne
pourra pas être mise à niveau pour le KIT
• L’accès à Internet est requis pour télécharger le programme
de mise à niveau et obtenir un code de certification.
Notez le numéro à 10 chiffres (numéro
a
d’identification interne de la machine) affiché
I.
I.
à côté de « No. » à la page 4 ou 7 de l’écran
des réglages.
• Vérifiez que le numéro d’identification interne de la
machine (No.) est correctement saisi car ces numéros
doivent être entrés dans l’Assistant de délivrance de
code de certification pour obtenir le code de certification.
Numéro
d’identification
interne de la
machine (No.)
Numéro de
version
Ouvrez le lecteur correspondant à votre CD-ROM
c
(généralement le lecteur « D ») sur
(Poste de travail)
Assistant de délivrance de code de
lancer l’
certification
• La procédure suivante peut être utilisée pour lancer
l’Assistant de délivrance de code de certification.
1. Cliquez sur Démarrer.
2. Cliquez sur Exécuter ou, dans la zone de
recherche, tapez « exécuter », puis, dans la liste
des résultats, cliquez sur Exécuter.
→ La boîte de dialogue Exécuter s’affiche.
3. Tapez le chemin d’accès vers le fichier d’application
(
D:\KeyWizard_KITI.exe
→ La boîte de dialogue Select Language (Sélectionner
une langue) s’affiche automatiquement.
Sélectionnez la langue souhaitée, puis cliquez
d
sur «OK».
, double-cliquez sur pour
.
l’Ordinateur
), puis cliquez sur OK.
* Le nombre de pages dans l’écran des réglages peut varier en
fonction de la version.
• Le numéro d’identification interne de la machine qui
apparaît à côté de « No. » est différent du numéro
de série (NO. SER.) figurant sur l’étiquette apposée
à l’arrière de la machine à coudre.
Insérez le CD-ROM dans le lecteur
b
correspondant de l’ordinateur.
• Dans Windows 7 ou Windows Vista, lorsque la boîte
4
de dialogue
cliquez sur
fichiers
• Sous Windows 8 ou 8.1, cliquez sur le message
Cliquez pour sélectionner l’action à exécuter
avec ce disque. qui apparaît à l’écran.
Exécution automatique
Ouvrir le dossier pour visualiser les
.
s’affiche,
→ L’Assistant de délivrance de code de certification
du KIT
I s’affiche.
Lisez attentivement les informations qui
e
s’affichent, puis cliquez sur
«
Suivant».
 Loading...