


Model 800ESXL
Issue 1/05
ESPRESSO MACHINE
Breville Customer Service Centre
US Customers |
Canada Customers |
||
Mail: |
2851 E. Las Hermanas |
Mail: |
Anglo Canadian |
|
Street |
|
2555, Avenue de |
|
Rancho Dominguez |
|
l’aviation |
|
CA 90221-5507 |
|
Pointe-Claire |
Phone: |
Customer Service: |
|
(Montreal) Quebec |
|
H9P 2Z2 |
||
|
1(866) BREVILLE |
|
|
|
|
|
|
Customer Service |
Phone: |
Customer Service: |
|
|
1(866) BREVILLE |
||
|
askus@brevilleUSA.com |
|
|
|
|
|
|
|
|
Customer Service |
|
|
|
|
askus@breville.ca |
www.brevilleusa.com www.breville.com


 is a registered trademark of Breville Pty Ltd. A.B.N. 98 000 092 928 2851 E. Las Hermanas Street, Rancho Dominguez, CA 90221-5507 USA
Tel 1866 BREVILLE
2555, Avenue Aviation, Pointe-Claire (Montreal) Quebec, H9P 2Z2 CANADA Tel 1866 BREVILLE
© Copyright Breville Pty Ltd 2005
Due to continual improvements in design or otherwise, the product you purchase may differ slightly from the one illustrated in this booklet.

ESPRESSO MACHINE
CONTENTS
4Congratulations
5 About your Breville Die Cast Series™ Espresso Machine
6Breville recommends safety first
8Know your Breville Die Cast Series™ Espresso Machine
10 Assembling your Breville Die Cast Series™ Espresso Machine
13 Operating your Breville Die Cast Series™ Espresso Machine 17 How to froth milk for a cappuccino or latté
20Using the hot water function
21Coffee making tips
25 Care and Cleaning
28 Trouble shooting guide
32 Coffee Variations
37 Recipes
3


 Congratulations
on the purchase of your new Breville Die Cast Series™ Espresso
From its superbly crafted and sensitive temperature control through to its professionally styled casing, your Die Cast Series Espresso Machine represents a perfect balance of functionality, reliability and absolute style.
In developing this booklet, our goal was to provide you with
the fundamental point from which you can start to discover the incredible versatility of your 800ESXL; the Espresso Machine that delivers simply superior coffee. Our hope is that with each page, you gain increasing pleasure from your 800ESXL and its ability to help you create a wonderfully broad range of flavour-rich coffees.
We would just like to say thank you, congratulations and…
5

BREVILLE RECOMMENDS SAFETY FIRST
IMPORTANT SAFEGUARDS
We at Breville are very safety conscious. We design and manufacture consumer products with the safety of you, our valued customer foremost in mind. In addition we ask that you exercise a degree of care when using any electrical appliance and adhere to the
•Carefully read all instructions before operating and save for future reference.
•To protect against fire, electrical shock and injury to persons do not immerse the appliance, cord or plug in water or any other liquid.
•This appliance is for household use only.
•Do not use this appliance for anything other than its intended use.
•Young children should be supervised to ensure that they do not play with the appliance.
•Do not leave the appliance unattended when in use.
•Do not touch hot surfaces. Use handles.
•Always use the appliance on a dry, level surface.
•To disconnect, turn all controls to ‘OFF’, then remove plug from power outlet.
•Do not place this appliance on or near a hot gas or electric burner, or where it could touch a heated oven.
•Do not let the cord hang over the edge of a table or counter, touch hot surfaces or become knotted.
•The use of accessory attachments not recommended by Breville may cause a risk of injury to persons, fire or electric shock.
•Strictly follow cleaning and care instructions.
•Do not use this appliance for anything other than its intended use. Do not use in moving vehicles or boats. Do not use outdoors.
•Carefully read all instructions before operating and save for future reference.
•Always switch the appliance to ‘OFF’, and then remove plug from the power outlet when the appliance is not being used and before cleaning.
•An extension cord is not recommended, however, if one is needed, the extension cord should be a grounded type and its electrical rating must be the same or more wattage as the appliance. Regularly inspect the supply cord, plug and actual
appliance for any damage. If found damaged in any way, immediately cease use of the appliance and call Breville Customer Service at 1-866-BREVILLE.
•For any maintenance other than cleaning, call Breville Customer Service at 1-866- BREVILLE.
SAVE THESE INSTRUCTIONS FOR HOUSEHOLD USE
ONLYNOTE:Your Breville appliance comes with the unique Assist™ Plug, conveniently designed with a finger hole in the power plug, for easy and safe removal from the outlet. For safety reasons it is recommended you plug your Breville appliance directly into the power outlet. Use in conjunction with a power strip or
ELECTRIC CORD STATEMENT
Your Die Cast Series Espresso Machine has a short cord as a safety precaution to prevent personal injury or property damage resulting from pulling, tripping or becoming entangled with the cord. Do not allow children to be near or use this appliance without close adult supervision. If you
must use a longer cord or an extension cord when using the appliance, the cord must be arranged so it will not drape or hang over the edge of a countertop, tabletop or surface area where it can be pulled on by young children or tripped over. To prevent electric shock, personal injury or fire, the electrical rating of the extension cord if you must use one must be the same or more than the wattage of the appliance (wattage is marked on the underside of the appliance).
6 |
BREVILLE RECOMMENDS SAFETY FIRST |
BREVILLE RECOMMENDS SAFETY FIRST |
7 |
|
|

KNOW YOUR BREVILLE DIE CAST SERIES™ ESPRESSO MACHINE
Extra large cup warming plate
15 bar pump Italian designed and made
Chromed/brass filter holder with solid phenolic handle and silicon burn guard
Removable 2.32 quart (2.2 liter) water tank use insert handle to remove from the
front of the machine or water tank filler button to fill from the rear of the machine
Extra large cup height for coffee mugs
Removable 1.06 quart (1 liter) drip tray and grid
Cord storage
Hot water button
press while the Selector Control is turned to ‘Steam’ to utilise hot water function
Steam button
will illuminate to indicate that the steam function is selected
Brew Head
for easy fit of the filter holder
2 dual wall stainless steel filters (1 cup filter and 2 cup filter)
Pre-brew function:
for optimum coffee extraction pressure
Auto purge function:
ensures that coffee is extracted at the correct temperature and not burnt
Power On/Off button surround illuminates when the button is pressed
Thermoblock heating system ensures coffee is extracted at the correct temperature
Advanced dual wall crema system for the perfect crema
External viewing back-lit water window
Drip tray full indicator 
Integrated accessory drawer
Heating light
illuminates in red when the Power On/Off button is pressed to ‘On’
Selector Control – for Espresso  , Standby (•) and Steam
Commercial swivel steam wand with stainless steel frothing attachment
Accessories (not shown in picture) Custom designed stainless steel frothing jug
Custom designed measuring/tamping spoon
Custom designed cleaning tool
8 |
KNOW YOUR BREVILLE DIE CAST SERIES ESPRESSO MACHINE |
KNOW YOUR BREVILLE DIE CAST SERIES ESPRESSO MACHINE |
9 |
|
|
||
|
|
|
|
ASSEMBLING YOUR BREVILLE DIE CAST SERIES™ ESPRESSO MACHINE
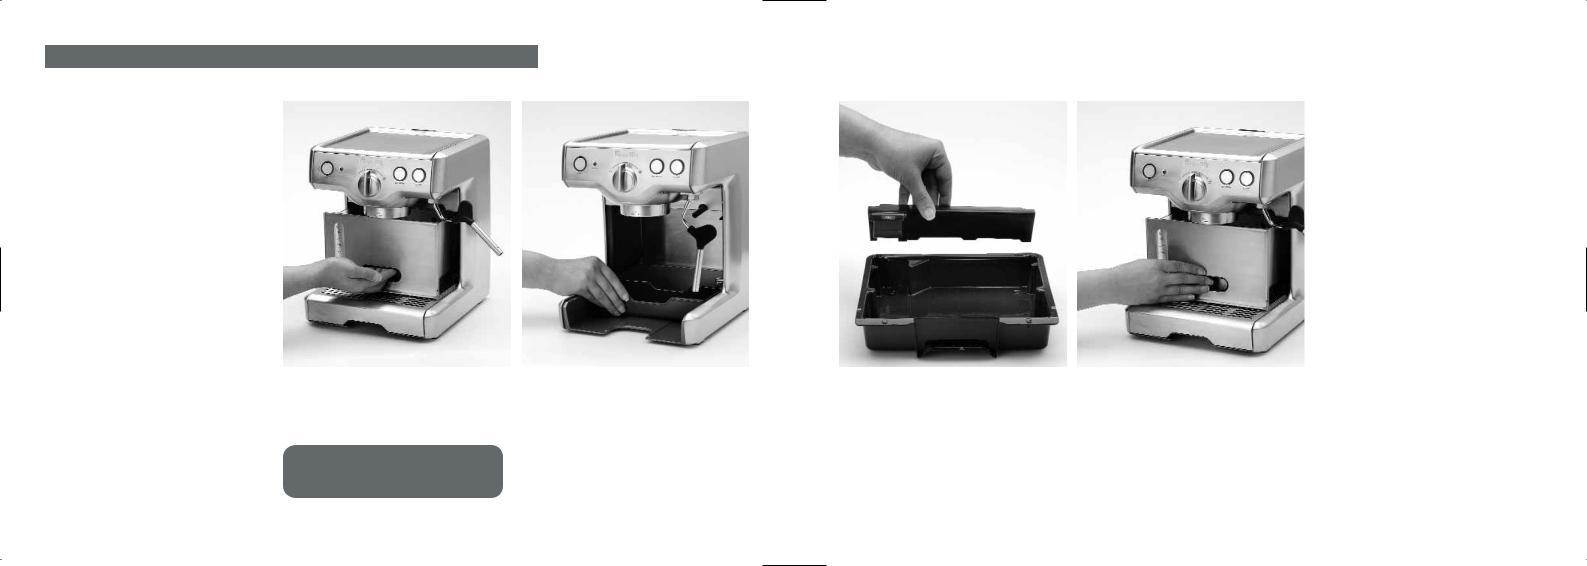
Your Die Cast Series Espresso machine will have the Drip Tray and Water Tank in place when you unpack it from the box.
The Storage Tray, 2 stainless steel Filters, Cleaning Tool and Measuring/tamping Spoon will be packed in a plastic sleeve. The Filter Holder and Frothing Jug will be packed inside the foam packaging. Ensure you have located all parts and accessories before throwing out the packaging.
Remove the Drip Tray and Water Tank and wash all parts and accessories in warm, soapy water using a non-abrasive washing liquid. Rinse and dry thoroughly.
NOTE:Do not clean any of the parts or accessories in the
TO REASSEMBLE: STEP 1
Insert the Storage Tray into the base of the machine and slide in towards the back wall.
This is a convenient location to store the Cleaning Tool, stainless steel Filters and Measuring/tamping Spoon when not in use,
Before first use: It is recommended to complete a water brewing operation without ground
coffee before brewing your first espresso coffee to ensure that all internal piping has been preheated (follow Steps 1 and 4 in Operating your Breville Die Cast Series Espresso Machine – Pages 13 and 15).
STEP 2
Slide the Drip Tray, with the Drip Tray Full Indicator and Grid in place, into the base of the machine and in front of the Storage Tray.
STEP 3
Slide the Water Tank over the Drip Tray and
into the front opening of the machine and into position above the Storage Tray. Ensure the Water Tank aligns flush with the sides of
the machine.
10 |
ASSEMBLING YOUR BREVILLE DIE CAST SERIES ESPRESSO MACHINE |
ASSEMBLING YOUR BREVILLE DIE CLASS SERIES ESPRESSO MACHINE |
11 |
|
|
|
|

OPERATING YOUR BREVILLE DIE CAST SERIES™ ESPRESSO MACHINE
STEP 1 – FILLING THE WATER TANK
• Ensure the Power On/Off button is ‘Off’ and
the Selector Control is set to the ‘•’ Standby position.
• Turn the machine off at the power outlet
and unplug the power cord.
Operating
•Remove the Filter Holder if locked into the Brew Head and move the Steam Wand to the side of the machine.
•Remove the Water Tank by pulling with the handle insert in the front of the Espresso Machine.
•When the Water Tank is removed, a black tube slides and extends out from the Water Tank storage area. Do not touch or try to remove this tube, it will automatically slide back into position when the Water Tank is reinserted.
•Fill the Water Tank with cold water to the maximum mark on the Water Window and slide the Water Tank carefully back into position in the machine.
NOTE: Check the water level before use and replace the water daily.
The water tank should be refilled with fresh cold water before each use.
Do not use mineral or
•Alternatively the Water Tank can be accessed from the rear of the machine. Press the button at the back of the Cup Warming Plate and the Water Tank Filler will open. Ensure the Water Tank is fitted firmly into position. Fill with cold water to the maximum mark on the Water
Window and close the Water Tank Filler.
OPERATING YOUR BREVILLE DIE CAST SERIES ESPRESSO MACHINE |
13 |
STEP 2 - PREPARING THE COFFEE
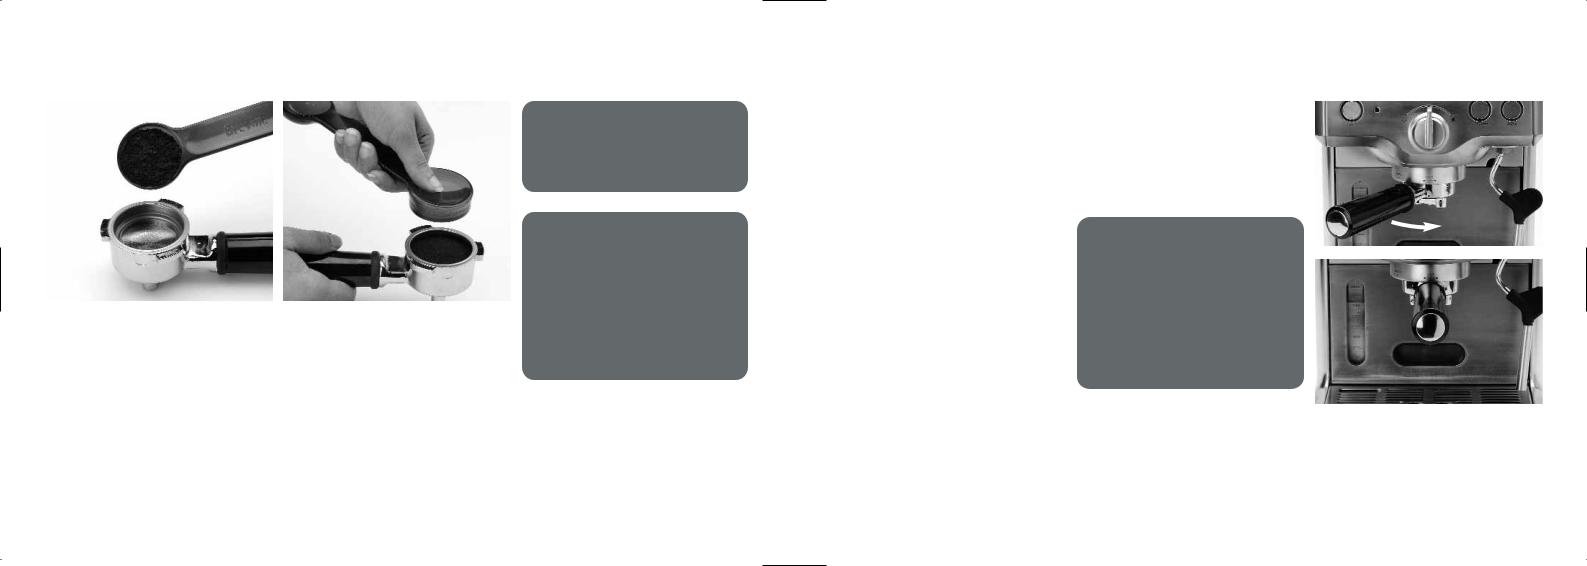
•Place the 1 or 2 cup filter into the Filter Holder (use the smaller filter for 1 cup and the larger filter for 2 cups).
•Use 1 level measure of ground espresso coffee for the 1 cup filter and 2 level measures for the 2 cup filter. It is important to use the correct amount of coffee for each Filter as the filter perforations have been constructed to utilise the pressure in the machine to extract optimal flavor with each brewing.
NOTE:THE FILTERS ARE HELD IN PLACE FIRMLY TO ENSURE THAT THEY DO NOT GET EMPTIED INTO THE TRASH
TIP: REMOVE THE FILTER USING THE INDENTS IN THE SIDE OF THE FILTER HOLDER, IF THIS PROVES DIFFICULT THE 800ESXL COMES WITH 2 FILTERS. USE THE EDGE OF
STEP 3 - TAMPING THE COFFEE
THE FREE FILTER AS A
• Distribute the coffee evenly in the Filter
LEVERAGE AID TO
and press down lightly with the tamping
REMOVING THE FILTER
end of the measuring spoon (Refer to
THAT IS FITTED.
Coffee Making Tips on Page 21).
•Clean any excess coffee from the rim of the Filter holder to ensure a proper fit into the Brew Head.
STEP 4 – PRIMING THE BREW HEAD
•Before placing the Filter Holder into position, it is recommended to run a short flow of water through the Brew Head.
•Ensure the Selector Control is in the ‘Standby’ position and plug the power cord into a 120V power outlet and switch on. Press the Power On/Off NOTE:Thebutton to ‘On’machineand theremainsbutton surroundready
will illuminate. The Steam button
for brewing and maintains a
surround will also illuminate. constant heating
•The machinetemperaturewill makewhilea pumpingthe noise then thePowerHeatingOn/offLight willbuttonilluminateis in red.
When the correct temperature has been the ‘On’ position. If the
reached the light will cycle out. temperature lowers, the
•Place aheatingcontainerlightunderwilltheilluminateBrew Head.
and the Thermoblock
• Prime the Brew Head by quickly turning
Heating System will
the Selector Control to the ‘Espresso’ position until water flows then turn back to the ‘Standby’ position. A pumping noise will be heard in this operation.
STEP 5 - PRE-WARMING THE CUPS
•The Cup Warming Plate will start to warm as the machine heats.
•Pre-warm the espresso cups by placing on the Cup Warming Plate. This will help maintain the coffee’s optimal temperature when brewed into the cups.
14 |
OPERATING YOUR BREVILLE DIE CAST SERIES ESPRESSO MACHINE |
OPERATING YOUR BREVILLE DIE CAST SERIES ESPRESSO MACHINE |
15 |
|
|
|
|

STEP 6 – INSERTING THE FILTER HOLDER
•Place the Filter Holder underneath the Brew Head so that the handle is aligned with the insert graphic. Insert the Filter Holder up into the Brew Head and rotate the handle to the right until resistance is
felt, this will be at an approximate 90° angle to the machine.
STEP 7 - BREWING THE COFFEE
•The red ‘Heating’ light cycles off when the machine has reached the correct temperature for brewing.
•Ensure the Drip Tray and Grid are in place.
•Place one or two pre-warmed cups beneath the Filter Holder outlet.
•Set the Selector Control to the ‘Espresso’ position.
•After a few seconds, aromatic coffee will begin to brew into the cups. A pumping noise will be heard in this operation.
•When sufficient coffee has flowed into the cups, set the Selector Control to the ‘Standby’ position. This will stop the flow of coffee.
•If the steam function is not required, leave the Selector Control to the ‘Standby’ position, unplug the power cord and allow the machine to cool.
PRE-BREW FUNCTION
•When the Selector Control is set to the ‘Espresso’ position, the 15 bar pump pumps water momentarily, followed by a pause, then continues to pump the water through to the ground coffee in the Filter Holder. This pre-brew function is an advanced feature of the 800ESXL. The ground coffee is moistened by a small amount of water before full extraction. The ground coffee expands and when greater pressure is built up, the brewed coffee is extracted with its full flavor.
HOW TO FROTH MILK FOR A CAPPUCCINO OR LATTÉ
CAUTION: THE METAL PARTS OF THE FILTER HOLDER MIGHT STILL BE VERY HOT. COOL THESE PARTS IN COLD WATER.
The Die Cast Series Espresso Machine comes complete with a Commercial Swivel Steam Wand and Stainless Steel Frothing Attachment. When using the Frothing Attachment a large amount of froth is easily created.
If less froth is required, remove the Frothing Attachment and steam the milk using the Steam Wand. To remove the Frothing Attachment, ensure it is cool then simply pull down and remove. The Frothing Attachment can be stored in the Storage Tray inside the machine if not used regularly.
To refit the Frothing Attachment ensure it is securely attached to the Steam Wand by inserting it, from either end opening, onto the Wand and pushing firmly upwards onto the rubber surround. Ensure the fine steam holes on either end of the Frothing Attachment are clean to achieve optimal frothing.
•The first step in making a cappuccino or latté is to make a short espresso. Refer to “Operating your Breville Die Cast Series Espresso Machine” on Page 12.
•Then fill the stainless steel frothing jug
16 |
OPERATING YOUR BREVILLE DIE CAST SERIES ESPRESSO MACHINE |
HOW TO FROTH MILK FOR A CAPPUCCINO OR LATTÉ |
17 |
|
|
|
|

1/3 full with cold fresh milk.
NOTE: When the 800ESXL is creating steam a pulsing noise can be heard. This is the normal operation of the
NOTE: If steam starts coming from
the Steam Wand before it is immersed in the milk, pause the steam by turning the Selector Control back to the ‘Standby’ position. This will avoid the steam pressure blowing milk out
•Turn the Selector Control to the ‘Steam’ position and press the ‘Steam’ button. (Refer to information on Steam and Hot Water buttons on Page 19.) The ‘Heating’
NOTE: The 800ESXL features a Swivel Steam Wand assembly so
the position of the Steam Wand can be changed to a
•When the red ‘Heating’ light stops flashing, quickly insert the Steam Wand into the jug of milk so that the Froth Attachment is just immersed into the milk.
•Hold the frothing jug at an angle so that the Frothing Attachment sits just below the surface of the heating milk and the steam will move the milk around the inside of the jug in a circular motion.
•When the milk starts to increase in NOTE:volume, immerseAlways theensureFrothingthat the
Attachment deeper into the jug to heat
Frothing Attachment has
the milk.
been firmly pushed onto the
•Hold theSteamjug atWandan angleand withconnectsone hand and placewithyourtheotherrubberhandsurroundon the outer.
base of the stainless frothing jug.
For best results use cold
•When thefreshbasemilkof the(lowjugfatbecomesmilk willtoo
hot to touch, set the Selector Control to froth easier).
the ‘Standby’ position, stopping the
Always clean the Steam steaming function before removing the
jug. A WandpumpingandnoiseFrothingwill sound for a short timeAttachment. after every
•Pour the steamed milk into each cup of freshly brewed espresso coffee and spoon in the frothed milk, in the
following ratios: Cappuccino - 1/3 espresso, 1/3 steamed milk,
1/3 frothed milk
Latté - 1/3 espresso topped with steamed milk and about 1cm of frothed milk (traditionally served in a glass)
STEAM BUTTON/HOT WATER BUTTON
•The Steam button surround will automatically illuminate when the machine is switched ‘On’ with the Power On/Off button.
•The machine will always automatically default to the Steam button when the appliance is first switched on.
•Both buttons cannot be operated at the same time.
•To select steam: when the Steam button surround is illuminated, just set the Selector Control to ‘Steam’
•To select hot water: press the Hot Water button and the surround will illuminate, then just set the Selector Control to ‘Steam’.
•If the machine remains switched ‘On’, the last button function used (Steam or Hot Water) will stay illuminated.
CAUTION: DO NOT ALLOW MILK TO RUN OVER THE TOP OF THE FROTHING ATTACHMENT, OTHERWISE IT WILL NOT FUNCTION PROPERLY.
TO AVOID SPLATTERING OF HOT MILK, DO NOT LIFT THE END OF THE FROTHING ATTACHMENT ABOVE THE SURFACE OF THE MILK WHILE FROTHING.
ENSURE THE SELECTOR CONTROL IS IN THE ‘STANDBY’ POSITION BEFORE REMOVING THE
18 |
HOW TO FROTH MILK FOR A CAPPUCCINO OR LATTÉ |
HOW TO FROTH MILK FOR A CAPPUCCINO OR LATTÉ |
19 |
|
|
|
|
USING THE HOT WATER FUNCTION
The 800ESXL features a separate Hot WaterNOTE:functionIf thet atmachinecan be usremainsd for making tea,switchedhot chocolate‘On’, theandlastother warm
drinks. The hot water is dispusednsed from button function will
the Steam Wand.
stay illuminated. To change
to the steam function,
To use the Hot Water function, remove the FrothingsimplyAttachmentpressfromthetheSteamSteam Wand. PressbuttonthesoHotthatWaterthebutsteamon then turn the Selectorlight surroundControl toilluminates‘Steam’. The
Hot Water button surround will illuminate and turn the Selector
when selected.
Control to the ‘Steam’
position. Refer to Steam
Place a jug or cup underneath the Steam Wand to collect the hot water.
To turn the hot water off, turn the
Selector Control to the ‘Standby’ position.
Limit the extraction of hot water to 2 quarts (2 liters) each use.
The machine is not designed to make whole pots of coffee and tea. The more the amount of water is extracted the cooler it becomes.
COFFEE MAKING TIPS
Making a good cup of coffee is an art that is simple to achieve. Here are some tips to help you make the perfect coffee.
THE COFFEE
Pre-ground coffee can be used and should be stored in an air-tight container, in a cool, dry area. Pre-ground coffee should not be kept for longer than 1 week as flavor will diminish. Do not refrigerate or freeze.
Whole coffee beans, freshly ground just before use, are recommended. Coffee beans should be stored in an air-tight container, in a cool, dry area but should not be kept for longer than 1 month as flavor will diminish. Do not refrigerate or freeze.
WATER FLOW
When brewing coffee, make sure the water flows through the Coffee Filter at the correct rate.
If the water flow is too slow the coffee will be over extracted and will be very dark and bitter, with a mottled and uneven crema on top.
If the water flow is too fast, the coffee will be under extracted – the optimal flavor will not develop, the coffee will be watery and lack the thick crema on the top.
The water flow can be adjusted by varying the pressure that the coffee is tamped (pressed down) in the Filter or by changing the grind of the coffee.
THE GRIND
If using a pre-ground coffee, ensure an espresso grind suitable for espresso/cappuccino machines is purchased.
If grinding coffee beans, the grind should be fine but not too fine or powdery. The grind will affect the rate at which the water flows through the coffee in the Filter and therefore the taste of the coffee.
If the grind is too fine (looks like powder and feels like flour when rubbed between fingers), the water will not flow through the coffee even when under pressure. The resulting coffee will be over extracted, too dark and bitter, with a mottled and uneven crema on top.
If the grind is too coarse the water will flow through the coffee too quickly. This will result
in an under-extracted coffee lacking in flavor and without the thick crema on the top layer
of coffee.
20 |
USING THE HOT WATER FUNCTION |
COFFEE MAKING TIPS |
21 |

TAMPING THE COFFEE
After measuring the ground coffee into the Filter it must be tamped (pressed down) using the flat end of the measuring spoon. The ground coffee should be tamped quite firmly.
If the coffee is not tamped firmly enough, the water will flow through the water too quickly and the coffee will be under extracted. If the coffee is tamped too firmly, however, the water will flow through the coffee too slowly and the coffee will be over extracted.
NOTE: The taste of your coffee will, of course, depend on personal preference and on many other factors such as the type of coffee bean used, the coarseness or fineness of the grind and the tamping pressure (pressed down). We recommend experimenting by varying these factors to
22 COFFEE MAKING TIPS |
23 |

CARE AND CLEANING
CLEANING THE STEAM WAND AND FROTHING ATTACHMENT
• The Steam Wand and Frothing Attachment should always be cleaned after frothing milk.
• Remove the Frothing Attachment and rinse in warm tap water. Ensure the two fine steam holes on either end of the Frothing Attachment are clear. Use the pin on the Cleaning Tool to unblock these holes.
• Wipe the Steam Wand with a damp
cloth, then with the Steam Wand Cleaning directed back into the drip tray, briefly
set the Selector Control to the ‘Steam’
and press the Hot Water button. clear any remaining milk from
the Steam Wand.
•Ensure the Selector Control is in the ‘Standby’ position. Press the ‘ON/OFF’ button to ‘OFF’, switch off at the power outlet, unplug the power cord and allow the machine to cool.
•If the Steam Wand remains blocked, use the pin on the Cleaning Tool to clear the opening.
•If the Steam Wand continues to be blocked, the tip of the Steam Wand can be removed
by using the spanner in the middle of the Cleaning Tool.
24 |
CARE AND CLEANING 25 |

•Soak the tip in hot water before using the pin on the Cleaning Tool to unblock. Replace the tip back onto the Steam Wand and secure with the Cleaning Tool.
with a damp cloth to remove any ground coffee particles.
•Periodically run water through the machine with the Filter Holder in place, but without any ground coffee, to rinse out any residual coffee particles.
CLEANING THE OUTER HOUSING / CUP WARMING PLATE
•The outer housing and cup warming plate can be cleaned with a soft, damp cloth (do not use abrasive cleansers, pads or cloths which can scratch the surface).
CLEANING THE DRIP TRAY
•The Drip Tray should be removed, emptied and cleaned at regular intervals,
particularly when the Drip Tray Full
NOTE: Do not clean any of the
Indicator is showing full.
parts or accessories in the
•Remove the Drip Tray Full Indicator and Grid from the Drip Tray, wash with warm soapy water, using a non-abrasive washing liquid, rinse and dry thoroughly.
•If further cleaning is required the full indicator can be removed from the drip tray by releasing the side snaps.
CLEANING THE STORAGE TRAY
•The Storage Tray can be removed after the Drip Tray is removed then cleaned with a soft, damp cloth (do not use abrasive cleansers, pads or cloths which can scratch the surface).
DECALCIFYING
•After regular use, hard water can cause mineral build up in and on many of the inner functioning components, reducing the brewing flow, power of the machine, and affecting the quality of coffee.
•We advise decalcifying the machine on a regular basis (every 2-3 months) using a liquid decalcifying agent. Follow the instructions provided, or use the following
as a guide:
Diluted solution (for softer water)
•1 part decalcifying agent
•2 parts cold tap water
Concentrated solution (for harder water)
•1 part decalcifying agent
•1 part cold tap water
CAUTION: DO NOT IMMERSE CORD, PLUG OR APPLIANCE IN WATER OR ANY OTHER LIQUID.
THE WATER TANK SHOULD NEVER BE REMOVED OR COMPLETELY EMPTIED DURING DECALCIFYING.
NOTE:The stainless steel Filters should not come in contact with any decalcifying agents.
Do not use powdered
26 CARE AND CLEANING |
CARE AND CLEANING 27 |

TROUBLE SHOOTING GUIDE
PROBLEM |
POSSIBLE CAUSES |
WHAT TO DO |
|
|
|
Coffee does not run through |
Machine is not turned on or plugged in |
Ensure the machine is plugged in, switched |
on |
|
at the power outlet and the ‘ON/OFF’ |
button is in |
|
the ‘ON’ position. |
|
Water tank is empty |
Refer to step 1 – Filling the water tank on |
page 13. |
|
|
|
Selector Control not in ‘Espresso’ position |
Turn the selector control to the ‘Espresso’ |
position. |
|
|
|
Coffee grind is too fine |
Ensure you use a suitable espresso grind. |
Refer to |
|
‘The Grind’ on page 21. |
|
Too much coffee in the filter |
Refer to ‘Preparing the coffee’ on page 14. |
|
Coffee tamped too firmly |
Refer to ‘Tamping the coffee’ on page 14. |
|
The filter is blocked |
Use the fine pin on the cleaning tool to clear |
the |
|
holes. Please refer to ‘Cleaning |
the filters’ on page 26. |
|
|
Coffee runs out too quickly |
The coffee grind is too coarse |
Ensure you use a suitable espresso grind. |
Refer to |
|
‘The Grind’ on page 21. |
PROBLEM |
POSSIBLE CAUSES |
WHAT TO DO |
|
|
|
Coffee runs out around the |
Filter holder is not inserted in the brew |
Refer to ‘Inserting the filter holder’ on page |
15. |
|
|
edge of the filter holder |
head properly |
|
|
There are coffee grounds around the filter rim |
Clean any excess coffee from the rim of the |
filter |
|
holder to ensure a proper fit |
into the brew head. |
|
|
|
Too much coffee in the filter |
Refer to ‘Preparing the coffee’ on page 14. |
|
Coffee has been tamped too firmly |
Refer to ‘Tamping the coffee’ on page 14. |
|
Incorrect filter for amount of coffee used |
Ensure you use the small filter for 1 cup of |
coffee |
|
and the large filter for |
2 cups of coffee. |
|
|
Coffee filters out in drops |
The water tank is empty or low |
Refer to step 1 – Filling the water tank on |
page 13. |
|
|
from the filter holder |
|
|
|
Coffee grind is too fine |
Ensure you use a suitable espresso grind. Refer |
to |
|
‘The Grind’ on page 21. |
|
Machine is blocked by mineral deposits |
Decalcify the machine; please refer to |
‘Decalcifying’ |
|
on Page 27. |
Machine is too loud |
Water tank is empty |
Refer to step 1 – Filling the water tank on |
page 13. |
|
|
|
|
|
28 |
TROUBLE SHOOTING GUIDE |
TROUBLE SHOOTING GUIDE |
29 |

PROBLEM |
POSSIBLE CAUSES |
WHAT TO DO |
|
|
|
Coffee is too cold |
Machine not preheated |
Ensure the red ‘Heating’ light cycles off as this |
is |
|
when the machine has reached |
the correct |
|
temperature. |
|
Cups not preheated |
The cup warming plate starts to warm up as |
the |
|
machine warms up. Please refer |
to ‘Pre-warming the |
|
cups’ on page 15. |
|
Milk not heated enough |
When the base of the jug becomes too hot to |
|
(if making a cappuccino or latté) |
touch this is when the milk is heated at the |
|
|
correct temperature. Please refer to ‘How to |
froth |
|
milk for a cappuccino or |
latté on page 17. |
|
|
No crema |
Coffee is not tamped firmly enough |
Refer to ‘Tamping the coffee’ on page 14. |
|
Coffee grind is too coarse |
Ensure you use a suitable espresso grind. Refer |
to |
|
‘The Grind’ on page 21. |
|
Ground Coffee is not fresh |
Pre-ground coffee should not be kept for |
longer |
|
|
|
|
than a week. Please refer to ‘The coffee’ on |
|
|
|
PROBLEM |
POSSIBLE CAUSES |
WHAT TO DO |
|
|
|
No steam is generated |
Machine is not turned on |
Ensure the machine is plugged in, switched on |
at |
|
|
|
|
the power outlet and the ‘on/off’ button is in |
the |
|
‘on’ position. |
|
Water tank is empty |
Refer to step 1 – Filling the water tank on |
page 13. |
|
|
|
Selector Control not in ‘Steam’ position |
Turn the selector control to the ‘Steam’ |
position. |
|
Ensure the steam |
button is selected for steam and |
|
‘Hot Water’ button |
selected for hot water. |
|
|
|
Steam Wand is blocked |
Use the pin on the cleaning tool to clear the |
|
|
opening. If the steam wand continues to |
be blocked, |
|
remove the tip of the steam |
wand using the spanner |
|
in the middle of the cleaning |
tool. Please refer to |
|
‘Care and cleaning’ on |
page 25. |
|
|
|
|
|
30 |
TROUBLE SHOOTING GUIDE |
TROUBLE SHOOTING GUIDE |
31 |

COFFEES TO TRY
ESPRESSO
Intense and aromatic, an espresso or short black as it’s also known uses about 7g of ground coffee. It is served in a small cup or glass to a level of approximately 30ml.
LONG BLACK
A long black is generally served as a standard espresso with hot water added to taste.
FLAT WHITE
A single dose of espresso in a cup topped with steamed milk, 1⁄3 coffee and 1⁄3 milk.
CLASSIC CAFE LATTÉ
Traditionally the morning coffee of Italy and France, taken with pain au chocolate or sweet biscotti. This blend of 1⁄3 espresso to 2⁄3 milk is made with a single shot of espresso. Top with steamed milk, poured down the inside rim of the glass to give a creamy consistency and perfect layer of froth.
CAPPUCCINO
The real thing is served very light and luke warm with 1⁄3 espresso to 1⁄3 steamed milk and a generous final third of creamy froth. For added finesse, hold a piece of card over
one half of the the cappuccino before dusting with chocolate.
MACCHIATO
A shot of espresso served short in a 70ml demitasse and stained with a dash of finely frothed milk.
32 COFFEES TO TRY |
COFFEES TO TRY 33 |

MOCHA FRAPPE (serves two)
Ready in minutes this impressive refresher will delight chocolate and coffee drinkers alike. Melt two heaped teaspoons of quality chocolate bits into a double shot of espresso. Add 1⁄2 cup
cold milk and 9 ice cubes and process in blender on a low speed to a smooth, velvety consistency. Pour evenly into two glasses and serve immediately.
ESPRESSO AFFOGATO
Totally irresistible, this sweet temptation is simply a single scoop of premium vanilla bean ice cream, drenched in espresso and if desired, your favourite liqueur. To create a sense of occasion, serve ice cream in a martini glass with shots on the side.
CON PANNA
Meaning ‘with cream’ this heart warmer is a chic variation on old-fashioned Vienna Coffee. In a 90-120ml cup, dress a double shot
of espresso with a dollop of fresh cream, whipped until glossy. Dust with cinnamon and serve immediately.
34 COFFEES TO TRY |
35 |
 Loading...