


TABLE OF CONTENTS |
|
Inhaltsverzeichnis |
|
Safety Instructions . . . . . . . . . . . |
3 |
Care and Cleaning . . . . . . . . . . . . |
5 |
Operating Instructions . . . . . . . . . |
4 |
Customer Services . . . . . . . . . . . |
6 |
Features . . . . . . . . . . . . . . . . . . . . |
4 |
Before Calling for Service . . . . . . . . |
6 |
Operation . . . . . . . . . . . . . . . . . . . |
4 |
Cover How to Obtain Service . . . . . |
6 |
|
|
Data Plate Information . . . . . . . . . . |
6 |
TABLE DES MATIÈRES |
|
Inhaltsverzeichnis |
|
Instructions de sécurité . . . . . . |
7 |
Entretien et nettoyage . . . . . . . . |
9 |
Instructions de fonctionnement |
8 |
Service à la clientèle . . . . . . . . . |
10 |
Caractéristiques . . . . . . . . . . . . . |
8 |
Avant de faire un appel de service |
10 |
Fonctionnement . . . . . . . . . . . . . |
8 |
Comment obtenir un service . . . . |
10 |
|
|
Plaque signalétique . . . . . . . . . . . |
10 |
CONTENIDO |
|
Inhaltsverzeichnis |
|
Instrucciones de Seguridad . . |
11 |
Cuidado y Limpeiza . . . . . . . . . |
13 |
Instrucciones de Operación . . |
12 |
Servicios al Cliente . . . . . . . . . . |
14 |
Características . . . . . . . . . . . . . . |
12 |
Antes de solicitar servicio . . . . . . |
14 |
Operación . . . . . . . . . . . . . . . . . |
12 |
Cómo obtener servicio . . . . . . . . |
14 |
|
|
Placa con información . . . . . . . . . . |
14 |
2

IMPORTANT SAFETY INSTRUCTIONS
READ ALL INSTRUCTIONS BEFORE USING THE APPLIANCE. READ AND SAVE THESE INSTRUCTIONS
WARNING – To reduce the risk of a range top grease fire:
a)Never leave surface units unattended at high settings. Boilovers cause smoking and greasy spillovers that may ignite.
Heat oils slowly on low or medium settings.
b)Always turn hood ON when cooking at high or when flambéing food (i.e. Crepes Suzette, Cherries Jubilee, Peppercorn Beef Flambé).
c)Clean ventilating fans frequently. Grease should not be allowed to accumulate on fan or filter.
d)Use proper pan size. Always use cookware appropriate for the size of the surface element.
e)Do not place any objets on the snorkel. They could fall down when the snorkel is raised.
Caution: Grease left on filters can remelt and move into the vent.
When children become old enough to use the appliance, it is the legal responsibility of the parents or legal guardians to ensure that they are instructed in safe practices by qualified persons.
WARNING – To reduce the risk of injury to persons in the event of a cooktop grease fire, observe the following:
a)Smother flames with a close-fitting lid, cookie sheet, or metal tray, then turn off the burner. Be careful to prevent burns. If the flames do not go out immediately, Evacuate and call the fire department.
b)Never pick up a flaming pan. You may be burned.
c)Do not use water, including wet dish cloths or towels. A violent steam explosion will result.
d)Use an extinguisher only if:
1)You know you have a Class ABC extinguisher, and you already know how to operate it.
2)The fire is small and contained in the area where it started.
3)The fire department is being called.
4)You can fight the fire with your back to an exit.
WARNING: Whenever possible, do not operate blower during a cooktop fire. However, do not reach through fire to turn off blower.
3
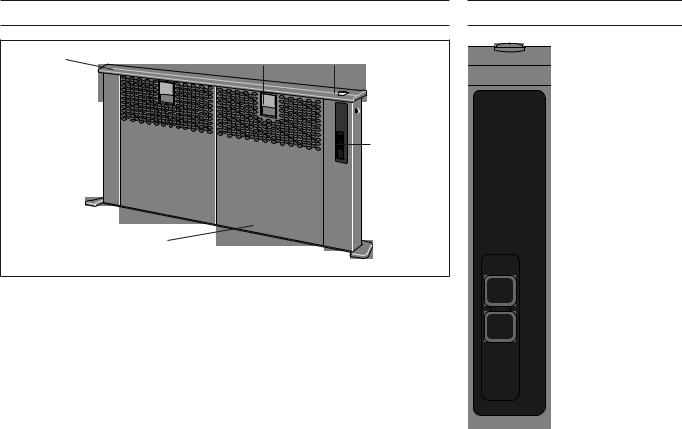
FEATURES
 • 0 • 1 • 2 • 3
Raised Intake
Intake Top Cap |
Filters (behind front panel) |
UP/DOWN Button |
Filter Release Lever |
Blower Speed Control Switch |
Blower (not shown) |
The Thermador Universal Cook’n’Vent® |
There are five primary parts of the |
takes the place of an overhead hood and |
downdraft system: the intake, the |
can be conveniently hidden away (lowered) |
UP/DOWN button, the blower, the blower |
when not in use. |
speed control switch, the filter and the filter |
|
release lever. |
|
|
Intake
The intake, when raised, captures and channels the cooking odors, steam and grease. The filters are located within the intake.
UP/DOWN Button
The UP/DOWN Button is located on the top right of the intake. Press the Button once to raise or lower the intake. It is not necessary to hold the Button.
Blower
The blower is the fan that draws the cooking odors out of the house.
Blower Speed Control Switch
The blower speed control switch is located on the right front of the intake. The intake must be raised in order to use the control switch. There are four blower speed settings: Off, Low, Medium, and High. Slide the switch to the desired setting.
Filters
The filters are located on the front of the intake. They condense and trap the grease in the air.
Filter Release Levers
The filter release levers are used to remove the filters. Pull out on the lever then pull up and out on the filter.
OPERATION
Snorkel Up/Down
Pushing the Snorkel Up/Down moves the intake up or down.
Pushing this button while snorkel is raising or lowering will stop motion.
Pushing again will reverse motion.
|
0 |
Blower Off |
|
|
1 |
Low Blower Speed |
|
• 0 |
2 |
Medium Blower |
|
|
Speed |
||
• 1 |
3 |
High Blower Speed |
|
• 2 |
Pressing the High, |
||
• 3 |
|||
Medium, or Low Blower |
|||
Speed buttons will turn on or change the ventilator speed to the corresponding button selected.
For Best Results
Turn the blower on before starting to cook.
A higher heat setting may be needed when the downdraft is in operation.
Use a rear burner when browning or pan frying meat.
Open a window or inside door slightly.
Clean the filters and the wall behind the filters frequently.
For Gas Cooktops, a lower blower speed should be used if:
•the gas flame is being distorted by the air movement.
•the burner continually sparks (clicks).
•the burner flame repeatedly blows out.
To Raise the Intake
Press the control push-button once to raise the intake.
The intake will stop automatically at its maximum height.
The blower will automatically turn on to the previously set blower speed.
To Set or Adjust Blower Speed
Vary the blower speed as needed for the food or the cooking method being used.
For example: greasy or pungent foods require greater ventilation power than boiling pasta. Turn the button clockwise to adjust the speed.
4

OPERATION
To Lower the Intake
Press the control push-button once.
Note: The blower will turn off when the intake is lowered if operating when the control push-button is pressed.
If Intake Stops
Locate and remove obstruction.
Press control button to raise intake.
Press control button again to lower intake.
CARE AND CLEANING
The efficiency of the downdraft ventilation system depends on the cleanliness of the intake and filters. The frequency of cleaning depends on the amount and type of cooking.
Do not use the ventilating system without the filters in place or with greaseladen filters or surfaces.
WARNING To avoid risk of fire and explosion do not use flammable liquids or solvents.
Always unplug or disconnect the appliance from the power supply before servicing.
CARE AND CLEANING
To Remove Filters
1.Pull out on lever.
2.Lift filter up and out.
3.Clean filters in the dishwasher or in warm, sudsy water. See Care and Cleaning Chart, next page, for further details.
To Replace Filters
1.Place bottom of filter in grease trough.
2.Pull out on lever.
3.Press top of filter into place.
4.Release Lever.
To Clean the Intake and Grease Troughs
Intake must be in the raised position to clean.
1.Turn off the blower.
2.Remove filters.
3.Clean intake and grease troughs with general household degreaser spray or cleaner.
4.Rinse and dry.
5.Replace filters.
Carbon Filter
A carbon filter is used only with a recirculation unit. Carbon filters are disposable; They cannot be cleaned or reused. With normal use (1 to 2 hours per day), the carbon filter should be replaced once per year.
The replacement active carbon filters are available by calling Thermador Customer Service or by ordering online at Thermador.com. Use Thermador-supplied filters only. Filters are priced and shipped in sets of 2 to allow replacement of both filters at the same time.
Always use the mildest cleaner that will do the job. Use clean, soft cloths, sponges or paper towels.
Rub stainless steel finishes in the direction of the grain. Wipe area dry to avoid water marks.
After cleaning, place all parts in their proper positions before using.
The cleaners recommended below indicate a type and do not constitute an endorsement. Use all products according to package directions.
A |
Anodized |
Top cap is not removable. Wash top and underside with hot sudsy |
|
Aluminum |
water. Rinse and wipe dry or apply Fantastic® or Formula 409® first to |
|
Top Caps for |
a clean sponge or paper towel and wipe clean. |
|
Stainless |
DO NOT USE powdered cleansers or steel wool pads. |
|
|
|
B |
Aluminum |
Clean filters in the dishwasher or by agitating in sudsy water. Ensure |
|
Mesh Filters |
that there is no soil trapped in the fine mesh. Dry the filters before |
|
|
reinstalling them. |
|
|
|
C |
Plastic |
DO NOT REMOVE push-button or control knob. Wipe with a moist |
|
Controls |
soapy sponge. Rinse and dry. |
|
|
|
D |
Painted |
Wash top and underside with hot sudsy water. Rinse and wipe dry or |
|
Top Cap for |
apply Fantastic® or Formula 409® first to a clean sponge or paper |
|
Black/White |
towel and wipe clean. |
|
|
DO NOT USE powdered cleansers or steel wool pads. |
|
|
|
E |
Stainless |
Wipe grease accumulation with a paper towel or sponge. Scrape |
|
Steel Parts |
heavy buildup with a plastic spatula. Clean with a soapy sponge; |
|
|
rinse and dry. |
|
|
Always wipe or rub with grain. Wipe with Fantastic® or Formula 409® |
|
|
sprayed onto a paper towel. If grease buildup is heavy, several |
|
|
appliacations may be necessary. |
|
|
Polish with Stainless Steel Magic® and a soft cloth. Remove water |
|
|
spots with a cloth dampened with white vinegar. Use Cameo |
|
|
Aluminum and Stainless Steel Cleaner® to remove heat discoloration. |
5
 Loading...