

BMW iDrive Owner's Manual

Owner's Manual
The Ultimate Driving
Machine
NAVIGATION,
ENTERTAINMENT,
COMMUNICATION.
OWNER'S MANUAL.
Contents
A-Z
Online Edition for Part no. 01 40 2 926 935 - X/13


User's manual for Navigation, Entertainment, Com‐
munication
Thank you for choosing a BMW.
The more familiar you are with the systems of your BMW, the
more easily you will be able to take full advantage of them. We
therefore strongly suggest:
Read this Owner's Manual before starting off in your new BMW.
Also use the Integrated Owner's Manual in your vehicle. It con‐
tains important information on the operation of your navigation,
entertainment and communication systems that will help you
make full use of the technical features they offer.
Any updates made after the editorial deadline for the printed or
Integrated Owner's Manual are located in the appendix of the
printed quick reference for the vehicle.
Supplementary information can be found in the additional bro‐
chures in the onboard literature.
We wish you a safe and enjoyable drive.
BMW AG
Online Edition for Part no. 01 40 2 926 935 - X/13

© 2013 Bayerische Motoren Werke
Aktiengesellschaft
Munich, Germany
Reprinting, including excerpts, only with the written
consent of BMW AG, Munich.
US English X/13, 11 13 490
Printed on environmentally friendly paper, bleached
without chlorine, suitable for recycling.
Online Edition for Part no. 01 40 2 926 935 - X/13

Contents
The fastest way to find information on a partic‐
ular topic or item is by using the index, refer to
page 134.
Navigation
8 Navigation system
9 Destination input
18 Destination guidance
21 Map view
24 Traffic bulletins
28 Navigation data
29 What to do if...
Entertainment
32 Tone
35 Radio
43 CD/DVD
51 External devices
60 Music collection
67 Rear audio remote control
68 Rear entertainment
Communications
78 Telephone
89 Office
101 Contacts
104 ConnectedDrive
110 Telephone in the rear
Reference
128 Short commands of the voice act.
system
134 Everything from A to Z
Online Edition for Part no. 01 40 2 926 935 - X/13

Online Edition for Part no. 01 40 2 926 935 - X/13

Navigation
This chapter contains various examples of how
the navigation system can guide you reliably to
your destination.
Online Edition for Part no. 01 40 2 926 935 - X/13

Navigation system
Vehicle equipment
All standard, country-specific and optional
equipment that is offered in the model series is
described in this chapter. Therefore, equip‐
ment is also described that is not available in a
vehicle, e. g., because of the selected optional
equipment or country variant. This also applies
for safety-related functions and systems.
General information
The navigation system can determine the pre‐
cise position of the vehicle with the aid of sat‐
ellites and vehicle sensors, and can reliably
guide you to every entered destination.
Navigation data are stored in the vehicle and
can be updated.
Note
Entries in stationary vehicle
Enter data only when the vehicle is sta‐
tionary, and always give priority to the applica‐
ble traffic regulations in the event of any con‐
tradiction between traffic and road conditions
and the instructions issued by the navigation
system. Failure to take to this precaution can
place you in violation of the law and put vehicle
occupants and other road users in danger.◀
Starting navigation system
1. Press the button on the controller.
2. "Navigation"
The navigation system can also be ac‐
cessed directly with the button on the
controller.
Navigation Navigation system
8
Online Edition for Part no. 01 40 2 926 935 - X/13

Destination input
Vehicle equipment
All standard, country-specific and optional
equipment that is offered in the model series is
described in this chapter. Therefore, equip‐
ment is also described that is not available in a
vehicle, e. g., because of the selected optional
equipment or country variant. This also applies
for safety-related functions and systems.
Manual destination entry
General information
The system supports you in entering city or
street names, e.g., by automatically complet‐
ing the entry.
Stored town/city and street names can be
called up quickly.
▷ If the existing entries should not be
changed, the entries for the state/province
and town/city can be skipped.
▷ Destination guidance is started to the
town/city center if no street is entered.
▷ If part of an address has not been entered
or entered ambiguously, a list of corre‐
sponding options will be displayed after
the destination has been accepted.
Entering a state/province
1.
"Navigation"
2. "Enter address"
3. Select "State/Province" or the displayed
state/province.
Entering the address
Entering a house number
1.
"House number"
2. Select the numbers.
3. Change to the list of house numbers.
4. Select a house number or range of house
numbers.
Entering the street
1.
Select "Street" or the displayed street.
2. Select letters, if necessary.
The list is narrowed down further with each
entry.
3. Move the controller to the right.
4. Select the street names from the list.
If there are several streets with the same
name:
1.
Change to the list of street names.
2. Select the street.
Entering a town/city
1.
Select "Town/City/Postal Code" or the dis‐
played town/city.
2. Enter a town/city as you would the street.
Destination input Navigation
9
Online Edition for Part no. 01 40 2 926 935 - X/13

If there are several towns/cities with the same
name:
1. Change to the list of town/city names.
2. Select the town/city.
Entering the postal code
1. Select "Town/City/Postal Code" or the dis‐
played town/city.
2. Select the numbers.
3. Change to the list of postal codes and
towns/cities.
4. Selecting an entry.
Or: enter a street and intersection
1.
Select "Street" or the displayed street.
2. Enter a street and intersection in the same
way as you would enter a town/city.
If there are several streets with the same
name:
1.
Change to the list of street names.
2. Select the street.
Starting destination guidance
1.
"Accept destination"
2. "Start guidance" or "Add as another dest."
Add, refer to page 16, a destination as a
further destination.
Address book
Selecting a destination from the
address book
1.
"Navigation"
2. "Address book"
Contacts with addresses are displayed if
these have been checked as destinations
from among the Contacts.
3. Select a contact in the list or, if desired,
with "A-Z search".
4. If necessary, "Business address" or "Home
address"
Storing the destination in the address
book
After entering the destination, store the desti‐
nation in the address book.
1.
"Navigation"
2. "Map"
3. "Guidance"
4. Open "Options".
5. "Store as new contact" or "Add to existing
contact"
6. Select an existing contact, if available.
7. "Business address" or "Home address"
8. Enter "Last name" and, if applicable, "First
name".
9. "Store contact in vehicle"
Navigation Destination input
10
Online Edition for Part no. 01 40 2 926 935 - X/13
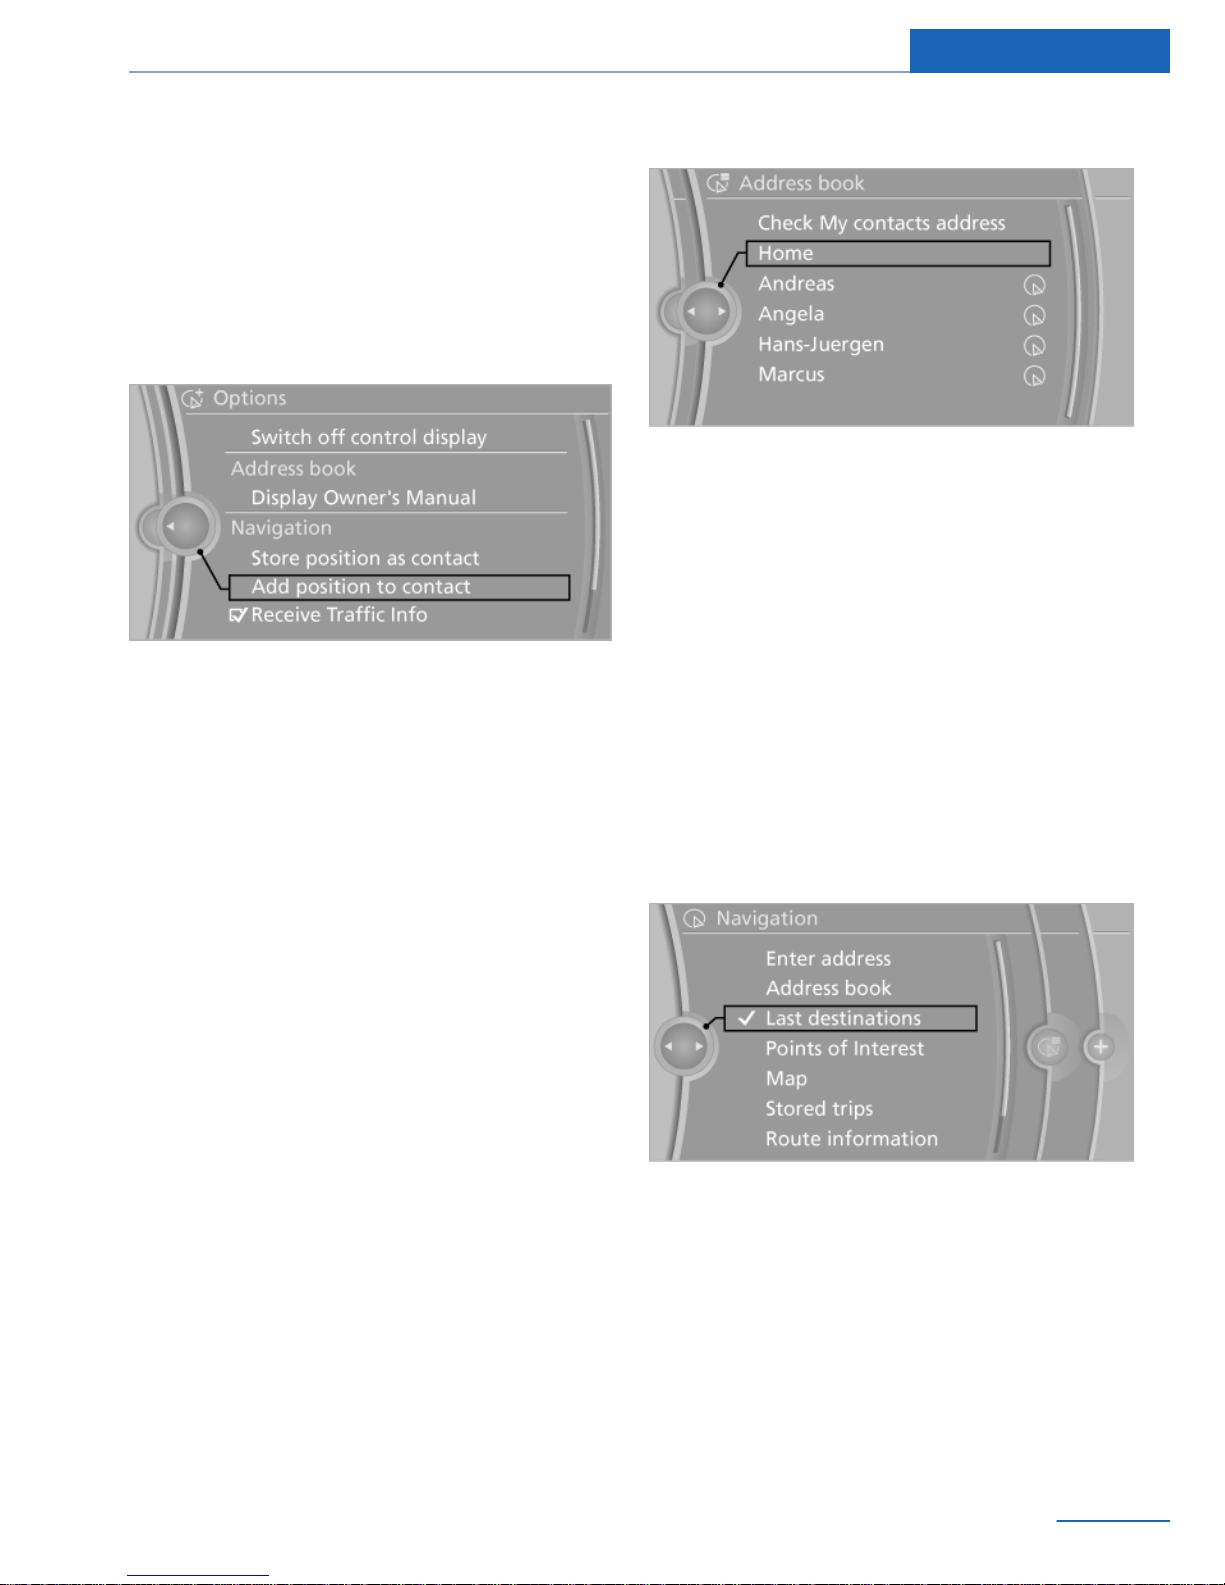
Storing the position
The current position can be stored in the ad‐
dress book.
1. "Navigation"
2. Open "Options".
3. "Store position as contact" or "Add
position to contact"
4. Depending on the selection, choose an ex‐
isting contact from the list. Select the type
of address and enter the first and last
names.
5. "Store in vehicle"
Editing or deleting an address
1.
"Navigation"
2. "Address book"
3. Highlight the entry.
4. Open "Options".
5. "Edit in Contacts" or "Delete entry"
Using the home address as the
destination
The home address must be stored.
1.
"Navigation"
2. "Address book"
3. "Home"
4. "Start guidance"
Last destinations
General information
The destinations previously entered are stored
automatically.
The destinations can be called up and used as
a destination for destination guidance.
Calling up the last destination
1.
"Navigation"
2. "Last destinations"
Starting destination guidance
1.
"Navigation"
2. "Last destinations"
3. Select the destination.
4. "Start guidance"
Destination input Navigation
11
Online Edition for Part no. 01 40 2 926 935 - X/13

Editing the destination
1. "Navigation"
2. "Last destinations"
3. Highlight the destination.
4. Open "Options".
5. "Edit destination"
Deleting the last destinations
1. "Navigation"
2. "Last destinations"
3. Highlight the destination.
4. Open "Options".
5. "Delete entry" or "Delete all last dest."
Special destinations
General information
Even with the most current navigation data, in‐
formation regarding particular individual desti‐
nations may have changed. For instance, cer‐
tain gas stations may not be operating.
Find special destinations
To select special destinations, e.g., gas sta‐
tions or tourist attractions:
1.
"Navigation"
2. "Points of Interest"
3. Select the search function.
Online Search
1. "Online search"
2. Select a special destination.
3. Select the symbol.
4. "Start guidance"
A-Z search
1. "A-Z search"
2. "Town/City"
Select or enter the town/city.
3. "Category"
4. Select the category.
5. "Category details"
Some special destinations permit selection
of multiple category details. Move the con‐
troller to the left to leave the category de‐
tails.
6. "Keyword"
7. Enter the keyword.
A list of the special destinations is dis‐
played.
8. Select a special destination.
Details are displayed.
If multiple details are stored, you can
browse through the tables.
If a phone number has been stored, a
connection can be established if neces‐
sary.
Special destinations can be stored in
the address book as a contact.
9. Select the symbol.
"Start guidance" or "Add as another dest."
Add a destination as a further destination,
refer to page 16.
"Start search": if a search term is not entered,
the search is repeated with the previous
search term.
Navigation Destination input
12
Online Edition for Part no. 01 40 2 926 935 - X/13

Category search
1. "Category search"
2. "Town/City"
Select or enter the town/city.
3. "Category"
4. Select the category.
5. "Category details"
Some special destinations permit selection
of multiple category details. Move the con‐
troller to the left to leave the category de‐
tails.
6. "Start search"
A list of the special destinations is dis‐
played.
7. Select a special destination.
Details are displayed.
If multiple details are stored, you can
browse through the tables.
If a phone number has been stored, a
connection can be established if neces‐
sary.
Special destinations can be stored in
the address book as a contact.
8. Select the symbol.
"Start guidance" or "Add as another dest."
Add a destination as a further destination,
refer to page 16.
Display of special destinations
List of special destinations: special destina‐
tions are organized by distance and are dis‐
played with a directional arrow to the special
destination.
The display depends on the scale of the map
and the category.
Special destinations of the selected category
are displayed as symbols in split screen in the
map view. The display depends on the scale of
the map and the category.
Destination entry via the Concierge
service
1. "Navigation"
2. "Enter address"
3. "Concierge"
A connection is established to the Concierge
service.
Displaying special destinations in the
map
The special destination categories can be dis‐
played on the map as symbols.
Set categories:
1.
"Navigation"
2. "Map"
3. Open "Options".
4. "Display Points of Interest"
5. Select the setting.
▷ "All"
▷ "None"
▷ "Custom": categories can be prese‐
lected.
The display in the map view can be switched
on and off, refer to page 22.
Destination entry by map
Selecting the destination
1.
"Navigation"
2. "Map"
The current position of the vehicle is indi‐
cated on the map.
Destination input Navigation
13
Online Edition for Part no. 01 40 2 926 935 - X/13

3. "Interactive map"
4. Select the destination with crosshairs.
▷ To change the scale: turn the control‐
ler.
▷ To shift the map: move the controller in
the required direction.
▷ To shift the map diagonally: move the
controller in the required direction and
turn it.
Specifying the street
If the system does not recognize a street, one
of the following is displayed:
▷ The name of a street nearby.
▷ The county.
▷ The coordinates of the destination.
Additional functions
Additional functions are available on the inter‐
active map after the controller is pressed.
▷ "POI near selected location": the
search for special destinations is started.
▷ "Show list": if the crosshairs are posi‐
tioned over a place with multiple special
destinations, these destinations will be dis‐
played in a list.
▷ "Show details": details about the desti‐
nation can be displayed as necessary.
▷ "Start guidance": destination guidance
is started.
▷ "Exit interactive map": switches back
to the map view.
▷ "Change map view": switches to the
northwards-oriented map view.
▷ "Display current location": the map sec‐
tion around your current location is dis‐
played.
▷ "Show destination": the map section
around the destination is displayed.
Destination entry by voice
General information
▷ Instructions for the voice activation sys‐
tem, see vehicle Owner's Manual.
▷ When making a destination entry by voice,
you can change between voice operation
and iDrive.
▷ To have the available spoken instructions
read out loud: ›commands‹.
Saying the entries
▷ The town/city, street, and house number
can be entered as a single command.
▷ Countries, towns and cities, streets, and
intersections can be said as whole words
or spelled in the language of the system.
Example: to enter a town/city in a US state
as a whole word, the language of the sys‐
tem must be English.
▷ Spell the entry if the spoken language and
the language of the system differ.
▷ Say the letters smoothly, and avoid exag‐
gerating the pronunciation and inserting
lengthy pauses between the letters.
Navigation Destination input
14
Online Edition for Part no. 01 40 2 926 935 - X/13

▷ The options available for entering data de‐
pend on the navigation data and the coun‐
try and language settings.
Entering an address in a command
1.
Press the button on the steering
wheel.
2. ›destination input‹
3. Wait for a request from the system.
4. Say the address in the suggested order.
5. Continue making the entry as prompted by
the system.
If necessary, individually name the separate
components of the address, e.g., the town/city.
Entering a town/city separately
The name of the town/city can be spoken as a
word or spelled out.
With the destination entry menu displayed:
1. Press the button on the steering
wheel.
2. ›Enter a city‹ or ›Spell city‹.
3. Wait for the system to prompt you for the
town/city.
4. Say the name of the town/city, or say at
least the first three letters.
Depending on the entry, up to 20 towns/
cities may be suggested.
5. Select the town/city.
▷ To select a recommended town/
city: ›Yes‹.
▷ To select a different town/city: ›Back‹.
▷ Select an entry: ›Entry number ...‹, e.g.,
entry 2.
▷ To spell an entry: ›Spell city‹.
▷ Scrolling: ›Scroll down‹, ›Scroll up‹.
6. Continue making the entry as prompted by
the system.
Entering a street or intersection
separately
Enter a street and intersection in the same way
as you would enter a town/city.
Entering a house number separately
Depending on the data in the navigation sys‐
tem, house numbers up to number 2,000 can
be entered.
1. ›building number‹
2. Say the house number.
Say each digit separately.
3. Continue making the entry as prompted by
the system.
Destination entry using GPS
coordinates
Destinations can also be entered directly using
GPS coordinates.
Enter the coordinates in degrees, minutes and
seconds or as decimal values.
1.
"Map"
2. "Guidance"
3. "Enter new destination"
4. "GPS coordinates"
5. "Longitude" or "Latitude"
6. Turn the controller until the desired degree
indication is displayed.
7. Press the controller.
8. Enter the values for minutes and seconds
accordingly.
9. "Accept destination"
Planning a trip
General information
When planning a trip, several intermediate
destinations can be entered.
Destination input Navigation
15
Online Edition for Part no. 01 40 2 926 935 - X/13

New trip
1. "Navigation"
2. "Map"
3. Move the controller to the left if necessary.
4. "Guidance"
5. "Enter new destination"
6. Select the type of destination entry.
7. Enter the intermediate destination.
8. "Start guidance"
Entering intermediate destinations
A maximum of 20 intermediate destinations
can be entered for one trip.
1.
"Map"
2. "Guidance"
3. "Enter new destination"
4. Select the type of destination entry.
5. Enter the intermediate destination.
6. "Add as another dest."
The intermediate destination is entered in
the destination list and is highlighted.
7. Turn the controller until the intermediate
destination is located in the desired posi‐
tion in the list.
8. Press the controller.
Starting the trip
1.
After all intermediate destinations are en‐
tered, highlight the first destination.
If the second destination, for example, is
highlighted when destination guidance is
started, the first destination is skipped.
2. "Start guidance"
This symbol marks the active leg of the
trip.
Storing a trip
Up to 30 trips can be stored in the trip list. If
necessary, delete existing trips to be able to
store new trips.
1. "Map"
2. "Guidance"
3. Open "Options".
4. "Save in My Trips"
5. Enter the name.
6. "OK"
Selecting a stored trip
1.
"Navigation"
2. "Stored trips"
Until the route category is opened, the
number of newly entered routes is dis‐
played after the respective category.
3. Select a route category.
4. Select a stored trip.
5. "Start guidance"
Reversing the direction of travel
Intermediate destinations are displayed in re‐
verse order in the list.
1.
"Map"
2. "Guidance"
3. Open "Options".
4. "Reverse order of trip dest."
Intermediate destination options
1.
"Map"
2. "Guidance"
Navigation Destination input
16
Online Edition for Part no. 01 40 2 926 935 - X/13

3. "Display all trip destinations"
4. Select an intermediate destination.
▷ "Edit destination"
▷ "Reposition dest. in the trip": move an
intermediate destination to another po‐
sition in the list.
▷ "Delete dest. in the trip"
▷ "Go to next dest. in the trip"
Some options are not available for certain trips.
Deleting a stored trip
1.
"Stored trips"
2. Highlight the desired trip.
3. Open "Options".
4. "Delete all trips" or "Delete trip"
Importing trips via a USB medium
1.
Switch on the ignition.
2. Connect the USB medium to the USB port
in the center armrest.
3. "Navigation"
4. "Stored trips"
5. "Import trips"
6. "USB"
7. "OK"
A maximum total of 30 trips may be stored on
the USB medium and in the navigation system;
otherwise, an import is not possible.
Calling up the last trip
1.
"Navigation"
2. "Stored trips"
3. "Last trip"
4. If desired, select an intermediate destina‐
tion.
5. "Start guidance"
Destination input Navigation
17
Online Edition for Part no. 01 40 2 926 935 - X/13

Destination guidance
Vehicle equipment
All standard, country-specific and optional
equipment that is offered in the model series is
described in this chapter. Therefore, equip‐
ment is also described that is not available in a
vehicle, e. g., because of the selected optional
equipment or country variant. This also applies
for safety-related functions and systems.
Destination guidance
Starting
1.
"Navigation"
2. Enter the destination, refer to page 9.
3. "Accept destination"
4. "Start guidance"
▷ The route is shown on the Control Display.
▷ The distance to the destination/intermedi‐
ate destination and the estimated time of
arrival are displayed in the map view.
▷ An arrow view is shown in the instrument
cluster, and on the Control Display and in
the Head-up Display if desired. Arrow view,
refer to page 19.
Exit
1.
"Navigation"
2. "Map"
3. "Guidance"
4. "Stop guidance"
Continuing
If the destination was not reached during the
last trip, destination guidance can be resumed.
"Resume guidance"
Route criteria
General information
The route calculated can be influenced by se‐
lecting certain criteria.
The route criteria can be changed when the
destination is entered and during destination
guidance.
Road types, such as highways, are part of the
navigation data and are taken into considera‐
tion when planning a route.
Destination guidance with traffic bulletins, re‐
fer to page 26.
Hints
The recommended route may differ from the
route you would take based on personal expe‐
rience.
The settings are stored for the remote control
currently in use.
Change
1.
"Navigation"
2. "Map"
3. "Route preference"
4. "Route preference"
5. Select the criterion.
Route criteria
▷ "Fast": time-optimized route, being a
combination of the shortest possible route
and the fastest roads.
▷ "ECO PRO": fuel consumption-opti‐
mized route, being a combination of the
route requiring low consumption and fast
roads.
▷ "Short": distance-optimized route, be‐
ing a combination of the shortest possible
route and the fastest roads.
Navigation Destination guidance
18
Online Edition for Part no. 01 40 2 926 935 - X/13

Additional criteria
▷ "Dynamic guidance": traffic information,
refer to page 26, is automatically in‐
cluded in the calculation for destination
guidance.
▷ "Avoid highways": highways are avoided
wherever possible.
▷ "Avoid ferries": ferries are avoided where
possible.
▷ "Avoid toll roads": toll roads are avoided
wherever possible.
▷ "Prefer express roadways": express roads
are preferred where possible.
▷ "Prefer HOV roadways": carpool lanes are
preferred where possible.
▷ "Areas to avoid": detours are provided to
go around blocked areas.
Alternative routes
If possible, alternative routes are suggested
during active route guidance.
1.
"Route preference"
2. "Alternative routes"
An overview showing the current route and
the suggested alternative routes is dis‐
played. In addition, details such as travel
time and route length, and for the alterna‐
tive routes information about fuel con‐
sumption compared with the current route
may be displayed if required.
The routes are shown in color on the split
screen.
3. Select to accept an alternative route.
Route information
Different views of the route are available during
destination guidance:
▷ Arrow view in the instrument cluster and
on the Control Display.
▷ List of route sections.
▷ Map view, refer to page 21.
▷ Depending on how the vehicle is equipped,
arrow view in the Head-up Display.
Arrow view
The following information is displayed during
destination guidance:
▷ Symbol for active destination guidance
with remaining travel time and distance to
destination.
▷ Small arrow: instruction, for example, about
the next change of direction with informa‐
tion about the distance to the turn and the
name of the new road.
▷ Large arrow: indicates the current direction
of travel.
▷ Street name of the currently traveled
street.
The display changes to a view of the intersec‐
tion depending on the road routing. Lane infor‐
mation may also be displayed here if applica‐
ble.
Display arrow view in split screen, refer to
page 23.
Lane information
On multilane roads, the recommended lanes
are marked in the arrow view by a triangle.
▷ Best lane.
▷ Lane also possible. However, another
lane change may be needed shortly.
Displaying list of route sections
When destination guidance is activated, a list
of route sections can be displayed. The driving
Destination guidance Navigation
19
Online Edition for Part no. 01 40 2 926 935 - X/13

distances and traffic bulletins are displayed for
each route section.
1. "Navigation"
2. "Route preview"
3. "Route information"
4. Highlight route section.
The route section is displayed in the split
screen.
Bypassing a section of the route
Calculate a new route for a route section.
1.
"New route for"
2. Turn controller until the desired distance
within which you would like to return to the
original route is displayed.
3. Press the controller.
Resuming the original route
If the route section should no longer be by‐
passed:
1.
"New route for:"
2. "Remove blocking"
Gas station recommendation
The remaining range is calculated, and if nec‐
essary gas stations along the route are dis‐
played.
Even with the most current navigation data, in‐
formation regarding individual gas stations
may have changed. For instance, certain gas
stations may not be operating.
1.
"Refuel"
A list of the gas stations is displayed.
2. Highlight a gas station.
The location of the gas station is displayed
in the split screen.
3. Select the gas station.
4. Select the symbol.
5. "Start guidance": destination guidance to
the selected gas station is started.
"Add as another dest.": the gas station is
added to the route.
Spoken instructions
Switching on/off
The setting is stored for the remote control
currently in use.
1. "Navigation"
2. "Map"
3. "Voice instructions"
Repeat
1.
"Navigation"
2. "Map"
3. Highlight the symbol.
4. Press the controller twice.
Volume
Turn the volume button while giving an in‐
struction until the desired volume is set.
Store on Favorites buttons
The function for switching the spoken instruc‐
tions on/off can be stored on a programmable
memory button for quick access.
Navigation Destination guidance
20
Online Edition for Part no. 01 40 2 926 935 - X/13

Map view
Vehicle equipment
All standard, country-specific and optional
equipment that is offered in the model series is
described in this chapter. Therefore, equip‐
ment is also described that is not available in a
vehicle, e. g., because of the selected optional
equipment or country variant. This also applies
for safety-related functions and systems.
Displays
1. "Navigation"
2. "Map"
At a glance
1 Function bar
2 Route section with traffic obstruction
3 Traffic sign for traffic obstruction
4 Planned route
5 Current location
6 Upper status field
7 Lower status field
Lines in the map
Streets and routes are displayed in different
colors and styles depending on their classifica‐
tion. Dashed lines represent railways and ferry
connections. Country borders are indicated by
thin lines.
Traffic obstructions
If traffic information of a radio station or a traf‐
fic information service is received, traffic in‐
structions can be displayed in the map, refer to
page 24.
Lines along the planned route indicate route
sections with traffic obstructions, depending
on the map scale. The position of the lines on
the route shows the direction of the obstruc‐
tion.
The traffic signs indicate the significance of
the obstruction.
▷ Red traffic sign: the obstruction affects the
planned route or direction.
▷ Gray traffic sign: the obstruction does not
affect the planned route or direction.
Planned route
After destination guidance is started, the plan‐
ned route is displayed on the map.
Status fields
Show/hide: press the controller.
▷ Upper status field: time, telephone, and en‐
tertainment details.
▷ Lower status field: symbol for active desti‐
nation guidance, status of traffic bulletins,
time of arrival, and distance to destination.
Function bar
The following functions are available in the
function bar:
Map view Navigation
21
Online Edition for Part no. 01 40 2 926 935 - X/13

Symbol Function
Destination guidance active/
inactive.
Switching spoken instructions
on and off.
Change the route criteria.
Search for a special destina‐
tion.
The most used special desti‐
nation categories are offered in
the second level.
Traffic information functions.
Detour suggestions are availa‐
ble.
Interactive map.
Set the map view.
Change the scale.
To change to the function bar, move the con‐
troller to the left.
Map section
Change
"Interactive map"
▷ To shift the map: move the controller in the
required direction.
▷ To shift the map diagonally: move the con‐
troller in the required direction and turn it.
Adjusting
The settings are stored for the remote control
currently in use.
1.
"Navigation"
2. "Map"
3. "Map views"
Map views
▷ "View facing north"
▷ "Direction of travel view"
▷ "Perspective view"
▷ "Traffic info map"
▷ "Additional Info"
Traffic bulletin map
"Traffic info map": information about traffic
flow is displayed in a special map view. The
symbols for the other additional information
set are also displayed.
Additional information
"Additional Info"
▷ "Points of Interest": symbols for special
destinations are displayed. Adjust display,
refer to page 13.
▷ "Traffic icons": symbols for traffic infor‐
mation, refer to page 24, are displayed.
▷ "Traffic flow": depending on the map
scale, a traffic obstruction's length, direc‐
tion, and impact are displayed in the map
using traffic signs or colored lines along
the calculated route provided that corre‐
sponding traffic information is present. In‐
formation about traffic flow in the map
view, refer to page 26.
▷ "Weather": weather symbols are dis‐
played on the map.
Displayed symbols: clear skies, cloudy
skies, rain, thunder shower, and snowfall,
each with the current temperature.
The weather information is updated auto‐
matically.
The symbols are displayed in several se‐
lected scales.
▷ "Satellite images": depending on availa‐
bility and resolution, in some scales satel‐
Navigation Map view
22
Online Edition for Part no. 01 40 2 926 935 - X/13

lite images are displayed as the back‐
ground.
▷ 3D "Perspective view in 3D": prominent
areas that are present in the navigation
data are displayed on the map in 3D.
Set map mode
"Map mode": select and make settings de‐
pending on the light conditions.
▷ "Day"
▷ "Night"
▷ "Automatic"
Status information
▷ "Status info": show/hide status fields,
refer to page 21.
Scale
Change
1.
Select the symbol.
2. To change the scale: turn the controller.
Automatically scaled map scale
"Auto scale": in the north-oriented map
view, the entire route from the starting location
to the destination is displayed. This view is
also selected if the scale is adjusted until the
following appears: "AUTO".
Map view for split screen
The map view can be selected for the split
screen independently from the main screen.
1.
Open "Options".
2. "Split screen"
3. Move the controller to the right repeatedly
until the split screen is selected.
4. Press the controller.
5. Select the map view.
▷ "Arrow display"
▷ "Map facing north"
▷ "Map direction of travel"
▷ "Map perspective view"
▷ "Position"
▷ "Exit ramp view": selected route sec‐
tions, e.g., major road intersections, are
shown in perspective view.
▷ "Traffic info map": the map is opti‐
mized for displaying traffic bulletins.
6. To change the scale: select the split
screen and turn the controller.
Screens related to the
destination
Displays
When destination guidance is active, photos
can be viewed of some destinations.
1.
"Navigation"
2. "Map"
3. "Guidance"
4. "Pictures at destination"
5. Depending on availability, a selection of
photos is available for viewing.
Map view Navigation
23
Online Edition for Part no. 01 40 2 926 935 - X/13

Traffic bulletins
Vehicle equipment
All standard, country-specific and optional
equipment that is offered in the model series is
described in this chapter. Therefore, equip‐
ment is also described that is not available in a
vehicle, e. g., because of the selected optional
equipment or country variant. This also applies
for safety-related functions and systems.
General information
Traffic bulletins from traffic warning services or
radio stations that broadcast Traffic Informa‐
tion, TI, can be displayed in the map view and
taken into account when calculating routes. In‐
formation on traffic obstructions and hazards is
updated continuously in this system.
The traffic bulletins are indicated on the map
by symbols.
The traffic bulletins for the surrounding area
are stored in a list.
Certain BMW models equipped with navigation
have the capability to display traffic informa‐
tion. If your system has this capability, the fol‐
lowing additional terms and conditions apply:
An End-User shall no longer have the right to
use the traffic information in the event that the
End-User is in material breach of the terms and
conditions contained herein.
BMW or its third party providers hold the rights
to the traffic data. You may not modify, copy,
scan or use any other method to reproduce,
duplicate, republish, transmit or distribute in
any way any portion of traffic data.
The traffic data is for informational purpose
only. Users assume all risk of use. BMW NA
and its service providers make no representa‐
tions about content, traffic and road condi‐
tions, route usability, or speed.
THE TRAFFIC DATA IS PROVIDED TO YOU
"AS IS," AND "WHERE IS". BMW NA AND
ALL THIRD PARTY PROVIDERS OF ANY OF
THE TRAFFIC DATA, EXPRESSLY DIS‐
CLAIMS, TO THE FULLEST EXTENT PER‐
MITTED BY LAW, ALL EXPRESS, IMPLIED
OR STATUTORY WARRANTIES OR REPRE‐
SENTATIONS WITH RESPECT TO THE
TRAFFIC DATA (INCLUDING, WITHOUT LIM‐
ITATION, THAT THE TRAFFIC DATAWILL BE
ERROR-FREE, WILL OPERATE WITHOUT IN‐
TERRUPTION OR THAT THE TRAFFIC DATA
WILL BE ACCURATE), INCLUDING, WITH‐
OUT LIMITATION, THE IMPLIED WARRAN‐
TIES OF MERCHANTABILITY, NON-IN‐
FRINGEMENT FITNESS FOR A PARTICULAR
PURPOSE, OR THOSE ARISING FROM A
COURSE OF DEALING OR USAGE OF
TRADE
NEITHER BMW NA NOR ITS THIRD PARTY
PROVIDERS WILL BE LIABLE TO YOU FOR
ANY INDIRECT, SPECIAL, CONSEQUENTIAL,
EXEMPLARY, OR INCIDENTAL DAMAGES
(INCLUDING, WITHOUT LIMITATION, LOST
REVENUES, ANTICIPATED REVENUES, OR
PROFITS RELATING TO THE SAME) ARIS‐
ING FROM ANY CLAIM RELATING DIRECTLY
OR INDIRECTLY TO USE OF THE TRAFFIC
DATA, AND EVEN IFBMW NA OR ITS THIRD
PARTY PROVIDERS ARE AWARE OF THE
POSSIBILITY OF SUCH DAMAGES. THESE
LIMITATIONS APPLY TO ALL CLAIMS, IN‐
CLUDING, WITHOUT LIMITATION, CLAIMS
IN CONTRACT AND TORT (SUCH AS NEGLI‐
GENCE, PRODUCT LIABILITY AND STRICT
LIABILITY). SOME STATES DO NOT ALLOW
THE EXCLUSION OR LIMITATION OF INCI‐
DENTAL OR CONSEQUENTIAL DAMAGES,
SO THOSE PARTICULAR LIMITATIONS MAY
NOT APPLY TO YOU.
Navigation Traffic bulletins
24
Online Edition for Part no. 01 40 2 926 935 - X/13

Display in the function bar of the map
view
Symbol Function
Symbol yellow:
The traffic information relates to the
calculated route and the prospec‐
tive delay is less than 20 minutes.
Symbol red:
The prospective delay is more than
20 minutes, or there is a road block
or hazard warning for the route.
There are suitable detours in keep‐
ing with the traffic bulletins.
Realtime traffic information, RTTI
In some countries, realtime traffic information,
RTTI, is transmitted by services that can be
booked additionally, and which can then be
used and displayed instead of the traffic bulle‐
tins from the radio stations.
With the realtime traffic information, the loca‐
tions of traffic obstructions are provided in
greater, more precise detail. Traffic conditions
on roads other than the highways, e.g., secon‐
dary roads and urban streets are also recorded
and displayed for a wide area. Recommended
detours can be calculated more accurately on
the basis of this information. The risk of be‐
coming caught in a further traffic obstruction
on detour routes is reduced. If applicable, sev‐
eral detour recommendations or additional in‐
formation may be offered.
When traveling in countries where realtime
traffic information is not available, the traffic
bulletins from the radio stations are still used
whenever possible.
The lower status field, refer to page 21, in the
map view shows whether TI or RTTI traffic bul‐
letins are being used.
Reception
Switching on/off
1. "Navigation"
2. Open "Options".
3. "Receive Traffic Info"
List of traffic bulletins
Displays
1. "Navigation"
2. "Map"
3. "Traffic list"
4. "Traffic list"
With active destination guidance, first the
traffic bulletins for the calculated route are
displayed with red symbols. Then, the traf‐
fic bulletins that do not affect the route are
shown with gray symbols. The traffic bulle‐
tins are sorted by their distance from the
current position of the vehicle.
5. Select a traffic bulletin.
"More information": display additional
information.
6. Scroll to the next or previous traffic
bulletin if required.
Detour recommendations
Displays
1.
"Navigation"
2. "Map"
3. "Detour": a list of detour recommenda‐
tions is displayed.
Traffic bulletins Navigation
25
Online Edition for Part no. 01 40 2 926 935 - X/13

Traffic bulletins on the map
Traffic summary
When this function is activated, the map view
is switched to shades of gray, the north-ori‐
ented map view is displayed, and if necessary
the scale is adjusted. The symbols for addi‐
tional information are hidden. This enables a
better view of the traffic bulletins. Day/night
mode is not taken into account in this setting.
Display traffic summary
1. "Navigation"
2. "Map"
3. "Traffic Info"
4. "Traffic summary"
Exit traffic summary
Move the controller to the left.
The original map view is displayed.
Symbols in the map view
Depending on the scale of the map and the lo‐
cation of the traffic obstruction along the route,
the symbols for the traffic obstructions are dis‐
played.
Information about traffic flow in the
map view
Depending on the map scale, a traffic obstruc‐
tion's length, direction, and impact are dis‐
played in the map using traffic signs or colored
lines along the calculated route.
▷ Black: road blocked.
▷ Red: congestion.
▷ Orange: stop-and-go traffic.
▷ Yellow: heavy traffic.
▷ Green: clear roads.
▷ Gray: general traffic bulletins, e.g., con‐
struction site.
The displayed information depends on the par‐
ticular traffic information service.
Traffic bulletins during
destination guidance
The concept
If bulletins about traffic obstructions have been
received, the system calculates possible de‐
tour suggestions.
General information
There are two possible destination guidance
modes.
▷ Semi-dynamic destination guidance: de‐
tour suggestions offered by the navigation
system can be accepted manually.
▷ Dynamic destination guidance: detour sug‐
gestions are automatically accepted by
destination guidance.
Semi-dynamic destination guidance
When traffic bulletin reception is switched on,
semi-dynamic destination guidance is active.
The destination guidance system takes the
available traffic information into account. A
message is displayed depending on the route,
the traffic bulletins, and the possible detour
routes. When there is a traffic obstruction, if
possible, a detour is offered.
In the event of special hazards, e. g., objects on
the road, a message is displayed without a de‐
tour suggestion.
The top part of the message displays:
▷ The symbol of the first traffic obstruction,
including the distance at which the traffic
obstruction first occurs, if applicable.
▷ Distance to start of the diversion.
The bottom part of the message displays:
▷ Remaining driving distance and arrival time
on the original route with a white symbol.
▷ Difference between the journey lengths
and time savings offered by the diversion
compared with the original route with a col‐
ored symbol.
Navigation Traffic bulletins
26
Online Edition for Part no. 01 40 2 926 935 - X/13

The following appears in the split screen:
▷ Original route, white.
▷ Detour, colored.
Accepting the detour
In the message:
"Detour"
Via the function bar:
1. "Navigation"
2. "Map"
3. "Traffic Info"
4. "Detour"
5. Open the desired detour.
6. "Detour"
Dynamic destination guidance
The route is automatically changed in the
event of traffic obstructions.
▷ The system does not point out traffic ob‐
structions along the original route.
▷ Traffic bulletins continue to be displayed
on the map.
▷ Depending on road type and the kind and
extent of the traffic obstruction, the calcu‐
lated route may lead through the traffic ob‐
struction.
▷ Dangerous situations are displayed regard‐
less of the setting.
Activating dynamic destination
guidance
1.
"Navigation"
2. "Map"
3. "Route preference"
4. "Route preference"
5. "Dynamic guidance"
Traffic bulletins Navigation
27
Online Edition for Part no. 01 40 2 926 935 - X/13

Navigation data
Vehicle equipment
All standard, country-specific and optional
equipment that is offered in the model series is
described in this chapter. Therefore, equip‐
ment is also described that is not available in a
vehicle, e. g., because of the selected optional
equipment or country variant. This also applies
for safety-related functions and systems.
Information on the
navigation data
1.
"Navigation"
2. Open "Options".
3. "Navigation system version": information
on the data version is displayed.
Updating
General information
Navigation data are stored in the vehicle and
can be updated from a USB medium.
Current navigation data and the authorization
code are available from your service center.
Hints
Depending on the data volume, the data up‐
date may take several hours.
Update during the trip to preserve the battery.
The status of the update can be queried.
Update
1.
Connect a USB device with the new navi‐
gation data to the USB interface in the cen‐
ter armrest.
2. Follow the instructions on the Control Dis‐
play.
3. Enter the release code for the navigation
data.
The navigation data will be updated. After a
journey is interrupted, follow the instruc‐
tions on the Control Display.
4. Remove the USB medium after the update.
Viewing the status
1.
Press the button.
2. "Navigation update"
Navigation Navigation data
28
Online Edition for Part no. 01 40 2 926 935 - X/13

What to do if...
Vehicle equipment
All standard, country-specific and optional
equipment that is offered in the model series is
described in this chapter. Therefore, equip‐
ment is also described that is not available in a
vehicle, e. g., because of the selected optional
equipment or country variant. This also applies
for safety-related functions and systems.
What to do if...
▷ The current transmission position cannot
be displayed?
The vehicle is located in an unrecognized
region, is in a poor reception area, or the
system is currently determining the posi‐
tion. Reception is usually best when you
have an unobstructed view of the sky.
▷ The destination without street information
is not used for route guidance?
When city has been input, no downtown
can be determined.
Input any street in the selected city and
start destination guidance.
▷ The destination is not used for route guid‐
ance?
The destination data is not contained in the
navigation data. Select a destination that is
as close as possible to the original.
▷ Letters for destination input cannot be se‐
lected?
The stored data do not contain the data of
the destination.
Select a goal that is as close as possible to
the original.
▷ Is the map displayed in shades of gray?
"Traffic summary" active: indication on the
Control Display is switched to shades of
gray. This enables a better view of the traf‐
fic bulletins. Deactivate the traffic info map,
refer to page 26.
▷ Spoken instructions are no longer output
during route guidance in front of intersec‐
tions?
The area has not yet been fully recorded,
or you have left the recommended route
and the system requires a few seconds to
calculate a new route suggestion.
What to do if... Navigation
29
Online Edition for Part no. 01 40 2 926 935 - X/13

Online Edition for Part no. 01 40 2 926 935 - X/13
 Loading...