


Please read first!
Dear customer,
With the purchase of this appliance, which is offering a load capacity of up to 6 kg, you have made a decision for up-to-date dryer technology – high quality, long service life, high reliability and an optimum in operating convenience.
•At first, please check if the appliance was received undamaged.
•If a transport damage is noticed, notify your supplier immediately; do not operate the appliance!
These operating instructions...
…are intended to help you operate this appliance quickly and safely.
•Read the instructions – before installation and initial operation of this appliance.
•Pay special attention to the safety information.
•Keep the instructions for future reference.
•If you sell this appliance pass on the instructions to the new owner.
Explanatory note on symbols
Throughout these instructions the following symbols are used:
 High voltage! Risk of electric shock!
Risk of other personal injury or property damage.
Important information or useful advise.
CONTENTS |
|
Machine Overview .............................. |
2 |
Safety First........................................... |
3 |
Disposal ............................................... |
3 |
Installation........................................... |
3 |
The proper location .......................... |
3 |
Built-under installation...................... |
4 |
Washer/dryer combination ............... |
4 |
Levelling ........................................... |
4 |
Changing hinge position .................. |
4 |
Drain hose connection...................... |
4 |
Electrical connection......................... |
5 |
The first time .................................... |
5 |
Before Drying ...................................... |
5 |
What can be dried ............................ |
5 |
What must not be dried.................... |
6 |
The right amount ............................. |
6 |
The door .......................................... |
6 |
Programmes ........................................ |
6 |
Programme selector.......................... |
6 |
Standard programmes...................... |
6 |
Special programmes ........................ |
7 |
Timed programmes ......................... |
7 |
Optional Functions.............................. |
8 |
Buzzer mute .................................... |
8 |
Child-proof lock................................ |
8 |
Time delay .......................................... |
8 |
Aborting a time-delay ....................... |
9 |
Programme progress indicator ........... |
9 |
Indicator lamp ..................................... |
9 |
After drying... ...................................... |
10 |
Fluff filter .......................................... |
10 |
Condensed water container .............. |
10 |
Condenser......................................... |
10 |
Drum ribs ......................................... |
11 |
AT A GLANCE ...................................... |
12 |
Preparation and start ........................ |
12 |
Changing the programme ................ |
12 |
Aborting a programme..................... |
12 |
Adding more laundry........................ |
12 |
Laundry final drying.......................... |
12 |
Programme end ............................... |
12 |
Programme table ................................ |
13 |
Trouble Shooting ................................ |
14 |
Technical Specifications / |
|
Energy Consumption .......................... |
15 |
1
Machine Overview
Programme selector |
Programme progress indicator |
||||||||||||||
|
|
|
|
|
|
|
|
|
|
|
|
Indicator lamps On/Off button |
|||
|
|
|
|
|
|
|
|
|
|
|
|
||||
|
|
|
|
|
|
|
|
|
|
|
|
|
|
|
|
|
|
|
|
|
|
|
|
|
|
|
|
|
|
|
|
|
|
|
|
|
|
|
|
|
|
|
|
|
|
|
|
|
|
|
|
|
|
|
|
|
|
|
|
|
|
|
|
|
|
|
|
|
|
|
|
|
|
|
|
|
|
|
|
|
|
|
|
|
|
|
|
|
|
|
|
|
|
|
|
|
|
|
|
|
|
|
|
|
|
|
|
|
|
|
|
|
|
|
|
|
|
|
|
|
|
|
|
|
|
|
|
|
|
|
|
|
|
|
|
|
|
|
|
|
|
|
|
|
|
|
|
|
|
|
|
|
|
|
|
|
|
|
|
|
|
|
|
|
|
|
|
|
|
|
|
|
|
|
|
|
|
|
|
|
|
|
|
|
|
|
|
|
|
|
|
Buzzer cancel button
Start/Pause/Cancel button
Display
Time delay buttons
Rating label |
Control panel |
Power cable |
|
||
|
|
Fluff filter |
|
(inside the door) |
|
Levelling feet |
Water drain connector |
|
2
Safety First
Intended use
•This appliance shall only be used for drying and airing of clothing labelled suitable for tumble drying.
•The care information in the clothing must be followed.
•This appliance is not intended for commercial use.
Safety information
•This appliance must be connected to a properly installed earthed outlet, protected by a fuse of adequate capacity.
Do not operate the appliance if the power cable or power cable plug are damaged or the appliance shows any other faults! Risk of electric shock!
•Never touch the power cable plug with wet hands! Never pull on the cable to unplug, always pull on the plug only.
Operate appliance only in well ventilated, low dust rooms. Do not block or cover the appliance's vent slots.
Do not reach into the drum while the appliance is heating up. Risk of scalding by the hot and moist textiles!
•Keep children away from the appliance! Electric appliances are no toys.
Textiles treated with cleaning materials or having been dry cleaned must not be dried in the appliance afterwards. The vapors generated may cause a risk of fire or explosion, poisoning hazard or damage to the appliance!
•Periodically clean all important parts of the appliance (see “After drying…”). Operating safety, drying time and energy consumption depend on such periodical cleaning.
•In case of malfunctions which cannot be rectified by the information contained in this manual:
Turn appliance OFF, unplug, notify the customer service.
Never attempt to repair the appliance yourself! You could endanger your own life and the life of other users! Only authorised electricians, such as our service technicians, are permitted to repair electric appliances.
Disposal
Where to leave the packaging?
The plastic wrapping must not get in-
to the hands of children! Risk of suffocation!
The packaging is made of materials which can be recycled.
•Separate the packing material by type:
–Styropor® parts and plastic wrapping go to a valuable substance collection point;
–battens go into bulky refuse.
The packaging is not to be disposed of in the regular household refuse!
What to do with the old appliance?
Dispose of your old appliance in an environmentally friendly manner.
•Ask you dealer or your local refuse collection service how to best dispose of your old appliance.
Before giving the appliance into bulky refuse, disconnect it from the mains, cut off the power cable and disable the door lock – so children will not be endangered.
Installation
The proper location
For drying the appliance requires a sufficient supply of clean, cool room air.
Operate the appliance only in well ventilated, low dust rooms. Do not block or cover the appliance's vent slots.
Do not operate appliance in locations where there is a danger of freezing. Some parts contain water and may be damaged by frost.
3
The floor must have a sufficient loadbearing capacity! If, for example, you are stacking a washer and the dryer, this combination can – when loaded – reach a total weight of 160 kg.
Important:
•Place appliance on an even an level floor only.
•Do not stand appliance on the power cable.
•Keep at least 1 cm distance to walls or other furniture.
Built-under installation
This appliance can be installed under a worktop.
•For this a special top cover is required (stock no. AP 2000), available at the customer service or specialised trade.
Only authorised specialists are permitted to carry out a built-under installation. Risk of electric shock!
Washer/dryer combination
This appliance can be put on top of any of our washing machines.
•A special stacking kit is required (stock no. MBS2000), available at the customer service or specialised trade.
Levelling
•Adjust feet until the appliance is level and does not rock. Checking with a spirit level is recommended.
Important:
•Adjust by the feet only, do not use wooden wedges or similar. Never remove the feet!
Changing hinge position
If you wish to open the door to the other side, you can have the hinge position changed from left hand to right hand or vice versa by our customer service.
Drain hose connection
The water arising from drying (“condensed water”) is normally collected in the condensed water container, which needs to be emptied after every drying cycle.
•The condensed water can also be drained permanently by means of the drain hose supplied into a siphon trap or any other drain.
In that case the condensed water container needs no longer to be drained – nevertheless the >Reservoir full  < indicator will light at the end of each drying cycle.
Important:
•In order for the water to run off observe the maximum hose length and highest point above the floor (see “Technical Specifications”)!
•Ensure that there are no sharp bends in the hose!
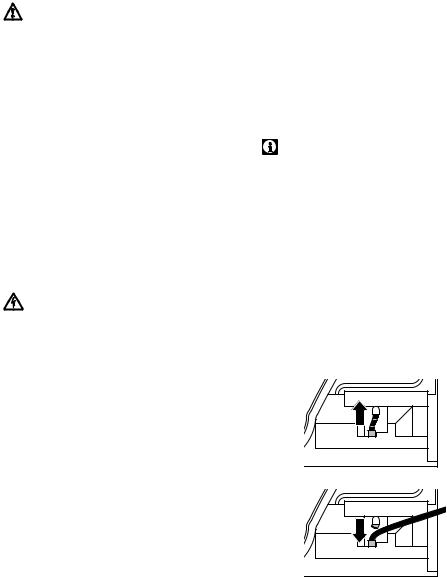
Here's how to proceed:
1.At the water drain connector, pull the hose up from inside the appliance by hand. Do not use pliers!
2.Push the drain hose firmly on the water drain connector.
3.Run the drain hose to the waste outlet of a washbasin and connect it.
4.If the drain hose is hung to the edge of a washbasin or bathtub, secure it against slipping off.
4
 Loading...