


Dishwasher
User manual
DWS 51500 SS
DWS 51500 FBI
DWS 51502 SS
DWS 51502 FBI

Dishwasher
User manual
DWS 51500 SS
DWS 51500 FBI
DWS 51502 SS
DWS 51502 FBI

To prevent accidents, which could cause serious injury or death, as well as machine damage read these instructions before installation and / or use.
CONTENTS
1. IMPORTANT SAFETY INSTRUCTIONS |
1 |
2. RECYCLING |
3 |
3. GETTING TO KNOW YOUR DISHWASHER |
4 |
4. LOADING THE DISHWASHER |
5 |
4.1 UPPER RACK |
7 |
4.2 LOWER RACK |
10 |
4.3 PROPER AND IMPROPER LOADING OF DISHWARE |
13 |
5. WHAT SHOULD NOT BE WASHED IN YOUR DISHWASHER |
14 |
6. OPERATING THE PRODUCT |
15 |
6.1 KEYS |
16 |
6.2 PREPARING THE MACHINE |
16 |
6.3 PROGRAM SELECTION |
16 |
6.4 AUXILIARY FUNCTIONS |
19 |
6.5 SCHEDULING THE WASHING TIME |
21 |
6.6 STARTING THE PROGRAM |
21 |
6.7 CANCELLING THE PROGRAM |
22 |
6.8 SALT INDICATOR ( ) |
22 |
6.9 RINSE AID INDICATOR ( ) |
22 |
6.10 END OF PROGRAM |
23 |
6.11 WATER CUT-OFF WARNING |
23 |
6.12 OVERFLOWING WARNING |
23 |
7. DETERGENT |
24 |
7.1 ADDING DETERGENT |
24 |
7.2 TABLET DETERGENTS |
25 |
7.3 RINSE AID |
26 |
8. ADJUSTING THE WATER SOFTENING SYSTEM |
27 |
9. FILLING THE DISHWASHER SALT DISPENSER |
28 |
10. CARE AND MAINTENANCE |
29 |
10.1 CARING FOR YOUR DISHWASHER EXTERIOR |
30 |
10.2 CARING FOR YOUR DISHWASHER INTERIOR |
30 |
10.3 CLEANING THE FILTERS |
31 |
10.4 CLEANING THE HOSE FILTER |
32 |
10.5 CLEANING THE WASH ARMS |
32 |
11. TROUBLESHOOTING |
34 |
12. TECHNICAL FEATURES |
38 |
13. WARRANTY STATEMENT FOR THE BLOMBERG DISHWASHERS |
39 |
14. HOW TO GET SERVICE |
41 |

INTRODUCTION
Please read this user manual and particularly the safety instructions completely and carefully. They will save you time and effort and help to ensure optimum dishwasher performance.
Be sure to observe all listed warnings and cautions. Look particularly for the icons with exclamation marks inside. The information icon will also provide important references.
AWARNING: Indicates a potentially hazardous situation which, if not avoided, could result in death or serious injury.
ACAUTION: Indicates a potentially hazardous situation which, if not avoided, may result in injury. It may also be used to alert against unsafe practices.
C NOTICE: Indicates a potentially hazardous situation which, if not avoided, may result in damage to the dishwasher, the table-
ware, the equipment or the environment.
1. IMPORTANT SAFETY INSTRUCTIONS
AWARNING:When using the dishwasher, follow basic precautions, including the following:
Read all instructions before using the dishwasher! Save these operating instructions and pass them on to any future user.
A“This device complies with Part 15 of the FCC Rules. Operation is subject to the following two conditions:
(1)this device may not cause harmful interference, and
(2)this device must accept any interference received, including interference
that may cause undesired operation.”
“No changes shall be made to the equipment without the manufacturer’s permission as this may void the user’s authority to operate the equipment”
•• Use the dishwasher only for its intended purpose as described in this user manual. This appliance is intended for normal household use only.
•• The manufacturer disclaims responsibility for damage or injury caused by improper use of this appliance.
•• The information in this user manual must be followed to minimize the risk of fire or explosion and to prevent property damage, personal injury or loss of life.
•• Do not operate your dishwasher unless all the enclosure panels are properly in place.
•• Do not tamper with the controls.
•• Do not abuse, sit on, stand in or on the door or dish rack of the dishwasher.
•• The cup racks are designed to support cups, glasses and kitchen utensils. When the cup racks are in the dishwasher do not lean on or use the cup racks to support your body weight.
1 USA

•• To reduce the risk of injury, do not allow children to play in, on or near the dishwasher.
•• Use only detergents or rinse aids recommended for use in a household dishwasher and keep them in a dry place out of the reach of children. Check that the detergent dispenser is empty
after the completion of each wash program.
•• Dishwasher detergents contain chemicals that can cause sickeness and may be if they are inhaled or swallowed. Also, be careful when opening the door due to hot steam that is producded during operation. Consult a doctor immediately if detergent has been swallowed or inhaled.
•• if the hot water has not been used in several weeks, we recommend running the hot water taps to remove any built up hadrogen gases.
•• Do not store or use flammable liquids or vapors in the area of the dishwasher.
•• When loading items to be washed, position sharp items so that they are not likely to damage the door seal and load sharp knives with the handles up to reduce the risk of cut-type injuries.
•• Do not wash plastic items unless they are marked “dishwasher safe” or the equivalent. For plastic items not so marked, check the manufacturer’s recommendations.
•• If a malfunction occurs, switch off the appliance and turn off the water supply to the dishwasher.
•• Please do not attempt to carry the dishwasher by yourself in order to avoid potential injuries. Two or more people are needed to move a dishwasher.
•• Before cleaning or carrying out maintenance, switch off the appliance, disconnect the power plug and turn off the water supply.
•• Repairs and technical modifications must be carried out exclusively by a Authorized technician.
•• If the dishwasher is not in use for an extended period of time (i.e. vacation home), we recommend remove all items
from the dishwasher, leave the door cracked open to allow air to circulate and turn off both the power and water supply to the dishwasher.
•• This appliance comes with a three prong NEMA 5-15P 15A power cord. It must be connected to a Grounded and Polarized wall receptacle that has been
installed and tested by an licensed electrician and that it has been installed based on all Local, State and Federal Electrical codes.
AWARNING:Improper
••
2 USA

result in respiratory problems, especially for the infirmed, elderly and children.
•• Chidren should not operate this machine without adult supervision.
•• Be Careful to not leave the door fully open when not being loaded or unloaded to prevent someone from tripping on the unit.
AWARNING:If your dishwasher is equipped with internal illumination, lamp should only be replaced by the Authorized Service Agent in case of failures that may occur on the lamp.
AWARNING: This product can expose you to chemicals including Nickel (Metallic) which is known to the State of California to cause cancer.
For more information go to
www.P65Warnings.ca.gov
Note: Nickel is a component in all stainless steel
and some other metal components.
SAVE THESE INSTRUCTIONS
•• Service should be performed by a qualified installer. Work by unqualified persons could be dangerous and may void the warranty.
•• Do not operate the appliance if damaged, malfunctioning, partially disassembled or if it has missing or broken parts.
•• Before installation or service, disconnect the power supply to the work area by unplugging the unit, “tripping” the circuit breaker or removing the fuse.
•• For safety reasons, dishwasher must be secured to adjacent cabinetry using the brackets provided. Failure to do this may cause damage to property or bodily injury.
•• Do not use any extension cord or portable outlet device to connect the dishwasher to a power supply.
2. RECYCLING
•• Remove the door to the washing compartment when removing an old dishwasher from service or discarding it. Ensure that the appliance presents no danger to children while being stored for disposal.
•• Remove the door lock or door of the washing compartment before disposing dishwasher so that children or small animals can not trapped inside.
•• Old appliances may contain materials that can be recycled. Please contact your local recycling authority about the possibility of recycling these materials.
•• Please check the water supply line periodically. It is susceptible to breakage. It becomes less flexible as time goes by.Replace it immediately when it is torn, cut, swollen or there is water leakage.
•• Please keep the dishwasher package out of the reach of
children after unpacking it.
A
3 USA
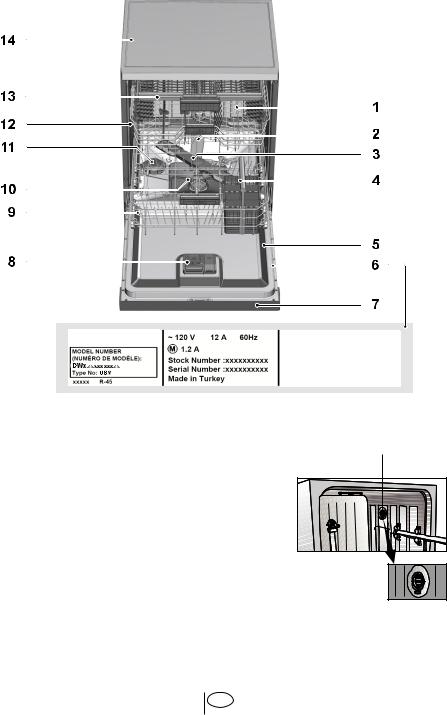
3. GETTING TO KNOW YOUR DISHWASHER
1. |
Upper basket |
|
2. |
Upper impeller |
15 |
3. |
Lower impeller |
|
4. |
Cutlery basket |
|
5. |
Door |
|
6. |
Model and Serial Tag |
|
7. |
Control panel |
|
8. |
Detergent and rinse aid dispenser |
|
9. |
Lower basket |
|
10. |
Filters |
|
11. Salt container (Select Models)
12.Upper basket rail
13.Upper cutlery basket (Select Models)
14.Tabletop (Select Models)
15.Turbo fan heat drying system (Select Models)
4 USA
4. LOADING THE |
Lower rack |
DISHWASHER |
|
1.Pull the handle to open the door. If the door is opened during operation, the dishwasher will stop running. Once the door is closed the program will continue.
2.Remove coarse food leftovers from tableware.
3.Now you can load the dishwasher.
ACAUTION:Hot steam can escape! Danger of serious burns or other injury.
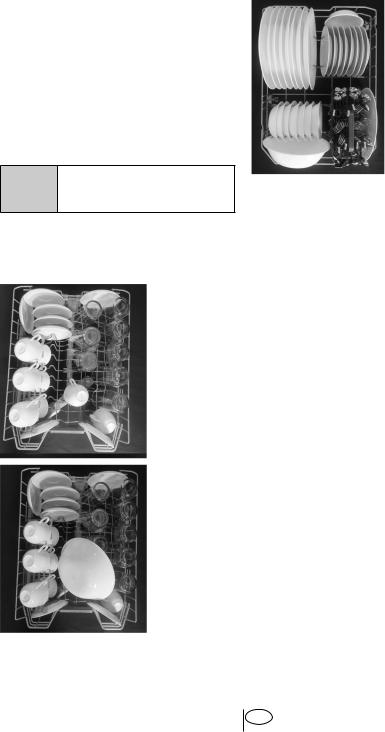
8 place setting loading pattern for daily, regular or typical use
Upper rack
5 USA

Cutlery basket |
|
|
|
|
|
|
|
|
|
|
|
||||||||
|
|
|
|
|
|
|
|
|
A |
CAUTION:Large knives and |
|||||||||
|
|
|
|
|
|
|
|
|
|
|
|
|
|
|
|
|
|
other utensils with sharp tips |
|
|
|
|
|
|
|
|
|
|
|
|
|
|
|
|
|
|
|||
|
|
|
|
|
|
|
|
|
|
|
|
|
|
|
|
|
|
|
and edges must be placed |
|
|
|
|
|
|
|
|
|
|
|
|
|
|
|
|
|
|||
|
|
|
|
|
|
|
|
|
|
|
|
|
|
|
|
|
|
|
horizontally into the upper |
|
|
|
|
|
|
|
|
|
|
|
|
|
|
|
|
|
|
|
rack due to risk of injury. |
|
|
|
|
|
|
|
|
|
|
|
|
|
|
|
|
|
|||
|
|
|
|
|
|
|
|
|
|
|
|
|
|
|
|
|
|
|
Other smaller knives and |
|
|
|
|
|
|
|
|
|
|
|
|
|
|
|
|
|
|
|
sharp utensils should be |
|
|
|
|
|
|
|
|
|
|
|
|
|
|
|
|
|
|
|
placed with sharp side down |
|
1: Salad Fork |
|
|
|
|
|
|
|
|
|
|
in the cutlery basket. |
|||||||
|
2: Teaspoon |
|
|
|
|
|
|
|
|
|
|
|
|||||||
|
|
|
|
|
|
|
|
|
|
A |
CAUTION:Use extreme |
||||||||
|
3: Dinner fork |
|
|
|
|
|
|
|
|
|
caution when removing |
||||||||
|
4: Knife |
|
|
|
|
|
|
|
|
|
knives and other sharp |
||||||||
|
5: Serving spoon |
|
|
|
|
|
|
|
|
|
|
utensils from the dishwasher. |
|||||||
|
6: Serving fork |
|
|
|
|
|
|
|
|
|
|
These items may have |
|||||||
|
|
|
|
|
|
|
|
|
|
|
|
|
|
|
|
|
|
|
shifted position during the |
|
2 |
|
|
|
|
2 |
2 |
|
|
|
|
2 |
|
|
|
||||
|
|
|
|
|
|
|
|
|
|
wash program, and may be |
|||||||||
|
2 |
|
|
|
|
2 |
2 |
|
|
|
|
2 |
|
|
|
||||
|
|
|
|
|
|
|
|
|
|
wet or slippery. |
|||||||||
|
|
|
|
|
|
|
|
|
|
|
|
|
|
|
|
|
•• Place all containers such as |
||
|
4 |
|
4 |
|
|
4 |
|
|
4 |
|
|||||||||
|
|
|
|
|
|
|
|
cups, glasses and pots into the |
|||||||||||
|
|
|
|
|
|
|
|
||||||||||||
|
|
|
|
|
|
|
|
|
|
|
|
|
|
|
|
|
|
dishwasher with the opening |
|
|
|
|
|
|
|
|
|
|
|
|
|
|
|
|
|
|
|
facing downwards (so that no |
|
|
1 |
|
3 |
|
3 |
|
|
|
1 |
|
|
|
water can collect). |
||||||
|
|
|
|
|
|
|
|
•• Small and light items can go into |
|||||||||||
|
|
|
|
|
|
|
|
|
|
|
|
|
|
|
|
|
|||
|
|
|
|
|
|
|
|
|
|
|
|
|
|
|
|
|
|
the upper rack. |
|
|
|
|
|
3 |
|
|
|
|
|
|
|
|
|
•• Long and narrow items are placed |
|||||
|
1 |
|
6 |
|
|
3 |
|
|
1 |
|
|
in the middle of the racks. |
|||||||
|
|
|
|
|
|
|
|
||||||||||||
|
|
|
|
|
|
|
|
|
|
|
|
|
•• Place all large and very dirty items |
||||||
|
|
|
|
|
|
|
|
|
|
|
|
|
|
|
|
|
|
in the lower rack. |
|
|
|
|
|
|
|
|
|
|
|
|
|
|
|
|
|
|
|
||
|
1 |
3 |
|
|
|
|
|
|
3 |
|
|
1 |
|
•• Load dishes accordingly and be |
|||||
|
|
|
|
|
|
|
|
|
|
|
careful when loading glasses so |
||||||||
|
|
|
|
|
|
|
|
|
|
|
|||||||||
|
|
|
|
|
|
|
|
|
|
|
|
|
|
|
|
|
|
they do not hit each other during |
|
|
|
|
|
|
|
|
|
|
|
|
|
|
|
|
|
|
|
the wash cycle. Also, make sure |
|
|
|
|
|
|
|
|
|
|
|
|
|
|
|
|
|
|
|
||
|
1 |
|
3 |
|
|
3 |
|
|
1 |
|
|
that both wash arms are not in |
|||||||
|
|
|
|
|
|
|
|
contact with any dishware. |
|||||||||||
|
|
|
|
|
|
|
|
||||||||||||
|
|
|
|
|
|
|
|
|
|
|
|
|
|
|
|
|
•• Do not overload your dishwasher |
||
|
|
|
|
|
|
|
|
|
|
|
|
|
|
|
|
|
|
and pay attention to manufacturer |
|
|
2 |
|
2 |
|
|
2 |
|
|
2 |
|
|
instructions regarding dishes |
|||||||
|
|
|
|
|
|
|
|
|
|
|
|
|
|
|
|
|
|
which are appropriate for use in for |
|
|
|
|
|
|
|
|
|
|
|
|
|
|
|
|
|
|
|
a dishwasher. Only with suitable |
|
|
4 |
|
4 |
|
4 |
|
|
|
4 |
|
|
|
dishes (mentioned in section 5) |
||||||
|
|
|
|
|
|
|
|
|
will you obtain optimal washing |
||||||||||
|
|
|
|
|
|
|
|
|
|||||||||||
|
|
|
|
|
|
|
|
|
|
|
|
|
|
|
|
|
|
results with a sensible use of |
|
|
|
|
|
|
|
|
|
|
|
|
|
|
|
|
|
|
|
energy. |
|
|
2 |
|
|
|
|
2 |
2 |
|
|
|
|
2 |
|
|
|||||
|
|
|
|
|
|
|
|
|
|
||||||||||
|
|
|
5 |
|
|
|
|
|
|
|
|
5 |
|
6 |
|
|
|
||
|
|
|
|
|
|
|
|
|
|
|
|
|
|
|
|
USA |
|||
|
|
|
|
|
|
|
|
|
|
|
|
|
|
|
|
|
|
|
|
4.1 UPPER RACK
Load the upper rack with dessert plates, cups, glasses etc.
ADJUSTABLE SHELVES
(Select Models)
CEILING CUTLERY BASKET
(Select Models)
Ceiling cutlery basket is designed to wash your cutlery items such as
forks, spoons and etc. by placing them between the bars on the basket..
7 USA
COLLAPSIBLE UPPER BASKET WIRES
(Select Models)
You can use collapsible wires when you need a larger space for your dishes in the upper basket of your machine.
To bring the collapsible wires into horizontal position, grab the wire from the middle position and push them
in the direction of arrow in the figure. Place your larger dishes into the area created. To bring the wires back to vertical position, just lift them up.
C Bringing the wires to the horizontal position by holding them from the tips may cause them to bend. Therefore, hold the wires from their stems while bringing them to the horizontal or vertical positions.
UPPER BASKET MULTIPURPOSE SERVICE RACK
(Select Models)
This accessory located at the upper basket of your machine allows you to easily wash pieces such as extra long ladles and bread knives.
You can lift up the upper basket multipurpose service rack to remove it if you do not want to use it.
If you want to use the upper basket multipurpose service rack again, you can easily attach it to the side section of your upper basket.
8 USA
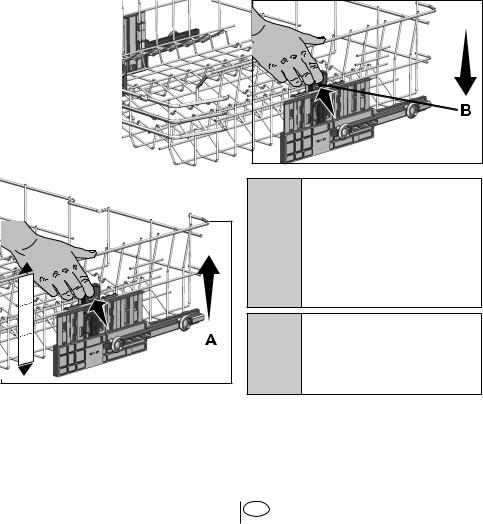
ADJUSTING THE HEIGHT OF THE UPPER BASKET
(Select Models)
The upper basket height adjustment mechanism has been designed for you to create large spaces in the lower or upper sections of your machine depending on your needs by adjusting the height in the upper or lower direction while your basket is empty or loaded.
To lower the basket, while it is in the uppermost position;
1.Hold the upper basket wires with both hands, slightly lift up the basket and simultaneously push and release the latches shown in the figure (B).
2.Lower the basket from its current position to the lower one.
3.Release the basket after it has reached one level down.
Thanks to this mechanism, you can |
Repeat the process if the height is not |
|
sufficient. |
||
use your basket in three different |
||
positions, namely lower, middle and |
|
|
upper positions (1, 2, 3). |
|
|
1. To raise your basket, hold the |
|
|
upper basket wires with both hands |
|
|
while the basket is in the lowermost |
|
|
position and pull them up (A). |
|
|
2. You will hear a "Click" from |
|
|
the right and left mechanisms, |
|
|
indicating that the basket has |
|
|
reached the next level. Release the |
|
|
basket. |
The movement mechanism |
|
Repeat the process if the height is not |
||
sufficient. |
may not function properly |
|
|
C if the upper basket is |
|
|
overloaded or if the weight |
|
|
distribution is not balanced. |
|
|
In heavier conditions, there |
|
1 |
is the risk of falling one level |
|
down. |
||
|
||
2 |
Make sure that the |
|
|
adjustment mechanism has |
|
3 |
C the same positions on the |
|
|
right and left sides of the |
|
|
upper basket. |
9 USA
HEIGHT SETTING
(Select Models)
In certain models, the height setting of the upper rack may be changed using the wheels which are present at two height levels.
ACAUTION:Make sure that the rack is empty. Changing the height setting while the rack contains tableware could cause the contents to dislodge, causing personal injury or damage to the tableware.
1.Release the latches on both the right and left tracks of the upper rack by turning them to the outside
A.
2.Pull out the rack completely B.
3.Place the rack into the tracks again at the desired height C.
4.Push the latches back into the correct position.
4.2 LOWER RACK
Use the lower rack for plates, bowls, pots etc.
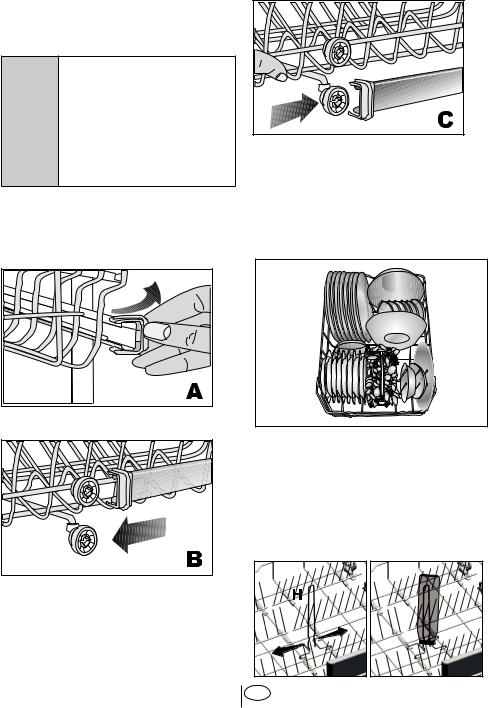
LOWER BASKET BOTTLE WIRE
(Select Models)
The bottle wire is designed for easier washing of long pieces with wide mouths. You may take out the bottle wire from the basket when not in use by pulling it out from both sides (H).
10 USA

COLLAPSIBLE LOWER BASKET TINES
(Select Models)
Foldable tines (A) located at the lower basket of the machine are designed for an easier placement of large pieces such as pans, bowls, etc. You can create larger spaces by folding each tines individually or all of them at once.
To bring the collapsible tines into horizontal position, grab the tines from mid position and push them in the directions of arrows (B). To bring the tines back to vertical position, just lift them up. Collapsible tines will click into the latch again (C).
Bringing the tines to the |
|
C horizontal position by |
|
holding them from the |
|
tips may cause them to |
|
bend. Therefore, it will be |
|
appropriate to bring the tines |
|
in the middle to horizontal or |
|
vertical position by holding |
|
them from their stems and |
|
pushing in the direction of |
|
arrow. |
11 |
COLLAPSIBLE LOWER BASKET TINES
(Select Models)
Foldable tines (A) located at the lower basket of the machine are designed for an easier placement of large pieces such as pans, bowls, etc. You can create larger spaces by folding each tines individually or all of them at once.
To bring the collapsible tines into horizontal position, grab the tines from mid position and push them in the directions of arrows (B). To bring the tines back to vertical position, just lift them up. Collapsible tines will click into the latch again (C).
|
Bringing the tines to the |
C horizontal position by |
|
|
holding them from the |
|
tips may cause them to |
|
bend. Therefore, it will be |
|
appropriate to bring the tines |
|
in the middle to horizontal or |
|
vertical position by holding |
|
them from their stems and |
|
pushing in the direction of |
USA |
arrow. |
 Loading...