


To prevent accidents and machine damage, read these instructions before installation or use. Use the washer-dryer only as instructed in this owner’s guide and installation instructions included with your product. Keep this guide for future reference
Front-Loading Automatic Washer-Dryer
Owner’s Guide & Installation Instructions
As an ENERGY STAR® partner, BLOMBERG has determined that this product meets the ENERGY STAR® guidelines for energy efficiency.
WMD24400W
Please read this guide first!
Dear Customer,
We hope that your product which has been manufactured in modern facilities and passed through a strict quality control procedure will give you the best results.
Therefore, we advise you to read through this document carefully before using your product and keep it for future reference.
This guide will…
…help you use your washer-dryer in a fast and safe way.
•Please read the guide before installing and starting your washerdryer.
•Particularly follow the instructions related to safety.
•Keep this guide within easy reach. You may need it in the future.
•Please read all additional documents supplied with this washerdryer.
Please note that this owner’s guide & installation instructions may be applicable for several other models. Differences between models will be identified in the guide.
|
|
2 / English |
Front-Loading Automatic Washer-Dryer |
|
|

Explanation of symbols
Throughout this guide the following symbols are used:
C CAUTION
• Important information or useful hints about usage.
AWARNING
• Warning for hazardous situations with regard to life and property.
BWARNING
• Warning for electrical shock
•Allergy UK, is the brand of British Allergy Association. Their main endorsement is the ‚Seal of Approval‘. When you see
a product with this logo on it, you have the reassurance the product has been scientifically tested to prove it is efficient at reducing/removing allergens from the environment of allergy and asthma sufferers or the products have significantly reduced allergen/chemical content.
If you have questions, call: Call Center (toll free number) 1-800-459-9848 (USA)
or send e-mail to: info@blomberginternational.com
For the list of dealers/retailers, distributors and authorized service agents, visit:http://www.blombergappliances.com
Please fill in the information below for future reference.
Model no.:
Serial no.:
Purchase date:
|
Owner’s Guide & Installation Instructions |
3 / English |
|
|
|

TABLE OF CONTENTS
1 Your Washer-dryer |
|
|
|
6 |
|
|
Overview . . . . . . . . . . . . . . . . . . . . . . . . . |
. |
. |
. 6 |
|
|
Specifications . . . . . . . . . . . . . . . . . . . . . |
. . |
. |
. |
. 8 |
2 |
Important Safety Instructions |
|
|
|
9 |
|
|
|
|
|
|
3 |
Installation Instructions |
|
|
|
14 |
The Right Location of Installation . . . . . . . . . . . . . . . . . . 14 Installation Clearances . . . . . . . . . . . . . . . . . . . . . . 15 Allowable Clearances for Undercounter Installation . . . . . . . . . . . 16 Allowable Clearances for Closet Installation . . . . . . . . . . . . . . 16 Removing packaging reinforcement . . . . . . . . . . . . . . . . . 17 Removing shipping bolts . . . . . . . . . . . . . . . . . . . . . 18 Leveling the product . . . . . . . . . . . . . . . . . . . . . . . 19 Electrical Connection . . . . . . . . . . . . . . . . . . . . . . . 19 Power supply and circuit . . . . . . . . . . . . . . . . . . . . . 21 Water Supply Connection . . . . . . . . . . . . . . . . . . . . . 22 Drainage . . . . . . . . . . . . . . . . . . . . . . . . . . . 24 Installation Checklist . . . . . . . . . . . . . . . . . . . . . . . 25 Transportation . . . . . . . . . . . . . . . . . . . . . . . . . 25 Disposal Information . . . . . . . . . . . . . . . . . . . . . . . 26 Appliance Disposal . . . . . . . . . . . . . . . . . . . . . . . 26
4 Operating Instructions |
|
27 |
First Use . . . . . . . . . . . . |
. . . . . . . . . . . . . . . 27 |
|
Laundry Tips . . . . . . . . . . . . . . . . . . . . . . . . . . 28 |
||
Preparing the laundry . . . . . . . . . . . . . . . . . . . . . . 30 |
||
Loading the washer . . . . . . . . . . . . . . . . . . . . . . . 31 |
||
Detergent Use . . . . . . . . . . . . . . . . . . . . . . . . . 32 |
||
Detergent Quantity . . . . . . . . . . . . . . . . . . . . . . . 33 |
||
Detergent Dispenser . . . . . . . |
. . . . . . . . . . . |
. . . . . 34 |
(II) Main Wash Detergent Compartment |
. . . . . . . . . . . |
. . . . 35 |
Liquid Fabric Softener Compartment . |
. . . . . . . . . . . |
. . . . 35 |
Using liquid detergents . . . . . . |
. . . . . . . . . . . |
. . . . . 36 |
(I) Liquid Chlorine Bleach Compartment |
. . . . . . . . . . . |
. . . . 36 |
Water Consumption . . . . . . . . |
. . . . . . . . . . . |
. . . . 37 |
5 Selecting a Program and Operating Your Washer-Dryer |
|
|
38 |
|
|
||
|
Control panel . . . . . . . . . |
. . . . . . . . . . . . . . |
. |
. |
. 38 |
|
|
|
Display symbols . . . . . . . . . . . . . . . |
. . . . . . . . . . . . . . . . . . . . . . . . . . . . . |
. . |
. . . 39 |
|
|
|
|
Preparing the machine . . . . . |
. . . . . . . . . . . . . . . |
. |
. |
39 |
|
|
|
Program and consumption table . |
. . . . . . . . . . . . . . . |
. |
. |
40 |
|
|
|
Selecting the washing program . |
. . . . . . . . . . . . . . . . . 42 |
|
|
|||
|
|
|
|
|
|||
4 / English |
Front-Loading Automatic Washer-Dryer |
||||||
|
|
|
|
|
|
|
|

TABLE OF CONTENTS
Washing programs . . . . . . . . . . . . . . . . . . . . . . . 42
Temperature selection . . . . . . . . . . . . . . . . . . . . . |
. |
47 |
Spin speed selection . . . . . . . . . . . . . . . . . . . . . |
. |
. 48 |
Drying programs . . . . . . . . . . . . . . . . . . . . . . . . 51 Washing and drying programs . . . . . . . . . . . . . . . . . . . 52 Auxiliary function selection . . . . . . . . . . . . . . . . . . . . . 54
Drying steps . . . . . . . . . . . . . . . . . . |
. . . . . . |
. |
. 56 |
Time display . . . . . . . . . . . . . . . . . . |
. . . . . . |
. |
. 57 |
End Time . . . . . . . . . . . . . . . . . . . |
. . . . . . |
. |
. 57 |
6 Preparation |
59 |
Starting the program . . . . . . . . . . . . . . . . . . . . . . . 59 Loading door locking system . . . . . . . . . . . . . . . . . . . . 60
Adding or taking out laundry . . . . . . . . . . . . . . . . . . |
. |
. 60 |
Changing the selections after program has started . . . . . . . . . . |
. |
61 |
Child Lock . . . . . . . . . . . . . . . . . . . . . . . . . . . 62 |
||
Cancelling the program . . . . . . . . . . . . . . . . . . . . |
. |
. 64 |
Re-spinning the laundry . . . . . . . . . . . . . . . . . . . . |
. |
. 64 |
End of program . . . . . . . . . . . . . . . . . . . . . . . |
. |
. 65 |
Energy saving mode . . . . . . . . . . . . . . . . . . . . . |
. |
. 65 |
7 User maintenance instructions |
66 |
Cleaning detergent dispenser . . . . . . . . . . . . . . . . . . . 66
Cleaning the door seal . . . . . . . . . . . . . . . . . . . . |
. |
|
. 67 |
Cleaning the drum . . . . . . . . . . . . . . . . . . . . . |
. |
. |
67 |
Cleaning the outer cabinet and control panel . . . . . . . . . . . . |
. |
|
. 68 |
Cleaning the water inlet strainers . . . . . . . . . . . . . . . . |
. |
. |
68 |
Cleaning the drain pump filter . . . . . . . . . . . . . . . . . |
. |
. |
69 |
Descaling the washer-dryer . . . . . . . . . . . . . . . . . . |
. |
. |
71 |
8 Troubleshooting |
|
|
72 |
9 WARRANTY STATEMENT FOR THE BLOMBERG CLOTHES |
|
|
|
WASHER-DRYER |
|
|
87 |
|
|
|
|
10 HOW TO GET SERVICE |
|
|
88 |
|
Owner’s Guide & Installation Instructions |
5 / English |
|
|
|

1 Your Washer-dryer
Overview
1


 2 8
2 8 


 3
3 


 4
4
5
6
7
1- Power cable
2- Top panel
3- Control panel
4- Drain hose
5- Loading door
6- Filter cap
7- Adjustable feet
8- Detergent drawer
|
|
6 / English |
Front-Loading Automatic Washer-Dryer |
|
|
Your Washer-Dryer
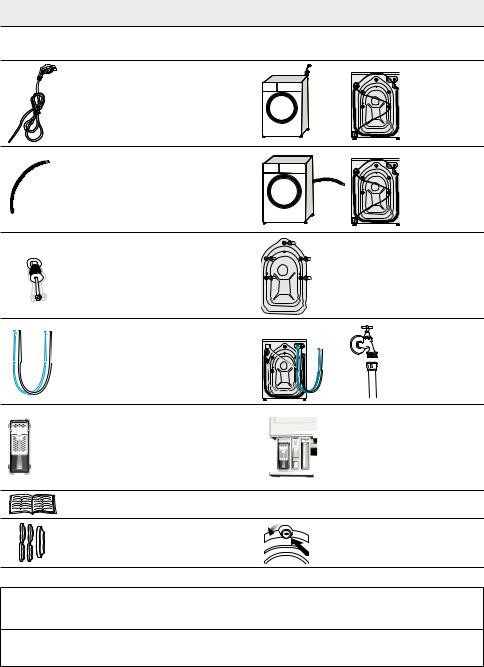
Package contents
Power cable
Water discharge hose
Transit bolts
Mains water inlet hose
Liquid detergent container (*)
User manual
Plastic plug group
C CAUTION
•Figures in this manual are schematic and may not match the product exactly.
(*) This may be supplied with the machine depending on the model of your product.
|
Owner’s Guide & Installation Instructions |
7 / English |
|
|
|

Your Washer-Dryer
Specifications
|
Front Loading Automatic |
|
Washer-Dryer |
Models |
WMD24400W |
|
|
Height (in) / (cm) |
33.1 / 84 |
|
|
Width (in) / (cm) |
23.6 / 60 |
|
|
Depth (in) / (cm) |
23.2 / 59 |
|
|
Net Weight (lbs) / (kg) |
158.7 / 72 |
|
|
Electricity (V/Hz.) |
208-240 / 60 |
|
|
Total Current (A) |
10 |
|
|
Total Power (W) |
2000-2350 |
|
|
Spinning cycle (rpm max.) |
1400 |
|
|
Water pressure (psi) / (bar) |
(15-145) / (1-10) |
|
|
Drain height (ft.) / (m.) |
4.9 / 1.5 |
|
|
Declared capacity (cu. Ft.) |
2.5 |
|
|
Rated capacity-Washing (lbs)/(kg) |
17.6 / 8 |
|
|
Rated capacity-Drying (lbs)/(kg) |
11.0 / 5 |
|
|
Specifications of this appliance may change without notice to improve the quality of the product. Figures in this guide are schematic and may not match your product exactly.
Values stated on the product labels or in the documentation accompanying it are obtained in laboratory in accordance with the relevant standards. Depending on operational and environmental conditions of the appliance, these values may vary.
|
|
8 / English |
Front-Loading Automatic Washer-Dryer |
|
|

2 Important Safety Instructions
BWARNING
•To reduce the risk of fire, electric shock or injury to persons while using your appliance follow basic safety precautions, including the following:
•Read all instructions before using the washer-dryer.
•Do not wash or dry articles that have been previously cleaned in, washed in, soaked in, or spotted with gasoline, dry-cleaning solvents, or other flammable or explosive substances (acetone, alcohol, kerosene, some liquid household cleaners, some spot removers, turpentine, waxes and wax removers) as they give off vapors that could ignite or explode.
•Do not add gasoline, dry-cleaning solvents, or other flammable or explosive substances to the wash water. These substances give off vapors that could ignite or explode.
•Under certain conditions, hydrogen gas may be produced in a hot-water system that has not been used for 2 weeks or more.
HYDROGEN GAS IS EXPLOSIVE. If the hot-water system has not been used for such a period, before using a washing machine, turn on all hot-water faucets and let the water flow from each for several minutes. This will release any accumulated hydrogen gas. As the gas is flammable, do not smoke or use an open flame during this time.
•Do not allow children to play on or in the appliance. Close supervision of children is necessary when the appliance is used near children.
•Before the appliance is removed from service or discarded, remove the door and the power cord / main plug to prevent accidents.
•Do not reach into the appliance if the drum is moving. Wait until the drum has completely stopped before opening the door.
•Do not install or store this appliance where it will be exposed to the weather and direct sunlight.
•Do not tamper with controls.
|
Owner’s Guide & Installation Instructions |
9 / English |
|
|
|

Important Safety Instructions
•Do not repair or replace any part of the appliance or attempt any servicing unless specifically recommended in the user-maintenance instructions or in published user-repair instructions that you understand and have the skills to carry out.
•This appliance must only be used for the purpose of washing, rinsing and spinning machine-washable items using laundry additives that are suitable for use in washers . The appliance manufacturer cannot be held responsible for damage caused by improper or unintended use of the appliance.
•Only detergents, softeners and additives suitable for use in
HE (High-efficiency) washers may be used. Always follow the instructions and information given by the laundry detergent manufacturers when using these products.
•Always follow the fabric care instructions of garment manufacturers.
•Do not touch the door glass while running at high temperatures.
Danger of burning!
•Do not sit on top of the product.
•Do not climb onto the product.
•Destroy the shipping carton, plastic bag and other packing materials after the product is unpacked. Keep children away from these packing materials. Danger of suffocation from plastic sheets and cartons!
•Do not mix chlorine bleach with ammonia or acids such as vinegar and/or rust remover when washing. This mixture can produce hazardous fume which may cause death.
•Do not operate this appliance if it is damaged, malfunctioning, partially disassembled, or has missing or broken parts, including a damaged cord or plug.
|
|
10 / English |
Front-Loading Automatic Washer-Dryer |
|
|
Important Safety Instructions
•Store laundry detergents and additives in a cool, dry place out of children’s reach due to danger of chemical poisoning and skin
irritation. Follow the manufacturers’ instructions when using laundry products.
•Do not wash or dry fiberglass materials. Small particles can stick to fabrics while running and may lead to skin irritation.
•Do not wash or dry items stained with vegetable oil, cooking oil or petroleum. These items may contain some flammable oils after laundering and the fabric may smoke or catch fire by itself.
•Be sure to unplug the power cable before attempting maintenance or cleaning of your appliance to minimize the risk of electric shock. Always unplug the cable by grasping the plug, not the cord.
•Do not use wet hands when plugging/unplugging the power cable.
•Check the water inlet and drain hose connections regularly for any leakage. Hoses should be replaced every 5 years.
•Do not leave the product door open to prevent children hurt themselves by hanging on the door or going inside the drum.
•Be careful when the appliance is draining hot water. Danger of burning!
•At the end of a washing day, turn off the water faucets to prevent any leakage that may occur due to a faulty condition of the appliance.
•Check the appliance and inlet hose connections for water leakage after each use. If there is leakage, turn off the appliance and water faucets and call service.
•Do not machine wash or dry items having large or heavy metal parts such as buttons or buckles. These items could severely damage the appliance.
•Always be sure to empty all foreign materials from the pockets of your clothing as small items such as coins, pins etc. could severely damage the appliance.
•Do not install and operate the appliance in places exposed to temperatures below freezing. Frozen water may cause severe damage by bursting hoses and pump.
|
Owner’s Guide & Installation Instructions |
11 / English |
|
|
|

Important Safety Instructions
•Make sure that shipping bolts are removed before you operate the product. If service is required as a result of not removing the bolts, it will not be covered by the warranty.
•Make sure that the drum is empty before you load the product.
•Do not store and use any flammable and combustible substances such as lint, paper and chemicals near the appliance.
•Always follow the manufacturer’s instructions when you are using a descaling agent. Be sure that descaling agent contains rustprotective materials and rinse the washer a few times thoroughly after the descaling process (See, Descaling the washer).
•Install and operate the product on a solid floor to prevent vibration or movement. It is not recommended to install and operate the product on wooden floor or on a carpet.
•The rated voltage of your washer is 208/240V, so it should not be directly connected to the wall power of 110/120V.
•If an abnormal sound is heard while running, refer to the
“Troubleshooting” of this guide.
•Call service for checking any possible damage or fault if the appliance is dropped or bumped.
•The end of drain hose should not contact the discharge water in any way as this might cause siphoning of water.
•Always leave the property after checking that the program cycle is completed and the product is turned off.
•Damaged or worn power cords and plugs must only be replaced by a Blomberg Service technician.
•Never use an extension cord or adapter to connect the appliance to the electrical power due to the risk of electric shock and/or fire.
•All broken and faulty components, panels and parts must only be replaced with original Blomberg spare parts by a Blomberg Service technician.
•Do not force the product’s door to open when it is locked. The door must be closed any time during the program cycle.
|
|
12 / English |
Front-Loading Automatic Washer-Dryer |
|
|

Important Safety Instructions
•Do not use fabric softeners or products to reduce static unless recommended by the manufacturers of the fabric softener product.
•Do not use heat to dry articles containing foam rubber or similarly textured rubber-like materials.
•Do not place items exposed to cooking oils in your dryer. Items contaminated with cooking oils may contribute to a chemical reaction that could cause a load to catch fire. To reduce the risk of fire due to contaminated loads, the final part of a tumble dryer cycle occurs without heat (cool down period). Avoid stopping a tumble dryer before the end of the drying cycle unless all items are quickly removed and spread out so that the heat is dissipated.
•Check the drain pump filter occasionally to remove coins, buttons and such small objects.
•Always drain off the water completely before cleaning the pump filter, before transporting the product, when there is a danger of frost and when there is a power failure (For emergency draining, See User maintenance instructions).
•Always be sure that the product has been properly installed by licensed personnel, water and electrical connections and grounding conform to all relevant codes and requirements.
•This manual does not cover every possible condition and situation that may occur. Use common sense and caution when installing, operating, and maintaining any appliance.
AWARNING
•This product may contain chemicals known to the state of California to cause cancer or birth defects or other reproductive harm.
SAVE THESE INSTRUCTIONS
Always follow the instructions on this user guide. If you aren’t sure how to perform them, please call Customer Service for assistance and scheduling service.
|
Owner’s Guide & Installation Instructions |
13 / English |
|
|
|

3 Installation Instructions
Read this first !
Install the clothes dryer according to the manufacturer’s instructions and local codes.
This product can be individually installed in free-standing and builtin installations. Before you install your appliance, read the following instructions completely and carefully:
•Save these instructions for future reference.
•This appliance must be properly installed and grounded by qualified and skilled technicians in accordance with all local codes and ordinances and the latest edition of the National Electrical Code,
ANSI/NFPA 70.
•Proper installation of this appliance is the responsibility of the owner and failure due to improper installation is not covered by the warranty.
The Right Location of Installation
You can install your product in a basement, closet or in a laundry room if the location has proper drainage, plumbing and power supply system. Always follow these instructions for installation:
•Do not install or store this appliance where it will be exposed to the weather, rain, damp places, water and direct sunlight. The ambient temperature must be higher than 60°F (15.6°C) for proper operation. Installation location must have the proper ventilation.
•Do not store and use any flammable and combustible substances such as lint, paper, curtains, gasoline, coal and liquid or vapor chemicals near the appliance.
•Install and operate the product on a strong solid concrete floor to prevent vibration, noise or movement in case of load unbalance. The floor must have sufficient load carrying capacity and the product must be leveled properly before the operation.
|
|
14 / English |
Front-Loading Automatic Washer-Dryer |
|
|

Installation Instructions
•It is not recommended to install and operate the product on a wooden floor or soft floor. If you have to install your product on a wooden or frame construction floor, the floor must be reinforced properly and the product must be located in the corner of the room if possible.
•Never place your product on a carpet. This prevents air circulation. The electrical components of the machine may overheat and cause damage.
•Do not stand appliance on the power cable.
•Do not install and operate your product in ambient temperatures lower than 32˚F (0˚C). Controls may stop working properly in such condition.
•If there is danger of frost, drain all remaining water in pump and hoses since it may freeze and cause damage by bursting them (see “Cleaning the drain pump filter”).
Installation Clearances
C CAUTION
•The installation location must be large enough for the product door to be fully opened for loading.
•The installation location must be large enough for ease of operation, maintenance and service.
•Ensure there is min 1/2” of clearance on each side of the product to allow slight sideways movement during washing and spin drying.
|
Owner’s Guide & Installation Instructions |
15 / English |
|
|
|

Installation Instructions
Allowable Clearances for Undercounter Installation
The dimensions are for the recommended spacing. Counter depth should be 23.5-24.5”(60-62 cm).
Custom undercounter installation – Washer-Dryer only
Allowable Clearances for Closet Installation
When installed in closet:
Sides, Rear, Front 1/2 in. (1.27 cm), Top= 1 in. (2.54 cm)
Closet door ventilation requirement: A louver having minimum 23 in2 (148 cm2) air opening located at 3 in (7.62 cm) from the bottom of closet door.
|
|
16 / English |
Front-Loading Automatic Washer-Dryer |
|
|
Installation Instructions
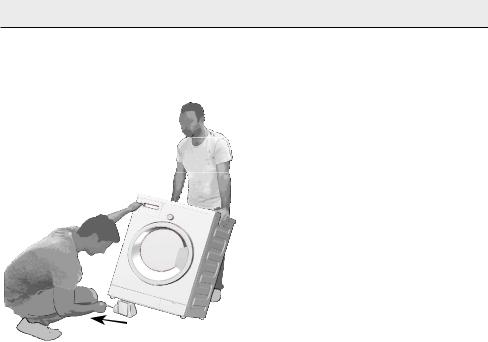
Removing packaging reinforcement
Tilt the product to remove the packaging reinforcement. Remove the packaging reinforcement by pulling the ribbon.
|
Owner’s Guide & Installation Instructions |
17 / English |
|
|
|
Installation Instructions
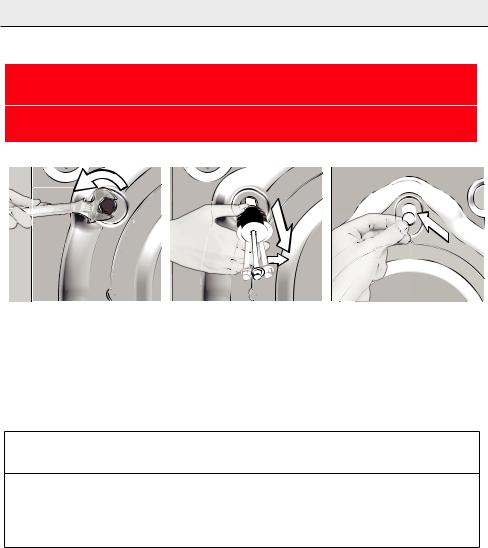
Removing shipping bolts
BWARNING
•Shipping bolts must be removed before operating the product! Otherwise, the appliance will be damaged seriously!
1.Loosen all the bolts with a spanner wrench until they rotate freely.
2.Remove the shipping bolts by turning them gently.
3.Bolt hole covers (supplied in the bag with the owner’s guide) are fitted into the holes on the rear panel with a special lock mechanism. To fit the cover, first insert it into the hole and then rotate it counterclockwise with a screwdriver until it is locked. To unlock, apply the procedure in reverse.
C CAUTION
•Keep the shipping bolts in a safe place to reuse when the product needs to be moved again in the future.
•Never move the appliance without shipping bolts properly fixed in place!
|
|
18 / English |
Front-Loading Automatic Washer-Dryer |
|
|
Installation Instructions
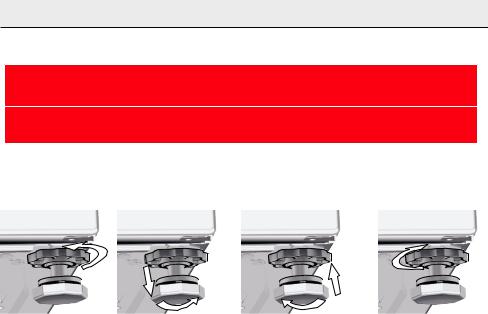
Leveling the product
BWARNING
•Do not use any tools to loosen the lock nuts. Otherwise, they can be damaged.
1.Manually (by hand) loosen the lock nuts on the feet. 2.Adjust them until the washer stands level and firmly. 3.Important: Tighten all lock nuts up again.
Electrical Connection
Grounding Instructions
This appliance must be grounded. In the event of malfunction or breakdown, grounding will reduce the risk of electric shock by providing a path of least resistance for electric current. This appliance is equipped with a cord having an equipment-grounding conductor and a grounding plug. The plug must be plugged into an appropriate outlet that is properly installed and grounded in accordance with all local codes and ordinances and the latest edition of the National
Electrical Code, ANSI/NFPA 70.
|
Owner’s Guide & Installation Instructions |
19 / English |
|
|
|

Installation Instructions
BWARNING
•Improper connection of the equipment-grounding conductor can result in a risk of electric shock. Check with a qualified electrician or serviceman if you are in doubt as to whether the appliance is properly grounded.
•Do not modify the plug provided with the appliance – if it will not fit the outlet, have a proper outlet installed by a qualified electrician.
•Be sure that the power cord is always accessible by the user after the appliance is installed.
•Never use an extension cord or adapter to connect the appliance to the electrical power due to the risk of electric shock and/or fire.
•It is the personal responsibility and obligation of the appliance owner to provide a proper and grounded outlet installed by a qualified electrician.
•Never use a damaged power cord since there is a risk of electric shock and/or fire.
•The damaged power cord must be replaced by a qualified electrician as soon as possible.
•Do not use wet hands when plugging/unplugging the power cable.
•Electrical supply voltage must conform to the voltage specifications (208-240V, 60Hz) located on the appliance.
•Only one appliance must be connected to a properly grounded individual branch circuit outlet.
•Be sure to unplug the power cable before attempting maintenance or cleaning of your appliance to minimize the risk of electric shock. Always unplug the cable by grasping the plug, not the cord.
•Do not use wet hands when plugging/unplugging the power cable.
|
|
20 / English |
Front-Loading Automatic Washer-Dryer |
|
|
Installation Instructions
Power supply and circuit
Important:
•Wall power connection should comply with national regulations.
•The wiring for the electrical outlet circuit must be sufficient to meet the appliance requirements. Use of a Groud Fault Circuit Interrupter (GFCI) is recommended.
•The voltage and maximum total current are specified in the section
“Specifications”.
•The appliance must not be directly connected to the wall power in case of absence of junction box.
•Connection via extension cords or multi-plugs should not be made.
BWARNING
•A damaged power cable must be replaced by a qualified electrician.
•The appliance must not be operated unless it is repaired! There is the risk of electric shock!
15 Amp. Fuse or circuit breaker, 208-240 volt, 60 Hz, grounded, alternating current
Properly grounded 4-prong receptacle is to be located so the power supply cord is accessible when the product is in installed position.
A |
(A) After the shipping bolts hole covers are fitted in the holes, the power supply hole cover (supplied in the bag with the owner’ guide) has to be fitted to the hole.
Owner’s Guide & Installation Instructions |
21 / English |

Installation Instructions
Water Supply Connection
Your product comes with both cold and hot water connections.
Connect the blue marked cold water supply hose to the cold water inlet valve/faucet and the red marked hot water intake hose to the hot water inlet valve/faucet. Screw the connecting bolts by hand and tighten the connection properly using a plier. Over tightening may cause damage on bolted connection.
BWARNING
•Be sure that the water connection of this product is handled by a qualified service technician or a plumber.
The product has two bolted ½’’ water supply hoses and ¾’’ female hose connections that can be connected to ¾’’ hot and cold water faucets.
BWARNING
•Be sure that there are rubber seals located on the hose connections. These seals and adjustable bolts ensure a safe connection without leaking. After the water connection is done, turn on both water faucets slowly and completely to check any water leaks.
•Be sure that water supply hoses are not crushed and they have no kinking, bulges or cuts before the water connection.
|
|
22 / English |
Front-Loading Automatic Washer-Dryer |
|
|

Installation Instructions
The water pressure must be between 15-145 psi (1-10 bar) for the proper operation of this washer. 1 bar corresponds to more than 2.1 gallons (8 liters) per minute flow rate with a fully open faucet. Water inlet hoses and valves should withstand a water pressure of 145
psi (10 bar) at maximum. If the pressure is higher than 145 psi, a pressure-reducing valve must be installed before the water inlet. If the water pressure is lower than 15 psi (1 bar), water fill time may extend or water inlet valve may shut off completely.
• Hot water supply temperature must not exceed 140˚F (60˚C). (Ideally 120˚F (48˚C))
•Do not connect the washer to an unpressurized water boiler since water pressure may not be adequate for proper operation.
•Do not remove the filters located on the water supply hoses (on faucet/hose and hose/inlet valve connections).
•Always use genuine “Blomberg” water supply hoses when connecting with this product. Old or worn-out hoses must not be reused. It is not advised to extend inlet or drain hoses, if necessary consult your dealer or technical service about hose extensions.
•Hot and cold water faucets must always be easily accessible to the user.
•At the end of a washing day, turn off water faucets to prevent any leakage or water damage that may occur due to a faulty condition of the appliance.
•Check the appliance and inlet hose connections for water leakage after each use. If there is leakage, turn off the appliance and water faucets and call service.
•Check the water inlet and drain hose connections regularly for any leakage. Hoses should be replaced every 5 years.
•If there is no hot water supply, hot water valve must be connected to a cold water faucet nevertheless. Both water valves should be connected to water supply for proper operation of your washer.
|
Owner’s Guide & Installation Instructions |
23 / English |
|
|
|
Installation Instructions
Drainage
BWARNING
•Drain hose should not be bent. Be sure that there are no kinks or cuts on it.
•Drain hose outlet must not contact the drained water.
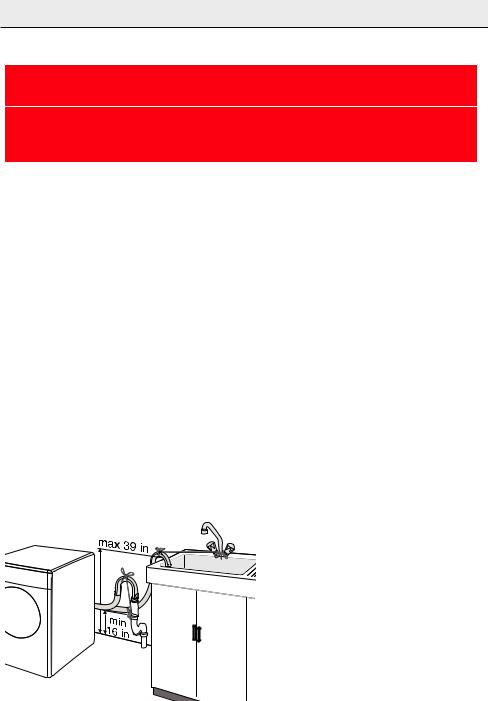
Drain hose may be connected into a sink, into the drain of a sink, to a standpipe and floor drain.
•When connecting into a sink, the drain hose should be placed at the edge of the sink and secured with the hose guide supplied by the manufacturer. Additionally, the guided hose may be tied to the water faucet with a strap for extra security.
•Drain hose may be connected into the drain of a sink . Be sure that the connection is safe and not leaking. An additional clip etc can be used for safe connection.
•Drain hose may also be connected to a minimum 1.26 in (32 mm) diameter stand pipe.
•Be sure to secure the drain hose tightly to the pipe (stand pipe, drain pipe/edge of the sink) with a strap etc.
•The hose should be placed between 16 and 39 in. (40 and 100 cm) from the floor level
•If you have floor drain system, you can place the drain hose in the hole located on the floor.
|
|
24 / English |
Front-Loading Automatic Washer-Dryer |
|
|

Installation Instructions
Installation Checklist
•Water inlet hose and accessory bags must be removed from the drum.
•Transportation/shipping bolts must be removed.
•Product must be properly leveled by using the adjustable feet.
•Water inlet hose is connected to the water faucet, secured and checked for any leaks by turning on faucet.
•Drain installation is done properly and drain hose is checked and secured to prevent any flooding.
•Product has to be plugged to a properly grounded live wall power outlet.
•Be sure that power outlet, water faucets and drain outlet must be always accessible to the user.
Transportation
Before you transport the product, you should carry out the following: 1.Turn off both water faucets.
2.Before you disconnect the water inlet hoses, decrease the pressure inside hoses by turning on the product choosing any wash program. As soon as the Start/Pause/Cancel led starts blinking, turn off the appliance. You may securely disconnect inlet hoses without any water gush.
3.Disconnect the drain hose and hang it on the back plate by inserting into the holder plastic brackets.
4.Unplug the power cord and hang it on the back plate properly.
5.Remove bolt hole covers and reinstall shipping bolts to their places.
You can apply the procedure in chapter “Removing shipping bolts” in reverse to accomplish this.
6.Be sure that rubber bushes are properly located in holes and bolts are screwed back tightly for secure transportation of the appliance.
|
Owner’s Guide & Installation Instructions |
25 / English |
|
|
|

Installation Instructions
Disposal Information
Packing Disposal
AWARNING
•Packing materials of the appliance are potentially dangerous for children. Materials such as plastic bags, films or wrappings must be kept away from children or disposed properly to prevent the danger of suffocation.
C CAUTION
•Packing materials are made of biodegradable and recyclable substances. You should consult your local authority or dealer about the environmental-friendly disposal of the packaging of your appliance.
Appliance Disposal
AWARNING
•Be sure to unplug the power cable, cut off the plug and disable the door lock before you dispose your old appliance. Otherwise there is a risk of injury for children and pets.
C CAUTION
•Old appliances contain many recyclable parts. You should consult your local environmental authority about a proper disposal. A proper disposal enables recycling therefore protects the environment.
|
|
26 / English |
Front-Loading Automatic Washer-Dryer |
|
|
4 Operating Instructions
First Use
A WARNING
•To reduce the risk of fire, electric shock, or injury to persons, read the IMPORTANT SAFETY INSTRUCTIONS before operating this appliance.
Before the first use,
•Be sure that the product is installed properly by a qualified installer or service technician in accordance with all national and local codes and requirements.
•Read all instructions carefully before using the washer.
•Check that shipping bolts are completely removed.
•Be sure that the location of installation has proper electrical supply voltage and plumbing system needed for the operation of the appliance.
•Turn on both water faucets and be sure that there are no leaks on hose-faucet connection points or on hoses themselves.
•Check that the drum is empty.
|
Owner’s Guide & Installation Instructions |
27 / English |
|
|
|

Operating Instructions
•Turn on the product, choose “"Tub Clean"” cycle on the program selector knob and start the washer as empty and without any laundry additives. When the cycle is finished, your product is ready for subsequent uses.
A WARNING
•Be sure that siiica gel package, which is located inside the drum, has been removed from the drum before the first use. Granules in this package do not contain poisonous or harmful materials.
It is not a detergent and it is not adible. Do not swallow. Do not use for any purpose. Throw into the recycle bin together with this package before the first usage of the product.
Laundry Tips
Sorting the laundry
C CAUTION
•Always follow the fabric care instructions of garment manufacturers. These instructions would give you proper guidance on suitable wash and drying cycles, operating temperatures and bleach usage.
|
|
28 / English |
Front-Loading Automatic Washer-Dryer |
|
|
 Loading...