


ULTRAFEX® CAR EX100
User´s Manual 

Bedienungsanleitung 

Version 1.1 May 1998
www.behringer.de
The information contained in this manual is subject to change without notice. No part of this manual may be reproduced or transmitted in any form or by any means, electronic or mechanical, including photocopying and recording of any kind, for any purpose, without the express written permission of BEHRINGER GmbH. ALL RIGHTS RESERVED © 1998 BEHRINGER. BEHRINGER and ULTRAFEX are registered trademarks. BEHRINGER INTERNATIONAL GmbH, Hanns-Martin-Schleyer-Str. 36-38, D-47877 Willich-Münchheide II. Tel. +49 (0) 21 54 / 92 06-0, Fax +49 (0) 21 54 / 92 06-30
E
D
Welcome to Behringer!
Thank you very much for expressing your confidence in Behringer products by purchasing the ULTRAFEX CAR. We are one of the leading manufacturers of professional recording studio equipment, and are very glad to welcome you as our customer in this new field of application. Like all our products for studio and sound reinforcement systems, the Behringer ULTRAFEX CAR was designed and manufactured with highest care and by using state-of-the-art techniques. Additionally, the unit is manufactured in compliance with a ISO9000 certified management system.
1. Installation
1.1 Installation in the vehicle
With the two brackets located in the package, any kind of suspension-type installation can be realized, but of course the ULTRAFEX CAR can also be mounted horizontally, and even vertically to a wall in which case, however, its operation is less convenient. To find the most suitable method of installation, please slacken the screws on the one side of the ULTRAFEX CAR´s case, adjust the bracket as required and fasten the screws, before you mount the other bracket on the opposite side of the case.
+Slackening all four screws holding the brackets makes it possible to remove the cover of the unit, which will immediately void any warranty rights! So please take care not to fasten both brackets at the same time!
Having adjusted the brackets as required, you can mount the unit in your vehicle using some kind of tapping screws. A good location can certainly be found below the dashboard or in the glove box. Take care not to damage any important parts such as cables which may be mounted behind the surface of installation.
1.2 Electrical connection
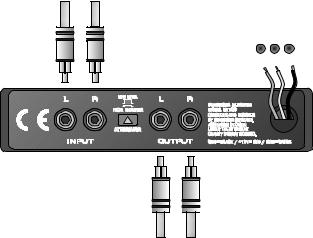
The ULTRAFEX CAR is inserted between the car radio or preamplifier and the power amp. The illustration (fig. 1) below gives you a detailed description of how to wire the unit. Use a RCA-type cable coming from the car radio or preamp to connect the ULTRAFEX CAR. Only use shielded cables to avoid interference problems. As an alternative to the car radio’s line output you could also use the speaker outputs on the radio to connect them to the inputs of the ULTRAFEX CAR. In this case, however, the switch on the rear of the unit must be set to position “FROM AMPLIFIER” (see chapter 3 for a detailed description of this switch). Use another high-quality RCA cable to connect the outputs of the ULTRAFEX CAR to the inputs of your power amplifier.
From radio / preamplifier output
Red:powersupply+12V |
Green:remotefromradio |
Black:Ground(-) |
To power amp
Fig. 1: Electrical connection of ULTRAFEX CAR
To supply the unit with power please connect the red cable from the ULTRAFEX CAR to the +12 V supply of your vehicle, and connect the green cable to the remote or antenna control output of your car radio. The black cable is used to connect the unit to the vehicle’s mass (negative pole). If possible, connect the mass of the ULTRAFEX CAR directly to the car radio rather than to any parts of the car body or the ground terminal of the power amp. This gives you best protection against interference often generated by other parts of electrical equipment used in cars.
 Loading...