Behringer DX500 User Manual

DX500


User´s Manual
Version 1.2 July 2000

 E
E
MIXERPRO 


 www.behringer.com

EG-Declaration of Conformity
INTERNATIONAL GmbH
acc. to the Directives 89/336/EWG and 73/23/EWG
We, BEHRINGER INTERNATIONAL GmbH
Hanns-Martin-Schleyer-Straße 36-38
D - 47877 Willich
Name and address of the manufacturer or the introducer of the product on the market who is established in the EC
herewith take the sole responsibility to confirm that the product:
PRO MIXER DX500
Type designation and, if applicable, Article-No
which refers to this declaration, is in accordance with the following standards or standardized documents:
x EN 60065 |
x |
x EN 55020 |
x |
x EN 55013 |
x |
EN 61000-3-2
EN 61000-3-3
EN 55022
The following operation conditions and installation arrangements have to be presumed:
acc. to Operating Manual
B. Nier, President |
Willich, 01.07.1998 |
Name, address, date and legally binding signature of the person responsible |
|
2

SAFETY INSTRUCTIONS
CAUTION: To reduce the risk of electrical shock, do not remove the cover (or back). No user serviceable parts inside; refer servicing to qualified personnel.
WARNING: To reduce the risk of fire or electrical shock, do not expose this appliance to rain or moisture.
This symbol, wherever it appears, alerts you to the presence of uninsulated dangerous voltage inside the enclosure - voltage that may be sufficient to constitute a risk of shock.
E
This symbol, wherever it appears, alerts you to important operating and maintenance instructions in the accompanying literature. Read the manual.
DETAILED SAFETY INSTRUCTIONS:
All the safety and operation instructions should be read before the appliance is operated.
Retain Instructions:
The safety and operating instructions should be retained for future reference.
Heed Warnings:
All warnings on the appliance and in the operating instructions should be adhered to.
Follow instructions:
All operation and user instructions should be followed.
Water and Moisture:
The appliance should not be used near water (e.g. near a bathtub, washbowl, kitchen sink, laundry tub, in a wet basement, or near a swimming pool etc.).
Ventilation:
The appliance should be situated so that its location or position does not interfere with its proper ventilaton. For example, the appliance should not be situated on a bed, sofa rug, or similar surface that may block the ventilation openings: or placed in a built-in installation, such as a bookcase or cabinet that may impede the flow of air through the ventilation openings.
Heat:
The appliance should be situated away from heat sources such as radiators, heat registers, stoves, or other appliance (including amplifiers) that produce heat.
Power Source:
The appliance should be connected to a power supply only of the type described in the operating instructions or as marked on the appliance.
Grounding or Polarization:
Precautions should be taken so that the grounding or polarization means of an appliance is not defeated.
Power-Cord Protection:
Power supply cords should be routed so that they are not likely to be walked on or pinched by items placed upon or against them, paying particular attention to cords and plugs, convenience receptacles and the point where they exit from the appliance.
Cleaning:
The appliance should be cleaned only as recommended by the manufacturer.
Non-use Periods:
The power cord of the appliance should be unplugged from the outlet when left unused for a long period of time.
Object and Liquid Entry:
Care should be taken so that objects do not fall and liquids are not spilled into the enclosure through openings.
Damage Requiring Service:
The appliance should be serviced by qualified service personnel when:
-The power supply cord or the plug has been damaged; or
-Objects have fallen, or liquid has been spilled into the appliance; or
-The appliance has been exposed to rain; or
-The appliance does not appear to operate normally or exhibits a marked change in performance; or
-The appliance has been dropped, or the enclosure damaged.
Servicing:
The user should not attempt to service the appliance beyond that is described in the Operating Instructions. All other servicing should be referred to qualifield service personnel.
3

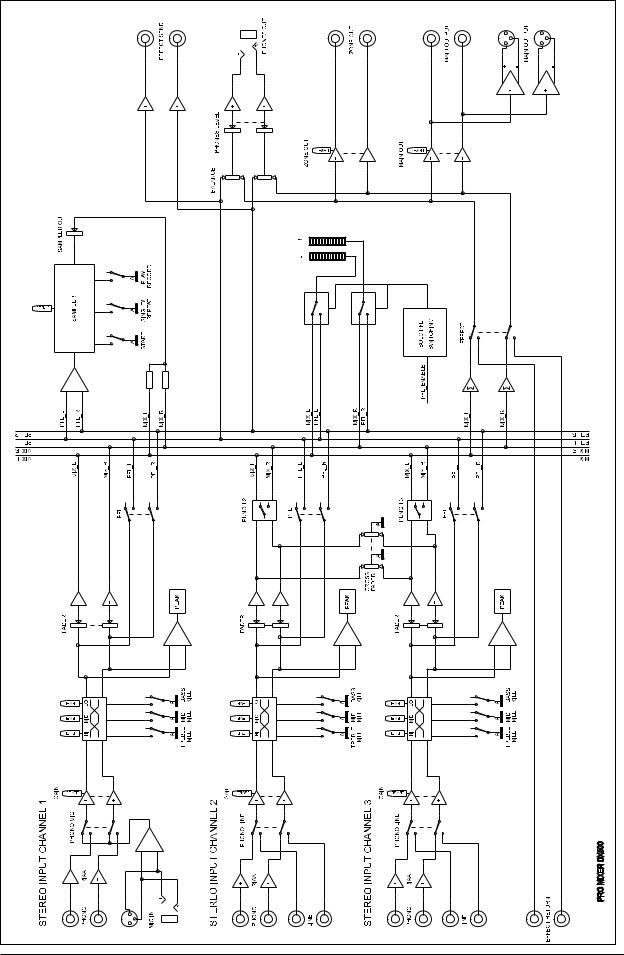
BLOCK DIAGRAM
4 |


FOREWORD
Dear Customer,
Welcome to the team of PRO MIXER users and thank you very much for expressing your confidence in BEHRINGER products by purchasing this unit.
It is one of my most pleasant tasks to write this letter to you, because it is the culmination of many months of hard work delivered by our engineering team to reach a very ambitious goal: presenting an outstanding mixer for flexible use in studios, clubs or at home. The task to develop our new PRO MIXER series certainly meant a great deal of responsibility, which we assumed by focusing on you, the discerning user and musician. It also meant a lot of work and night shifts to accomplish this goal. But it was fun, too. Developing a product usually brings a lot of people together, and what a great feeling it is when everybody who participated in such a project can be proud of what we’ve achieved.
It is our philosophy to share our joy with you, because you are the most important member of the BEHRINGER family. With your highly competent suggestions for new products you’ve greatly contributed to shaping our company and making it successful. In return, we guarantee you uncompromising quality (manufactured under ISO9000 certified management system) as well as excellent technical and audio properties at an extremely favorable price. All of this will enable you to fully unfold your creativity without being hampered by budget constraints.
We are often asked how we can make it to produce such high-grade devices at such unbelievably low prices. The answer is quite simple: it’s you, our customers! Many satisfied customers means large sales volumes enabling us to get better conditions of purchase for components, etc. Isn’t it only fair to pass this benefit back to you? Because we know that your success is our success, too!
I would like to thank all people whose help on “Project DX500“ has made it all possible. Everybody has made very personal contributions, starting from the designers of the unit via the many staff members in our company to you, the user of BEHRINGER products.
My friends, it’s been worth the trouble!
Thank you very much,
Uli Behringer
6

TABLE OF CONTENT
1. |
THE MANUAL .......................................................................................................................... |
8 |
|
|
2. |
PRO MIXER OVERVIEW ......................................................................................................... |
8 |
|
|
|
2.1 |
......................................................................Highly accurate MAIN and PFL VU bargraph meters |
8 |
E |
|
2.2 |
How will YOU use YOUR DX500? ................................................................................................... |
9 |
|
|
2.3 |
PSU (Power Supply Unit) ................................................................................................................ |
9 |
|
|
2.4 |
........................................................................................................................................Warranty |
9 |
|
|
2.5 |
Packing .......................................................................................................................................... |
9 |
|
3. |
INPUT CHANNELS .................................................................................................................. |
9 |
|
|
|
3.1 |
Input selection .............................................................................................................................. |
10 |
|
|
3.2 |
Gain setting ................................................................................................................................... |
10 |
|
|
|
3.2.1 Quick way ........................................................................................................................... |
10 |
|
|
|
3.2.2 Gain setting by using PFL ................................................................................................... |
10 |
|
|
3.3 |
Equalizer ....................................................................................................................................... |
11 |
|
4. |
MASTER SECTION ............................................................................................................... |
11 |
|
|
|
4.1 |
Output ............................................................................................................................................ |
11 |
|
|
4.2 |
Cross fader .................................................................................................................................... |
11 |
|
|
4.3 |
Transforming with Punch ............................................................................................................... |
11 |
|
|
4.4 |
Effects loop ................................................................................................................................... |
12 |
|
|
4.5 |
Outputs ......................................................................................................................................... |
12 |
|
5. |
PFL AND HEADPHONES ...................................................................................................... |
12 |
|
|
|
5.1 |
PFL : Pre-Fader Listen ................................................................................................................. |
12 |
|
|
5.2 |
Headphones - read carefully! ........................................................................................................ |
13 |
|
6. |
SAMPLER .............................................................................................................................. |
13 |
|
|
|
6.1 |
Record mode ................................................................................................................................ |
13 |
|
|
6.2 |
Playback mode ............................................................................................................................. |
13 |
|
7. |
CONNECTIONS ..................................................................................................................... |
14 |
|
|
|
7.1 |
PRO MIXER DX500 connections .................................................................................................. |
14 |
|
|
7.2 |
Plug soldering guide ..................................................................................................................... |
14 |
|
8. |
GLOSSARY ........................................................................................................................... |
15 |
|
|
9. |
SPECIFICATIONS .................................................................................................................. |
19 |
|
|
10.WARRANTY .......................................................................................................................... |
20 |
|
||
7
 Loading...