


E3493
First Edition
January 2008
<![endif]>English
XG-Station
Quick Installation Guide
<![endif]>English
Safety Precautions
The following safety precautions will increase the life of the ASUS XG-Station. Follow all precautions and instructions. Except as described in this manual, refer all servicing to qualified personnel. Do not use damaged power cords, accessories, or other peripherals. Do not use strong solvents such as thinners, benzene, or other chemicals on or near the surface.
Disconnect theAC power before cleaning. Wipe the XG-Station using a clean cellulose sponge or chamois cloth dampened with a solution of nonabrasive detergent and a few drops of warm water and remove any extra moisture with a dry cloth.
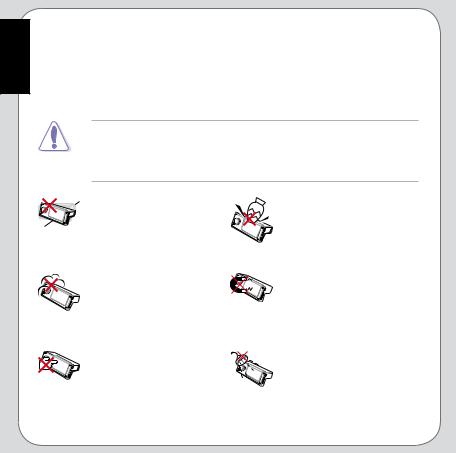
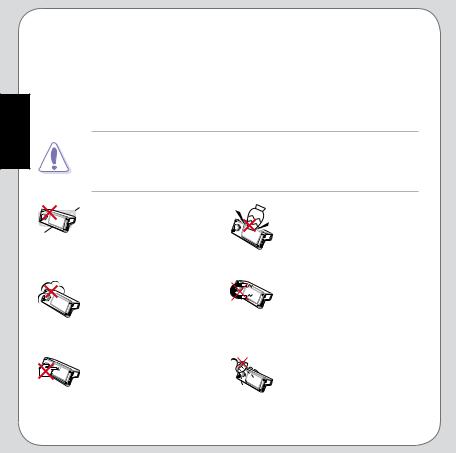
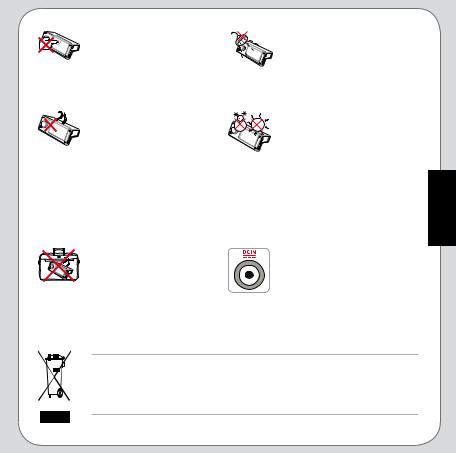
DO NOT place on uneven or unstable work surfaces. Seek servicing if the casing has been damaged.
DO NOT expose to dirty or
dusty environments. DO
 NOT operate during a gas leak.
DO NOT press or touch the 
 display panel. Do not place
together with small items that may scratch or enter the XG-Station.
DO NOT place or drop objects on top and do not shove any foreign objects into the XG-Station.
DO NOT expose to strong  magnetic or electrical fields.
DO NOT expose to or use
near liquids, rain, or moisture.
 DO NOT use the modem during electrical storms.
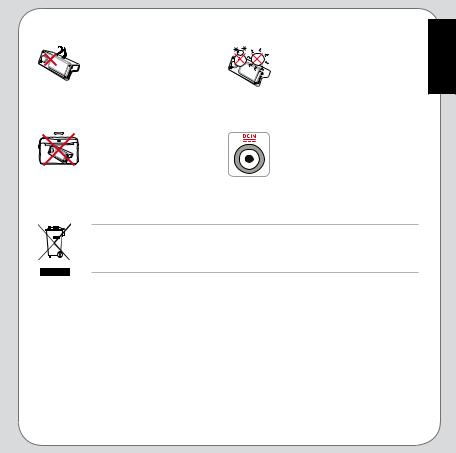
DO NOT leave the XG-
Station on your lap or any part of the body to prevent discomfort or injury from heat exposure.

 DO NOT carry or cover a

 XG-Station that is powered
ON with any materials that will reduce air circulation such as a carrying bag.
SAFE TEMP: This XGStation should only be used  in environments with ambient temperatures between 5°C (41°F) and 40°C (104°F)
INPUT RATING: Refer to the rating label on the bottom
of the XG-Station and be sure that your power adapter complies with the rating.
This symbol of the crossed out wheeled bin indicates that the product (electrical and electronic equipment) should not be placed in municipal waste. Check local regulations for disposal of electronic products.
<![endif]>English
<![endif]>English
1.Installation requirements
To ensure a successful installation of the ASUS XG-Station, your computer must meet the following requirements:
•Anotebook computer with one empty PCI Express compatible card slot
•Microsoft® Windows® Vista/XP (32 bit)
•> 256 MB DRAM system memory
•> 312 MB available HDD space for driver installation package
•CD-ROM drive (or DVD-ROM drive) for software installation
2.Specifications summary
VGA |
ASUS EN8600GT |
I/O ports |
1 x TV-out |
|
2 x DVI-I out ports |
|
2 x USB 2.0 ports |
|
1 x Microphone port |
|
1 x Headphone port supporting S/PDIF out |
|
1 x DC in |
|
1 x Express card connector |
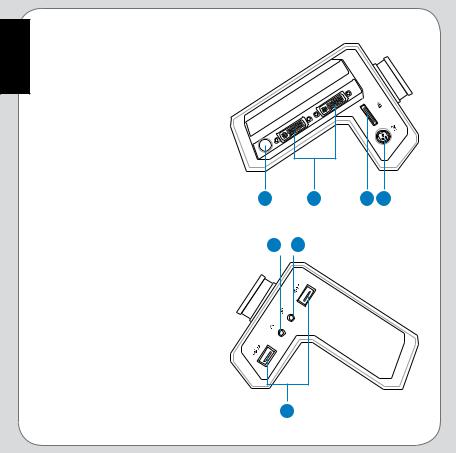
3.Hardware introduction
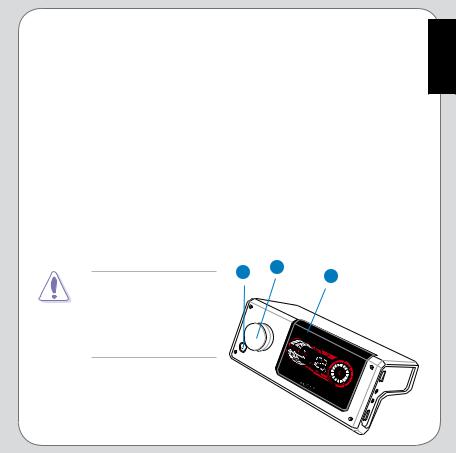
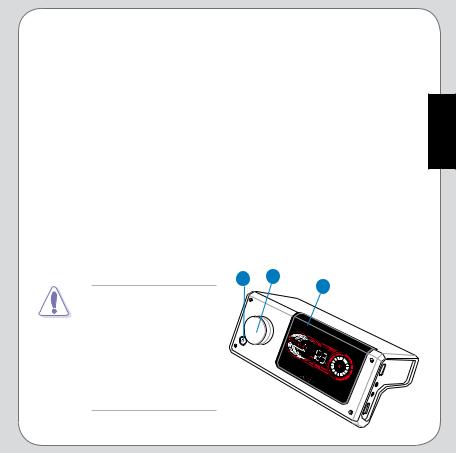
Front view
1.Display: shows the options of volume, GPU clock, GPU temperature, frames per second (FPS), Dolby Headphone support, and fan speed. When an option is selected, a red dot appears below the option. The red bars stand for high values, orange for medium, and yellow for low.
2.Control knob: press to switch menu options including volume, GPU
clock, and fan speed. Rotate to adjust volume, GPU clock, and fan speed.
3.Power button: once connected to your notebook computer, the XGStation turns on automatically when you start up your computer. In case the XG-Station does not start up, press the power button during POST.
In addition, if the XG-Station does not turn off after you shut down the computer, press and hold the power button for 5 seconds to turn off the XG-Station.
ASUS XG-Station is NOT a |
3 |
2 |
1 |
|
|||
hot-swappable device. DO |
|
|
|
NOT turn OFF or detach the |
|
|
|
XG-Station during system |
|
|
|
operation. Doing so may |
|
|
|
cause system failure! |
|
|
|
<![endif]>English
<![endif]>English
Left view
4.DCIN: connects to the external
AC adaptor.
5.Express card connector: connects the XG-Station to the express card slot on the notebook
PC.
6.DVI-I out ports: connects to any
DVI-I compatible device.
7.TV-out port: connects to a TV or projector through a S-Video cable.
Right view
8.Microphone port: connects to a microphone.
9.Headphone port: connects to a headphone or 2/2.1 channel speakers. In S/PDIF mode, connects to external digital decoder or digital speaker systems.
10.USB 2.0 ports: connects to any USB 2.0 device.
7 |
6 |
5 |
4 |
9 8
10 |

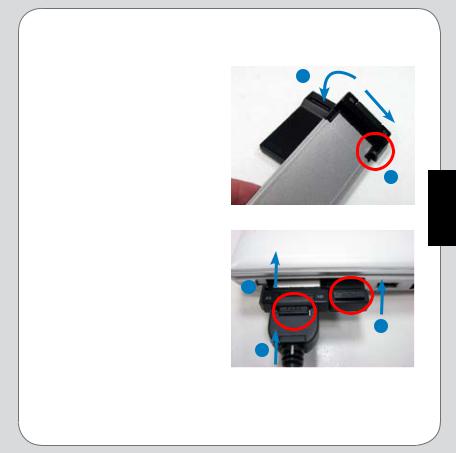
4.Hardware installation
To install the ASUS XG-Station:
1. Power OFF the notebook PC 3 and all other peripheral devices
connected to it.
2. |
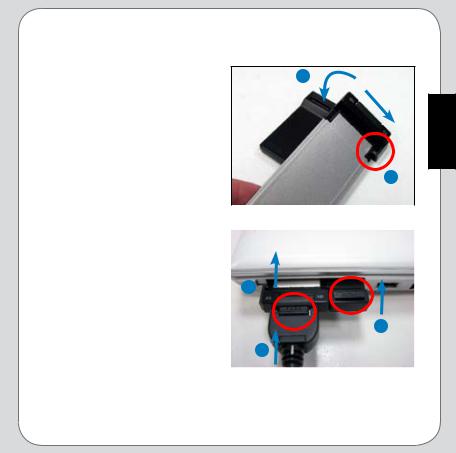
Align the express card groove |
|
|
to the tenon of the express card |
|
|
holder as shown in the picture. |
|
3. |
Attach the express card to the |
2 |
|
card holder. |
4.Attach the express card cable to the express card with the PUSH button facing up.
5. |
Insert the express card to an |
5 |
|
empty express card slot on the |
|
|
notebook PC until you hear a |
|
|
click sound. |
6 |
6. |
Follow the direction shown in the |
4 |
|
picture to lock the express card |
|
|
|
|
|
holder. |
|
|
|
<![endif]>English
<![endif]>English
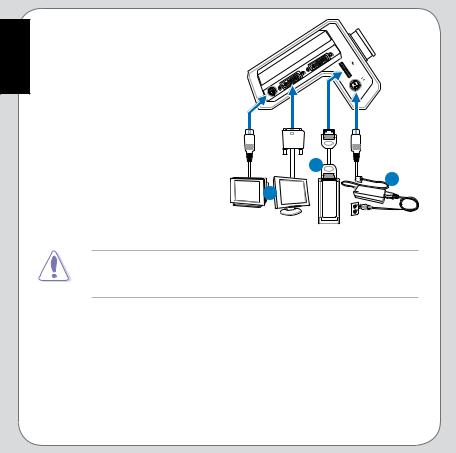
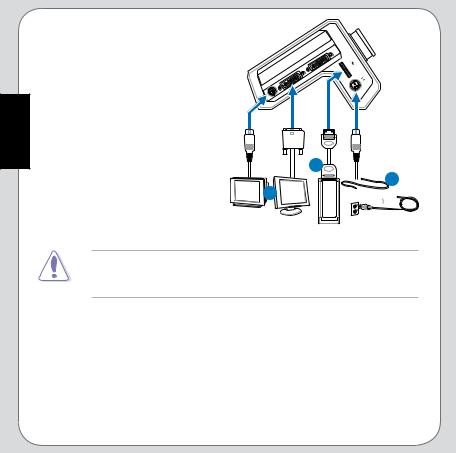
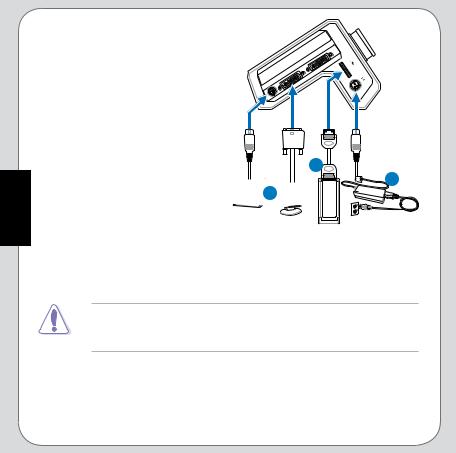
7.Attach the other end of the express card cable to the express card connector on the XGStation.
8. Attach theAC adaptor to the XG-
Station.
9.Connect the XG-Station to an external display device using the
DVI-I out ports or the TV-out port.
10. Power on the external display |
7 |
device then the notebook |
8 |
computer. The XG-Station will |
9 |
start up automatically. |
|
ASUS XG-Station is NOT a hot-swappable device. DO NOT turn OFF or detach the XG-Station during system operation. Doing so may cause system failure!
5.Driver installation
After installing the XG-Station on your computer, you need to install the device driver that enables the XG-Station to work with Windows operating system.
The version and content of the driver CD are subject to change without notice.
If you have already installed the ASUS XG-Station, the Found New Hardware Wizard window may pop up before or during driver installation.
To install the device driver:
1.Click Cancel from the Found New Hardware wizard window.
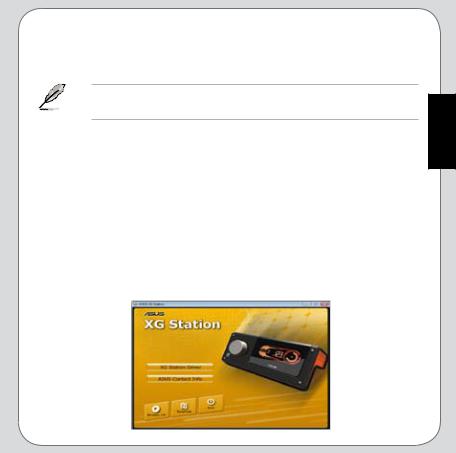
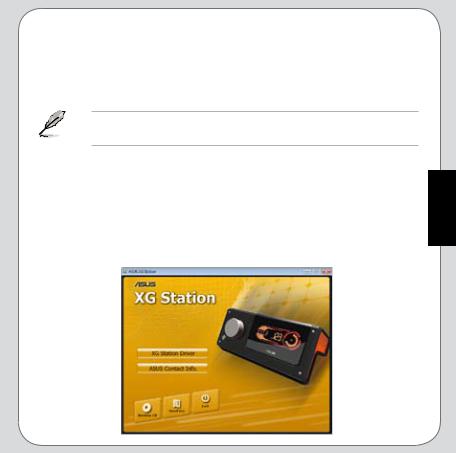
2.Insert theASUS XG-Station support CD into your optical drive.
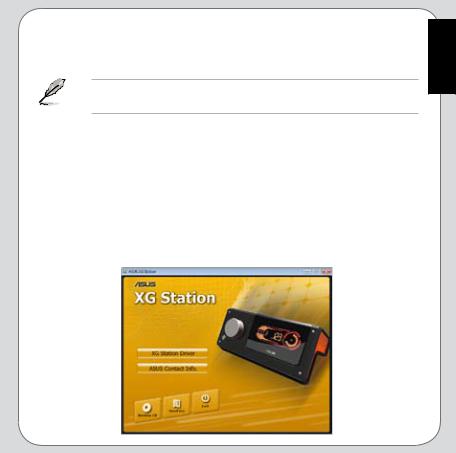
If autorun is enabled, theASUS XG-Station Driver screen appears automatically. See figure below. Go to step 5.
If Autorun is not enabled in your computer, perform step 3.
<![endif]>English

|
3. |
Click My Computer on your desktop and double-click the optical drive |
|
| <![if ! IE]> <![endif]>English |
|||
|
icon. |
||
4. |
Double-click the setup.exe icon located on the optical drive. |
||
|
|||
|
5. |
Follow the on-screen instructions to complete the installation. Read the |
|
|
|
“END USER LICENSE AGREEMENT” in the process and make sure that |
|
|
|
you understand and accept it before continuing the installation. |
|
|
6. |
When the installation finishes, you may be prompted to restart your |
|
|
|
computer. You can choose to restart the computer later if desired. |
10
F3493 Première édition Janvier 2008
XG-Station
Guide d’installation rapide
<![endif]>Français
<![endif]>Français
Consignes de sécurité
Les consignes de sécurité suivantes ont pour but d’accroître la durée de vie duASUS XG-Station. Lisez-les attentivement. Contactez votre revendeur ou du personnel qualifié pour tout type de maintenance. N’utilisez pas de cordon d’alimentation, d’accessoire ou tout autre périphérique endommagé. N’utilisez pas de dissolvants puissants (ex: diluants, benzène, etc) ou tout autre produit chimique sur ou à proximité de la surface de l’appareil.
Déconnectez l’alimentation avant de nettoyer l’appareil. Nettoyez la surface du XG-Station à l’aide d’une éponge en cellulose propre ou d’un chiffon
en peau de chamois humidifié d’un détergent non-abrasif et supprimez l’humidité résiduelle avec un chiffon sec.
NE PAS placer sur une |
NE PAS insérer ou laisser |
surface inégale ou instable. |
tomber des objets sur |
Contactez votre revendeur si |
l’appareil. |
le boîtier est endommagé. |
|
NE PAS exposer à la |
NE PAS exposer à des |
salissure ou à la poussière. |
champs magnétiques ou |
NE PAS utiliser lors d’une |
électriques puissants. |
fuite de gaz. |
|
NE PAS appuyer ou toucher |
NE PAS exposer ou utiliser |
le panneau d’affichage. |
à proximité de liquides, de |
Ne pas placer à proximité |
la pluie, ou de l’humidité. NE |
d’objets de petites taille |
PAS utiliser lors d’orages |
pouvant rayer ou s’introduire |
électriques. |
dans l’appareil. |
|

NE PAS laisser l’appareil 
 sur vos genoux ou toute

 autre partie de votre corps
  afin d’éviter de vous blesser.

 NE PAS transporter ou

 couvrir l’appareil, si ce
dernier est sous tension, avec tout objet susceptible de réduire la circulation d’air (ex: sacoche de transport).
TEMPERATURE DE FONCTIONNEMENT: Cet appareil ne doit être utilisé que dans des environnements possédant une température ambiante située entre 5°C (41°F) et 40°C (104°F).
TENSION NOMINALE: Référez-vous à l’étiquette de voltage située sous l’appareil et assurez-vous que l’adaptateur d’alimentation est conforme aux valeurs nominales.
Le symbole représentant une benne à roue barrée, indique que le produit (équipement électrique et électronique) ne doit pas être placé dans un conteneur à ordures ménagères. Veuillez consulter les réglementations locales en matière de mise au rebut de produits électriques.
<![endif]>Français

|
1. |
|
Pré-requis d’installation |
|
|
Pour assurer la réussite de l’installation de ASUS XG-Station, votre ordinateur |
|||
|
doit satisfaire aux pré-requis suivants: |
|||
|
• Un PC portable avec slot pour carte PCI Express libre |
|||
| <![if ! IE]> <![endif]>Français |
• Microsoft® Windows® Vista/XP (32 bits) |
|||
• |
> 256 |
Mo de mémoire vive |
||
|
||||
|
• |
> 312 |
Mo d’espace disque pour l’installation du pilote |
|
|
• Un lecteur de CD-ROM (ou DVD-ROM) pour l’installation du logiciel |
|||
|
|
|
|
|
2.Résumé des spécifications
VGA |
ASUS EN8600GT |
Ports d’E/S |
1 x port de sortie TV |
|
2 x ports de sortie DVI-I |
|
2 x ports USB 2.0 |
|
1 x port microphone |
|
1 x port casque supportant la sortie S/PDIF |
|
1 x port d’alimentation (CC) |
|
1 x connecteur ExpressCard |
3.Introduction au matériel
Vue avant
1.Ecran: affiche le volume, la fréquence d’horloge et la température du GPU, le débit d’images par seconde (FPS), le support Dolby, et la vitesse du ventilateur. Si une option est sélectionnée, un point rouge apparaît sous celle-ci. Les barres rouges représentant la valeur la plus haute, les barres orange la valeur moyenne, et les barres jaunes la valeur la plus basse.
2.Molette de contrôle: appuyez pour sélectionner une des options suivantes: volume, fréquence d’horloge du GPU et vitesse du ventilateur. Tournez la molette pour ajuster la valeur de chaque option.
3.Bouton d’alimentation: une fois connecté à votre ordinateur, le XG-
Station s’allume automatiquement au démarrage du PC portable. Si le XG-Station ne démarre pas, appuyez sur le bouton d’alimentation press lors du POST. Par ailleurs, si le XG-Station ne s’éteint pas lors de l’extinction de l’ordinateur, maintenez le bouton d’alimentation enfoncé pendant 5 secondes pour mettre hors tension le XG-Station.
3 |
2 |
1 |
ASUS XG-Station NE |
|
|
|
|
|
SUPPORTE PAS le |
|
|
branchement à chaud. |
|
|
NE PAS éteindre ou |
|
|
déconnecter le XG-Station |
|
|
lorsque ce dernier est en cours d’utilisation, ceci pouvant causer une panne du système !
<![endif]>Français

<![endif]>Français
Vue latérale gauche
4.DCIN: se connecte à l’adaptateur secteur externe.
5.Connecteur ExpressCard: connecte le XG-Station au slot
ExpressCard du PC portable.
6.Ports de sortie DVI-I: se connecte à tout périphérique compatible DVI-I.
7.Port de sortie TV: se connecte à un téléviseur ou un projecteur vidéo via un câble S-Video.
Vue latérale droite
8.Port microphone: se connecte à un microphone.
9.Port casque: se connecte à un casque ou à un système de haut-parleurs 2/2.1. En mode
S/PDIF, se connecte à un décodeur numérique externe ou à un système de haut-parleurs numériques.
10.Ports USB 2.0: se connecte à tout périphérique USB 2.0.
7 |
6 |
5 |
4 |
9 8
10 |
4.Installation du matériel
Pour installer le ASUS XG-Station:
1. Eteignez votre PC portable 3 ainsi que tous les périphériques
connectés à de dernier.
2.Alignez la cannelure de l’ExpressCard au tenon du porteExpressCard comme illustré ci-contre.
3. |
Connectez l’ExpressCard au |
2 |
|
|
porte-ExpressCard. |
|
|
|
|
|
|
4. |
Connectez le câble de |
|
|
|
l’ExpressCard en vous assurant |
|
|
|
que le bouton PUSH soit face |
|
5 |
|
vers le haut. |
|
|
5. |
Insérez l’ExpressCard sans un |
|
6 |
|
slot pour ExpressCard libre du |
|
|
|
PC portable jusqu’à ce qu’un |
|
4 |
|
léger cliquetis se fasse entendre. |
|
|
6. |
Suivez la direction de la flèche |
|
|
|
|
||
|
illustrée dans la photo ci-contre |
|
|
|
pour verrouiller le porte-ExpressCard. |
|
|
<![endif]>Français
<![endif]>Français
7.Connectez l’autre extrémité du câble pour ExpressCard au
connecteur ExpressCard du XG-
Station.
8.Connectez l’adaptateur d’alimentation au XG-Station.
9.Connectez le XG-Station à un périphérique d’affichage externe via les ports de sortie DVI-I ou le port de sortie TV.
10.Allumez le périphérique d’affichage externe puis le PC portable. Le XG-Station démarre automatiquement.
7


 8 9
8 9 

ASUS XG-Station NE SUPPORTE PAS le branchement à chaud. NE PAS
éteindre ou déconnecter le XG-Station lorsque ce dernier est en cours d’utilisation, ceci pouvant causer une panne du système !
5.Installation du pilote
Après avoir installé le XG-Station sur votre ordinateur, vous devrez installer le pilote permettant à l’appareil de fonctionner sous Windows.
La version et le contenu du CD des pilotes peuvent changer sans avertissement préalable.
Si vous avez déjà installer ASUS XG-Station, la fenêtre Assistant de nouveau matériel détecté peut apparaître avant ou pendant l’installation du pilote.
Pour installer le pilote de l’appareil:
1.Cliquez sur Annuler lorsque la fenêtre Assistant de nouveau matériel détecté apparaît.
2.Insérez le CD de supportASUS XG-Station dans votre lecteur optique.
Si l’Exécution automatique est activée, l’écran d’installation du pilote
ASUS XG-Station apparaît automatiquement. Voir figure ci-dessous.
Passez à l’étape 5.
Si l’Exécution automatique est désactivée, allez à l’étape 3.
<![endif]>Français

|
3. |
Cliquez sur l’icône Poste de travail du Bureau de Windows et double- |
|
|
cliquez sur l’icône représentant votre lecteur optique. |
|
4. |
Double-cliquez sur l’icône setup.exe localisée sur le CD. |
|
5. |
Suivez les instructions apparaissant à l’écran pour terminer l’installation. |
|
|
Prenez le temps de lire la licence d’utilisation “END USER LICENSE |
| <![if ! IE]> <![endif]>Français |
6. |
AGREEMENT” et acceptez-la pour continuer l’installation. |
vous le souhaitez. |
||
|
Une fois l’installation terminée, il peut vos être demandé de redémarrer |
|
|
|
votre ordinateur. Vous pouvez choisir de redémarrer ultérieurement si |
|
|
|
10
G3493
Erste Ausgabe
Januar 2008
XG-Station
Schnellinstallationsanleitung
<![endif]>Deutsch

<![endif]>Deutsch
Sicherheitshinweise
Die Einhaltung der folgenden Vorsichtsmaßnahmen verlängert die
Lebensdauer der ASUS XG-Station. Folgen Sie allen Verkehrungen und
Anleitungen dieses Handbuches und überlassen Sie alle Wartungen dem qualifizierten Servicepersonal. Verwenden Sie bitte keine beschädigten Netzkabel, defektes Zubehör oder andere Peripheriegeräte. Wenden Sie auf oder in Nähe der Oberfläche keine starken Reinigungsmittel wie Verdünner, Benzin oder andere Chemikalien an.
Trennen Sie das Netzkabel ab, bevor Sie das Gerät reinigen. Wischen Sie die XG-Station mit einem sauberen Zellstoffschwamm oder einemAutoleder ab, das mit einem nichtscheuernden Reinigungsmittel oder ein paar Tropfen warmem Wasser befeuchtet ist. Entfernen Sie zusätzliche Feuchtigkeit mit einem trockenen Tuch.
Stellen Sie es NICHT auf |
Stellen Sie KEINE Objekte |
schräge oder instabile |
auf das Gerät oder lassen Sie |
Arbeitsflächen. Falls etwas |
etwas darauf fallen. Stecken |
beschädigtist,wendenSiesich |
Sie keine Fremdkörper in die |
bitte an Servicepersonal. |
XG-Station. |
SetzenSiedasGerätKEINER |
SetzenSiedasGerätKEINEN |
schmutzigen oder staubigen |
starken elektromagnetischen |
Umgebung aus. Arbeiten |
Feldern aus. |
Sie NICHT während eines |
|
Gaslecks. |
|
Drücken oder berühren Sie |
BenutzenSiedasGerätNICHT |
||
denBildschirmNICHT.Halten |
inderNähevonFlüssigkeiten, |
||
SieGegenständefern,diedas |
Regen oder Feuchtigkeit. |
||
Gerät zerkratzen oder in es |
Benutzen Sie es NICHT |
||
eindringen könnten. |
|
während eines Gewitters. |
|
B e n u t z e n |
S i e |
d a s |
TEMPERATUR:DieXG-Station |
angeschaltete |
oder |
sich |
sollte nur in Umgebungen mit |
aufladendeNotebookNICHT |
Temperaturen zwischen 5°C |
||
für längeren Zeitraum auf |
und 40°C benutzte werden. |
||
Ihrem Schoß oder anderen |
|
||
Körperteilen, da es durch |
|
||
Hitzekontakt zu Unbehagen |
|
||
oder Verletzungen kommen |
|
||
könnte. |
|
|
|
Bedecken Sie das |
|
EINGANGSSPANNUNG: |
|
eingeschaltete Notebook |
Prüfen Sie am Aufkleber |
||
NICHT mit Materialien, |
|
an der Unterseite der |
|
die die Luftzirkulation |
|
XG-Station, ob Ihr Netzteil |
|
beeinträchtigen. Stecken |
den Stromversorgungs- |
||
Sie es NICHT eingeschaltet |
anforderungen entspricht. |
||
in eine Tragetasche. |
|
|
|
Das Symbol der durchgestrichenen Mülltonne weißt darauf hin, das dieses Produkt (elektrisch, elektronisches Zubehör) nicht im normalen Hausmüll entsorgt werden darf. Bitte erkundigen Sie sich nach lokalen Regelungen zur Entsorgung von Elektroschrott.
<![endif]>Deutsch

<![endif]>Deutsch
1.Installationsanforderungen
Um sicher zu stellen, das die ASUS XG-Sation erfolgreich installiert werden kann, muss ihr Computer folgendeAnforderungen erfüllen.
•Ein Notebook-Computer mit einem freien PCI-Expresskarten-kompatiblen Kartenschacht
•Microsoft® Windows® Vista/XP (32 bit)
•> 256 MB DRAM Systemspeicher
•> 312 MB freier Festplattenspeicher für das Treiberinstallationspaket
•CD-ROM-Treiber (oder DVD-ROM-Treiber) zur Software-Installation.
2.Spezifikationsübersicht
VGA |
ASUS EN8600GT |
E/A- |
1 x TV-Ausgang |
Anschlüsse |
2 x DVI-I-Ausgänge |
|
2 x USB 2.0-Anschlüsse |
|
1 x Mikrofonanschlüsse |
|
1 x Kopfhöreranschluss welcher den S/PDIF-Ausgang unterstützt |
|
1 x Gleichspannungseingang |
|
1 x Expresskartenanschluss |

3. Hardwarebeschreibung
Vorderansicht
1.Display: Zeigt die Optionen Lautstärke, GPU-Takt, GPU-Temperatur, Frames pro Sekunde (FPS), Dolby-Kopfhörerunterstützung, und Lüftergeschwindigkeit an. Wenn eine Option ausgewählt wurde, erscheint ein roter Punkt unter der Option. Rote Balken stehen für einen hohen Wert, orange für einen Mittelwert und gelb für niedrige Werte.
2.Kontrollknopf: Drücken Sie diesen Knopf um zwischen den Menüoptionen Lautstärke, GPU-Uhr, GPU-Temperatur, Frames pro Sekunde (FPS), Dolby Kopfhörerunterstützung, und Lüftergeschwindigkeit zu wählen.
3.Stromtaste: Einmal mit ihrem Notebook verbunden, schaltet sich die XGStation immer dann automatisch ein, wenn Sie ihren Computer starten. Falls die XG-Station nicht startet, drücken Sie während POST auf den Stromknopf. Zusätzlich können Sie, falls die XG-Station nicht zusammen mit ihrem Computer herunterfährt, 5 Sekunden den Stromknopf drücken, um die XG-Station auszuschalten. 3 2 1
DieASUS XG-Station kann NICHT im laufenden
Betrieb angeschlossen und getrennt werden. Schalten
Sie die XG-Station NICHT während des Betriebs einfach aus. Dies zu tun könnte Systemschäden verursachen!
<![endif]>Deutsch

<![endif]>Deutsch
Linksansicht
4.DCIN: Verbindet einen externen Stromanschluss.
5.Expresskarten Anschluss:
Verbindet die XG-Station mit dem Expresskartenschacht Ihres
Notebook-PCs.
6. DVI-I -Ausgänge: Verbinden
jedes DVI-I-kompatible Gerät.
7. TV-Ausgang: Verbindet über |
|
|
|
ein S-Video-Kabel mit einem |
7 |
6 |
5 4 |
Fernseher oder Projektor. |
|||
Rechtsansicht |
9 |
8 |
|
8.Mikrofonanschluss: Verbindet ein Mikrofon.
9. |
Kopfhöreranschluss: Verbindet |
|
|
ein Kopfhörer oder ein 2/2.1- |
|
|
Kanallautspecher. Im S/PDIF- |
|
|
Modus verbindet es einen |
|
|
externen Digitaldecoder oder ein |
|
|
digitales Lautsprechersystem. |
|
10. |
USB 2.0-Ports: Verbindet |
|
|
jeglicheArt von USB 2.0-Geräten. |
10 |
|
|
4.Hardwareinstallation
Installieren der ASUS XG-Station: |
|
|
1. |
Schalten Sie den Notebook-PC |
|
3 |
||
|
und alle anderen verbundenen, |
|
|
Peripheriegeräte die mit ihm |
|
|
verbunden sind AUS. |
|
2. |
Richten Sie die |
|
|
Expresskartenfuge |
|
|
auf die Schienen des |
2 |
|
Expresskartenhalters aus, genau |
|
|
wie auf dem Bild gezeigt. |
|
3. |
Bauen Sie die Expresskarte in |
|
|
||
|
den Kartenständer ein. |
|
4. |
Verbinden Sie das |
|
|
Expresskartenkabel mit der |
|
|
Expresskarte; Der PUSH-Knopf |
|
|
muss dabei nach oben zeigen. |
5 |
5. |
Stecken Sie die |
|
|
Expresskarte in einen leeren |
6 |
|
Expresskartenschacht Ihres |
|
|
Notebook-PCs, bis Sie ein |
4 |
|
Klicken hören. |
|
6.Folgen Sie dabei der Richtung, die im Bild angegeben ist um den
Expresskartenhalter sicher einzubauen.
<![endif]>Deutsch
<![endif]>Deutsch
7.Verbinden Sie das andere Ende des Expresskartenkabels mit dem Expresskartenanschluss Ihrer XG-Station.
8.Verbinden Sie das Netzteil mit der XG-Station.
9.Verbinden Sie die XG-Station mit einem externen Bildschirmgerät, indem Sie den DVI-I-Ausgang oder den TV-Ausgang benutzen.
10.Schalten Sie erst den externen Bildschirm und dann den
Notebook-Computer an. Die XG-
Station wird automatisch starten.
7
 9
9
8
DieASUS XG-Station kann NICHT im laufenden Betrieb angeschlossen und getrennt werden.. Schalten Sie die XG-Station NICHT während des Betriebs einfach aus. Dies zu tun könnte Systemschäden verursachen!
5.Treiberinstallation
Nachdem Sie die XG-Station auf Ihrem Computer installiert haben, müssen Sie nun den Gerätetreiber installieren, damit die XG-Station mit ihrem Windows
Betriebssystem zusammen arbeitet.
Die Version und der Inhalt der Treiber-CD können ohne Vorankündigung geändert werden.
Falls Sie die ASUS XG-Station bereits installiert haben, erscheint das Fenster
Neue Hardware gefunden auf dem Bildschirm bevor oder während die Treiberinstallation läuft.
Installation des Gerätetreibers:
1.Klicken Sie bei Neue Hardware gefunden auf schließen.
<![endif]>Deutsch

|
2. |
Legen Sie dieASUS XG-Station-Hilfs-CD ins optische Laufwerk. |
|
|
Wenn die automatische Wiedergabe eingeschaltet ist, erscheint der |
|
|
ASUS XG-Station-Treiberbildschirm automatisch. (Wie auf dem Bild der |
|
|
vorherigen Seite) Gehen Sie in diesem Fall zu Schritt 5 über. |
|
|
Falls die automatische Wiedergabe nicht aktiviert ist, folgen Sie den |
|
|
Anweisungen von Schritt 3 an weiter. |
|
3. |
Klicken Sie auf ihrem Desktop Mein Computer an und doppelklicken Sie |
|
|
auf das Symbol des optischen Treibers. |
|
4. |
Doppelklicken Sie das setup.exe Symbol welches sich auf dem optischen |
|
|
Laufwerk befindet. |
|
|
|
| <![if ! IE]> <![endif]>Deutsch |
5. |
Folgen Sie den Anweisungen auf dem Bildschirm um die Installation zu |
|
haben, sowie ferner auch akzeptieren, bevor Sie die Installation |
|
|
|
vervollständigen. Lesen Sie sich die “ENDBENUTZERVEREINBARUNG” |
|
|
durch und gehen Sie sicher, dass sie alles gelesen und verstanden |
|
|
abschließen. |
|
|
|
|
6. |
Wenn die Installation beendet ist werden Sie aufgefordert den Computer |
|
|
neu zu starten. Sie können auswählen den Computer erst später neu zu |
|
|
starten wenn sie wünschen. |
10
 Loading...