


E8465
Second Edition V2
June 2013
Xonar D1
PCI audio card
English
Quick start guide
ASUS Xonar D1 Quick start guide |
|

English
1.1System requirements
To ensure a successful installation of the Xonar D1 audio card, your computer must meet the following requirements:
•One PCI compatible slot for the audio card
•Microsoft® Windows® Vista/XP(32/64bit)/MCE2005
•Intel® Pentium® 4 1.4GHz or AMD Athlon 1400 CPU or faster CPU
•256 MB DRAM system memory
•60 MB available HDD space for driver installation package
•CD-ROM drive (or DVD-ROM drive) for software installation
•High-quality headphones, powered analog speakers, or digital speakers with Dolby Digital decoder to enjoy the Ultra-High Fidelity sounds of the card
1.2Package contents
Check your ASUS Xonar D1 audio card package for the following items:
•ASUS Xonar D1 audio card
•ASUS Xonar D1 support CD (including RMAA V6.0.6 utilities)
•Additional low-profile bracket
•S/PDIF TOSLINK optical adapter x1
•Quick installation guide
ASUS Xonar D1 Quick start guide

1.3Card installation
To install the Xonar D1 audio card:
1.Power OFF the computer, the monitor, and all other peripheral devices connected to your computer.
2.Unplug the computer power cord from your computer and power outlet.
3.Touch the metal back or side panel of the computer to avoid static electricity.
4.Remove the chassis cover.
5.Locate an empty PCI slot on the motherboard.
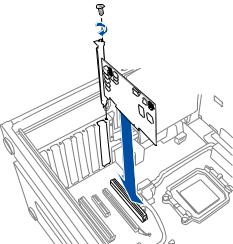
7.Align and insert the audio card into the PCI slot until it seats in place. Make sure the goldfingers are properly inserted to the slot.
8.Secure the bracket screw that holds the audio card in place. Refer to the picture below for the bracket screw hole.
9.Put back the chassis cover.
10.Reconnect all cables.
11.Power ON the computer.
English
ASUS Xonar D1 Quick start guide
English
1.4Driver installation
After installing the Xonar D1 audio card on your computer, you need to install the device driver that enables the Xonar D1 audio card to work with Windows operating system.
The version and content of the driver CD are subject to change without notice.
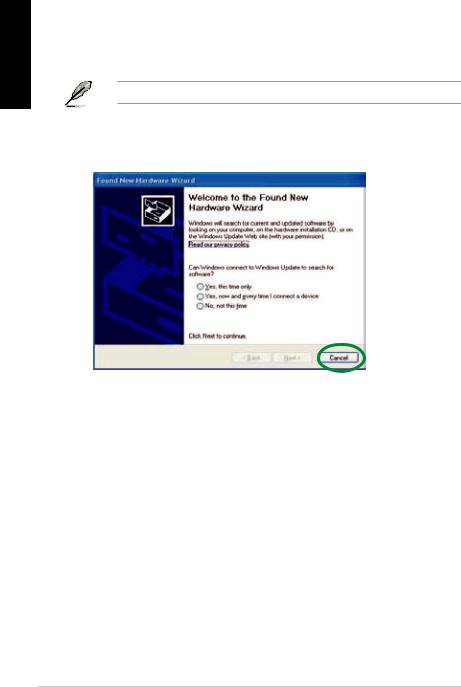
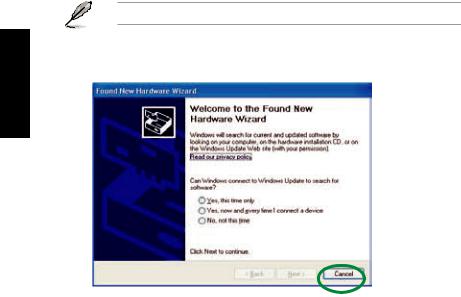
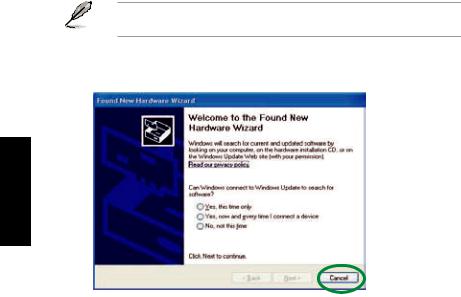
If you have already installed the ASUS Xonar D1 audio card, the Found New Hardware Wizard window may pop up before or during driver installation. See figure below.
1.4.1Installing the audio card driver
To install the device driver:
1.Click Cancel from the Found New Hardware wizard window.
2.Insert the ASUS Xonar D1 support CD into your optical drive.
If autorun is enabled, the ASUS Xonar Card Driver screen appears automatically. Go to step 5.
If Autorun is not enabled in your computer, perform step 3.
3.Click My Computer on your desktop and double-click the optical drive icon.
4.Double-click the setup.exe icon located on the optical drive.
5.Follow the on-screen instructions to complete the installation. Read the “END USER LICENSE AGREEMENT” in the process and make sure that you understand and accept it before continuing the installation.
6.When the installation finishes, you may be prompted to restart your computer.
You can choose to restart the computer later if desired.
ASUS Xonar D1 Quick start guide
1.5Connecting audio device
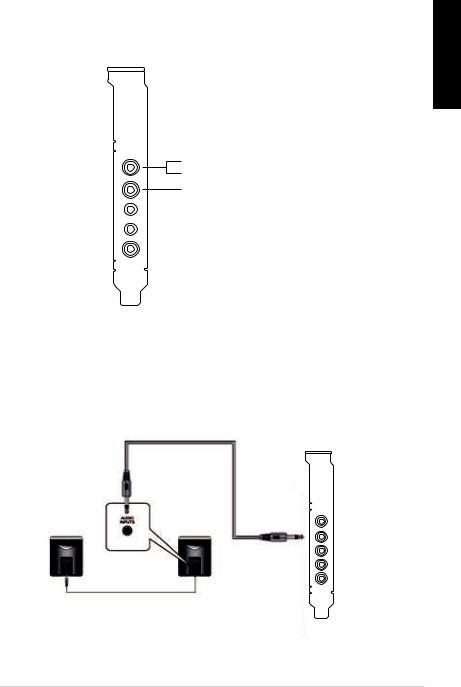
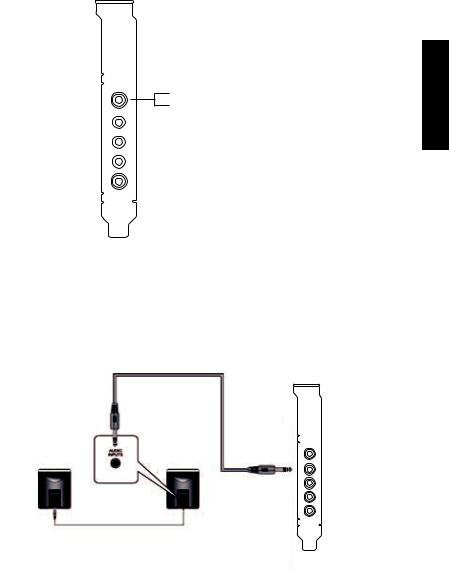
1.5.1Back ports
SPDIF Out
Line / Mic In
Front Out

 Side Surround

 Center & Subwoofer

 Back Surround
English
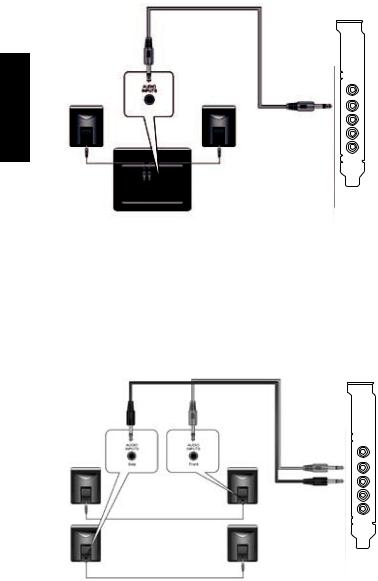
1.5.2Connecting analog speakers
2 Speakers
Front Out
ASUS Xonar D1 Quick start guide
English
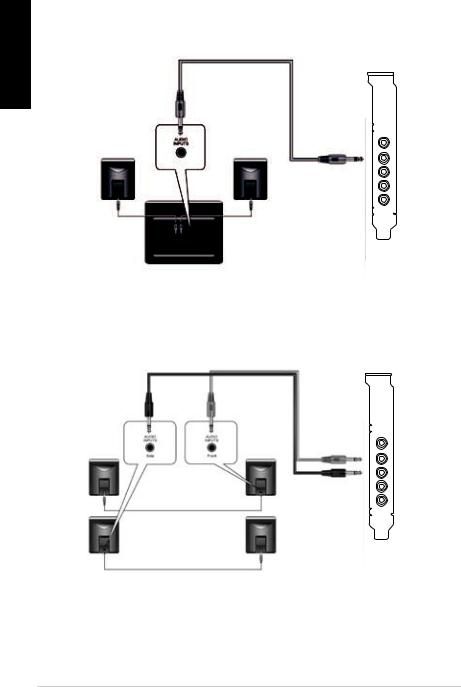
2.1 Speakers
Front Out
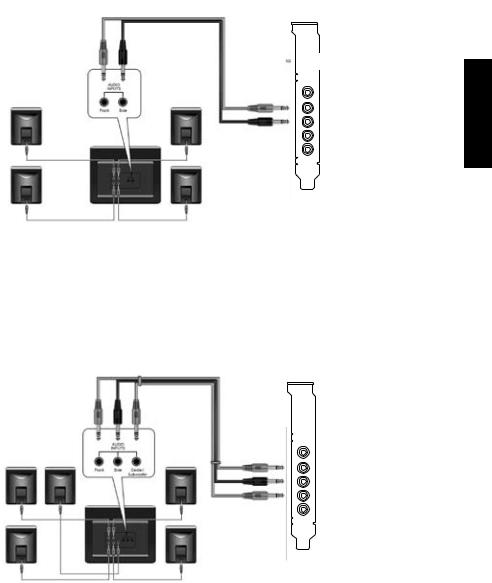
4 Speakers
Front Out
Side Surround
ASUS Xonar D1 Quick start guide
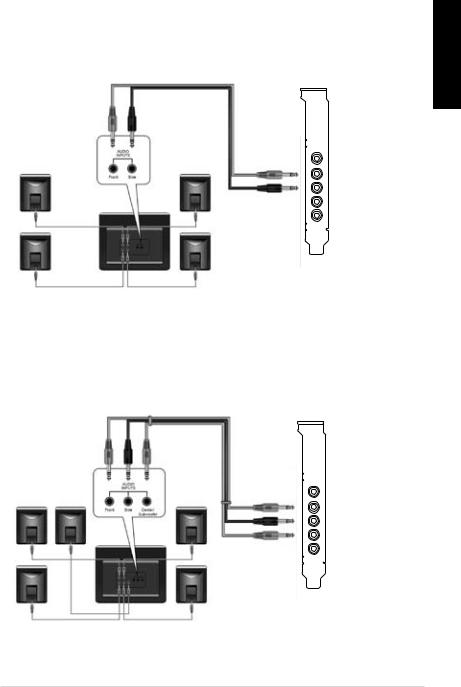
4.1 Speakers
5.1 Speakers
English
Front Out
Side Surround
Front Out
Side Surround
Center & Subwoofer
ASUS Xonar D1 Quick start guide

English
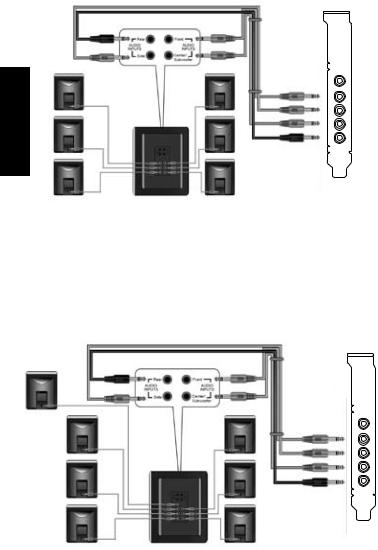
6.1 Speakers
Front Out
Side Surround
Center & Subwoofer
Back Surround
7.1 Speakers
Front Out
Side Surround
Center & Subwoofer
Back Surround
ASUS Xonar D1 Quick start guide
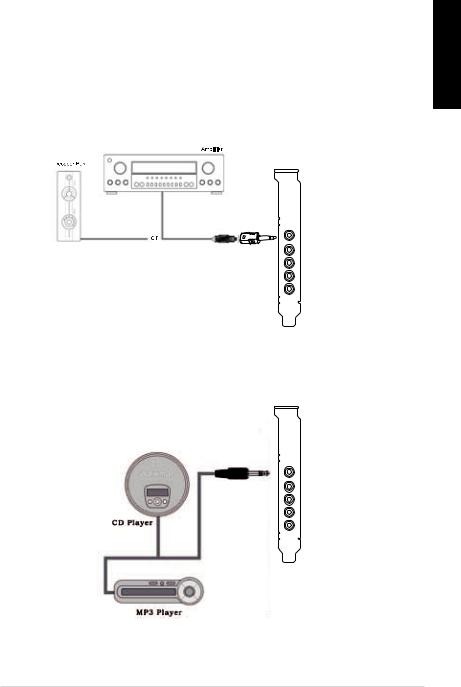
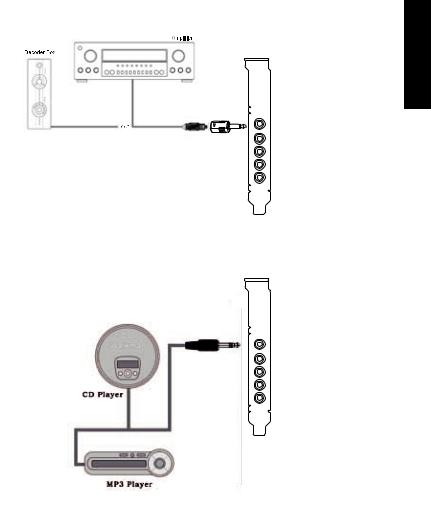
1.5.3Connecting digital speakers
SPDIF Out
Plug the optical TOSLINK adapter into the S/PDIF-Out port. Then, connect your decoder’s S/PDIF In port to the optical adapter with the TOSLINK optical cable.
SPDIF Out
English
1.5.4Connecting Line-In audio sources
Line In
ASUS Xonar D1 Quick start guide

English |
1.5.5 Connecting headphone / microphone |
|
|
|
|
10 |
ASUS Xonar D1 Quick start guide |
Xonar D1
Carte son PCI
Guide d’installation rapide
Français
ASUS Xonar D1 - Guide d’installation rapide |
11 |

|
1.1 |
Pré requis système |
|
|
Avant d’installer la carte son Xonar D1, assurez-vous que votre ordinateur puisse |
||
|
satisfaire aux critères suivants: |
||
|
• Un slot PCI disponible pour la carte son |
||
|
• |
Microsoft® Windows® Vista/XP(32/64bits)/MCE2005 |
|
|
• Un processeur Intel® Pentium® 4 1.4GHz ou AMD Athlon 1400 ou supérieur |
||
Français |
• Mémoire DRAM supérieure à 256 Mo |
||
• Plus de 60 Mo d’espace disque disponible pour l’installation des pilotes |
|||
|
intégrant un décodeur Dolby Digital pour profiter pleinement de la qualité audio |
||
• Un lecteur de CD-ROM (ou DVD-ROM) pour l’installation des logiciels
• Des écouteurs de haute qualité, des haut-parleurs analogiques ou numériques délivrée par la carte son
1.2Contenu de la boîte
Avant l’installation, vérifiez que la boîte de votre carte son ASUS Xonar D1 contient les éléments suivants:
•Carte son ASUS Xonar D1
•CD de support ASUS Xonar D1 (incluant les utilitaires RMAA V6.0.6)
•Support demi-hauteur additionnel
•Adaptateur S/PDIF optique TOSLINK x1
•Guide d’installation rapide
12 |
ASUS Xonar D1 - Guide d’installation rapide |
1.3Installation de la carte
Pour installer la carte son Xonar D1:
1. |
Eteignez l’ordinateur, le moniteur, ainsi que tous les autres périphériques |
|
||||
|
connectés à votre PC. |
|
||||
2. |
Débranchez le cordon d’alimentation de votre ordinateur et de la prise électrique. |
|
||||
3. |
Touchez la partie arrière métallique ou le panneau latéral du châssis pour |
|
||||
|
vous décharger de l’électricité statique. |
Français |
||||
4. |
Retirez le panneau latéral du châssis. |
|||||
5. |
Localisez un slot PCI libre sur la carte mère. |
|||||
|
||||||
6. |
Alignez et insérez la carte son sur le slot PCI jusqu’à ce qu’elle soit bien en |
|
||||
|
place. Assurez-vous que les connecteurs dorés sont correctement insérés |
|
||||
|
dans le slot. |
|
||||
7. |
Sécurisez la carte son au châssis à l’aide d’une vis. Référez-vous à |
|
||||
|
||||||
|
l’illustration ci-dessous pour localiser le pas de vis. |
|
||||
8. |
Replacez le panneau latéral du châssis. |
|
||||
9. |
Reconnectez tous les câbles. |
|
||||
10. |
Allumez l’ordinateur. |
|
||||
|
|
|
|
|
|
|
|
|
|
|
|
|
|
|
|
|
|
|
|
|
ASUS Xonar D1 - Guide d’installation rapide |
13 |
Français
1.4Installation des pilotes
Une fois la carte son Xonar D1 installée sur votre ordinateur, vous devrez installer le pilote permettant à la carte son Xonar D1 de fonctionner sous un système d’exploitation Windows.
La version et le contenu du CD des pilotes peuvent changer sans avertissement.
Si vous avez déjà installé la carte son ASUS Xonar D1, la fenêtre de l’Assistant Ajout de nouveau matériel détecté peut apparaître avant ou pendant le processus d’installation des pilotes. Voir la figure ci-dessous.
1.4.1Installer le pilote de la carte son
Pour installer le pilote de la carte son:
1.Cliquez sur Annuler lors de l’apparition de la fenêtre de l’Assistant ajout de nouveau matériel.
2.Insérez le CD de support de la carte son ASUS Xonar D1 dans votre lecteur optique.
Si l’Exécution automatique est activée, l’écran d’installation du pilote ASUS Xonar Card Driver apparaît automatiquement. Passez directement à l’étape 5. Si l’Exécution automatique n’est pas activée sur votre PC, passez à l’étape 3.
3.Cliquez sur Poste de travail et double-cliquez sur l’icône de votre lecteur optique.
4.Double-cliquez sur l’icône setup.exe du CD de support.
5.Suivez les instructions apparaissant à l’écran pour terminer l’installation.
Lisez le contrat de licence “END USER LICENSE AGREEMENT” et acceptez-le pour pouvoir continuer.
6.Une fois l’installation terminée, il peut vous être demandé de redémarrer votre ordinateur. Vous pouvez toutefois choisir de redémarrer ultérieurement.
14 |
ASUS Xonar D1 - Guide d’installation rapide |
1.5Connecter un périphérique audio
1.5.1Ports arrières
Sortie SPDIF
Entrée audio / Entrée micro

 Sortie avant

 Haut-parleur Surround latérale

 Haut-parleur central & caisson de basses

 Haut-parleur Surround arrière
1.5.2Connecter des haut-parleurs analogiques
Configuration à 2 haut-parleurs
Français
Sortie avant
ASUS Xonar D1 - Guide d’installation rapide |
15 |
Configuration 2.1
Français
Configuration à 4 haut-parleurs
Sortie avant
Sortie avant
Haut-parleur Surround latérale
16 |
ASUS Xonar D1 - Guide d’installation rapide |
Configuration 4.1
Sortie avant
Haut-parleur Surround latérale
Configuration 5.1
Français
Sortie avant
Haut-parleur Surround latérale Haut-parleur central & caisson de basses
ASUS Xonar D1 - Guide d’installation rapide |
17 |
Configuration 6.1
Français
Configuration 7.1
Sortie avant
Haut-parleur Surround latérale Haut-parleur central & caisson de basses Haut-parleur Surround arrière
Sortie avant
Haut-parleur Surround latérale
Haut-parleur Surround arrière
18 |
ASUS Xonar D1 - Guide d’installation rapide |
1.5.3 Connecter des haut-parleurs numériques
Sortie SPDIF
Connectez l’adaptateur TOSLINK optique sur le port de sortie S/PDIF. Puis, connectez le port d’entrée S/PDIF de votre lecteur MD/CD/DVD à l’adaptateur optique du câble TOSLINK.
Français
Sortie SPDIF
1.5.4Connexion de sources audio entrantes
Entrée audio
ASUS Xonar D1 - Guide d’installation rapide |
19 |
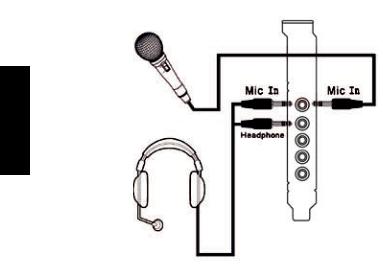
1.5.5Connexion d’un casque / microphone
Français
20 |
ASUS Xonar D1 - Guide d’installation rapide |
Xonar D1
PCI Audio-Karte
Deutsch
Schnellinstallationsanleitung
ASUS Xonar D1 Schnellinstallationsanleitung |
21 |

Deutsch
1.1Systemanforderungen
Um eine erfolgreiche Installation der Xonar D1 Audio-Karte sicherzustellen muss Ihr Computer die folgenden Vorraussetzungen erfüllen:
•Ein PCI-kompatibler Steckplatz für die Audiokarte
• |
Microsoft |
® |
Windows |
® |
Vista/XP(32/64Bit)/MCE2005 |
|
|
|
|
•Intel® Pentium® 4 1,4GHz oder AMD Athlon 1400 Prozessor oder höher
•256 MB DRAM Systemspeicher
•60 MB freier Festplattenspeicherplatz für die Treiberinstallationspack
•CD/DVD-ROM-Laufwerk für Software-Installation
•Hochqualitative Kopfhörer, aktive Analoglautsprecher oder digitale Lautsprecher mit Dolby Digital-Dekoder, um den Ultra-HiFi-Sound dieser Karte zu erleben
1.2Paketinhalt
Vor der Installation überprüfen Sie Ihre ASUS Xonar D1 Audio-Kartenverpackung |
|
auf folgenden Inhalt: |
|
• |
ASUS Xonar D1 Audio-Karte |
• |
ASUS Xonar D1-Hilfs-CD (mit RMAA V6.0.6-Anwendungen) |
• |
Zusätzliche flache Klammer |
• |
S/PDIF TOSLINK optischer Adapter 1x |
• |
Schnellinstallationsanleitung |
22 |
ASUS Xonar D1 Schnellinstallationsanleitung |

1.3Karteneinbau
So bauen Sie die Xonar D1 Audio-Karte ein:
1. |
Schalten Sie die Computer, den Monitor und alle Peripheriegeräte, die mit |
|
||||
|
dem Computer verbunden sind, aus. |
|
||||
2. |
Ziehen Sie das Netzkabel des Computers aus der Steckdose und aus dem |
|
||||
|
Computer heraus. |
|
||||
3. |
Berühren Sie die metallene Rückseite oder Seitenabdeckung des |
|
||||
|
Computers, um statische Entladungen zu vermeiden. |
|
||||
4. |
Entfernen Sie die Gehäuseabdeckung. |
|
||||
5. |
Suchen Sie einen leeren PCI-Steckplatz auf dem Motherboard. |
|
||||
6. |
Richten Sie die Audio-Karte im PCI-Steckplatz aus und stecken Sie |
|
||||
|
sie hinein, bis die Karte richtig sitzt. Vergewissern Sie sich, dass die |
|
||||
|
Goldkontakte richtig im Steckplatz stecken. |
|
||||
|
|
|||||
7. |
Sichern Sie die Karte mit einer Schraube, siehe rechte Abbildung. |
Deutsch |
||||
8. |
Schließen Sie die Gehäusabdeckung. |
|||||
|
||||||
9. |
Schließen Sie alle Kabel wieder an. |
|
||||
10. |
Schalten Sie den Computer ein. |
|
||||
|
|
|
|
|
|
|
|
|
|
|
|
|
|
|
|
|
|
|
|
|
ASUS Xonar D1 Schnellinstallationsanleitung |
23 |
1.4Treiberinstallation
Nach dem Einbau der Xonar D1 Audio-Karte in Ihren Computer müssen Sie die Gerätetreiber installieren, damit die Xonar D1 Audio-Karte mit dem WindowsBetriebssystem zusammenarbeiten kann.
Die Version und der Inhalt der Treiber-CD können ohne vorherige Ankündigung geändert werden.
Wenn Sie die ASUS Xonar D1 Audio-Karte schon eingebaut haben, erscheint möglicherweise vor oder während der Treiberinstallation ein Fenster des Hardware-Assistenten (Neue Hardware gefunden). Siehe folgende Abbildung.
Deutsch
1.4.1Installation der Audio-Kartentreiber
So installieren Sie die Gerätetreiber:
1.Klicken Sie im Fenster Neue Hardware gefunden auf Abbrechen.
2.Legen Sie die ASUS Xonar D1-Hilfs-CD in das optische Laufwerk ein.
Wenn Autorun aktiviert ist, erscheint das Fenster für die ASUS XonarKartentreiber automatisch und Sie können mit Schritt 5 fortfahren. Wenn Autorun nicht aktiviert ist fahren Sie mit Schritt 3 fort.
3.Klicken Sie auf Ihrem Bildschirm auf Arbeitsplatz und doppelklicken Sie auf das Symbol Ihres optischen Laufwerks.
4.Doppelklicken Sie auf das Symbol setup.exe, welches Sie auf der CD finden.
5.Folgen Sie den Bildschirmanweisungen, um die Installation fertigzustellen. Lesen Sie die “Endbenutzer-Lizenzbestimmungen” und vergewissern Sie sich, dass Sie alles verstanden haben. Akzeptieren Sie dann die bestimmungen, bevor Sie mit der Installation fortfahren.
6.Wenn die Installation beendet ist, werden Sie aufgefordert Ihren Computer neu zu starten. Sie können den Computer später neu starten, wenn gewünscht.
24 |
ASUS Xonar D1 Schnellinstallationsanleitung |
 Loading...