

Page 1
User Manual
V1.0
Page 2

Page 3

CONTENTS
Introduction ..................................................................... 1
Features ................................................................................................1
System Requirements .............................................................................1
About the Remote Control ................................................. 2
Parts and Functions .......................................................... 4
Quick Start ....................................................................... 5
Using the AV Playback Function......................................... 6
Connecting to AV Equipments .................................................................6
Detail View............................................................................................. 8
Thumbnail View and Slideshow ............................................................. 21
Setup Menu.................................................................... 23
Function Setup ..................................................................................... 23
PC Operation.................................................................. 27
Introduction ......................................................................................... 27
Software Installation............................................................................. 28
Connecting to PC.................................................................................. 28
Disconnecting from PC .......................................................................... 29
About the File System of Hard Disk Drive ............................................... 30
Media Files for Playback ........................................................................ 31
Using the Utility Programs..................................................................... 33
About the Partitioning of the Hard Disk Drive .........................................37
Appendix........................................................................ 39
Specifications ....................................................................................... 39
Troubleshooting ...................................................................................40
Error Code ...........................................................................................42
Copyright ............................................................................................. 42
Page 4

Page 5
Introduction
Introduction
Features
The Mobile Video HDD is specially designed as a dual-use stand-alone media player. When
attached to a PC, it operates as a USB 2.0 Hi-Speed (and eSATA for dual connection model)
Serial ATA external hard disk drive, with a large capacity of data storage. When attached
to an AV device, the Mobile Video HDD lets you browse and play back your entire media
library directly to your TV or Home Theater!
The Mobile Video HDD can play back DVD Folder, VCD, MPEG1, MPEG2, DivX/Xvid(AVI)
movie files, MP3 music files, JPEG photo and graphic files.
The Mobile Video HDD supports both NTFS and FAT32 file system.
Supports both NTSC and PAL TV systems.
Supports component video output up-scaling to 720p:
The Mobile Video HDD is equipped with component video jacks (Y/Pb/Pr jacks) which
provide you with high quality output for your home theater High Definition flat panel
display.
Supports digital audio output:
The Mobile Video HDD is equipped with a COAXIAL RCA jack for outputting digital audio
signal to a receiver. It will provide you with uncompromised lossless Hi-Fi audio experience.
(Cable not provided.)
This unit is not for in-car entertainment use. Unstable power or vibration may
damage the unit.
Do not use an AC adapter other than the one came along with the retail package;
Any damage caused by unauthorized adapters will avoid warranty.
TV screen does not display normally:
Press and hold
correctly.
then press MENU repeatedly until the screen displays
System Requirements
Desktop or Notebook PC with USB 2.0 port for USB 2.0 connection
Desktop or Notebook PC with eSATA port for eSATA connection (for dual connection model
only)
Operating systems: Windows Vista / XP / 2000 / Me / 98SE
Storage medium: A SATA hard disk drive
1
Page 6
About the Remote Control
(
About the Remote Control
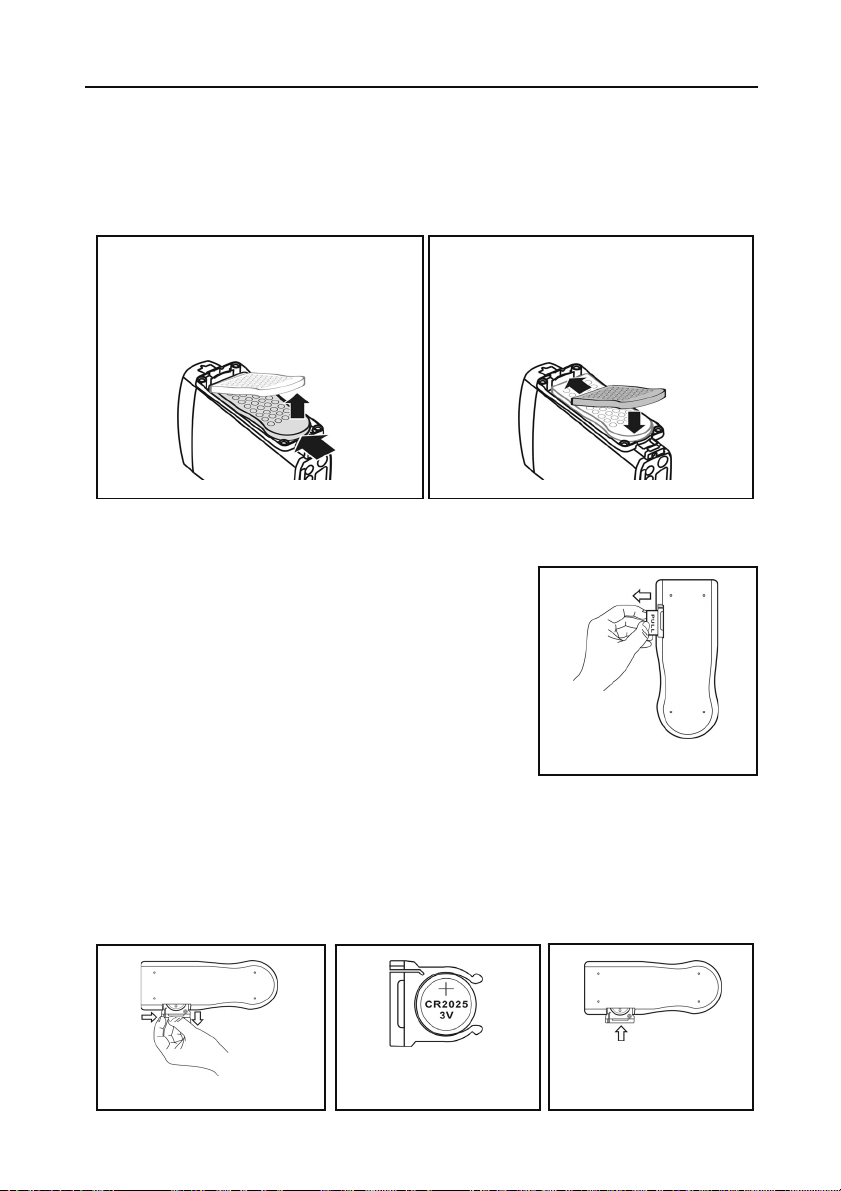
How to Take and Store the Remote Control
This device is designed with a remote control storage compartment at the bottom. You can
store the remote control in the compartment to avoid misplacing.
Take out the Remote Control
n: Push the bottom of remote forward.
o: The remote will be released from the
stand.
By offering the Part Number of the Remote Control, you can purchase a new one from our
dealer if it is missing. The Part Number of the Remote Control: 7900035-51
o
n
Using the Remote for the First Time
For the first time use of the remote, see the illustration
shown alongside. Pull out the tab to enable the battery
power of the remote.
Store the Remote Control
p: With the buttons facing up, insert the
top of remote and push it forward.
q: Push the bottom of remote to fix it.
p
q
Changing the Battery of Remote
If the battery becomes depleted, change the battery
according to the following instructions:
1. Turn the remote control on its back, and then press the tab on the left side with
fingernail
2. The battery model of this remote is [CR2025]. Refer to the illustration below to insert the
battery accurately with the positive side facing up – see illustration below.
3. Place the new battery and make sure it is inserted and seated securely.
2
n. Hold and pull at the indentationo to take out the battery unit.
Load the new battery
+ towards up)
Insert the battery holder Take out the battery holder
Pull out the tab
Page 7
About the Remote Control
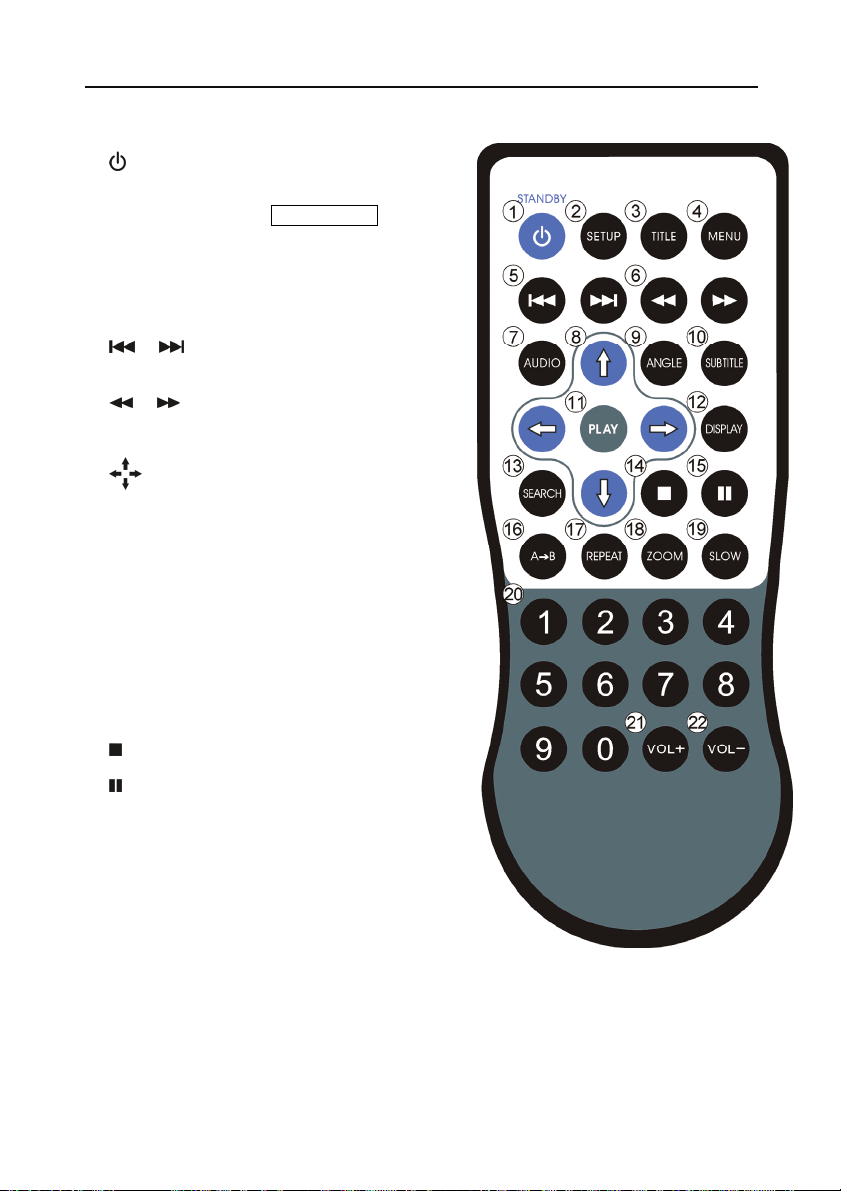
Buttons
1
○
STANDBY:
2
○
SETUP:
○3
TITLE:
4
○
MENU:
5
○
/ :
6
○
/ :
7
○
AUDIO:
8
○
9
○
ANGLE:
10
○
SUBTITLE:
11
○
PLAY:
12
○
DISPLAY:
13
○
SEARCH:
14
○
:
15
○
:
16
○
AÆB:
17
○
REPEAT:
18
○
ZOOM:
19
○
SLOW:
20
○
0~9:
21
○
VOL+:
22
○
VOL-:
:
Activate from Standby mode / Go
back to Standby mode.
Enter SETUP MENU
Open DVD title menu
Switch to Thumbnail View mode /
Open DVD main menu
Play the previous / next file in
sequence
Fast rewind / Fast forward
Switch audio channels
Cursor keys
Switch DVD angles / Rotate JPG
image
Switch DVD / DivX subtitles
Play the current selected file /
folder.
Display file properties / played
time
Search by Title / Time
Stop current playback
Pause current playback
Repeat from A to B
Change the play mode
Enlarge image
Slow motion playback
Number pad
Volume up
Volume down
3
Page 8
Parts and Functions
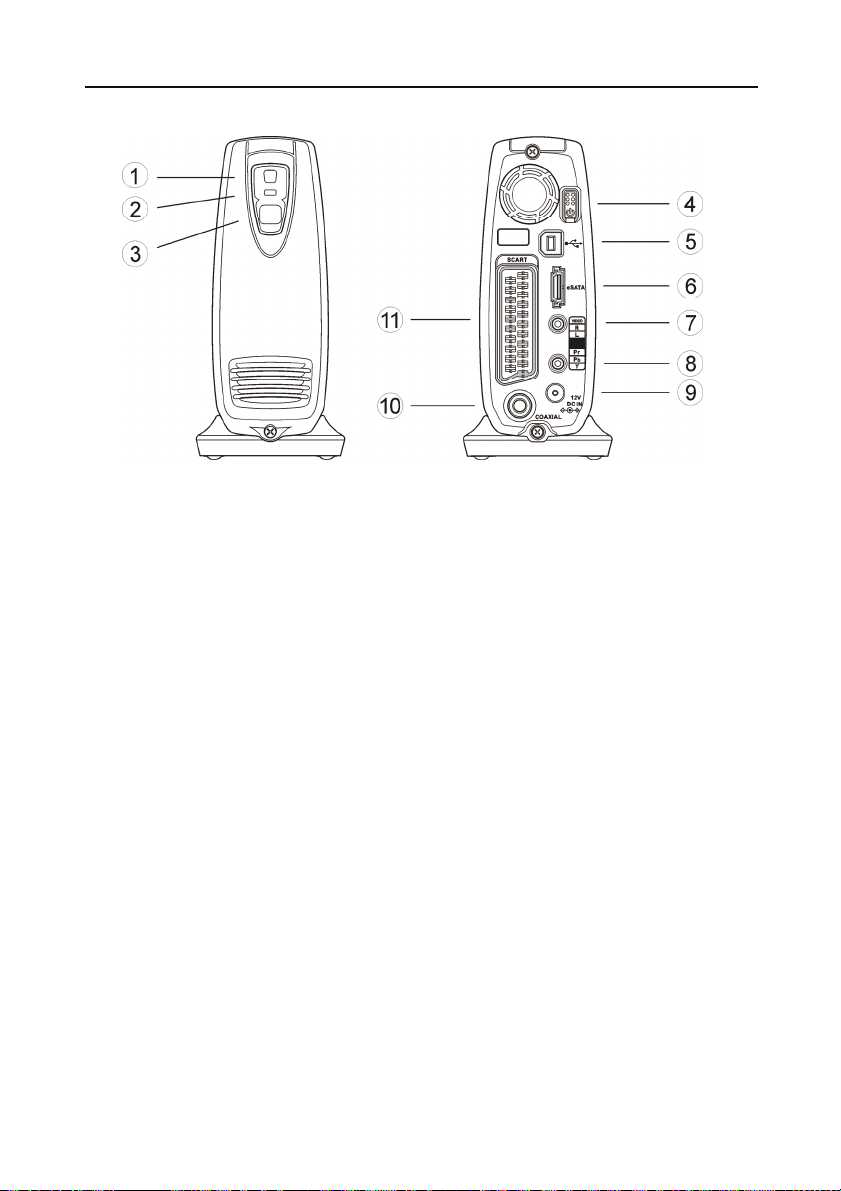
Parts and Functions
Power and access
c
indicator (Blue) :
Remote indicator
d
(orange) :
e Remote receiver : When using the remote, point the remote towards here.
Power switch : Press this button to turn on this device. Press this button for
f
USB 2.0 connector : When using USB 2.0 connection, connect the cable here.
g
eSATA connector (dual
h
interface model only) :
Composite audio/video
i
output connector :
Component video
j
output connector :
Power connector : Connect to the AC adapter.
k
Coaxial digital audio
l
connector:
SCART video output
⑪
connector:
Lights up: The power is on.
Blinking: Booting up/ Accessing the data through PC connection.
Blinks 1 time: Received the remote signal.
Blinks 3 times: Cannot initiate media player function. Please
check and make sure the unit is not connected to a PC.
about 1 second to turn it off.
When using eSATA connection, connect the cable here.
Outputs composite video and audio signals with a special cable
provided. The colors of the jacks are yellow, red and white.
Outputs component video signals with a special cable provided.
The colors of the jacks are green, blue and red.
Outputs digital audio signal. Connect this jack to a receiver with
a RCA cable. (cable not provided)
Outputs video/audio signal for European AV equipments
equipped with this connector. (cable not provided)
4
Page 9

Quick Start
Quick Start
Read Before Use
1. Do not operate electronics with wet hands.
2. Do not operate this device in a bathroom.
3. Do not bend cables in a sharp angle.
4. Keep this device unreachable from children.
5. Keep this device and its accessories away from heat sources.
How do I use this Mobile Video HDD
Copy media files from your computer to this unit, and then connect it to your TV or Home
Theater. The User Interface is somewhat intuitive like a Browser. Try starting with
and PLAY buttons.
How to copy media files into it?
1. Make sure that this Mobile Video HDD had been correctly formatted.
2. Plug the USB cable and the adaptor.
3. Press the Power Switch to turn it on.
4. Copy files just like using a USB external HDD. You can do it with Windows Explorer or
Mac OS Finder. (No additional software needed!)
How to play media files on my TV?
1. Connect it to your TV with cables provided.
2. Plug the AC adaptor into the Power Connector and press the Power Switch to turn it on.
3. Press the
4. Browse with
(STANDBY) button on the remote to activate the unit.
and PLAY buttons
What if my TV screen displays unstable image?
Hold the button on the remote and then press the MENU button repeatedly until the image
goes steady.
How to configure settings?
Press the SETUP button.
What if I have more questions to ask?
Go to the “Troubleshooting” chapter, and read detailed descriptions in this manual.
5
Page 10
Using the AV Playback Function
Using the AV Playback Function
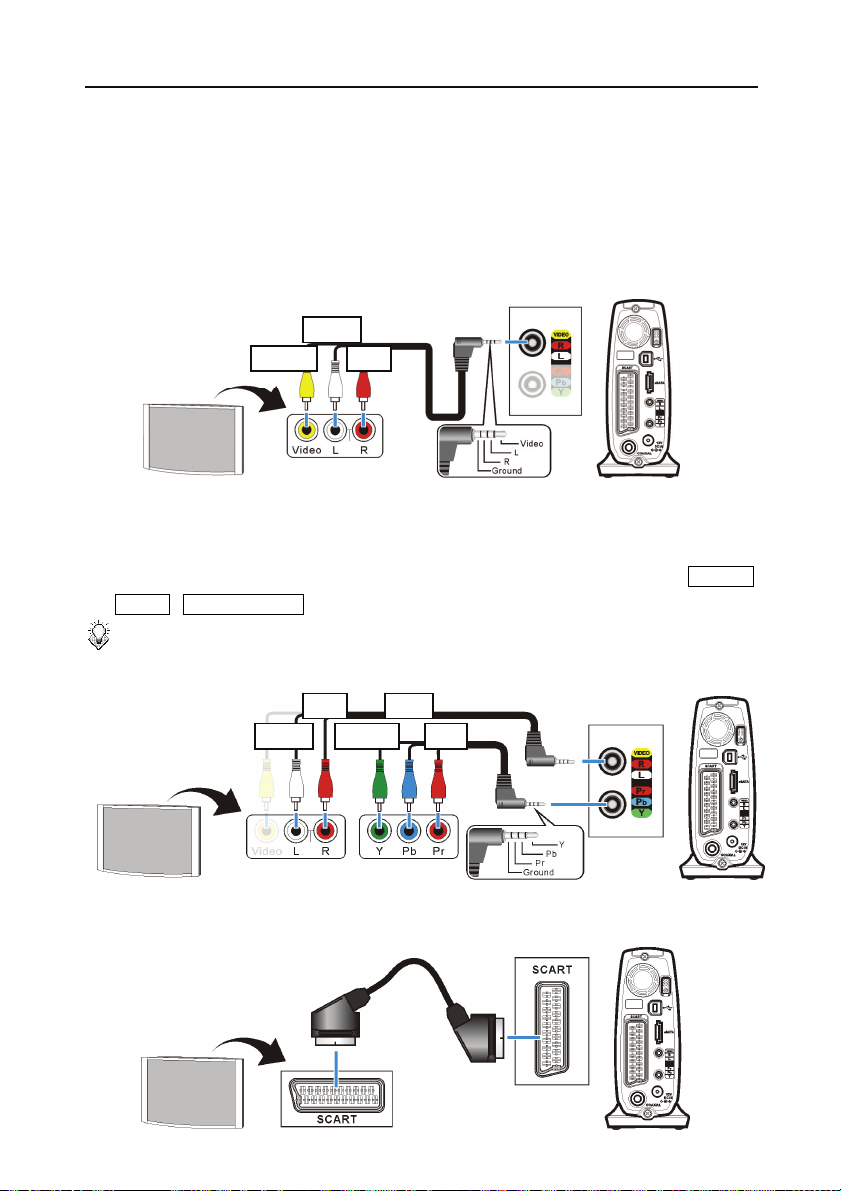
Connecting to AV Equipments
Using Composite Audio/Video Output
The composite video is the most popular audio/video output format. Most TV sets and AV
amplifiers (receivers) support this type of connection. Yellow: Video signal; White: Left
audio channel; Red: Right audio channel.
Using Component Video Output (Y/Pb/Pr)
If your TV supports Component Video input (Y/Pb/Pr), you can connect it for better video
quality. You will have to connect the analog or digital audio cable for audio output. You can
also configure display ratio, progressive scan, and the 720p up-scaling output in SETUP
MENU > VIDEO SETUP . Please refer to the illustration below for connecting instruction.
Note:
Some TV sets are equipped with separate composite and component audio
inputs. Be sure that you have connected the correct one.
White
Yellow Red
Red
White
Blue
RedGreen
Using SCART Video Output
If your TV is equipped with SCART input, connect this connector to output the audio/video
signal. (SCART cable not provided)
6
Page 11

Using the AV Playback Function
Using Coaxial Output Digital Audio
To output the digital audio signal, connect this connector to an AV amplifier (receiver)
which equips a digital audio decoder. You will also get multi-channel sound effect if the
audio source carries it.
Power Connection
1. Connect the DC jack of the AC adapter to the connector marked “DC IN”, plug the other
end into an electrical outlet.
2. Press the Power switch and then the blue LED will light up with low luminance, entering a
mode called “Standby mode.” You can press
activate the unit for playback. Pressing the
standby mode.
(STANDBY) button on the remote to
(STANDBY) button again will switch to the
Activated:
LED lights up with high
luminance
Standby:
LED lights up with low
luminance
7
Page 12
Using the AV Playback Function
T
Activating the Mobile Video HDD for AV Playback
1. Turn on your TV and AV amplifier (receiver), and switch to the correct input channel.
2. Press the Power switch to turn on the unit, and then press
remote control to activate it. The activation takes about 5-7 seconds, and the LED will blink
brightly at the same time.
3. After the LED stops blinking and turns steadily bright, you can use the remote to operate
this unit for playback.
4. After playback, press
5. If you want to move the Mobile Video HDD, turn off this unit by pressing the Power switch
until the orange LED is turned on, and then it will be safe to remove all connections after
both LEDs are off.
When using the remote, point the remote towards this unit’s Remote receiver.
y
During the remote operation, the inhibit icon will appear on the screen
y
when you pressed a button with non-available operation.
If the setting of the video output is incorrect, the TV screen will not display normally.
y
Switch to correct setting by pressing and holding and then press MENU.
(STANDBY) again to switch back to the standby mode.
Detail View
(STANDBY) button on the
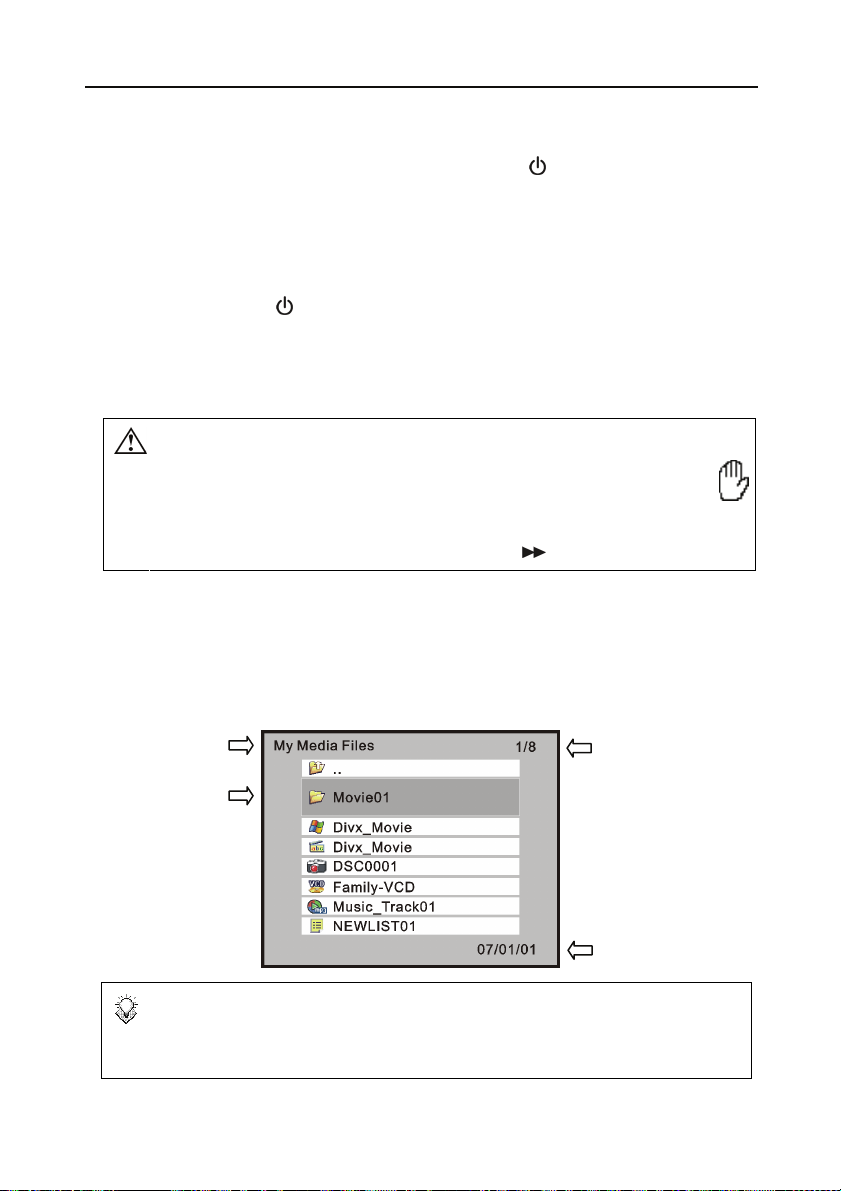
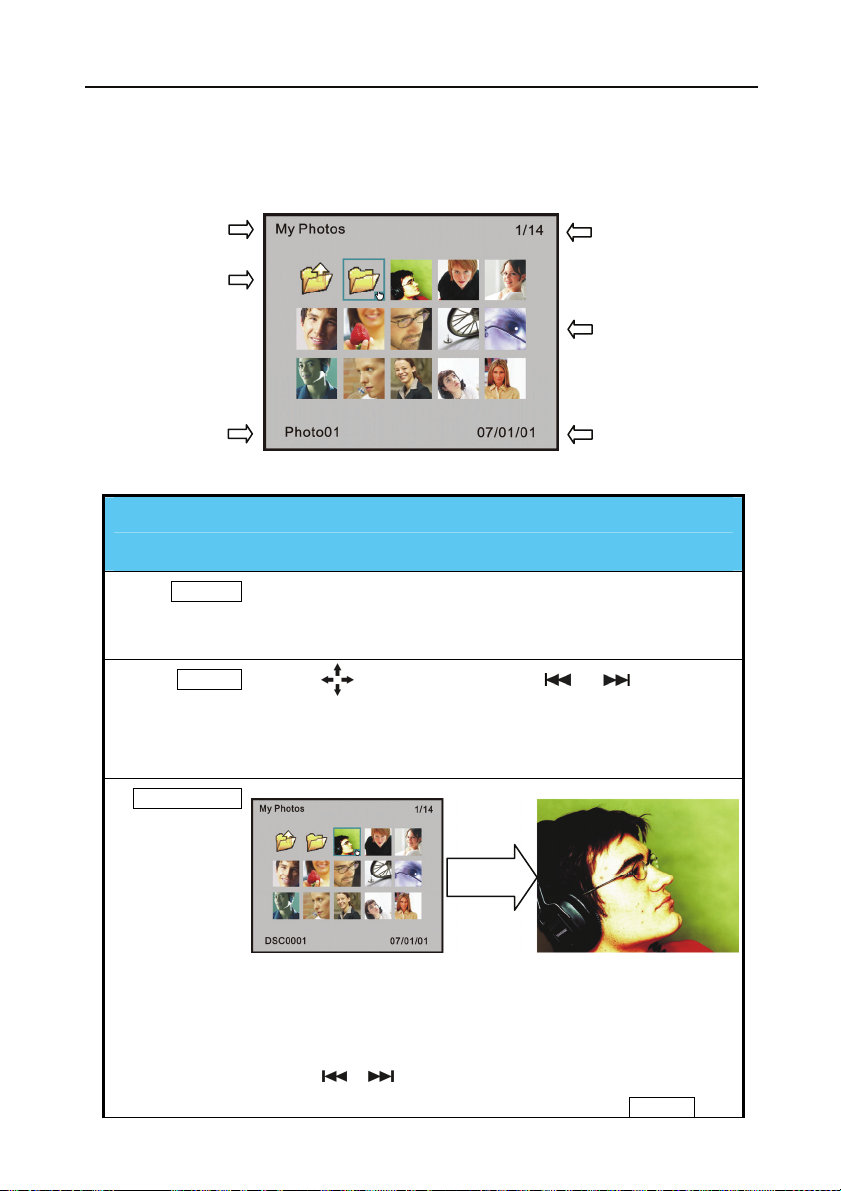
After activating this unit, all folders and media files will appear on the screen as the figure
shown below. This mode is called “Detail View”.
Folder name
Selected item
The top level of the disk is called the “ROOT” folder. While there are some
operations reserved at the ROOT level only, it is recommended to categorize your
files in folders rather than to save all of them underneath the root folder.
8
otal items and the
item number
Item information
Page 13
Using the AV Playback Function
Y
Y
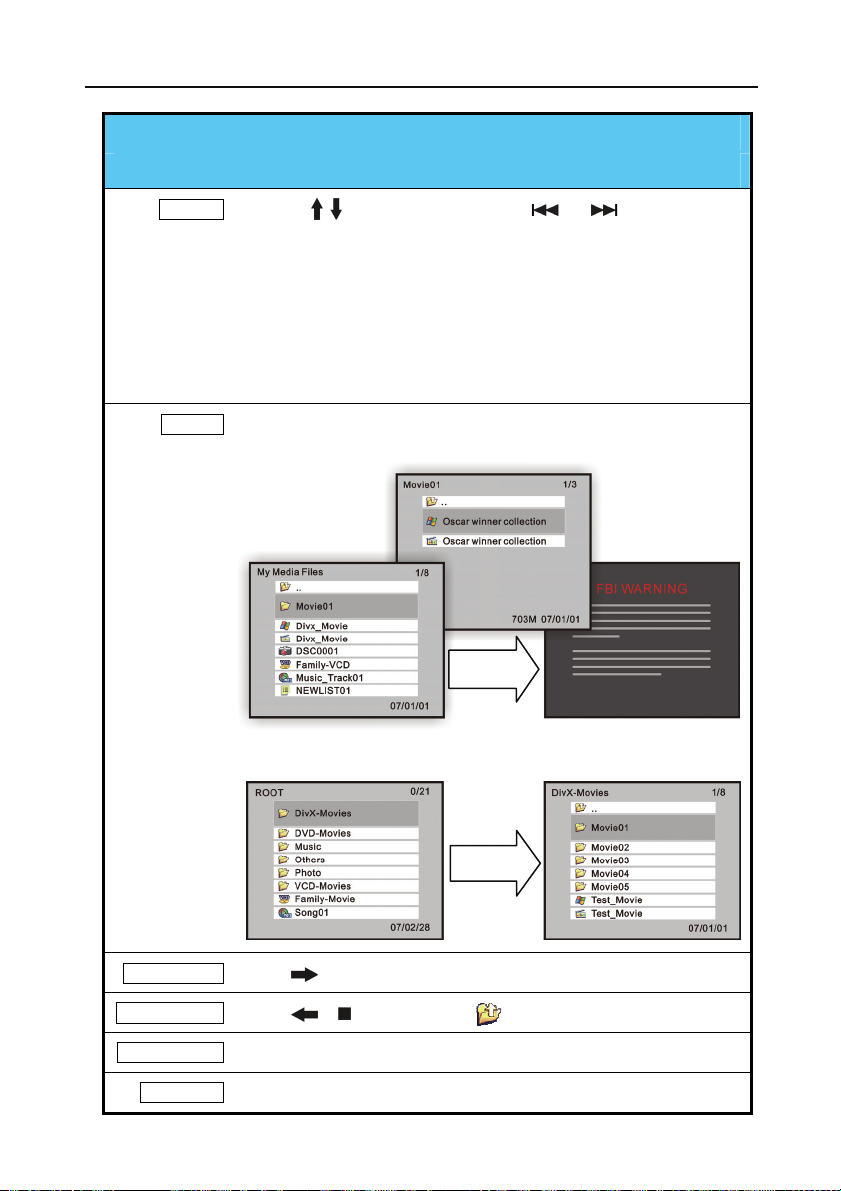
Operations of “Detail View”
Browsing folders and media files for playback
Selection y Press
next page. The highlighted area indicates the selected item.
You can press 0~9 buttons to select the number of the target file. If
y
the selected file is recognizable, the unit will start playback.
You CANNOT perform selection by pressing 0~9 button under the
y
“ROOT” folder. It is only reserved for private folder password
purpose.
Playback y Press the PLAY button on a selected folder to play all media files
inside that folder, or to play a single file if only one file is selected.
y
If a folder contains no recognizable media file, pressing the PLAY
y
button will open that folder.
button to select an item,
Press
PLA
or for previous or
open a folder Press button to open the selected folder.
Parental folder Press , button or select to go back to the parental folder.
Back to ROOT Press TITLE button to jump back to the “ROOT” folder directly.
Information Press DISPLAY button to display information of the selected file.
Press
PLA
9
Page 14
Using the AV Playback Function
Icon Descriptions
: A folder
: The parental folder
The IFO file of a DVD movie. To play back the entire DVD movie with DVD
:
menu, this is the file to play.
A MPEG1 (VCD) file. The filename extension can be dat, mpg, mpe, or
:
mpeg.
: A DivX /Xvid movie file. The filename extension can be avi, divx, or xvid.
A DivX /Xvid subtitle file. The filename extension can be srt, sub/idx, ssa,
:
ass, psb, sub, or smi.
: A MPEG2 file. The filename extension can be mpg, vob, or m2p.
: A MP3 music file. The filename extension is mp3.
: A WAV music file. The filename extension is wav.
: A JPEG graphic file. The filename extension can be jpg, jpe or jpeg.
: A Playlist.
: A file with problem for playback.
10
Page 15

Using the AV Playback Function
Private Folder
“Private folder” function allows users to keep their private files secret. Users may install the
Utility program (in the Utility CD) on their PC to setup this function. The Main Locked
Folder will be invisible on screen until the correct password is entered.
Input Password
Displaying Locked Folders
1. In “Detail View” mode, press the TITLE button to go back to the “ROOT” folder.
2. Use 0~9 buttons to enter the 4 digit password. (The
each time you press those buttons.)
3. If the password you have entered is correct, the hidden Main Locked Folder will
display immediately, with default name Private Folders. The folder name is
designated by the Private Folder Manager utility. You can set it up with a new
name.
icon will appear on the screen
Hiding Locked Folders
1. In “Detail View” mode, press the TITLE button to go back to the “ROOT” folder.
2. Use 0~9 buttons to enter 4 digits other than the correct password.
3. If the password is incorrect, the Main Locked Folder will disappear immediately.
4. You can also press
will automatically be set hidden when this unit is activated next time.
button to go back to standby mode. The Main Locked Folder
11
Page 16

Using the AV Playback Function
Introduction and Playback of the Media Files
Folder Play
A folder
Folder1
..
The Mobile Video HDD introduces a convenient feature named “Folder Play”. You can play
all media files contained in one folder by simply pressing the PLAY button on that folder
icon. A maximum of 2048 files/folders can be categorized into one single folder.
Ö
Ö
The parental folder
By selecting the parental folder icon (
level in its directory tree.
..) or pressing the button, you can come up a
DVD Folder
Movie1
Movie1
“DVD Folder” means a folder contains complete DVD movie files. Mobile Video HDD can
directly play back this folder just like playing back a DVD disc. To establish a DVD folder on
the Mobile Video HDD, just insert the DVD disc into a computer’s optical drive, and then go
to “My Computer” to browse the disc. Copy the entire “VIDEO_TS” folder on the DVD to the
Mobile Video HDD. Some DVD discs can’t be copied because they have been protected
(with the CSS protection). The back-up operation of any DVD content must obey your local
law of copyright/ intellectual property rights. Please respect copyright, do not copy
DVDs with copyright and do not distribute them to other people.
To play the “DVD Folder” movie, simply select the folder and then press the PLAY button.
Or you can play it by selecting the
button.
If the DVD Folder is incomplete, you can still play back the VOB files directly,
y
while some functions will be lost, such as the selection of subtitles, chapters, and
angles.
Ö
Ö
A IFO file
A VOB file
VIDEO_TS IFO file, and then press the PLAY
DivX Files
Movie2
Movie2
12
A DivX video file
Ö
A DivX subtitle file (its filename must be the same as the movie file)
Ö
Page 17

Using the AV Playback Function
This kind of media files includes DivX and Xvid files. Most of them are available as separate
video files (the filename extensions include avi, divx, and xvid) and subtitle files.
To play these media files, select the video file or the folder that contains these files, and then
press the PLAY button. The subtitle has to be named exactly the same filename as the movie
file in order to display automatically.
For text type subtitle files encoded in ANSI code, the OSD Language must be set to match
the language of the subtitle; while the ones encoded in Unicode (UTF-8) fashion can be
displayed properly regardless of the OSD Language setting.
VCD and MPEG1 Files
Movie3
This kind of media files includes files that meet the MPEG1 format (the filename extensions
include dat, mpg, mpe, and mpeg). To play these media files, select the media file or the folder
that contains these files, and then press the PLAY button.
A MPEG1 media file
Ö
MPEG2 Files
Movie4
This kind of media files includes files that meet the MPEG2 format (the filename extensions
included mpg, mpe, mpeg, vob, m2p). To play these media files, select the movie file or the
folder that contains these files, and then press the PLAY button.
If the VOB file is in a “DVD Folder”, please follow the instructions of “DVD Folder” section to
play back the entire movie. Playing back a single VOB file directly will cause some DVD
functions to be lost, such as the selection of subtitles, chapter and angle
A MPEG2 media file
Ö
Music Files
Music1
Music2
The Mobile Video HDD can play both MP3 and WAV music files. To play these music files,
select a file or a folder that contains these files, and then press the PLAY button. While the
music is playing, the playback seek slider will be displayed on the screen. The title,
performer, and the album information from the ID3 tag of an MP3 file will be displayed on
the screen also.
A MP3 music file
Ö
A WAV music file
Ö
13
Page 18

Using the AV Playback Function
Photo and Graphic Files
Photo1
This kind of media files includes files that meet the JPEG format (the filename extensions
include jpg, jpe, jpeg). Most digital cameras store photo images in this format.
To play back these graphic files, select a file or a folder that contains these files, and then
press the PLAY button. The Mobile Video HDD will play all graphic files in one folder
sequentially with a fixed interval (slide-show mode). You can configure this functions in the
SETUP MENU > PREFERENCE PAGE > S.S. INTERVAL
If you don’t want to display the photos in the slide-show mode, you can press the
button, and then press or button for previous or next photo file.
A JPEG graphic file
Ö
Playlists
NEWLIST1
A Playlist is a list of media files which can be played contiguously. You can create these lists
by using the Playlist Manager utility. To play back a Playlist, just select one and the press
the PLAY button. A total 2048 files can be managed into a single Playlist.
Ö
A Playlist
14
Page 19
Using the AV Playback Function
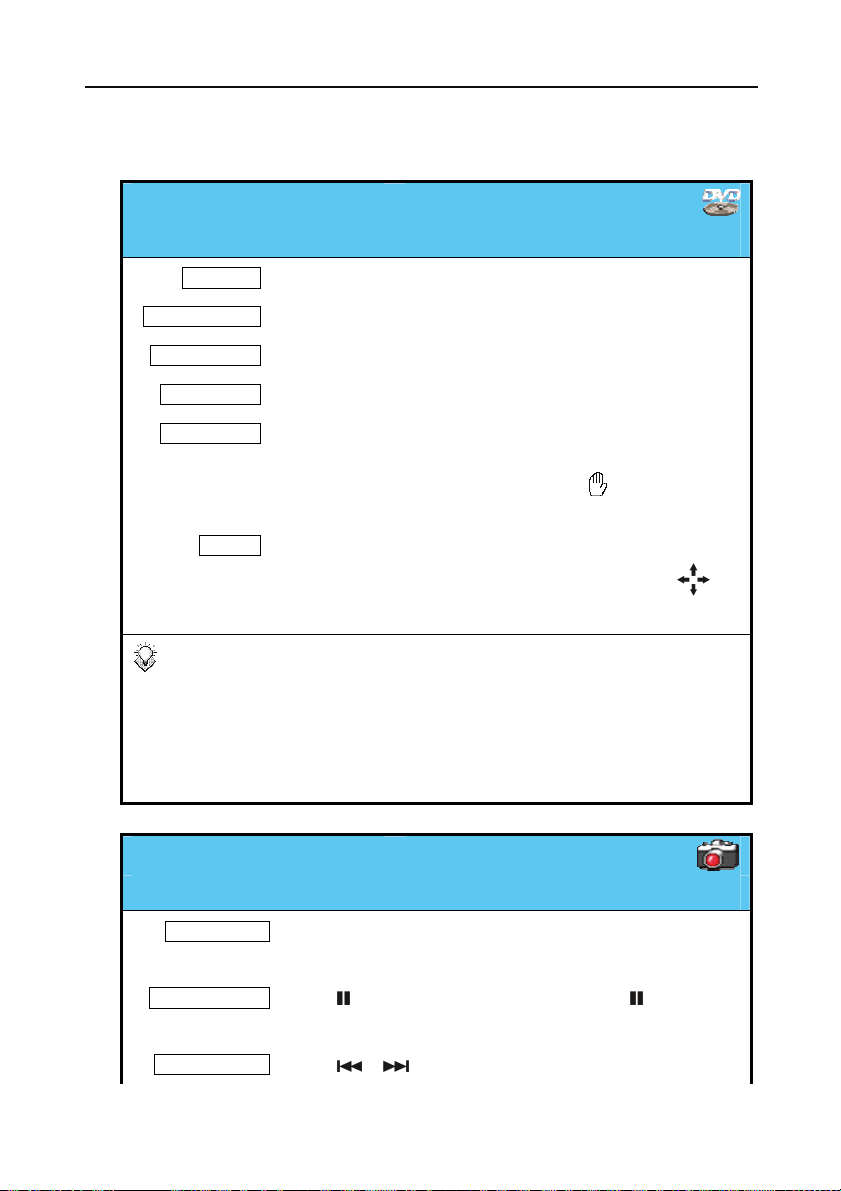
Operations while Playback
While playing back, you can enable the following operations:
[The icons on top of table indicate the media files associated with each function]
DVD Folder
Plays the complete DVD movie with DVD menu.
DVD Menu Press MENU button will open the DVD Main Menu.
DVD Title Menu Press TITLE button will open the DVD Title Menu
Change subtitle Press SUBTITLE button.
Change audio Press AUDIO button.
Change angle
Zoom in
Some DVD will disable the SUBTITLE and AUDIO key function. You will
y
need to set up these functions in the DVD Menu by pressing MENU key.
The "ZOOM” function will be disabled under 720p video output mode.
y
If the DVD menu behaves incorrectly, such as blank screen or repeated
y
segments, press STOP button to stop playing, and then select the VIDEO_TS
file. Press AÆB button to play the Main Title directly.
Press ANGLE button to change to another view angle if
y
available.
After pressing the ANGLE button, if the
y
that only one view angle is available.
Press ZOOM button to enlarge the image in a recurring
sequence. If the image is larger than the screen, press
move it.
appears,
it means
to
Slideshow Play
Play graphic files continuously.
Slideshow Play Pressing PLAY button on a JPEG file will start the Slideshow
Slideshow Pause Press button to pause the Slideshow. Press button again
Previous / Next Press / button.
play.
to continue Slideshow play.
15
Page 20

Using the AV Playback Function
Rotate Pause Slideshow first, and then press ANGLE button to rotate
the photo image counterclockwise.
Zoom in Pause Slideshow first, and then press ZOOM button to enlarge
the image in a recurring sequence. If the image is larger than
the screen, press
The "ZOOM” function will be disabled under 720p video output mode.
y
You can refer to “Thumbnail View and Slideshow” chapter for more
y
information.
to move it.
Change DivX Subtitle
Change the subtitle, or disable the subtitle.
Change subtitle Press the SUBTITLE button to change to next subtitle available.
Please read the following notice concerning the DivX subtitle :
If the movie file and subtitle file have the same filename, the subtitle will be
y
displayed automatically while playing back.
You can also specify another subtitle file. Press button to stop the playback
y
first, and then it will go back to the “Detail View” mode. You can select the
desired subtitle file, and then press SUBTITLE button. A message “DIVX
SUBTITLE SELECTED” will appear on the screen. Then resume playing the
movie and the selected subtitle will be displayed.
For text type subtitle files encoded in ANSI code, the OSD Language must be
y
set to match with the language of the subtitle; while the ones encoded in
Unicode (UTF-8) fashion can be displayed properly regardless of the OSD
Language setting. You can adjust this setting in SETUP MENU >
GENERAL SETUP > OSD LANGUAGE
After pressing the SUBTITLE button, if the
y
is no subtitle file or the selected subtitle file is not supported.
appears,
Change Audio
You can change to different language channels if the movie file contains them.
it means that there
Change audio
16
Press AUDIO button to change to another language channel if
y
available.
If the appears after pressing the AUDIO button, it means that
y
Page 21

Using the AV Playback Function
only one language channel is available.
The languages and the audio channel encodings of each audio
y
track in a DVD/ DivX movie may very from one another,
depending on the information carried by the source itself.
You can set audio output as one of the following three:
y
MONO LEFT , MONO RIGHT , OR STEREO .
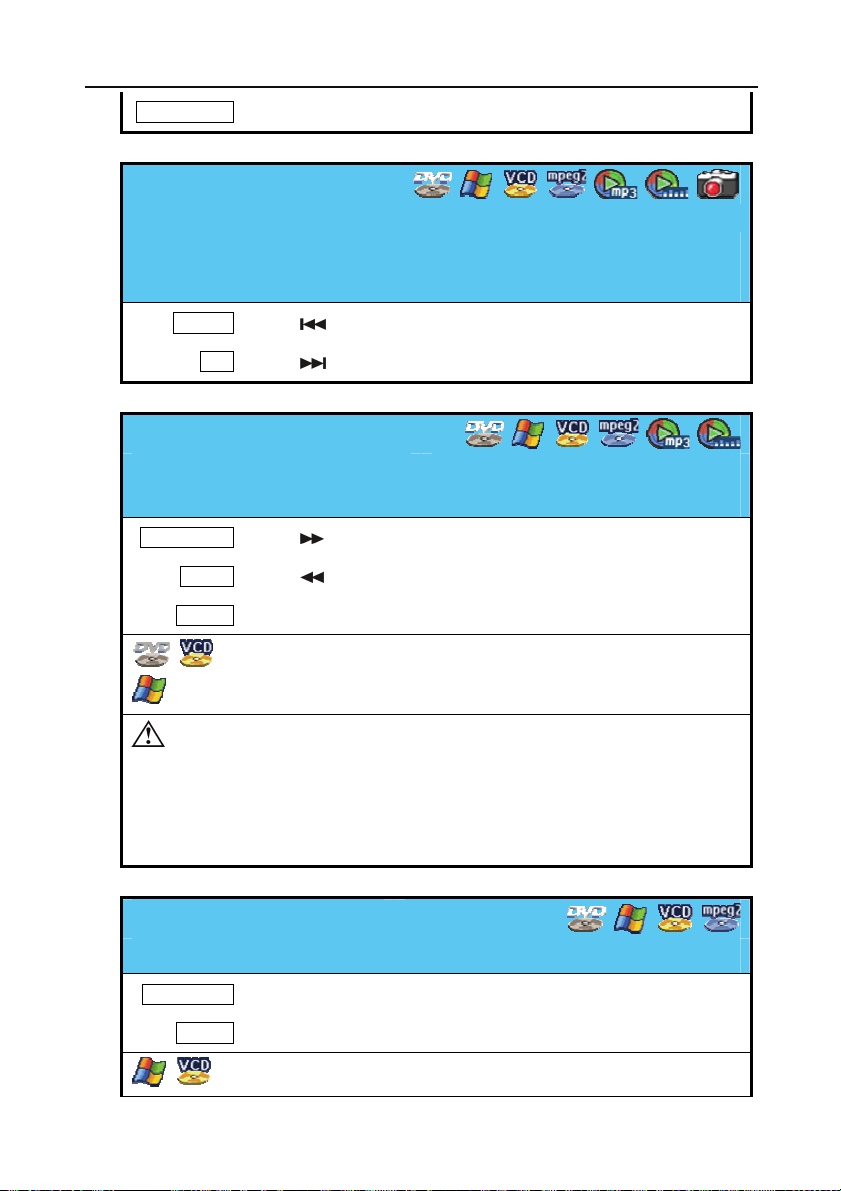
Stop Playback
Stops the ongoing playback and goes back to “Detail View”
Stop Pressing button will stop the playback and will go back to
“Detail View”.
After the playback of and stopped, you can do the followings:
Resume
Complete Stop After stopping the playback, press button again. A “RESUME OFF”
Pressing the
After stopping, if you never play another file and the current file is
y
still selected, press PLAY to continue playing the current file from
the break point.
The Resume function will not be available for files located within
y
the Locked Folders.
message will then be displayed on the screen. The resume function is
now canceled.
button in the Detail View will return to the parental directory.
Pause
Pause the ongoing playback
Pause Press button.
Resume Press or PLAY button to continue playing the file.
Volume Adjustment
Increase or decrease the volume output level.
Volume up Press VOL+ button.
17
Page 22
Using the AV Playback Function
Volume down Press VOL- button.
Play the Previous /
Next
Play the previous title / chapter or file.
Play the next title/ chapter or file.
Previous Press button.
Next Press button.
Fast Forward / Rewind
Fast forward: quickly plays a file forward (the speed is adjustable).
Rewind: quickly plays a file backward (the speed is adjustable).
Fast forward Press button to adjust speed.
Rewind Press button to adjust speed.
Resume Press PLAY button to restore normal speed.
: Adjust speed in sequence: [2X Ö 4X Ö 6X Ö 8X Ö Normal].
: Adjust speed in sequence: [2X Ö 4X Ö 8X Ö 16X Ö Normal].
During the fast forward or rewind playback, the image may appear
y
discontinuous and sound may become mute.
When fast forward playing to the next chapter, it will restore normal speed.
y
When rewinding to the beginning of the current chapter, it will restore normal
y
speed.
Slow Motion
Plays a file at a slower speed (the speed is adjustable).
Slow motion Press SLOW button to adjust speed.
Resume Press PLAY button to restore normal speed.
: Adjust speed in sequence: [1/2X Ö 1/4X Ö 1/8X Ö Normal].
18
Page 23
Using the AV Playback Function
: Adjust speed in sequence: [1/2X Ö 1/4X Ö 1/8X Ö 1/2X Rewind Ö 1/4X
Rewind Ö 1/8X Rewind Ö Normal]
During the slow motion playback, the sound may become mute.
y
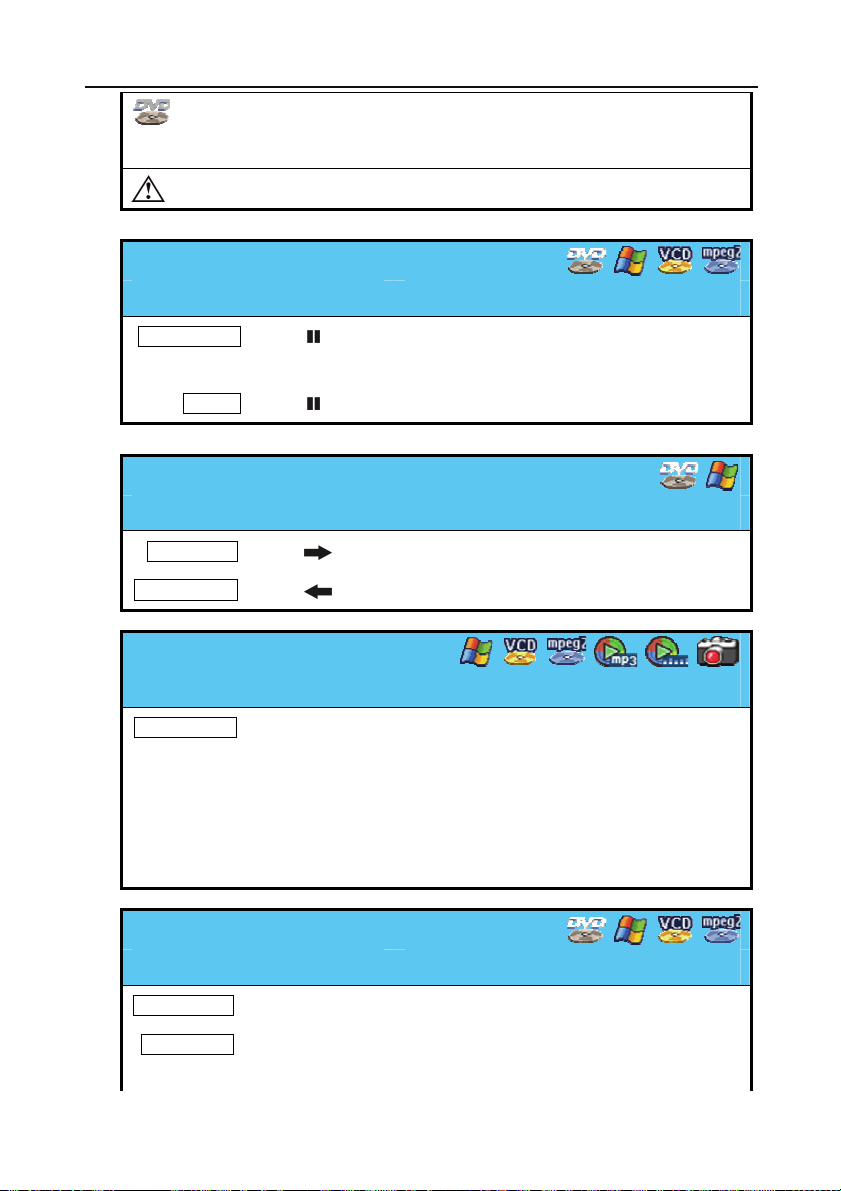
Step Playback
Plays a movie in a frame-by-frame wise.
Step playback Press button to pause the playback.
Press SLOW button to play one single frame at a time.
Resume Press or PLAY button to restore normal playback.
Skip Playback
Skip forward or backward a segment, and then play.
Skip forward Press button. (10 seconds)
Skip backward Press button. (10 seconds)
Play Mode
Plays in a repeat or random fashion.
Change mode Press REPEAT button to change the mode in sequence :
“REPEAT ONE” (repeats the current one) Ö “REPEAT ALL” (repeats
all files in the folder) Ö “SHUFFLE REPEAT” (randomly plays all files
in the folder and repeats if all files are played) Ö “SHUFFLE”
(randomly plays all files in the folder until all files are played) Ö
“NORMAL”.
Repeat from A to B
Repeats a selected segment.
Starting Point While playing to the desired start point, press AÆB button.
Ending Point While playing to the desired end point, press AÆB button.
It will start the repeated playback immediately.
19
Page 24
Using the AV Playback Function
Normal Play Press AÆB button again to cancel this repeat operation.
Chapter Searching
Plays the movie from the chapter indicated.
Display Press SEARCH, and the screen will display
“TITLE: _ _ / _ _ CHAPTER: _ _ / _ _”.
Input Press 0~9 buttons to select a chapter.
Play Press PLAY, the movie will be played from the indicated title or chapter.
The entered value must not exceed the total number of titles or chapters, or
y
will appear to indicate this error.
the
Time Searching
Plays the movie from a certain time point.
Display Press SEARCH button (
display “TITLE: _ _ / _ _ _ _ : _ _ : _ _”.
Input Press 0~9 buttons to select a desired starting point (hh:mm:ss).
Play Press PLAY, and then the movie will be played from that point on.
The entered value must not exceed the length of the movie, or the will
y
appear to indicate this error.
press SEARCH 2 times
), and the screen will
Display Information
Display the information of the file being played.
Time Press DISPLAY button to display elapsed time (or more) while
playing a file.
File information Press DISPLAY button to display file information in Detail View
mode.
20
Page 25
Using the AV Playback Function
T
Y
Thumbnail View and Slideshow
After activating this unit, press the MENU button on the remote control to browse photo
images. This mode is called “Thumbnail View”.
Folder name
Selected item
Item name selected
otal items and the
item number
Items displayed as large
icons. JPEG files shown
as thumbnails
Item information
Operation of “Thumbnail View”
Browsing photo files with thumbnail preview
Activating y Press MENU button on the remote control to activate the
Thumbnail View mode. Press it again to go back to the Detail
View mode.
Selection
Slideshow Play
Press button to select an item, or for previous
y
or next page. The highlighted area indicates the selected item.
Some functions like SETUP, TITLE and the DISPLAY will be
y
disabled.
Pressing the PLAY button on a JPEG file will start the “Slide
y
Show” display mode. The photos will be displayed contiguously
with a fixed interval from the one being played now.
Press / button will play the previous / next file.
y
You can setup the interval between each slide atSETUP
y
Press
PLA
21
Page 26

Using the AV Playback Function
MENU > PREFERENCES > S.S INTERVAL . This setup is
only available at Detail View mode. You need to press MENU key
to switch to Detail View mode, and then press SETUP key to
open SETUP MENU .
Slideshow Pause y Press button will pause the slideshow play. In the pause state,
press ZOOM button to enlarge the photo image in a recurring
sequence; press ANGLE button to rotate the photo image
counterclockwise.
Press / button will play the previous / next file.
y
Press button again to continue playing the Slideshow.
y
Open a folder y Press PLAY button to open the selected folder.
Parental folder y Press button or select to go back to the parental folder.
Icon Descriptions
A folder
:
The parental folder
:
A thumbnail preview of a JPEG file
:
A video file. It represents all video files recognizable.
:
A DivX /Xvid subtitle file. The filename extension of it can be srt, sub/idx,
:
ssa, ass, psb, sub, or smi.
A MP3 or WAV music file. The filename extension can be mp3 or wav.
:
A Playlist.
:
A file with problem for playback.
:
22
Page 27

Setup Menu
Setup Menu
Function Setup
Press SETUP to display the SETUP MENU . See the following to set up the functions:
Functions
GENERAL SETUP
Options
Operation of SETUP MENU
1. Press
2. Press
3. Select EXIT SETUP and press
exit.
4. You can also press
to select the sub-menu.
to enter the sub-menu.
PLAY
SETUP
to exit directly.
Operation of the Sub-menu
1. Press
2. Press to move to “Options”.
3. Press
4. Press
5. Press to move to “Functions”.
6. Select MAIN PAGE and press
to exit.
to select the function.
to select the setting.
to confirm.
PLAY
PLAY
to
PLAY
OSD LANGUAGE
Select the language to display the
SETUP MENU , information and DivX
subtitle.
AUDIO
Select the language for the default
audio when playing a DVD movie.
SUBTITLE
Select the language for the default subtitle when playing a DVD movie.
If “OFF” is selected, the subtitle will not be displayed when play back.
23
Page 28

Setup Menu
DVD MENU
Select the language for the default menu when playing a DVD movie.
AUDIO SETUP
This sub-menu can only be set when the
unit stops playback.
DOWNMIX
Set this function when output audio
signal via the Composite connectors:
LT/RT : Outputs the left or right
channel to both channels.
Stereo : Outputs stereo audio.
SPDIF OUTPUT
Outputs the digital audio signal via the Coaxial connector. After enabling this function, the
Composite connector will not output the audio signal.
OFF : Outputs audio via Composite, and disables the digital audio output.
SPDIF/RAW : Outputs the digital audio without decoding. See “PRO LOGIC.”
SPDIF/PCM : Converts the multi-channel audio signal into stereo for output. See
“LPCM OUTPUT.”
PRO LOGIC
This function only works if you have selected “SPDIF/RAW”.
If the movie contains PCM stereo sound, after enabling this function and connected to an
AV amplifier (receiver) equipped with a digital audio decoder, the audio output will be
simulated as multi-channel sound.
OFF : No multi channels simulation.
ON : Outputs audio signal with multi channels simulation.
AUTO : Outputs audio signal with multi channels simulation whenever possible.
LPCM OUTPUT
This function only works if you have selected “SPDIF/PCM”.
LPCM stands for Linear Pulse Code Modulation, which is a common method for
encoding audio signal in CD and DVD. Higher sampling rate means audio output with
more detail to meet Hi-end audiophile equipment requirements.
24
Page 29

Setup Menu
g
LPCM 48K : The sampling rate of the digital audio output will be limited at 48KHz.
LPCM 96K : The sampling rate of the digital audio output will be limited at 96KHz.
VIDEO SETUP
This sub-menu can only be set when the
unit stops playback.
TV STANDARD
NTSC : Outputs NTSC signal to TV.
PAL : Outputs PAL signal to TV.
TV DISPLAY
4:3 PS : Displays the 16:9 images in “Pan and Scan” with a 4:3 ratio TV connected.
4:3 LB : Displays the 16:9 images in “Letter Box” with a 4:3 ratio TV connected.
16:9 : Connects to a 16:9 wide screen TV.
PICTURE MODE
AUTO: Follows the contents to output the picture mode.
FILM: Always output progressive scan.
VIDEO: Always output interlaced scan.
SMART: Enhanced picture quality of the AUTO mode.
VIDEO OUTPUT
COMPONENT :Outputs video signal via both composite and component connectors.
SCART : Outputs SCART RGB video signal via the SCART connector.
COMPONENT OUTPUT will be disabled for not compatible with it.
COMPONENT OUTPUT
SD INTERLACE : When connecting to a TV equipped with Y/Cb/Cr video input.
SD PROGRESSIVE: When connecting to a TV equipped with Y/Pb/Pr video input.
720P: When connecting to a TV supports high definition video input,
enabling this option will output a 16:9 up-scalin
format for High Definition displays.
Enabling this option will make TV DISPLAY / VIDEO OUTPUT
options disabled, and the DVD/JPEG ZOOM function will also be
disabled at this mode.
component video
25
Page 30

Setup Menu
g
Note:
Holding
You’ll have to exit the SETUP MENU for the settings to take place.
PREFERENCES SETUP
S.S. INTERVAL
This option stands for “Slide Show
Interval.” It sets up the interval
between two photos when playing the
photo files.
ANGLE MARK
When playing a multi angle DVD movie,
a mark will be displayed on screen.
ON: The angle mark will be displayed on the screen for 3 seconds.
OFF: The angle mark will not be displayed on the screen.
and then pressing MENU on the remote control will chan
the video output format in the following sequence: 720p Ö SD
PROGRESSIVE Ö SD INTERLACE Ö NTSC / PAL (toggle) and so on.
If you find the display incorrect, try this method to get back to standard
NTSC or PAL video output, and then configure the video setup correct.
e
CLOSED CAPTIONS
If a movie contains “Closed Captions”, it will have “Closed Captions” or CC mark printed
on its retail box. Set this function “ON” to display the Closed Captions contained.
DEFAULTS
When this function is activated, all settings will be reset to factory defaults.
26
Page 31

PC Operation
PC Operation
Introduction
The installation CD contains the device driver, Utility program and the user’s manual.
The Utility programs feature “Private Folder” and “Playlist” functions. The Private
Folder Manager utility allows you to set the folders in Mobile Video HDD as “Locked” or
“Public”. Unless the correct password was entered, the Locked Folders cannot be seen
during PC or TV operation, therefore your data are safely protected against unauthorized
access. On the other hand, the Playlist Manager utility allows you to arrange your favorite
media files in series, namely the “Playlist” function.
According to your operation system, read the following information:
Windows Vista/XP/2000/Me has already supported the Mobile Video HDD with their
native driver. You can directly connect this unit to PC, and access it like a regular hard
disk drive in “My Computer”. If you want to use the utility program, follow the
instructions in “Software Installation” to install it.
Windows 98SE user must install the driver from the utility CD before using the Mobile
Video HDD via USB 2.0 connection.
The utility Playlist Manager supports Windows Vista/XP/2000; Windows Me/98SE not
supported.
The utility Private Folder Manager supports Windows Vista/XP/2000/Me/98SE.
Mac OS 10.2 or above supports the unit with its native driver. Just connect the unit to a
Mac computer and access it like a regular hard disk drive. But the utilities are for
Windows only.
Some USB 2.0 Host Controllers may require updated device driver files to operate
y
properly. If you have problems with your USB connection, visit the Windows
Update web site to make sure you have the latest Service Packs and device
drivers installed on your PC before contacting technical support.
Windows Me and Windows 98SE do not support NTFS file system. If this unit is
y
formatted as a NTFS disk, you won’t be able to see this drive in “My Computer”
under Windows Me and Windows 98SE environments. You will need to delete
the existing NTFS partition and reformat this unit as a FAT32 file system. See
“How to Partition the Hard Disk Drive”.
27
Page 32
PC Operation
Software Installation
1. Do not connect the Mobile Video HDD to computer yet.
2. Insert the utility CD into computer’s optical drive, and then the installation window should
automatically appear on the screen. If the installation window doesn’t show up, go to “My
Computer” and browse the CD. By executing the “autorun.exe” file, the installation window
will appear.
3. Click on “Install Driver and Utility”, and then follow the on screen instructions for
installation.
4. After the software had been successfully installed, see “Connecting to PC” for cable
connection.
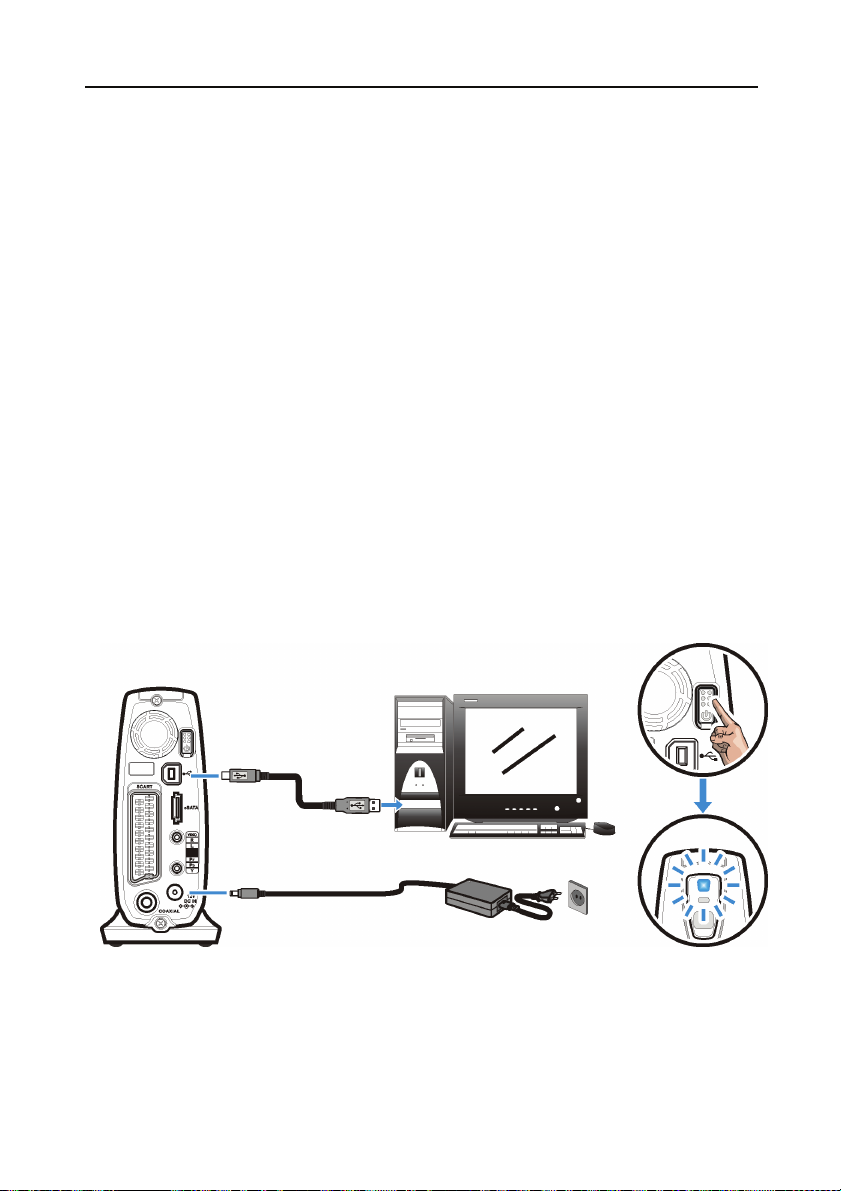
Connecting to PC
Connecting with USB 2.0 Interface
1. Connect the plug of AC adapter to the connector marked “DC IN”, plug the other end into
an electric outlet.
2. Connect the USB cable to the USB connector. Then connect the other plug to computer’s
USB 2.0 port.
3. Press the Power switch and then the blue LED will light up.
4. The computer will detect the Mobile Video HDD and you can start accessing the drive.
o
p
n
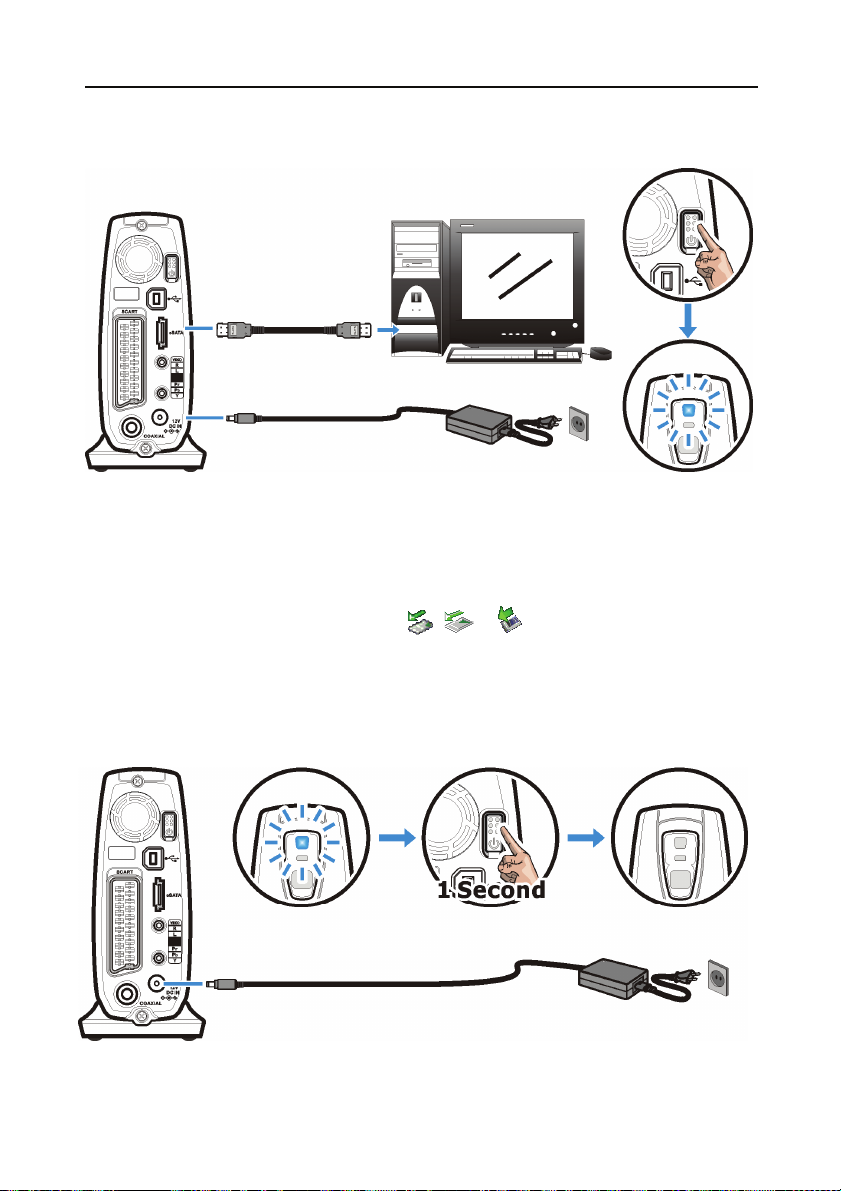
Connecting with eSATA Interface (dual connection model only)
1. Connect the plug of AC adapter to the connector marked “DC IN”, plug the other end into
an electrical outlet.
2. Connect the eSATA plug to the eSATA connector. Then connect the other plug to
computer’s eSATA port.
28
Page 33
PC Operation
3. Press the Power switch and the blue LED will light up.
4. The computer will detect the Mobile Video HDD and you can start accessing the drive.
o
p
n
Disconnecting from PC
When you are ready to disconnect Mobile Video HDD from PC, follow these steps:
1. Close all the programs that are accessing the Mobile Video HDD.
2. Close all Explorer windows which display the content of the Mobile Video HDD.
3. Click the safely remove hardware icon (
the drive letter assigned to Mobile Video HDD. When the system message “safely
removed” appears, unplug the interface cable from the computer.
4. Press the Power switch for about 1 second until the orange LED is on. Then this unit will be
turned off in 3~5 seconds.
, or ) in the System Tray and select
29
Page 34

PC Operation
About the File System of Hard Disk Drive
The Mobile Video HDD is pre-formatted as a FAT32 disk. You can directly access this drive
after it is connected to PC. If you want to re-partition the disk, please note:
Although your operating system may support several different file systems, FAT32 or NTFS
partitions are strongly recommended. When using the Mobile Video HDD as a media
player, it can only read NTFS or FAT32 partition.
Although you can create multiple partitions on the hard disk drive, when using the
Mobile Video HDD as a media player, it can only browse and play the media files
located in the first “Primary” partition.
See “How to Partition the Hard Disk Drive” section to create or to change the partition. The
following information will help you decide which file system is best for you.
NTFS File System
NTFS file system can support very large files (no 4GB size limitation for single file), and it is
compatible with Windows Vista/XP/2000. If your PC or laptop computer runs Windows
Vista/XP/2000 as its OS, partitioning and formatting the Mobile Video HDD as NTFS is
recommended.
FAT32 File System
The FAT32 file sy stem is require d if your co mputer uses Win dows 98SE, Wind ows ME or the
Mac OS X operating systems. These operating systems do not support NTFS file system
(while Windows Vista/XP/2000 would support both FAT32 and NTFS file systems). The
FAT32 file system has some limitations, but it is supported by many different operating
systems, i.e. Windows 98/ME, Linux, Mac OS, etc. Even if your computer does support
NTFS partitions, a FAT32 partition might still be a better choice if you expect to copy files
between different operating systems.
Hard disk drives formatted as FAT32 volumes have the following limitations:
This drive cannot store any file larger than 4GB in size.
The Windows Vista, Windows XP and Windows 2000 “New Partition Wizard” cannot
create FAT32 partition larger than 32GB in size. This limitation is due to the Windows
Vista/XP/2000 operating system, not the FAT32 file system. FDISK and other
disk-partitioning utilities can create FAT32 partitions much larger than 32GB. Despite
these limits in partitioning new FAT32 drives, Windows Vista/XP/2000 can still access
FAT32 partitioned drives larger than 32GB.
30
Page 35
PC Operation
Media Files for Playback
When using the Mobile Video HDD as a media player, it can only browse and play back some
specific media file formats. Please read the following before using it as a media player.
When using the Mobile Video HDD as a media player, it can only browse and play
back media files located in the first “Primary” partition.
The Mobile Video HDD can play back the following media files:
DVD movie files
DivX/Xvid movie files: The filename extensions are AVI, DIVX, XVID
DivX/Xvid subtitle files: The filename extensions are SRT, SUB, IDX/SUB, SMI, PSB, ASS, SSA
VCD files: The filename extension is DAT
MPEG1 / MPEG2
Audio and music files: The filename extensions are WAV, MP3,
Photo and graphic files: The filename extensions are JPG, JPEG
The Video file Recorded by a Capture Card
If you use a capture card or TV card to record TV programs, the recorded files will usually
be encoded in MPEG1 or MPEG2 format (the filename extensions are MPG, MPEG, and M2P).
To copy these media files, just create a folder in the Mobile Video HDD, and then copy these
files into that folder.
If your hard disk uses NTFS file system, the recorded file is probably larger than
4GB, so please partition the Mobile Video HDD as NTFS to store the large file.
files: The filename extensions are MPG, MPEG, M2P, VOB
The Video Recorded by DV
To play back the video recorded by a DV, you’ll need to transfer the DV files to a computer
and convert it to MPEG1, MPEG2 or DivX file format, and then copy the converted files into
a folder in Mobile Video HDD.
To transfer the DV file to computer, you can:
Use the utility bundled with the DV. A DV is often bundled with some utility for user to
transfer the DV file to computer, and to encode it into other file format. Please use this
utility as your first choice.
If your computer is equipped with a capture card, connect DV’s AV-Out to the capture
card’s AV-In, and start capturing the video from the DV.
31
Page 36

PC Operation
To convert the DV file already stored in the computer, you can use a convert program such
as CyberLink PowerDirector, Ulead Media Studio Pro, and Ulead VideoStudio to manage this
job done.
The Other Media Files
The other media files, such as WMV, ASF or MOV files, can’t be played back on Mobile Video
HDD. Please use a convert program, such as Ulead Video ToolBox or WinAVI
Videoconverter, to convert these files into MPEG1, MPEG2, or DivX format. Then copy the
converted files into the folders in Mobile Video HDD.
32
Page 37
PC Operation
Using the Utility Programs
The utility programs contain “Playlist Manager” and “Private Folder Manager”. The Playlist
Manager creates a collection of media files which can be played contiguously; while the
Private Folder Manager allows you to set specific folders in the Mobile Video HDD as “Locked
Folders”, which will not be displayed on TV or PC operation until a correct password is entered.
You can use this program to protect your precious data from unauthorized accesses.
The “Playlist Manager” supports Windows Vista/XP/2000; the “Private Folder Manager”
supports Windows Vista/XP/2000/Me/98SE.
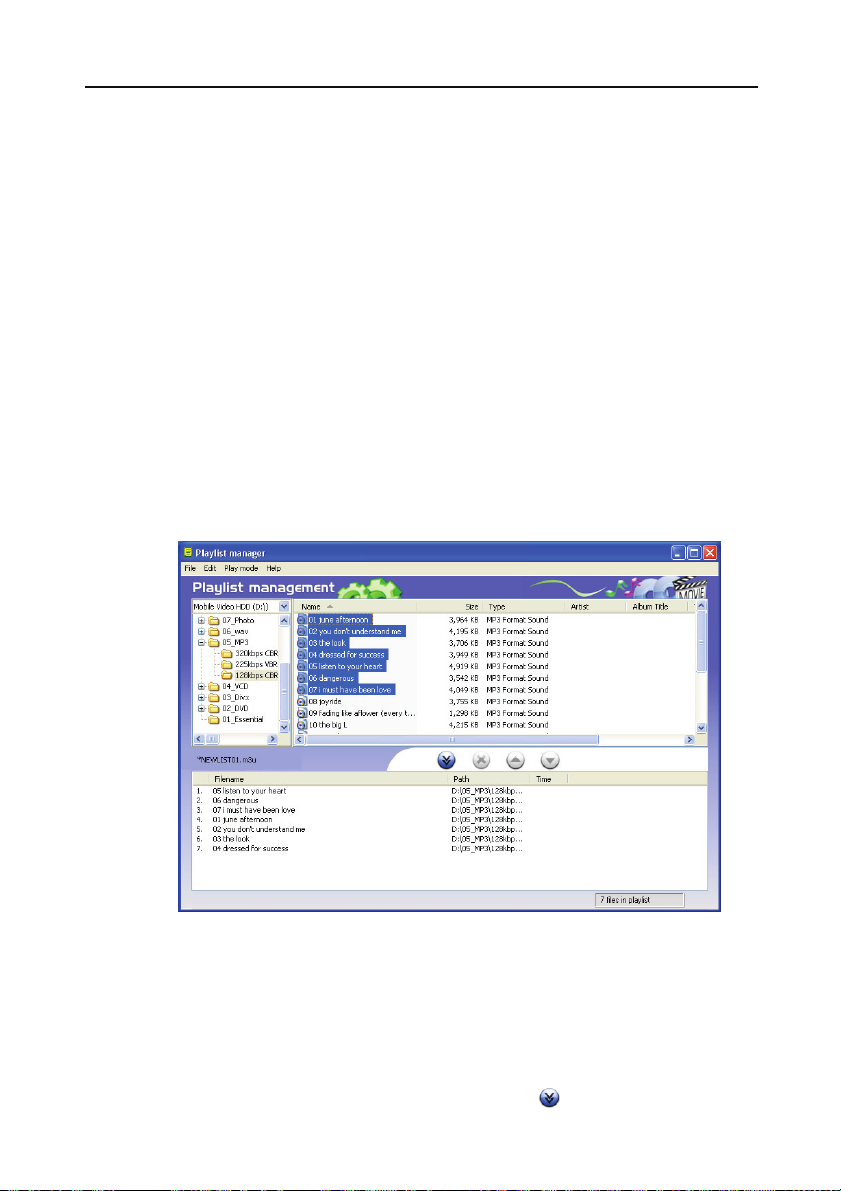
Playlist Manager
The Playlist Manager Utility allows you to create Playlists consist of blending video, audio, and
photo files. A total 2048 files can be added to a single Playlist. A Playlist is a m3u file; you can
also use the m3u file established by other software players, such as Windows Media Player or
Winamp. If you find your Playlist missing during TV operation, open it with our Playlist
manager and save it again.
1. Connect the Mobile Video HDD to computer. Click on “Start” Ö “All Programs” (Vista:
“Programs”) Ö “Mobile Video HDD” Ö “Playlist Manager” to launch the utility.
2. Creating a new Playlist: Selecting the drop list <File> Ö <New Playlist>. The newly
created Playlist in the lower column can then be named as wish. You can create as many
Playlists as you may.
3. Add files to your Playlist: Browse and select the files that you would like to add in
your Playlist from the upper column, and then press the
button.
33
Page 38

PC Operation
4. Remove files from your Playlist: Browse and select the files that you would like to
remove from your Playlist from the lower column, and then press the
5. Adjusting the Playlist sequence: Select the files that you want to manage and use
or button to move them a step forward or backward in the Playlist.
6. Selecting the play mode: There are five modes available.
i. Normal: Play from the first of the list down to the end of the list.
ii. Repeat One: Play the first file repeatedly. Press Next to play the next file
repeatedly. It is especially useful for briefing presentation purpose.
iii. Repeat All: Play in normal mode and repeat the entire list after the last file had
been played.
iv. Shuffle: Randomly play the files in the list once.
v. Shuffle Repeat: Play in shuffle mode and repeat the list after all files in the list had
been played once.
Private Folder Manager
1. Connect the Mobile Video HDD to computer. Click on “Start” Ö “All Programs” (Vista:
“Programs”) Ö “Mobile Video HDD” Ö “Private Folder Manager” to launch this
utility.
2. This utility will automatically detect any Mobile Video HDD connected to this computer.
Choose the drive letter you want to setup from the “Drive” at the top of the utility
window if you have mounted more than one Mobile Video HDD.
3. The folders under the “ROOT” folder will be listed in the following window.
button.
34
Page 39

PC Operation
Set the Folders as “Locked Folders”
You can create “Locked Folders” which will not be displayed on TV when using this unit as a
media player, and will not be displayed during PC operation either.
1. Choose the drive if necessary.
2. Use cursor to select the folders for following operation.
3. Click “Mark as Locked” button. It will add a lock icon next to the folder name. These
operations will take place immediately after the button is pressed.
4. Input 4 digits of number in the “Password”
field. You will need this password to display
these “Locked Folders” on TV when using the
AV playback function, and you will need to
input it for next launch of this utility.
5. After finishing above settings, click “Exit”
button to exit this utility.
Displaying the “Locked Folders”
1. When using the Mobile Video HDD as a media player, you need to use the remote control
to input the correct password under the ROOT folder in Detail View mode for
displaying these folders you’ve marked as Locked. (The
screen each time you press those buttons.)
2. After the password is entered, these locked folders will be shown in a folder named after
the Private Folder Name, default as “Private folders”. You can also change the name
as your wish.
3. If you need to display these locked folders during PC operation, follow the next
paragraph to set them as “Public Folders”.
Note:
You may refer to the Detail View
information.
icon will appear on the
–
Private Folder section (page.10) for more
Set the Folders as “Public Folders”
1. Choose the drive if necessary.
2. Use cursor to select the folders for following operation.
3. Click “Mark as Public” button. This will remove the lock icon next to the folder name.
These operations will take place immediately after the button is pressed.
4. Input 4 digits of number in the “Password” field. You will need this password to display
these “Locked Folders” on TV when using the AV playback function.
35
Page 40

PC Operation
5. After finishing above settings, click “Exit” button to exit this utility.
If you forget your password
1. Open the “Template folders” folder in the Mobile Video HDD
2. Open the text file “copyright.txt” with any text editing program.
3. Find the “FORGOT USER PASSWORD” section, and then follow the description there to
recover your password.
Do not try to delete the “Template folders” folder and the “MPlay.sys” file in the
“Root” folder of Mobile Video HDD, or you will loose the “Private Folder” function
when using the AV Playback function.
36
Page 41

PC Operation
About the Partitioning of the Hard Disk Drive
Partitioning the Hard Disk Drive under Windows Vista/XP/2000
The Mobile Video HDD will not function when initialized as a “Dynamic” disk type.
Always use it with the “Basic” disk type.
1. Click “Start” Ö “Settings” Ö “Control Panel” Ö “Administrative Tools” Ö “Computer
Management”. This will open the Computer Management Window.
2. Click on “Disk Management”, all disk drives currently connected to the system will be
listed on the right side. Find out the Disk # which indicates the Mobile Video HDD.
If the hard disk drive is a new, un-partitioned disk, a “Stop” sign next to the
disk will indicate this drive as an “Unknown” type of drive. In this situation,
Windows will not allow you to create a partition on this disk.
In Windows Vista: right-click on the “Stop” mark, then select “Initialize Disk”
y
to initialize the disk. Select the MBR partition style, and then follow the
steps to create a new partition.
In Windows XP: right-click on the “Stop” mark, then select “Initialize Disk” to
y
initialize the disk. After the initialization of the disk, refer to the following
steps to create a new partition.
In Windows 2000: Windows will start up the “Write Signature and Upgrade
y
Disk Wizard” immediately. Use this wizard to initialize the hard disk to
“Basic” disk type, and then follow the steps to create a new partition.
3. To delete an existing partition, right-click on the drive and select “Delete Partition”.
Note: Delete a partition will also erase all data stored within the partition!
4. To create a new partition, right-click on the drive and select New Partition (Vista: New
5. Select “Primary Partition” and click “Next”.(Vista will omit this step).
6. Set the partition size :
7. Assign a drive letter to it and click “Next”.
8. Set the file system to FAT32 or NTFS and click “Next”.
Simple Volume). This will open the New Partition Wizard (Vista: New Simple
Volume Wizard). Click "Next" to start the wizard.
Windows 2000/XP/Vista “Disk Management” can only create FAT32 partitions smaller
than 32768MB).
You can create a NTFS partition of any size.
37
Page 42

PC Operation
9. Click “Next” to confirm settings.
10. Click “Finish” to close the wizard and to start the partitioning and formatting process.
Partitioning the Hard Disk Drive under Windows Me/98SE
FDISK is a program to create partitions on the hard disk drive. (Data can only be written to
a drive after it is partitioned and formatted). To partition the Mobile Video HDD, you must
execute FDISK under the MS-DOS mode.
Please follow these steps:
1. Install the Mobile Video HDD under Windows, and confirm that it is properly detected by
the operating system.
2. Go into the MS-DOS mode by clicking on “Start” Ö “Programs” Ö “MS-DOS Prompt”.
3. At the DOS prompt, type “FDISK” and press Enter key.
4. In the first screen, answer “Y” to enable large disk support.
5. The next screen is “FDISK OPTIONS”.
You must type “5” on this screen to change the current fixed disk drive; the
default fixed drive set by FDISK is the internal hard disk drive. If you do not
change it to the Mobile Video HDD, the data of internal hard disk drive will be
destroyed.
If the option 5 does not appear on this screen, it means the Mobile Video HDD
is not installed properly, please check its installation.
6. In “Change Current Fixed Disk Drive” screen, type the disk drive number that is assigned
to the Mobile Video HDD (usually, it is assigned to number 2).
7. Go back to “FDISK OPTIONS” screen, now you can create (type “1”) or delete (type “3”)
the partition of the drive.
Note: Delete a partition will also erase all data stored within the partition!
8. Follow the instructions of FDISK to create a new “Primary” partition. Accepting the
9. After you finished FDISK, reboot computer to activate the change.
default values will create the largest FAT32 partition possible.
38
Page 43

Appendix
Appendix
Specifications
STORAGE
HDD 3.5” SATA I/II
File System FAT32 or NTFS
INTERFACE
USB2.0 USB type B Connector x 1
eSATA reserved
AUDIO/VIDEO INTERFACE
Audio/Video Composite Video + Audio R/L (3.5mm phone jack x 1)
Component Video: Y, Pb, Pr (3.5mm phone jack x 1)
Digital Audio Coaxial S/PDIF Output (RCA x 1)
SCART SCART connector x 1 (Europe)
OS SUPPORT
MEDIA SUPPORT
Media Type MPEG-1, MPEG-2, DivX, Xvid, MP3, WAV, JPEG
Media Files dat, mpg, mpe, mpeg, vob, m2p, avi, divx, xvid, jpg, jpeg, mp3, wav
DivX Subtitle IDX/SUB, SRT, ASS, SSA, SUB(type II), SMI, PSB
DVD Folder DVD Menu/Audio/Subtitle/Angle Selection
CONTENT RESOLUTION
Video 720 x 576 pixels
JPEG 5120 x 3840 pixels (baseline)
MP3 320kbps
IDX/SUB 480i / 576i / 480p / 576p
VIDEO OUTPUT
TV NTSC / PAL
Screen Ratio 4:3 / 16:9
Component 480i / 480p / 576i / 576p / HD-720p
AUDIO OUTPUT
Analog Audio Stereo/Left mono/Right mono
Digital Audio SPDIF
SECURITY
Private Folder Password protection in both TV/PC mode
POWER SUPPLY
Input AC 100-240 V, 50/60Hz
Output DC 12V, 2A
BATTERY OF REMOTE
CR2025 DC3V
WORKING ENVIRONMENT
5
STORAGE ENVIRONMENT
0
GENERAL
Dimensions: 7.7(L) x 2.4(W) x 4.8(H) inch
196(L) x 61(W) x 122(H) mm
WEIGHT 894g/31.5oz (Approx. with HDD)
Specifications are subject to change without notice.
Windows Vista/XP/2000/Me/98SE
o
C ~ 35 oC, Humidity 8% ~ 80%
o
C ~ 40 oC, Humidity 5% ~ 95%
39
Page 44

Appendix
T
Troubleshooting
Problem Possible Cause Solution
TV screen does not
display normally
No power
(All LEDs are off)
Can’t operate with
the remote control
Some folders are not
listed in “Detail
View”
Some files can’t be
played back
The SETUP MENU
appears to be in an
unrecognizable
language.
No image Video ◎ cable is not connected.
◎Video setting is not correct.
The ◎ power plug is not properly
connected.
◎The unit has not been turned on.
◎If this unit can’t be activated by
pressing
control, it is probably because
the power is off.
Remote is not point◎ ing toward
the remote receiver.
The tab of battery ◎ has not been
removed.
◎Battery is not assembled properly.
Battery ◎ became depleted.
◎These folders may be “Hidden”,
“Encrypted”, “Compressed” or
“System Folder”.
◎These files are compressed by
Windows.
he formats of these files are not
◎
supported.
◎These files are damaged.
Incorrect ◎ OSD LANGUAGE
setting.
Incorrect◎ video setting.
button of remote
◎Press and hold
MENU until screen displays correctly.
◎Reboot the TV set and connect the
composite cable instead of the
component cable
Check the power connection and ◎
plug it again.
◎Press Power switch to turn it on.
◎Refer to “No power” section for its
solution.
Point the ◎ remote toward the
receiver when in operation.
Pull out the tab of the battery on ◎
the side of remote control.
◎Check the battery direction.
◎Replace the battery.
◎Change the attribute of these
folders, or create another folder.
◎Uncompress them.
◎Convert these files to some
supported format.
◎Replace them with undamaged
ones.
Check the◎ OSD LANGUAGE
setting in SETUP MENU .
Check video connection◎ .
◎Press and hold
MENU repeatedly until the screen
displays correctly.
then press
and then press
40
Page 45

Problem Possible Cause Solution
Can’t change audio or
subtitle language of a
movie
No audio output Audio ◎ cable is not connected.
Un-recognizable
subtitle occurs when
playing some DivX
movies
The audio or subtitle
is not the language
you have selected
Can’t fast forward,
rewind, slow motion,
step play, or search
“HDD FATAL ERROR”
message appears on
the screen
This movie ◎ comes with only one
language.
Volume is too low◎ .
Play◎ ing in fast forward, in
rewinding or in slow motion.
◎Incorrect TV audio input channel.
Incorrect audio setting◎ .
Incorrect audio channel◎ .
◎For an ANSI encoded subtitle file,
the setting of “OSD Language” is
inconsistent with the DivX
movies’ subtitle file.
◎Subtitle problem.
This movie ◎ doesn’t come with the
selected language.
Some movie◎ files prohibit these
operations.
The hard drive is malfunction◎ ing
or the setting is incorrect.
Check the contents◎ .
Check audio c◎ onnection.
Increase volume◎ .
Resume normal playback speed by ◎
pressing PLAY button.
◎Some TV sets equip with separate
composite and component audio
inputs. Be sure that you have
connected the correct one.
Check the setting in ◎ SETUP
MENU to make sure the SPDIF
setting is OFF when you connect
this unit to your TV or AV receiver
with the composite cable provided,
and vice versa.
◎Press AUDIO button on the
remote control to select the correct
audio channel.
◎Match the setting of “OSD
Language” with the DivX subtitle
file.
◎See [Operations while Playing
Back] – [Change Subtitle] for the
solution.
Press ◎ AUDIO or SUBTITLE to
select another language.
◎Pop a beer and enjoy the movie.
◎See [Error Code] – [Error Code of
Hard Disk Drive] for the solution.
Appendix
41
Page 46

Appendix
Distorted booting
image or incorrect
color while playback
DVD menu behaves
incorrectly, such as
blank screen or
repeated segments.
◎The video output is set to SD
PROGRESSIVE while using the
composite video output.
◎The DVD Folder lacks some files
for this function.
◎Set the video output to SD
INTERLACE.
◎Press STOP button to stop playing,
and then select the VIDEO_TS file.
Press the AÆB button to play the
Main Title directly.
Error Code
Error Code of Hard Disk Drive
On the top left corner of the screen, when “HDD FATAL ERROR – ##” (## represents the
error code) appears, please check the following chart for solutions:
Code Solution
01 ~ 02 : These two may occur when the hard drive inside the unit is not a certified
disk approved by us.
03 : The hard drive is malfunctioned. Check the hard drive health state.
04 : The partition of the hard drive is wrong. Please format the first “Primary”
partition with NTFS or FAT32 file system.
05 : Bad sectors detected.
10 ~ 15 : Please reformat the hard drive when one of these codes occurs.
Copyright
Microsoft, Windows, and Windows Media Player are registered trademarks of Microsoft
Corporation. Mac, Mac OS, and Finder are registered trademarks of Apple Computer, Inc. All
other products are trademarks or registered trademarks of their respective owners and are
hereby recognized as such.
42
Page 47

Page 48

7451139-50
 Loading...