

Page 1

Final Cut Pro 7
Exploring Final Cut Pro
Page 2

Apple Inc.
2009 Apple Inc. All rights reserved.Copyright ©
Your rights to the software are governed by the
accompanying software license agreement. The owner
or authorized user of a valid copy of Final Cut Studio
software may reproduce this publication for the
purpose of learning to use such software. No part of
this publication may be reproduced or transmitted
for commercial purposes, such as selling copies of this
publication or for providing paid for support services.
The Apple logo is a trademark of Apple Inc., registered
in the U.S. and other countries. Use of the “keyboard”
Apple logo (Shift-Option-K) for commercial purposes
without the prior written consent of Apple may
constitute trademark infringement and unfair
competition in violation of federal and state laws.
Every eort has been made to ensure that the
information in this manual is accurate. Apple is not
responsible for printing or clerical errors.
Because Apple frequently releases new versions and
updates to its system software, applications, and Internet
sites, images shown in this book may be slightly dierent
from what you see on your screen.
Apple
1 Innite Loop
Cupertino, CA 95014
408-996-1010
www.apple.com
Apple, the Apple logo, Final Cut, Final Cut Pro,
Final Cut Studio, iPod, QuickTime, and Soundtrack are
trademarks of Apple Inc., registered in the U.S. and
other countries.
iPhone is a trademark of Apple Inc.
MobileMe is a service mark of Apple Inc.
The YouTube logo is a trademark of Google Inc.
Other company and product names mentioned herein
are trademarks of their respective companies. Mention
of third-party products is for informational purposes
only and constitutes neither an endorsement nor a
recommendation. Apple assumes no responsibility with
regard to the performance or use of these products.
Page 3

Contents
7 Chapter 1: A First Look at Final Cut Pro
8 Opening Final Cut Pro
10 Jump In: Explore the Browser
14 Jump In: Explore the Viewer
19 Jump In: Explore the Canvas
24 Jump In: Explore the Timeline
28 Jump In: Work with the Main Windows
29 Learning About Projects, Sequences, Clips, and Media Files
31 Key Concepts
33 Chapter 2: Bringing Media into Your System
34 Jump In: Explore Tape-Based Video Capture
40 Jump In: Explore File-Based Video Transfer
48 Jump In: Import Still Images and Other Media
51 Learning About Ingesting Media and Setting Up Projects
53 Key Concepts
3
Page 4

55 Chapter 3: Preparing Clips in the Viewer
55 Jump In: Get to Know the Viewer
61 Jump In: Change Clips in the Viewer
62 Jump In: Create a Title Clip
68 Jump In: Change Clips over Time
77 Learning About Motion Parameters
79 Key Concepts
81 Chapter 4: Working with the Canvas and Timeline
81 Jump In: Work with the Canvas
86 Jump In: Work with Tracks in the Timeline
93 Jump In: Edit Clips into a Sequence in the Timeline
97 Key Concepts
99 Chapter 5: Basic Editing
99 Jump In: Trim Clips
107 Jump In: Make Simple Split Edits and Cutaways
113 Learning About the Trim Edit Window
115 Key Concepts
117 Chapter 6: Working with Audio
118 Jump In: Work with a Clip’s Audio in the Viewer
125 Jump In: Change Audio Levels over Time
134 Jump In: Work with Audio Tracks in the Timeline
140 Key Concepts
4
Contents
Page 5

141 Chapter 7: Creating Voiceovers
141 Jump In: Add Voiceover Clips
150 Key Concepts
151 Chapter 8: Adding Video Filters and Transitions
152 Jump In: Apply Filters to Clips
157 Jump In: Make Simple Color Corrections
159 Jump In: Add Transitions Between Clips
16 5 Learning About Transitions
16 9 Key Concepts
17 1 Chapter 9: Outputting Your Finished Movie
17 2 Jump In: Create a QuickTime Movie
17 3 Jump In: Export a Movie in a Specic File Format
17 6 Key Concepts
17 7 Chapter 10: Getting Answers
17 7 Jump In: Explore Final Cut Pro Help
17 8 What’s Next?
Contents
5
Page 6

Page 7

A First Look at Final Cut Pro
1
Welcome to Final Cut Pro. If you’re new to the Final Cut Pro
video editing workow, this guide is for you. Here you’ll create
a sample video project and learn by doing.
Each chapter of this book presents major features and guides you in trying things
out. Feel free to explore on your own. Have fun learning the basics. Later, when you
feel comfortable, you can bring in your own video and other media and begin serious
editing with Final Cut Pro.
This book assumes that you’ve installed Final Cut Pro on your computer.
If you haven’t installed Final Cut Pro yet: See the Installing Your Software booklet.
If you prefer to start by reading in-depth explanations of concepts and procedures used
with Final Cut Pro: Open Final Cut Pro and choose Help > Final Cut Pro Help. Then
click Final Cut Pro 7: User Manual.
7
Page 8
Opening Final Cut Pro
You’ll start by opening Final Cut Pro and creating a sample project.
To open Final Cut Pro:
Double-click the Final Cut Pro icon in your Applications folder.1
If you see the Choose Settings dialog, click OK to accept the default settings.2
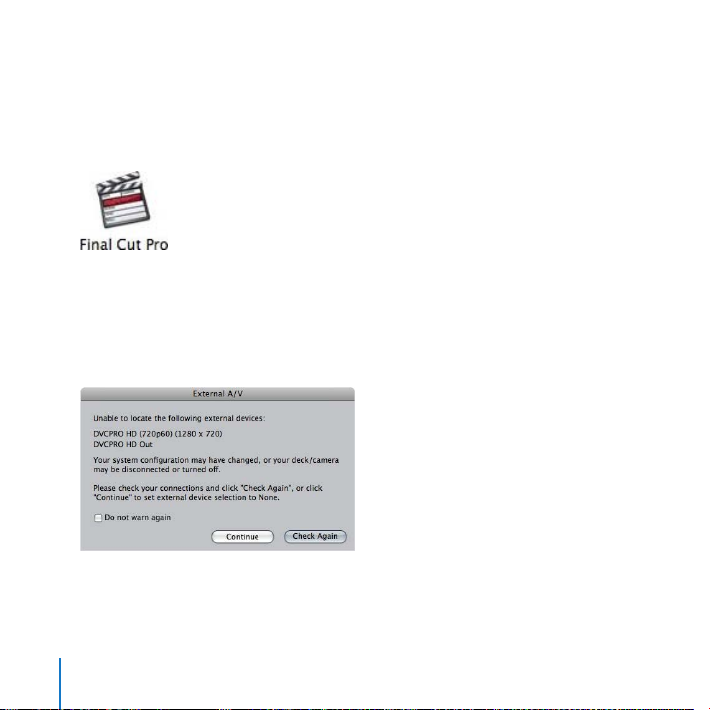
When you open Final Cut Pro, it checks to see if a camera or other device is connected
to your computer. If no device for capturing video is connected, a dialog appears
asking whether you want to connect a device and have Final Cut Pro check again, or
continue without connecting a device.
8
Chapter 1 A First Look at Final Cut Pro
Page 9
Click Continue.3
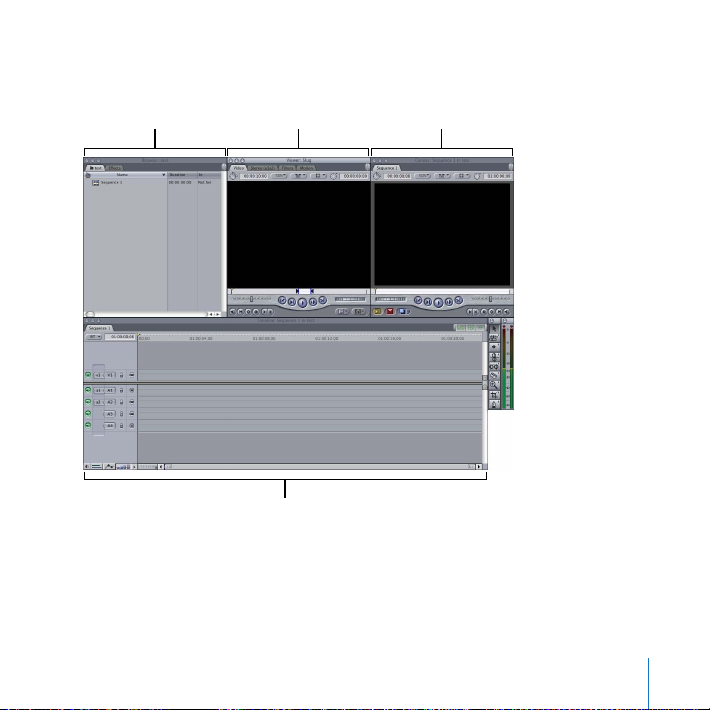
Browser
Viewer
Canvas
Timeline
When Final Cut Pro opens, your screen will look similar to this:
On the left you see the Browser, where you create projects and organize bins that hold
your clips. Now you’re ready to explore a simple video editing workow.
Chapter 1 A First Look at Final Cut Pro
9
Page 10

Explore the BrowserJump In:
First, you’ll import some clips into your project, and then you’ll explore some important
parts of the Final Cut Pro interface. If you have video les of your own on your
computer, feel free to import several and work with them as you explore. You’ll learn
more about capturing video from a camcorder or other device later.
Getting Ready
To import sample video les:
In Final Cut Pro, choose Help > Final Cut Pro Help. 1
Click the link below the description of the 2 Exploring Final Cut Pro manual to download
the sample les.
After downloading, double-click the folder to decompress it, then drag the four sample 3
les from your Downloads folder into your Movies folder.
Choose File > Import > Files.4
Navigate to the Movies folder. 5
Select the sample les. You can Shift-click or Command-click les to select several at once.6
Click Choose.7
10
Chapter 1 A First Look at Final Cut Pro
Page 11
To import your own video les that are already on your computer:
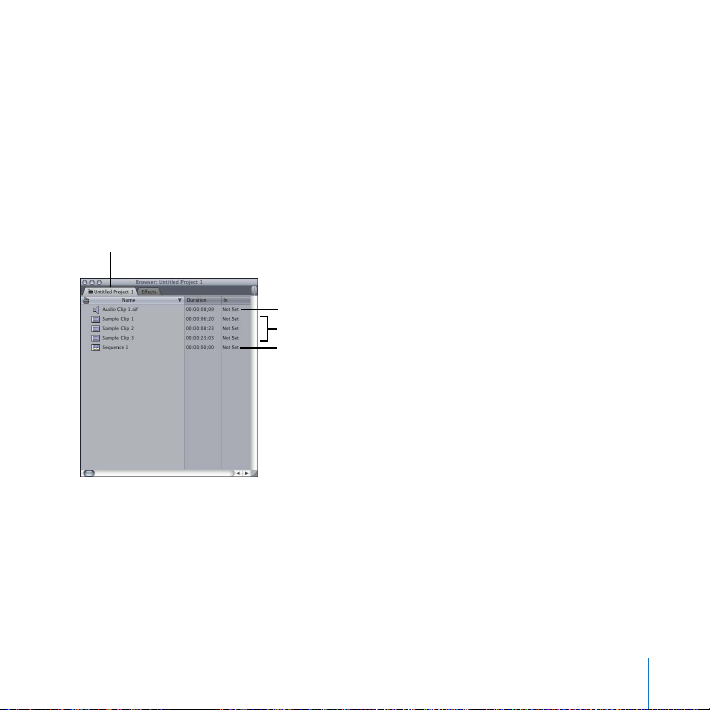
Project tab
Audio clip
Sequence icon
Sample video clips
Choose File > Import > Files.1
Navigate to the folder holding your video les. 2
Select the les you want to import into Final Cut Pro. You can Shift-click or Command-click 3
les to select several at once.
Click Choose.4
Next, you’ll explore the Browser. Your Browser now looks similar to this:
Chapter 1 A First Look at Final Cut Pro
11
Page 12

Try This
Feel free to try out any of the following to see what happens.
Change the Browser display:
Choose View > Browser Items > as Large Icons to display the clips as icons.
Choose View > Browser Items > as Small Icons to display the clips as smaller icons. Drag
the clips around in the Browser to reposition or reorder them.
Choose View > Browser Items > as List to display the clips as a list of items.
Create and work with bins:
Choose File > New > Bin to create a new bin to hold clips. Type “Samples” as the bin 1
name and press Return.
You can create bins, which are like folders, to hold and organize the clips in your project.
Press Command-B to create another bin. Name it “Samples 2” and press Return.2
Double-click the Samples bin to open it. Click the close button to close the bin. Click the 3
Samples 2 bin to select it, and press Return to open it. Press Control-W to close the bin.
Select the Samples 2 bin and press Delete to delete it.4
Select items in the Browser:
Click an item in the Browser. Press the Up Arrow and Down Arrow keys to select items.
Shift-click items in the Browser.
12
Chapter 1 A First Look at Final Cut Pro
Page 13
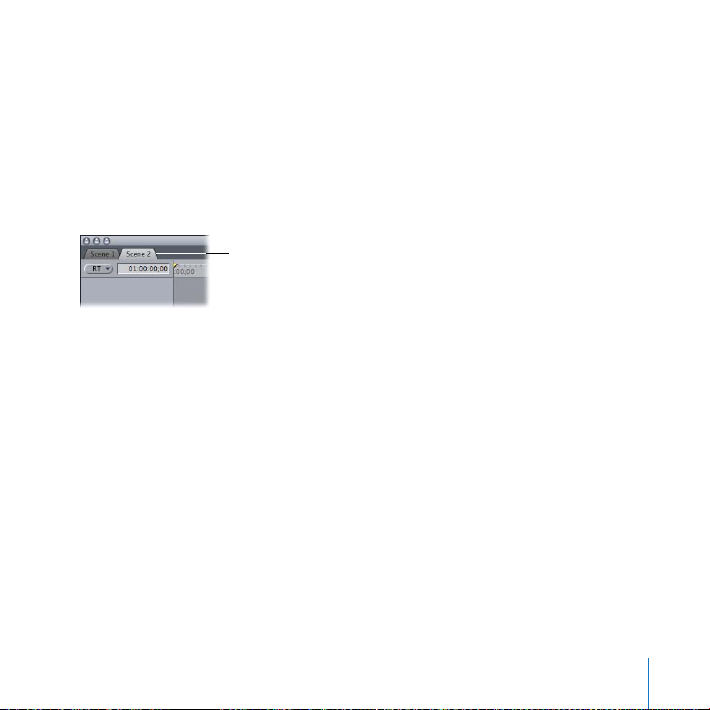
Create a new sequence:
Sequence tabs
Choose File > New > Sequence. 1
A new sequence icon appears in the project. A sequence represents clips in the
Timeline. A sequence might hold a scene, a portion of your movie, or the entire movie.
Select the sequences and name them “Scene 1” and “Scene 2.”2
Double-click the Scene 2 sequence icon and notice that there are now two sequence 3
tabs in the Timeline.
Click the sequence tabs in the Timeline to switch between sequences. 4
After you open a sequence in the Timeline, you can place the clips you want in it. You’ll
learn more about working with sequences later.
View additional Browser information:
Drag the scroll bar at the bottom of the Browser to see additional columns of clip
information.
Control-click an item in the Browser to bring up a shortcut menu of useful commands.
Click in the Browser to close the shortcut menu.
Save changes to your project:
Choose File > Save Project to save your work. Name the project any name you like.
Chapter 1 A First Look at Final Cut Pro
13
Page 14
Explore the ViewerJump In:
You use the Viewer to view and edit individual clips, set In and Out points, set markers,
and more.
Try This
Place a clip in the Viewer:
Drag Sample Clip 1 into the Viewer.
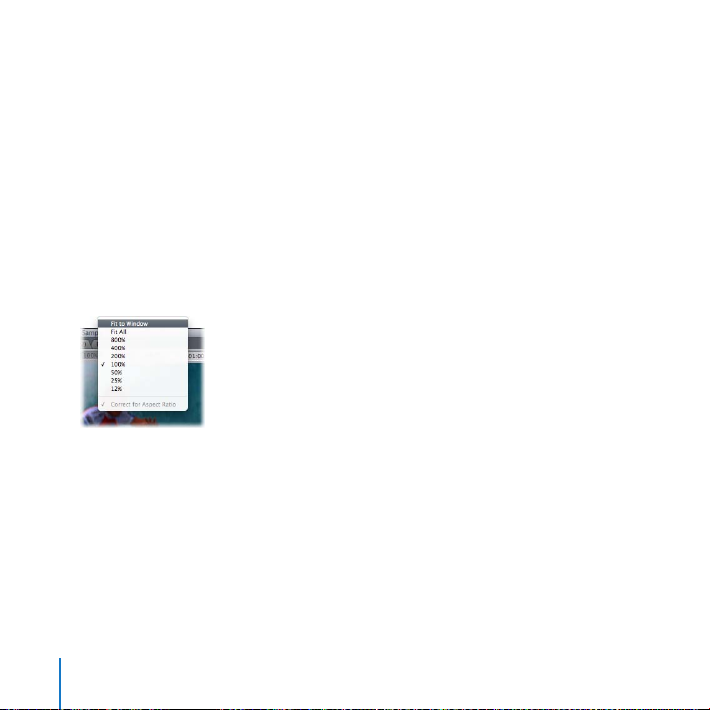
Change the display of a clip in the Viewer:
Choose Fit to Window from the Zoom pop-up menu in the Viewer. Final Cut Pro resizes
the clip to display it completely within the Viewer’s frame. Choose 50% from the Zoom
pop-up menu to display the clip at half size.
14
Chapter 1 A First Look at Final Cut Pro
Page 15

Play a clip in the Viewer:
Play button
Scrubber bar
Click the Play button to start and stop playing the video clip. Then press the Space bar
to start and stop playing the video clip.
Press J to play the clip backward. Press K to stop playback. Press L to play the clip
forward. Press the J or L key several times to accelerate the playback speed, and press K
to stop playback.
Chapter 1 A First Look at Final Cut Pro
15
Page 16
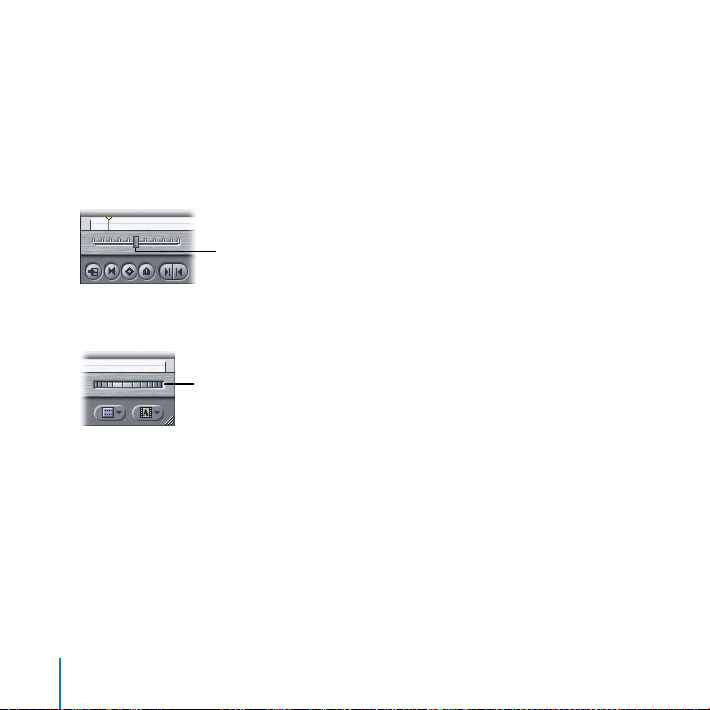
Navigate to specic locations in a clip:
Shuttle control
Jog control
Click in the white scrubber bar to reposition the playhead. The scrubber bar represents
the length of the clip.
Press the Home key or the End key to move the playhead to the beginning or end of
the clip.
Drag the shuttle control right or left to play the clip forward or backward slowly.
Drag the jog control to move the playhead forward or backward by a small number of
frames.
Press the Right Arrow or Left Arrow key to move the playhead forward or backward
one frame at a time. Hold down Shift and press the Right Arrow or Left Arrow key to
move the playhead forward or backward 1 second at a time.
If your mouse has a trackball, position the pointer over the Viewer and roll the trackball
left or right to reposition the playhead in the Viewer.
16
Chapter 1 A First Look at Final Cut Pro
Page 17

Set and work with In and Out points:
Play In to Out button
In point marker
Out point marker
Position the playhead near the beginning of the clip and choose Mark > Mark In to set
an In point. Position the playhead near the end of the clip and choose Mark > Mark Out
to set an Out point. Click the Play In to Out button to play the clip starting from the In
point. Click the Play In to Out button again to restart the playback from the In point.
Press the Space bar to stop playing the clip.
Drag the In point and Out point markers in the scrubber bar to new positions.
Position the playhead near the beginning of the clip and press I to set an In point.
Position the playhead near the end of the clip and press O to set an Out point. ( You can
also press I or O as a clip plays to set In and Out points on the y.)
Chapter 1 A First Look at Final Cut Pro
17
Page 18

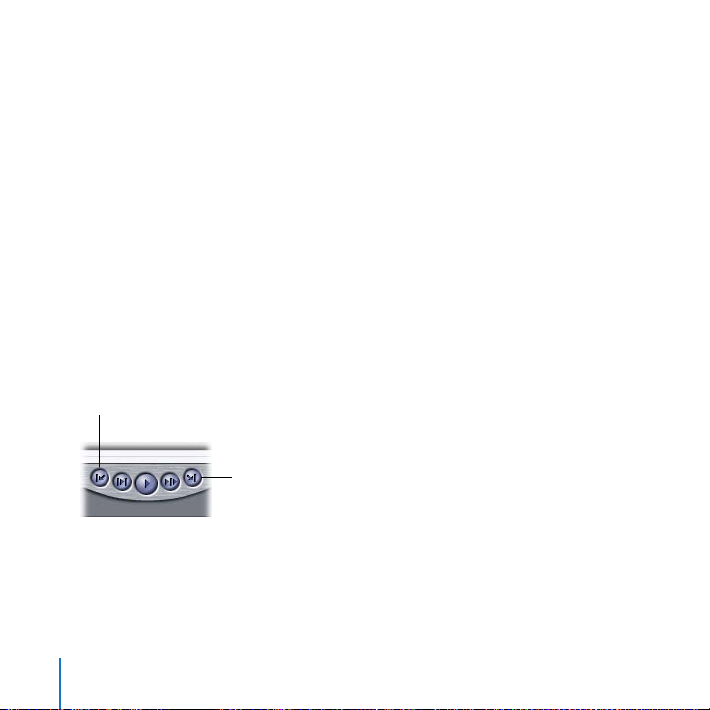
Navigate between edit points:
Go to Previous Edit button
Go to Next Edit button
Click the Go to Next Edit button or the Go to Previous Edit button to move the
playhead to the next or previous edit point.
Press the Up Arrow and Down Arrow keys to move between edit points.
18
Chapter 1 A First Look at Final Cut Pro
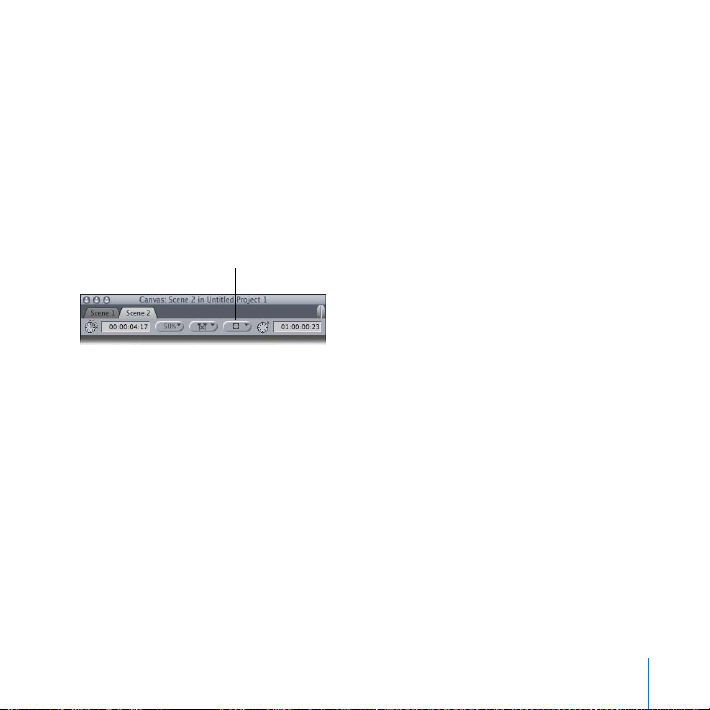
Page 19

Explore the CanvasJump In:
Sequence tab
Transport controls
Scrubber bar
The Canvas is where you play back the movie that you’ve created in the Timeline.
Chapter 1 A First Look at Final Cut Pro
19
Page 20
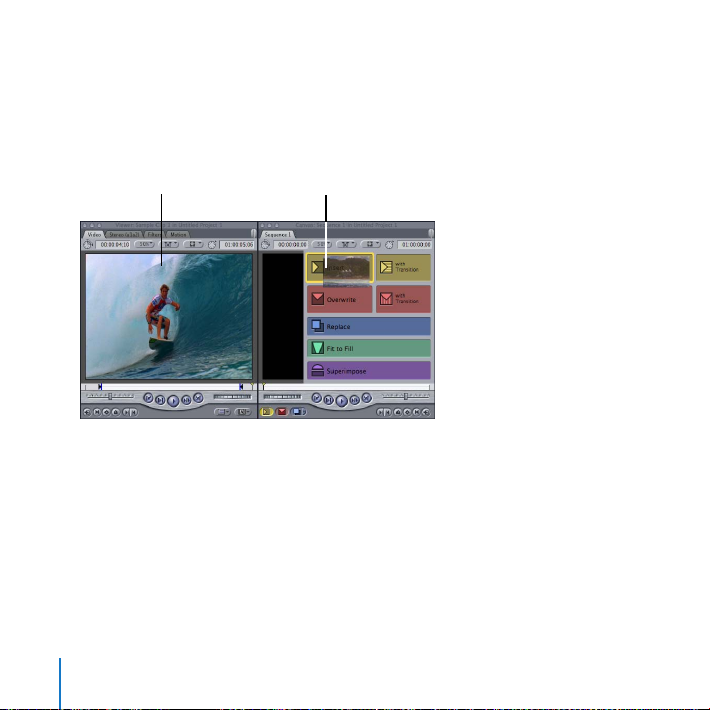
Try This
Drag from here... ...to here.
Use the Canvas to place a clip in the Timeline:
Drag the clip from the Viewer (just drag the image) into the Canvas until the colored
Edit Overlay appears. Drag the clip to the Insert section of the overlay. The clip is
inserted in the Timeline.
If you see a message asking if you want Note: Final Cut Pro to set the Timeline
sequence settings to match the incoming clip settings, click Yes.
20
Chapter 1 A First Look at Final Cut Pro
Page 21
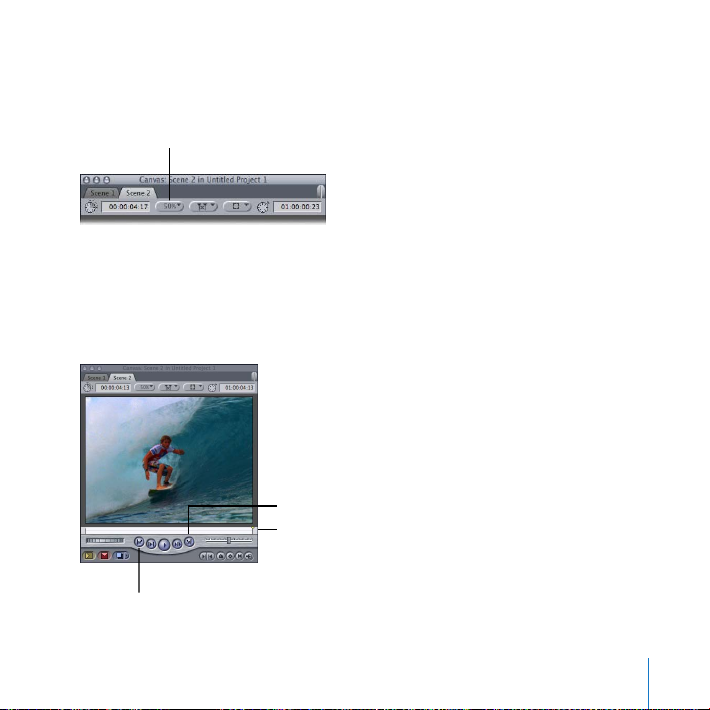
Change the display of the Canvas:
Zoom pop-up menu
Scrubber bar
Go to Previous Edit button
Go to Next Edit button
Choose several dierent zoom levels from the Zoom pop-up menu. Last, choose the
50% zoom level from the Zoom pop-up menu.
Play and navigate within the clip in your sequence:
Click the Canvas window to make it active. To play the clip in your sequence in the
Timeline, press Home to move the playhead to the beginning of the Timeline, then
click the Play button in the Canvas transport controls. Most of the Canvas controls work
identically to those you’ve used in the Viewer.
Chapter 1 A First Look at Final Cut Pro
21
Page 22
Press the Space bar to start and stop playback.
Go to Previous Edit button
Go to Next Edit button
Click in the white scrubber bar in the Canvas to reposition the playhead. The scrubber
bar represents the sequence in the Timeline.
Press the Home key or the End key to move the playhead to the beginning or end of
the sequence in the Timeline.
Press the J key or L key to play the clip backward or forward. Press K to stop playback.
Press the J or L key several times to accelerate the playback speed.
Move the playhead forward or backward:
Press the Right Arrow key or Left Arrow key to move playhead forward or backward
one frame at a time. Hold down Shift and press the Right Arrow or Left Arrow key to
move the playhead forward or backward 1 second at a time.
Click the Go to Next Edit button or Go to Previous Edit button to move the Canvas
playhead to the next or previous edit point in the sequence. Press the Up Arrow and
Down Arrow keys to move between edit points.
22
Chapter 1 A First Look at Final Cut Pro
Page 23
Reposition the playhead in the Canvas (if your mouse has a trackball):
View pop-up menu
Position the pointer over the Canvas and roll the trackball left or right to reposition the
playhead in the Canvas and Timeline.
Change the display of the Canvas:
Choose Show Overlays from the View pop-up menu. Choose Show Title Safe from
the View pop-up menu to have Final Cut Pro display borders showing the part of the
image that will appear on a standard video screen. Choose Show Overlays from the
View pop-up menu again to turn o the display of overlays.
Chapter 1 A First Look at Final Cut Pro
23
Page 24
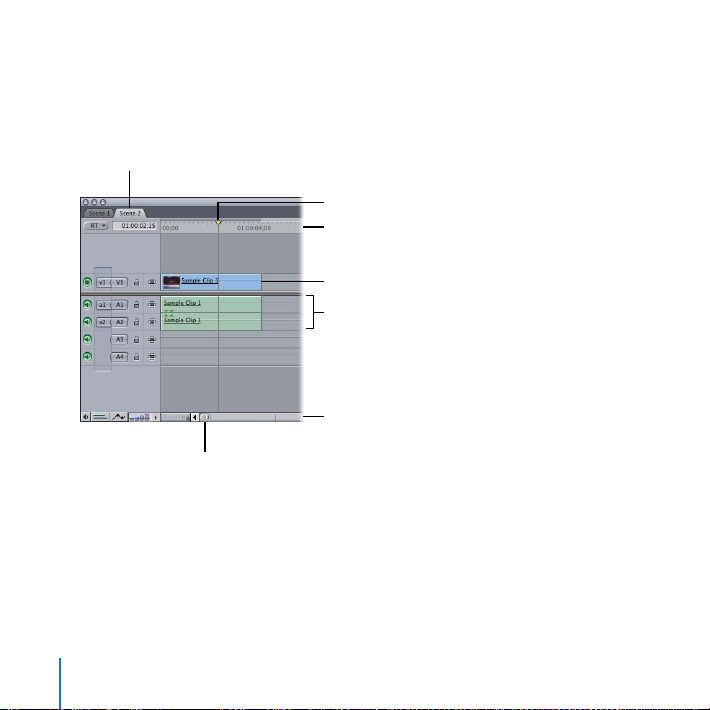
Explore the TimelineJump In:
Ruler
Zoom slider
Thumb tab
Sequence tab
Video clip item
Audio clip items
Playhead
The Timeline holds your sequences, which contain the arrangement of video and
audio clips, and other items such as titles and transitions, in the order you want them
in your movie.
Try This
Play and navigate within the sequence in the Timeline:
Click in the Timeline ruler to reposition the playhead. Try using the J, K, and L keys to
play the sequence in the Timeline. Press Home and End to jump to the beginning or
end of the sequence. Use arrow keys to move the playhead to dierent locations.
24
Chapter 1 A First Look at Final Cut Pro
Page 25
Drag the thumb tabs at the ends of the Zoom slider to change the displayed length of
Drag the clip to move it.
Drag the end of a clip
to shorten or lengthen it.
the Timeline’s clips. Scroll through the Timeline by dragging the Zoom slider left or right.
Press Command–Equal Sign (=) and Command-Hyphen (-) to zoom in to and out of the
Timeline.
Scroll through the sequence in the Timeline:
Press H to select the Hand tool, then drag left or right within the Timeline. Press A to
select the Selection tool again.
If your mouse has a trackball, position the pointer over the Timeline and roll the
trackball left or right to scroll through the sequence.
Change a clip in the Timeline:
Drag the clip to the right to reposition it in your sequence in the Timeline. (Just drag
the blue bar that represents the clip.)
Chapter 1 A First Look at Final Cut Pro
25
Page 26
Position the pointer over the end of the clip and drag to shorten or lengthen the clip.
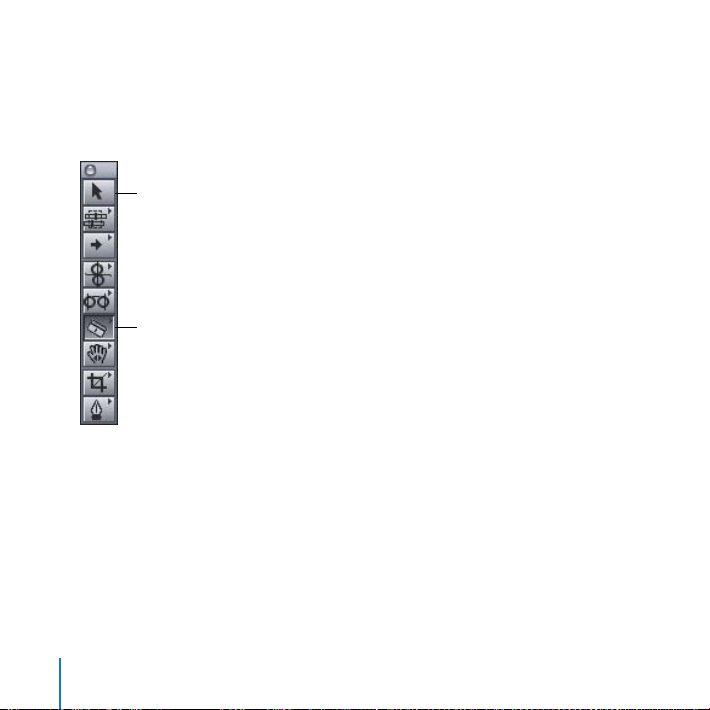
Razor Blade tool
Selection tool
You can trim either end of a clip this way.
Click the Razor Blade tool in the Tool palette. Position the pointer over the clip, then
click to split the clip. Click the Selection tool. Select part of the clip and press Delete.
Cancel your actions:
Choose Edit > Undo to cancel your last change. Press the Undo command’s keyboard
shortcut, Command-Z, to undo the change before that. You can undo up to 99 changes.
26
Chapter 1 A First Look at Final Cut Pro
Page 27

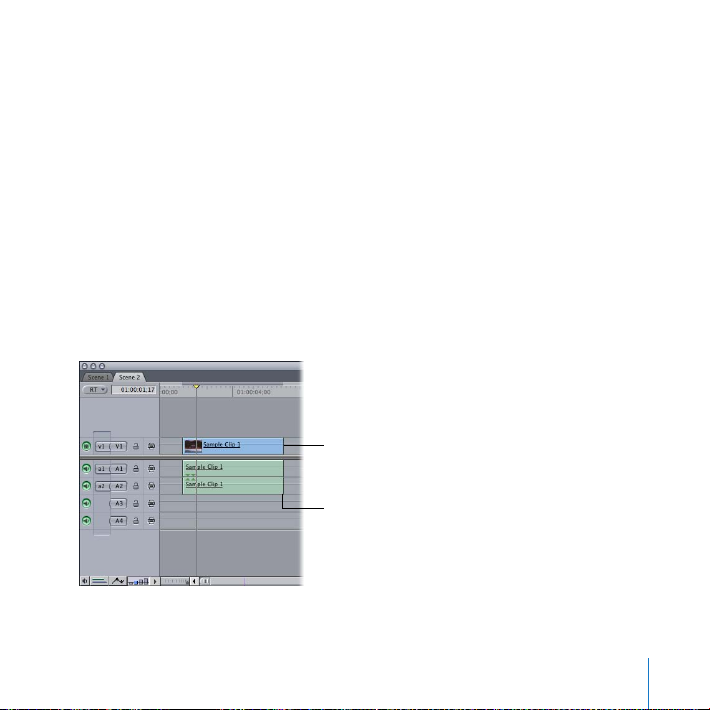
Change the Timeline track size:
Track Height control
Change the size of tracks by clicking the Track Height control.
Add more clips to the Timeline using the Canvas window:
To add another clip to your sequence in the Timeline, rst press End to position the 1
playhead at the end of the last clip.
Drag Sample Clip 2 from the Browser into the Viewer. Set In and Out points if you wish 2
(press I to set an In point, and press O to set an Out point).
Drag the clip from the Viewer to the Insert section of the Canvas Edit overlay. 3
Open a sequence clip in the Viewer to make changes:
Double-click the blue bar of Sample Clip 1 in the Timeline to open the clip in the
Viewer. Change the In and Out points of the clip in the Viewer to make the clip shorter,
and see the change appear in the Timeline.
Eliminate gaps between clips in your sequence:
To eliminate a gap, click the space in the Timeline where the gap appears (between the
clips) to select it, then press Delete.
Experiment with dragging and moving clips in the Timeline:
Experiment with dragging and changing the position and lengths of clips in the Timeline.
Chapter 1 A First Look at Final Cut Pro
27
Page 28

Work with the Main WindowsJump In:
Final Cut Pro provides some easy methods for working with its main windows.
Try This
Change the active window:
Press Command-1 to activate the Viewer.
Press Command-2 to activate the Canvas.
Press Command-3 to activate the Timeline.
Press Command-4 to activate the Browser.
Change the window layout for dierent editing purposes:
Drag the title bar of a window to change its position.
Choose Window > Arrange > Standard to restore the standard window layout.
Choose Window > Arrange > Two Up to change to a window layout that allows you to
easily work with the Viewer and Canvas.
Choose Window > Arrange > Audio Mixing to change to a layout designed for easily
working with the audio in your sequences.
Choose Window > Arrange > Color Correction to change to a layout that allows you to
easily grade and color correct clips.
When you’ve nished exploring these window layouts, press Control-U to restore the
standard window layout.
28
Chapter 1 A First Look at Final Cut Pro
Page 29

Learning About Projects, Sequences, Clips, and Media Files
To begin creating a movie, you create a project in the Browser. To create a new project,
choose File > New Project.
You can have multiple projects open at once, each represented by a tab in the Browser.
To access a specic project, you click the project tab. You can also drag a project tab
out of the Browser window to open the project in a separate window. You can reuse
and share sequences and clips between projects.
Learning About Sequences
When you create a new project, a sequence icon appears in the project, too. This
sequence icon represents the clips you place in the Timeline. You can open a sequence
by double-clicking it in the Browser, and the sequence then appears in the Timeline.
You can create multiple sequences in a project. For a long project, for example, you
might create dierent sequences to hold dierent scenes. You can create as many
sequences as you wish. A sequence tab appears in the Timeline title bar for each open
sequence. Clicking the sequence tab in the Timeline displays the sequence’s clips.
You can drag a sequence from the Browser and place it in the Timeline, just as you
can with a clip. You can place one sequence after another in the Timeline. You can also
place sequences within sequences. So, for example, you might create several dierent
sequences that represent scenes in your movie and then arrange them in their nal
order within a single master sequence.
Chapter 1 A First Look at Final Cut Pro
29
Page 30

Understanding the Relationship Between Clips and Media Files
An important rst stage in creating a project is transferring your video to your
computer. Final Cut Pro provides a variety of ways to get media into your computer.
The method you use depends on the media type. You’ll learn more about capturing
and transferring video in the next chapter.
After you’ve captured or transferred your media into a project, clip icons representing
the media les appear in the project’s tab of the Browser window. A large project may
hold many clips. For complicated projects, you can create a system of bins to hold and
organize clips. You can name and organize the bins to suit your work style.
When you capture or transfer clips, the corresponding media les are stored on your
computer hard disk. You can specify where you want the media les stored. Because
video and audio media les are often large, you’ll want to plan where your les will reside.
An important point to remember is that the media les from your camcorder or other
sources are not stored in a project. The clips in a project merely point to the media les
stored elsewhere on your hard disk. When you modify a clip, you are not modifying
the media le, just the clip’s information in the project. You work with and edit clips in
Final Cut Pro, but the underlying media les are unchanged on your hard disk.
30
Chapter 1 A First Look at Final Cut Pro
Page 31

If you transfer a Final Cut Pro project le to another computer for editing, you must
also transfer all the media les to the other system as well. It’s important to maintain
the connection between your media les on disk and the clips in your project. If, for
example, you rename media les on your hard disk in the Finder, you may have to
reconnect those les to the appropriate clips in your project later. Your media les are
placed in the Scratch Disk folder that is created when you rst ingest media. Keep in
mind that it’s a good idea to keep all your les for a project in a central location, rather
than have les in dierent locations on dierent disks. Final Cut Pro provides easy
ways to maintain the connection between media les and clips, but it’s important to
remember that your clips represent media les that reside elsewhere on a hard disk.
Key Concepts
Project: A project in the Browser holds the clips, sequences, and bins to be used in a
video program.
Sequence: A sequence represents a chronological arrangement of clips in the Timeline.
Double-clicking a sequence icon in the Browser opens that sequence in the Timeline.
Clip:
Clips appear in the Browser, where you can organize them and then edit them
into a sequence. Clips point to the media les stored on your hard disk.
Media les:
The digital les that are captured or transferred from a camcorder or
other device and that correspond to clips in your project.
Chapter 1 A First Look at Final Cut Pro
31
Page 32

Viewer: A window in Final Cut Pro in which you can work with a clip to set In and Out
points, play back the clip, and make many other types of changes such as applying
lters and adjusting motion parameters. Basically, you make changes to a clip using
the Viewer and then place the clip in the sequence in the Timeline.
Timeline:
The Timeline holds a sequence of clips in the order in which they should
appear in your movie. Video and audio clips are stored in tracks in the Timeline, and
you can move, rearrange, change, and delete clips to create the chronological order
of your video.
Next, you’ll learn more about importing video and other media into Final Cut Pro.
32
Chapter 1 A First Look at Final Cut Pro
Page 33

Bringing Media into Your System
2
Final Cut Pro provides a variety of methods for bringing your
video and other media into your Final Cut Pro system for editing.
Bringing media into your system is called ingesting. In this chapter, you’ll experiment
with bringing some of your own video footage into Final Cut Pro and familiarize
yourself with the features for logging and ingesting. After you’ve had some basic
experience ingesting sample clips, you can begin envisioning how to routinely log and
ingest your own video.
If you don’t have video footage that you’d like to try ingesting, skip this chapter for
now. You can refer to the Final Cut Pro 7 User Manual for all the details you’ll need to
ingest your video later.
Today, there are many dierent kinds of camcorders and dierent video formats. The
ingest method you use depends on the type of camcorder you have.
Many standard camcorders record video on tape. If your camcorder or deck uses
videotape, follow the instructions in “Jump In: Explore Tape-Based Video Capture” on
page 34.
Some advanced camcorders record video as digital les stored on capture cards,
optical discs, or hard disks. To bring these types of les into Final Cut Pro, follow the
instructions in “Jump In: Explore File-Based Video Transfer” on page 40.
33
Page 34

Explore Tape-Based Video CaptureJump In:
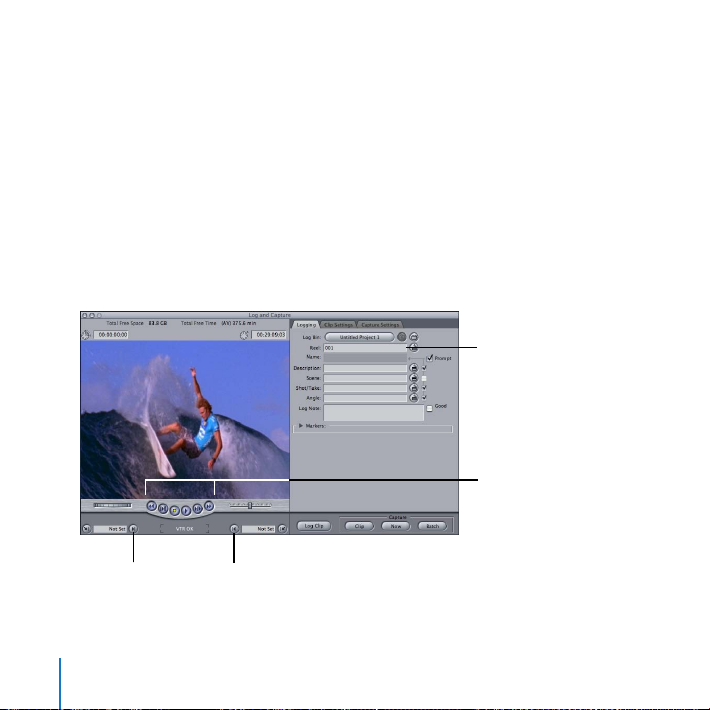
You use the Log and Capture window to preview and capture the footage on your tape.
You can play the footage on tape from your camera or deck using the transport controls.
To capture a clip, you mark the beginning and end of the clip using the Mark In and Mark
Out buttons, enter logging information, and then capture the clip to your hard disk.
Getting Ready
Connect your camcorder or deck to the computer:
Follow the directions in your camcorder or video deck user manual to connect your 1
camcorder or deck to the computer using a FireWire or USB cable.
Turn on your camcorder or deck and set it to the play/edit setting so that Final Cut Pro 2
can control your device and capture the footage.
When you connect a camcorder or VTR deck to your computer, Final Cut Pro automatically
detects it when you open the Log and Capture window.
34
Chapter 2 Bringing Media into Your System
Page 35

Create a new project to hold your video:
Choose File > New Project. For now the name of the project is “Untitled,” and a new
project tab appears in the Browser. Later, when you save the project, you can give it any
name you like.
Choose an Easy Setup to congure Final Cut Pro to work with your type of video
and camcorder:
Choose Final Cut Pro > Easy Setup.1
In the Easy Setup dialog, choose the format of your footage from the Format pop-up 2
menu. If you have a standard DV camcorder, choose NTSC or PAL, depending on your
region. If your footage is from a high denition camcorder, choose HD.
From the Use pop-up menu, choose an Easy Setup that matches the format of your 3
footage. For example, if you have a DV NTSC camcorder, choose DV-NTSC. If you chose
HD from the Format pop-up menu, the Use pop-up menu lists Easy Setups for many
of the common HD formats. Check your camcorder user manual if you’re unsure of the
format of your footage, then choose the appropriate Easy Setup.
Click Setup.4
Choose a scratch disk to hold the media you’re capturing in the project:
Choose Final Cut Pro > System Settings.1
In the System Settings window, click Set in the Scratch Disks tab. 2
Select the hard disk location where you want the media les stored. Select a disk or folder 3
and click Choose. Although there are many other custom settings that you can specify in
the System Settings window, just click OK to set the scratch disk location for now.
Chapter 2 Bringing Media into Your System
35
Page 36
Try This
Mark In button
Mark Out button
Reel field
Transport controls
Select a logging bin:
Choose File > New > Bin to create a new bin to hold clips. Rename the bin, if you wish.
Select the bin and choose File > Set Logging Bin.
Open the Log and Capture window:
Choose File > Log and Capture.
Preview footage on tape:
Use the transport controls to play and review the videotape. The transport controls
work similarly to those you’ve already used in the Viewer and Canvas. You can also
press the J, K, and L keys to rewind, stop, and play the tape.
36
Chapter 2 Bringing Media into Your System
Page 37

Set rough In and Out points for a clip that you want to capture:
Use the transport controls to go to the beginning of a section of tape that you want to
capture. Click the Mark In button to set an In point to roughly mark the beginning of
the clip. Play the video forward until you’ve reached the end of the section of tape you
want to capture. Click the Mark Out button to mark the rough Out point of the clip.
Enter logging information about a clip:
Enter a reel name or number in the Reel eld.
Enter a short, descriptive clip name in the Description eld. This description appears in
the Name eld when you nish entering the description.
Enter scene, shot/take, and angle information in the Scene, Shot/Take, and Angle elds
if you wish. If you don’t want to include an item in the logging information, deselect
the checkbox beside the eld. For example, deselect the checkbox beside Shot/Take to
not include shot/take information in the logging information.
Enter a note about the clip contents in the Log Note eld, if you wish. If the clip is one
worthy of inclusion in your movie, select the Good checkbox.
Chapter 2 Bringing Media into Your System
37
Page 38
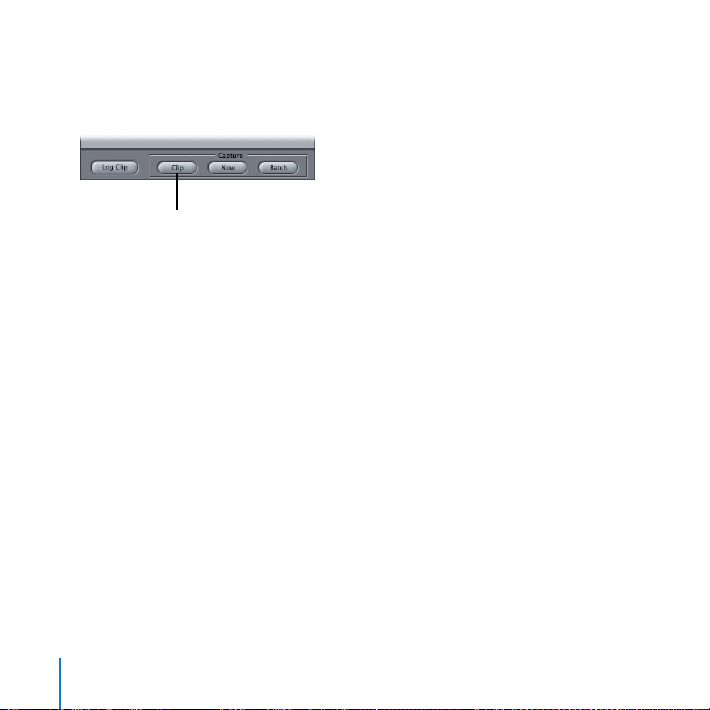
Capture a single clip:
Capture Clip button
After setting In and Out points and entering logging information, click the Capture
Clip button.
Final Cut Pro rewinds the tape and captures the footage as a media le on your hard
disk. The new clip appears in the Browser.
Log additional clips without capturing them:
Use the transport controls to set In and Out points in another clip that you want to 1
capture.
Enter logging information for the clip. Click the Slate button beside a logging eld to 2
increment the previously entered information by one number.
Click the Log Clip button to log the clip information in the Browser without capturing the 3
media on your hard disk. When the Log Clip dialog appears, enter a clip name and click
OK. Final Cut Pro records the clip and its logging information in the Browser. The icon for
the clip has a red bar through it to indicate that the clip is oine, or not yet captured.
Log another clip, setting In and Out points and entering logging information, then 4
click the Log Clip button to log the clip information in the Browser. When the Log Clip
dialog appears, enter a clip name and click OK.
38
Chapter 2 Bringing Media into Your System
Page 39

Batch capture multiple clips at once:
Capture Batch button
Capture Now button
Capture oine clips by clicking the Capture Batch button. When the Batch Capture m
dialog appears, choose All Items in Logging Bin from the Capture pop-up menu, then
click OK. When the Insert Reel dialog appears, click Continue. Final Cut Pro rewinds the
tape and captures the logged clips, one by one.
Capture your footage as a single clip using Capture Now:
If you wish, you can click the Capture Now button to capture all or part of a tape as one m
clip. After you click Capture Now, Final Cut Pro starts capturing the media on the tape,
continuing until the end of the tape is reached or until you press the Esc (Escape) key
to stop the capture. (If you capture a long tape sequence this way, you can break the
clip into smaller subclips later during your edit.)
If you’d like to try importing still images or audio les, skip ahead to “Jump In: Import
Still Images and Other Media” on page 48.
Chapter 2 Bringing Media into Your System
39
Page 40

Explore File-Based Video TransferJump In:
Logging area
Preview area
Browse area
Transfer Queue area
You use the Log and Transfer window to preview le-based media mounted on your
computer or another device. You can preview the footage using the transport controls.
To transfer a clip into your Final Cut Pro project, you mark the beginning and end of
the clip using the Mark In and Mark Out buttons, enter logging information, and then
transfer the clip to your hard disk by adding it to the Transfer Queue.
40
Chapter 2 Bringing Media into Your System
Page 41

Getting Ready
Create a new project to hold your video:
Choose File > New Project. For now the name of the project is “Untitled,” and a new
project tab appears in the Browser. Later, when you save the project, you can give it any
name you like.
Choose an Easy Setup to congure Final Cut Pro to work with your type of video
and camcorder:
Choose Final Cut Pro > Easy Setup.1
In the Easy Setup dialog, choose the format of your footage from the Format pop-up 2
menu. If your footage is from a high denition camcorder, choose HD.
From the Use pop-up menu, choose an Easy Setup that matches the format of 3
your footage. For example, If you chose HD from the Format pop-up menu, the Use
pop-up menu lists Easy Setups for many of the common HD formats. Check your
camcorder user manual if you’re unsure of the format of your footage, then choose the
appropriate Easy Setup.
Click Setup.4
Chapter 2 Bringing Media into Your System
41
Page 42

Choose a scratch disk to hold the media you’re transferring to the project:
Choose Final Cut Pro > System Settings.1
In the System Settings window, click Set in the Scratch Disks tab. 2
Select the hard disk location where you want the media les stored. Select a disk or folder 3
and click Choose. Although there are many other custom settings that you can specify in
the System Settings window, just click OK to set the scratch disk location for now.
When selecting a scratch disk location, avoid selecting a hard disk location Important:
nested within a scratch disk folder that’s already in use, which can cause confusion
about where your media les are located later.
Connect your camcorder or deck to the computer and copy your footage:
Follow the directions that came with your camcorder, video deck, ash memory card, 1
P2 card, or other device to connect the device to the computer or card reader. (Some
le-based camcorders may record les directly to hard disks, in which case you just
connect the hard disk to your computer as you would any other hard disk.)
Follow the instructions that came with your device to copy your footage to your computer. 2
Typically, you must copy an entire folder of les from your device to your computer, and
not copy individual les from within a folder. Once the folder containing your footage is on
your computer hard disk, Final Cut Pro can access it as a mounted volume.
42
Chapter 2 Bringing Media into Your System
Page 43

Try This
Add Volume button
Click a file to select it for
logging and transferring.
Search field
Select a logging bin:
Choose File > New > Bin to create a new bin to hold clips. Rename the bin, if you wish.
Select the bin and choose File > Set Logging Bin.
Open the Log and Transfer window:
Choose File > Log and Transfer.
Mount a volume:
In the Browse area of the Log and Transfer window, click the Add Volume button. Select
any volume that holds footage that you’d like to transfer, then click Open.
Chapter 2 Bringing Media into Your System
43
Page 44

Locate les on mounted volumes:
Mark In button
Clip name
Transport controls
Mark Out button
In the Browse area, click a le to select it for logging and transferring.
Click a column heading in the Browse area to sort the les by that column category, in
ascending or descending order.
Enter a lename in the search eld to locate les with that name.
Preview footage:
With a le selected in the Browse area, use the transport controls in the Preview area
to play and review the footage. The transport controls work similarly to those you’ve
already used in the Viewer and Canvas. You can also press the J, K, and L keys to rewind,
stop, and play the footage.
44
Chapter 2 Bringing Media into Your System
Page 45

Set rough In and Out points for a clip:
You can quickly choose
logging information that
you’ve used previously from
the Autofill pop-up menu.
Logging fields
You can add incremental
numbers to a field’s logging
information by clicking the
Increment button.
Use the transport controls to go to the beginning of a section of a media that you want
to transfer. Click the Mark In button to set an In point to roughly mark the beginning of
the clip. Play the video forward until you’ve reached the end of the media you want to
transfer. Click the Mark Out button to mark the rough Out point of the clip.
Log a clip:
Enter a reel name or number in the Reel eld, if you wish. Final Cut Pro automatically
adds the folder name of the mounted volume as the reel name.
Enter a short, descriptive clip name in the Clip Name eld.
Chapter 2 Bringing Media into Your System
45
Page 46

Enter scene, shot/take, and angle information in the Scene, Shot/Take, and Angle elds
Click to reveal
the current logging
bin in the Browser.
Progress bar
Pause button
Thumbnail Resize slider
if you wish.
Enter a note about the clip contents in the Log Note eld, if you wish. If the clip is one
worthy of inclusion in your movie, select the Good checkbox.
Add a clip to the Transfer Queue:
After entering your logging information and setting In and Out points for the clip,
click the Add Clip to Queue button to have Final Cut Pro move the clip to the Transfer
Queue and begin transferring the le.
Once the le is transferred, the new clip appears in the Browser.
46
Chapter 2 Bringing Media into Your System
Page 47

Log additional clips without immediately transferring them:
Select a clip in the Log and Transfer window’s Browse area, then set In and Out points 1
and enter the logging information for the clip. Click the Increment button beside a
logging eld to increment the previously entered information by one number.
Select other clips in the Browse area, and set In and Out points and add logging 2
information for those clips.
When you’re ready to transfer your logged clips, select them in the Browse area and 3
drag them to the Transfer Queue area, or click the Add Clip to Queue button.
If you’d like to try importing still images or audio les, see the next section, “Jump
In: Import Still Images and Other Media.”
Chapter 2 Bringing Media into Your System
47
Page 48

Import Still Images and Other MediaJump In:
You can import still images and graphics les into your projects and place them in
your sequence in the Timeline. You can also import audio les such as CD tracks, voice
recordings, or sound eects and place these clips in the audio tracks of the Timeline.
Final Cut Pro can import many common le formats (see the Final Cut Pro 7 User Manual
for a complete list). But the easiest way to see if you can use a certain le type in your
project is to just try importing it. If you have still images or audio les available, you can
experiment with importing them here.
Make sure to follow all copyright laws when including still images, graphics Important:
les, and audio les in your projects.
Getting Ready
Prepare to import a still image:
Place or locate still images that you’d like to import, such as photos, on your computer.
For example, you can import images directly from your Pictures folder, if you wish.
Prepare to import an audio le:
Place an audio le, such as a sound eect or music le, on your computer. If you like,
insert a music CD into your disc drive and, when the disc opens on your desktop, drag
a music track into your Music folder (or any other location you prefer).
48
Chapter 2 Bringing Media into Your System
Page 49
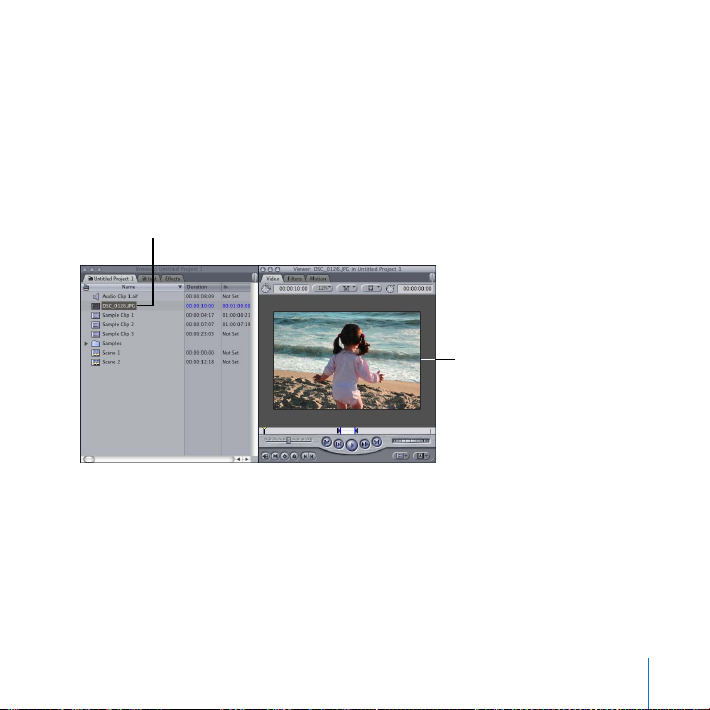
Try This
Still-image clip
Still-image clip
in the Viewer
Import still images into a project:
Choose File > Import > Files. Select the still-image les you want to import and click
Choose. The still images appear as clips in the Browser. Experiment with dragging a
still-image clip into the Viewer, changing In and Out points if you like, and then editing
the image into your sequence in the Timeline. You can edit and change the still-image
clip in the Timeline just as you can a video clip.
Chapter 2 Bringing Media into Your System
49
Page 50

Import audio les into a project:
Drag the audio clip...
...into the sequence
in the Timeline.
Choose File > Import > Files. Select the audio les you want to import and click Choose.
The audio les appear as clips represented by a speaker icon in the Browser. To place
an audio clip in the Timeline, drag the audio clip from the Browser down to the audio
tracks in the Timeline. Experiment with editing the audio clip using the same methods
you use for editing video clips.
Although Final Cut Pro cannot import MP3 or MP4 audio les directly from your
iTunes Library, you can export audio les from iTunes as AIFF les and import them
into Final Cut Pro.
50
Chapter 2 Bringing Media into Your System
Page 51

Learning About Ingesting Media and Setting Up Projects
When you capture or transfer footage from a camcorder, the media les are stored on
your scratch disk, a disk location that you tell Final Cut Pro to use. You can congure
Final Cut Pro to store dierent types of media les in dierent locations. For example,
you can have Final Cut Pro store audio media les in one location and video media les
in another. Because media les can take up considerable space, you can assign several
hard disks as scratch disks to hold your media.
Choosing an Easy Setup is a quick way to congure Final Cut Pro to match the settings
of your camcorder and video format. It’s an important rst step in setting up a new
project. Choosing an Easy Setup sets the Final Cut Pro capture settings and congures
the sequence settings to allow you to play back and edit your footage. The Easy Setup
also species output settings for when you output the nal video to tape or another
media format.
You can place clips of dierent video formats in the Timeline. For example, even
though the majority of your clips might be DV, you can place DVCPRO 50 or HD
clips in the same sequence. If Final Cut Pro is unable to play back a clip in real time
without dropping frames, a red bar appears above the clip in the Timeline. This red bar
indicates that the clip must be rendered in order to play correctly. You can select the
clip and choose a command to have Final Cut Pro render that clip. Final Cut Pro then
processes the clip to work with the current sequence and places the rendered les on
your scratch disk. The downside is that rendering such clips becomes an extra step in
editing. For example, if you change a rendered clip, you may need to render it again.
Chapter 2 Bringing Media into Your System
51
Page 52

Choosing an Easy Setup that matches the majority of your video footage helps you
avoid having to render most of your footage. You can’t always avoid rendering clips; for
example, when you superimpose a title above another clip, Final Cut Pro must render the
clips to make them work together. However, choosing the correct Easy Setup for your
video is important not only for ingesting but also for facilitating the editing process.
You use the Log and Capture window to capture tape-based footage directly from a
camcorder or another device such as a video deck. The Log and Capture window allows
you to preview, log, and set rough In and Out points for the media on tape. You then
capture the footage to store it as media les on your hard disk. An online clip is one
whose media has been captured and is ready for use. If you have only logged the media
and not captured it yet, the clip is oine, not ready for editing. Clips can also become
oine if they have been moved or renamed and Final Cut Pro can’t locate them.
Final Cut Pro provides powerful features for locating and reconnecting oine clips.
You use the Log and Transfer window to transfer footage from camcorders that record
le-based media. You can transfer the les directly from a camcorder, a hard disk, or
another device such as a P2 card. The Log and Transfer window allows you to preview,
log, and set In and Out points for the digital media les. You can then add them to the
Log and Transfer window’s Transfer Queue to transfer them to your hard disk.
52
Chapter 2 Bringing Media into Your System
Page 53

Key Concepts
Logging: Logging footage allows you to record information about a clip that will
help you identify it later. Using the Log and Capture window or the Log and Transfer
window, you can record information about the clip, including a reel name, clip name
or description, and other information such as the shot or take number, notes, and
more. You can also set rough In and Out points for the clip that you can rene later
during your edit.
Ingesting:
Ingesting is a broad term for the act of bringing media into your
Final Cut Pro system. Ingesting includes capturing tape-based footage, transferring
le-based footage, and importing les such as audio les or graphics les into
Final Cut Pro.
Capturing: When you click a capture button in the Log and Capture window,
Final Cut Pro accesses your videotape and captures the tape-based media to your
computer. It records the media le on your scratch disk, and a corresponding clip
appears in the Browser.
Transferring:
When you place le-based media in the Transfer Queue in the Log and
Transfer window, Final Cut Pro accesses your le-based media and transfers it to your
computer. It records the media le on your scratch disk, and a corresponding clip
appears in the Browser.
Importing:
When you import a le on your computer into Final Cut Pro,
Final Cut Pro accesses the media le on your computer, and a corresponding clip
appears in the Browser.
Chapter 2 Bringing Media into Your System
53
Page 54

Capture Now: Â The Capture Now process begins the automatic capture of your
tape-based footage at any point on a tape and continues capturing until the end of
the tape or until you stop the capture by pressing the Esc (Escape) key. The captured
footage is stored as one clip. You can then use Final Cut Pro commands and editing
features to break the clip into smaller subclips. Capture Now allows you to skip the
process of previewing and logging many individual clips.
Batch capturing:
 After you log a series of clips from your media, Final Cut Pro can
search through your tape and capture the media les to your computer hard disk
one by one. Batch capturing clips like this is an ecient alternative to logging and
capturing clips individually.
Next, you’ll explore using the Viewer to discover more of its features.
54
Chapter 2 Bringing Media into Your System
Page 55

Preparing Clips in the Viewer
3
The Viewer provides ecient ways to review and edit
individual clips in your projects.
In this chapter, you’ll explore more of the features of the Viewer.
Get to Know the ViewerJump In:
You work with individual clips in the Viewer. The Viewer provides powerful ways to
position and adjust how clips appear onscreen. You can also change the Viewer’s
display of your clip to match your work style.
55
Page 56

Getting Ready
Viewer title bar
View pop-up menu
Current Timecode field
Resize control
Mark In and
Mark Out buttons
Zoom pop-up menu
In the Browser, click the tab of the project that holds your sample clips. Drag a clip from 1
the Browser into the Viewer.
Set In and Out points for the clip using the Mark In and Mark Out buttons.2
Use the illustration above to locate the Viewer items you want to explore next.
56
Chapter 3 Preparing Clips in the Viewer
Page 57

Try This
Reposition the Viewer:
Drag the Viewer title bar to move the Viewer to a new screen location.
Change the size of the Viewer:
Drag the resize control in the lower-right corner of the Viewer to change the Viewer size.
Open multiple clips in separate Viewer windows:
Select another clip in the Browser.1
Choose View > Clip in New Window. 2
You can also use this command to open clips in the Timeline in a separate window.
Select a clip in the Timeline, then choose View > Clip in New Window.3
Close a Viewer window:
Click the close button in the top-left corner of the Viewer. Close all the Viewer windows
that you’ve opened, except one. Choose Window > Arrange > Standard to place the
Viewer in the standard window arrangement again.
Show the title safe overlay:
Choose Show Overlays from the View pop-up menu, then choose Show Title Safe
from the View pop-up menu. The blue lines that appear on the clip show the standard
screen limits and the area in which you can place titles without clipping on most
monitors and displays.
Chapter 3 Preparing Clips in the Viewer
57
Page 58

Show the timecode overlays:
Choose Show Timecode Overlays from the View pop-up menu. Change the In and Out
points to see how the timecode overlays change.
Turn o the display of overlays:
Choose Show Overlays from the View pop-up menu again to turn o the display of
overlays.
Open the Timecode Viewer:
Choose Tools > Timecode Viewer to open the Timecode Viewer. Play the clip in the
Viewer to see how the Timecode Viewer changes. To hide the Timecode Viewer, choose
Tools > Timecode Viewer again.
Place the playhead at an In point, at an Out point, or at Media End:
Press the Up Arrow or Down Arrow key to move the playhead forward or backward in
the clip.
58
Chapter 3 Preparing Clips in the Viewer
Page 59

Set the playhead at an exact frame in a clip by entering a timecode value:
Current Timecode field
Timecode Duration field
In the Current Timecode eld, enter a timecode value that matches a point in your
clip. Enter a timecode value in the format 00:00:00:00 (hours: minutes: seconds:
frames). You can also enter just the second and frame values. For example, to specify
the frame at 3 seconds and four frames, enter “03:04” and press Enter. (Final Cut Pro
assumes that the value for hours and minutes is 00.) Experiment with entering
timecode values to learn how this works.
Change the duration of a clip by specifying a duration in timecode:
Enter a timecode value to specify the length of a clip. For example, to set the length of
a clip to 3 seconds and four frames, enter “03:04” and press Enter. (Final Cut Pro assumes
that the value for hours and minutes is 00.) The clip’s Out point changes to match the
clip length that you entered. Press Command-Z to undo the change.
Chapter 3 Preparing Clips in the Viewer
59
Page 60

Add markers to indicate specic times in a clip:
Add Marker button
In the Viewer, place the playhead where you want to add a marker and click the Add
Marker button. Set several markers to mark specic times in a clip.
Navigate between markers:
Press Shift –Up Arrow to move the playhead to the previous marker.
Press Shift –Down Arrow to move the playhead to the next marker.
Delete markers:
Position the playhead over a marker and choose Mark > Markers > Delete. Experiment
with adding and deleting markers. Choose Mark > Markers > Delete All to delete all
your markers after you’ve nished experimenting.
60
Chapter 3 Preparing Clips in the Viewer
Page 61

Change Clips in the ViewerJump In:
After opening a clip in the Viewer, you can reposition the clip on the screen and
enlarge it, shrink it, or rotate it to display it at a dierent angle. To make such changes,
you display the clip in a wireframe view.
Getting Ready
If necessary, click the Scene 2 tab in the Timeline to open the sequence with your 1
sample footage.
Double-click a clip in the Timeline to open it in the Viewer.2
Choose a zoom level of 25% from the Zoom pop-up menu to reduce the display of the 3
clip to a size smaller than that of the Viewer window.
Try This
Display a clip in a wireframe mode:
Choose Image+Wireframe from the View pop-up menu in the Viewer. The image
appears with diagonal lines across it and handles on the corners.
Depending on the processing capabilities of your computer, Important: Final Cut Pro
may be able to play back your changes immediately. However, in some cases, you may
see a red line appear in the Timeline or a message appear in the Viewer or Canvas to
indicate that Final Cut Pro cannot play back the changes without rendering. If you see a
red line, press Option-R to render the changes.
Chapter 3 Preparing Clips in the Viewer
61
Page 62

Reposition the clip on the screen:
Position the pointer on the image in the Viewer and drag left or right to reposition the
image. Play the clip to see the eect of repositioning it.
Scale the display of the clip up or down on the screen:
Drag a corner of the clip to resize the clip larger or smaller. Changing the size eectively
zooms in to or out of the clip. Reposition the clip to adjust the focal point. Play the clip
to see the eect of your changes. Experiment with enlarging or shrinking the clip and
repositioning it for display.
Rotate a clip to a dierent viewing angle:
Position the pointer over the blue line in the corner of a clip until a curved pointer
appears. When the pointer changes, drag the corner of the clip slightly to rotate the clip.
Experiment with rotating and repositioning the clip to change its display on the screen.
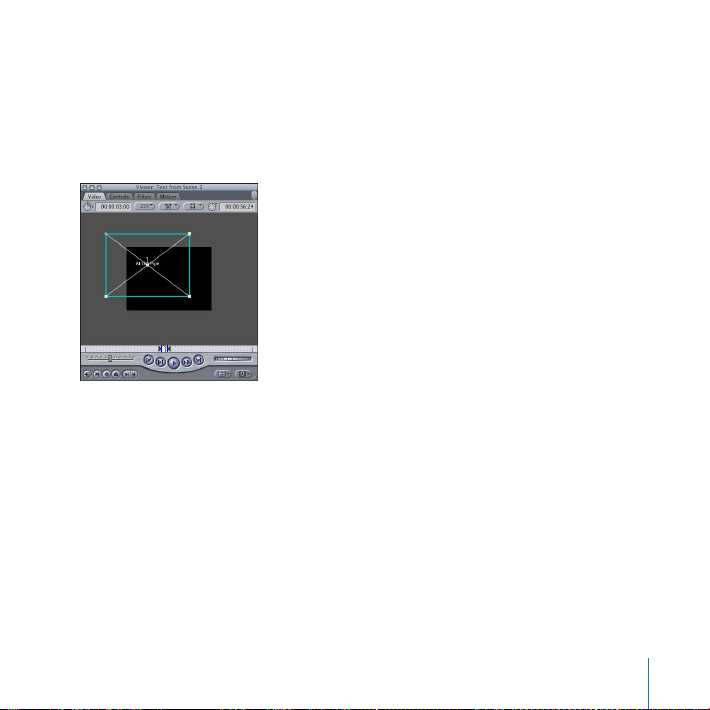
Create a Title ClipJump In:
You can display titles in your movie, superimposing them on your clips if you wish. You
can choose from many dierent types of fonts, font sizes, and styles, as well as colors
and many other display details.
62
Chapter 3 Preparing Clips in the Viewer
Page 63

Try This
Generator pop-up menu
Create a title clip in the Viewer:
Choose Text > Text from the Generator pop-up menu.
Sample text appears in the Viewer. You can now change the text using the titling controls.
Get to know the titling controls:
Click the Controls tab in the Viewer to reveal the titling controls.
Select the sample text in the Text eld and type “At the Pipe” or text of your own.
Choose a font from the Font pop-up menu.
Set a font size using the Size controls.
Chapter 3 Preparing Clips in the Viewer
63
Page 64

Choose a text color by double-clicking the Font Color color picker. Select a color from
Font Color color picker
the color wheel and then click OK. Click the Video tab to see the sample text onscreen.
Enter “03:00” in the Timecode Duration eld at the top-left corner of the Viewer to set
the length of the title clip to 3 seconds.
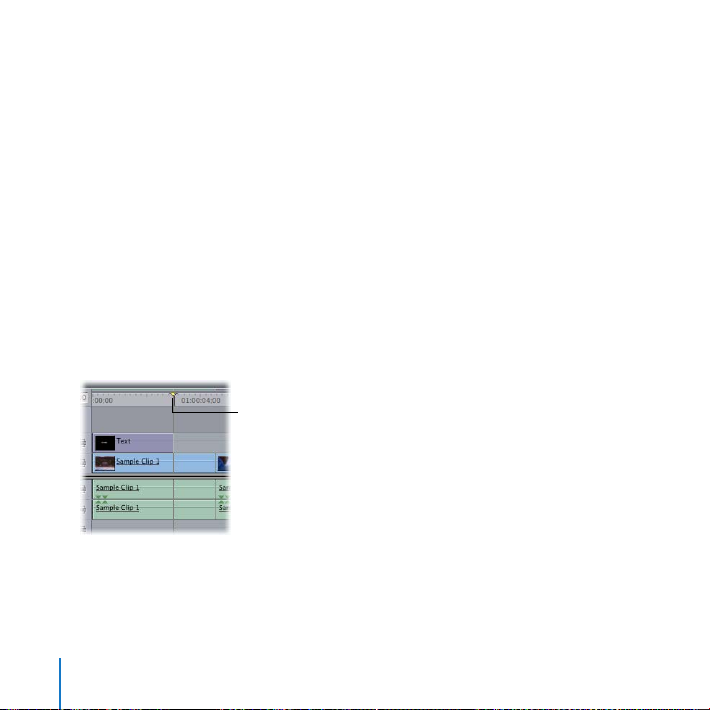
Insert a title clip in your sequence:
Click in the Timeline and press Home to position the playhead at the beginning of the
sequence. Drag the title clip in the Viewer to the Insert section of the Canvas Edit Overlay.
If there happen to be any gaps in your sequence, delete them by clicking each gap to
select it and pressing Delete. Press Home and play the sequence to see the new title.
If a red line appears in the Timeline over clips in your sequence, press Option-R Note:
to render the clips for playback.
64
Chapter 3 Preparing Clips in the Viewer
Page 65
Reposition a title on the screen:
Double-click the title clip in the Timeline to open it in the Viewer. 1
In the Viewer, drag the title text to a dierent position. Experiment with repositioning 2
the text on the screen. You can also experiment with changing the look of the title
using the controls in the Controls tab.
Chapter 3 Preparing Clips in the Viewer
65
Page 66

Superimpose a title over another clip:
Drag the title clip at the beginning of the movie above Sample Clip 1 in the Timeline. 1
Position the playhead over the gap at the beginning of the movie and choose 2
Sequence > Close Gap.
Press Option-R to render the clips if a red line appears above the clips.3
Play the movie to see how the superimposed title looks.4
Reposition the superimposed title to t the background clip:
Position the playhead in the title clip in the Timeline so that you can see the title in 1
the Canvas.
Double-click the superimposed title clip in the Timeline to open it in the Viewer. 2
Drag the text in the Viewer to a position that looks good against the background clip. 3
You can also make other changes in the Controls tab.
Click in the Timeline to make it active, and press Option-R to render the clip if needed.4
Play the movie to see the changes that you made.5
66
Chapter 3 Preparing Clips in the Viewer
Page 67

Arrange a title and clip to appear side by side:
Place the playhead in the title clip in the Timeline.1
In the Timeline, double-click Sample Clip 1, the background clip, to open it in the Viewer.2
Drag the corner of Sample Clip 1 to reduce the clip size so that it is smaller than the 3
screen size, as in the illustration below.
Reposition the clip by dragging it left or right to leave a blank space on the screen.4
Double-click the superimposed title clip in the Timeline to open it in the Viewer. 5
Drag the text in the Viewer to a good position next to the background clip. Resize the 6
text to match the space available on the screen.
Press Option-R to render the changed clips, if needed.7
Play the movie in the Timeline to see the title change. Experiment with repositioning 8
and resizing the title and the background clip.
Chapter 3 Preparing Clips in the Viewer
67
Page 68
Change Clips over TimeJump In:
Position the playhead here.
The changes that you’ve made to clips and titles can also be made to happen over time
as the movie plays. For example, a clip might move across the screen, or a title might
appear and then disappear. Final Cut Pro allows you to make many types of changes
over time.
To eect changes in a clip, you specify frames at which a change should occur. These
frames are called keyframes. For example, you might set a keyframe where a clip should
begin moving and then set another keyframe at the point in time when the clip should
stop. Next, you’ll try setting keyframes to see how this works.
Try This
Set keyframes and scale a clip up or down:
In the Timeline, position the playhead just after the end of the title clip, then double-click 1
Sample Clip 1 in the Timeline to open it in the Viewer.
68
Chapter 3 Preparing Clips in the Viewer
Page 69
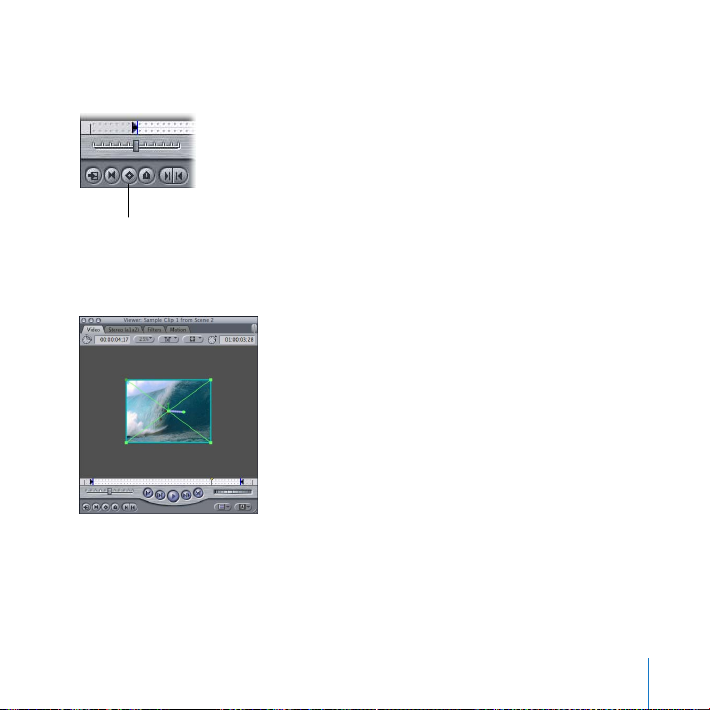
Click the Add Motion Keyframe button. In this case, the keyframe marks where the clips 2
Add Motion
Keyframe button
will begin to change size.
Note that the wireframe and handles of the clip in the Viewer turn green to identify the
new keyframe.
Chapter 3 Preparing Clips in the Viewer
69
Page 70

Move the playhead ahead in the Viewer to the frame where you want the change 3
Move the playhead
to approximately
this position.
to end. In this case, place the playhead at the approximate position you see in the
illustration below. This will be the frame at which the clip is completely resized.
Click the Add Motion Keyframe button to set another keyframe.4
Resize and reposition the clip to ll the normal display area. 5
Play the clip in the Viewer to see it change size over time.6
70
Chapter 3 Preparing Clips in the Viewer
Page 71

Navigate between keyframes in the Viewer:
Position the playhead here.
With the Viewer active, press Shift-K and Option-K to move the playhead from one
keyframe to another. You can use these keyboard shortcuts to quickly nd and move
between keyframes.
Move a clip over time:
In the Timeline, position the playhead about midway through the title clip. 1
Double-click the title clip to open it in the Viewer. 2
Click the Add Motion Keyframe button to add a keyframe.3
Press the Down Arrow key to move the playhead to the Out point of the title clip. This 4
is where you want the text to stop moving.
Chapter 3 Preparing Clips in the Viewer
71
Page 72

Press Control-K to set another keyframe. Drag the title clip o the screen background. 5
Drag the title clip
off the screen.
Press the Up Arrow key to move the playhead to the beginning of the clip, and then 6
play the clip to see the text move over time. Click in the Timeline to make it active,
press Option-R to render the clips, if necessary, and play the sequence.
In the Viewer, press Shift-K or Option-K to move the playhead forward or backward 7
until it is on the last keyframe, and then reposition the text. Play the clip to see the
eect of your change.
72
Chapter 3 Preparing Clips in the Viewer
Page 73
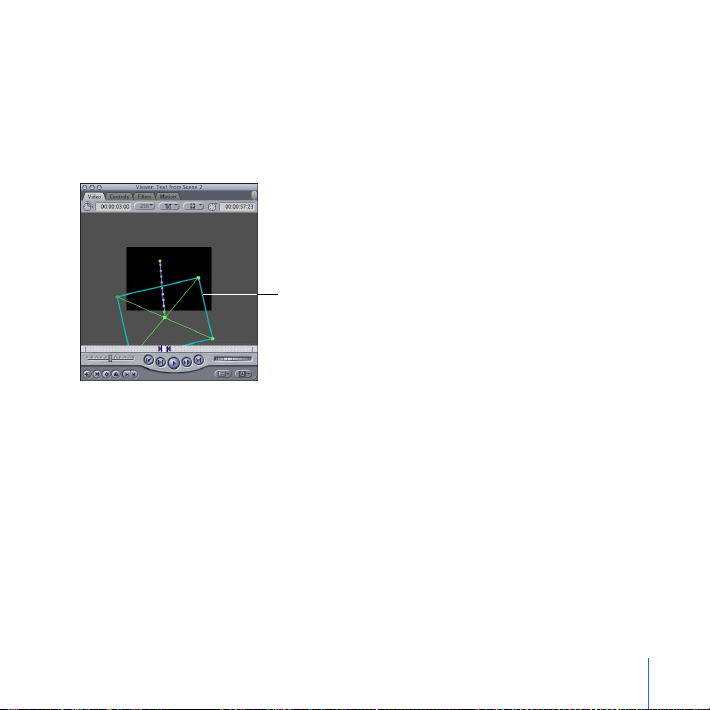
Rotate a clip over time:
Drag to rotate
the wireframe.
With the title clip still open in the Viewer and the Viewer active, press Shift-K or Option-K 1
as necessary to move the playhead to the last keyframe, where the text stops moving.
Position the Selection tool pointer near a corner of the wireframe for the title clip. When 2
the pointer changes to a curved pointer, drag to rotate the clip to a dierent angle.
Click in the Timeline to make it active, press Home, render the clips, if necessary, and 3
play the sequence to see the clip rotate over time.
Experiment by positioning the playhead on the last keyframe and rotating the clip to 4
dierent angles. Play the clip.
Chapter 3 Preparing Clips in the Viewer
73
Page 74

Change a clip’s opacity over time:
Drag here to resize
the window.
Enter “0” (zero) here
and press Return.
With the title clip still open in the Viewer, click the Motion tab to display the motion 1
controls. Drag the corner of the Viewer to expand it, as shown below. The options you
see are all parameters that you can set to change the display of the clip.
Click the disclosure triangle for the Opacity parameter, then enter “0” (zero) in the 2
Opacity eld and press Return to set the text to be transparent. Click the Video tab in
the Viewer to see that the text is no longer visible (only the blue wireframe appears).
74
Chapter 3 Preparing Clips in the Viewer
Page 75

Click the Motion tab again. Beside each parameter appears a keyframe graph area that 3
Opacity keyframe button
Keyframe graph area
The opacity increases here.
represents the duration of the clip. You can add keyframes to this keyframe graph area
to change specic parameter settings over time.
With the Viewer active, press Home to position the playhead at the beginning of the clip 4
in the keyframe graph area, then click the Opacity keyframe button to add a keyframe.
Press the Right Arrow key 15 times to move the playhead ahead 15 frames to where 5
text should be completely visible. Click the Opacity keyframe button again to add a
second keyframe. Drag the clip’s Opacity slider to 100. Your keyframe graph area should
look similar to this:
Click the Video tab in the Viewer and play the clip to see the text appear over time. 6
You can also set the clip to disappear by setting two more keyframes.
Chapter 3 Preparing Clips in the Viewer
75
Page 76

Click the Motion tab and click in the keyframe graph area to position the playhead near 7
Add a keyframe here.
Add a last keyframe here.
the end of the clip, then click the keyframe button to set another keyframe.
Press the Down Arrow key to move the playhead to the end of the clip, and set another 8
keyframe. Set the opacity to 0 (zero). The keyframe graph area should now look similar
to this:
Choose Window > Arrange > Standard to resize the Viewer.9
Press Option-R to render the clips, and then play the sequence in the Timeline to see 10
how the text appears and then disappears based on the keyframes you set. Experiment
with making changes to the keyframes and Opacity parameter settings.
76
Chapter 3 Preparing Clips in the Viewer
Page 77

Learning About Motion Parameters
You’ve had a brief introduction to some of the changes you can make using the Viewer,
but many more are possible using the Motion tab.
By adjusting a clip’s motion settings, you can change its geometry to move, shrink,
enlarge, rotate, and distort in nearly any way you like. You can change any of these
options independently over time using keyframes, allowing you to create professional
eects and impressive changes to your clips.
As a general rule, you set keyframes in pairs, one at the beginning of a change
(as an anchor) and one at the end of the change (at which you specify a changed
parameter value).
Chapter 3 Preparing Clips in the Viewer
77
Page 78

You can add keyframes in the keyframe graph area by clicking the keyframe button for
Keyframe button
Keyframe navigation
buttons
a parameter.
If the playhead is currently on a keyframe, clicking the button removes the keyframe.
The buttons on either side of the keyframe button move the playhead forward or
backward to the next keyframe.
When keyframes are added to a clip, small diamonds appear in the keyframe graph
area to mark the location of the keyframes. You can drag these diamonds to dierent
positions in the keyframe graph area to change the eect.
As you add keyframes, the number of frames between two keyframes determines the
speed of a change. Hence, the more frames between two keyframes, the longer the
change takes. Keyframes that are a small number of frames apart create quick changes.
78
Chapter 3 Preparing Clips in the Viewer
Page 79

Key Concepts
Image mode: A Viewer display mode that shows the video content of a clip as it plays
back. You can change the display to show the clip at reduced or expanded sizes as
you work with the clip.
Image+Wireframe mode:
A Viewer display mode that shows the video content of
the clip surrounded by a wireframe and handles. In this viewing mode, you can
change the display of the clip, repositioning it onscreen, rotating it, and even adding
keyframes and animating the clip’s parameters.
Title safe overlay:
This Viewer display mode places borders on a clip that show the
area where title content will safely appear on the average video monitor. If you put
text within the title safe boundary, you can be sure that it will not be clipped when
viewed on most screens.
Keyframe:
A frame within a clip that has been marked as a key point at which a
change will occur. To eect changes over time, you add keyframes to a clip to identify
specic frames where a change should begin or end.
Motion tab:
A tab in the Viewer that provides options that allow you to change a clip.
For example, you can specify the exact location of a clip, scale the clip up or down,
rotate it, change its opacity, and more. The Motion tab allows you to specify precisely
the changes you want by changing parameter settings (as opposed to manually
dragging or changing the clip in the Image+Wireframe mode).
Next, you’ll explore using the Canvas to view sequences in the Timeline.
Chapter 3 Preparing Clips in the Viewer
79
Page 80

Page 81

Working with the Canvas
and Timeline
You use the Canvas and Timeline to build your project’s
sequences, adding, removing, rearranging, and trimming clips
as you like.
Next, you’ll use the Canvas to learn its basic video editing functions, and then you’ll
explore working with clips in a sequence in the Timeline.
Work with the CanvasJump In:
As you’ve seen, the Canvas provides a view of a sequence in the Timeline. You can use
the Canvas to edit clips into your sequence.
Getting Ready
Choose File > New > Sequence to create a new sequence. Name the sequence “ Tracks” 1
and press Return.
Double-click the Tracks sequence icon in the Browser to open the empty sequence in 2
the Timeline.
4
81
Page 82
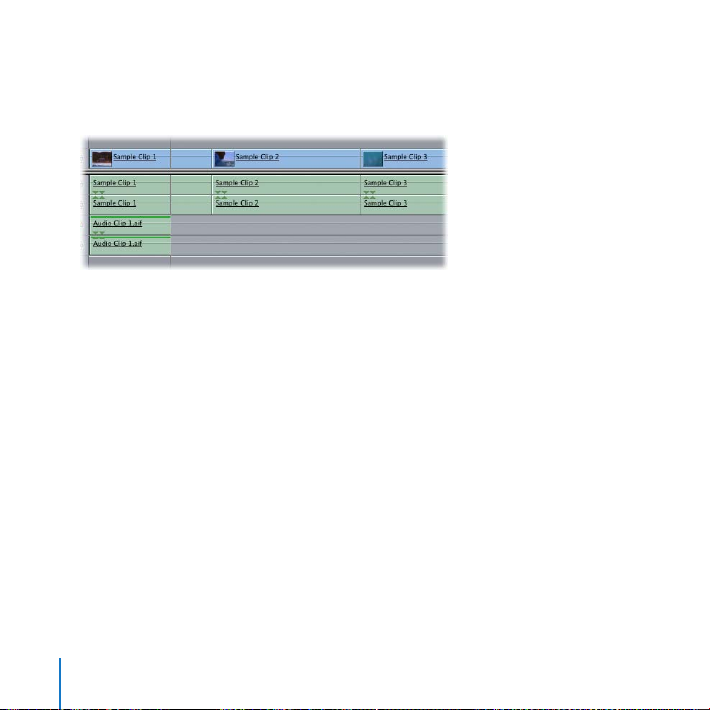
During this section, feel free to place your clips in the Timeline repeatedly to build a
longer sequence to experiment with, or place Sample Clip 1, Sample Clip 2, Sample
Clip 3, and Audio Clip 1 in the Timeline as shown in the following illustration:
To add Audio Clip 1 to the sequence, drag the audio clip from the Browser to the Timeline
below Sample Clip 1 and release the mouse button when the downward-pointing arrow
appears. Final Cut Pro automatically adds two audio tracks.
82
Chapter 4 Working with the Canvas and Timeline
Page 83
Try This
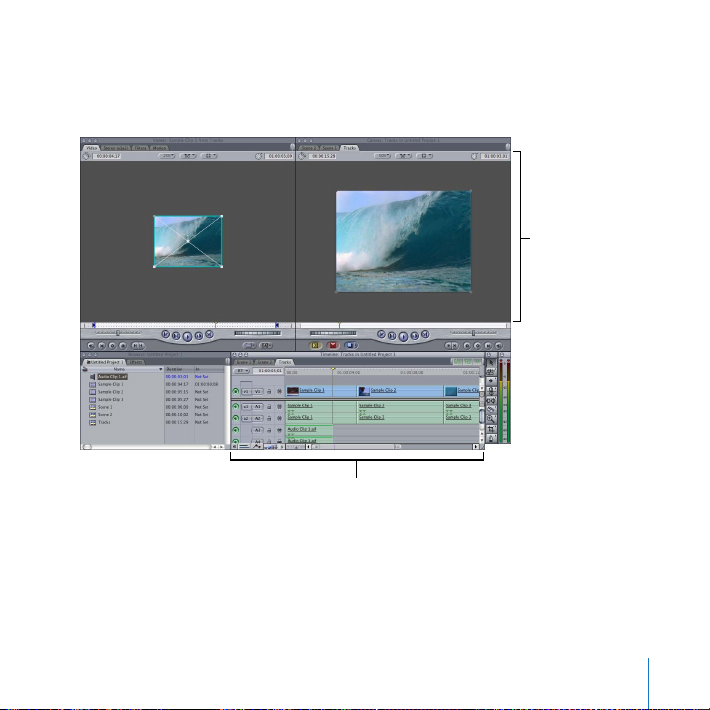
Timeline
Canvas
Change the window layout for a larger view of the Canvas:
Choose Window > Arrange > Two Up.
Display a sequence in Image+Wireframe mode in the Canvas:
Choose Image+Wireframe from the View pop-up menu in the Canvas. The image
appears with handles on the corners. You can now manipulate the display of the clip by
dragging the image and repositioning the clip by its handles.
Chapter 4 Working with the Canvas and Timeline
83
Page 84
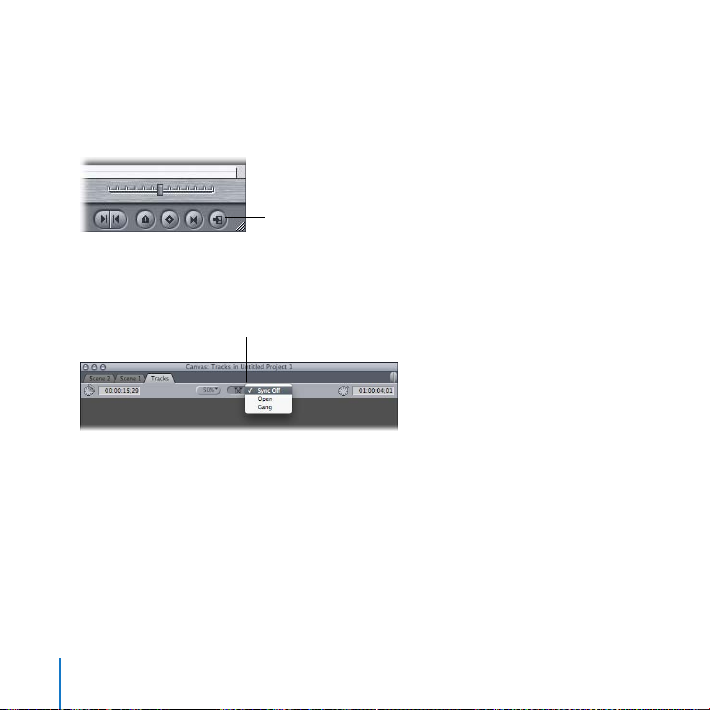
Update the Viewer to show the current frame in the Canvas:
Show Match Frame button
Playhead Sync
pop-up menu
Play the sequence, and notice that the frame displayed in the Viewer is dierent from
the one displayed in the Canvas. Click the Show Match Frame button in the Canvas. The
Viewer changes to show the same frame as the Canvas.
Keep the Viewer and Canvas in sync for easy editing:
Choose Open from the Playhead Sync pop-up menu in the Canvas. 1
Play the sequence. 2
When you stop playing the sequence, the Viewer display automatically changes to
show the same frame as the Canvas. Now, whenever the playhead stops on a clip in the
Timeline, Final Cut Pro opens that clip in the Viewer for edits. Changes you make in the
Viewer or Canvas are updated in the Timeline immediately.
Make changes to the clip in the Viewer or in the Canvas, and play the sequence to see 3
how this works.
84
Chapter 4 Working with the Canvas and Timeline
Page 85
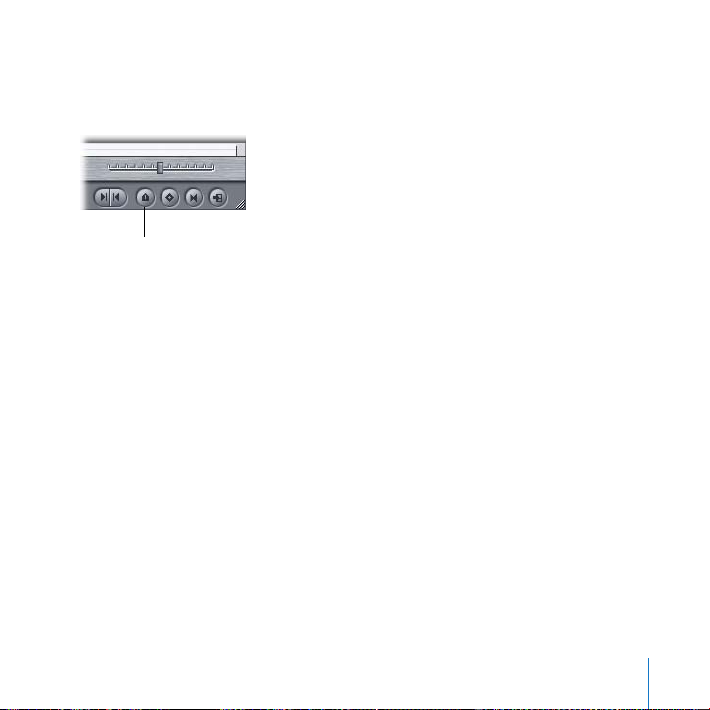
Set markers in the Timeline to mark specic points in a sequence:
Add Marker button
Click the Add Marker button in the Canvas to set a marker in the Timeline at the 1
current position of the playhead.
Reposition the playhead in the Canvas, and this time press M to add another marker. Play 2
your sequence and press M to add more markers on the y. You can use this method of
adding sequence markers to quickly mark specic frames where events occur.
Navigate to markers in the Timeline:
Press Shift–Up Arrow or Shift–Down Arrow to move to the previous or next marker in
the sequence.
Delete markers in the Timeline:
Place the playhead over a marker in the Canvas or Timeline. Choose Mark > Markers >
Delete.
Change markers in the Timeline:
Click a marker to select it in the Timeline, then press M. The Edit Marker dialog
appears with options for changing the marker. (Don’t worry about creating chapter,
compression, or scoring markers for now. You can learn about the dierent kinds of
markers later.)
Chapter 4 Working with the Canvas and Timeline
85
Page 86

Work with Tracks in the TimelineJump In:
Select Track
Select All Tracks Backward
Select Track Forward
Select Track Backward
Select All Tracks Forward
As you work with clips in your sequence, you can select clips in specic tracks, lock
tracks so clips can’t be changed, turn the tracks on or o so that they play or don’t play
as you review your sequence, and set specic tracks as destinations for incoming clips.
Try This
Select clips in the Timeline:
Select the Select Track tool and try selecting an entire track at once.
Select the Select Track Forward tool or Select Track Backward tool and try selecting a
clip and all the clips following or preceding it on a single track.
Select the Select All Tracks Forward tool or Select All Tracks Backward tool and try
selecting a clip and all the clips following or preceding it on all the tracks. Press A to
select the Selection tool again.
86
Chapter 4 Working with the Canvas and Timeline
Page 87
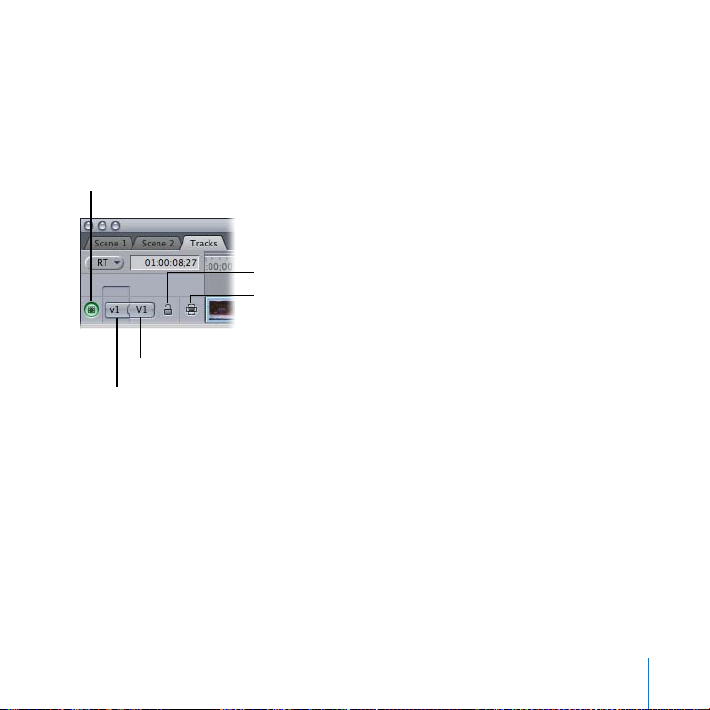
Lock a track to keep it from changing:
Track Visibility control
Source control
Destination control
Auto Select control
Lock Track Control
Click the Lock Track control for a track to prevent changes to that track. You can lock
a track anytime that you want to make sure the timing and positioning of items on
a track won’t change while making edits on other tracks. Click the Lock Track control
again to unlock the track.
Turn a video track on or o:
Click the Track Visibility control for a video track to prevent the track’s video from
appearing when you play back the sequence. Play the sequence to see that the track
has been turned o. Click the Track Visibility control again to turn the track back on.
Turn an audio track on or o:
Click the Track Visibility controls for the audio tracks that hold Audio Clip 1 to prevent
the audio clip from playing during sequence playback. Play the sequence to hear that
the audio tracks have been turned o. Click the Track Visibility controls again to turn
the tracks back on.
Chapter 4 Working with the Canvas and Timeline
87
Page 88
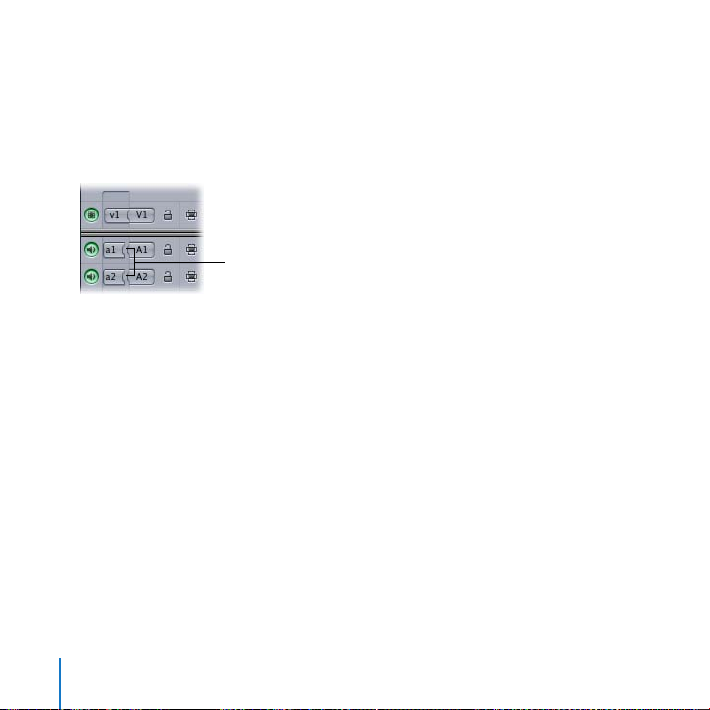
Place only the video portion of a clip in a sequence:
Disconnected
Source controls
Click the a1 and a2 Source controls for the audio tracks to disconnect them from their 1
Destination controls.
This disconnects the audio tracks as destination tracks and prevents the audio portions
of a clip from being placed in the sequence.
Double-click Sample Clip 1 in the Browser to open it in the Viewer. 2
Position the playhead in Sample Clip 3 in the Timeline.3
Drag Sample Clip 1 from the Viewer to the Overwrite section of the Canvas Edit Overlay 4
to see that only the video is placed in the Timeline.
88
Chapter 4 Working with the Canvas and Timeline
Page 89

Place only the audio portion of a clip in a sequence:
Disconnected
v1 Source control
Click the a1 and a2 Source controls for the audio tracks again to reconnect them to their 1
Destination controls. This allows the audio portion of a clip to be placed in the sequence.
Click the v1 Source control to disconnect it from the V1 Destination control. 2
Press the End key to move the playhead to the end of the sequence. 3
Drag Sample Clip 1 from the Viewer to the Overwrite section of the Canvas Edit Overlay 4
to see that only the clip’s audio is placed in the Timeline.
Chapter 4 Working with the Canvas and Timeline
89
Page 90

Add new tracks to a sequence:
Choose Sequence > Insert Tracks.1
Type “1” in the Insert N Video Tracks eld to add a new video track, type “2” in the Insert 2
N Audio Tracks eld to add two audio tracks, then click OK. Scroll in the Timeline to see
the new tracks that were added.
90
Chapter 4 Working with the Canvas and Timeline
Page 91

Set a video destination track before placing clips in a sequence:
Connect the v1 Source
control to the V2
Destination control.
Drag the v1 Source control to the V2 Destination control to specify that the V2 track 1
should be the destination track. Click the Source control to connect it to the V2
Destination control, if necessary.
Press End to move the playhead to the end of the sequence. Drag a clip from the 2
Viewer to the Overwrite section of the Canvas Edit Overlay.
The clip’s video item is placed in the video track you selected.
Chapter 4 Working with the Canvas and Timeline
91
Page 92

Set audio destination tracks before placing clips in a sequence:
Drag the a1 and a2 Source
controls to the A3 and
A4 Destination controls.
Drag the a1 and a2 Source controls to the A3 and A4 audio Destination controls.1
Drag a clip from the Viewer to the Overwrite section of the Canvas Edit Overlay. The 2
clip’s audio is placed in the audio tracks you selected.
92
Chapter 4 Working with the Canvas and Timeline
Page 93

Edit Clips into a Sequence in the TimelineJump In:
After building a sequence, you may need to make changes, such as replacing one clip
with another, adding cutaways, and adding music or sound eects. In this section, you’ll
try out some of the basic methods for placing clips in a sequence. These methods
include steps for 3-point editing in which you to place clips in the Timeline by specifying
three In or Out points in your Viewer and Timeline.
Getting Ready
Drag the v1 Source control to the V1 Destination control, drag the a1 Source control to
the A1 Destination control, and drag the a2 Source control to the A2 Destination control.
Chapter 4 Working with the Canvas and Timeline
93
Page 94

Mark a clip in the sequence and replace it:
Sequence In and Out
points marking a clip that
you want to replace
Move the playhead to a clip in the Timeline that you want to replace.1
Choose Mark > Mark Clip. The sequence clip is marked with In and Out points on both 2
ends in the Timeline.
Double-click Sample Clip 3 to open it in the Viewer. Drag Sample Clip 3 from the Viewer 3
to the Overwrite section of the Canvas Edit Overlay to replace the clip marked in the
sequence. The clip you dragged replaces the clip marked in the sequence.
94
Chapter 4 Working with the Canvas and Timeline
Page 95

Place a clip so that it starts at a specic point in a sequence:
Sequence In point marking
where an incoming clip
should start
Place the playhead on a frame in the sequence where you would like to add a clip. 1
(Anywhere will do.)
Press I to set an In point for the sequence in the Timeline. 2
In the Viewer, set In and Out points in a clip that you want to place in the Timeline. 3
Drag the clip from the Viewer to the Overwrite section of the Canvas Edit Overlay 4
to place the clip at the sequence In point. The clip replaces the one in the Timeline
starting at the In point that you set.
Chapter 4 Working with the Canvas and Timeline
95
Page 96
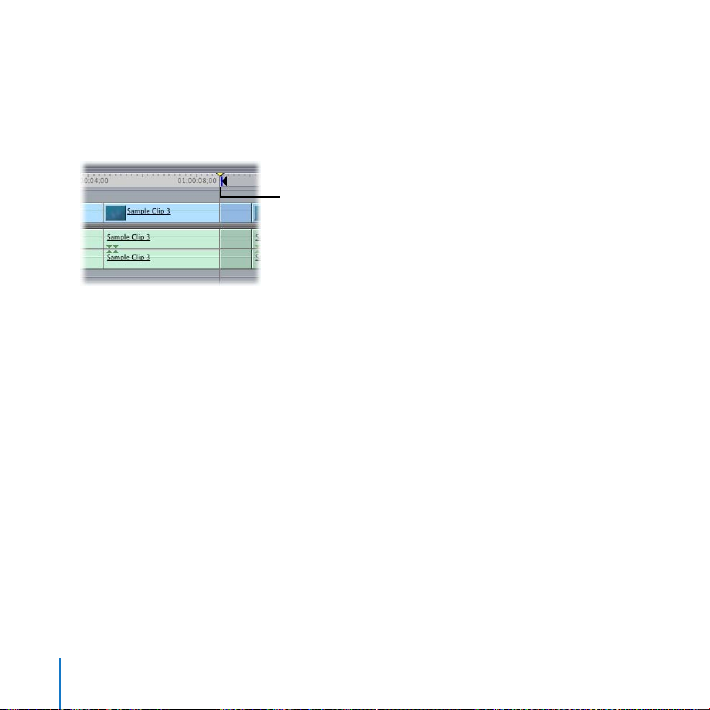
Place a clip so that it ends at a specic point in a sequence:
Sequence Out point
marking where an
incoming clip should end
Place the playhead on a frame in the sequence where you would like the incoming clip 1
to end.
Press O to set an Out point for the sequence in the Timeline. 2
In the Viewer, set In and Out points in a clip. 3
Drag the clip from the Viewer to the Overwrite section of the Canvas Edit Overlay. 4
Final Cut Pro places the Out point of the incoming clip at the sequence Out point.
Fill a specic segment of a sequence with a clip:
Place the playhead on a frame in the sequence where you would like an incoming clip 1
to start.
Press I to set an In point in the sequence. 2
Move the playhead ahead to a frame where you would like the clip to end. (For now, 3
just move the playhead ahead about 10 frames.)
Press O to set an Out point in the sequence. 4
96
Chapter 4 Working with the Canvas and Timeline
Page 97

In the Viewer, set an In point in a clip. You only need to set an In point. (If there is an 5
Out point already set, choose Mark > Clear Out to remove the Out point. Final Cut Pro
is then free to use as much of the clip as is available to ll the duration between the
sequence In point and the sequence Out point.)
Drag the clip from the Viewer to the Overwrite section of the Canvas Edit Overlay to have 6
the clip ll the duration between the sequence In point and the sequence Out point.
Key Concepts
Playhead sync: You can choose Open from the Playhead Sync pop-up menu to have
Final Cut Pro always display the same frames in the Viewer and Canvas windows,
allowing you to quickly open and make edits to specic clips in the Viewer.
Overwrite edit:
An overwrite edit replaces a clip or clips in the Timeline with the
incoming clip that you are adding to the sequence.
Sequence markers:
Markers placed in a sequence in the Timeline or Canvas.
Sequence In and Out points: In point and Out point markers set in the Timeline. You
can use these markers to specify where an edit should occur when you perform an
insert or overwrite edit in the Timeline.
Next, you’ll explore basic editing techniques in Final Cut Pro.
Chapter 4 Working with the Canvas and Timeline
97
Page 98

Page 99

Basic Editing
5
The heart of video editing involves arranging and trimming
clips in a sequence. Final Cut Pro provides easy-to-use tools
and editing procedures for ecient editing.
Next, you’ll try out basic video editing methods and use simple tools to select and
trim clips.
Trim ClipsJump In:
Once you’ve ordered clips in a sequence, you may need to adjust the clips, shortening,
lengthening, or repositioning them in the Timeline. Final Cut Pro provides editing and
trimming tools that allow you to change clips in a sequence without creating gaps. In
this section, you’ll try using some of these tools.
99
Page 100

Getting Ready
Zoom pop-up menu
Press Control-U to choose the Standard window layout.1
Choose File > New > Sequence to create a new sequence. Name the sequence 2
“Trimming” and press Return.
In the Browser, double-click the Trimming sequence icon to open the sequence in 3
the Timeline.
Choose 50% from the Zoom pop-up menu in the Viewer.4
Choose Image from the View pop-up menu in the Viewer.5
100
Chapter 5 Basic Editing
 Loading...