

Page 1

Express Fax/Modem
User’s Guide
Page 2

K Apple Computer, Inc.
Copyright © 1994 by Apple Computer, Inc.
The Apple logo is a trademark of Apple Computer, Inc., registered in the U.S. and other
countries. Use of the “keyboard” Apple logo (Option-Shift-K) for commercial purposes without
the prior written consent of Apple may constitute trademark infringement and unfair
competition in violation of federal and state laws.
Every effort has been made to ensure that the information in this manual is accurate. Apple is
not responsible for printing or clerical errors.
© Apple Computer, Inc., 1994
20525 Mariani Avenue
Cupertino, CA 95014-6299
(408) 996-1010
Apple, the Apple logo, APDA, AppleLink, AppleShare, AppleTalk, ImageWriter, LaserWriter,
LocalTalk, Macintosh and MacTerminal are trademarks of Apple Computer, Inc., registered in
the U.S. and other countries.
AppleTalk Remote Access, Finder, PowerBook, System 7, and TrueType are trademarks of
Apple
Computer, Inc.
Adobe, Adobe Illustrator, and PostScript are trademarks of Adobe Systems Incorporated,
registered in the United States. Adobe Photoshop is a trademark of Adobe Systems
Incorporated.
Hayes is a trademark of Hayes Microcomputer Products, Inc.
MacDraw, MacPaint, and MacWrite are registered trademarks of Claris Corporation.
QuarkXPress is a registered trademark of Quark, Inc.
Touch-Tone is a trademark of Western Electric.
Simultaneously published in the United States and Canada.
Mention of third-party products is for informational purposes only and constitutes neither an
endorsement nor a recommendation. Apple assumes no responsibility with regard to the
performance or use of these products.
Page 3

Contents
Preface How to use This Book ix
Communications regulation information x
FCC and DOC information xi
Chapter 1 Introducing the Express Modem 1
Your modem package 2
Other materials 3
Other software you can purchase 3
AppleTalk Remote Access 3
On-line services 4
General communications applications 4
Modem design 4
Express Modem software 5
Express Modem features 5
Express Fax software 6
Express Fax features 6
Express Fax structure 7
Connecting your Macintosh 8
Installing the Express Modem software 9
iii
Page 4

Chapter 2 Using Your Modem 11
What modems do 12
Setting up a connection 12
Determining the speed 13
Error control 13
Data compression 13
Reaching another modem 14
Chapter 3 Express Fax Quick Start 21
Using Fax Quick Send 22
If Fax Terminal will not open 28
Receiving your first fax 29
Getting ready to receive faxes 29
Checking for received faxes 30
Chapter 4 Getting the Most Out of Your Express Fax 33
Setting up the fax environment 34
Entering fax station information 34
Setting Preferences 35
Using Fax Sender 37
Selecting Fax Sender 37
Fax Sender Page Setup 38
Entering cover page information 39
Using a telephone credit card 41
Selecting a cover page 43
Automatic dialing 44
Using Fax Phone Book 45
Setting send time 49
Previewing a fax 50
Manual dialing 51
Monitoring a fax 54
iv
C
ONTENTS
Page 5

Accessing Fax Terminal 55
Forwarding a fax 57
Resetting the send time 58
Canceling a fax 60
Deleting faxes 61
Using the Fax Log 62
Receiving a fax 64
Setting Fax Terminal preferences for receiving 64
Checking for received faxes 65
Opening a fax document 67
Receiving manually 68
Chapter 5 Fax Viewer 69
Opening a fax 70
Viewing a fax 71
Positioning a document 71
Scrolling pages 71
Changing the page orientation 72
Improving fax display 72
Editing a fax 74
Cutting a page 74
Copying a page 74
Pasting a page 74
Clearing a page 75
Selecting a portion of a page 75
Resequencing a fax 77
Printing a fax 77
Converting a fax document to a PICT file 77
Forwarding a fax 79
C
ONTENTS
v
Page 6

Chapter 6 Fax Cover 81
Customizing cover pages 82
Customizing fields 82
Positioning and resizing fields 85
Using the grid 86
Aligning fields 86
Adding graphics 89
Installing cover pages 93
Removing a cover page 94
Appendix A Technical Information 97
Express Modem control panel 98
Setting the modem 98
Monitoring the modem 98
Turning the modem on and off 99
Express Settings 100
Blind dialing 101
Auto-Answer 101
Wake Macintosh on ring 102
Speaker pop-up menu 102
Selecting the serial port 102
Express Status 103
Selecting Express Status 103
Communications Toolbox compatibility 104
Call management 105
Setting auto-answer at the application level 106
Answering manually 107
Software specifications 108
Hardware specifications 109
vi
C
ONTENTS
Page 7

Appendix B Modem Command Set 111
Modem states 112
Moving between command and on-line states 112
Using AT commands 113
Entering AT commands from MacTerminal 113
Commands documented in this appendix 115
Integrated (non-serial port) modems 115
Command set rules 115
AT command set 117
Special commands 117
Standard AT commands 118
S registers 123
Verbalize result codes 128
MNP-specific AT commands 134
ASCII character set 136
Appendix C Tips and Troubleshooting 137
Checking the installation 138
Glossary 153
Index 167
Checking the telephone line 139
Ve rifying that your software is installed 141
Common problems 142
Other screen display problems 145
Messages and alerts 146
Express Modem control panel status messages 146
Express Modem Tool alerts 147
Express Fax messages 147
Connecting to older modems 148
Setting up AppleTalk Remote Access 149
Setting up AppleLink 151
C
ONTENTS
vii
Page 8

1
Preface
How to Use This Book
This manual provides complete information for operating the Express Modem.
It is assumed that you are familiar with basic Macintosh desktop operations. If
not, refer to the manuals that come with your Macintosh.
m Chapter 1 explains how fax/modems work and describes the installation of
the Express Modem software.
m Chapter 2 covers the use of the Express Modem for data communications.
If you have never used a modem, you should read this part to familiarize
yourself with modem operation. Use this chapter as a complement to
communications software packages you may own.
m Chapters 3 through 6 cover the use of the Express Fax software for
sending and receiving faxes with your Macintosh. These chapters provide
complete information on the easy-to-use Express Fax program.
In the back
m At the back of the book you’ll find appendixes, a glossary, and an index.
The appendixes include information on the modem technical
specifications, the AT command set, and modem tips and troubleshooting.
ix
Page 9

Communications regulation information
The following information is provided in compliance with US FCC (Federal Communications
Commission), Canadian DOC (Department of Communications).
Important
This equipment has been tested and found to comply with the limits for a Class B digital device
in accordance with the specifications in Part 15 of FCC rules. See instructions if interference to
radio or television reception is suspected.
Radio and television interference
The equipment described in this manual generates, uses, and can radiate radio-frequency
energy. If it is not installed and used properly—that is, in strict accordance with Apple’s
instructions—it may cause interference with radio and television reception.
This equipment has been tested and found to comply with the limits for a Class B digital device
in accordance with the specifications in Part 15 of FCC rules. These specifications are designed
to provide reasonable protection against such interference in a residential installation. However,
there is no guarantee that interference will not occur in a particular installation.
You can determine whether your computer system is causing interference by turning it off. If
the interference stops, it was probably caused by the computer or one of the peripheral devices.
If your computer system does cause interference to radio or television reception, try to correct
the interference by using one or more of the following measures:
m Turn the television or radio antenna until the interference stops.
m Move the computer to one side or the other of the television or radio.
m Move the computer farther away from the television or radio.
m Plug the computer into an outlet that is on a different circuit from the television or radio.
(That is, make certain the computer and the television or radio are on circuits controlled by
different circuit breakers or fuses.)
If necessary, consult the service and support information that came with your computer for
instructions on how to contact an Apple-authorized service provider or Apple for assistance. Or,
contact an experienced radio/television technician for additional suggestions. You may find the
following booklet helpful: Interference Handbook (stock number 004-000-00345-4). This
booklet, prepared by the Federal Communications Commission, is available from the U.S.
Government Printing Office, Washington, DC 20402.
Important
Changes or modifications to this product not authorized by Apple Computer, Inc., could void
the FCC Certification and negate your authority to operate the product.
This product was tested for FCC compliance under conditions that included the use of shielded
cables and connectors between system components. It is important that you use shielded cables
and connectors to reduce the possibility of causing interference to radios, television sets, and
other electronic devices. For Apple peripheral devices, you can obtain the proper shielded
cables through an Apple-authorized dealer. For non-Apple peripheral devices, contact the
manufacturer or dealer for assistance.
x
P
REFACE
Page 10
DOC Class B Compliance This digital apparatus does not exceed the Class B limits for radio
noise emissions from digital apparatus set out in the radio interference regulations of the
Canadian Department of Communications.
Observation des normes—Classe B Le présent appareil numérique n’émet pas de bruits
radioélectriques dépassant les limites applicables aux appareils numériques de la Classe B
prescrites dans les règlements sur le brouillage radioélectrique édictés par le Ministère des
Communications du Canada.
Notify your local telephone company
Some telephone companies require that you notify the local business office when you hook up a
modem to their lines.
Information you need in the United States
A label on the modem contains, among other information, the FCC registration number and
ringer equivalence number (REN). If requested, provide this information to your telephone
company.
m FCC ID number Part 15: BCGM7784
This number confirms that your modem has been approved by the FCC.
m FCC registration number Part 68
This number appears on your Macintosh.
m Ringer equivalence number: 0.7B
The ringer equivalence number (REN) is useful to determine the quantity of devices you
may connect to your telephone line and still have all of those devices ring when your number
is called. In most, but not all areas, the sum of RENs of all devices should not exceed
five (5). To be certain of the number of devices you may connect to your line, as determined
by the REN, you should call your telephone company to determine the maximum REN for
your calling area.
m Model number: M7784
m Manufacturer: Apple Computer, Inc.
m Telephone jack type: USOC, RJ-11
P
REFACE
xi
Page 11

Information you need in Canada
The Canadian Department of Communications (DOC) label identifies certified equipment. This
certification means that the equipment meets certain telecommunications network protective,
operational, and safety requirements. The Department does not guarantee the equipment will
operate to the user’s satisfaction.
Before installing this equipment, users should ensure that it is permissible to be connected to the
facilities of the local telecommunications company. The equipment must also be installed using
an acceptable method of connection. In some cases, the company’s inside wiring associated
with a single-line individual service may be extended by means of a certified connector
assembly (telephone extension cord). The customer should be aware that compliance with the
above conditions may not prevent degradation of service in some situations.
Repairs to certified equipment should be made by an authorized Canadian maintenance facility
designated by the supplier. Any repairs or alterations made by the user to this equipment, or
equipment malfunctions, may give the telecommunications company cause to request the user to
disconnect the equipment.
Users should ensure for their own protection that the electrical ground connections of the power
utility, telephone lines, and internal metallic water pipe system, if present, are connected
together. This precaution may be particularly important in rural areas.
Warning
Users should not attempt to make such connections themselves, but should contact the
appropriate electric inspection authority or electrician.
m Load number: 5
The load number (LN) assigned to each terminal device denotes the percentage of the total
load to be connected to the telephone loop that is used by the device, to prevent overloading.
The termination on a loop may consist of any combination of devices and is subject only to
the requirement that the total of the load numbers of all devices does not exceed 100.
m Telephone jack type: CA-11
xii
P
REFACE
Page 12

Telephone line problems
If your telephone doesn’t work, there may be a problem with your telephone line. Disconnect
the modem to see if the problem goes away. If it doesn’t, report the problem either to your local
telephone company or to your company’s telecommunications people.
Consult the service and support information that came with your computer for instructions on
how to contact an Apple-authorized service provider or Apple for assistance. The telephone
company may ask you to disconnect this equipment from the network until the problem has
been corrected or you are sure that the equipment is not malfunctioning.
If your modem causes harm to the telephone network, the telephone company may discontinue
your service temporarily. If possible, they will notify you in advance. But if advance notice isn’t
practical, you will be notified as soon as possible. You will be advised of your right to file a
complaint with the FCC.
Your telephone company may make changes in its facilities, equipment, operations, or
procedures that could affect the proper operation of your equipment. If the telephone company
makes such changes, you will be given advance notice so as to give you an opportunity to
maintain uninterrupted service.
Important
The modem will not work with party lines, cannot be connected to a coin-operated telephone,
and may not work with a digital private exchange (PBX).
P
REFACE
xiii
Page 13

1
Introducing the Express Modem
In this chapter
This chapter informs you about
m Your modem package
m Other materials
m Modem design
m Express Modem capabilities and features
m Express Fax capabilities and features
m Connecting your Macintosh
m Installing the Express Modem software
Before you begin
Before connecting your Macintosh to your telephone line,
be sure you have everything you need.
1
Page 14

Your modem package
The Express Modem package contains:
m the Express Fax/Modem User’s Guide
m a length of telephone cord
m a disk containing the modem and fax software
m depending on your CPU model, a country Data Access Arrangement (not
pictured here)
If you’re missing something, see the service and support materials that came
with your computer for a number to call.
The contents of your package are shown below.
Express Fax/Modem
User’s Guide
Express Modem
Install
disk
Telephone cord
Note: Your telephone cord may look different from the one pictured.
Te lephone connectors vary by region. Your package contains the telephone
cord appropriate for your region.
2
C
HAPTERONE
Page 15

Other materials
To use your Express Modem, you may also need:
m A modular connector on your telephone line If your telephone cord
cannot be removed from the wall or has a non-standard jack, you’ll need a
modular adapter or a new telephone system that provides a modular jack.
Ask your local telephone retailer for assistance in selecting the most
appropriate solution for a modular jack.
m An analog telephone line The Express Modem is designed for use with a
traditional telephone system (also called an analog system). Most homes
use an analog system.
m Communications Toolbox compatible software The Express Modem
comes with CTB compatible fax software. If you plan to use a terminal
emulator or other data communications package, you must purchase it
separately. It should be CTB compatible.
m PowerBook options Depending on the PowerBook model you have, you
can purchase an approved travel adapter for correct modem configuration
in the country you’re visiting. Ask your Apple dealer for details.
Other software you can purchase
In addition to the Express Modem and Express Fax software, you can
purchase communications software, such as MacTerminal, that fits your own
needs. A few types of software are discussed below.
AppleTalk Remote Access
AppleTalk Remote Access software allows you to connect to your office
AppleTalk network over telephone lines. With AppleTalk Remote Access you
can work anywhere there is a phone line, transferring files and accessing
electronic mail, printers, servers, and other network devices. The high speed
of the modem (up to 14400 bps) makes the connection time shorter and
therefore less expensive. See “Setting up AppleTalk Remote Access” in
Appendix C.
I
N T R O D U C I N G T H EEXPRESSMODEM
3
Page 16

On-line services
On-line services offer connection to data bases, bulletin boards, and a variety
of other services. Access software is provided at subscription time.
General communications applications
General communications applications allow simple terminal emulation, file
transfer, and remote connection. This type of software gives you the broadest
range of options, and allows you to take full control of your modem if you
decide to use the direct modem AT commands described in Appendix B.
If you want to use your modem for purposes beyond on-line services
for example to send a file from your computer to a friend’s computer, you
should acquire software compatible with the Macintosh Communications
To olbox, such as MacTerminal. However, the Express Modem supports most
non-CTB compatible applications.
Some of the information in this guide may not apply to your particular
communications software. For in-depth information, see the user’s guide that
comes with the communications software you purchase.
. See also: Appendix A, “Communications Toolbox compatibility.”
Modem design
4
C
HAPTERONE
Communications capabilities are built into your modem, but you can’t use
them without installing the Express Modem and Fax software.
Once installed, the modem software and hardware work together as a team.
Many of the modem’s traditional functions, such as data compression, are
handled by the software.
With most commercially available modems, if you want to take advantage of
improved technology, you must buy new hardware. The advantage of having a
software modem is that you can easily upgrade your modem just as you
upgrade any other software. As such, you can obtain the latest improvements
by upgrading your software from a disk or server.
Page 17

Express Modem software
The Express Modem software consists of:
m Express Modem, a control panel, available from the Apple Menu, for
turning the modem application on and off, controlling the modem, and
monitoring modem status
m Express Modem Tool, a tool compatible with the Macintosh
Communications Toolbox for setting up and using your modem
Express Modem features
Here is a summary of Express Modem features:
m Hayes compatible
m High-speed data transfer at up to 14400 bits per second (bps)
m Error control for data integrity and reliability; data compression for
increased data throughput (up to 4 to 1)
m Simple interface that automatically allows the modem to make the best
connection without bothersome setup
m Easy upgrades and feature enhancement at lower cost
I
N T R O D U C I N G T H EEXPRESSMODEM
5
Page 18

Express Fax software
The Express Fax software consists of five programs to handle fax functions:
m Fax Terminal, a program for monitoring faxes during send and receive,
available from the Apple menu
m Fax Viewer, a program for viewing faxes you have sent or received
m Fax Sender, a printer driver for sending faxes and managing addresses
m Fax Extension, a system extension for managing send and receive between
the fax software and the modem
m Fax Cover, a program for making fax cover pages
Express Fax features
The Express Fax software supports Group 3 fax send and receive capability.
Express Fax allows you to convert any Macintosh program document to fax
format and send it to another computer capable of receiving faxes or to a
dedicated fax machine. Express Fax allows you to receive a fax from a Group
3 remote fax device.
Here is a summary of Express Fax features:
m Easy send and forward of fax documents by printing to a remote fax device
m Fax receive
m V.17, V.29, and V.27 ter CCITT high-speed, reliable fax send and receive
(14400, 12000, 9600, 7200, 4800, 2400) for Group 3 fax
m Shortcut selection of Fax Sender
m Viewing, printing, forwarding, and copying of faxes
m Fast imaging
m Fax Quick Send
m Te lephone credit card support
m Fax smoothing feature that dramatically improves fax display
m Personalized fax cover page design
6
C
HAPTERONE
Page 19

Express Fax structure
The Express Fax programs handle assembly, transmission, and reception of
faxes. The following diagram shows how the programs interrelate.
Fax Cover
Run this
application
to manage
cover pages
Attach
cover
Prepare a document
in your application.
Press Shift-Control
keys while choosing
Fax from File Menu
Fax Sender
Appears in
place of Print
dialog box
ForwardSend
Fax Terminal
Opens
automatically
when you send
or receive a fax
Fax Extension
Manages send
and receive
between Fax
Te rminal and
Express Modem
Forward
View
Save
Print
Fax Viewer
Run this
application to
view sent and
received faxes
Express Modem
I
N T R O D U C I N G T H EEXPRESSMODEM
7
Page 20

Connecting your Macintosh
To link your Macintosh to your telephone line, connect one end of the
telephone cord to your Macintosh and the other to your telephone line.
1Make sure that your computer is turned off.
2 Locate the internal modem on the back of your computer (RJ-11 receptacle).
3Plug one end of the cord into your computer’s internal modem jack receptacle.
Internal Modem port icon
Internal Modem port
jack receptacle
Modem connector (RJ-11)
Note: The Internal Modem port in your CPU may be different than the port
pictured above.
4Plug the other end of the cord into your telephone wall jack.
If a telephone is plugged into the jack you want to use, unplug your telephone
cord from the jack.
Note: Before attempting to use your modem over the telephone lines, make
sure the modem is properly connected.
8
C
HAPTERONE
Page 21
Installing the Express Modem software
The Installer places items in your System Folder and Extensions folder. Some
of these items are control panels and programs that you will use to send and
receive data and fax.
Note: If you are reinstalling or upgrading the modem and fax software, the
installer will not overwrite any existing fax phone book or cover pages.
. See also: Chapter 2, “Using Your Modem,” and refer to the user’s guide that
came with your communications software. To send and receive faxes, see
Chapter 3, “Express Fax Quick Start.”
1 Turn your computer on, and wait until the desktop appears.
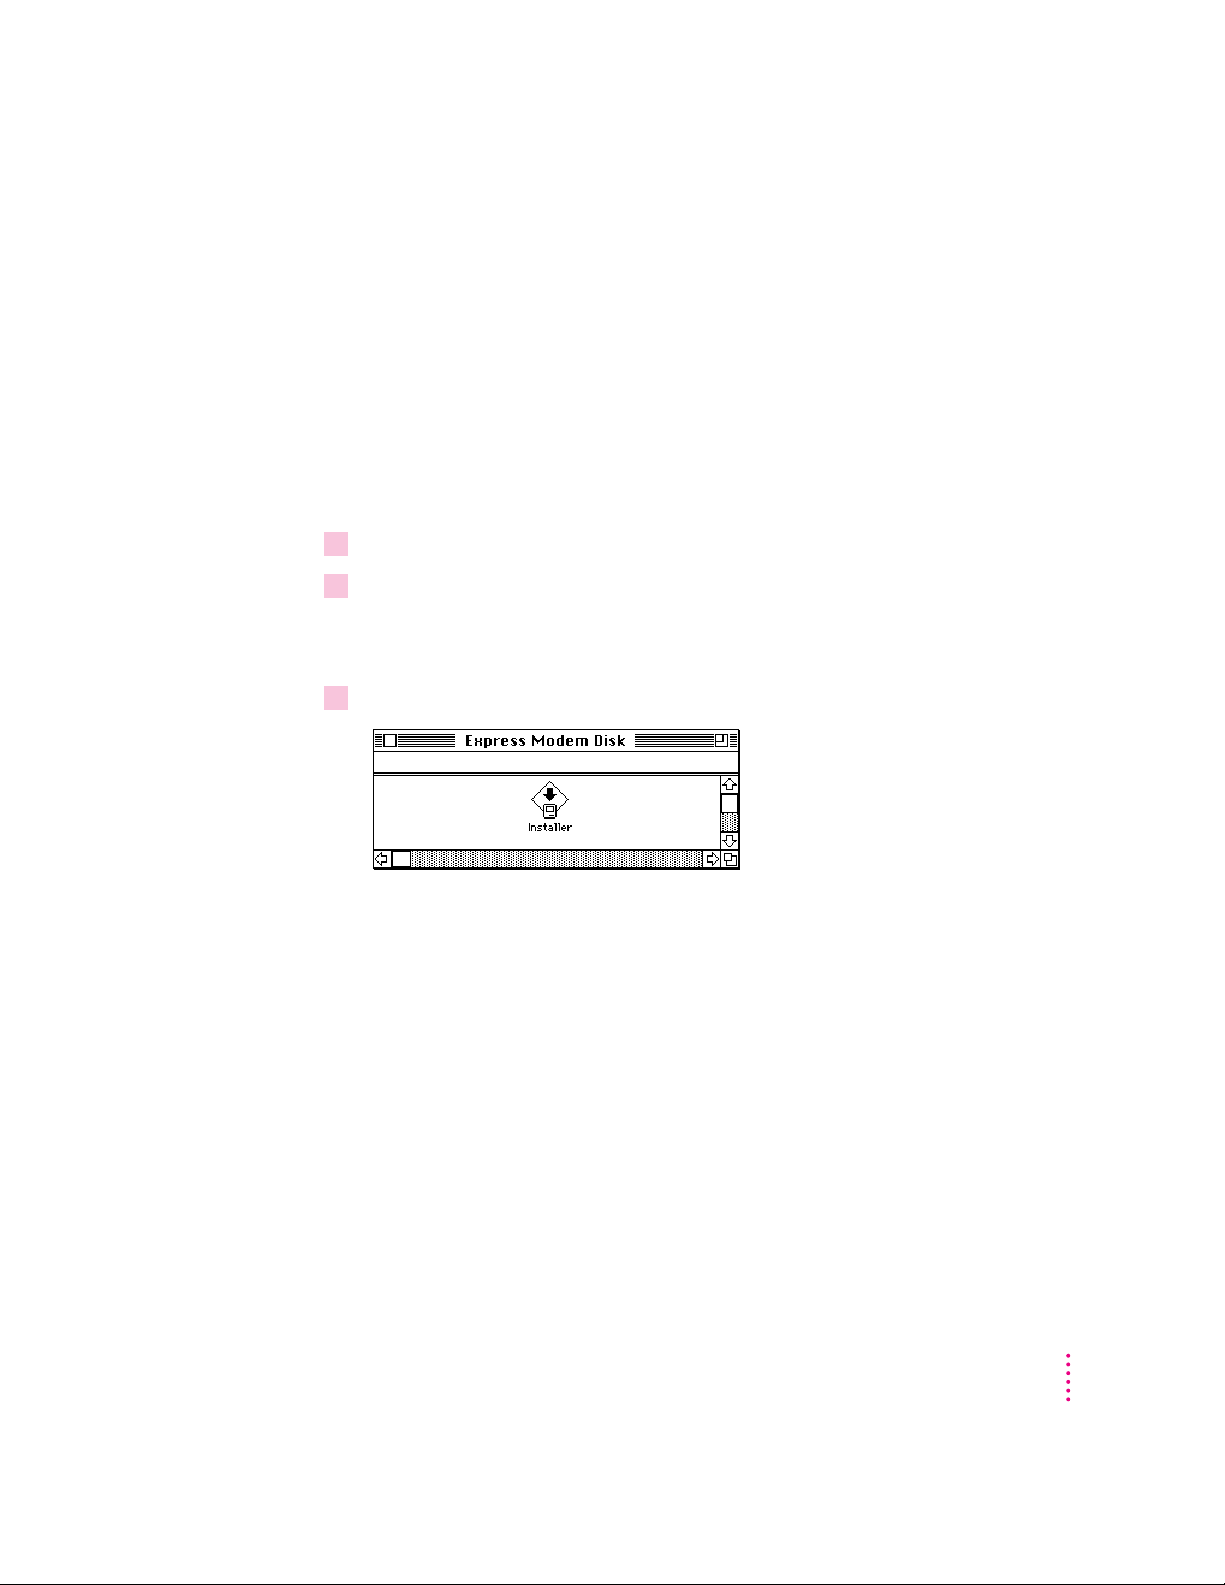
2 Insert the Express Modem disk in your disk drive and, if necessary, double-click the disk
icon to open the Install window.
The Express Modem window opens.
3 To open the Installer, double-click the Installer icon.
I
N T R O D U C I N G T H EEXPRESSMODEM
9
Page 22
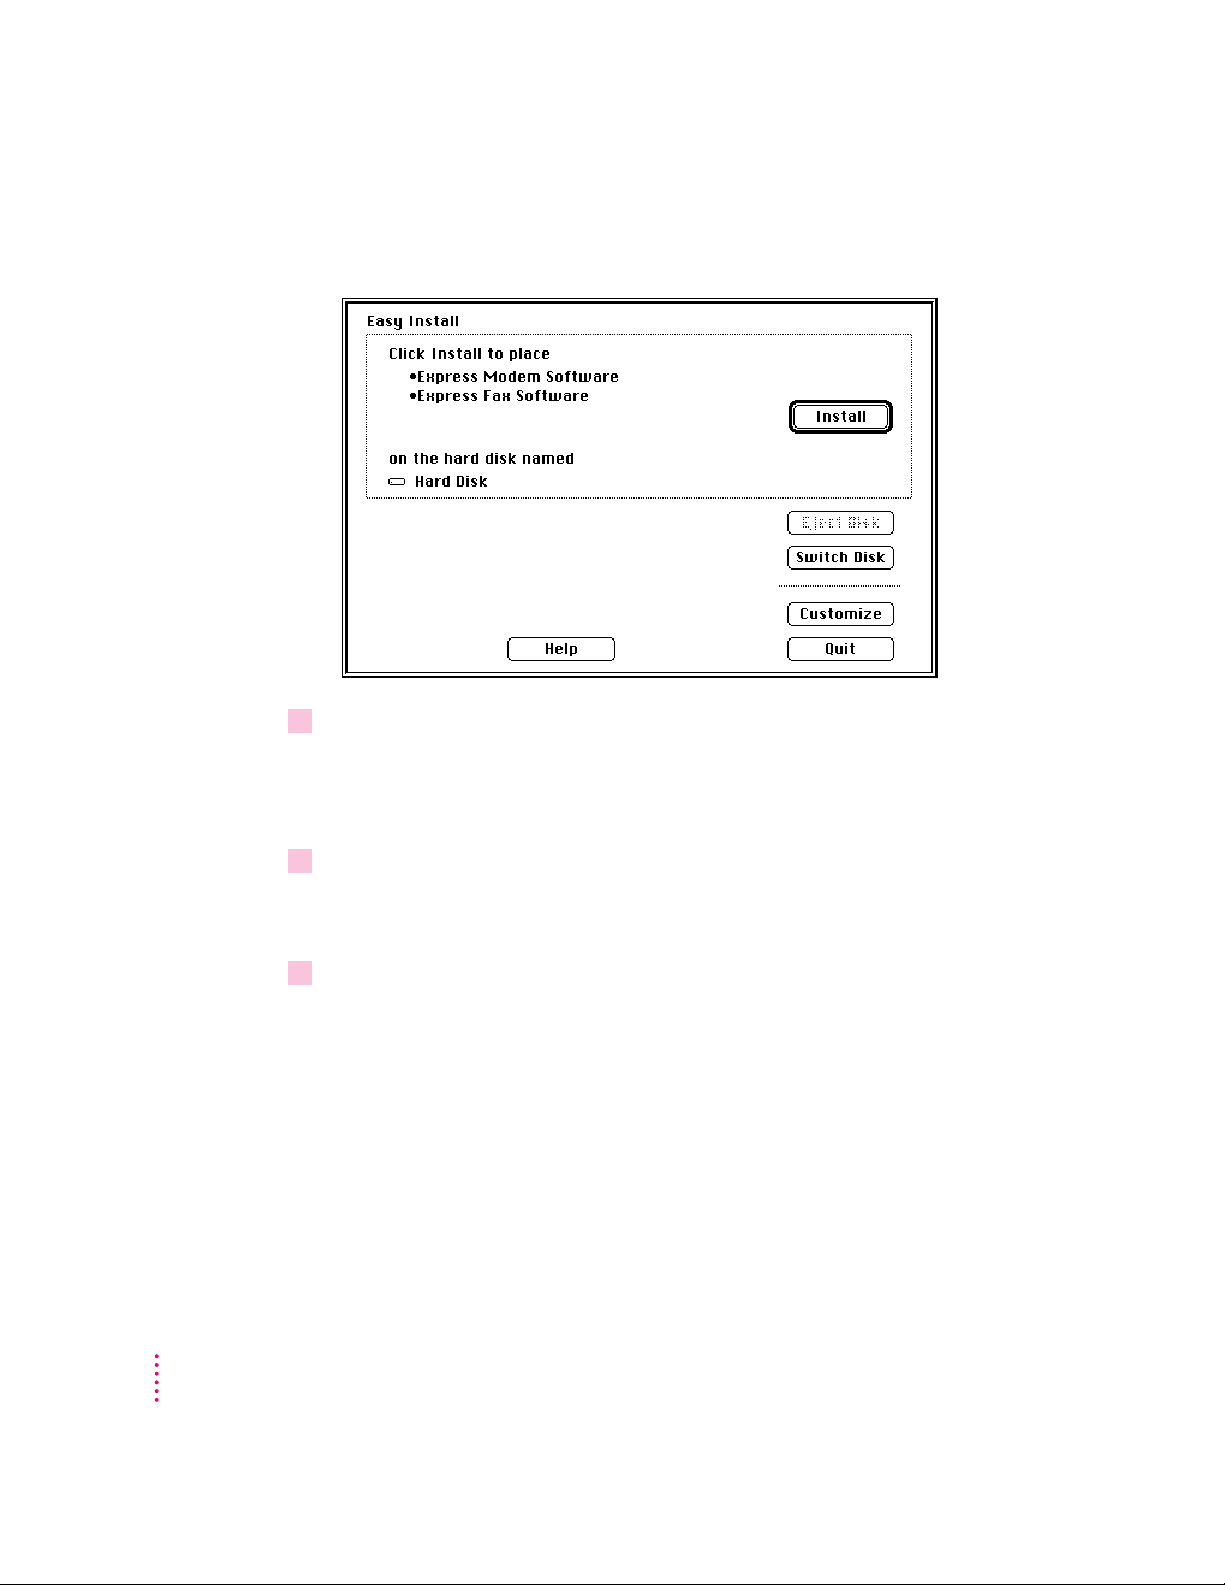
The Easy Install dialog box appears. Easy Install automatically detects the
Macintosh model you are using and installs the software correctly.
4Make sure that the hard disk indicated in the box is where you want to install the
software.
If the wrong disk name appears, click the Switch Disk button until the correct
disk name appears.
10
C
HAPTERONE
5 Click Install.
A message informs you when the installation has been successfully
completed.
6Click Restart to restart your computer and activate the software.
. See also: Appendix A for information on using the Express Modem
control panel.
Page 23

2
Using Your Modem
In this chapter
This chapter informs you about
m What modems do
m Reaching another modem
Before you begin
If you have followed the installation steps in Chapter 1, you are ready to
connect to another modem.
11
Page 24

What modems do
Before two computers can exchange data via a modem connection, they must
be able to recognize each other and agree on how data will be transmitted.
Without modems, computers cannot exchange data over long distances
because the signal will degrade after a few meters. Therefore, to pass across
the PSTN (Public Switched Telephone Network), digital information from
your computer is converted to a sound modulated signal. The signal is
reconverted to digital by the receiving modem.
Modems also dial and establish connections between computers. They control
the flow of data across the telephone line so transmission takes place with
optimal speed and accuracy.
Setting up a connection
When two computers connect through their modems, the modems’ first task is
to reach agreement on speed, error control, and data compression. Reaching
agreement is called handshaking.
Handshaking is equivalent to saying, “I’m German; you’re French, but we
both speak English. So let’s speak English a little slowly. If we’re both
English, we can speak more quickly.”
12
C
HAPTERTWO
Your modem is already set to automatically make the best possible
handshaking agreement. See Appendixes A and B for a complete list of
specifications and default settings.
In general, it is best to accept your modem’s automatic settings. If you want to
set your own speed, error control method, and data compression type, see the
user’s guide that came with your communications software and the AT
command set in Appendix B.
Page 25

Determining the speed
Initially, your modem tries to connect at 14400 bps, its fastest speed. If the
remote modem can’t connect at 14400 bps, your modem falls back to the next
highest speed. Fallback continues until the two modems agree on their
capabilities.
Error control
Error control is used by modems to check data for errors. Your modem and
the remote modem must agree on an error control method. Your modem will
try to use a method called V.42 and MNP class 2–4. If the remote modem
doesn’t support this type of error control, both fall back until an agreement is
reached.
Data compression
Data compression increases the speed of your modem by eliminating gaps
and redundancies from the data. For instance, if you connect at 14400 bps
with data compression enabled, the speed can increase up to 4 times the
non-compression speed.
Your modem uses a type of data compression called V.42 bis or MNP class 5. If
the remote modem doesn’t support these types of data compression, it will
not use any.
U
SINGYOURMODEM
13
Page 26
Reaching another modem
The following example uses MacTerminal, CTB compatible communications
program. To use your communications software, you must select the modem
connection tool that corresponds to your modem, in this case the Express
Modem Tool. Most communications programs are similar, so you can
probably use this example with your own software.
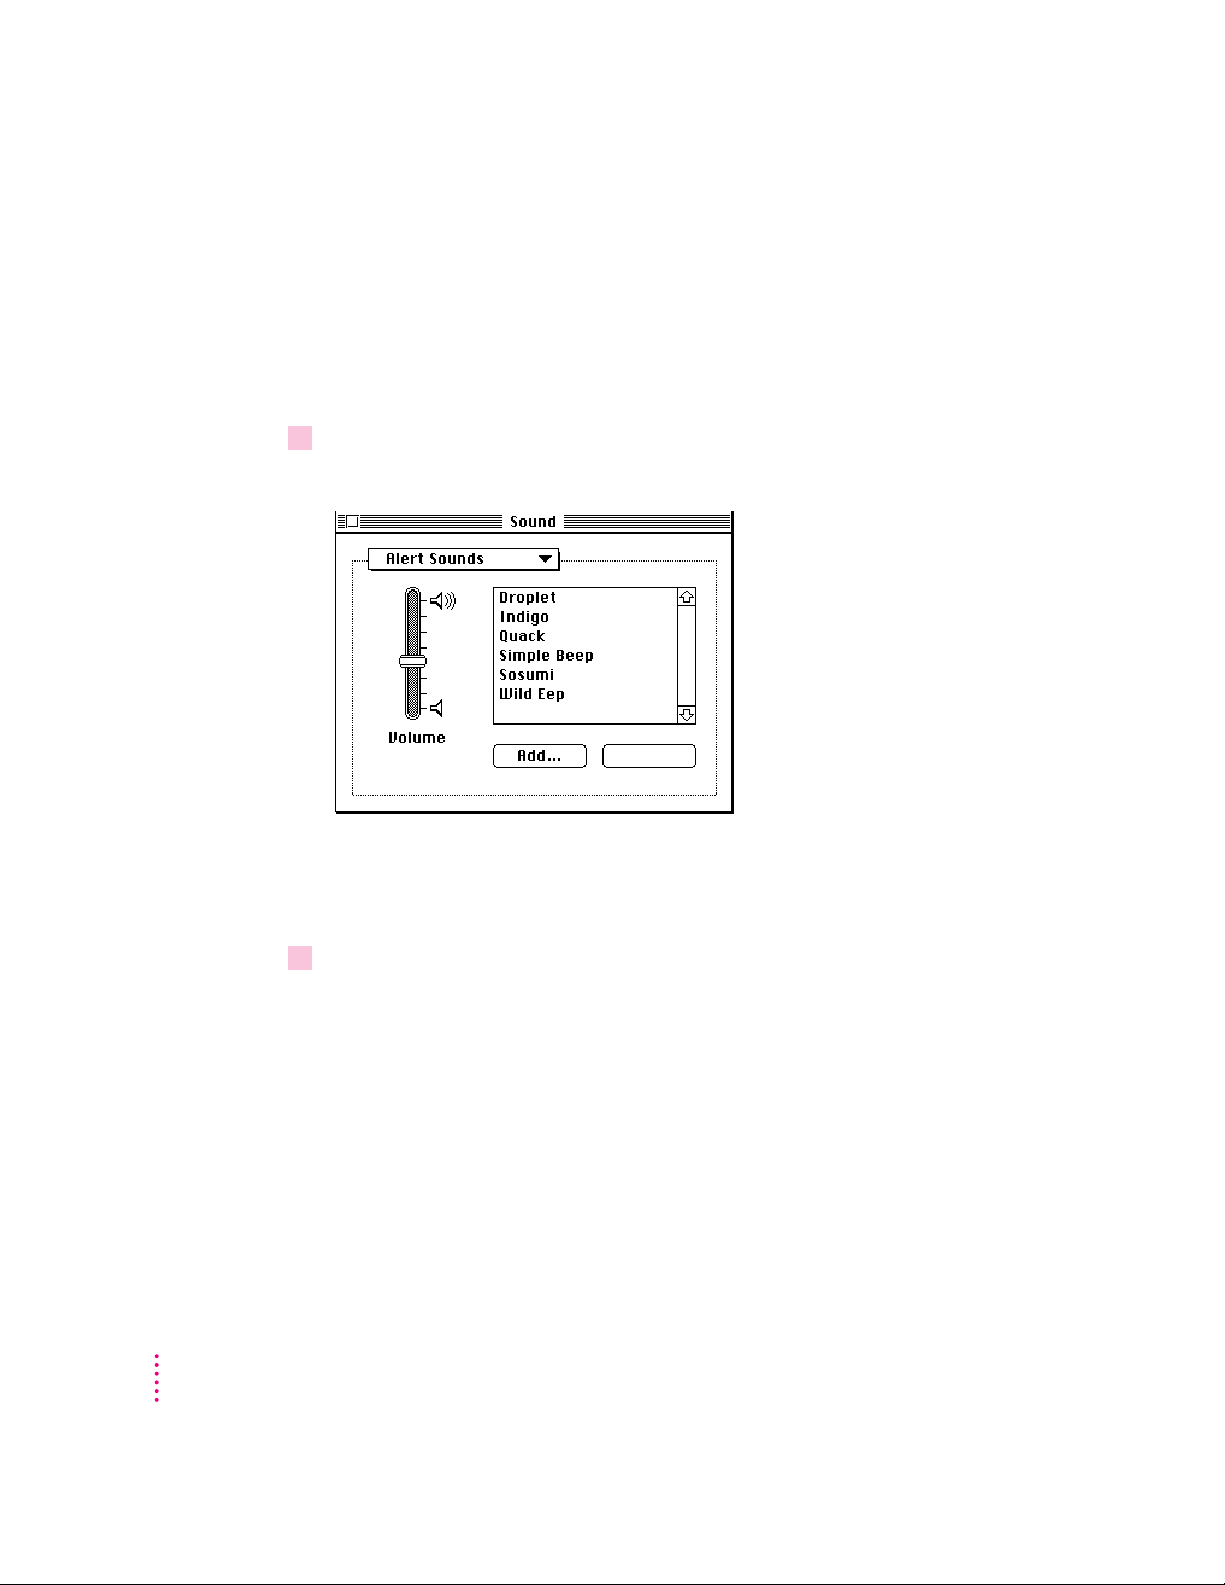
1Double-click the Sound control panel icon in the Control Panels window.
The Sound control panel appears.
14
C
HAPTERTWO
. See also: “Express Modem control panel” for additional speaker and
other settings and “Communications Toolbox Compatibility” for using
non-Communications Toolbox applications in Appendix A.
2If necessary, set the speaker volume above the lowest mark in the Sound control panel
then close the control panel.
Increasing the speaker volume allows you to listen as the modem dials the
telephone number you specify.
Page 27
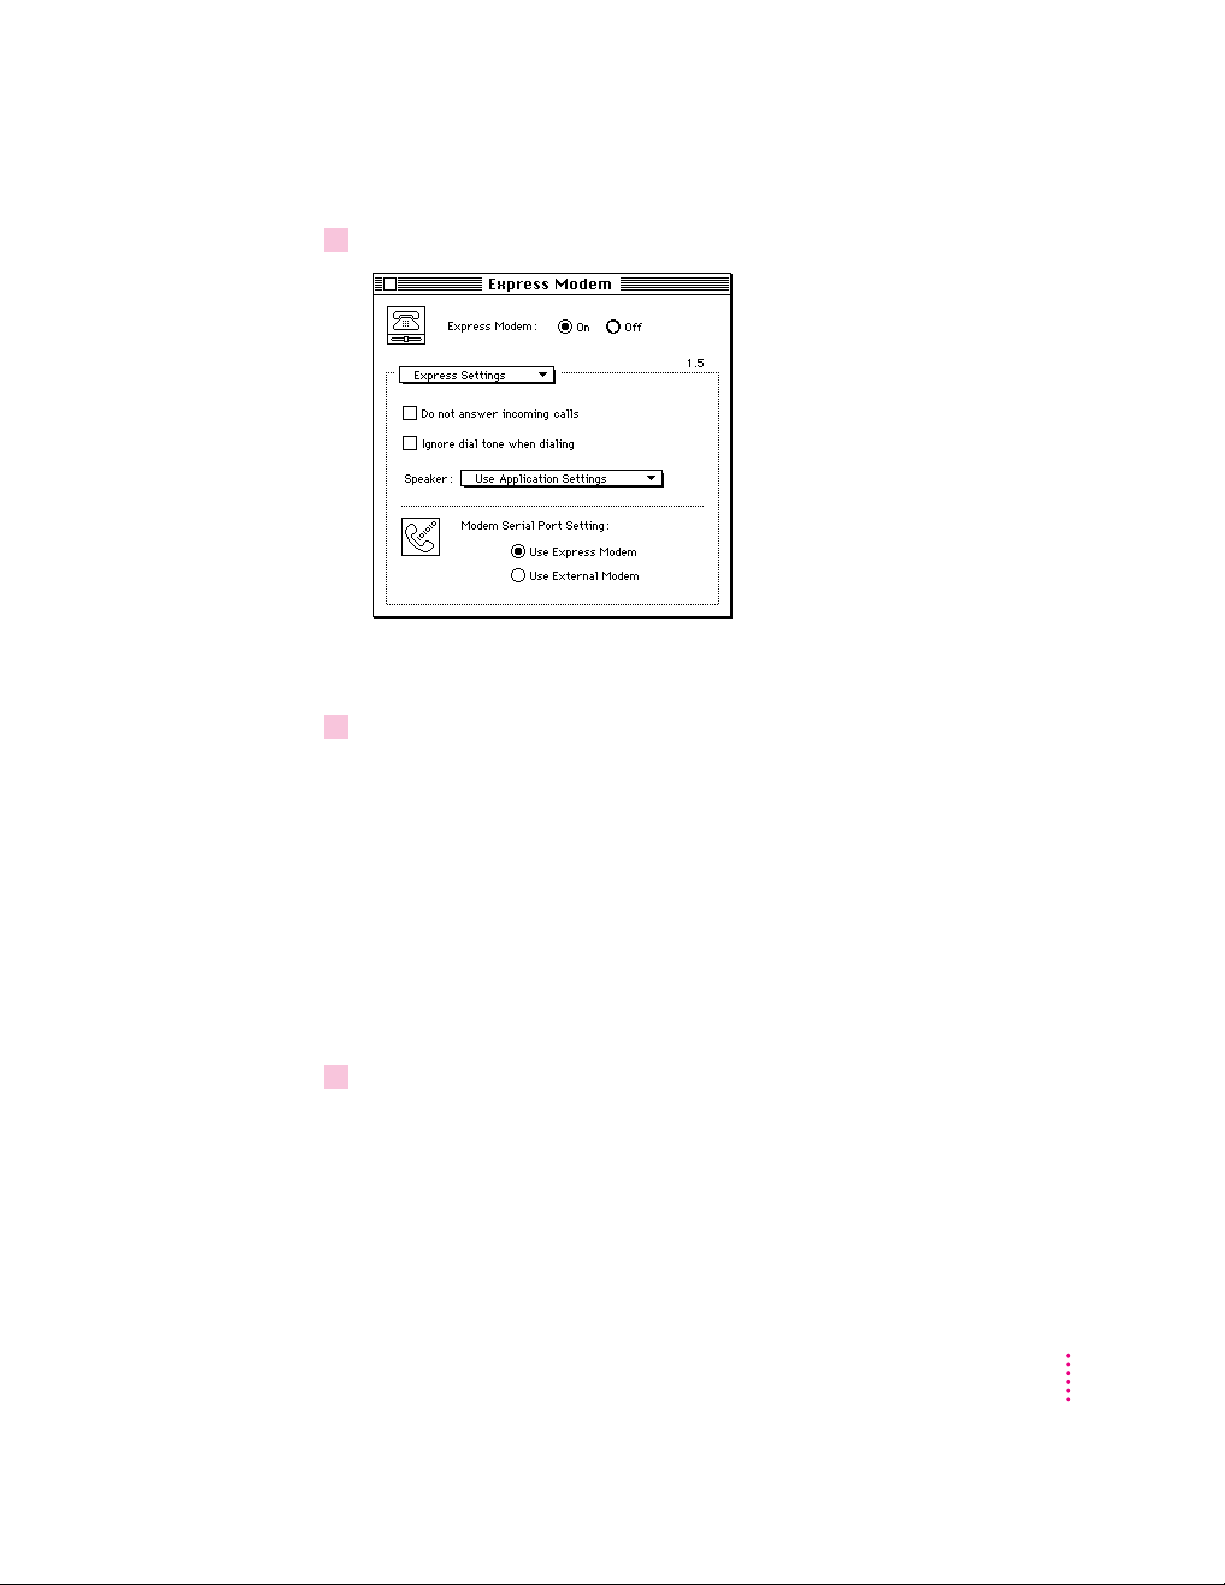
3 Open the Express Modem control panel and verify that Express Modem is turned on.
Note: Refer to Appendix A for Express Modem control panel settings
information.
4 Turn to the user’s guide that came with your communications software.
Your software’s user’s guide should explain how to choose the type of
connection you want and how to connect to another modem. Most
communications software programs have menus named Settings and Sessions,
where you will find the options you need. Check in the user’s guide for the
exact names.
If you have an on-line service, try dialing the service using the instructions
found in the user’s guide. If you want to connect to an on-line service, you
may have to match the service’s connection settings. Check the manual or
telephone the company that provides the service. (To match your service’s
settings, refer to Step 6 in this procedure.)
5 Open your communications software.
U
SINGYOURMODEM
15
Page 28
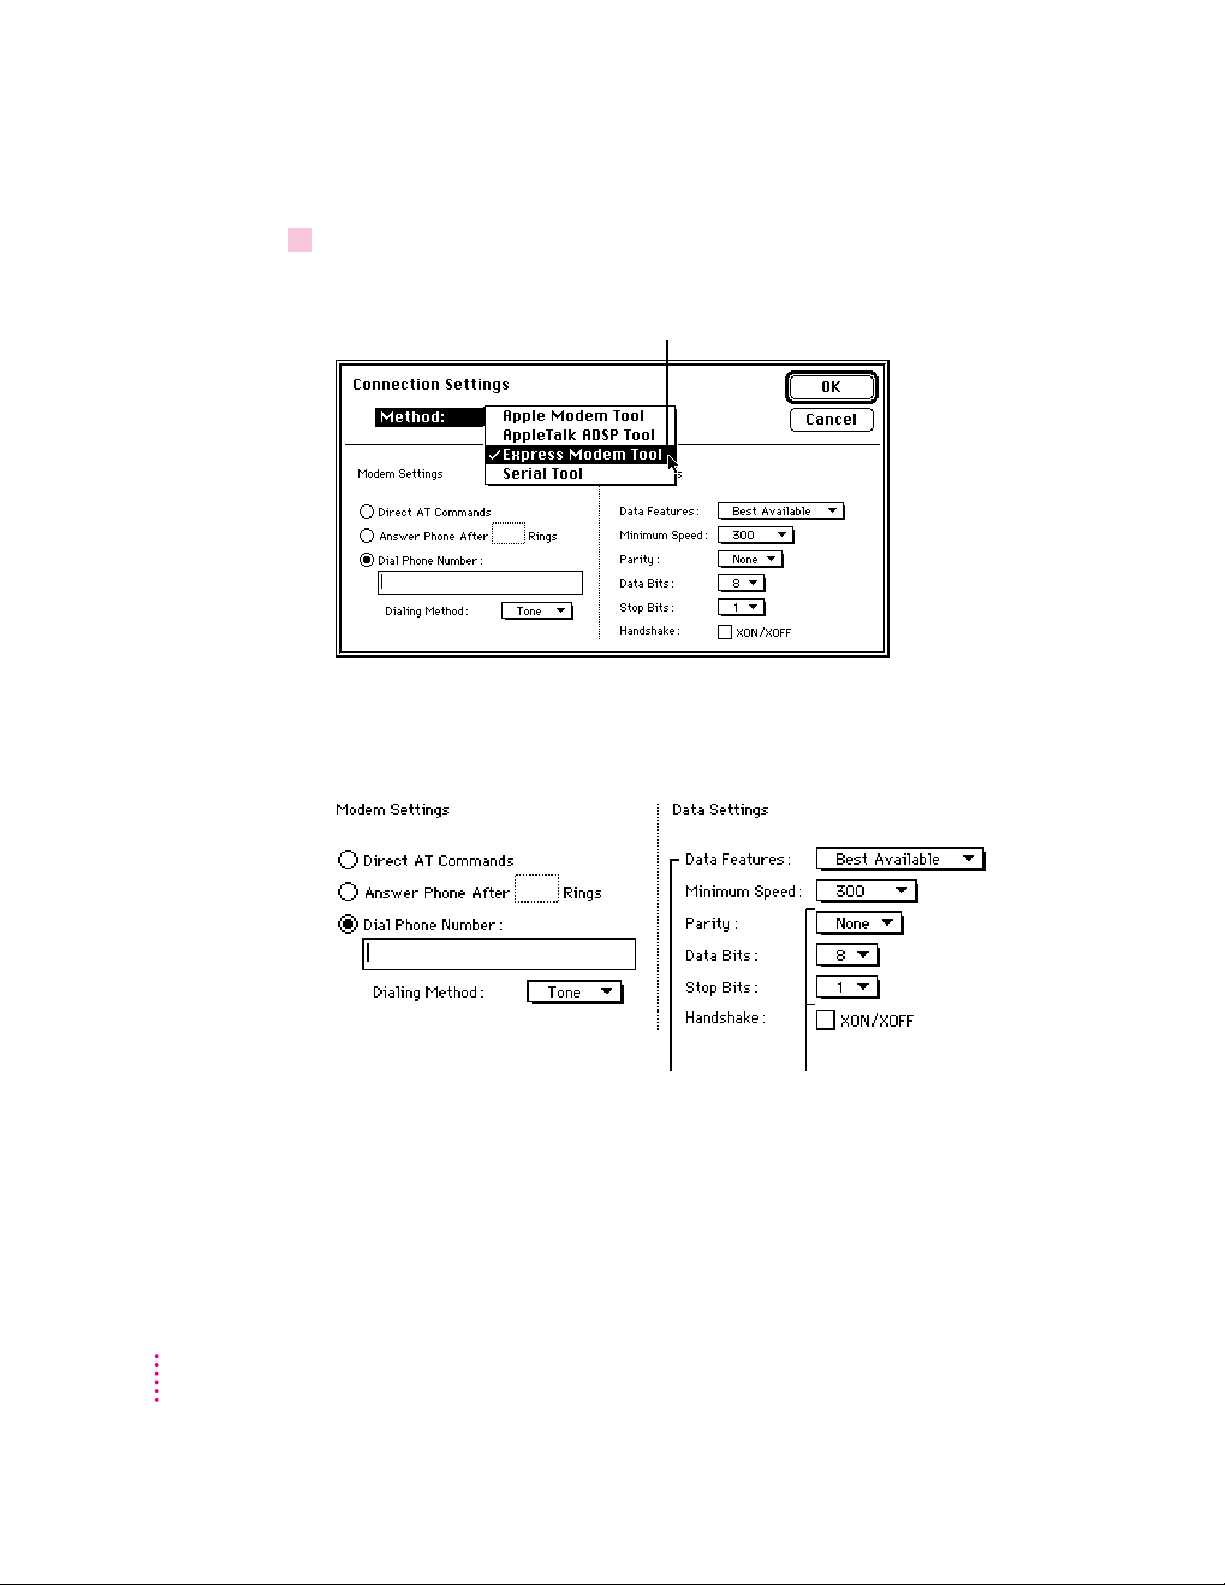
6Choose Connection from the Settings menu and select Express Modem Tool in the
Connection Settings pop-up menu.
Express Modem Tool should
appear in this pop-up menu.
This selection matches the Connections Method, the Express Modem Tool, to
your Express Modem.
You can now modify the Express Modem settings choices.
16
C
HAPTERTWO
To make optimal
connection, select
Best Available. To
connect without
error correction or
data compression,
select None.
Match these settings
to the remote modem’s
when connected.
Works when any of the
above Data Features
is selected.
Page 29
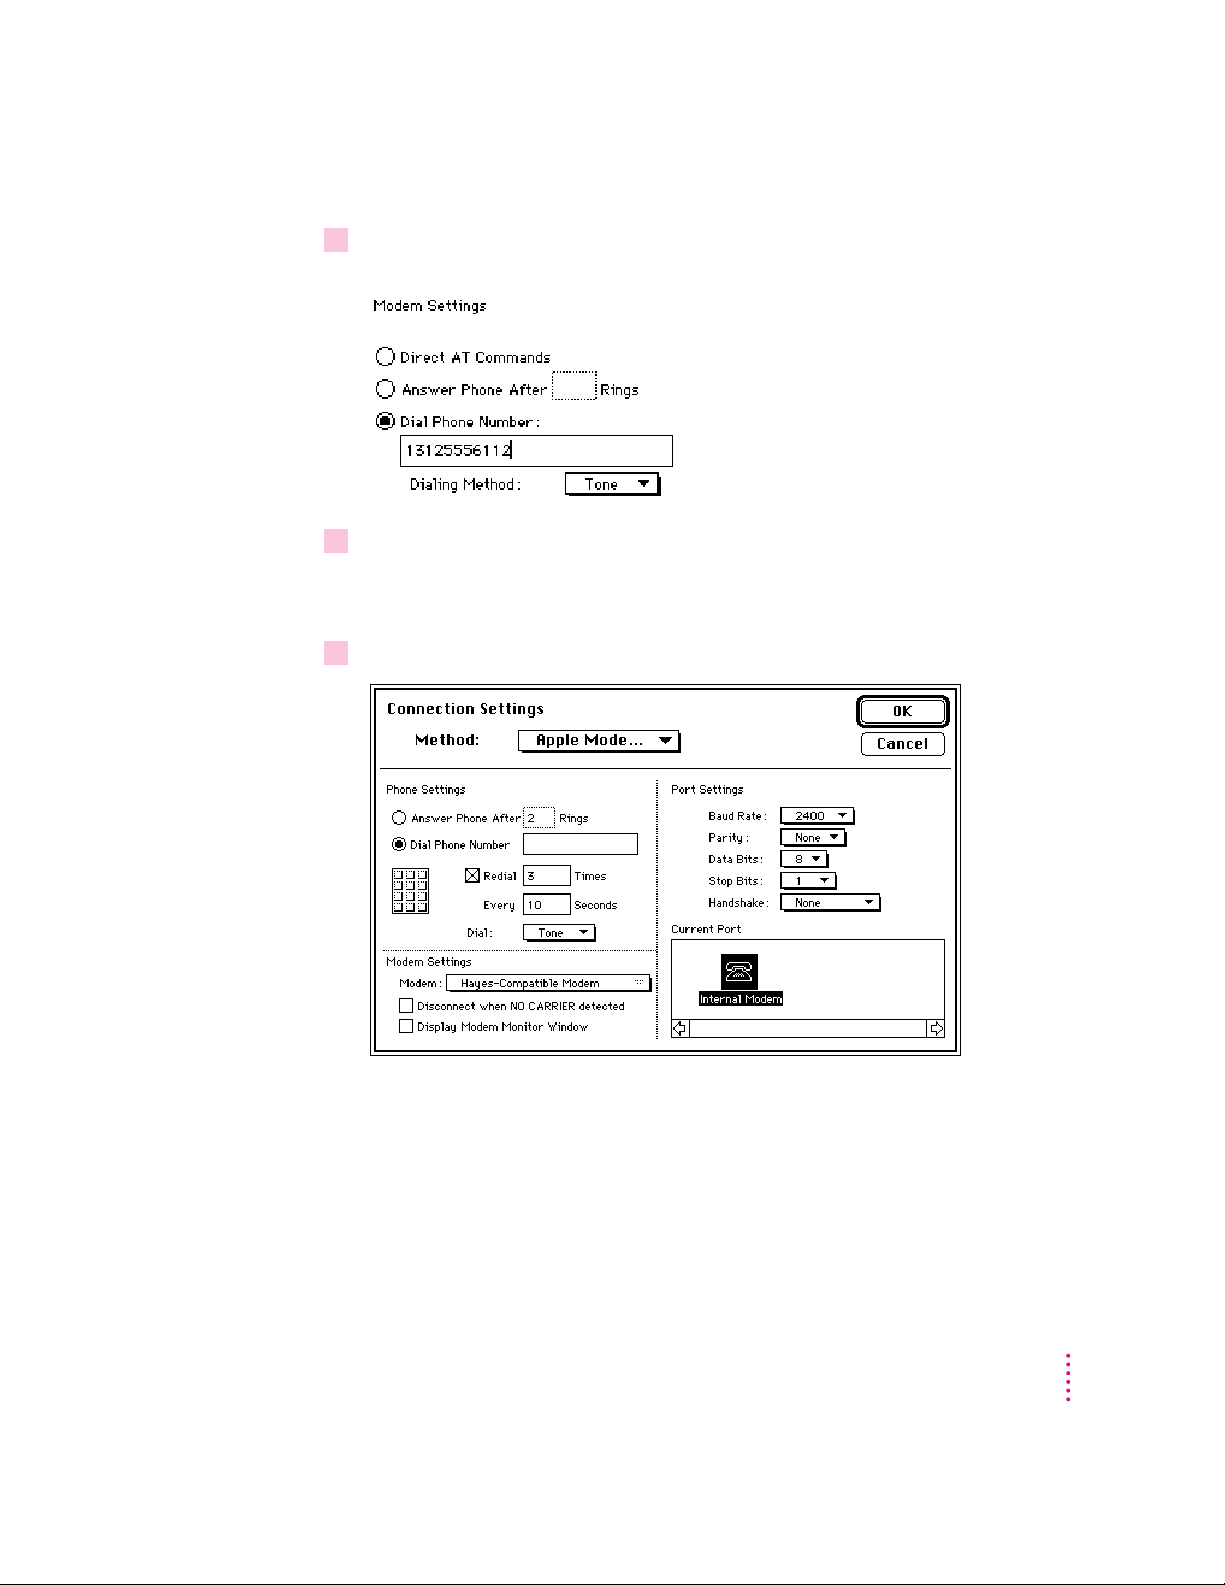
7Click Dial Phone Number under Modem Settings, enter the phone number of a
remote modem in the box below it, then click OK.
8If you decide not to use Express Modem Tool, select another tool from the Connection
Settings pop-up menu.
For example, you can select Apple Modem Tool, Serial Tool, or another tool.
9Double-click the Internal Modem icon in the Current Port field.
U
SINGYOURMODEM
17
Page 30
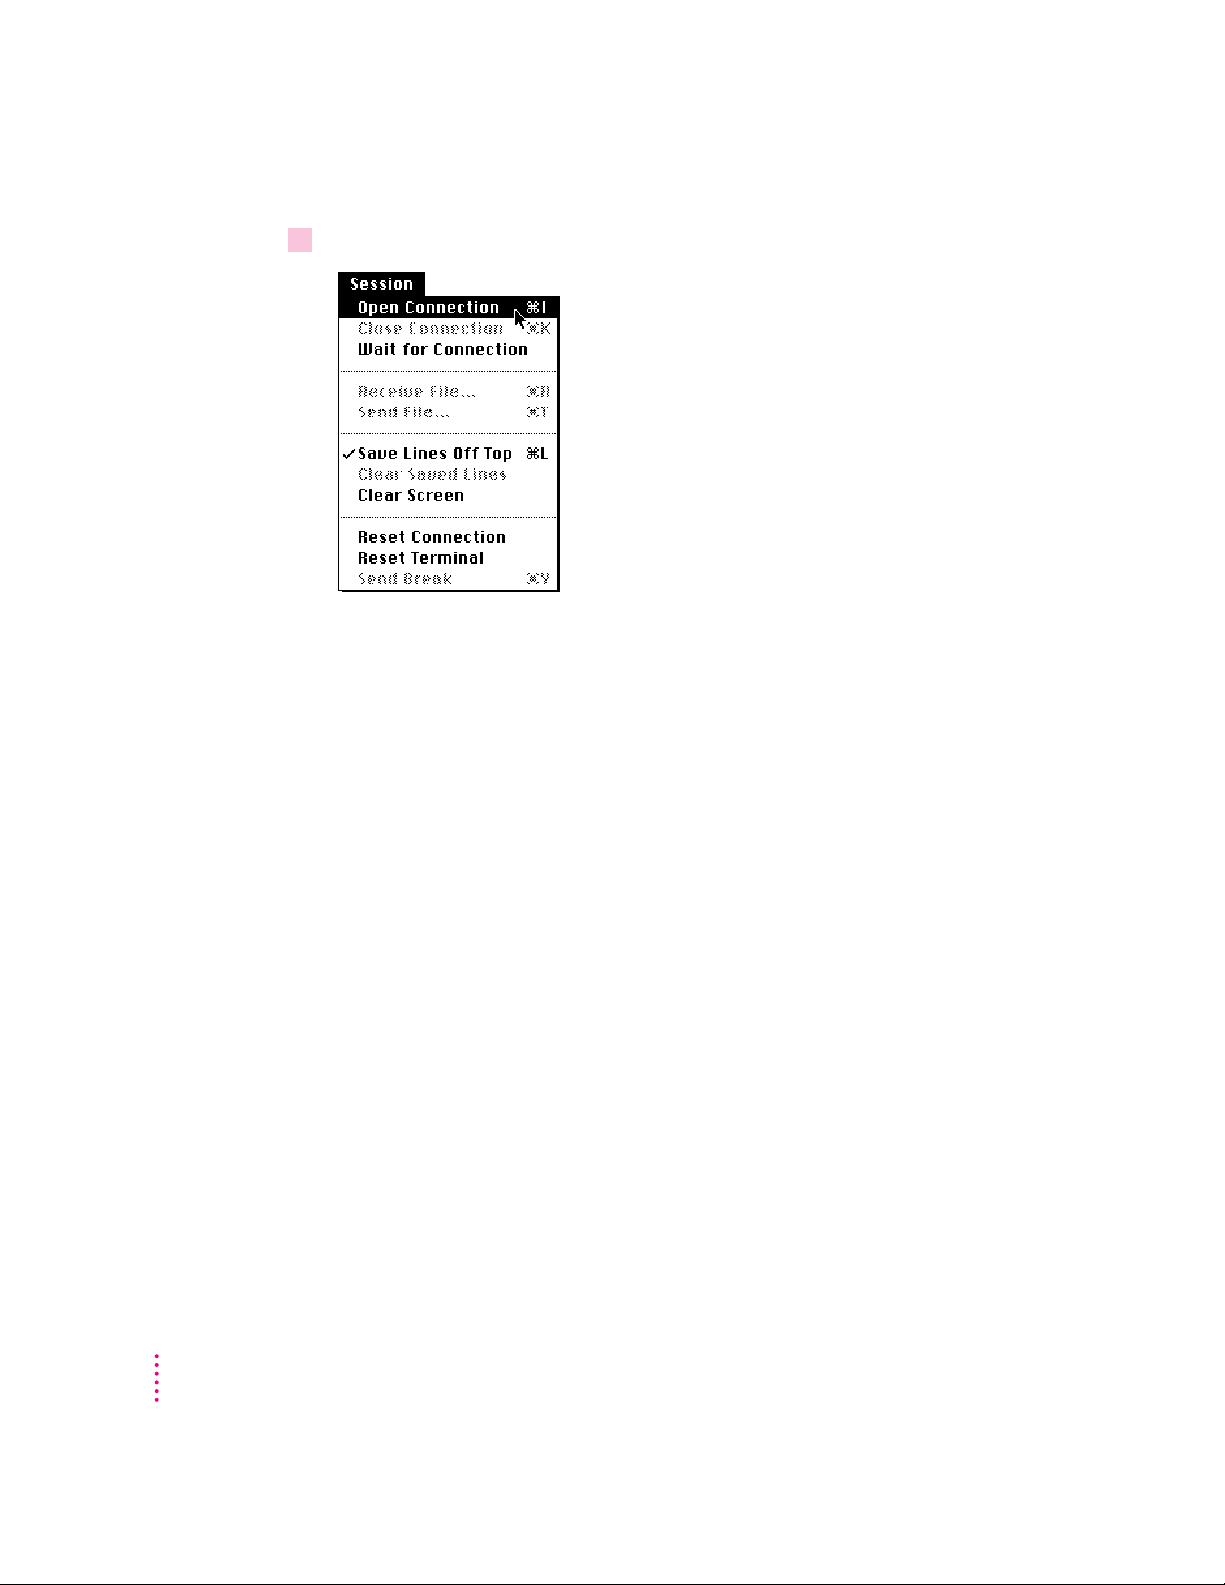
10 Choose Open Connection from the Session menu.
Selecting Open Connection is the same as lifting up the receiver of your
telephone. Depending on the software application you’re using, you should
be able to hear the modem dialing the telephone number for you if you have
entered a phone number. If you can hear a dial tone and the modem dialing
the telephone number or a busy signal, you’re properly connected to the
telephone line.
18
C
HAPTERTWO
Page 31

11 Select Express Status in the Express Modem control panel.
The Express Status field appears in the Express Modem control panel. This
field monitors the connection process, providing you with information on
connection speed, error and compression protocols, and status messages.
. See also: “Express Status” in Appendix A for additional information on this
subject.
12 When you want to terminate the connection, choose Close Connection from the Session
menu.
If you connect to a service, you may have to log out and use the “hang up”
command. Refer to your communications software or service software
manual.
Note: Before attempting to use your modem over the telephone lines, make
sure you understand how to dial a number and hang up.
U
SINGYOURMODEM
19
Page 32

Page 33

3
Express Fax Quick Start
In this chapter
m Using Fax Quick Send
m Receiving and printing a fax
Before you begin
If you have skipped directly to this chapter, please make sure that you have
connected your modem to the telephone line, verified your connections, and
installed the Express Fax software. See Chapter 1 for software installation.
21
Page 34

Using Fax Quick Send
You can start by sending an easy first fax with Fax Quick Send. Use this first
fax exercise as a tutorial, then explore more advanced features in Chapter 4,
“Getting the Most Out of Your Express Fax.”
1 Open the Express Fax Folder, then open “My first fax” by double-clicking it.
You can make a fax of a document from any program or any window on the
desktop. The TeachText document “My first fax” has been provided for your
convenience.
2Hold down the Control and Shift keys while choosing Fax from the File menu.
22
C
HAPTERTHREE
Page 35

The Fax Sender dialog box appears in place of the Print dialog.
Sending a fax is like printing to a remote printer.
IMPORTANT
Step 2 is a shortcut. You can also select Fax Sender in the
Chooser (see Chapter 4, “Selecting Fax Sender”). This shortcut works with
all programs, but some applications’ menus may not change Print to Fax. If
the menu doesn’t change, choose Print from the File menu.
3 In the Fax Quick Send field, type the fax number of your recipient.
Put the recipient’s fax number in
the Fax Quick Send box.
If you use a number to obtain an outside line from your
present location, place it in the Dial Prefix box.
Insert a comma after the number to indicate a pause.
E
XPRESSFAXQUICKSTART
23
Page 36

4Click the Options button.
The Options dialog box appears. Make sure you select Tone or Pulse
according to the type of phone you have.
5To save the information you entered, click OK.
You return to the Fax Sender dialog box.
24
C
HAPTERTHREE
Page 37

6 To fill in sender information, click the Cover Info button.
Ty pe information about yourself in the Cover Info dialog box. To move from
field to field, use the Tab key. The information you type here will appear on
your fax cover page.
The Station ID can be any combination of letters and
numbers you wish to identify your fax with.
Type any special messages in the Notes field.
E
XPRESSFAXQUICKSTART
25
Page 38

7To save the information you entered, click OK.
The Fax Sender dialog box reappears.
8To see your first fax before sending, click the Preview button.
Preview displays the fax with the cover page. The cover page selected is the
Standard cover page. The sender information you entered in the Cover Info
dialog box is displayed during preview. Click the right arrow in the scroll bar
at the bottom of the Preview dialog box to view the other pages of your fax.
26
9 Click Send to transmit your fax.
C
HAPTERTHREE
Your fax is transmitted immediately.
Page 39

10 To monitor the sending of your fax, choose Fax Terminal from the Application menu at
the right end of the menu bar.
Application menu icon
Fax Terminal appears in
the Application menu shortly
after you click Send.
Fax Terminal appears.
The status window
displays a series of
messages during
transmission.
Should transmission fail on the first attempt, Fax Sender automatically
retransmits your fax twice. (You can change the number of retries in Fax
Terminal Preferences; see “Setting Preferences” in Chapter 4.)
E
XPRESSFAXQUICKSTART
27
Page 40

11 Choose Fax Log in the Fax Terminal Windows menu.
Once the fax is sent, you can check transmission results in the Fax Log. You
have sent your first fax, and, equally important, you have verified that
transmission was successful.
If Fax Terminal will not open
Fax Terminal will open in the background only if sufficient memory is
available.
m If you are expecting a fax, be sure to quit any unnecessary applications to
free up memory. You may want to acquire more RAM memory for your
Macintosh; see your Apple dealer.
m If Fax Terminal does not open, it may also be a result of the Fax Terminal
Preferences selected. See “Setting Preferences” in Chapter 4. Even if Fax
Te rminal doesn’t open during reception, fax reception will occur without
problem. You won’t lose any faxes.
28
C
HAPTERTHREE
Page 41

Receiving your first fax
Your Express Fax receives faxes just like an office fax machine. You can be
working on your computer or away from home or office when a fax arrives.
By default, the fax software is not set to receive faxes when it is installed. The
Auto-Answer checkbox in the Fax Terminal Preferences dialog box must be
selected.
To receive a fax in your absence, you must leave your Macintosh turned on,
but none of the fax programs need be open.
Getting ready to receive faxes
1Choose FaxTerminal from the Apple menu.
Fax Terminal opens.
2Choose Auto-Answer from the Fax menu.
This choice automatically sets the Auto-Answer checkbox in Fax Terminal
Preferences.
. See also: “Setting Preferences” in Chapter 4 and “Auto-Answer” and “Call
management” in Appendix A.
E
XPRESSFAXQUICKSTART
29
Page 42

Checking for received faxes
1Look for the Fax Terminal icon blinking over the Application menu on the menu bar.
The Application menu is at the right side of the menu bar.
The blinking icon tells you that a fax is waiting in the Fax Terminal Received
Fax folder.
2Choose Fax Terminal from the Application menu or the Apple Menu.
Fax Terminal appears.
3To select the received fax you wish to view, click its name in the Fax Terminal queue,
then click Open.
30
C
HAPTERTHREE
You can also manage fax reception yourself.
. See also: “Receiving Manually” in Chapter 4.
Page 43

Opening a document in the Fax Terminal queue automatically opens Fax
Viewer, and your fax appears in a Fax Viewer window.
4 To set up your fax for printing, choose Page Setup, then choose Print from the
File menu.
You can use Fax Viewer to prepare your fax for printing, forwarding, or
saving.
. See also: Chapter 5, “Fax Viewer,” for a complete reference of the Fax
Viewer features.
Most of the time, you will want to print only incoming faxes. Fax Viewer
handles printing in the same way any other Macintosh application does.
E
XPRESSFAXQUICKSTART
31
Page 44

Page 45

4
Getting the Most Out of Your Express Fax
In this chapter
m Setting up your fax environment
m Using Fax Sender
m Monitoring incoming and outgoing faxes
m Receiving and opening a fax
Before you begin
Review the material in Chapter 3 to make sure you understand the basic
steps of fax operation.
33
Page 46

Setting up the fax environment
You can begin by setting up Fax Terminal to take advantage of all features.
Entering fax station information
This information provides your return address, allowing the recipient to
identify you from the received cover page.You can enter cover information
both in the Fax Sender Fax Cover Info and Fax Terminal Info dialog boxes.
1 Open Fax Terminal.
2Choose Fax Terminal Info from the Fax menu.
A Fax Terminal Info dialog box appears.
3Type information in the various fields of the dialog box.
34
4Click OK to save the Fax Terminal information.
C
HAPTERFOUR
Station ID is a 20-character header line identification of
your choice. If your recipient’s fax device has the
capability, Station ID is printed on the top of each page of
the fax document, along with the date and time.
Page 47

Setting Preferences
The Preferences dialog box allows you to control Fax settings.
1Choose Preferences from the Fax Terminal Fax menu.
The Preferences dialog box appears.
Select this box to save
fax files. Check Fax
Terminal fax folders
from time to time for
available disk space.
Check this box to activate Fax
Terminal while a fax is being
sent or received.
Displays notification for received faxes, manual dial, and errors.
A batch of faxes may be interrupted by one unsuccessful fax.
Selecting None allows a batch of faxes to be sent without
interruption. Unsuccessful faxes can be resent.
Sets auto-answer and number of rings.
You can always answer manually. See
“Receiving Manually” later in this chapter.
2Click the options to make your choices.
Table 4-1 summarizes the choices available.
Note: If you select None in the Preferences dialog box, Fax Terminal does
not interrupt sending a batch of faxes should a single fax fail for any reason.
3 To save your Preferences, click OK.
G
E T T I N G T H EMOSTOU T O FYOUREXPRESSFAX
35
Page 48

WARNING
Certain fax image files may use large amounts of disk space.
If you frequently receive large files, be sure that you have enough space
on your hard disk.
Ta ble 4-1 Fax Terminal Preferences dialog options
Preference fields Result
Show Fax Terminal Allows Fax Terminal window to be displayed automatically during
window send and receive. If not selected, you can still activate it during send
or receive.
Save fax image files Faxes are transmitted and received as image files. This checkbox
allows you to save sent fax image files.
Turn off V.17 If the remote fax does not support V.17, you may have to turn it off.
Turn off ECM If the remote fax does not support ECM, you may have to turn it off.
Auto-Answer Must be checked to receive faxes automatically. If unchecked, you
(unchecked by default) may still receive manually. Review procedures in “Receiving a fax”
in this chapter. Can be set in Fax menu.
When sending fails
Retry Sets the number of retries.
Time between tries Sets the time between tries.
36
C
HAPTERFOUR
Resend all pages Resends the entire fax if transmission fails.
Resend only those Sends only the pages that failed to transmit.
pages not already sent
Received Fax, Manual Dial,
Error Notification
None No notification. Check the log for received faxes or failures. Check Fax
Terminal for received faxes.
Display icon Displays icon in menu bar so that you can check for received faxes and
transmission problems.
Display icon and alert Displays icon in menu bar so that you can check for received faxes and
transmission problems. Displays alert box for Manual Dial and Errors.
Page 49

Using Fax Sender
Fax Sender handles all aspects of fax transmission including forwarding.
Selecting Fax Sender
Selecting Fax Sender is like selecting a local or network printer, such as an
ImageWriter or a LaserWriter.
1Choose the Chooser from the Apple menu (
K
).
The Chooser window appears.
2Scroll down the icons in the upper-left box, if necessary, until you see the Fax
Sender icon.
3 Click the Fax Sender icon.
The modem icon appears in the box on the right side of the window.
4Close the Chooser by clicking the close box.
As long as Fax Sender remains selected, all print jobs go to the fax process,
not to your printer. Be sure to reselect the printer icon in the Chooser when
you have finished sending your fax.
G
E T T I N G T H EMOSTOU T O FYOUREXPRESSFAX
37
Page 50

IMPORTANT
As an alternative to the above method of selecting Fax Sender,
hold down the Control and Shift keys while choosing Fax from the File menu.
This shortcut does not deselect your regular printer; you return automatically
to your previous printer settings for printing after the fax is sent. This
shortcut works with all programs, but some applications’ menus may not
change Print to Fax. If the menu doesn’t change, choose Print from the
File menu.
Fax Sender Page Setup
A number of options are available in the Fax Setup dialog box.
1Choose Fax Setup from the File menu.
Be sure that you have selected Fax Sender in the Chooser. Otherwise, use the
shortcut of holding down the Control and Shift keys when you select Fax
Setup from the File menu. Note that the File menu items Print and Page
Setup automatically change to Fax and Fax Setup respectively.
38
2Select Fax Setup options as needed, and then click OK.
C
HAPTERFOUR
Refer to Table 4-2 for option settings.
Page 51

Table 4-2 Fax Sender Page Setup options
Option Result
Orientation
Portrait Transmits the fax vertically.
Landscape Transmits the fax horizontally.
Reduce or Enlarge Reduces or enlarges the fax by the percentage you indicate.
Image Quality
Fine Converts fax to highest image quality for sending. Increases the send time.
Standard Converts fax to normal image quality for sending. Decreases the send time.
Bitmap Alignment Scales the Macintosh 72 dpi image so that every pixel is matched evenly
to the fax machine resolution. Produces the best-quality image for
bitmapped documents, but enlarges the printed image to 108% of
actual size.
Entering cover page information
The Cover Page Information dialog box is similar to the Fax Terminal Info
dialog box. Both dialog boxes provide space for entering return address
information to help your correspondent identify you. In addition, the Cover
Page Information dialog box provides space for the document subject and a
short note.
1Choose Fax from the File menu.
The Fax Sender dialog box appears instead of the usual Print dialog box.
G
E T T I N G T H EMOSTOU T O FYOUREXPRESSFAX
39
Page 52

2To fill in cover page information, click the Cover Info button in the Fax Sender
dialog box.
The Cover Page Information dialog box appears.
3Type information you want to appear on the cover page of the fax you are sending.
The sender name you see when you first open the
dialog box is the Owner Name you entered for
AppleShare in the Sharing Setup control panel.
40
C
HAPTERFOUR
If you have already entered your return address information in Fax Terminal,
you can change the information, the document name, or add a note. When
you change the information in the Cover Page Information dialog box, it
changes the information entered in the Fax Terminal Info dialog box, and vice
versa.
Page 53

Using a telephone credit card
The Telephone Credit Card option allows you to use a credit card or calling
card to send a fax.
Note: Until the dial card number is changed or deselected, all sent or
forwarded faxes use this number. Be careful to remove the number for calls
not dialed by credit card.
1Type the credit card access code in the Fax Sender Dial Prefix box.
2Click Options in the Fax Sender dialog box.
The Options dialog box appears.
G
E T T I N G T H EMOSTOU T O FYOUREXPRESSFAX
41
Page 54

3To charge a fax to your credit card account, click the Telephone Credit Card checkbox,
then enter your credit card number.
Many phone systems send a tone to indicate when the calling card number
and PIN should be entered.
To detect the tone, enter a colon (:) in front of the
credit card number. If you find that the tone is not
being properly detected, enter one or more commas
to pause before sending the calling card number.
4To continue setting up your fax, click OK.
42
C
HAPTERFOUR
Fax Sender protects your privacy by hiding your credit card number when the
Options dialog box is reopened.
Page 55

Using dial modifiers
Placing a comma in any position in the telephone number, Dial Prefix box, or
Dial Card Number field requests a two-second pause. This may be useful
when dialing long distance or overseas. To increase the pause time, add more
commas.
You may need to put additional dial modifiers after the dial prefix or before
the credit card number if your long distance service acknowledges an access
code or telephone number with a tone before placing the call. See the Dial
command in Appendix B.
Dial Modifier Result
Comma (,) Introduces a two-second pause before sending the next character.
“At sign” (@) Detects a specified period of silence before completing dial string.
Dial tone detect (W) Detects presence of dial tone before completing dial string.
Colon (:) Same as W. Detects a wider range of tones, such as Calling Card tones,
before finishing dial string.
Selecting a cover page
The fax software comes with three cover page choices:
m Standard is a precomposed text-only cover page. You can use it as is or
modify it with the Fax Cover program. Standard appears in the Fax Sender
Cover Page pop-up menu as the default selection. (Standard can be deleted
as a cover page choice.) . See also: “Installing cover pages” in Chapter 6.
m None means that no cover page is attached to the fax. The first page of the
document can be used as a cover page.
m A sample cover page comes with the fax software in the Express Fax
Folder. This choice does not appear in the Fax Sender Cover Page pop-up
menu unless installed with Fax Cover. . See also: “Installing cover pages”
in Chapter 6.
You can create as many customized cover pages as you need.
. See also: “Customizing cover pages” in Chapter 6 to compose and modify
customized cover pages.
G
E T T I N G T H EMOSTOU T O FYOUREXPRESSFAX
43
Page 56

1Select a cover page from the Fax Sender Cover Page pop-up menu.
XYZ Cover is a customized
cover page.
Automatic dialing
Auto Dial allows you to use the Fax Phone Book and delayed send features in
Fax Sender. For example, you can use Fax Phone Book to send a fax to
multiple recipients.
When you send the same fax to more than one person at a time and there is a
delivery problem for any recipient, Fax Sender puts the fax to that recipient in
the waiting queue for retry (according to the number of tries you selected in
the Retry field in the Fax Terminal Preferences dialog box). At the same time,
Fax Sender delivers the fax to the other recipients in the order placed in the
Send To field.
44
C
HAPTERFOUR
Auto Dial is the default selection in Fax Sender. When Auto Dial is selected,
you can transmit your fax from the Fax Sender or from the Preview dialog
box. Auto Dial applies to most cases. See “Manual Dialing” later in this
chapter.
Page 57

Using Fax Phone Book
Fax Phone Book holds a list of recipients along with their addresses and
telephone numbers. You can enter, update, and remove entries from the list
and then use the list to address your faxes by selecting recipients by name.
Adding addresses
You create a list of recipients one by one. You can add their addresses at send
time or whenever you wish.
1Click New in the Fax Sender dialog box.
These are existing Fax
Phone Book entries.
G
E T T I N G T H EMOSTOU T O FYOUREXPRESSFAX
This entry has been dragged into the Send To field for
sending. A dimmed entry remains in the Fax Phone Book.
45
Page 58

A New Entry dialog box appears.
2Enter the address information and click Add.
You must fill in the Last Name
and Fax # fields. The other
fields are optional.
Parentheses and dashes can
be included in the Fax # and
Voice # fields.
New names are added automatically to the Fax Phone Book when you
click Add.
46
1To edit an address:
C
HAPTERFOUR
Editing addresses
m Select an address in Fax Phone Book and click Edit in the Fax Sender
dialog box, or
m Double-click an address in Fax Phone Book while holding down the
Option key.
Page 59

2Change the information by selecting the text and retyping, and then click one of the
buttons when you are finished.
m Change saves your edits.
m Cancel restores the old address.
m Delete removes the address from the Fax Phone Book.
Removing addresses
To remove an address from Fax Phone Book, select the address, then:
m Press the Delete key on your keyboard (you are asked to confirm the
deletion), or
m Press x-X. (You must use the keyboard shortcut for the Cut command.)
To remove addresses from the Send To scroll box:
m Drag the address outside the scroll box, or
m Double-click the address.
G
E T T I N G T H EMOSTOU T O FYOUREXPRESSFAX
47
Page 60

Addressing a fax
You can address a fax to one or more recipients. Fax Sender sends the fax to
each recipient, one at a time, in the order placed in the Send To field.
To address a fax:
m Double-click the address in Fax Phone Book, or
m Drag names from Fax Phone Book to the Send To field.
To obtain an outside line when dialing from office buildings, you may need to
place a number, such as a 9, before the telephone number. Put this number in
the Dial Prefix box. By placing the prefix number in the Dial Prefix box, you
can keep the numbers in Fax Phone Book independent of the dialing prefix.
48
C
HAPTERFOUR
Page 61

Setting send time
You can change the send time in the Fax Sender Options dialog for the
current fax and in Fax Terminal for any faxes in the queue.
Sending immediately
If the Send Immediately button is selected, your fax is sent immediately. Send
Immediately is the default.
Delaying send time (“Send at”)
Fax Sender allows you to choose the time you want to send a fax.
1Click the “Send at” button in the Fax Sender Options dialog box.
The time displayed is the system time you set in the General Controls panel
or with the Alarm Clock.
2Click any element in the time or date displays that you wish to change.
An arrow button appears and the element you are changing is highlighted.
3Click a directional arrow to set the time.
Be sure not to set the time back before the current hour or date.
You can also change the send time while a fax is waiting to be sent.
. See also: “Resetting the send time” later in this chapter.
G
E T T I N G T H EMOSTOU T O FYOUREXPRESSFAX
49
Page 62

Previewing a fax
Preview is similar to the “print preview” feature of some programs.
m If you wish to see your fax before sending, click Preview in the Fax Sender
dialog box.
Scrolling pages
Use the scroll bar at the bottom of the window to view each page. Clicking
the arrow at the right end of the scroll bar allows you to move through the fax
one page at a time beginning with the cover page.
50
C
HAPTERFOUR
Changing views
Clicking the View button toggles between a reduced and an actual size view
of a page. In actual size, you can move the page with the grabber hand to
examine an undisplayed portion of the page.
Note: If you click Cancel while in the Preview dialog box, you go back to
your document, not to the Fax Sender dialog box. Names that you have
dragged to the Send To scroll box are lost; you will have to select Fax
Sender again.
Page 63

Manual dialing
Most fax machines can be dialed automatically. Occasionally, you may have to
use your telephone to manually dial a recipient’s fax device. You might have to
do this if the line is shared by several devices, is an extension, or needs to be
set to receive.
IMPORTANT
same telephone jack as your modem. You can purchase a
To use Manual Dial, your telephone must be connected to the
Y
adapter to make
this connection.
1Choose Fax from the File menu.
2 Click the Manual Dial button.
3 Drag a recipient name from your Fax Phone Book to the Send To scroll box or type a
number in the Quick Send field.
4 Click Send.
After Fax Sender has prepared your Fax for sending, a blinking icon notifies
you that your fax can now be sent by dialing manually.
. See also: “Setting Preferences” earlier in this chapter.
G
E T T I N G T H EMOSTOU T O FYOUREXPRESSFAX
51
Page 64

5When you see the blinking icon at the right end of the menu bar, select Fax Terminal
from the Application menu.
The Manual Dial dialog box appears.
6Follow the instructions in the Manual Dial dialog box.
m Dial your recipient’s fax device from your telephone.
m Click Send when you hear your recipient’s fax tone.
m Hang up the telephone.
52
C
HAPTERFOUR
Page 65

Table 4-3 Fax Sender options
Option Result
Dial
Auto Dials recipient’s fax number automatically.
Manual Allows you to dial recipient’s fax number manually.
Dial Prefix Adds PBX or other access code prefixes at send time. Use commas for
two-second pauses.
Cover page
Standard Sends fax with text-only cover page.
None Sends fax without cover page.
Custom choices Sends fax with cover page designed in Fax Cover.
Fax Phone Book To add an address, click New. To edit an address, click Edit. To remove
an address, select the address and use the Delete key on the keyboard.
You are asked to confirm.
Send to Displays the recipient addresses for the current fax. To remove an
address, drag outside the box or double-click.
Preview Allows you to preview your fax before sending.
Cover Info
Sender information Allows you to enter your name, address, voice, and fax numbers.
Subject Prints document name or name you choose on cover page.
Notes Prints a short note in cover page Notes field.
Options
Dial
Tone
Pulse
Selects Touch-Tone dial.
Selects pulse dial.
Send time
Send immediately
Delay send (“Send at”)
Sends the fax immediately (default).
Allows you to choose the time to send the fax.
Telephone Credit Card
Dial Card Number
Allows you to automatically append your credit card calling number to the
telephone number. All faxes use this credit card number until changed.
Place dial modifiers before credit card number if necessary.
New Allows you to create a new address and add it to Fax Phone Book.
Edit Allows you to edit and delete addresses in your Fax Phone Book.
G
E T T I N G T H EMOSTOU T O FYOUREXPRESSFAX
53
Page 66

Monitoring a fax
Fax Terminal allows you to forward faxes, check the status of faxes currently
being sent and received, review the list of sent and received faxes, cancel a
currently transmitting fax, delete faxes from any of the queue folders, and
reset the send time for faxes. You can also open and view the faxes in your
lists.
Fax Terminal contains a log for keeping track of fax results.
Shows recipient or sender
name for fax in progress.
Displays document file
name or name you
typed in Fax Sender
Cover Info Subject field.
A downward pointing
triangle indicates that
the folder’s contents are
displayed.
A right pointing triangle
indicates that
the folders contents are
not displayed.
Icons show status
of fax in progress.
An unopened fax inside
the Received Fax folder.
An opened fax inside the
Received Fax folder.
The folders for Received, Sent, and
Waiting To Be Sent faxes in the Fax
Terminal queue. Double-click to
display contents.
54
C
HAPTERFOUR
Page 67

Accessing Fax Terminal
Fax Terminal is a program that you will use frequently. For example, you may
wish to check Fax Log quickly. As initially installed, Fax Terminal is
accessible from the Apple menu (K).
While preparing your fax, Fax Terminal opens automatically and its name
appears in the Application menu at the right end of the menu bar. Whether
you view Fax Terminal automatically at send or receive time depends on the
selection you made in the Fax Terminal Preferences dialog box. To bring Fax
Terminal to the front:
m If you chose “Show Fax Terminal window when sending or receiving” in
the Preferences dialog box, choose Fax Terminal from the Application
menu.
m If you chose not to show the Fax Terminal window, select Fax Terminal
from the Application menu and then choose Fax Terminal from the
Windows menu.
. See also: “Setting Preferences” in this chapter.
Once transmission is complete, if the fax queue is empty, Fax Terminal closes
automatically when you change to another open program.
IMPORTANT
If an alert message appears saying you don’t have enough
memory to open Fax Terminal at send time, you must quit some of your active
programs to provide enough memory for Fax Terminal to open. You won’t lose
any work, and your fax is still prepared. As soon as you quit the programs,
Fax Terminal opens and your fax is sent.
G
E T T I N G T H EMOSTOU T O FYOUREXPRESSFAX
55
Page 68

Table 4-4 Fax Terminal document types
The Fax Terminal queue contains three types of folders: Received Fax
Documents, Sent Fax Documents, and Waiting To Be Sent Documents.
Icon Document type
Received Fax Documents
Read
These documents have been received and read. They can be forwarded.
Unread
These documents have been received, but not opened. They can be opened and
forwarded. See “Opening a fax document” later in this chapter.
Sent Fax Documents
Successful
These documents have been successfully sent. They can be opened and forwarded.
Unsuccessful
These documents were not sent because of transmission problems. They can be opened
and forwarded. The preferences you selected for the original fax in Fax Terminal
preferences apply to forwarded unsuccessful faxes.
Waiting To Be Sent Documents
56
C
HAPTERFOUR
Send Immediately (Default)
If you send four faxes in rapid succession, one is sent while the three others
take a place in the queue. You can change the order of transmission in the queue by
dragging a Send Immediately fax up or down to a new position in the list.
Delayed Send (“Send at”)
A Delayed Send document’s send time is set in the Fax Sender Options dialog box.
You cannot drag a Delayed Send document to a new position in the queue. See “Resetting
the send time” later in this chapter to reset the send time.
Retry
A Retry is a fax that has returned to the queue after unsuccessful transmission.
A Retry takes its next send time from the “Time between tries” setting in the Fax Terminal
Preferences dialog box. You cannot reset the time of a Retry fax. A Retry becomes an
unsuccessful fax after the number of retries expires.
Page 69

Forwarding a fax
You may forward any fax you’ve sent or received.
1Select a fax document in either the Received Fax or Sent Fax Documents folders.
2Choose Forward Fax from the File menu.
The Fax Sender dialog box appears. The Send button changes to Forward.
3Enter a fax number in the Quick Send field or select an address from the Fax Phone
Book.
. See also: “A ddressing a fax” in this chapter.
G
E T T I N G T H EMOSTOU T O FYOUREXPRESSFAX
57
Page 70

4 To forward your fax, click Forward.
You can limit the number of pages
to forward by entering a range of
page numbers.
m Received faxes are forwarded as received with the original cover page if
one was attached, and with your cover page if you select one.
m Sent faxes are forwarded without the original cover page, but you can
select and include one when you forward.
m To forward a fax without attaching your cover page, select None from the
Cover Page pop-up menu.
58
1To reset the send time of a delayed fax, open the Waiting To Be Sent folder and select a
2Choose Set Send Time from the Fax menu.
C
HAPTERFOUR
Resetting the send time
You can reset the send time of a delayed fax in Fax Terminal. You cannot drag
a delayed fax in front of another fax in the queue because you have already
assigned it a specific send date and time in the Fax Sender Options dialog
box, but you can change the assigned send time. See Table 4-4 “Fax Terminal
document types.”
delayed fax by clicking its name.
Page 71

3 To reset the send time, select the element of the date or time you want to change.
4 Click the arrow buttons in the Set Send Time box, then click OK.
In this example, the time of the second fax is set ahead so that it can be sent
before the first fax.
G
E T T I N G T H EMOSTOU T O FYOUREXPRESSFAX
59
Page 72

Canceling a fax
Canceling a fax stops sending or receiving of the fax in progress.
1 Bring the Fax Terminal window to the front.
2Choose Cancel Sending or Cancel Receiving from the Fax menu.
This menu item
changes to Cancel
Receiving, as the
case may be.
60
C
HAPTERFOUR
The current fax stops sending or receiving after a few seconds and Fax
Terminal becomes available again. Cancel Sending does not affect faxes in the
queue.
Page 73

Deleting faxes
You can delete faxes from the lists inside the folders in the Fax Terminal
queue. You can select several faxes discontinuously by opening the folders,
holding down the Shift key, and clicking faxes.
1 Open one or more folders.
2Select one or more faxes to delete.
3Click the Delete button or press the Backspace or Delete keys.
G
E T T I N G T H EMOSTOU T O FYOUREXPRESSFAX
61
Page 74

Using the Fax Log
The Fax Log keeps information about fax transmissions. This information
may be useful to prove that a fax was actually sent or received at a given time.
The log is especially useful when you need to check the results of delayed
faxes.
Each fax, whether sent or received successfully or not, is automatically
recorded as an entry in the log. When transmission is finished, you can check
transmission results in the log.
m To see the log, choose Fax Log from the Windows menu.
The Fax Log appears and you can scroll up or down.
Managing log entries
62
1Choose Set Log Entries from the Fax menu and set the number of entries you wish.
2To save the log under a new name, choose Save Log As from the File menu.
3Type the name you want for the file, then click Save.
C
HAPTERFOUR
For easy log management, you should limit the number of entries in the log,
then archive the log by saving the contents as an archive file with a new file
name. For example, you might name the archive files Faxes Jan, Faxes Feb,
and so on.
The preset limit for the number of entries in the log is 50. To avoid losing
entries, save the log under a different name as you approach the limit.
Page 75

Clearing the log
Once you’ve saved the log as an archive file, you can clear the old entries from
the log.
m To clear the log, choose Clear Log from the Fax menu.
This clears the entries in the log. Because you have saved the contents of the
log under another name and then cleared the log itself, no information is lost.
IMPORTANT
It’s up to you to save the log under another name when you are
approaching the limit. If you reach the limit without saving, the oldest entries
are removed automatically so that the log never contains more than the
chosen number of entries.
To check historical information on the results of a given fax, you can display
any archived logs by opening them with TeachText or a word processor. You
cannot open the Fax Log with TeachText or a word processor.
Table 4-5 Fax Terminal Fax Log
Menu option Result
File
Save Log As Saves log under a different name. Archived logs can be opened by
TeachText.
Fax
Set Log Entries Specifies the number of entries the log contains. Preset value is 50.
Clear Log
Clears entries in the log. (You should archive the log under a different
name before clearing.)
Window
Fax Log Displays Fax Log. Log may be printed during display.
G
E T T I N G T H EMOSTOU T O FYOUREXPRESSFAX
63
Page 76

Receiving a fax
1Choose Preferences from the Fax menu.
Faxes can be received automatically or manually. The Fax Terminal
application doesn’t have to be open to receive a fax. Make sure your computer
is correctly set to receive.
. See also: “Auto-Answer” in “Express Settings” in Appendix A.
Setting Fax Terminal preferences for receiving
If you want to receive faxes automatically, you must set Fax Terminal
preferences or use the shortcut.
Choosing Auto-Answer is a shortcut for
clicking Auto-Answer in Fax Terminal
Preferences.
64
2Click the “Auto-Answer” checkbox in the Preferences dialog box, set the number of
C
HAPTERFOUR
rings, then close the dialog box.
IMPORTANT
If you deselect the Auto-Answer checkbox, faxes can only be
received manually.
Page 77

Checking for received faxes
Faxes are placed in the Received Fax Documents folder.
According to the choice made in the Fax Terminal Preferences dialog box,
Fax Terminal provides the following notification for received faxes.
Fax Terminal Fax Terminal notification
Preferences choice
None No notification. To see if you have received a fax, open Fax Terminal and
look for received fax documents in the queue or a blinking arrow in the
Status box. You can also check Fax Log.
Display icon Fax Terminal displays a blinking icon in the menu bar when a fax is
received. See example below.
Display icon and alert Fax Terminal displays a blinking icon in the menu bar when a fax is
received. See example below.
The following example assumes that Display icon is selected.
1When you see the blinking icon, choose Fax Terminal from the Application menu.
G
E T T I N G T H EMOSTOU T O FYOUREXPRESSFAX
65
Page 78

The Fax Terminal window appears.
2Look for the blinking arrow above the icon in the Status box.
A blinking arrow tells
you when a fax has
been received.
Receiving a fax while you're working
If you set Show Fax Terminal Window in Fax Terminal Preferences and you are
working at your Macintosh, the Fax Terminal status field indicates the
progression of a fax received.
66
C
HAPTERFOUR
Page 79

Opening a fax document
When you open a fax document in Fax Terminal, the Fax Viewer program
automatically starts.
1Click a fax document in the Sent Fax Documents or Received Fax Documents folders.
2 To view your fax document in Fax Viewer, click Open.
The Fax Viewer program opens and your document appears in a Fax Viewer
window.
. See also: “Viewing a fax” in Chapter 5.
G
E T T I N G T H EMOSTOU T O FYOUREXPRESSFAX
67
Page 80

Receiving manually
Manual receive provides the option of sharing the same telephone line for fax
and voice calls. If you receive faxes occasionally, you can keep your line open
for voice calls and still receive faxes on the same line when you hear the
fax tone.
Manual receive is always enabled. Even if Auto-Answer is disabled, you can
always receive faxes manually.
1Answer the telephone.
2When your correspondent informs you he is ready to send you a fax or when you hear
the fax tone, choose Receive Manually from the Fax menu.
68
3When you hear the fax tone, click Receive.
C
HAPTERFOUR
A Receive Fax dialog box appears.
When reception is complete, the fax appears in the Fax Terminal Received
Fax Documents folder.
Page 81

5
Fax Viewer
In this chapter
This chapter explains the Fax Viewer program features in the most likely
sequence of events for handling a received fax
m Opening a fax
m Viewing a fax
m Improving fax display
m Editing the pages of a fax or resequencing it
m Selecting part of a fax to paste into a document created by a
graphics program
m Printing a fax
m Converting a fax to PICT format
m Forwarding a fax
Before you begin
You should be familiar with the information in Chapters 3 and 4
on receiving faxes.
69
Page 82

Opening a fax
You can use several methods to open a sent or received fax for viewing in
Fax Viewer.
m Open a Fax Viewer document by one of the following methods:
M Double-click a document in the Sent or Received Fax Documents
folders in the Fax Terminal queue.
M Select a document from the Sent or Received Fax Documents folders in
the Fax Terminal queue, and then click Open.
M Open a Sent or Received Fax document in Fax Viewer using the Open
command in the File menu.
M Double-click a Fax Viewer document in the Finder.
Your fax document appears in a Fax Viewer window.
Fax Viewer menu bar
70
C
HAPTERFIVE
Paging
scroll bar
Page icon
Page positioning
scroll bars
Page 83

Viewing a fax
You can view a fax document at different resolutions by choosing options in
the Page menu:
m Actual Size displays your fax at the real page size (default).
m Fit in Window displays a full page of your fax on your screen.
m Fax Resolution View means that each dot of the 200 dots per inch (dpi)
fax is displayed as a pixel on the Macintosh screen. The resulting view is
approximately 277% of actual size.
Positioning a document
Your screen may be too small to display an entire page within the active
window.
m To examine undisplayed portions of a page, use the vertical and
horizontal page positioning scroll bars at the right of the Fax Viewer
window.
Scrolling pages
m To scroll pages, use the paging scroll bar at the lower left of the Fax
Viewer window.
Clicking the arrow at each end of the paging scroll bar
scrolls through the fax one page at a time.
To scroll to an approximate page, move the page
icon along the scroll bar. For example, to view page
5 in a 10-page document, move the page icon to the
center of the scroll bar.
F
AXVIEWER
71
Page 84

In addition to the paging scroll bar, the Page menu offers commands for
changing pages:
m Previous Page allows you to move backward one page.
m Next Page allows you to move forward one page.
m Go To Page displays a dialog box for moving to a specific page.
Changing the page orientation
You may want to change the orientation of a page if a fax you received is
turned the wrong way, for example upside down.
m Choose the orientation you wish from the Page menu.
M Rotate Right turns the current fax page 90 degrees clockwise.
M Rotate Left turns the current fax page 90 degrees counterclockwise.
M Flip Vertical rotates the current fax page 180 degrees.
M Flip All Pages rotates all the pages in the current fax 180 degrees.
Improving fax display
Fax Viewer has a special smoothing feature that allows you to optimize fax
display. Smoothing increases the sharpness of a fax on your screen,
permitting easier reading and scanning with OCR software.
72
C
HAPTERFIVE
1Set your monitor to Color or 256 Grays in the Monitors control panel.
Page 85

Depending on the content of the received fax, you can experiment with the
monitor settings and the Use Smoothing command to get the best resolution
for display. Smoothing is enabled by default.
2Choose Use Smoothing from the Page menu.
How smoothing works
The resolution of a fax is 200 dots per inch (dpi). Your
Macintosh converts the 200 dpi fax resolution to the 72 dpi of
the Macintosh screen. The conversion process concentrates gray
areas together, making the document appear darker. The
smoothing feature looks for dark areas, and then applies a
special algorithm known as dithering to improve document
resolution.
F
AXVIEWER
73
Page 86

Editing a fax
You may need to resequence, eliminate, or combine pages from several faxes.
Cutting a page
Entire pages can be cut to the Clipboard for later use.
1Make sure you’re viewing the page you wish to cut.
2Choose Cut Page from the Edit menu.
Cut Page cuts the entire page. Notice that the page count decreases by
one page.
Copying a page
Pages can be copied from a document to keep the original fax intact.
1Make sure you’re viewing the page you wish to copy.
2Choose Copy Page from the Edit menu.
The Clipboard holds one page at a time. Be sure to paste the page into a Fax
Viewer or Paint program document before copying another page. Notice that
the page count remains the same. Copied pages are not removed from the
current fax.
74
C
HAPTERFIVE
Pasting a page
You may paste a cut or copied fax page into any Fax Viewer or Paint program
document.
1 Select the page you want and cut or copy it to the Clipboard.
2 Use the Scroll Bar to display the page that will precede the page you want to paste in.
3Choose Paste Page from the Edit menu.
Notice that the page count increases by one page and that Fax Viewer places
the page after the one displayed.
Page 87

Clearing a page
Clear Page deletes one page at a time.
1Make sure you’re viewing the page you wish to delete.
2Choose Clear Page from the Edit menu.
You can use Undo to restore the deleted page. The current page is deleted
from the fax and the following page takes its place in the order. Notice that
the page count decreases by one page.
Selecting a portion of a page
You may want to select a portion of a page for pasting into a document
created by another program, such as MacPaint. Fax Viewer provides a
selection rectangle tool for selecting and copying portions of documents.
1 Select the page you wish to copy from.
2Move the pointer over the page.
Notice that the arrow pointer becomes a crosshair. It now functions as a
selection rectangle tool for selecting rectangular areas.
F
AXVIEWER
75
Page 88

3 Drag the selection rectangle tool across the image from the upper left to the lower right,
releasing the trackball or mouse button when the image is enclosed.
A moving dashed line encloses the selected image.
Moving dashed line
Selection rectangle tool
4Choose Copy Selection from the Edit menu.
Fax Viewer places the selected image at current resolution in PICT format in
the Clipboard.
Note: To place a copy of your selection in the Clipboard at Actual Size
regardless of what the viewing resolution is, press x-Option while choosing
Copy Selection from the Edit menu.
5Make your Paint program document the active window, and then choose Paste from the
File menu.
The selected image appears in your document.
76
C
HAPTERFIVE
Page 89

Resequencing a fax
By using a combination of Cut, Copy, Paste, and Clear Page, you can
resequence a fax. In fact, you can open several faxes and copy pages into a
new Fax Viewer document.
Printing a fax
You print a fax the same way you print any document. See “Print a
Document” and “Printing Your Work” in your Macintosh user’s guide. Make
sure the printer is selected in the Chooser.
Converting a fax document to a PICT file
Fax Viewer allows you to save in Fax Viewer or in PICT file format. Fax
Viewer documents can be opened only by the Fax Viewer program. PICT
files may be opened by other programs, such as MacDraw or TeachText.
In other words, the Save As command acts as a conversion tool for fax
documents.
1Choose Save As from the File menu.
The Save As dialog box appears. Notice the pop-up menu, titled Format at the
bottom of the dialog box.
2Change the document type using the Format pop-up menu.
In the following example, Fax Viewer is checked because the document is a
Fax Viewer document. Dragging to PICT selects PICT format.
3When you’re finished, click Save.
The current page is converted to PICT format (72 dpi) and placed in the
folder of your choice.
F
AXVIEWER
77
Page 90

Conversion file formats Use
Fax Viewer Can be opened only by Fax Viewer
PICT 72 dpi Standard PICT format
PICT 200 dpi High definition PICT format
Fax Viewer is a program for viewing and manipulating the fax documents you
receive. Because a fax is a graphic image, it is similar to documents created in
a Paint program. This means that you cannot edit the text as you can in a
word processor.
IMPORTANT
Fax files can be quite large in size. Check the size of your Sent
and Received Fax folders from time to time to make sure you are not running
out of disk space. It is best to delete faxes that you don’t need to keep. Print
them or make backup copies before deleting. You can use Fax Log to keep
transmission records.
78
C
HAPTERFIVE
Page 91

Forwarding a fax
1 Open a Fax Viewer document using any of the several methods, then choose Forward
Fax Viewer forwards your faxes in the same way Fax Terminal does.
Fax from the File menu.
. See also: “Opening a fax” earlier in this chapter.
Choosing Forward Fax
forwards an already imaged
fax in the Sent or Received
Fax Documents folders.
Choosing Fax Setup and then
Fax reimages an existing fax
document before sending.
The Fax Sender dialog box appears.
2 Forward your fax as you would in Fax Terminal.
. See also: “Forwarding a fax” in Chapter 4.
F
AXVIEWER
79
Page 92

Page 93

6
Fax Cover
Fax Cover allows you to create, manage, and store fax cover pages.
In this chapter
m Customize the fields on a cover page
m Align fields
m Add graphics to a cover page
m Install and remove cover pages
Before you begin
You don’t have to attach a cover page to a fax before sending. If you wish to
use customized cover pages with your faxes, you must read this chapter.
81
Page 94

Customizing cover pages
Cover pages contain fields for address information. Each field has field title
and text. Field titles are labels, such as “To” and “From.” Field text is
information you enter, such as your recipient’s name. You customize a cover
page by rearranging the appearance and positions of the individual fields and
by adding graphics.
Customizing fields
You can decide which fields to display, change title names, edit field title and
field text appearance, and position and resize fields on the cover page.
Space for a
PICT graphic
Sender ID
82
C
HAPTERSIX
Recipient ID
Field
Field title
Field text
Printable
page area
Page 95

1 Open the Fax Cover folder (installed on your hard disk) and double-click the Fax
Cover icon.
When a new cover page appears, it displays fields of titles and text. You can
identify field text by the angle brackets (< >) surrounding it. Text in angle
brackets acts as a placeholder for the text you enter in the Cover Page
Information dialog box and Fax Phone Book in Fax Sender.
2Choose Show Fields from the Layout menu.
Initially, all fields are selected. The Show Fields command displays a dialog
box for specifying which fields will be shown on the cover page. Clicking a
field deselects it (removes the checkmark), and it will not appear on the page.
F
AXCOVER
83
Page 96

3Position the cursor on a field title to change the field title name.
Clicking a field title automatically selects the entire title. When the arrow
pointer is positioned over any part of a field title, it changes to an I-beam. You
can edit all or part of the field title by selecting and typing over existing
characters or by placing an insertion point in the field title and inserting or
appending characters.
4 To change the font, size, and style of the field title, select all or part of the field title and
use the Font and Style menus.
You can use Select All Field Titles from the Edit menu, or you can Shift-click
to select combinations of fields to edit simultaneously.
Use the Font menu to customize the font and size. Use the Style menu to
customize the style (bold, italic, and so on) and alignment (left, center,
and so on).
84
C
HAPTERSIX
5To change the font, size, and style of the field text, click anywhere in the text area to
highlight the field text and use the Font and Style menus.
You can use Select All Field Text from the Edit menu, or you can Shift-click
to select combinations of fields to edit simultaneously.
Use the Font menu to customize the font and size. Use the Style menu to
customize the style (bold, italic, and so on) and alignment (left, center,
and so on).
Page 97

Positioning and resizing fields
You can position and resize fields individually or in groups.
1 To select a field, click anywhere in the field text, not on the field title.
Clicking inside the field will highlight the text within the field, and handles
will appear at the field corners.
2 To resize the field, drag one of the handles.
If you choose a font, size, and style for the field that would require vertical
space greater than the current size of the field, the field will automatically
increase to the required height.
3 To reposition a field, drag the field by its center (not by a handle) to a new location on
the page.
When a field is being moved, the outline of both the field and its title will be
displayed to indicate that the field title is moving with the field.
F
AXCOVER
85
Page 98

Using the grid
The grid allows you to align fields easily as you move them. When the grid is
turned on, fields that you move or resize will automatically snap to the
nearest grid line whether visible or not.
1To turn the grid on, choose Turn Grid On from the Layout menu.
2To see the invisible grid lines, choose Show Grid Lines from the Layout menu.
Aligning fields
You can align fields to the grid or to each other. The following examples show
you how to align three fields to the grid and then three fields to each other.
Example 1: Aligning fields to a grid
1Shift-click three fields to select them.
You might choose fields at random in the following positions.
86
C
HAPTERSIX
Page 99

2Choose Set Alignment in the Layout menu.
The following dialog box appears.
3Set Grid Spacing to 30 pixels.
4Click the Align Objects To Grid button.
5Click Left under the Horizontal option and None under the Vertical option.
6 Click OK.
The fields snap to the nearest left gridline.
F
AXCOVER
87
Page 100

Example 2: Aligning fields to each other
Notice that the grid lines have been turned off in the Layout menu.
1Shift-click three fields to select them.
2Choose Set Alignment in the Layout menu.
The Set Alignment dialog box appears.
3Click the Align Objects To Each Other button.
4Click Right under the Horizontal option and None under the Vertical option.
5 Click OK.
88
C
HAPTERSIX
The fields snap to the farthest right side of the farthest right field.
Note: To reuse the same alignment settings, just choose Align from the
Layout menu. The settings stay the same until you change them.
 Loading...